Recently (2024) I have begun to review my lace edgings once more.
The repeats are planned so that the first row of lace transfers happens to the right rather than the traditional left. This fact allows for
1: consistent knitting with 2 passes of each carriage and fewer passes of wheels and brushes on the yarn being used
2: end needle selection being canceled on the knit carriage, and turned on on the lace carriage, with no manual adjustments in end needle positions necessary at any point.
PNGs are provided, they may need to be mirrored depending on your machine model and download software. When copying the pngs they may be changed to RGB mode by default, use any program to switch them back to indexed, BW, 2 colors and save in the new format prior to attempting to knit them.
Edgings may be also produced beginning with the first row of LC transfers to the left, but the designs will be longer, requiring extra blank rows to place the respective carriages properly on their respective sides, a topic that can be addressed in a future post.
Looking back at my post from 2018, written while using the older version of Ayab software and working on a 910, another including an edging written this month(7/20).
The mirrored repeat
 its 22X48 png
 ![]()
 Most of the more recent proof of concept swatches have been knit on a 930 using img2track for downloads.
A reminder: although I make an effort to include punchcard knitters in my writings, the full repeats as given and used for my test swatches and knit on an electronic are not suitable for use on punchcard machines as they are.
Electronic machines advance the pattern a design row with each carriage pass. Punchcard machines do not advance the card as the second carriage comes into use from the opposite side, repeating the action produced on the previous row.
For a discussion of some of the required design differences when using cards please see the post: Doilies: Lace meets hold and goes round, where short rows are combined with lace transfers, as in this sample. 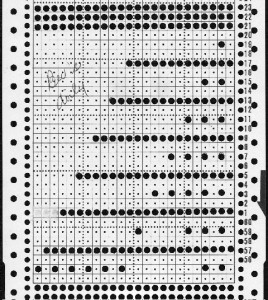 When using the slip stitch setting and changing the number of needles in work, or having ladders created by having needles out of work in the A position, the knit carriage end needle selection needs to be canceled (KCII).
Many early published trim repeats were intended for use with hand transfers combined with plain knit rows. Such designs may be translated for use on electronics and automated with this method.
At first I used a punchcard machine knit (KC) carriage with an added magnet as my KC, then on the 930 I found I could use one of my 910 carriages but not the other, the second fit the bed too snugly to make it usable.
The arrows indicate the direction of the adjustable slots in the LC mechanisms.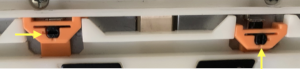 In a working later model LC, end needle selection is in work (W) with the slots in the horizontal position, out of work (OW) in the vertical position.
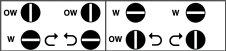 The 910 LC is also missing its magnet (left), gluing on a magnet in the position shown below made it usable again on the electronic
 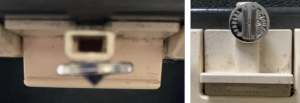 Reworking some of the former swatches in no particular order, beginning with this one:
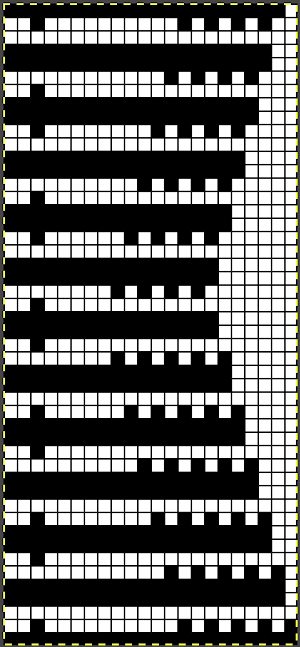
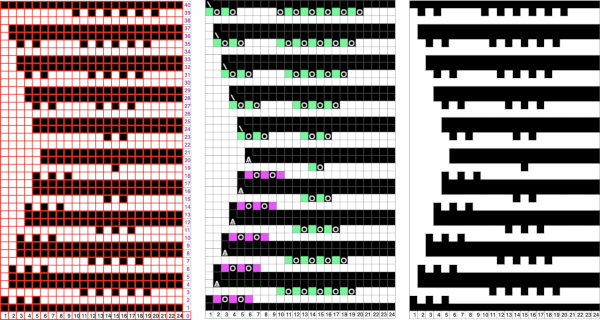
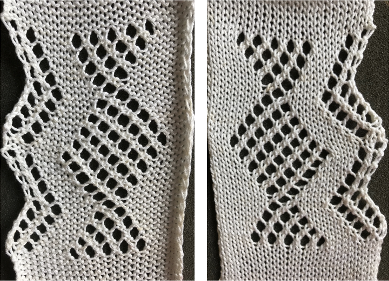 The 2018 repeat is charted on the left, the amended 24 stitches wide repeat is in the center, and the mirrored image for download to my 930 is on the right.
 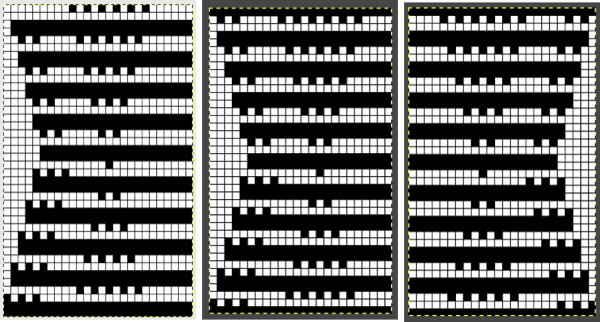 Having the repeat 24 stitch width allows for positioning the knitting other than on the very center of the machine following the markings on any 4.5 mm punchcard machine needle tape. If this is done in electronics, the design should then be programmed for all-over patterning, not for single-motif.
Splitting the bottom 2 all-black rows of pixels/punched holes and moving the one row to the very top of the design is another of the new changes.
I prefer to plot out these repeats at the start of the decreasing angle. The first row then sets up the needle bed preselection on the widest stitch count of the pattern. The original repeat was charted using Numbers and scaled in Gimp to produce a downloadable file.
The method as it was worked out in chart form, and symbols used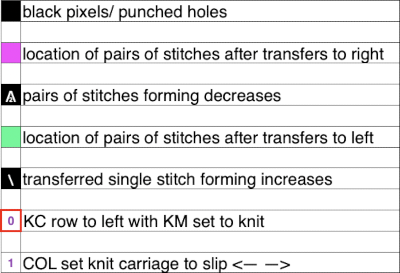
 The resulting, more successful swatch
 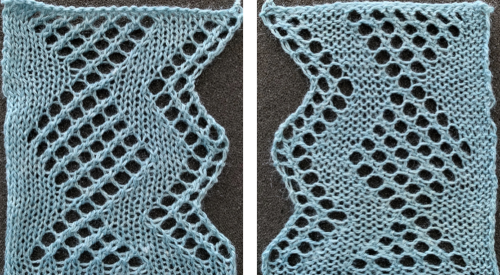 revisited 2024, the repeat PNG
 ![]() with added eyelets formed with all transfers in the same direction along the straight edge
with added eyelets formed with all transfers in the same direction along the straight edge ![]() the proof of concept swatch:
the proof of concept swatch: 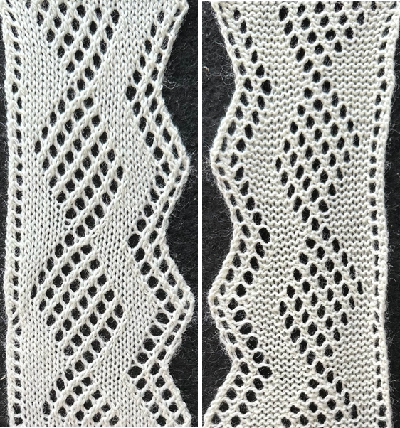 2018 failed attempt at a continuous pattern
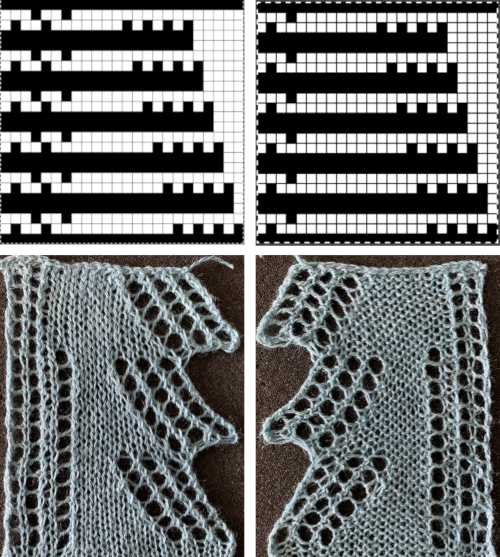
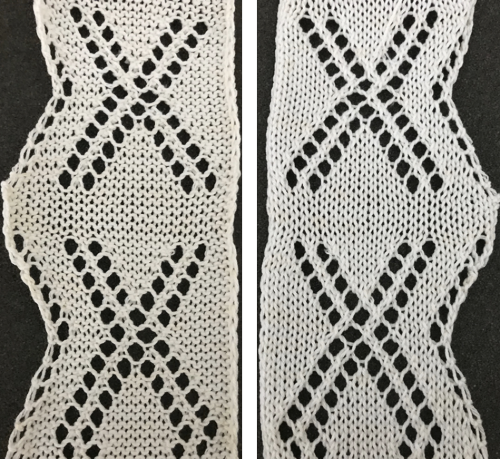 Charting it out anew: on the right is the amended repeat adding 4 more rows to the top of the original
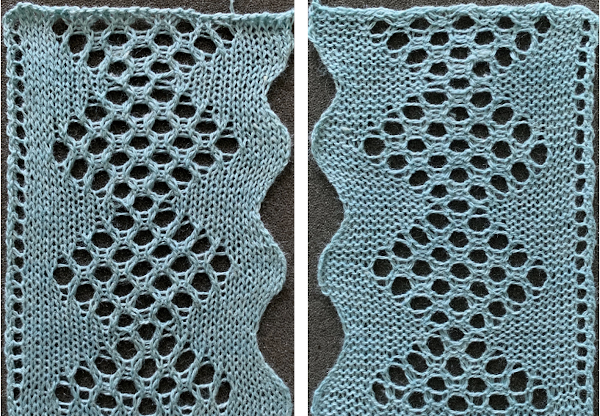
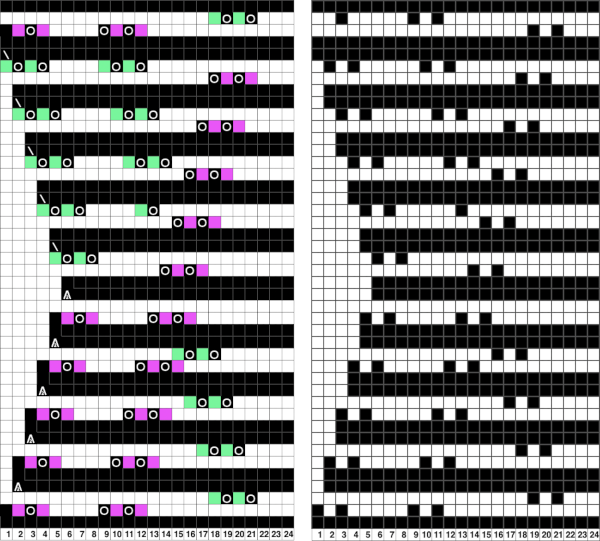 The resulting swatches:
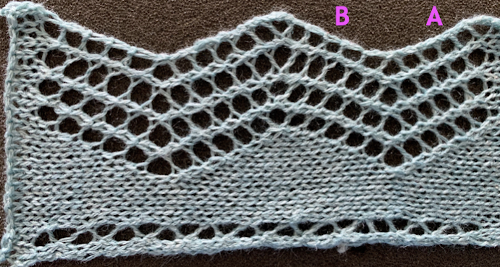
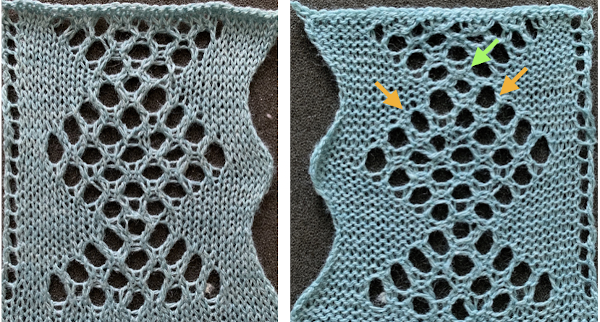
A= the LC switched to fine lace “accidentally” for a few rows.
B= on the very edge eyelets are single on decreasing angles, and double on increasing ones.
C= Though the very edge has those differences, the number of knit stitches between the inner shape on the left and the outer one on the right is fixed.
D= the lines created by the transfer sequences to create the diamond shapes are far more successful.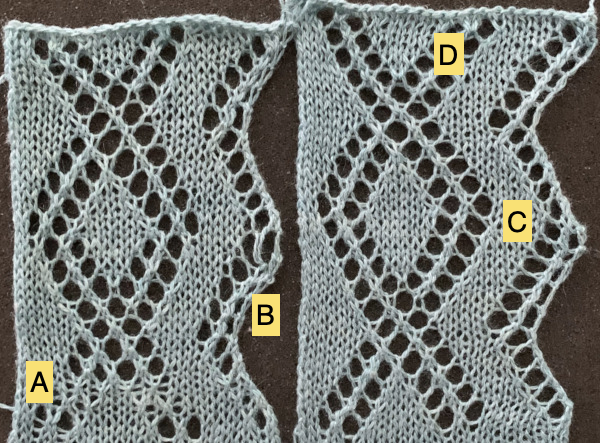 These charts illustrate the above repeat on the left. On the right, the edge transfers are imagined reduced to single eyelets on the increasing angle. In turn they would result in a wider area of knitting in the zigzag shape between the curved edge and the diamond shape. Another possible solution follows, using expanded graphs with extra LC passes
 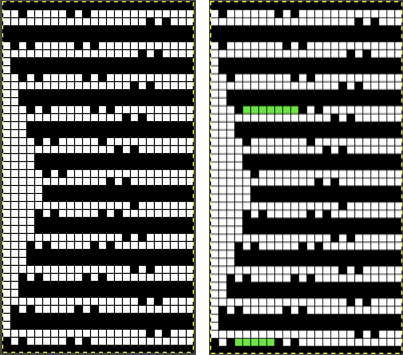 Returning to the above repeats after a break in 2024, a new design, 24X48 is more resolved, columns of knit may be added along the straight edge, with or without planned eyelets, and the shape at the center of the XX also offers enough room for forming a DIY smaller shape.
![]()
“A Machine Knitter’s Guide to Creating Fabrics” by Susanna Lewis (1981) is the ultimate resource for punchcard knitting for knitters with any amount of experience. On page 223 she offers a repeat for a lace trim. It is shown on the left below, after being reorganized to start on the full 24 stitch width row of the edging. In the center chart, rows of black pixels are added, and on the right, the full electronic repeat is shown mirrored for download to the 930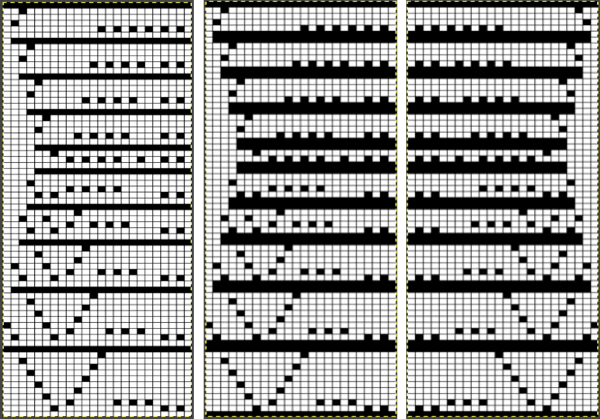 2018, a 26X70 stitches wide repeat beginning at the narrowest part of the trim
![]()
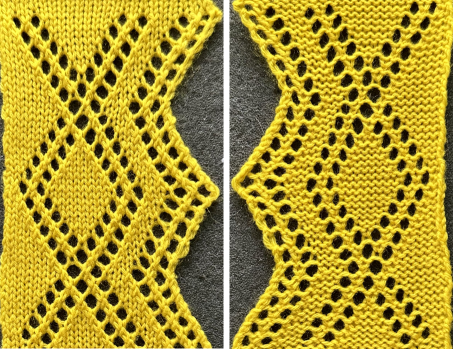
 2020, a 24 X70 stitch version beginning at the widest part
 ![]()
 The curved edge is noticeably different and more uniform than in edgings where the increasing angle is formed only by a single stitch being transferred to the next needle on the left, creating an eyelet immediately to its right.
The above design, as well as the Brother one published and shared at the bottom of the 2018 post, add two more passes of the LC for stepped decrease/ increase shaping. Three needle positions are involved in each sequence. The decreasing angle will have a single edge stitch, followed by a right-hand transfer with 2 stitches on that needle, and an eyelet to their right after the four LC passes are completed. The increasing angle will be formed by two single edge stitches with an eyelet to their right as well after those four LC passes are completed. ![]() Moving on to the Brother published chart at the bottom of the 2018 post: the original is on the left, readjusted for planning to begin with the decreasing curve in the center, and charted for download on the right (mirrored in turn for use on the 930). The original was said to be 68 rows high but proved to be 72. It is also 18 stitches at the widest point, not 24. I did not follow the publication’s directions for alternating between fine and normal lace either, simply left the LC set to N.
Moving on to the Brother published chart at the bottom of the 2018 post: the original is on the left, readjusted for planning to begin with the decreasing curve in the center, and charted for download on the right (mirrored in turn for use on the 930). The original was said to be 68 rows high but proved to be 72. It is also 18 stitches at the widest point, not 24. I did not follow the publication’s directions for alternating between fine and normal lace either, simply left the LC set to N.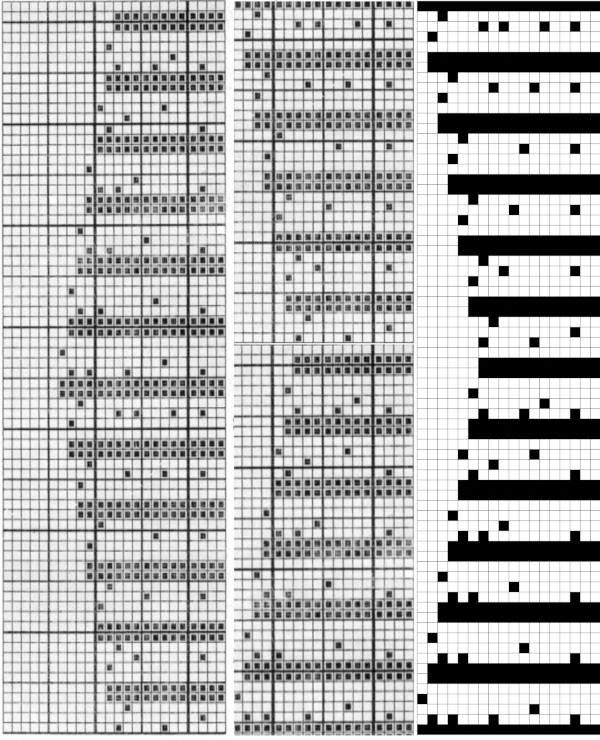 the png for the repeat as drawn, 18X72 pixels
![]() The test swatch
The test swatch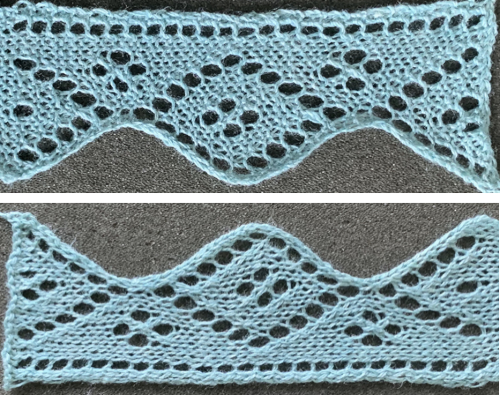 A fellow Ravelry member reminded me of Tessa Lorant’s lace publications. I had forgotten I actually owned this single one from 1981.
 Upon examining it, I rediscovered her patterns, many for hand knitting with accompanying written row by row instructions and charts, others at the back of the pub, with punchcard machine repeats.
The 24 stitch card designs provided were for use on Knitmaster/Studio 260 and 360 machines. The repeats are typical of lace often referred to as “simple”, a specialty of carriages that are capable of transferring and knitting in single carriage passes. For some ways to use such cards on Brother models please see post, or search subsequent shares.
The increases and decreases are achieved through row tracking and hand manipulation. Many of the edgings pictured are very open, and the suggestion is made that they be starched. Using different yarns and working in trims that contain more stocking stitches in their body make for more practical use nowadays.
Transfers are made in the same direction, which may factor into the results biasing. The edges in some, in addition, are shaped with multiple increases and decreases. If knitting long strips, a small piece of scrap yarn with weight on it may help keep the cast on stitches knitting and transferring properly.
I am not sharing any of her published directions, only providing ideas for analyzing and converting some of the punchcard repeats.
The first is from page 48, marked up for identifying transfers to the right (later decreases, magenta line), and transfers to the left (later increases, cyan line). A template with solid black pairs of rows to indicate slip stitch knitting sequences is a good place to start and can be expanded to suit the repeat. The yellow squares on the right indicate a beginning plan for increases and decreases. They and black squares to their left would be eliminated from the final design. 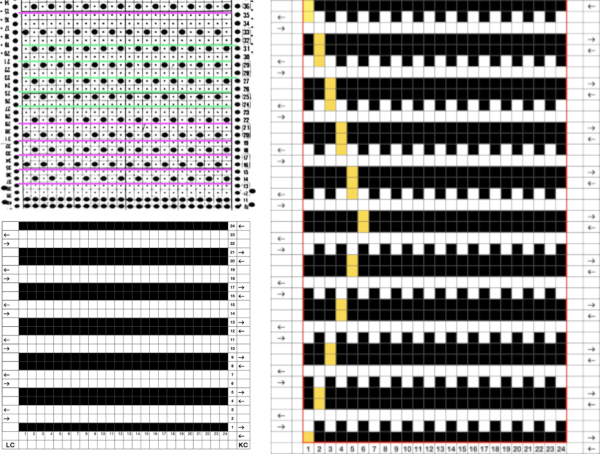 Working one chart through to knitting: the bottom left image shows part of the original card. Magenta squares indicate transfers to the right and cyan ones to the left. The straight edge border with the larger number of eyelets was a bit fiddly to knit, so the second option is also offered and tested.
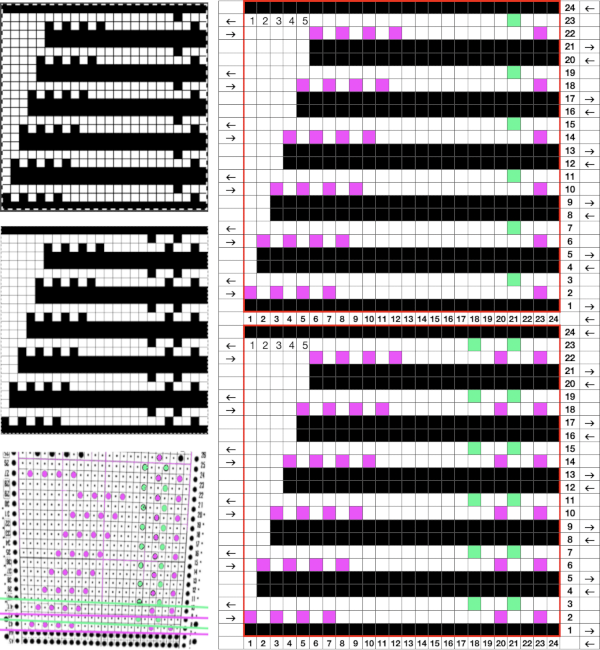 The repeats were mirrored for actual knitting on my 930, the 24X24 pngs:
 ![]()
![]()
 I knit to the left after all the needles were preselected at the end of the decreases and then cast on over the empty needles on the left, bringing them out to hold so they would be knit for the second row as the knit carriage returned to the right side. A garter carriage weight seemed to be enough to help anchor down the newly formed stitches during subsequent transfers.
 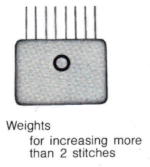 Making a pattern design more one’s own: part of the original design from p. 52, split so the pattern may begin on the widest part of the repeat, punchcard “holes” marked for left and right transfers
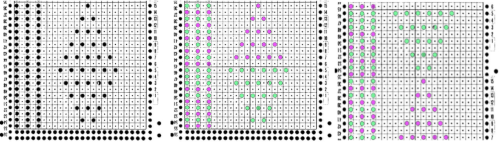 Here it was charted out in Numbers with the intent to produce the 2 stitches stitch edge along the outer curve and a less open one on the straight vertical side
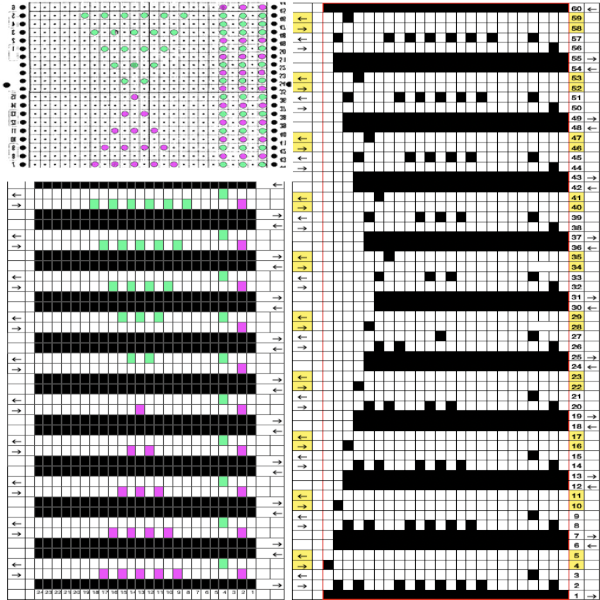
![]() This sort of knitting can be a bit fiddly. I believe if I were to produce any such trims in great lengths and had the option, I would choose to dedicate a punchcard KM to the project so it would be easier to step away from and return to it as the spirit moved me.
This sort of knitting can be a bit fiddly. I believe if I were to produce any such trims in great lengths and had the option, I would choose to dedicate a punchcard KM to the project so it would be easier to step away from and return to it as the spirit moved me.
If any loops are formed (A) and rows are not unraveled to correct the situation, it is best not to tug hard with the work on the machine. Stitch sizes on several needles may be altered, and the movement of the pairs of eyelets may become distorted. Because the knit carriage must be moved to the far right to be disengaged from the belt, this will tend to pull down extra yarn from the tension mast. A very gentle tug at the start of the first knit row should keep loops from forming.
The condition of the latches and needles is important. In stocking stitch knitting one of the signs of a “bad needle” is stitches tucking repeatedly on a needle that is not intended to be patterning in any way. The stitch in the hook is joined by a loop that does not knit off properly. It helps to start in a light color and a “friendly” yarn. Clearly identifiable stitch formation helps to develop an understanding of its structure. Eyeing the row of transfers upon their completion helps pick up improperly transferred or dropped stitches, saves runs that result if the latter go unnoticed before continuing to knit. At times there may appear to be a needle problem with a loop sitting over a needle or a dropped stitch and attempts to form “properly” knit stitches in transfer rows will create simple stockinette. Eyelets will not form properly, and stitches will want to get longer and not maintain their shapes. B and C point to the resulting differences in structures. 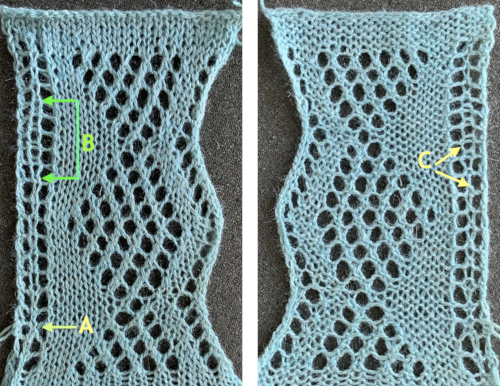 The last Tessa sample, from page 60, brings up the topic of large eyelet lace, also revisited in a recent post. I thought the 24-stitch repeat too narrow, I expanded it to 32 and added eyelets on the straight edge.
I began by splitting the card in order to begin the pattern at its widest point and decreased the number of eyelets in the shapes to allow for automatic shaping. In these punchcards, rows with no transfers are part of the program, are free of any holes. Black pixels are used to program slip stitch all knit rows.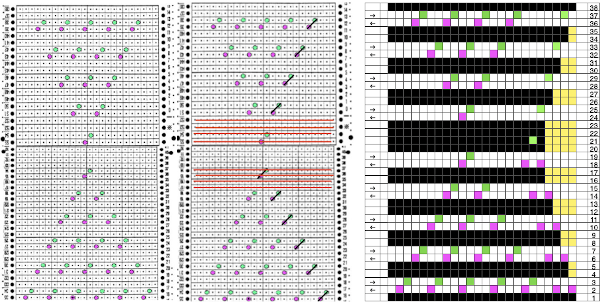 More transitions in planning, a 32X32 repeat:
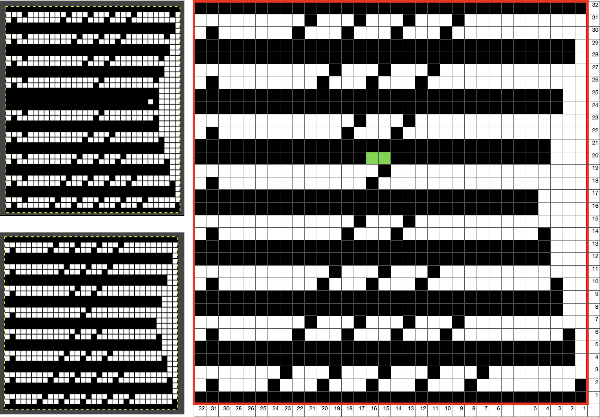
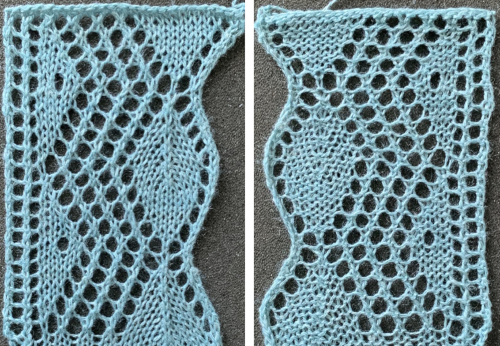
![]() two of the rejected swatches
two of the rejected swatches 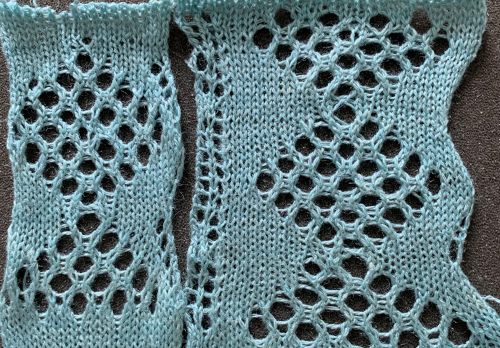 Consideration needs to be made in terms of whether some small ladders are a design element or not, hooking up “floats” helps reduce or eliminate them on decreasing angles on both sides of the shape, but the resulting eyelets appear a bit larger and different than the rest.
When at first I attempted 2 single eyelets following each other at the intersection of the shaps I needed to cast on after a single float was created between the center needles and followed by the first all knit row from right to left. That turned out to be unnecessary in the final swatch with the number of eyelets increases immediately after the single one in the final repeat. Using it will place a transfer left and a transfer right, holding down the loops in the 2 hooks affected on the second knit pass to the right. Leaving the bottom float alone echoes the remaining fabric.
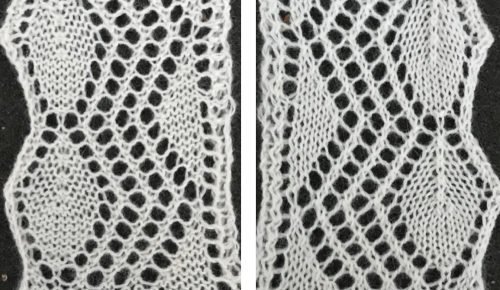
The image on the left illustrates the result of not casting on on that center eyelet if it is to be repeated. The other photos show picking up floats and hooking them up in needles not receiving any transfers.  The Tessa trims are knit in fine yarns. This shows a portion the inspiration large eyelet trim, note the appearance of the space between the two center eyelets is different
 My version with the floats hooked up and onto the needles with no multiple stitches already on them at the center eyelet as the pattern shifts:
 Sometimes less is more, here extra hookups are not used, making the trim quicker and easier to knit. At this point, I am experiencing sticky latches, not improved by light oiling, likely to be fatigued from constant use of the center 24 stitches. The needles do not look obviously in need of replacement. One alternative is to swap and shift the center 24 needles to a less used part of the needle bed.
Another image of the Tessa sample in repeat followed by my own test swatch 
 At the top of the piece I did have to deal with closing the eyelets to facilitate 2 knit rows and binding off. I prefer to work from left to right, dealing with the right side of the loops first: drop loop on the right side, use a tool to enter the float created from its back
 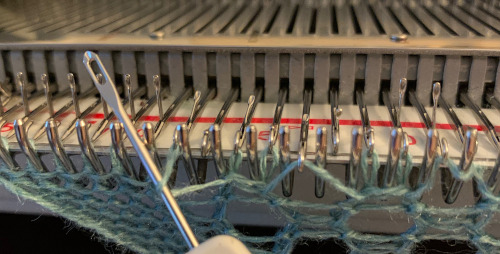 twist tool and yarn clockwise
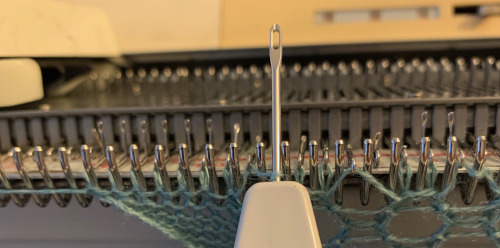 lift the e-wrap onto the empty needle on the right
 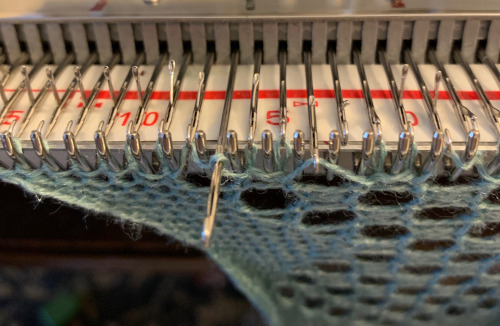 Repeat the process with the loop on the left of that needle pair, and do so across the bed before continuing to knit. The wraps will create full stitches on the next pass of the knit carriage.
An example working with a randomly selected pattern from Stitchworld, #156: 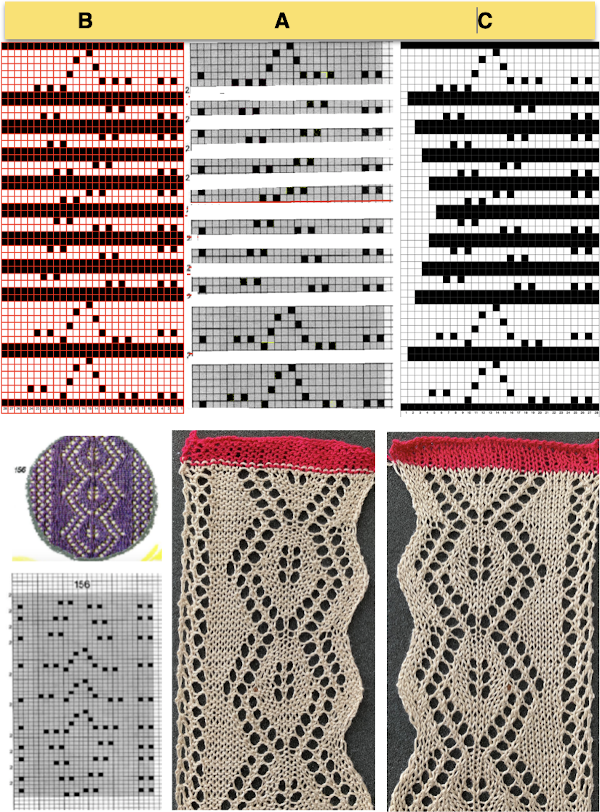
![]() A: the pattern is divided and shifted to plan the trim beginning with decreases rather than increases
A: the pattern is divided and shifted to plan the trim beginning with decreases rather than increases
B: with the superimposed table grid in numbers, the eyelet transfer squares were traced, adding all black rows for slip stitch selection of all knit stitches in between each transfer sequence
C: increases and decreases are planned by removing black squares
The image was then scaled in GIMP, and downloaded with img2track.
The straight-edge eyelet detail alternates the direction of transfers to the right and in turn to the left in each segment.
On the curved edge, increases and decreases were performed manually before each 2 knit rows. Empty needles need to remain in work positions throughout.
I chose to use the fully fashioned method for shaping, moving 2 stitches to the left for decreases, and two to the right for increases, then picking up from below the adjacent stitch to their left to fill in the empty needle. This was slower than having planned needle selection for eyelets do the work of shaping.
A very similar charting process may be used to construct circular “doilies”, where the slip stitch rows are used as a substitute for hand-selecting needles to holding/ short row positions. I have revised my 2011 post on lace meets hold and goes round/, and plan on following that up with one using edging repeats to achieve that type of shape.