Nearly 9 years ago, I began exploring scale designs. At the time, my charts were generated using Excel 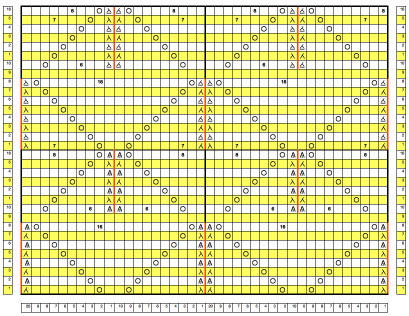 and a program called Intwined Pattern Studio, which soon became inoperative
  The above repeat, visualized tiled.
 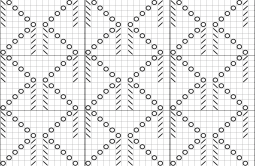 At present, using custom-printed needle tapes has proven useful in tracking actions required in hand-manipulated stitches.
The attached PDFs have been printed in the proper aspect ratio with the following changes from default settings using Mac Preview,  and Acrobat Reader
 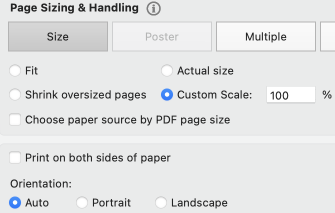 7 needles
single 4.5
Whether the knit tests are worth pursuing in large pieces with or without modifications is subject to end-use and personal preferences.
To begin with, stitches were transferred, the empty needles were pushed back to the A position, Out Of Work, and returned to the work, B position, for reversing or shifting the shapes.
Forming ladders: the chevron shapes are created by single stitch transfers, and bringing needles in and out of work.
A starting chart:  Keeping the same palette as in previous charts, yellow cells represent needle positions where stitches are not disturbed, and the white cells where needles are taken OOW. The up-arrow needles mobed to A/OOW, and the down-arrow needles returned to B.
The work in progress:
1: to reduce the line length formed by the single stitches, the point at which needles are returned to work can be varied
2: in this instance, as 5 empty needles side by side are reached, bring needles into work for the next shape on each side of the single stitch decreasing the number of empty needles to four. As the knit carriage returns to the opposite side, loops are formed on each of the needles returned to work
3: continue to bring an empty needle into work aside each pre-existing loop
4: after the last 2 empty needles are returned to work and are followed by a knit row the last two loops are formed
5: knit one last row across all the needles, and begin transfers for the alternate shape. 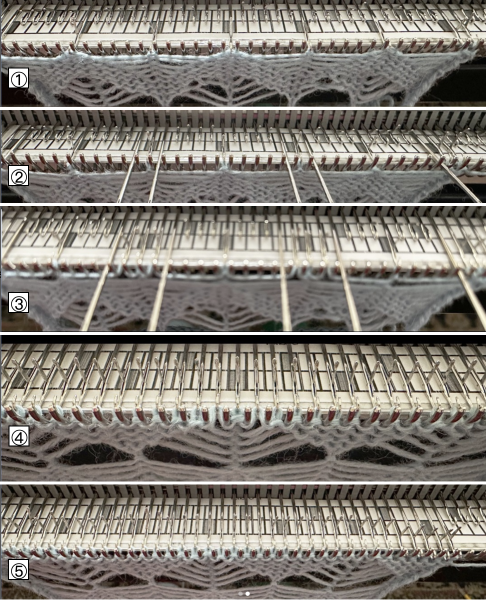 This yarn is a 2/8 wool, which worked nicely for holding ladder edge stitches in the leaf swatches but yielded a stiff knit in this case, and the elongated single stitches fold over at the top, creating extra nubs on the surface of the knit.
  Continuing designs with similarly shaped outlines but leaving the emptied needles in work, B position, produces different shapes. All needles remain in B throughout.
The yellow columns in the chart indicate the locations on the needle bed where stitches are never moved.
Visualizing the tiled repeat and the direction of the transfers: the initial experiment is also a 12-row repeat. The magenta cells indicate spots where extra all-knit rows may be added in DIY.
The work in progress:
A 7-prong tool is handy in making the 5 and 4-stitch transfers.
After each transfer, loops will form on the empty needles with the next carriage pass
3: the loop becomes part of the subsequent transfer, and the newly emptied needle remains in work
The first swatch began with a 12-row repeat and an all-knit row before transfers began for the alternate shape. 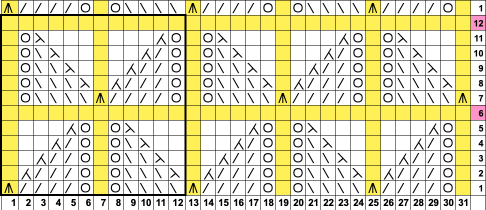 Visualized in larger BW tiling
 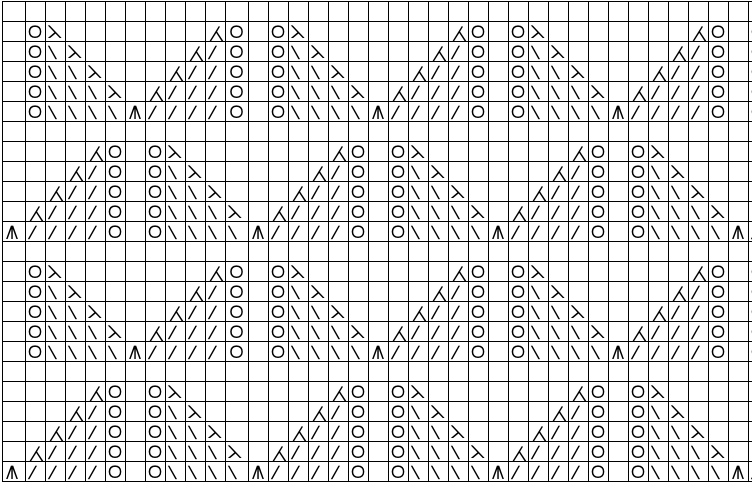 The transfers are made away from the circles in the chart using multiple transfer tools.
After each transfer, the empty needles are left in B or pushed out to E.
As the knit carriage moves to the opposite side, loops are formed on the empty needles.
Each loop becomes part of the next transfer.
Setting up the first design row using a 7-prong tool with 5 prongs selected: the numbers in the lower image indicate the number of stitches on each of those needles as the setup row is completed. 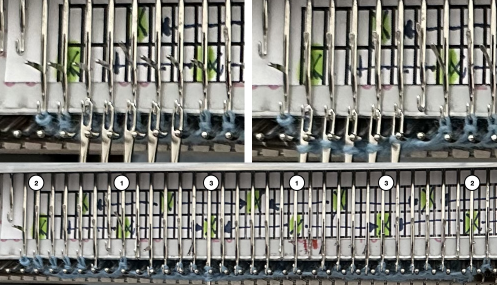 The second group moves 4 stitches at a time. Loops are treated as stitches.
After the transfers, there will be groups of 2 stitches adjacent to those holding 3 in the previous row.
The outline in the lower image points to one pair of transfers in the process of being completed.
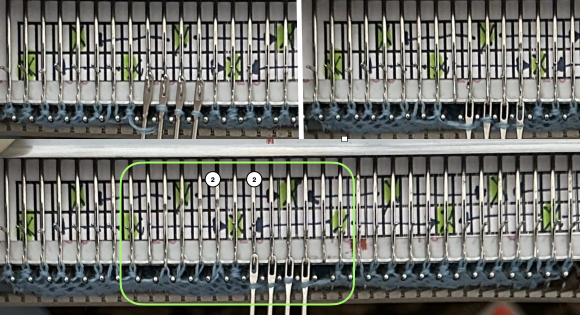 1: When this configuration is reached, knit one more row to the opposite side,
2: begin transfers away from the midpoint between the shapes to form the brick repeat. 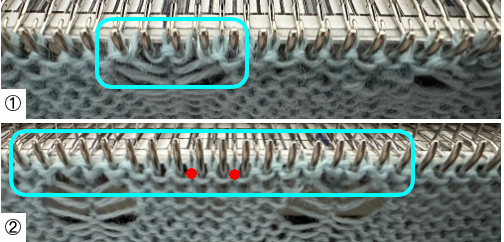 The result forms a bump once more due to the length of the single knit stitch columns.
 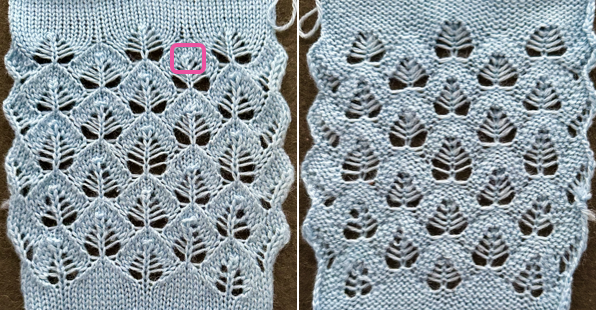 The above yarn is a 2/8 wool, the swatch was quite stiff. A second swatch was knit using a softer, thinner, alpaca-silk blend.
The relaxed knit after removal from the machine was very textured and narrow, 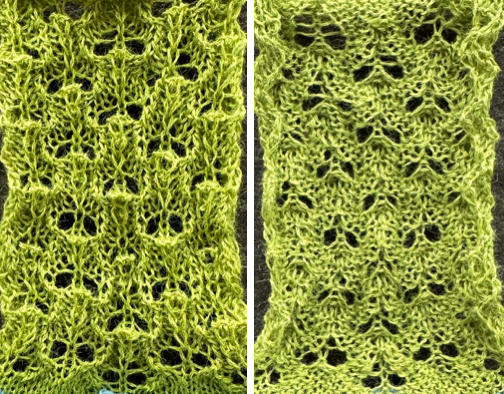 this result followed some light pressing and steaming.
Traditional wet blocking would be required to maintain the shapes in a final piece. 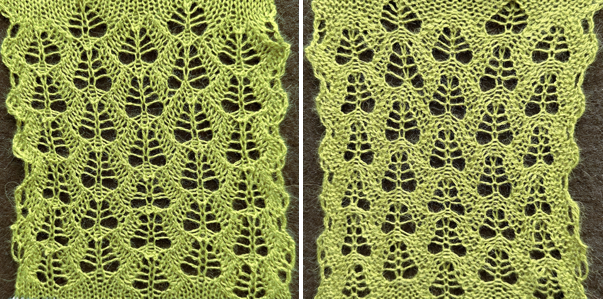 Eliminating the all-knit row to reduce the extra lengths of those single-stitch columns did not produce what to my eye was an improved knit.
In a last what-if test, the chart was turned 180 degrees, with transfers beginning with a single stitch, and ending with moving five. 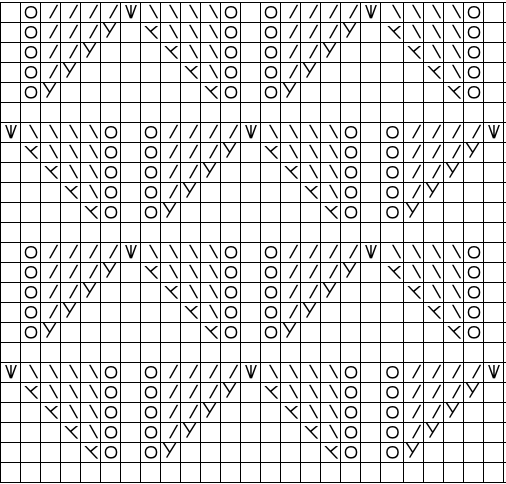 The results, knit in 2/15 wool and lightly steamed and pressed, appeared more successful to my eye.
  relaxed overnight, the surface is a bit more 3D
 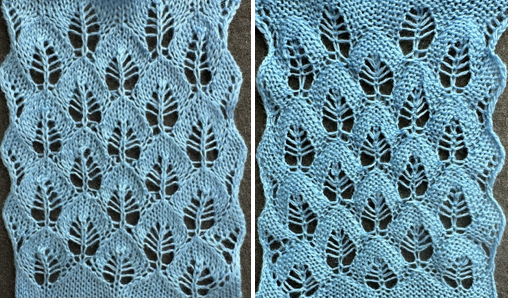 Using a similar technique for multiple transfer lace designs: a 14-row repeat, magenta cells mark all knit rows, and all transfers are made toward stitches aside every 7 stitches except for on rows 6 and 13,
 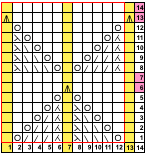 circles in the chart now indicate eyelets, transfers are made every row.
 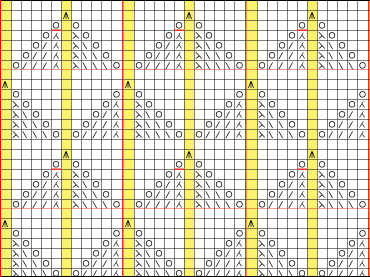 1: the setup row.
Empty needles are left in work, B. Cyan dots mark needles holding 2 stitches after the beginning transfers
2: the next knit carriage pass forms loops on the empty needles
3: with the next transfer, an empty needle results adjacent to each loop, the start of the next eyelet 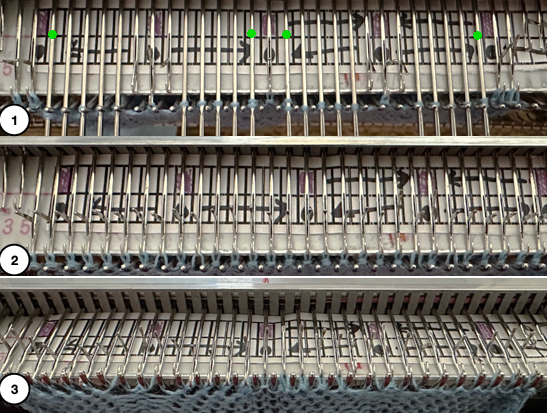 On Row 6 the last transfer results in 3 stitches on the normally undisturbed vertical stitch columns, 6A as the next carriage pass is made, 6B, loops are formed on the empty needles. A second row is knit on every needle, 7, and transfers begin to be reversed for the top half of the shape, 8.
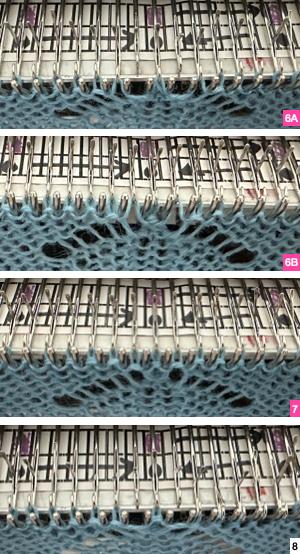
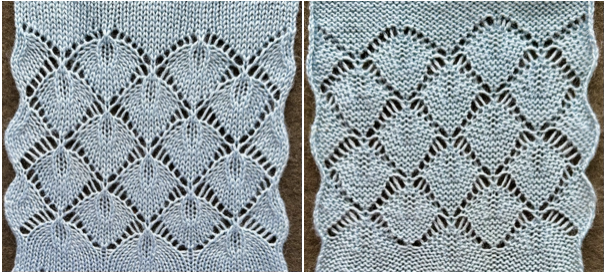 The result shares some similarities with another hand technique .
![]()