A collection of previous posts exploring some variations on the topic:
Ladders with lace, (leaf) “making things work” 1 3/15
Ladders with lace, (leaf) “making things work” 2 3/15
Ladder lace 8/13 Instructions reviewed in 2022, one of the accompanying swatches: 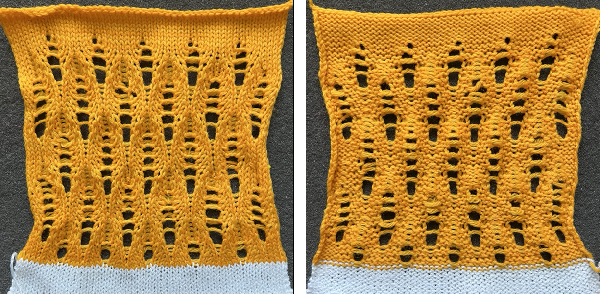 Ladders and Lace 8/13. MK ladders, and a bit of crochet 12/16
Tuck “lace” trims (and fabrics 1) 6/17
Tuck “lace” trims (and fabrics 2) 6/17
Tuck “lace” trims or fabrics 312/17
Automating tuck stitches combined with “lace” 2 6/17
Combining tuck stitches with “lace” 1 3/15
Many fabrics other than the traditional ones familiar to hand knitters and machine knitters that create eyelet patterns by transferring and combining stitches with yarnovers often include the term lace in their name, one such is ladder lace.
No matter what machine is in use, charts may be developed and followed that include row-by-row directions for needles out of work and any movement of stitches to alter the look of the floats created in the resulting spaces.
Knitology offers endless video inspiration for lovers of hand techniques including ones relying on patterns including ladders.
There are several aids in maintaining the desired repeat in NOOW (needles out of work). When establishing the initial needle configuration, punchcard knitters can punch a single row to match the required needle selection if the repeat works within the 24-stitch constraint, and use locked preselection to make transfers in base knitting.
Electronic knitters may use the same concept, I prefer if doing so to plan for programming the width of the stitches in use on the needle bed, adding pixels for knit borders on either side. Punchcard users may need to disregard some needle selections to form them.
Another option for hand technique tracking in addition to marking the needle tape or even the needle bed is to print custom needle tapes created in a spreadsheet.  They can be marked as needed to guide hand technique selections, with colors added if preferred, and are easily swapped out if corrected or additional tapes are needed for different segments of the same technique.
A variety of printable tapes for multiple gauge knitting machines is offered by Claudia Scarpa in her blog post.
A series of printable sheets for tracking row counts at even intervals may be found at the bottom of this post.
In laddered fabrics, the edge stitch on either side of the float may widen and grow in size over time.
The 8/13 swatch uses lace transfers that produce doubled-up stitches to help with stitch stability.
Adding hand techniques serves a similar purpose in wide or varying ladder space designs created on the knit bed.
The length of the item produced combined with the added weight in the finished piece as it is hung or worn may quicken any lengthening and narrowing of the piece, requiring blocking again or at the very least pressing and steaming.
The fiber used makes a difference in the retention of the blocked shapes, in this case, man-made fibers may serve better than wool with its spring back.
If a needle is emptied, if left forward or brought back to the B position, it will pick up a loop on the next pass, and when followed by a second knit row, an eyelet is formed in the loop location.
If a loop on a previously empty needle is dropped after it is formed, the resulting ladder grows in width.
Latching ladders while on the machine creates knit stitches on the purl ground.
Stitches may be removed and returned to the needle bed, cable crossings may be involved.
Picking up the heels of specific stitches on designated rows below and placing them on the knit stitches to the right or left of the ladder space is a way of adding non-vertical shaping.
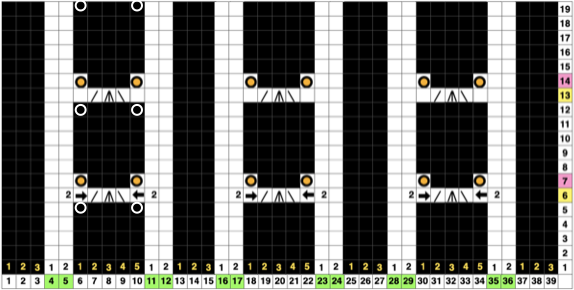
If experimenting with the number of rows knit before adding hand techniques, keep good notes in order to be able to reproduce segments in an all-over pattern. Beginning patterning with simple transfers in stocking stitch ground, here the needle configuration shifts but remains constant throughout. My proof of concept swatch is knit in 2/8 wool. 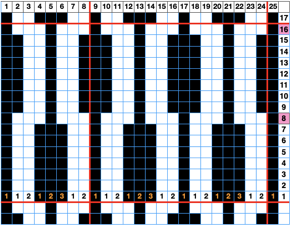 Visualizing the necessary actions:
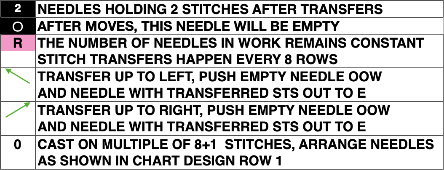
 The proof of concept:
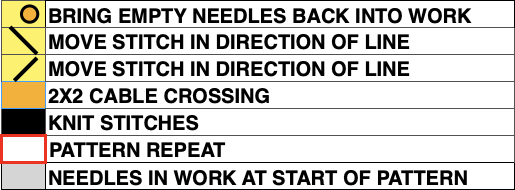
 Adding 2X2 cable crossings: this repeat is 12 stitches wide.
A chain cast-on allows for dropping the 2 chains in the location of the starting ladders, with some weight applied to the starting rows one may proceed to the first cable crossing.
On row 6, and then again at 10-row intervals from there, the designated pairs of stitches are crossed consistently in the same direction. The needles aside from the crossing are pushed back to the A position.
Knit 4 rows.
On row 10, and then again at 10-row intervals from there move the left stitch of the pair of the center needles to its left, and the right stitch to its right, restoring the empty column at the center of the chart. Return the remaining empty needles to the B or E position
Knit 6 rows.
Repeat the process, ending with 6 knit rows. ![]()
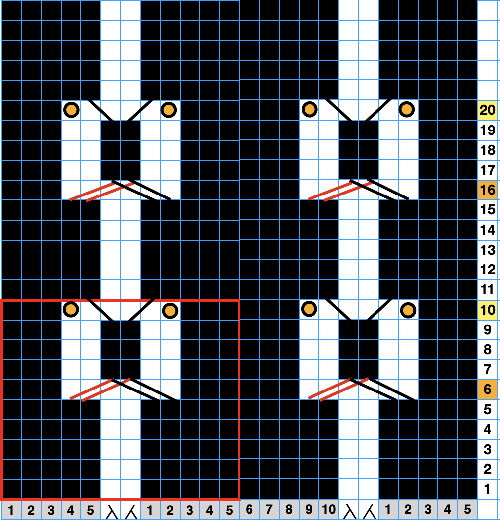
 This variation uses transfer lace stitch crossings to produce larger eyelets than seen in the above swatch. Row counts for specific hand techniques can be tracked in a written or printed document if preferred.
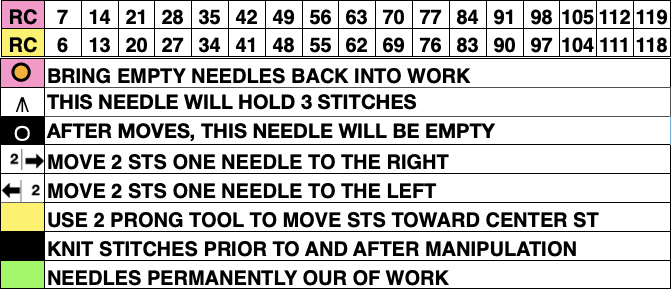
 The knitting in progress: the initial needle spacing:
 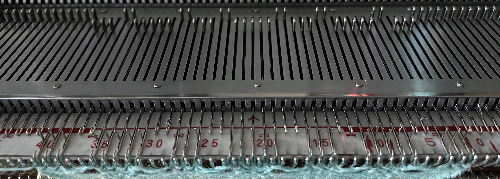 Emptied needles are in the process of being returned to work after the transfers to restore the initial setup, the first knit row will create loops on those needles, and the stitch is completed with the next knit pass from the opposite side
 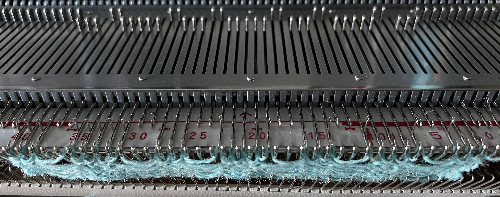 The growing pattern becoming apparent
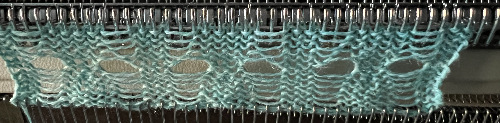
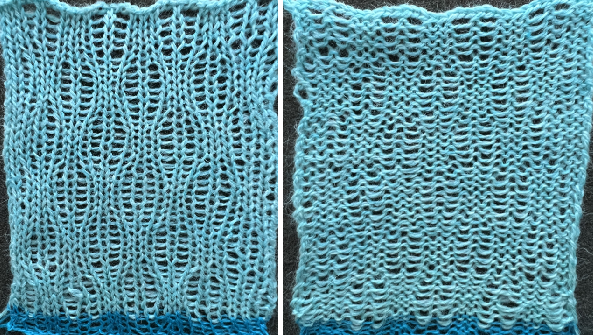
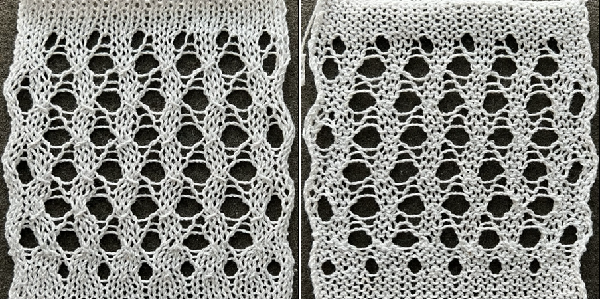
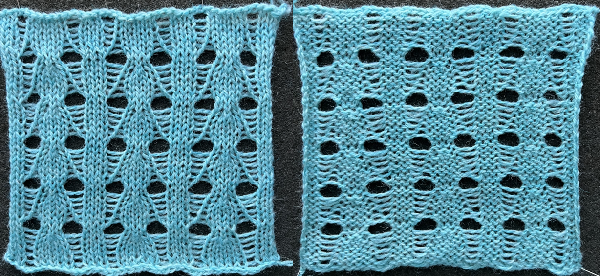 After updating the 8/13 post, these experiments continue exploring the above concept. The yarn now used is a wool rayon, which appeared not to split, and retains blocking if it is used.
The samples use an 8-row repeat with different transfer methods. The first uses two-stitch transfers. The 24-stitch version is suitable for a punchcard, 48 rows in height. 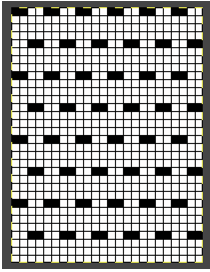 the smallest electronic repeat
 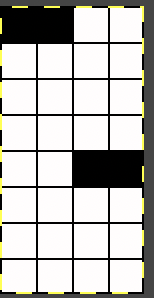 tiled to a 28-stitch repeat for the electronic, in the width of my planned swatch, only for the required 8-row height
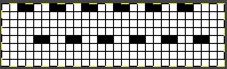
![]()
![]()
![]() The now familiar double loops
The now familiar double loops 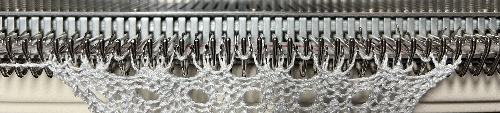 Beginning ladders
 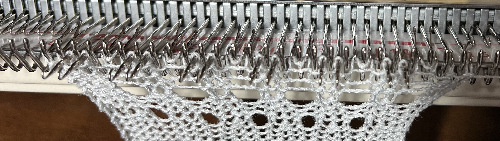 A partial row view of stitches moved 2 at a time toward the higher end stitch count, treating the loops as one would stitches
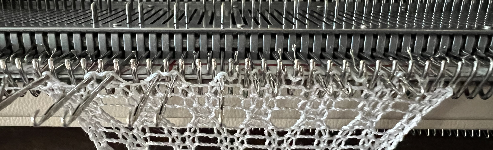
 e-wrapping one of the two loops consistently in the same direction at the top of the piece will form equal eyelets on the next pass
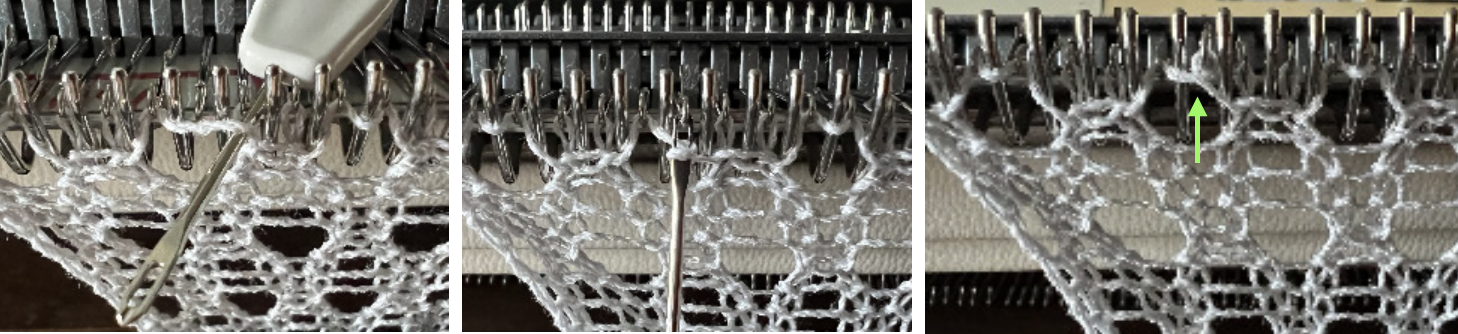
 Working with multiple loops held in hooks of specific needles: the following swatches were actually the beginning for what became the above thread
I tend to web surf in the early morning hours. Sometimes that includes coming across YouTube videos where contributors show fantastic dexterity at handling tools while developing complex fabrics using only hand techniques.
This is one example:
https://www.youtube.com/watch?v=IoJbbInlxck.
As usual, I attempted to automate as much as I could and failed to be able to execute a truly similar fabric.
In my first modified version, I introduced knit rows as seen below to make tracking of hand techniques easier and to facilitate knitting stitches/ loops groups.
The result is of course quite different from the swatch in the video.
To knit: begin with a permanent cast on over the planned number of needles. In this case, 2 needles are included to form vertical all-knit borders on both sides.
I knit most of my proof of concept swatches on an electronic machine and download a plain design repeat with a stitch count equal to the entire width of the number of needles in use on the bed.
On a punchcard model, the all-knit border needles would have to be brought out to E on every row for them to knit with each carriage pass.
Using provided repeat pngs as shared may require mirroring the repeat horizontally depending on the download program and the knitting machine model used, as well as changing the image mode back to indexed BW since downloaded designs from the posts may be converted to RGB mode as they are copied.
If working on a finished piece, knit several rows of waste yarn, followed by a row of ravel cord and a permanent cast-on, otherwise simply knit enough to hang a comb and some weights, required for most tuck knitting.
I happen to have a 2/20 wool as my go-to for most experiments that result in 4 or more loops building up in the needle hooks.
The beginning concept: hand transfers and automated tuck patterning

![]() The programmed repeat is planned for two rows of knit stitches between sets of loops
The programmed repeat is planned for two rows of knit stitches between sets of loops 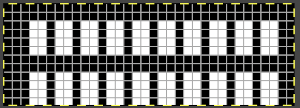
![]() After the cast-on and base knit rows, program the machine and preselect the first pattern row. The starting side does not matter unless the use of the color changer is planned, in which case, the first preselection row would need to move toward it.
After the cast-on and base knit rows, program the machine and preselect the first pattern row. The starting side does not matter unless the use of the color changer is planned, in which case, the first preselection row would need to move toward it.
Because some needles are taken out of work, end needle selection is canceled.
After the first preselection row, the machine is set to tuck in both directions.
My test repeat was programmed as a single motif on the 930, with the image mirrored horizontally.
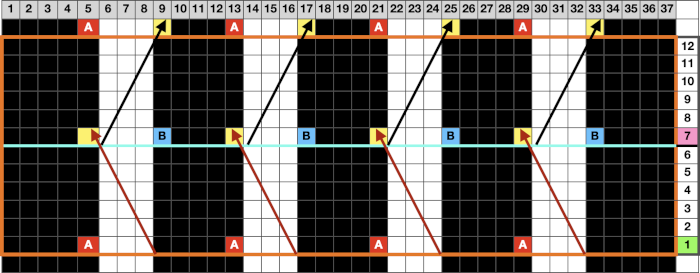
Each pattern segment is 6 rows high, the full repeat is 12 rows tall. Color changes could be introduced every 6 rows.
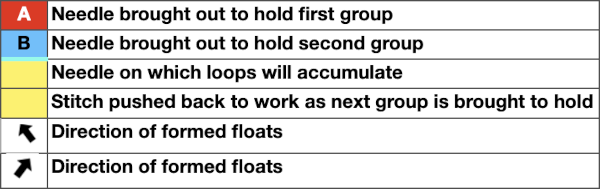
Following the chart for the first segment, transfer the A marked nonselected location needles to the adjacent preselected ones on their left, push the emptied needles out to A position, OOW after each transfer, and its adjacent needle with the combined stitches/loops out to E position.
After 4 tuck stitch rows, push any needles previously placed out of work to A position out to E so they will knit appropriately on the next pass as part of an all-knit row.
As the carriage moves to the opposite side, the second all-knit row will preselect. As the carriage again moves once again to the previous side, it will knit the whole row, while preselecting for the first hand-technique row once more.
Prior to the next carriage pass, transfer each of the marked B location nonselected needles to the adjacent preselected ones on its right, push the emptied needles out to A, OOW after each transfer, and its adjacent needle with the combined stitches out to E.
Form loops for 4 more rows, and push any needles previously placed back to A position out to E so they will knit appropriately on the next pass, forming an all-knit row. As the carriage moves to the opposite side, the next all-knit row will preselect, followed by preselection for loops and transfers again as the carriage moves again to the previous side knitting every stitch.
Repeat the process for the desired length.
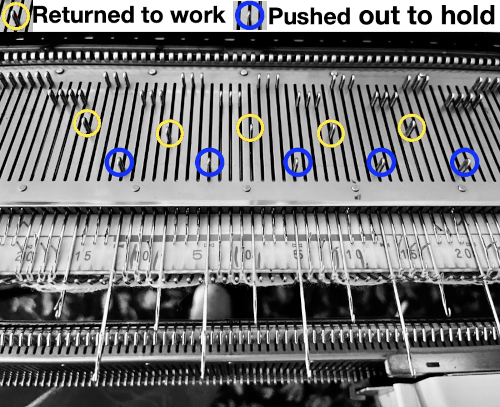
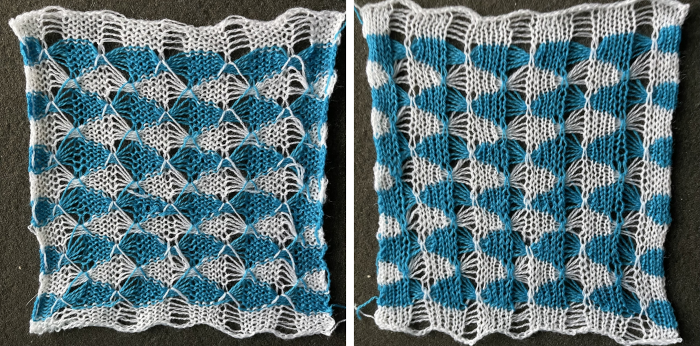
End the piece with at least 2 all-knit rows after a full or half design repeat. Cast off loosely to compensate for the widening due to the type of stitch formation. ![]() This fabric is executed as a hand technique/ short rows with no automated tuck patterning assistance. I have found when using the tuck automated setting in Brother models there is often a limit for accumulating no more than 4 strands in the hooks of the needles, while in using holding, manually pushing needles out to hold and back to work can be far more forgiving.
This fabric is executed as a hand technique/ short rows with no automated tuck patterning assistance. I have found when using the tuck automated setting in Brother models there is often a limit for accumulating no more than 4 strands in the hooks of the needles, while in using holding, manually pushing needles out to hold and back to work can be far more forgiving.
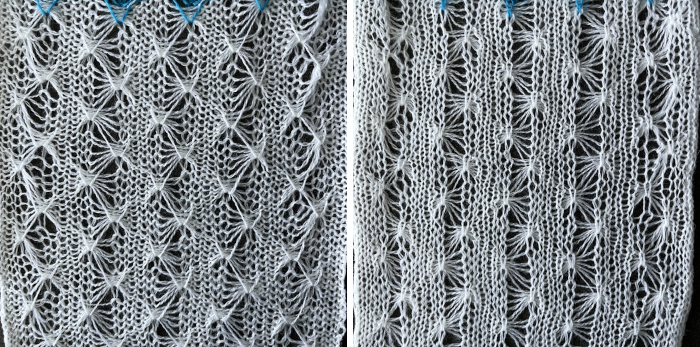
In this instance, loops are formed for 6 consecutive rows.
There are no all-knit rows. The color changes were made every 6 rows prior to knitting across the newly adjusted needle positions.