The blog post Pretend/ mock cables 3 presented the concept of using tuck stitch patterning and needle preselection, a Brother feature, as a guide to creating a version of mock cable crossings.
These designs are from an ancient Japanese publication. Technically the results are not very cable-like for these three concepts, but they share the principles behind the technique. 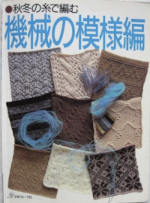 I am offering this information as a way of interpreting and adapting the suggestions in the publication. There has been some editing of the originally shared repeat suggestions after testing them in proof of concept swatches.
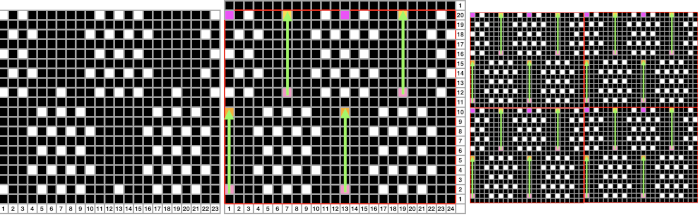
The scanned inspiration source:  The punchcard repeats: symbols are used in the above chart. The elongated short inverted U shapes, with some in bold type, represent the tuck stitch locations and needles that will hold loops in a pattern. The longer, thinner inverted Us suggest which tuck loop(s) will be raised and hooked up on new locations to create the desired textured effects.
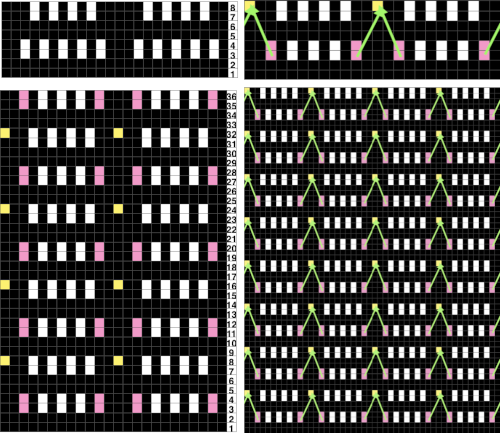
Punchcards mirror the design horizontally when in use, so the texture will appear as shown in the swatch photos on the knit side when the design is worked based on the illustrated charts on the right.
When using the tuck setting, unpunched holes will create loops on nonselected needles, punched holes will create knit stitches. Electronic patterns will use black and white pixels to result in the same selections.
Deliberately not punching holes or adding white pixels may be used to provide a marker on all knit unpunched or black pixel rows for hand techniques to take place, ie in the repeat planned for 194.
With the charts as guides, partial punchcard repeats for the three designs: 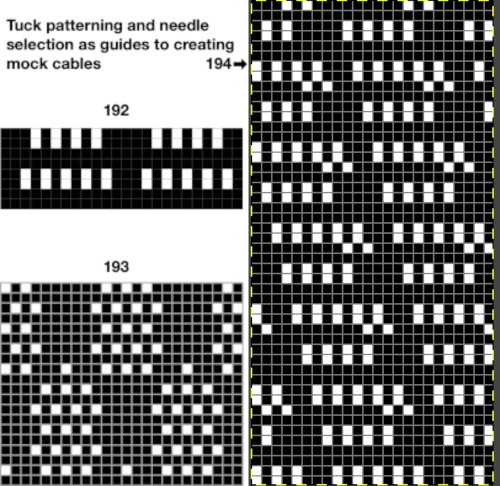 Punchcards ideally require a minimum of 36 punched pattern rows to roll accurately, the single, smallest repeat segment is adequate for knitting on electronic machines.
I knit primarily on a 930 and prefer to tile the repeats in width to the number of needles in my samples. The single motif button, default on the 930, need not then be reset and the design will be automatically centered. It is not a necessary step. Centering any single repeat across the needles in use or otherwise placing it may be achieved by programming its position. In punchcard machines, the selection is fixed across the 24 stitch markings on the needle tape, other positioning may be achieved by shifting the knitting in its position on the needle bed.
My illustrations are achieved by using both Mac Numbers and Gimp.
Adding color to help visualize hand techniques, and tiling to check alignments:
192 is 8 rows in height, more than that is needed to indicate the locations for hooking loops up. It appears this happens on white squares in the published original chart, which translate to knit stitch locations, the punched holes in the card.
For some transfer locations, no needle selection clues are provided, and they are made based on visual identification.
If the transfer is to be made onto a preselected needle, push the appropriate needle back to the B position.
Visually follow the rows down to locate the appropriate tuck loop(s),
lift them onto the needle just put it back to B,
and push that same needle out to the E position after the hook up in order to form a knit stitch with the next carriage pass.
The repeat with the most frequent hand technique is 192, with hookups every 8 rows 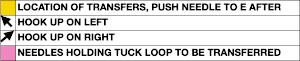
![]()
 Using light color yarn makes it easier to identify the closely packed stitch structures.
The tool used to pick up and rehang stitches can vary depending on personal preference.
Programming the design as an 8-row pattern allows for easier tracking in a design that requires actions to be taken at that specific interval.
Another view: 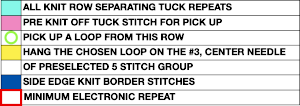
 I had a hard time finding the proper spot for picking up loops and needed extra magnification in addition to my bifocals to sort that out.
The wool used for the test swatches is a 2/8 weight.
Because transfers in the scanned publication are made on a tuck stitch row, these designs may be easier to execute on a Studio machine.
As Brother knits that last tuck row, it preselects every needle for the knit row that will happen with the next carriage pass from the opposite side. I found the location easier to track for the hand technique a row early, before the every-needle preselection.
The effect is subtle and time-consuming, a consideration if planning larger pieces of knitting. 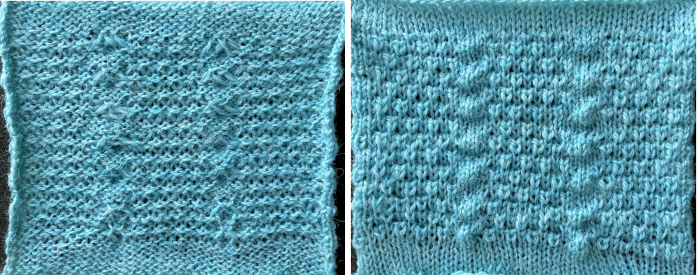 193 is 20 rows high, with hookups every 10.
 ![]()
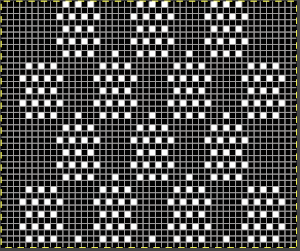
 In the concept swatch, some of the tuck stitches were eliminated, seen here in a 48 stitch wide repeat, allowing for a released edge on either side. The tiled X2 in height repeat checks its vertical alignment.
 ![]()
 This time as many of the compounded knit and tuck loops as possible were moved, producing more detailed surface textures on the knit side
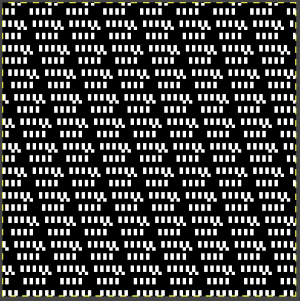
 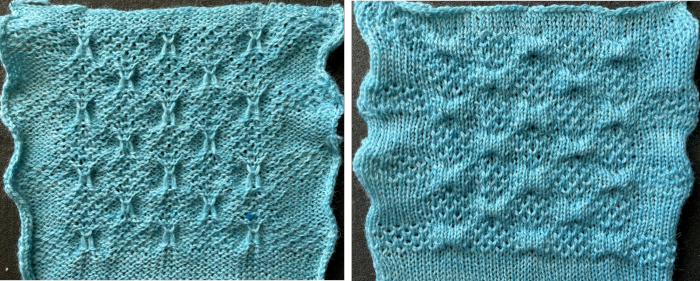 194 is 48 rows high, with hookups also every 8 rows. The single 24X 48 png is followed by the tiled 48 stitches wide version and the tiled Gimp alignment check
 ![]()
![]()
 The visualization of stitch/loop movements
 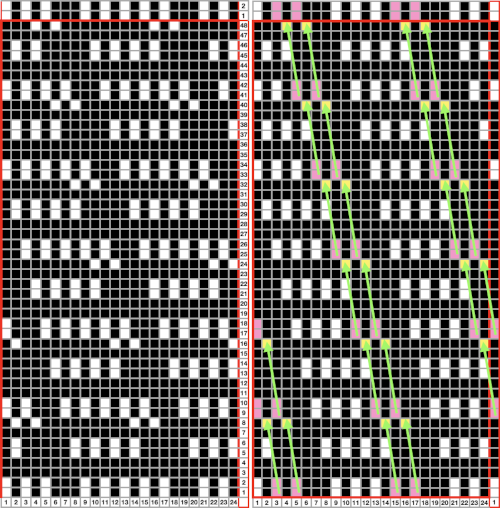 The hand technique occurs after an all-knit row, which in cards would be all punched, in electronics all black pixels.
In Brother kms, while the first all-knit row is made, the next with isolated pairs of preselected needles will occur.
Prior to moving the carriage to the opposite side, hook up from highlighted locations, and bring needles out to E after doing so. 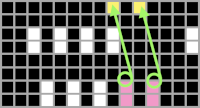 As the carriage travels across the bed again, all knit stitches will form while preselecting for the subsequent tuck stitch row. A rhythm will develop eventually.
Notes to self:
some days it is not good to be near a knitting machine
cables and intensive hand techniques are still on my avoid if at all possible list
keep an eye on broken ends of yarn in old cones at least periodically before knitting across whole rows
if knitting lengths of this technique, or even a large swatch, removing the ribber if it is in use will facilitate the process. Remember to check its balance when it is recoupled with the main bed
while you are busy keeping an eye out on what to pick up and which stitches did not form properly or are jumping off the main bed, remember to look up at the yarn mast periodically, especially if the tension appears to change suddenly 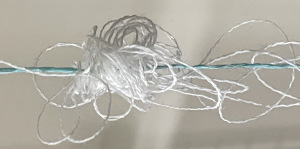 An improvement, however, over this masterpiece a decade ago when working in my attic supplementary studio space 😉
  Although all hooking up aka ruching is in the same direction, there is no apparent biasing. This fabric is quite compressed, not for someone without a lot of focus, patience, and good eyesight.
 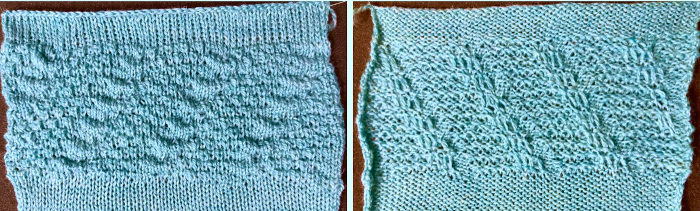 This pattern emulates the wishbone trim familiar to many knitters. It is the easiest in the series to execute, with the most textured result. The knit repeat used in the swatch is 26 stitches wide and can be trimmed easily to 24 stitches wide for use with punchcard machines.
The heels above the designated tucked stitches at the bottom of each repeat are lifted up and onto the single unselected needle of an all-knit row.
End needle selection is on, and the tuck setting in both directions is used after the initial preselection row.
Though initially an all-knit border was planned on each side, several knit stitches were eliminated on one side of the swatch. The difference is seen in the edges of the work, where all-knit stitches are allowed to roll, creating a very different “trim” than where tuck patterning was left uninterrupted. Such rolls can make satisfactory added details along accessories such as scarves, where a few rows of all knit stitches may also be allowed to roll to the purl side at the top and bottom of the piece as a finishing alternative.
The 26X16 single repeat. ![]() Tiled repeat, checking alignment
Tiled repeat, checking alignment 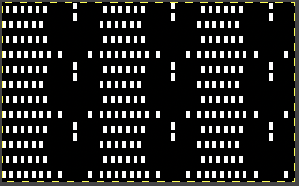 Charted information
 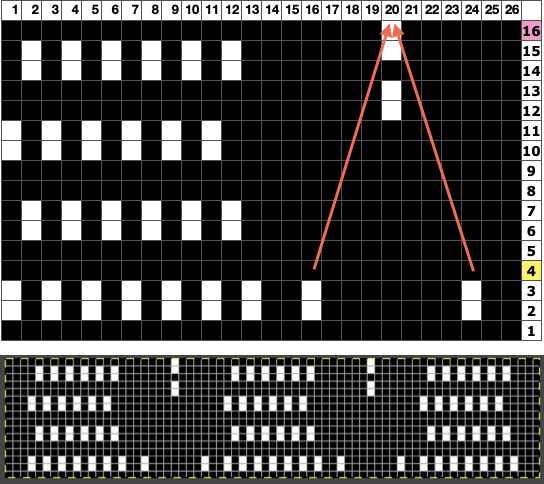 The proof of concept swatch
 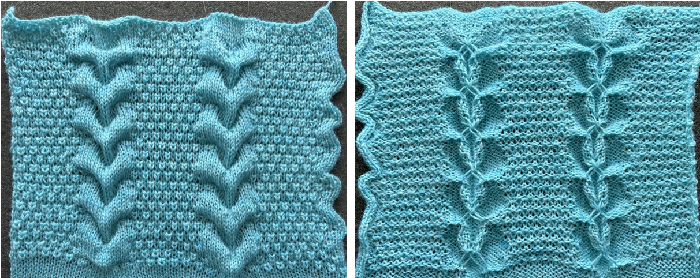 A mock cable trim may be knit separately, in any color or even multiple colors, and applied as you knit on a large piece or stitched on after the fact.
One variation as a hand technique: after a closed cast-on on 10 stitches, knit 10 rows.
Pick up the second stitch from each side of the original cast-on row, and hook up on needles 5 and 6 on each side of the center. Knit 10 rows.
Pick up the second stitch from each side 10 rows below, hang on needles 5 and 6 on each side of the center, and repeat to the desired length.
Color changes may be added every 10 rows when all knit selection is made.
The slip stitch setting in this case is used to track and facilitate the process.
End needle selection is on, with the knit carriage set to slip in both directions, with the first preselection row made after at least one base knit row.
Weight may not be necessary depending on how comfortable one is with managing the knit without them and the yarn being used.
The repeat, in turn, is tiled twice in height in the shared png 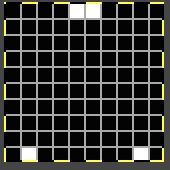
![]() A short slip stitch float will form in the location of the white pixels at the bottom of the chart and when the selection is made to match the top row of the repeat, the single float is picked up and hung on the unselected needles,
A short slip stitch float will form in the location of the white pixels at the bottom of the chart and when the selection is made to match the top row of the repeat, the single float is picked up and hung on the unselected needles, 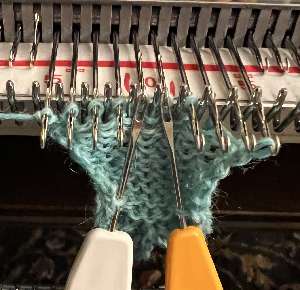 Those needles are brought out to E position after the transfers.
At that point, prior to the next carriage pass, the color may be changed. The short single skipped stitch floats are shown more clearly in this image. 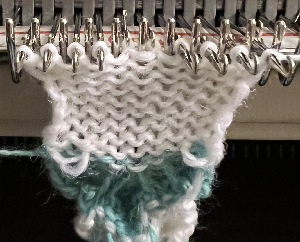 When changing colors it is best to use yarns of the same thickness that will knit easily at the same tension, not done in the first shape in this sample.
If using 2 carriages operating from opposite sides to carry different color(s) remember that extension rails will need to be used, as both will be selecting needles and will anchor onto the belt to do so.
Floats will happen at the side(s) as colors are carried up, but they and cut yarn ends can be hidden when the trim is applied. 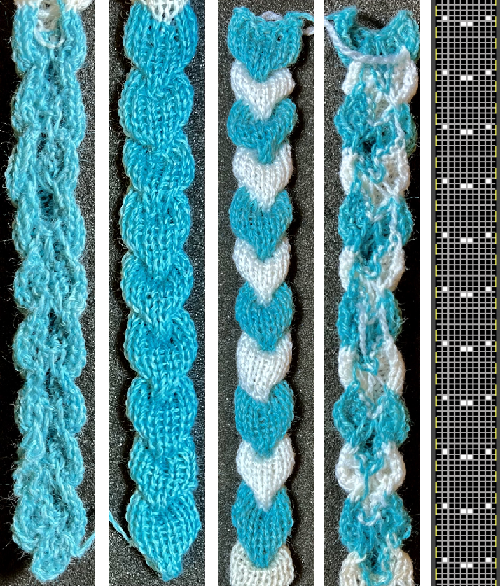 Here a fixed number of stitches +1=11 is knit for a fixed number of rows
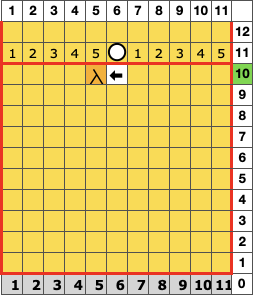
an eyelet is created every 10 rows A
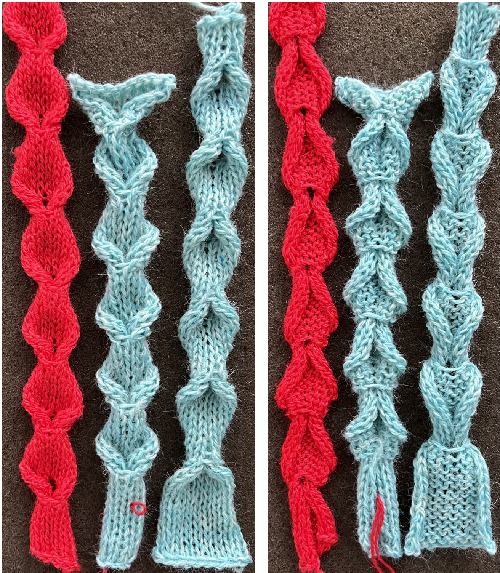
A single eyelet was sufficient to allow for feeding the trim through on the same side and from the bottom up, B and C, upon completion of the planned strip length. The red sample on the left is knit with 2/18 silk/wool, the blue is 2/wool. It is best to avoid any fiber that will pill easily.
The blue samples were knit for 65 rows each. 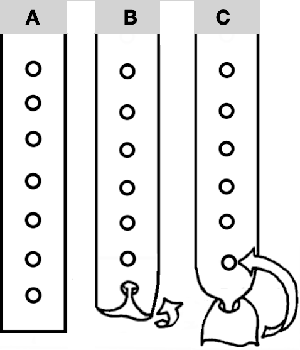 In DIY, begin a test by casting on an odd number of needles (11, chart row 0)
if all needles are not properly formed after a permanent cast-on, bring all needles out to E for the first 2 or 3 rows
insert a claw weight
knit the same number of rows as cast on -1 (10)
transfer a needle to the left or right so as to maintain an even number of needles on each side after the transfer, making certain the empty needle is in the work position before the next carriage pass (chart row 10)
as you knit to the opposite side a loop will form on the empty needle, the eyelet location (chart row 11)
a carriage pass to the opposite side will form the full stitch in the loop location (chart row 12)
The charted working repeat for the trims below is outlined in red