Though this post presents cable movements in colors using multiple stitches, the resulting repeats may be knit by hand or at times on the machines in single color textures and the number of stitches in any column may be reduced or expanded, keeping the direction of the cable crossings the same.
Though DIY charting may not be your goal, perhaps the charts themselves will inspire similar stitch movements. Segments of any of the charts may be clipped, saved, and manipulated for easy versions of other options.
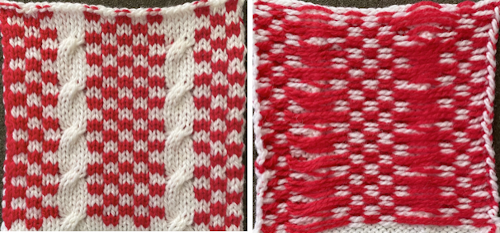
My first published experiment with cables created in vertical columns of alternating colors was in 2012, 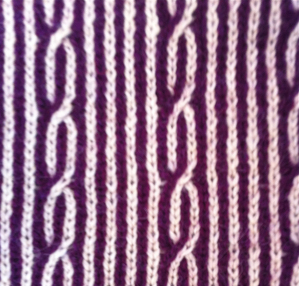 A quick way to imagine variations of the same pattern is to choose segments of the swatch photo and alter their direction and/or placement
  Using the spreadsheet, shifting crossings are imagined, adding a half-drop variation, creating secondary shapes.
 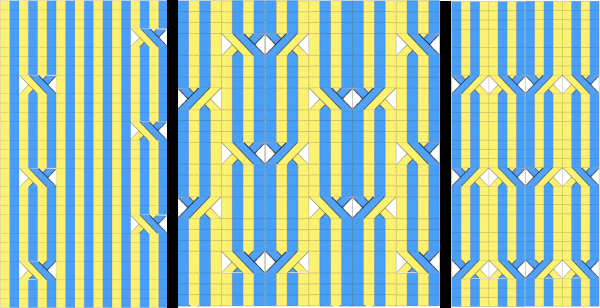 A variation doubling the width of the cable crossing in a half-drop repeat
 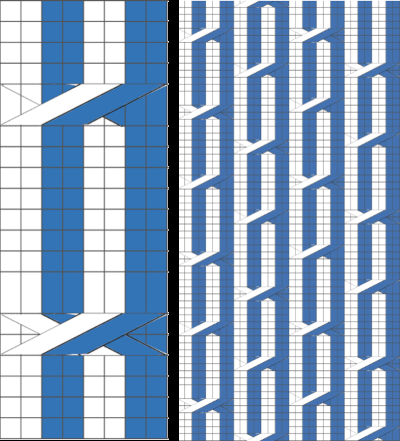 In machine knitting, one is looking at the purl side, and the ability to move stitches is often limited by the fact that their placement on a metal bed is fixed distances apart. Simpler repeats can be executed as isolated vertical bands on solid color or striped or even FI grounds, adding the ribber for even more complexity in execution.
Hand knitting makes moving multiple stitches possible more easily, and because the crossings are usually made with the knit side facing, it remains easier to keep track of directions in which to move the stitches.
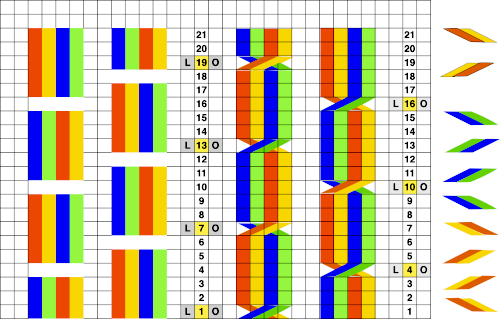
There are other choices in charting for either, cable crossings happen as a row progresses in hand-knit, and in machine knitting, knitting stops, and crossings are made before continuing with the next row. If color changes are planned every two rows then cables need to have multiples of 4 rows between each set of crossings. Hand-knit possibility on the left, with expanded charting for machine knitting 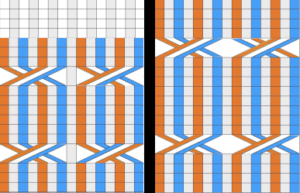 I continue to be fond of visualizing results in color in a spreadsheet prior to knitting swatches. As usual, as the sample charts multiply, the techniques often evolve as well for creating them.
Without access to Excel, I am presently using Numbers 11.2 in macOS Monterey 12.0.1, a version with several changes from the previous. Working with shapes does not remain my preferred method, but shapes are useful and worth considering in drafts of charts for many stitch patterns outside this topic.
Notes on my process: to start with, a table is created with enough cells to accommodate more than one repeat of the planned cable crossings in both height and width. I prefer working on a cell size of 20X20 pixels and using magnification if needed to make work details more visible, decreasing it before screengrabs for illustrations here.
The choices for cell border styles may be made both in terms of colors and line quality or eliminated altogether 
 To add a shape, in the toolbar, search for shapes and select a category on the left,
 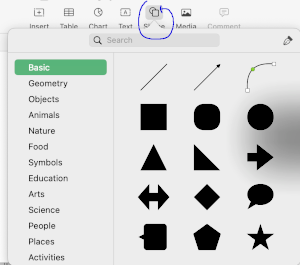 then click on the shape or drag one onto the sheet to add it.
To browse all shapes move the pointer over the shapes pane and scroll down.
It is possible to create and save custom shapes.
To make a shape editable
1: click on a shape to select it
2: choose Format, Shapes and Lines, Make Editable from the format menu at the top of your screen,  handles will appear. In this case, a red square in each corner, and a small circle on the left side
  3: double click a white handle to change the line from curved to straight, handles represent different types of lines
Squares with a red outline: lines that connect to this point are straight
Circles with a red outline: lines that connect to this point are curved
4: click outside the edge of the shape when done editing it
Saving custom shapes
1: Click a custom shape to select it, then choose Format, Shapes and Lines, Save to My Shapes (from the Format menu at the top of your screen). 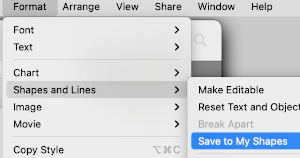
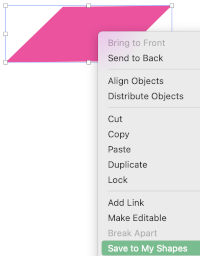 The shape is saved in the My Shapes category of the shapes library, which appears only when you have custom shapes. Shapes appear in the library in the order you create them, this order cannot be changed.
2. Type a name for the shape in the field that appears below it, or click the name to change it.
To delete a custom shape, Control-click it in the shapes library, then choose Delete Shape.
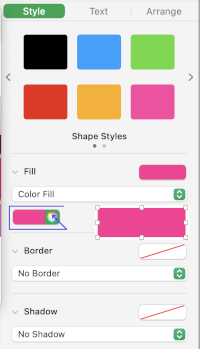
Color choices are the same as for any work with colored cells, for the default palette, left-click on the marked area, and choose from current fill selections 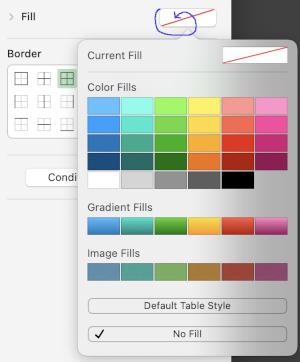 Choosing custom colors: left-click on fill, then on the colored globe, new selections appear, click on any one of the pencils to select the new color, it will move up from other selections, the change will be reflected, can be undone and repeated several times
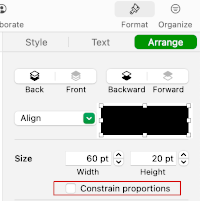
  Creating the first cable crossing shape: choose the square from the basic shapes, if the first plan is to work across 3 cells, change its size to the width of 60 pixels, 20X3, and single height of 20 pixels, also changing colors if desired. To do so, left-click on it, uncheck constrain proportions, and change values to desired ones
  Change its color
  It is a good idea to copy and paste a few shapes outside the table in case they are needed
A: place the shape on the cell grid
B: make the shape editable
C: click on the left upper corner of the shape on the small white square, it will turn red, drag, and place it where desired, and release it
D: repeat with the small white square in the lower right corner, release
E: check image size, adjust to 60 pixels wide, 20 high, make editable again if tweaking is needed,
F: the first crossing shape is completed 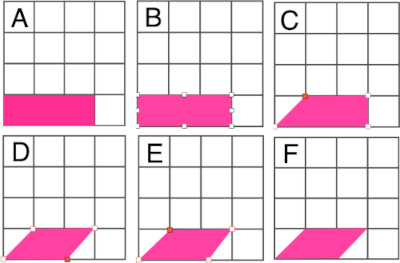 Right-click on the final shape, copy it, and paste it several times on the sheet away from the table.
Copying and pasting shapes on a single cell will fit any image within its borders, to remove it choose the cell, color fill, no fill, from the format menu 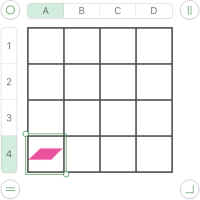 To use the shape, left-click on it, drag it into the desired position.
Cable crossings are usually in pairs, so a companion shape will be needed, 60 pixels wide by 20 high, in a contrasting color, the results of making the larger image editable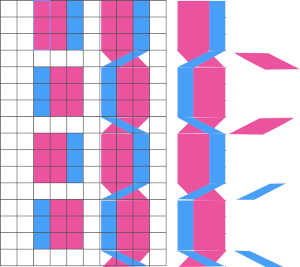
 The combined images may be created in a paint program such as Gimp and the resulting file, in turn, may be used in a spreadsheet. Pngs can be custom filled with any color of your choice in Gimp or its equivalent
 ![]()
![]()
![]()
![]() To draw a straight line in Gimp when applicable, select your preferred brush tool, click the point that begins your line, hold the Shift and Command keys in a Mac, drag the cursor to where you want the line to end. Click the endpoint, this creates a straight line between the two points with your selected brush. After the line is drawn, release the Shift and Command keys.
To draw a straight line in Gimp when applicable, select your preferred brush tool, click the point that begins your line, hold the Shift and Command keys in a Mac, drag the cursor to where you want the line to end. Click the endpoint, this creates a straight line between the two points with your selected brush. After the line is drawn, release the Shift and Command keys.
When charts are for personal use only, individual preference guides visualization methods, considerations for publishing may be different.
Yarn colors may be used in the charts, moving wider columns of stitches may be difficult if not impossible on a machine, but hand knitting opens a different world of opportunities for pattern use.
Working in a spreadsheet is easier for me than only using Gimp.
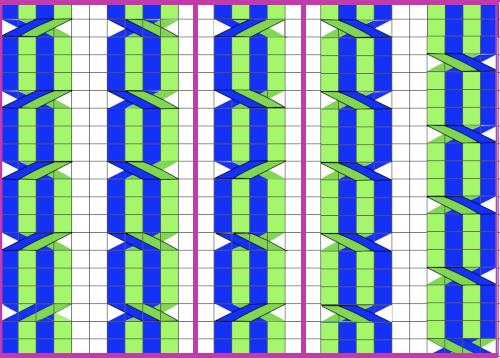
Seeking out a method for better definition of cable stitches to facilitate following crossings visually, cable crossing rows here are now double-height for added clarity; other choices include showing grid or not, and using BW for stitches crossed to the front in any direction.
Disregarding the grid, each column of color could be any number of stitches wide, while having the grid allows for easy counting of rows. Any chart may be used in knitting using a single color as well. 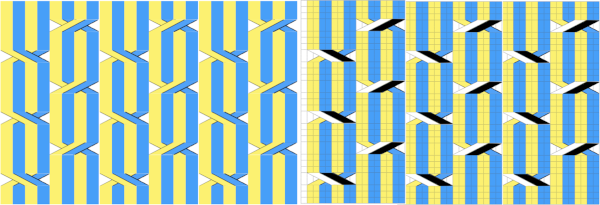 Fair isle repeats: when working cables in FI, in addition to tracking cable directions, the needles must be placed in the proper needle positions B and D for correct patterning to continue.
A series of cables executed along vertical lines of the same color. The red border surrounds the full repeat. These illustrations are as they would appear for hand knitting, with crossings made as knitting progresses along the corresponding chart rows on the knit side of the fabric 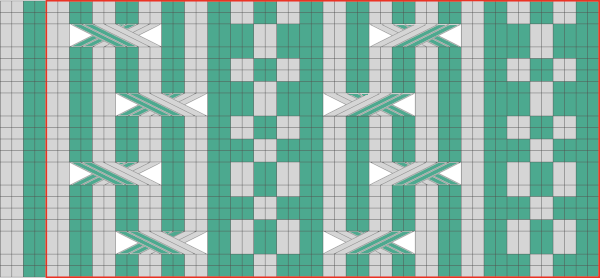 Fair isle on mixed striped ground
 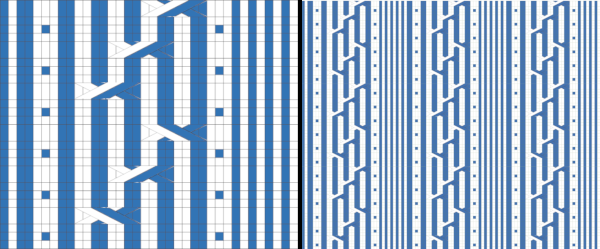 Fair isle with repeat changes, expanded further by mirroring
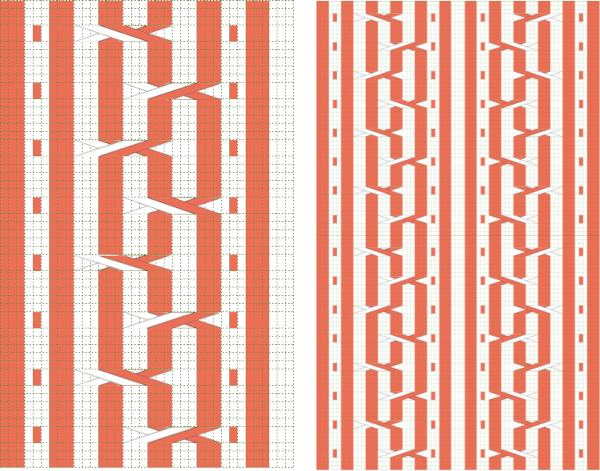

 An expanded MK illustration
 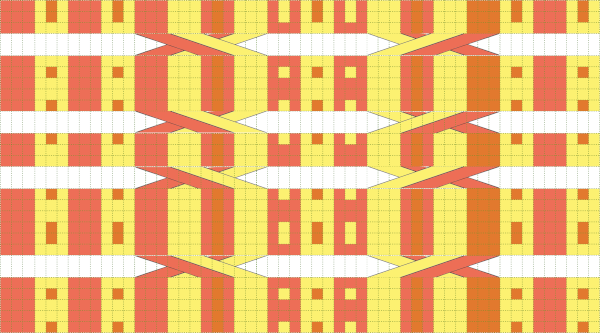 A FI sample shared in 2015.
  From Slip stitch patterns with hand transferred stitches, single bed 2/21
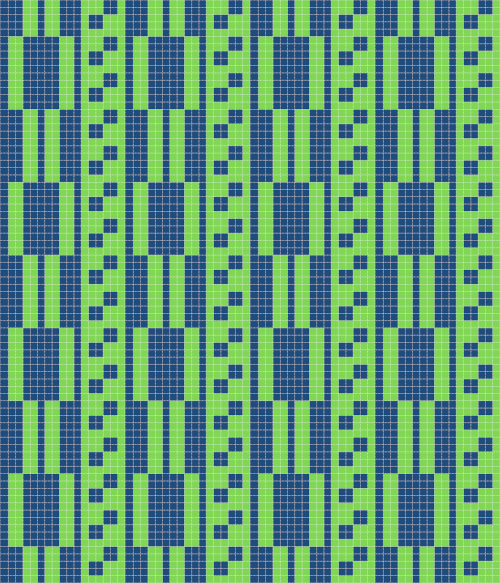
 When using fair isle patterning as a guide to forming cables on the machine, crossing directions matter more since one is no longer simply placing color on like color: this chart transitions from the original idea to the placement of the crossings, a full repeat with their direction reversed based on which color is wanted to travel to the knit side is drawn, and on the far right, the look of the final FI repeat
 Adding a third color, possible intarsia knit as all over pattern or isolated as a panel. Even in hand-knit, the latter may be in a contrasting gauge and joined to pieces of the garment after their completion.
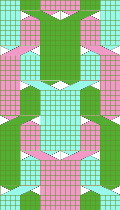
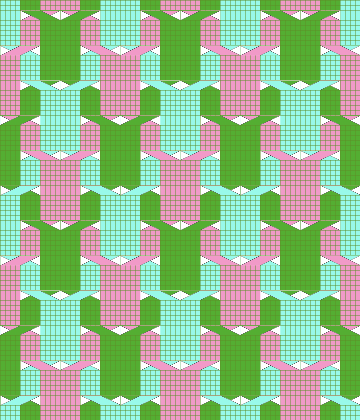
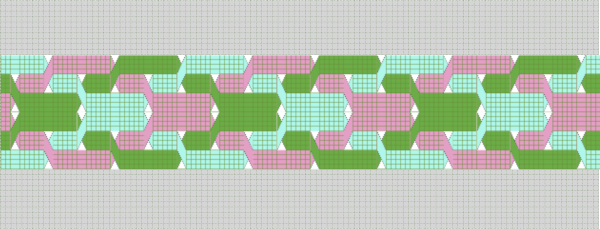 These repeats may be worked as vertical panels between rows of plain knit or rib
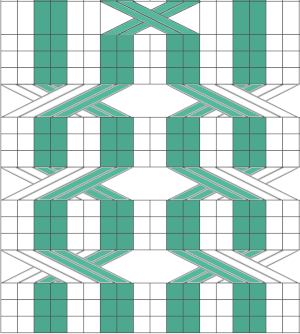
 Symmetry is not always needed,
 MK, adding the ribber: one of the things that may lead to confusion is the use of the term every other needle knitting. If one is working on every needle on both beds, the needles on either bed are centered between those on the opposite one, thus patterning occurring on either bed that becomes EON. Colors are used to track the movement of stitches, not colorwork, which happens on the same needles, either bed, or the plaiting feeder may be used to produce the illusion of additional colors.
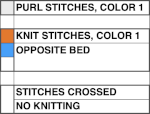
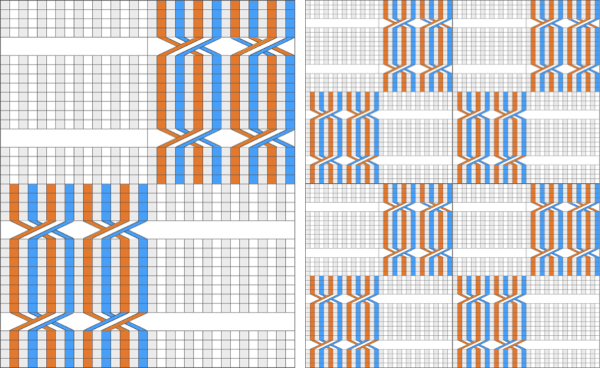 Part of an experimental swatch using the ribber and tuck settings
 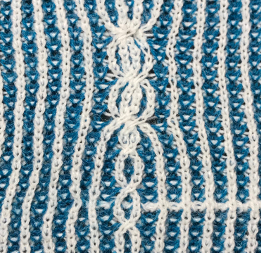 In attempting brioche on the machine the color changes happen every 2 rows, so a minimum of 4 rows or a multiple of 4 rows are planned between moving any stitches. Although the same color will be used in the crossings each time, using 2 colors for cable segments may make the chart easier to follow
 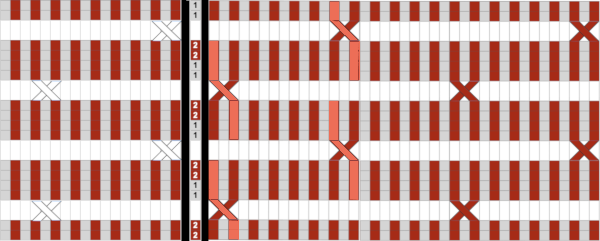 Using the ribber, one of the crossings on striped grounds: Slip stitch patterns with hand transferred stitches, double bed. 2/21
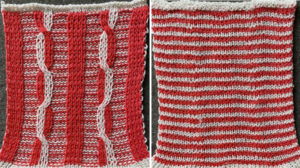
 A range of experiments with associated samples:
Some cables to try, hand-knit 1/15
A hand-knit stitch tale 2: a bit of cables and lace, charting, HK to MK 7/14
Chain cable HK experiment 1/13
Machine knitting cables: single bed, 1 12/14
Machine knitting cables: single bed, introducing the ribber 1/15
Some “real” cables on KM 1/12
Hand to machine, symbols 4: cables 2/13
A simple braided cable (and card) 1/12
Machine knit cables: using patterning as a guide to transfers 2/15
Using punchcards to track cables and twists in pattern 2 12/11
Using punchcards to track small cables in pattern 1 1/12
Holding and “cables” 12/11
Pretend/ mock cables 4: revisiting i-cords 1/13
Pretend/ mock cables 3 7/18
Pretend/ mock cables 2 1/14
Pretend/ mock cables 1: i-cords, holding 1/12
A few i-cords and more to try 1/12
Cables with lace transfers 12/11
Cables in color 2/15
Visualizing knit cables in color_ Excel 1/15
Knit charting in Mac Yosemite; visualizing knit cables 11/14