This post originally included samples worked using needles on the ribber as well, now in another in progress post: Slip stitch patterns with hand transferred stitches, double bed
An earlier post with a range of single-color experiments: A hand-knit consult to machine knit slip stitch
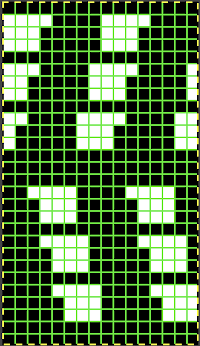
The inspiration source for the topic here was found on Pinterest 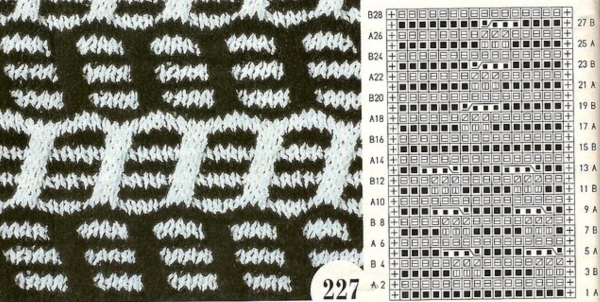 Adapting the motif for machine knitting, visualizing the actions needed.
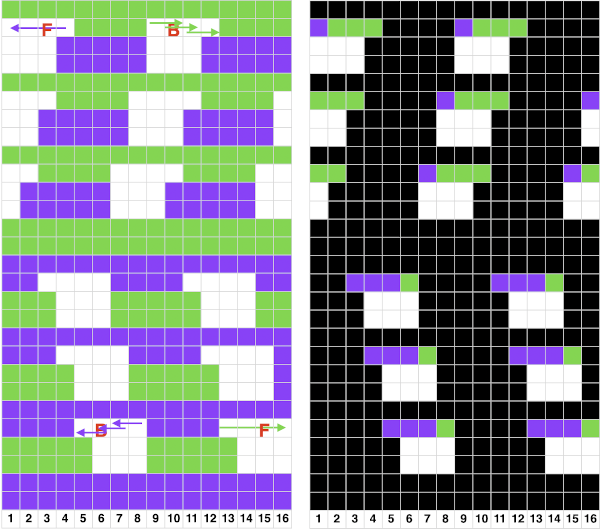
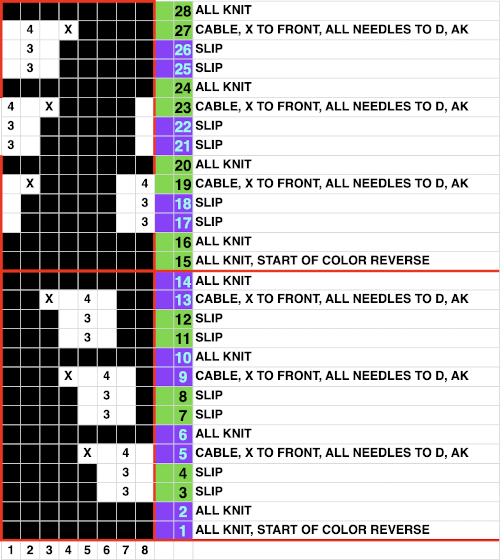 The repeat is suitable for punchcard machines as well. The first preselection row is toward the color changer, end needle selection is on. Cable crossings, 1 front, 3 back, are made every 4 rows except where the color reverses at the midpoint, where 4 all knit rows are preselected and occur. The fourth, extra non selected needle, X, is removed on a tool and held in front of the work. The three adjacent stitches are then also removed on a tool, moved to fill in the now empty needle to the left in the bottom segment of the repeat, to the right in the top half. The remaining held stitch is then transferred onto the newly empty needle. All stitches in the transfer group are brought to D, the remaining needles should have been preselected. If any have been disturbed, line them up as well so all the needles will knit with the carriage set to slip.
 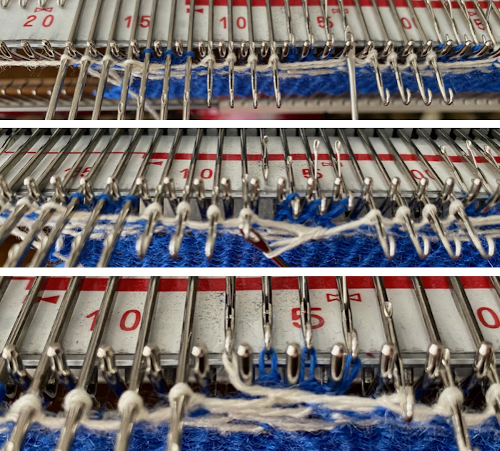 The color is changed, and the row with the completed transfers becomes the first all knit row in the next color pair or rows.
The repeat as programmed into my 930
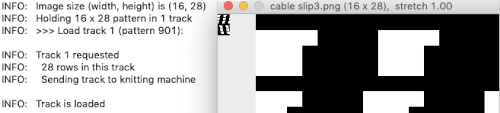
 Working on a single bed is for me, more user-friendly than double bed. I like to program the width of my repeats when possible, they can then be treated as single motifs, the default in the 930 with downloads using img2track, and I do not have to rely on notes, memory, or position programming to place the work predictably on the needle bed. My full repeat
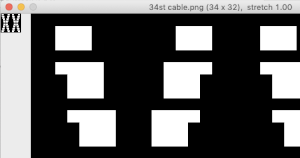
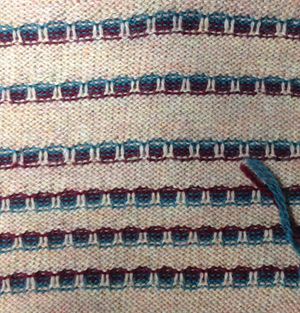
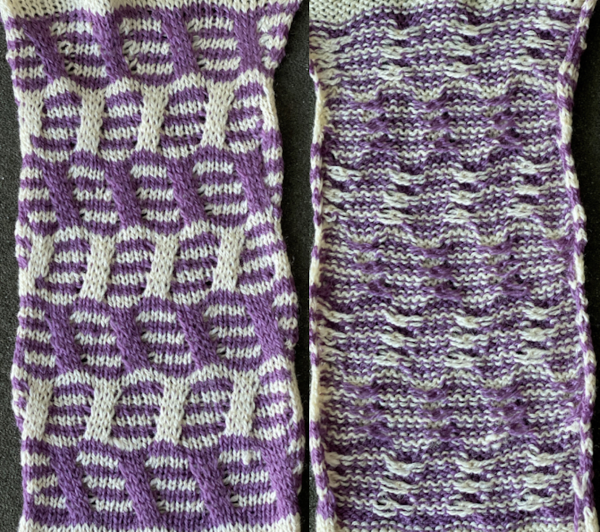
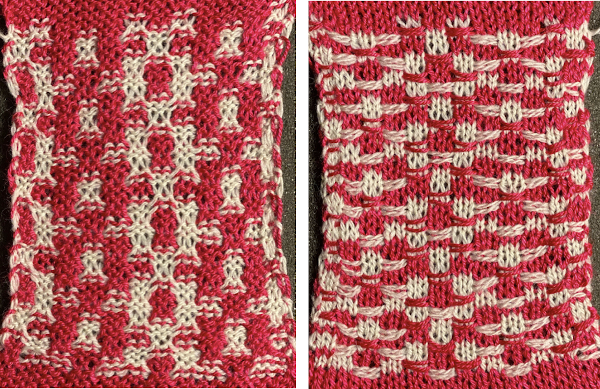
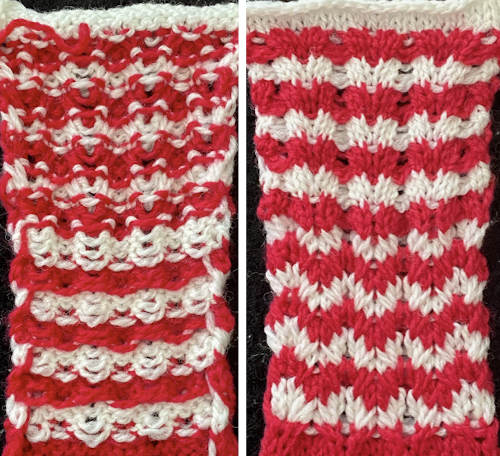
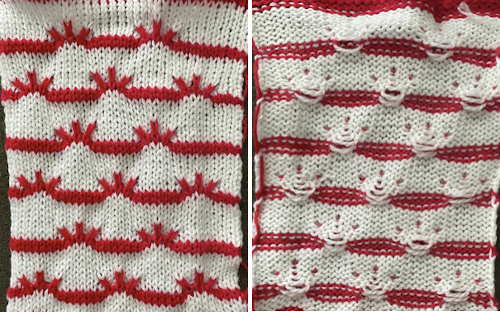
 The knit carriage was set to KC I and to slip in both directions, the same design and execution methods were used as for the first swatch. The yarn is 2/18 wool, the tension was set at 4.., the slipped and crossed stitches pull the fabric in both width and height, the swatch was steamed and pressed to flatten it. Small eyelets occur along the edges where the single stitches were moved to one side or the other across three needle positions. It was not possible to produce a 3X3 crossing at the center of the shapes.
 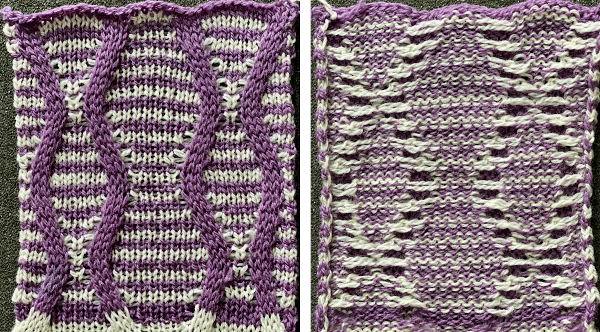 Over time I have encountered illustrations of unraveled knit or slipped stitches being brought out to the purl side, creating thread patterns on the knit surface, and changing the color structure on the purl. This illustrates a slip stitch being created via a hand technique
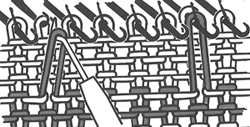
 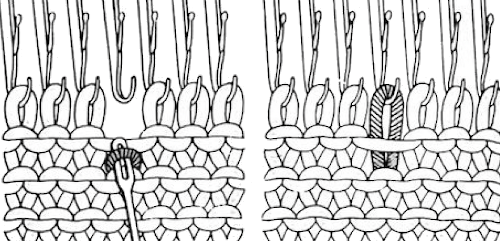 Here the dropped stitch is hooked up on the purl side
 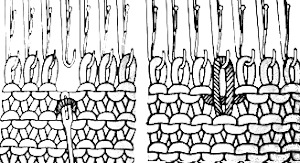 Using the automated slip stitch setting simplifies the technique. The method often described to deal with moving the elongated slipped stitches is illustrated below. Using a latch tool inserted behind the slip floats, remove a single slipped stitch at a time, passing it under the slip stitch floats, and rehanging it in its original needle position.
 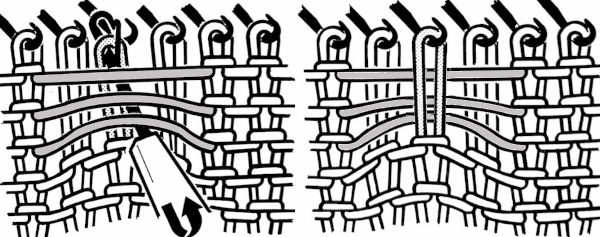 In testing techniques, a simple design that is recognizable with the preselection of needles makes it easier to track progress and accuracy. Though these patterns may be executed in a single color, working in contrasting, bright yarn colors is helpful in isolating stitch formations and understanding their structures. More than one stitch may be moved at any one time. I found when using more than 2 rows of slip the ground fabric began to look gathered and distorted, so my tests are knit using 2X2 pixel blocks.
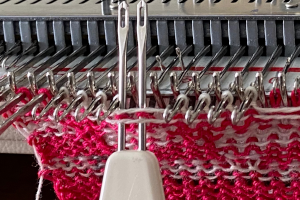
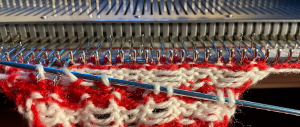
To move the slipped stitches, slide a multiple eye tool under the slip stitch floats that are to be moved to the front of the knit, holding the tool parallel to the knit bed, lift floats up and onto the non selected needles,  pull tool forward, so stitches and floats move behind the latches
  push tool back toward the needle bed
  lift the slipped stitches and floats together onto the tool
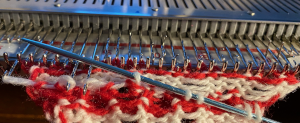
 insert a latch tool from behind between the prongs of the multiple eye tool,
 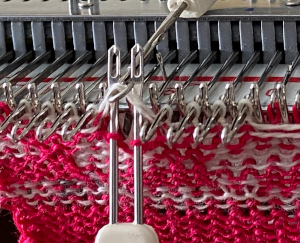 lift the floats over the eyes of the tool, placing them behind it and the slipped stitches, being careful not to hook them up onto gatepegs,
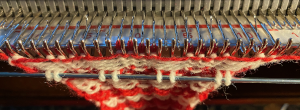
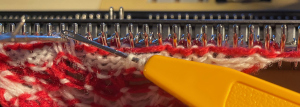
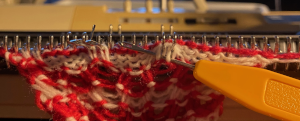
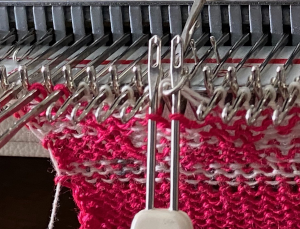 now lift the original slipped stitches back onto their previous place on the needle bed, they will be part of the first all knit row in the contrasting color;
 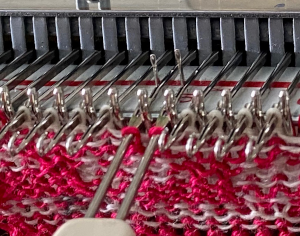 bring the needles with the restored stitched out to E, thus making certain they will knit as the carriage makes its next pass
 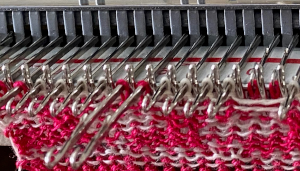 The pattern is charted below in development, color changes were planned every 2 rows. The third blank row in each slip stitch location marks the spot for the above manipulations to take place, noted in the chart with grey cells marked with pink dots. After the initial preselection row toward the color changer, only for the first all knit pattern row, push non-selected needles out to hold, E, to ensure all stitches will knit in the ground color. Subsequently, the first design row is part of the continuing repeat. The next color change will begin to form the floats.
 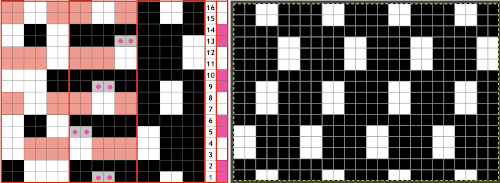 The sequence at the bottom of the swatch is off because I had a change of heart about which color I wanted to form the solid color shapes
 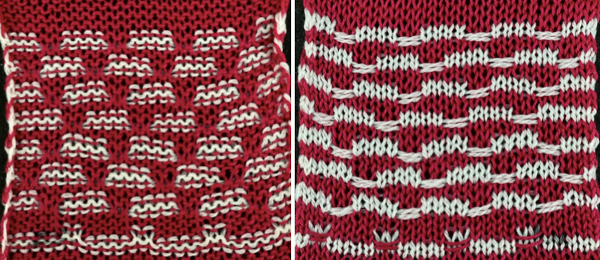 To my surprise, the process became oddly meditative, and I moved onto a different motif built with 2X2 pixel blocks. As seen with mazes and mosaics, a design intended for standard fair isle, tuck, or slip, with color changes every 2 rows, will produce an altered final shape,
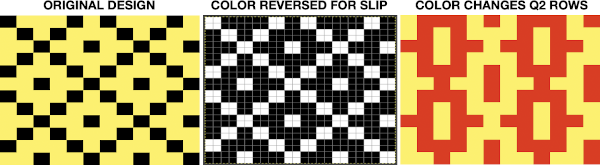
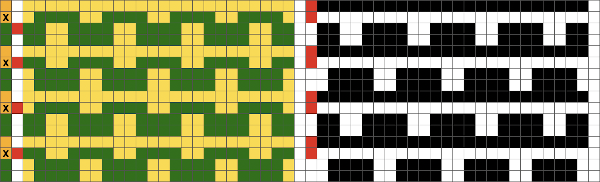
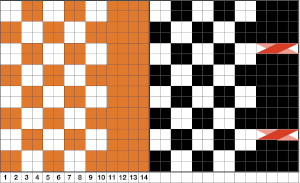
 Combining hand techniques: the starting chart begins to address the movement of stitches. On the left, the placement of crossed colors is shown, but technically the design produced is different. On the rows marked with X and red cells, cable crossings are made. All stitches in that row are then pushed out to E, the color is changed and the result is that row and the preselected next one are going to knit on every stitch, those rows are highlighted with red cells on the right as well. Black cells reflect punched holes or repeat for a 24 stitch brick repeat
![]()
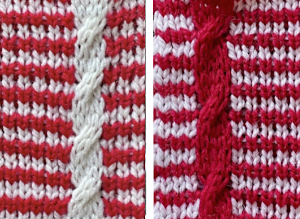
 Two types of crossings were used in the swatch, one moving the elongated slipped stitches on the knit side of the work, the simpler process,
  the other involves moving the slipped stitches to the purl side of the work which the purl side after slipping the slip stitch floats behind them in the first steps, followed by performing all crossings to the purl side, then bringing all the needles out to E, changing the color, and continuing in the pattern.
  The blank line indicates the crossing row, the numbers the rows actually knit.
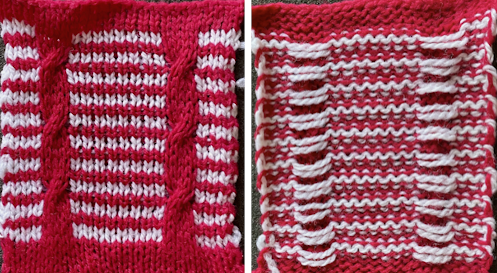
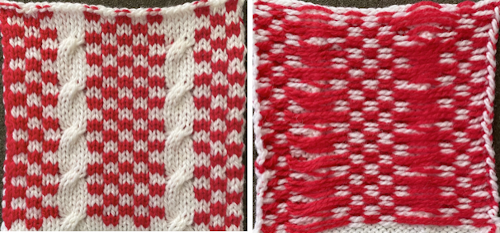
  The resulting knit proof of concept: the fabric has a 3D effect. My red yarn is an acrylic chosen simply for thickness and contrast that flattened with a bit of steam. The white yarn travels in two opposite directions for the crossings, creating eyelets in the center of each pair of moves. The slip stitch floats brought to the knit side in the top half nearly disappear on the knit side. Both surfaces are “bumpy”
 ![]() A design with each color being crossed: the attempted visualization and repeat.
A design with each color being crossed: the attempted visualization and repeat. 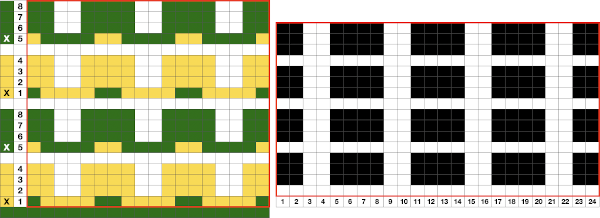 The repeat appears to use slip-stitch in a vertical column, not ever possible in standard knitting. The explanation is that on those blank rows, crossings are made prior to knitting the next row. The chart on the left reflects the needle placement of each color after the crossings. All pattern needles are then brought out to E, maintaining the needle selection. Slipped stitches will have been replaced by knit ones in the alternate color.
When ready for cabling, there will be 3 floats in one color, and a fourth, single one, in the other.
For the first row of knitting, there will be no preselection. Bring all those needles out to E with color 1, then continue as described.
My first test had 2 more rows in each pattern segment, I found the stitches persistently wanting to jump off the needles due to the amount of texture. 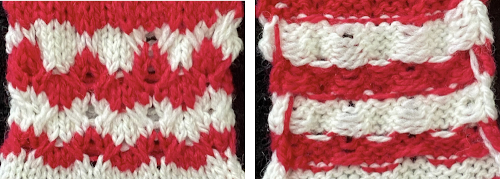 The charted repeat
 ![]()
 Transferring the slip stitch floats to the knit side was fiddly, I actually prefer the texture created by moving the elongated loops on the knit side. All cabled fabrics narrow considerably. My swatch is 24 stitches wide, knit at tension 9, 14 transfer repeats measure a whole 2.25 inches in width, 4.25 in length. The white yarn is a 2/8 wool, the red a 2/11.5 acrylic.
The very first preselection row and those blank rows in a card or in pixels will only select the first and last needle if the cam button is set to KC one, signaling action needs to be taken  the needle selection is fixed, so it easy to ID and restore after transfers are made.
 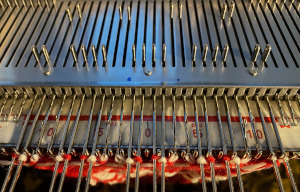 A couple more ways to transfer those slip stitch floats to the front of the fabric: floats can be lifted on top of the needles that formed them and behind the stitches on them, a fine knitting needle or tool can be inserted through the stitches across the row, a few, or a pair at a time, being careful not to twist the stitches. In turn, the stitches can then be dropped off the main bed, held on the needle or tool, and be replaced carefully on the needles in question across the row. Crossings are then made, the proper needle set up is manually chosen for the next carriage pass, and the process starts over again. Folks who like lifelines could thread a ravel cord threaded through a needle and use them to remove the same stitches off the bed instead of the knitting needle.
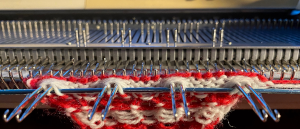
Returning to cabling with crossings showing only on the knit side, attempting wider cables: several issues need to be worked out. The more frequently one color is slipped, the more rows the alternate color will knit, which will lead to distortion of the fabric in the striped areas. The greater the number of stitches crossed, the harder the cable is to achieve, so my tests use 2X2 cables. Dark colors are harder to see both when moving stitches, and often in the final fabric. Spacing between the cabled columns and whether or not to place them or all knit rows on the edges is another choice that needs to be made. 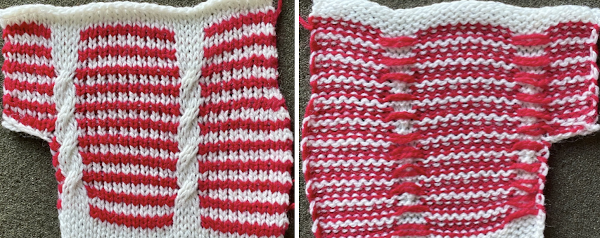
 The charted repeats are for the red cable with the second spacing, illustrating options for cabling on row 7 or row 11, pulling needles out to E after making the transfers before knitting the last row of the design. Pairs of slipped and all knit rows are added to lengthen the distance between cables and to reduce some of the extra lengths in all striped areas
 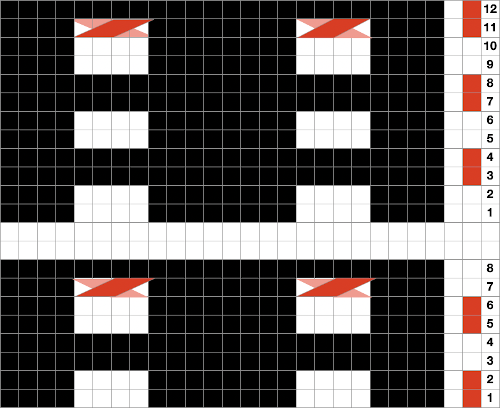 This idea may work in a border or a trim as well. I did not test bringing the slipped stitches to the purl side. The chart shows adjustments in the placement of the repeat to make tracking crossings easier
 ![]() The actions taken
The actions taken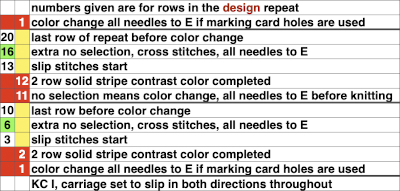
 One more to try
  If the goal is to add checks along with solid color cables, the best way to achieve the fabric is to use the fair isle setting. There will be 2 sets of floats formed with each carriage pass. A blank segment may be added at the stitch crossing location as in previous repeats, with those needles brought out to E before the next row is knit, remembering that proper needle preselection needs to be maintained throughout
 ![]()
 Another approach is to bring elongated stitches created manually up on the purl side. The resulting fabric will be more gathered on the knit side, with no formation of slip stitch floats, it is referred to as ruching, and may serve as a compromise when color changes are made over 2 rows of contrast