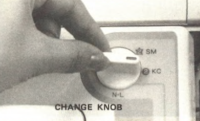
Lace knitting for many introduces knitting with 2 carriages for the first time. The lace carriage advances the cards, mylars, or programmed pixels in a design row with each pass. In other stitch types the knit carriage, once it is set to select needles ie using the change knob on KC, in punchcard machines,
 or KCI for end needle selection, KCII for no end needle selection in electronic models, also advances the pattern a row with each pass. The advances happen in Brother machines when any carriage locks onto the belt and moves past the center 0 marking as it travels from one side of the stitches in work and past them to the other.
Electronic and punchcard published lace patterns may be used in both machines as long as when punchcard models are in use, the pattern repeat is a maximum of 24 stitches wide or a factor of 24, such as 2, 4, 6, 8, or 12 stitches in width for each complete repeat segment. This exchange is possible because the knit carriage does not advance the pattern repeat in both models, it is left set for performing plain knitting, with the change knob set to N-L.
When the knit carriage(s) is (are) also set to produce patterning, extra caution needs to be taken with the alternate carriage being off the needle bed so both carriages do not lock onto the belt, which will then be anchored on one side, and pulled toward that spot from the opposite side, possibly causing it to break. One instance in transfer lace knitting when the knit carriage also selects needles is in knitting automated edgings.
Many other stitch types may be knit with 2 knit carriages selecting needles from opposite sides. It is one way to have frequent color changes without using a color changer, tensions and cam button settings can also be different. On an electronic machine, each pass of each carriage advances the design by one row. Here patterns stop being interchangeable. With 2 carriages selecting needles, when a punchcard machine is used, as the alternate carriage makes its first pass from the opposite side, the card does not advance, so the previous preselection is repeated. To use a published repeat for either machine on the other, the repeat needs to be adjusted.
If one of the two knit carriages is left set to N-L, it will not advance the pattern, providing an easy way to add plain knit rows between patterned ones without having to alter cam button settings or the programmed repeat. In transfer lace knitting, there are many considerations when attempting to represent carriage movements for both carriages in a single chart when the knit carriage is not also selecting in pattern, but simply knitting and not advancing the repeat. The first illustrations use the machine knit repeat developed from a hand-knit pattern inspiration many a year ago 2013/12/05/lace-mesh-motif-charting_-mac-numbers.
Since then software versions, computers, operating systems, and my use of them have evolved and changed. I have edited the post with additional information, inked in a different color.
Experimenting with DAK has brought me back to thinking about the issues in charting lace fabrics in particular.
Lace knitting tips including card and electronic markings for transfers and knit rows
Mesh grounds: 2017/07/29/to-mesh-or-not-to-mesh-5-design-repeats/
Info on lace meshes for both grounds and patterns 2021/05/12/to-mesh-or-not-to-mesh-8-more-numbers-meet-gimp/
Two of the posts on using Studio repeats on Brother brands:
2019/02/23/revisiting-use-of-lace-patterns-studio-vs-brother-machines/
A Studio lace card with single blank rows between transfer segments knit on a 910
No symbols are used in this chart, generated using the DAK template print preview for knitting with a Brother model 950 i. The red cells represent transfers to the left with LC operating from the left, the green cells represent transfers to the right, and the grey cells indicate knit stitch rows.
The knit rows in most lace unless the pattern is combining KC needle selection for slip, tuck, FI, or weaving do not advance the pattern rows.
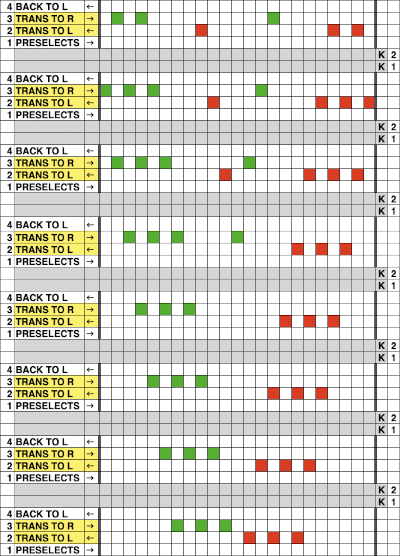
LC actions are marked on the left, the KC ones on the right
The LC makes 4 passes:
1: preselects for transfers to the left as it moves to the right
2: transfers to the left as it returns to the left,
3: transfers to the right as it moves to the right, there is no preselection for the next row
4: moves back to the left with no transfers or preselection
The KC follows with 2 knit rows. In the chart for this pattern, representing only the repeat, there is no room to indicate KC passes on the left-hand column
![]() The appearance of the chart or template changes if 2 empty rows are added to represent the KC passes. It may help one understand what is happening but in Brother machines, 2 of the 4 blank rows here would need to be eliminated for the pattern to knit properly.
The appearance of the chart or template changes if 2 empty rows are added to represent the KC passes. It may help one understand what is happening but in Brother machines, 2 of the 4 blank rows here would need to be eliminated for the pattern to knit properly.
![]() Making distinctions in the programming for the repeat depends on its use. If one is using DAK for interactive knitting, by necessity those extra rows are needed to allow for the view onscreen of the rows involved in the plain knitting with the knit carriage. I would assume knitters are instructed to set the knit carriage to KCI or KCII, each carriage will advance the knitting for a row with each pass, extension rails are a necessity since each carriage needs to engage the belt for patterning. Using the same repeat for drawing on a mylar sheet or for download outside the DAK environment the greyed-out 2 extra rows can be eliminated by marking squares or entering pixels and punching holes (depending on repeat width), and the remaining repeat should work.
Making distinctions in the programming for the repeat depends on its use. If one is using DAK for interactive knitting, by necessity those extra rows are needed to allow for the view onscreen of the rows involved in the plain knitting with the knit carriage. I would assume knitters are instructed to set the knit carriage to KCI or KCII, each carriage will advance the knitting for a row with each pass, extension rails are a necessity since each carriage needs to engage the belt for patterning. Using the same repeat for drawing on a mylar sheet or for download outside the DAK environment the greyed-out 2 extra rows can be eliminated by marking squares or entering pixels and punching holes (depending on repeat width), and the remaining repeat should work.
If the image is being downloaded as is to an electronic, it may be used as given, with the knit carriage selecting needles and the cam button set to KC I or II.
Because printing template previews are produced using the fair isle option, the design will be mirrored, a necessity in some electronic models, but for punchcard knitting the same repeat with the extra rows removed, if accurate overall should be usable as-is. The numbering for the punchcard machine sequences however reflects the subtraction of the extra rows in the electronic template, the provided numbers then have skips in the sequences and do not match the actual design row numbers useful when a card is being punched.
Electronic carriages are equipped with a magnet, and must always travel past the center needle 0 position center mark on the needle tape. Markings on brand-specific published punchcards give clues as to which carriage to use and for how many passes. They also may vary depending on the year the punchcards or mylars were issued. To review, here are some of the markings commonly found
Lace knitting on punchcard machines a symbol summary: 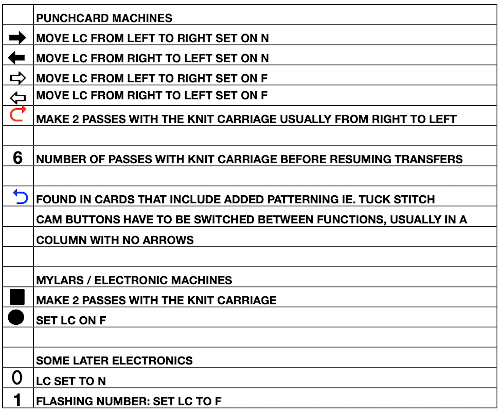 There are many differences in transfer lace design: design transfer segments may vary considerably in the number of lace passes and transfers between each pair, or more in some instances, of knit rows. In the pattern below, only 2 rows of knitting are completed after 20 lace carriage passes, the bottom half is repeated X times, and the top half X times, adding even more complexity. Depending on the knitting machine model, the pattern may also need to be mirrored to knit accurately.
 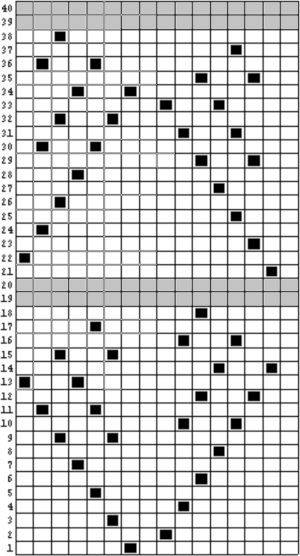 Published punchcard books offer patterns with potential errors usually sorted out. Both punchcard machines and electronics scan the card or mylar inside the machines, several rows down below what is visible to the knitter at eye level on the exterior of the card or mylar slots, so markings on both need to be made accordingly. This is a fact that needs to be considered with cable downloads of the same patterns if entering memos for knit rows. In the case of punchcards, Brother reads 7 rows down, Studio 5. In fabrics other than transfer lace adjusting for the brand is straightforward ie to knit fair isle, tuck, or slip pattern if using a Studio company-supplied punchcard repeat, simply start the Studio card on row 3. If punching your own, design rows match, and if the blank card is marked for Brother, the numbering is accurate by default. Brother transfer lace cards begin with pattern selection, Studio brand with 2 knit rows. In this repeat, a mesh repeat is created first moving to the left, then to the right, the 2 knit rows follow 2 LC passes for transfers to the left, and 4 LC passes for transfers to the right. Brother row one marking is underlined with a blue line, Studio with red
 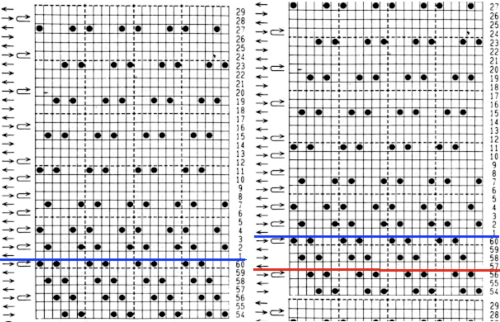 A Studio repeat adjusted for use on Brother also illustrates that the number of knit rows is only two, the LC passes can vary in number between knit rows. Here LC passes are marked with outlines around pertinent row numbers on the right
  Brother vs Studio: extra knit rows in Brother are not physically left as blank rows in cards, the rows for KC are still 2 blank ones, while in Studio cards there is a blank row for each knit row in the pattern. Both these samples have a 6-knit row sequence. Because Studio begins with 2 blank rows, in the repeat on the right only 4 rows are left blank at the top of the repeat.
 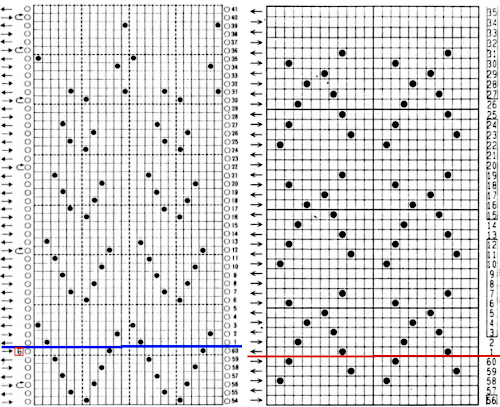 Adjusting for extra knit rows, Studio to Brother
 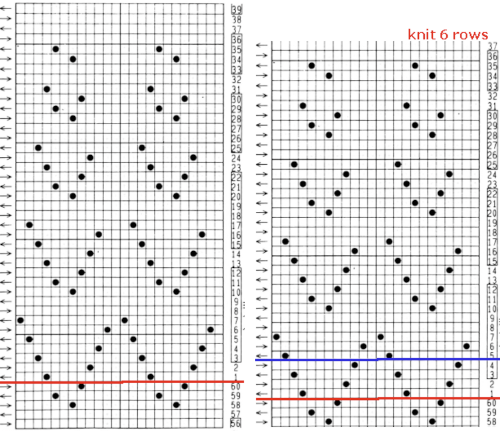 These samples are from Brother punchcard volume 4:
single blank rows between transfer segments 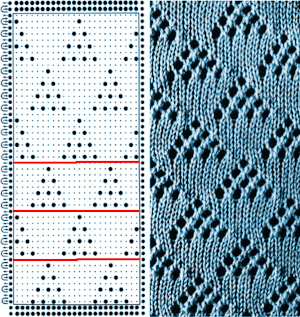 varying numbers of blank rows between repeat segments
![]() multiple rows of knitting (8) marked aside a single pair of blank rows
multiple rows of knitting (8) marked aside a single pair of blank rows 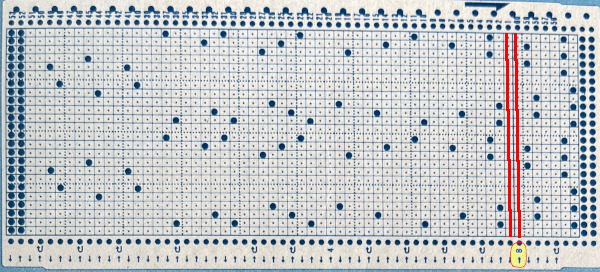 Some electronic examples using the 2-row spacing between transfer segments: this is a page directly from the Stitchworld electronic pattern book
 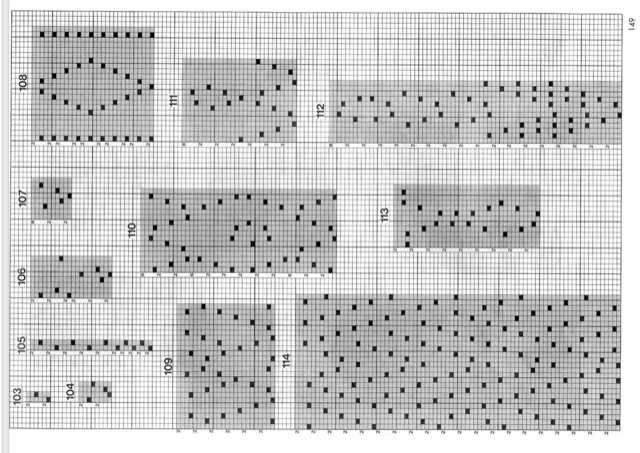 a pattern published on a full Brother mylar sheet
  this is from a studio mylar, the same holds true in terms of the number of empty rows between transfers,
 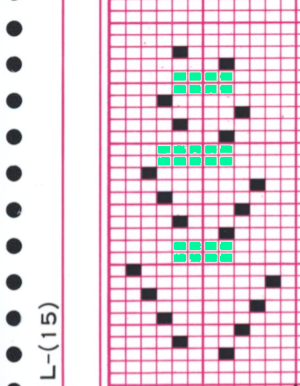 that is the reason why most transfer lace patterns unless they are designed as studio simple lace where transfers are made with each carriage pass, patterns may be exchanged between both brands, the only difference being studio starts with 2 blank rows, ends with transfer markings, Brother starts with transfer markings, ends with 2 blank rows.
Electronic repeats are interchangeable after taking that into account, but not mylar sheets between machines, the respective brand mylar readers differ in the number of rows below eye level where the electronic readers scan the design, and the set or starting line will be in a different spot.
Transfer lace may also be combined with other stitch types, each with its own considerations as in these instances both types of machines have the KC selecting needles as well. The punchcard published patterns need to be adjusted for use on electronic models. As already mentioned, punchcards do not advance with the first pass of the alternate carriage from the opposite side, while electronic models advance a row with each pass of both carriages:
adding KC slip stitch selection for creating ruffles and doilies
tuck stitch
weaving 1, weaving 2
fair isle
The lace module in Dak in theory will do the work for the knitter once the pattern is entered as symbols. Eyelets will be represented in single rows, a shorthand version of the previous samples. Reviewing how the transfers would appear on the knit and the purl side respectively. 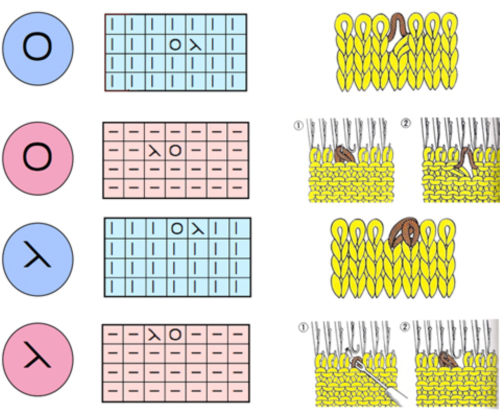
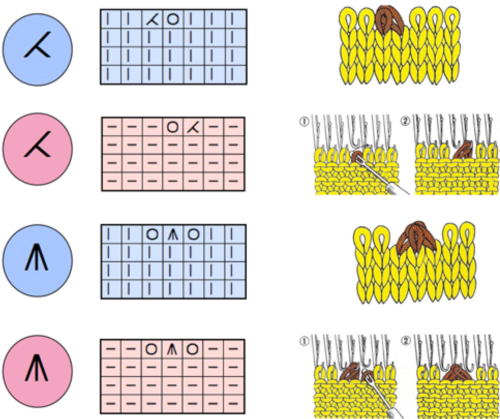
 The LC can move only one needle at a time, so when multiple needles need to move to place the eyelets properly, the options are to use a hand tool to perform the moves or to develop a pattern with multiple transfers in each segment of the final repeat. The full repeats are often very long.
Approaches for developing DIY design repeats:
2013/07/23/from-hand-knit-lace-chart-to-punchcard-1/
2013/07/24/from-lace-chart-to-punchcard-2/