I have posted previously on lace punchcards, their use, and traveling between machine models. There is extensive documentation in manuals and literature on the mechanics of their patterning. This series will attempt to follow my most recent post and to visually address the transitions from a charted repeat to a corresponding punchcard.
The illustrations may apply to machines that use two carriages for lace, Brother/KNitking, and some Toyota. other than simple lace on both Brother and Studio machines by altering the placement of the first selection row on the respective punchcards.
The sole function of the auxiliary lace carriage is to select and transfer stitches. The passes required to execute the transfers for one pattern row are known as a transfer sequence. Since the lace carriage is always set to read the card, every pass needs to be programmed in the card and electronic patterning.
Each time transfers are required it takes two or four passes (more for multiple transfer lace) to preselect the needles, transfer the stitches, and return to the left side. One pattern row on the chart will need expansion (akin to a color separation) into passes necessary to execute the transfers for each sequence. The lace carriage will always activate the card reader, so every pass must be reflected on the card. This accounts for the familiar arrow markings on the left of factory pre-punched lace cards. Selection, positioning, and return passes are blank rows on cards, resulting in no needles being selected. No selection rows may serve as a reminder to switch carriages. It is best to begin with simple charts to sort out the process. For punchcard machines, the stitch repeat must be a factor of/divisible evenly into 24. Color-coding eyelets for left and right transfers may help. In multiple transfer lace, two or more adjacent stitches are transferred to the right or to the left, creating an eyelet group. On the knit side the group will lean away from the eyelet. The lace carriage is not capable of multiple transfers at one time, so each stitch in a group will require a separate pass. Within each group, the lace carriage must transfer the stitch farthest away from the eyelets first.
Some simple transfers, graph markings on left, expanded for punching on right
 the symbols key for this post
  a multiple transfer stitch charted for machine knitting
  location for holes, and directions for lace carriage transfers on the next row
 ![]() the punched card and associated actions
the punched card and associated actions  going wider, and combining different size motifs
  the expanded version
  An alternative way of working: colors are chosen for horizontal lines on which holes for transfers are placed, in the direction indicated by the inspiration chart
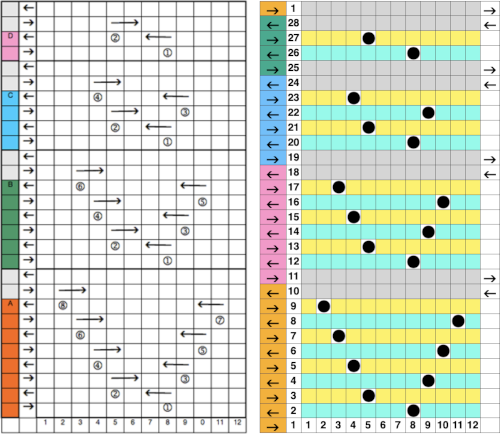 The equivalent mylar repeat
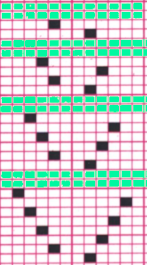
Sandy, thank you! I never understood HOW the lace carriage worked or even how to know which way it was going to transfer.
So the symbol (dot in the circle) that corresponds to hole punched in card – that is the pass that just pulls the needles out and the next pass transfers the stitch? I’ll have to go play!