The main difference between the 2 stitch types is that in tuck stitch the strand of yarn on the non-selected needle is held in the hook of the needle forming a loop,  while in slip stitch the strand of yarn bypasses the non-selected needles as the row is knit, forming floats between stitches
  Symbols commonly used for both
![]() In both instances the stitch on non-selected needles when the pattern begins (blue row in photo) is held in that needle hook, growing in length until that same needle is selected, and with the next row of knitting (red) one returns to the standard knit stitch formation.
In both instances the stitch on non-selected needles when the pattern begins (blue row in photo) is held in that needle hook, growing in length until that same needle is selected, and with the next row of knitting (red) one returns to the standard knit stitch formation.
Both distort the fabric, the tuck stitch widens and shortens it, while the slip stitch narrows and also shortens it. Both are capable of producing textured, interesting fabrics on only one or on both sides of the knit depending on the pattern’s design repeats. Which side is chosen as the public side is simply a matter of preference. In accessories and clothing, the interplay and “reversible” effects can provide added interest.
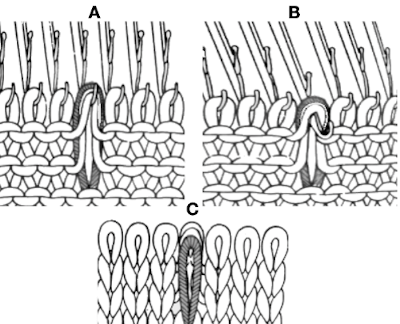
Because in tuck knitting the stitches are being held and gathered, more rows will be required to produce the desired length in pieces. Because the knit gets stretched sideways fewer stitches will be required to achieve the wanted width, making it suitable where larger garment pieces are planned. Looking at the stitch in a 2D diagram: A– loops are created for 2 rows, the original stitch is shown elongated. Each patterning needle hook now holds 3 yarn ends. B– the needle coming forward prior to the next pass whether by card reader selection or by hand, will knit on the next carriage pass to the opposite side. C– the originally held stitch as it might appear on the knit side
 The group of loops as they knit together then forms small lumps/ bumps, or what I think of as “butterflies”.
The capacity of the needle hooks in terms of the number of loops they can hold and the quality and thickness of the yarn used place quick limitations of the number of rows one may use for tuck patterning. The Passap system tolerates many more such rows than the Japanese model machines, where the limit is often 4 rows. Slip-stitch is far more flexible in terms of applied “rules”.
Brother controls for patterning in any model are by the selection of cam buttons that offer directional arrows on the carriage 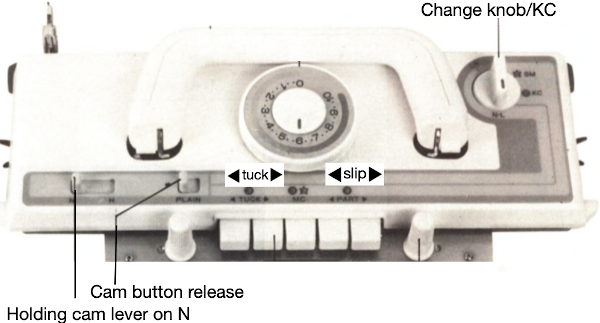 Some of the options:
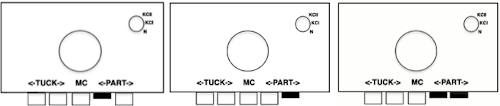
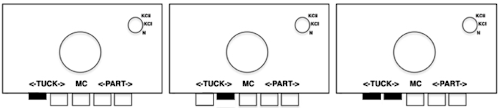 and not often used, but worth exploring, the use of opposing tuck and slip buttons at the same time.
  As with any knitting, for needle selection to occur the knit carriage (also known as KC) needs to engage the belt using the change knob set to KC. End needle selection or not depends on the goal fabric. If KC is in use but no cam buttons are pushed in, there will be needle selection, but the fabric produced will remain stocking stitch.
Any tuck cards may be used in the slip setting, but the reverse is not true.
Functions are in the directions of the arrows. For example, if a left button is pushed in, the next carriage pass will form loops or skipped stitches while traveling from right to left on the non preselected needles, and knit stitches on all needles on the return pass to the right, aside from any preselection being present. If both buttons are pushed in, the knit will form loops or skipped stitches with each carriage pass on non selected needles until those needle positions are pre-selected again, and then the stitches held in the hooks of the needles will knit with the next carriage pass.
It is possible to create the stitch structure on any machine, including manually by pulling selective needles out to hold for X number of rows. Motifs may be short or long, all over or isolated, can be arranged vertically, horizontally, diagonally, in diamond, basketweave, and plaid effects, may be combined with the use of stitches on the opposite bed, and with needles out of work (OOW) on either or both beds.
Punchcards are restricted to a maximum of 24 stitches or factors of 24 in the width of the repeats and require a minimum of 36 rows if they are to be used in continuous patterning. In electronics, the basic rules should be followed, but a single small repeat is enough to program, the size of large non-repetitive ones is limited only by machine memory and mode of download.
Both fabrics like to be weighted evenly, and several rows of waste yarn should be used at the start of the piece prior to testing patterns. Because it will be wide or narrow and short, that is a consideration if the plan is to combine several types of stitches in the same garment. Gauge swatches should be larger than usual.
Boiling things down to black and white: in both tuck and slip automatic patterning, selected needles produce knit stitches. Punchcard knitters are required to punch a hole for every knit stitch, leaving only areas that will be forming the tuck loops or skip stitch floats blank on the card. In a published chart for the stitch is used, black squares may be used to represent knit stitches and rows, white ones the tuck or slip stitch locations. It is up to the user to determine whether if using a published source, color reversing the repeat in electronics, or punching out the all-white areas as opposed to black is required. In single bed stitch formation, if one knits with two or more empty needles in work side by side, it will quickly become evident stitches will not form properly on those needles without additional steps being taken. This remains true in tuck knitting, but not in slip stitches. Though there are some exceptions, the usual rule is to have no more than one unit in any row without a punched hole or black square/pixel on either side of it. Punchcard pattern books are a great source of “safe” repeats. Electronic users need to isolate and draw a minimum of one repeat, which may be quite small. If duplicating a whole card with fewer unpunched holes than punched ones, only the white squares need to be drawn as black, and later the repeat is color reversed. Punchcard patterns usually have two rows of all punched holes at the top and bottom of the card that will rest on the first and last 2 rows of the design repeat respectively, allowing for the card to roll continuously in its reader. Cards also need a recommended minimum of 36 rows. Brother #1 mark on the right is 7 rows up from the bottom, while the card reader is reading design row one inside the machine, out of view. Cards from other KM manufacturers may be used, but the starting row may differ, as was also true back in mylar days. Punchcard machines produce the pattern as drawn on the purl side. Some electronic models or download programs vary, and may require the pattern to be flipped horizontally.
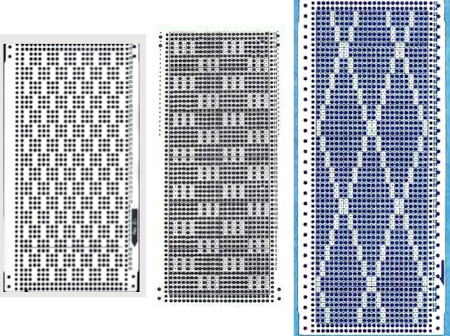
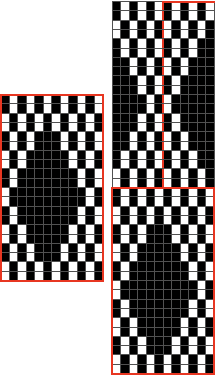
An easy way to start becoming familiar with the knit structure of stitches is to begin by working with “safe” design repeats, using a familiar yarn in a light color. Depending on the punchcard machine model year, the card on the left (1) was a standard Brother issue, the one on the right (2) not always. Both may be used to test all cam buttons and stitch types, card one tolerates elongation well, card 2 may meet some resistance with tuck stitch if the yarn is thicker than the needle hooks will contain easily. 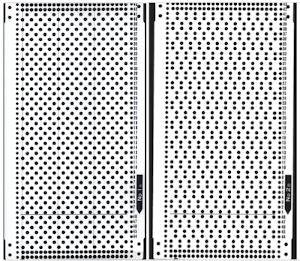 Converting the cards to black and white pixels: the small single repeats for each card are highlighted with a red border. Depending on the method for programming the electronic machine, however, the single repeat may have to be repeated horizontally to match the number of stitches to be used in the piece. The third repeat is a hybrid of the previous 2, the start of making what is published more personal
 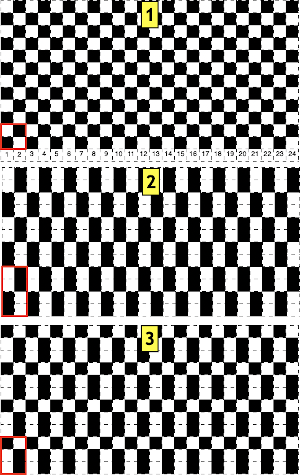 Studying published sources makes it easier to design more personal repeats. Cards that are “safe to use” can get one started in examining the texture and developing an understanding of how stitches are formed. They are often composed of variations of either card 1 or card 2 with added black areas. Using punchcards supplied in the packs with respective machine models appropriately can easily be done
 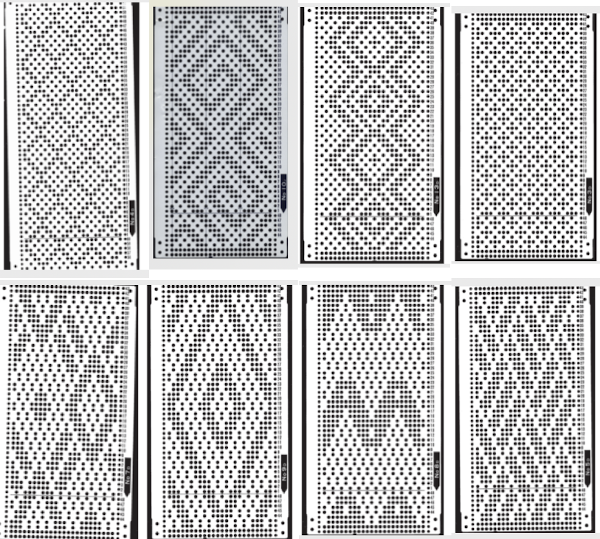 Additional published cards are also easily found increasing the number of tucked rows and observing the rule of knit stitches on both sides of the single unpunched squares resulting in no preselection. Below, some of the single repeats are outlined in red. With additional rows now tucking, the added insurance of having them knit off properly at regular intervals is achieved by all punched (or black squares) single rows, highlighted with orange squares on their left. The black border isolates the actual patterning rows in the designs. Again, the top and bottom pairs of all punched rows are not part of the overall design but are necessary for the punchcard machines to line up patterning for knitting a continuous design
 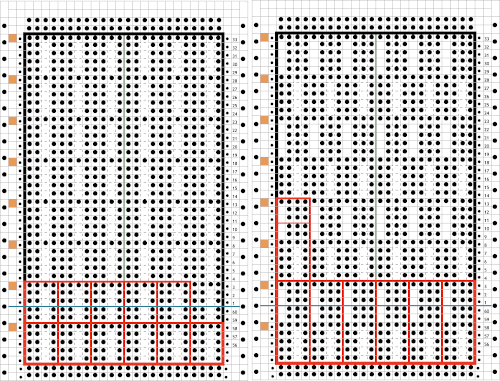 The blank vertical areas may be arranged moving across the repeat’s canvas in a variety of ways. In this chart the tuck symbol is evident, some of the knit stitches around each tuck series are highlighted at the bottom of the chart in green, the single electronic possible repeat is 4 sts by 12 rows
 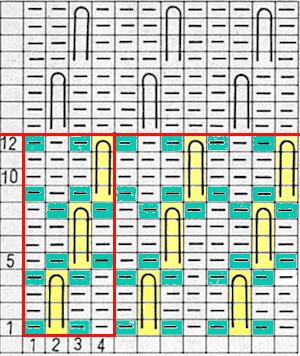 What may be confusing when symbols and charts such as the above are encountered is that the very first row of the symbol actually rests on the spot where the knit stitch that is being held for the next 3 rows rests, so design row 1, 5, 9, 13, etc are actually all knitted. The punchcard minus the all punched rows at its top and bottom:
 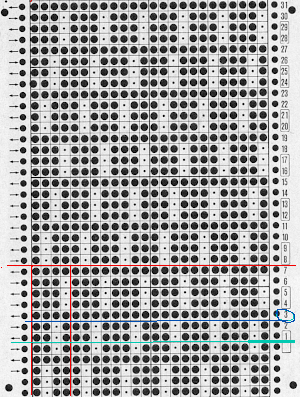 The factory-supplied blank cards may have arrows on the left, familiar in lace card designs. In the above case, the implied use is that the card start in the locked position on row 1 with the carriage on the right, preselecting to the left. If only a single color is to be used starting side does not matter. If regular color changes are recommended, more often than arrows dots, or color numbers are used in that column to indicate color change locations. In Brother machines, the first preselection row may be made from either left to right or right to left, depending on the fabric being created. With the exception of dbj using the KRC button or patterns that expressly specify the starting side, most patterns using the color changer will need a start from the right. Here if that is done, color changes could occur every 4, 8, or 12 rows using 2 or even 3 color sequences.
There is another issue to note. Counting up design rows from the bottom the card is marked row 1 five rows up. This is a Studio punchcard. If using it on a Brother machine, the starting row would actually occur with the card locked on row 3, color change row markings if given, would have to be altered accordingly.
The distribution of tuck stitches can occur in groups, or more sparsely. The card on the right begins to break the rules with 2 needles tucking side by side for 3 rows. Those areas create floats akin to those created by slip stitches as the side-by-side loops drop off the needles in those areas rather than knitting off together. As areas of white become less balanced, punchcard knitters may find it easier to mark the tuck bars and punch all else, electronic knitters draw the white as black, and color reverse.
 Few tuck stitches amidst lots of plain knitting are likely to not distort the fabric very much or produce a noticeable texture. The fabric will lie fairly flat, and approach a width proportionately closer to that of stocking stitch using the same yarn. The outlines can serve as markers for the introduction of additional hand techniques ie tying objects or beads in the center of the shapes after knitting and prior to felting in order to obtain surface bubbles of non felted stitches, or marking areas for duplicate-stitch or other embellishments.
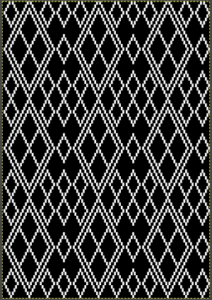
In some instances, thread lace repeats can provide DIY inspiration. With the color reversed, the structure for possible tuck can be observed and determined if suitable. In the bottom right image, those white solid lines are the easiest edit, shown in progress  With the basic structure recognized, weaving punchcards may be suitable, not all need be color reversed.
 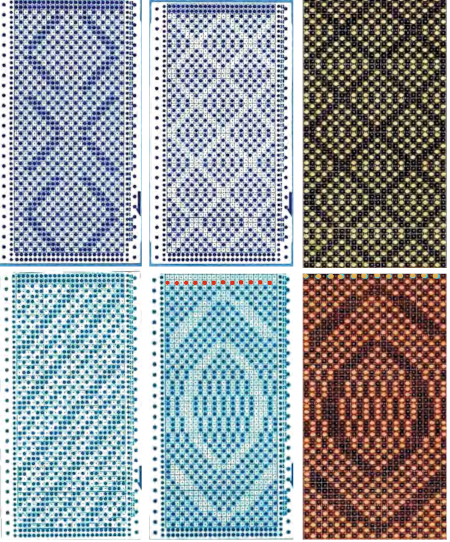 Electronic repeats may also be used directly or adapted for use on punchcard machines, providing the repeat unit is a factor of or up to a maximum of 24 stitches in width, which translates to 2,4,6,8,12, and 24, and repeated to the recommended minimum of 36 rows in height. For tuck stitch, those narrow vertical bars surrounded by black squares are the common factor. The StitchWorld pattern book charts require only matching a usable width for use in punchcard models since the knit stitches are shown as black squares. Here is a random selection
 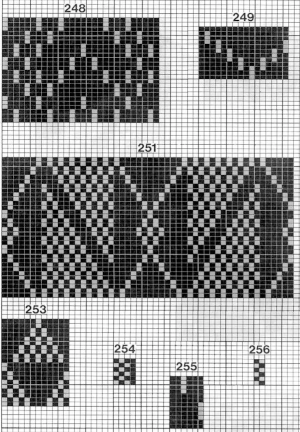 253 translates easily to this, it would need to be punched twice
 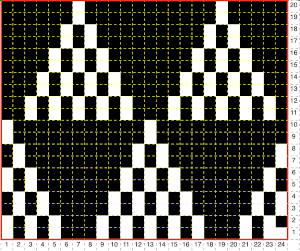 251 is a bit more problematic. Half the repeat is wider than 24 stitches. Here it is readjusted to 24 stitches, the height is 32 rows which may just barely squeak by punched only once
 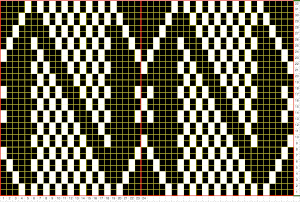 the repeat is tiled to check proper alignments
  This repeat is from a Studio mylar sheet. It also may be used in punchcard machines after removing 2 columns, since only half the repeat is necessary, and it is 26 stitches in width. The color reverse option is necessary. In electronic machines, it is easily accomplished with a command or the flip of a switch/ push of a button. The white squares as given would produce loops on all the corresponding needles, with no stitch formation in those areas.
 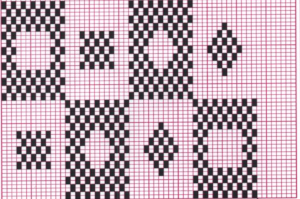 I chose to eliminate 2 columns from the blocks on the left. Tiling shows the amended repeat’s appearance, with the color reversed image for actual knitting to its the right.
  Repeats with a balanced number of black and white squares provide all-over textures in fairly balanced fabrics. As the number of black squares on a field of speckled tuck stitches grows, the knit shapes may actually poke out from the surface of the knit, since those areas are not gathered in the same way as their surroundings. Yarn properties and tension also have an effect.
Design with very few black vertical single stitch “bars” are commonly found in patterns published for electronics, often also too large for use on punchcard models. As with lace, where there are few black pixels on large fields of white, caution in trimming the image is necessary. Tiling once again helps one locate possible errors. An example of such an image tagged as being 42X62: 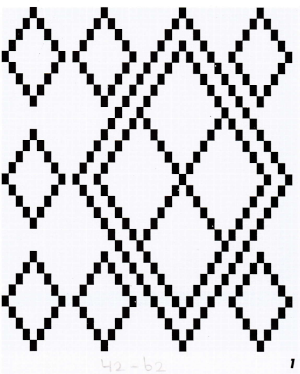
![]() tiled 42X62
tiled 42X62 adjusting to avoid those 4 rows tucking consecutively, now 42X60
![]()
 Designing your own can begin with the choice of a template, such as this one, 24 stitches by 36 rows.
 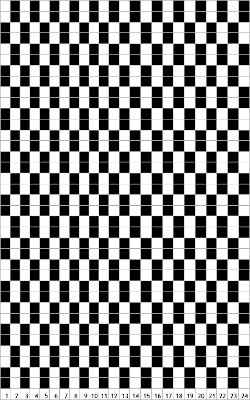 To begin with, I added a rectangle to the full template repeat on the left. To its right, the size of the rectangle then begins to be altered along with the addition of some all knit rows. The center illustrates making certain the 4 stitch repeat aligns properly at the top and bottom of the new repeat. The test final repeat image is on the right.
 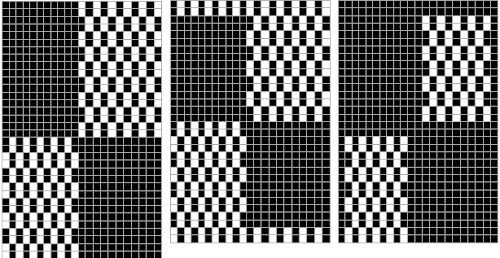 Working with a different shape, using copy and paste to place it, adding a brick variation on the right, for punchcard full repeats of 24X40
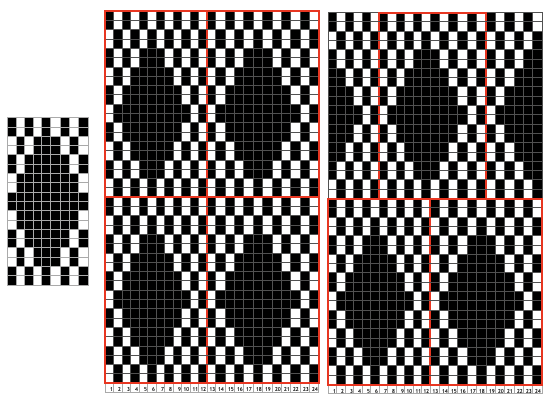
![]()
![]() The matching electronic repeats for both, unless your download requires programming for the total number of needles in use:
The matching electronic repeats for both, unless your download requires programming for the total number of needles in use:
 Testing tuck stitch limits, breaking the side by side white square rule in all over patterning with moving blocks of 2 by 2 blank squares
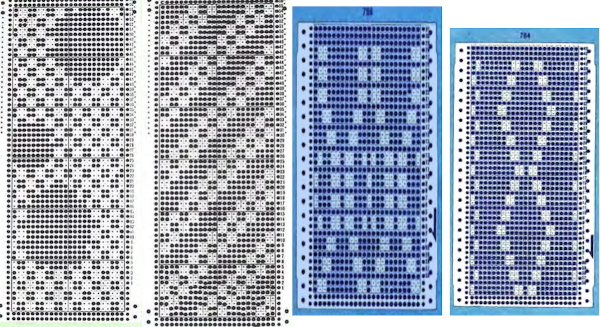
A collection of previous posts
When more than one stitch tucks
Tuck stitch meets thread lace repeats and vice versa
Tuck lace trims (and fabrics) 2
“Crochet” meets machine knitting techniques: tuck lace trims (and fabrics 1)
Tuck and slip color striping
For those who enjoy hand techniques/slip-stitch
A no longer “mystery pattern”
A hand-knit consult
Thank you for this very thought provoking study of tuck and slip. The possibilities seem quite endless, and there is so much room for exploration and innovation. Great primer!