I have always found 2 or more color patterned brioche stitches executed in hand knitting as inspiring and complex challenges to admire, but have not been tempted to actually attempt to execute them in any way.
I have not knit on a Studio KM in more than a decade, have been asked whether this fabric is possible to produce on Studio/Knitmaster. The crucial difference between the 2 brands (Passap has its own universe) is the fact that Studio selects and knits with each pass. Needle pre-selection for clues as described here is not an option. Some Studio information from manuals on tuck knitting including settings for “English rib and Double English rib”: tuck on Studio km.
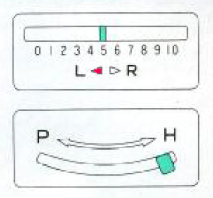
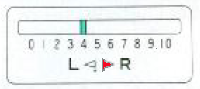
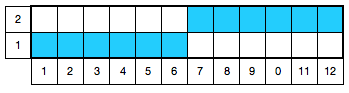
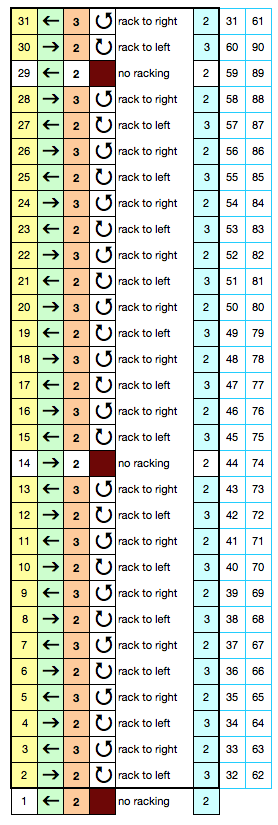
This was my first Brother machine knit swatch result: 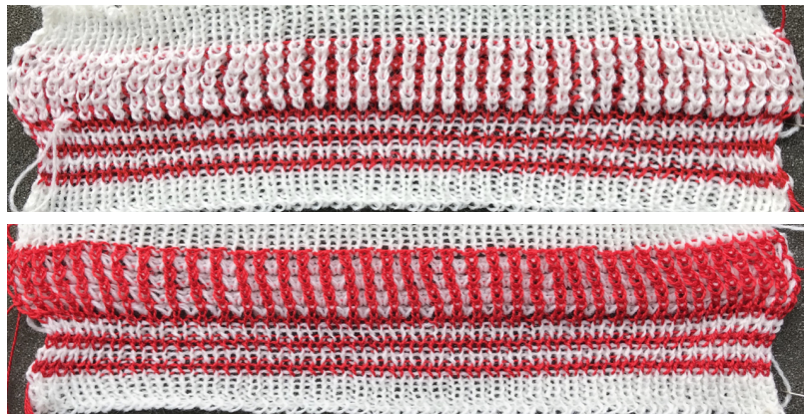 Each of the 2 colors tucks for 2 rows and in turn, knits for 2 rows alternately. Settings are changed manually as shown below after every 2 rows knit, following each color change on the left.
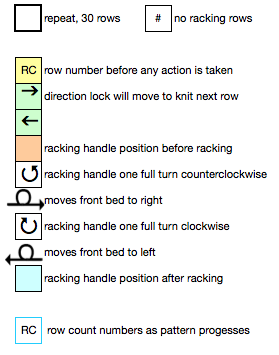
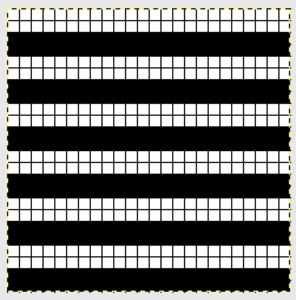
 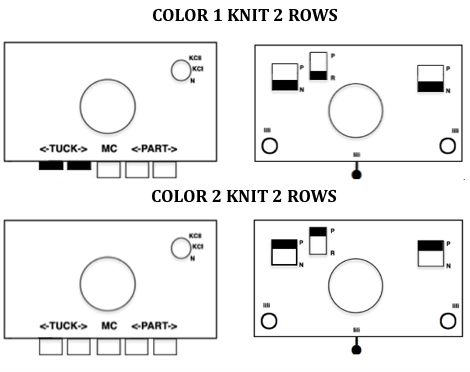 Making things a little easier: the top bed may be programmed on any machine, including punchcard models to avoid cam button changes in the knit carriage every 2 rows. With the main bed set to tuck <– —> throughout, black squares will knit for 2 rows, white squares will tuck, also for 2 rows. The first preselection row is toward the color changer. When no needles are selected on the top bed (white squares) the top bed will tuck every needle, the ribber is set to knit.
 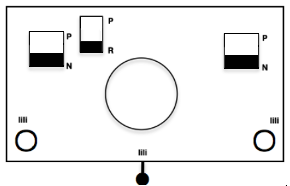 When needles are selected on the top bed (black squares), the ribber is set to tuck in both directions. The ribber will tuck on every needle.
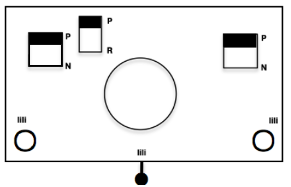
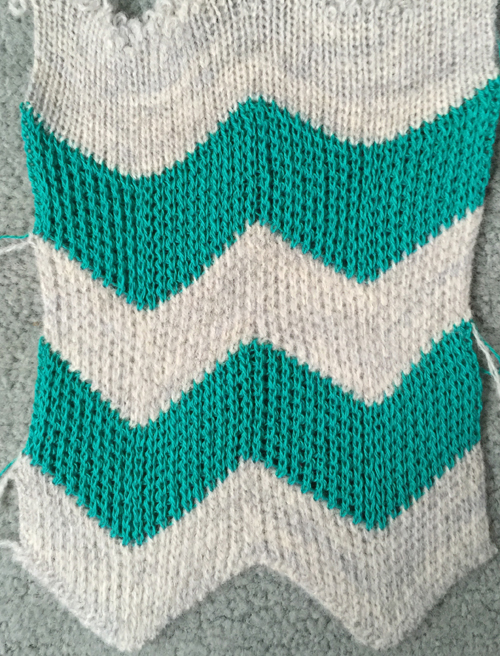
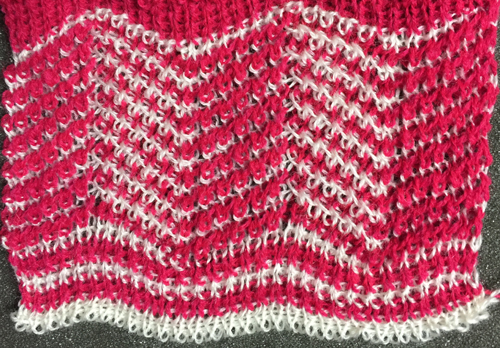
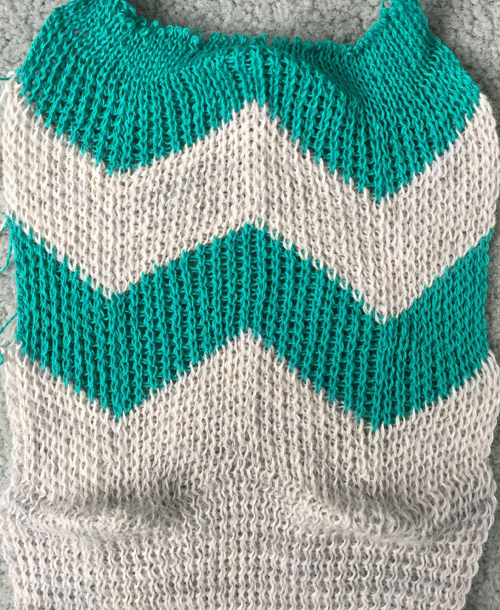
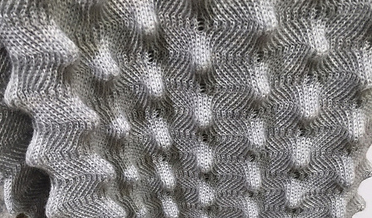
![]() Proof of concept: blue yarn is used on rows where main bed needles are selected (black squares). The crossed stitches at the top right begin to represent an effort to create surface shapes or designs on the fabric. They are created by crossing stitches 1X1, making certain the stitch creating the “shape” is carried to the front side of the fabric, the opposite stitch crossed so it is facing the knitter.
Proof of concept: blue yarn is used on rows where main bed needles are selected (black squares). The crossed stitches at the top right begin to represent an effort to create surface shapes or designs on the fabric. They are created by crossing stitches 1X1, making certain the stitch creating the “shape” is carried to the front side of the fabric, the opposite stitch crossed so it is facing the knitter.  I used KCI in this instance, the first needle on left in work on the ribber bed, last needle on right in work on the top bed. A border is created on the knit’s edges on the far right and left. The reverse side of the fabric:
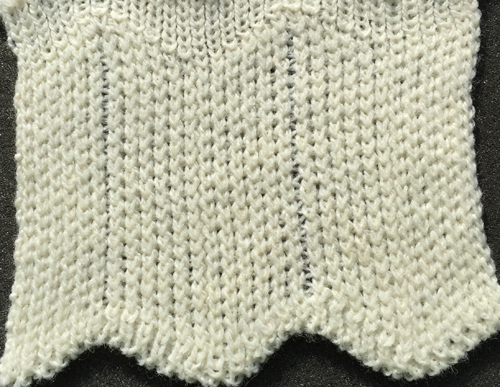
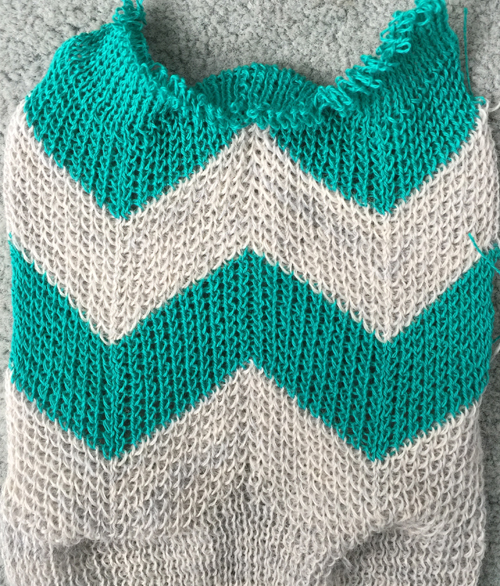
 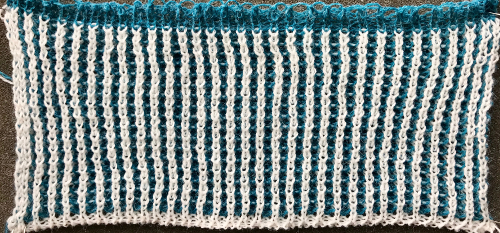 Using a blank square on a knit row to help track 1X1 crossing patterns
 ![]()
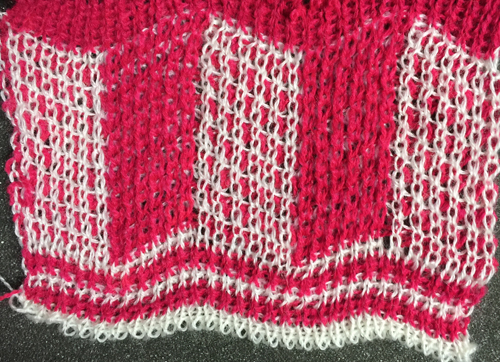
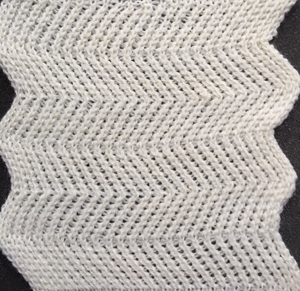
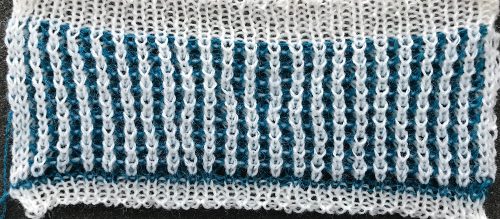
![]() Working the 24 stitch repeat using KCI; both first and last needles in work on the ribber bed. Due to operator error and forgetting to change ribber settings after a transfer row, I chose to stop knitting rather than attempt a pattern correction
Working the 24 stitch repeat using KCI; both first and last needles in work on the ribber bed. Due to operator error and forgetting to change ribber settings after a transfer row, I chose to stop knitting rather than attempt a pattern correction 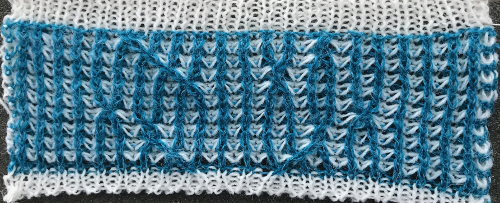
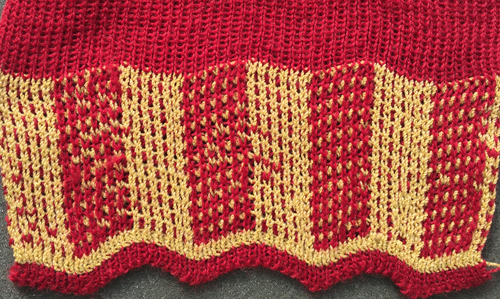
 Another attempt at cabling, 1X1 and 2X2. That white line in the bottom image on the right was caused by the color changer picking up and knitting both colors for part of the row before I noticed it. I got rid of the “wrong” color from the feeder and continued on. The wider 2X2 cables require “special handling” and eyelets are formed on columns aside from them after transfers are made.
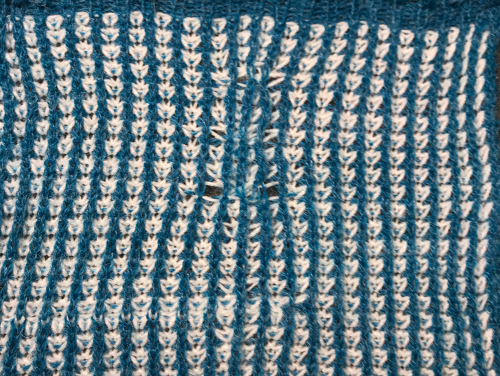
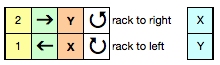
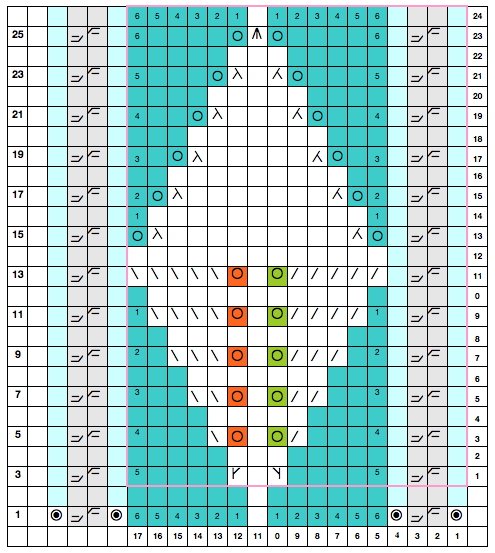
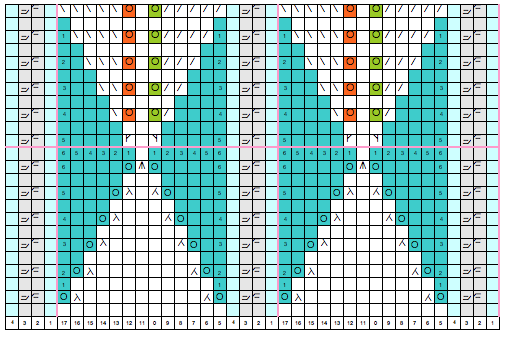
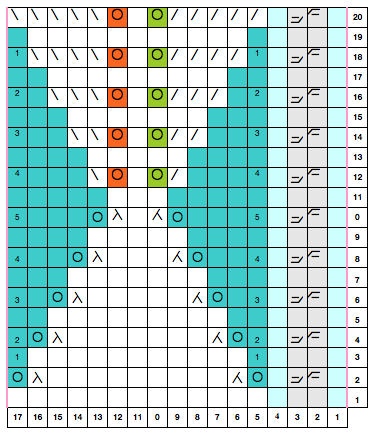
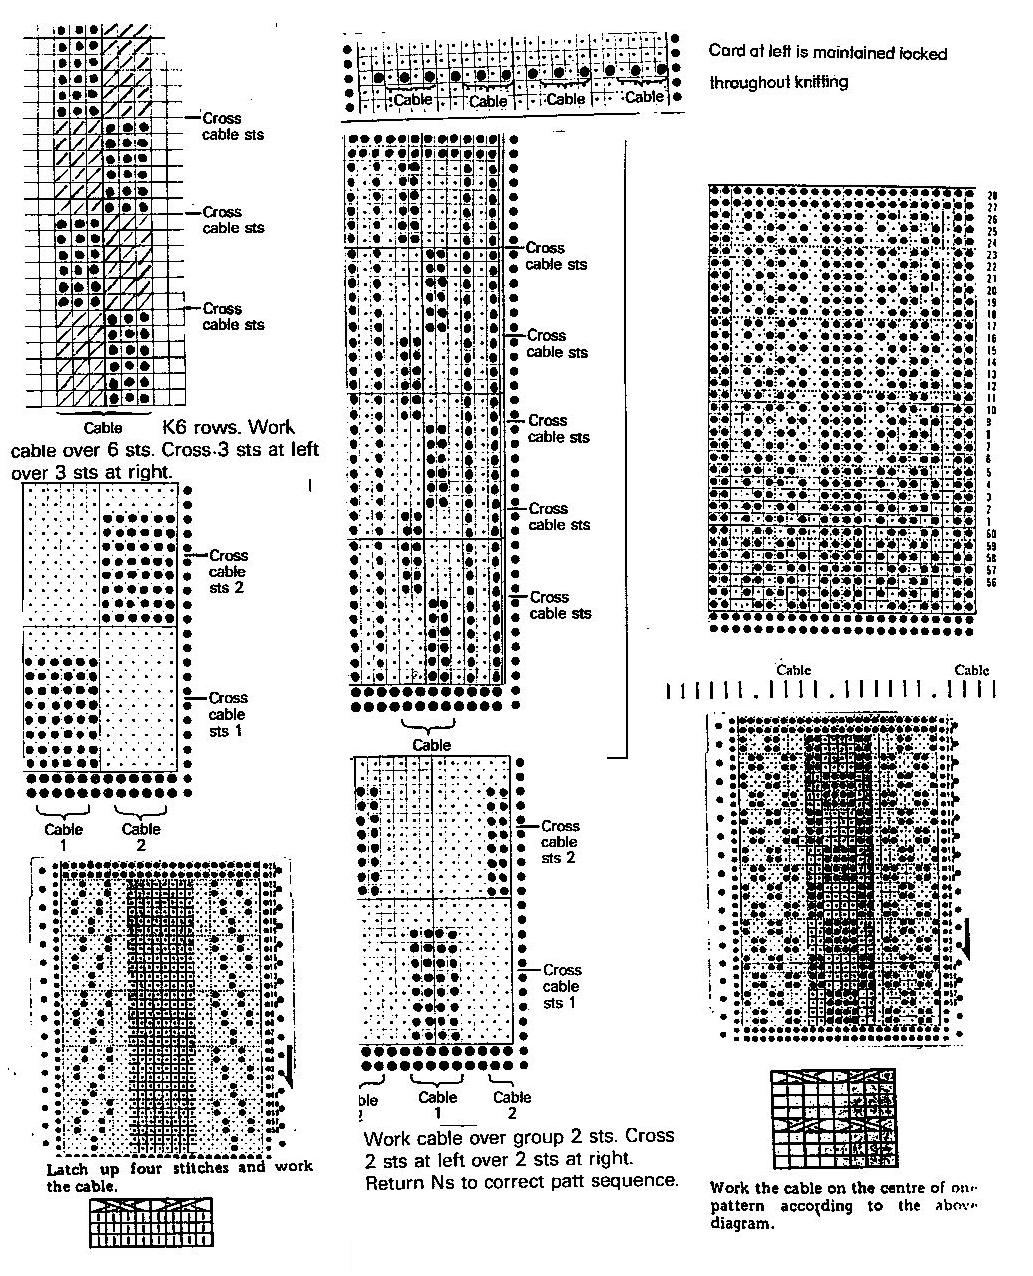
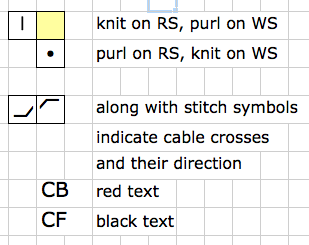
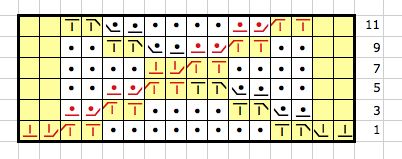
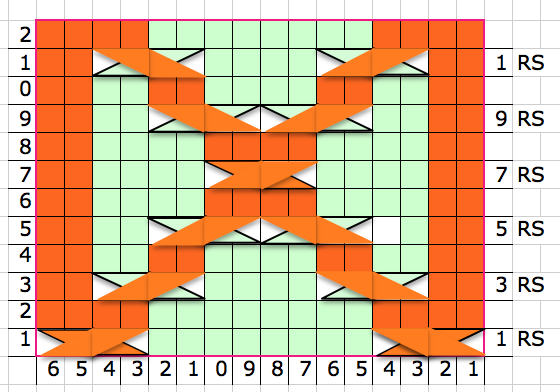
 In 2022 I wrote a series of posts on visualizing cables including using the charts to anticipate ribber work and using custom printed needle tapes to facilitate the process. This chart illustrates cable crossings, which can be made in either direction. My own cables were made with the #4 stitch moving in front and over the #2 stitch. Keep in mind when direction matters, crosses will be mirrored on the knit side.
This particular repeat when used in 2 color brioche will move the cable stitches across a center vertical line in the same color as the stitches being crossed
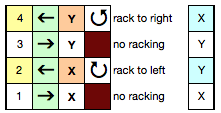
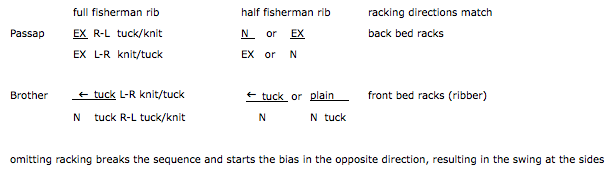
 For knitting using only one color, the machine is set with the main bed tucking on every needle in one direction, followed by knitting on every needle as it returns to the starting side, the ribber does the same but in the opposite direction. It is a circular tuck, also referred to as fisherman’s rib. The possible cam setting options:
 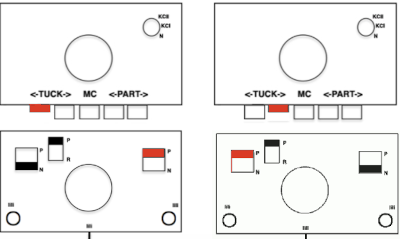 The cable crossings are made on an all knit row, following tape markings and always on needles marked in the chart.
Knitting the pattern in 2 colors requires ribber setting changes as described at the top of the post, and the first preselection row is made toward the color changer.
Knit rows are created after every needle is preselected, which happens for 2 consecutive rows. After the first row is knit, push back to B needles with stitches involved in the cable pattern,  cross the specific ones, push any/ all needles B position needles out to E, and the second all knit row will be completed with the return of the carriages to the left.
Tension adjustments will likely be needed with every needle tucking on each bed for 2 rows. I had a loop hung up on a gate peg that was not noticed, which can be seen as a snag toward the bottom of the colored swatch segment. After the fact repairs in these stitches can be hard if even possible.
The concept swatch has varied test spacing between crossings.
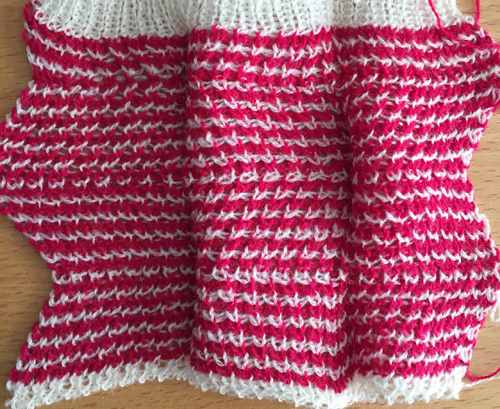
Again, note that with this method crossings occur over a center column in the same color, not the contrast as in previous swatches. 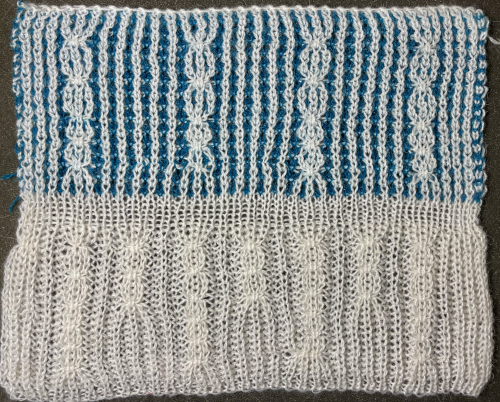 Plaiting is sometimes suggested as a way to imitate color changes in fisherman-rib. In this particular fabric, the result was quite muddy on both sides.
 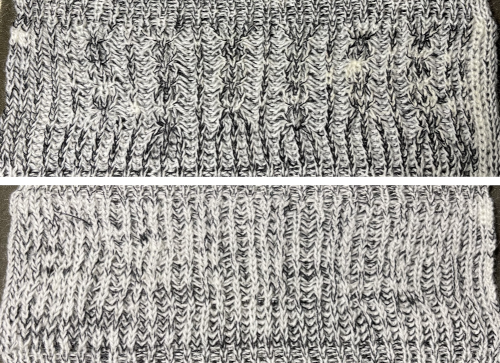 The situation is different when working on single bed vertically striped fair isle designs. One of my ancient machine-knit demo FI swatches:
  On any knitting machine with every other punched hole, or electronic with black squares, or pixels locked on a single row, if the pattern is knit in FI, continuous columns of vertical color are created.
 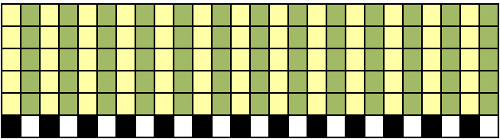 If the goal is creating the continuous and unbroken vertical stripe 2 color pattern single bed, one must place like color on like color.
Because FI is essentially a slip stitch the fabric, it will have less stretch and is narrower and shorter than when knitting either yarn in stocking stitch.
Cables on the machine need to be transferred across fixed widths between needles, so there are distinct limits as to how far stitches will allow their movement in groups in either direction. Loosening the tension can often help. Sometimes it is possible to create extra slack by a variety of means, making moving the stitches easier.
I have found my own limit for this fabric was working with a 2X2 cross (it is possible to work moving single needles as well).
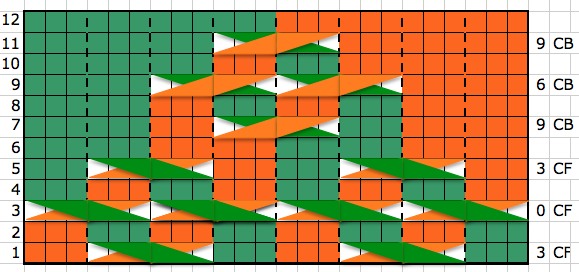
Adding to the complexity of single bed: proper needle selection for the next row knit needs to be restored prior to knitting it when using the FI setting, movement of stitches is mirrored on the knit side in the opposite direction of that viewed on the purl. Visualizing some possibilities as worked on the purl side 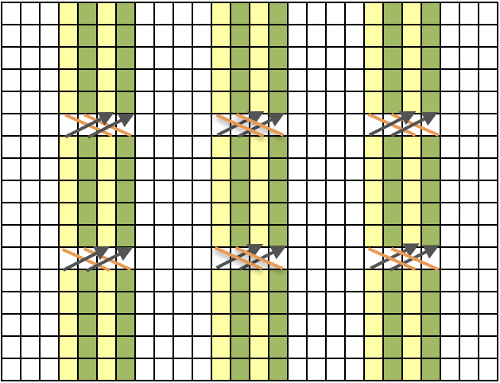 to consider the knit side appearance mirroring is not enough
 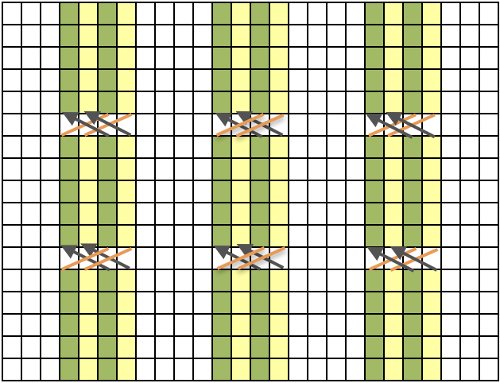 the direction and appearance of the crossed stitches on the knit surface are reversed from that on the purl as well
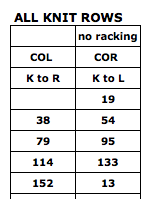
 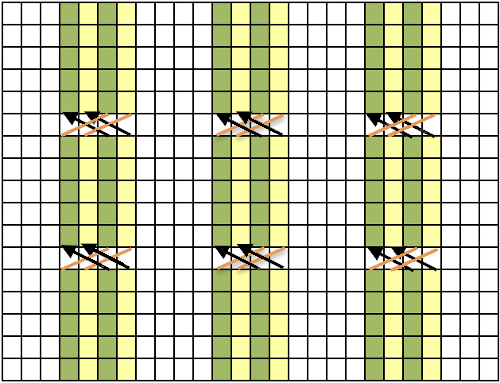 When working every needle rib it will take 4 rows of knitting with 2 color changes to produce the striping on a single row. R represents stitches on the ribber, K the stitches on the knit bed
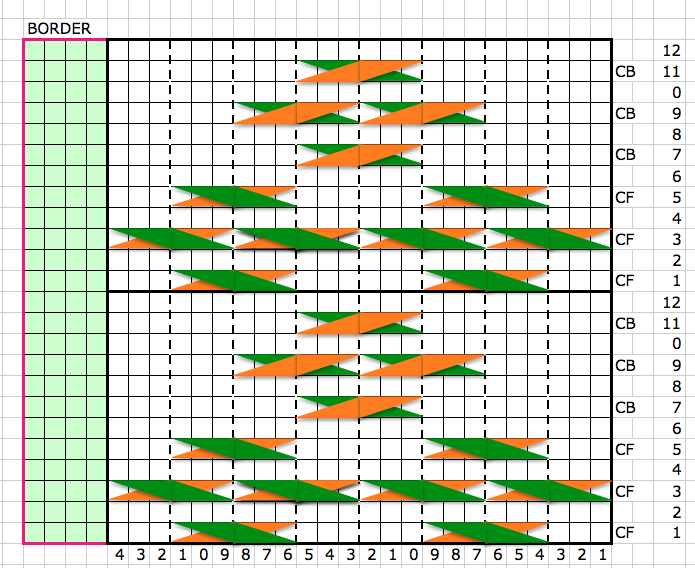
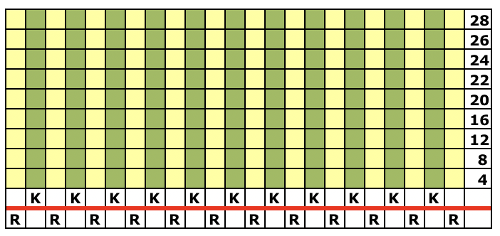 This shows an instance where crossing the numbered stitches on the main bed with color changes every 2 rows, by default, lines up the same color on the same color. Stitches in the same color are formed in the in-between needles on the opposite bed.
Another way of looking at the 1X1 crossings on the top bed behind a single central fixed stitch on the ribber. 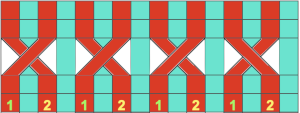 The fabrics may be tested and knit in single colors as well.
  When working on the 2 color brioche crossings are made on a row where all stitches are the same color; 1X1 cables when made in this case, are forced apart by the tucked stitches between them on the opposite bed, in the alternate color, implied here by the white line
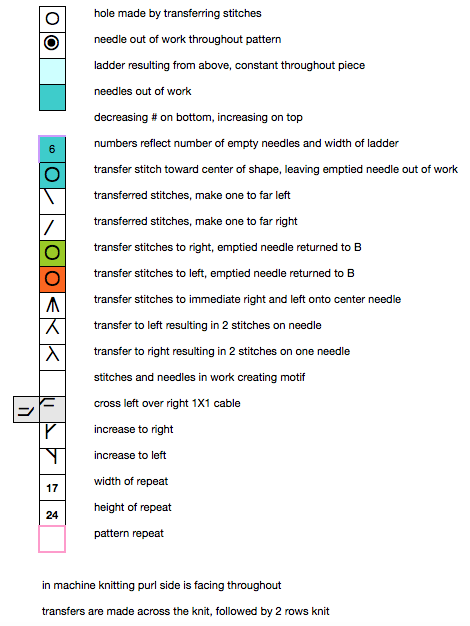
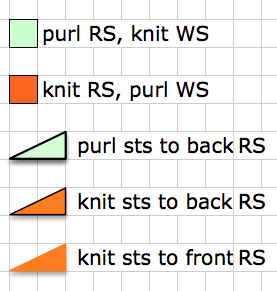
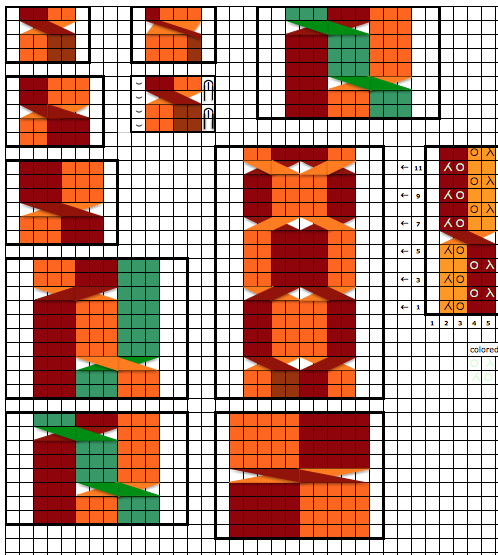
 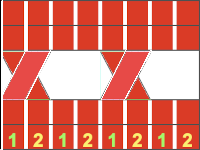 Tuck stitches widen the fabric. As a result, the tucked knitting in this chart on the ribber (represented by the color yellow), forces the space between the knit stitches produced on the main bed (represented by the color green) apart, while stitches tucked on the ribber will create the gap between the stitches knit on the ribber, appearing on the reverse side of the fabric. The combinations create the appearance of single stitch vertical stripes.
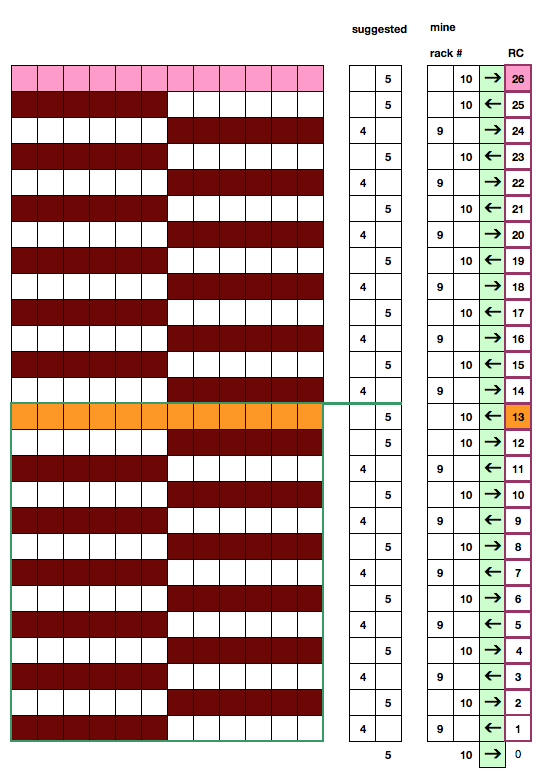
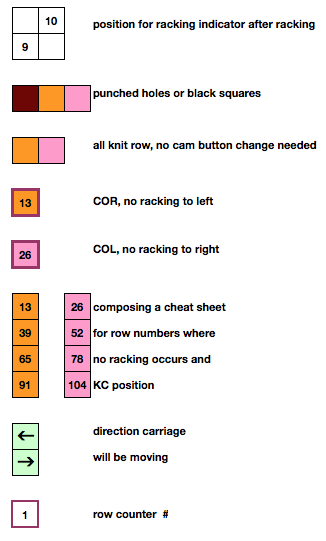
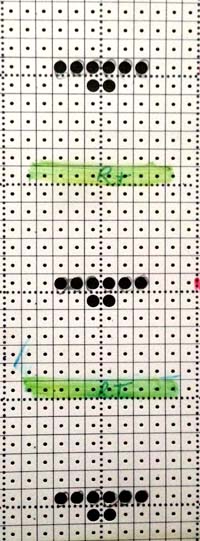
This is an illustration of one possibility for programming reminders for tracking the location of cable crossings 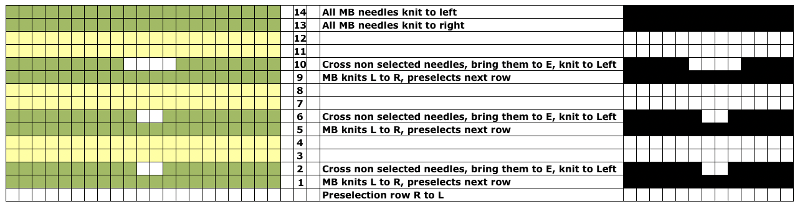 Every needle ribs are generally knit at tighter tensions than when the same yarn is knit single bed. Too loose a tension in any tuck fabric causes problems with loops forming or knitting off properly, too tight will produce stitches that do not knit off properly. One limitation of crossing stitches here is the actual stitch size, which needs to be constrained to produce the fabric. Tiny stitches need to travel across fixed space. One by one crossing is manageable, 2 by 2 requires extra slack to make the transfers possible.
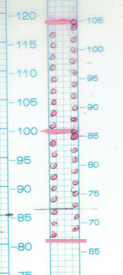
Adding some “give” to crossed stitches
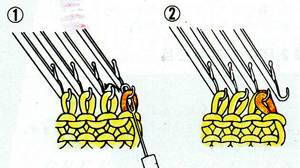
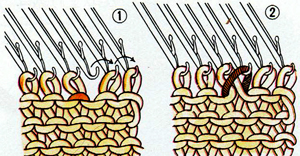
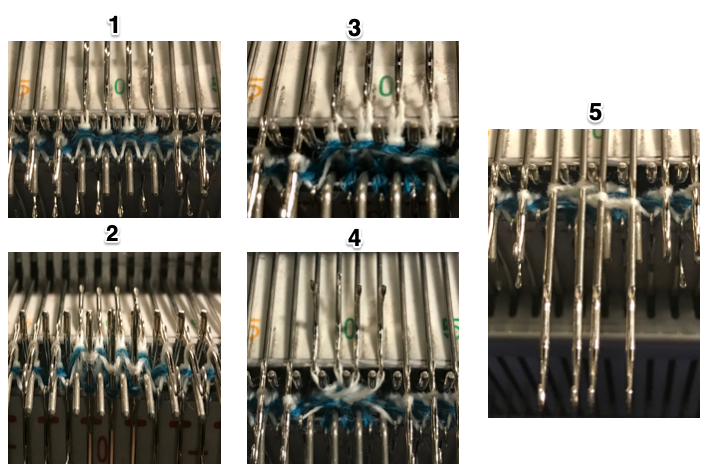
1: the carriage has moved from left to right after the color change. All needles except for the four white squares in my design were preselected prior to the next row of knitting. The carriage now stays on the right
2: take note of the white tuck loops formed on the ribber on the previous pass from left to right
3: white tuck loops ( I chose center 3) are lifted up and off their respective needles and allowed to drop between the beds. This will allow the 4 white cable crossing stitches to have more slack.
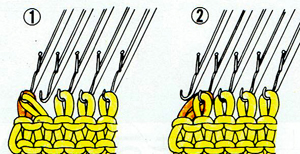
4: cross your cable in the intended direction
5: push cable stitch needles out to E
Knit from right to left, change color, continue in pattern
With some planning on longer pattern repeats it is possible to plan added clues to tracking rows on which the cables occur and their location on the needle bed. Repeats with very few marked areas merit testing in tile as any other repeat.
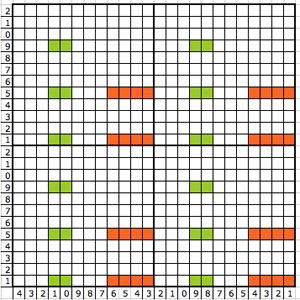
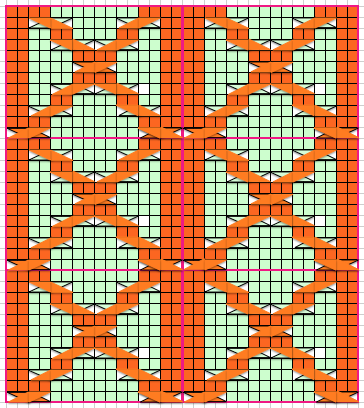
 The charted repeat on the left below when tiled shows the area of a patterning error, on the right with the missing blank rows added the problem is shown to be resolved, the repeat is now 24 X 84.
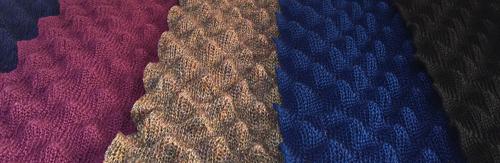
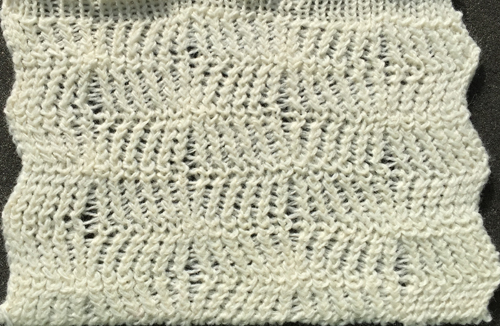
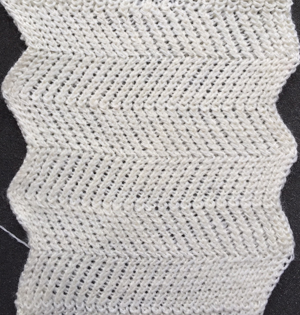
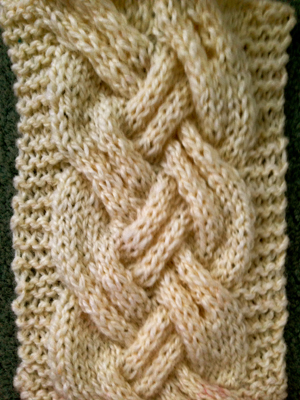
![]() A proof of concept swatch:
A proof of concept swatch: 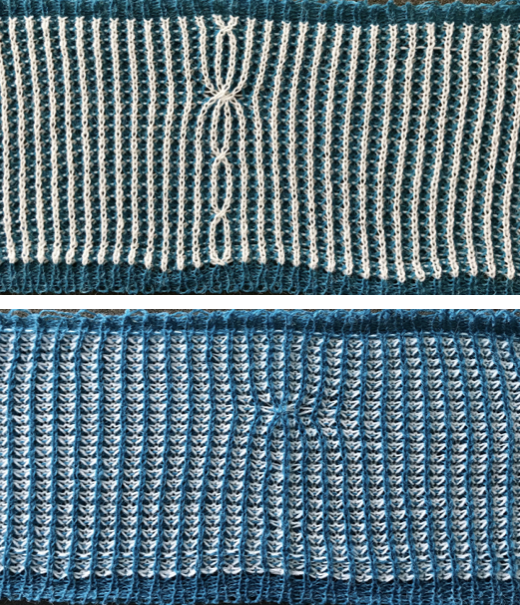 Planning for all over the brick layout of corrected repeat:
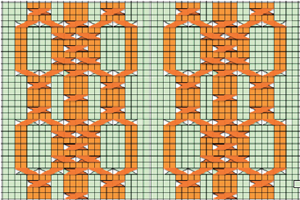
 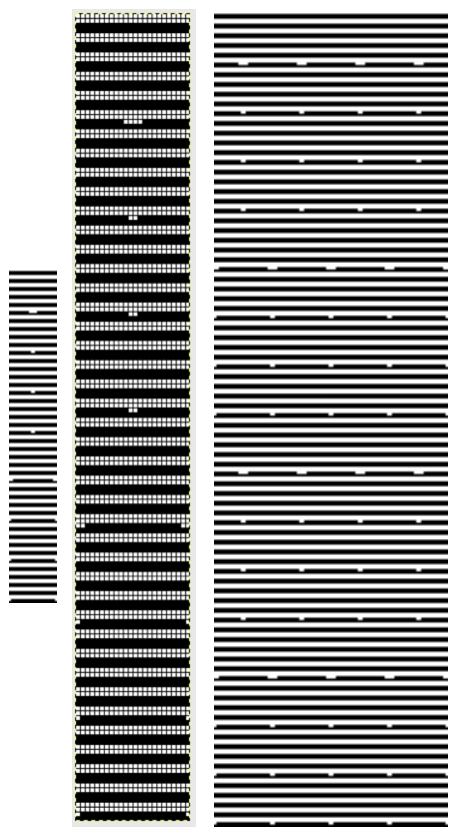 The tiled repeat .png, 96 X 336, the single 24 X 168.
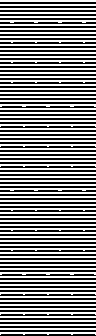
![]() More detailed charts of the 2 repeats, suitable for punchcard machines. Ayab knitters need to repeat the final motif across the width of the download in order to match the number of pixels to the number of stitches in use across the needle bed, using the single setting.
More detailed charts of the 2 repeats, suitable for punchcard machines. Ayab knitters need to repeat the final motif across the width of the download in order to match the number of pixels to the number of stitches in use across the needle bed, using the single setting.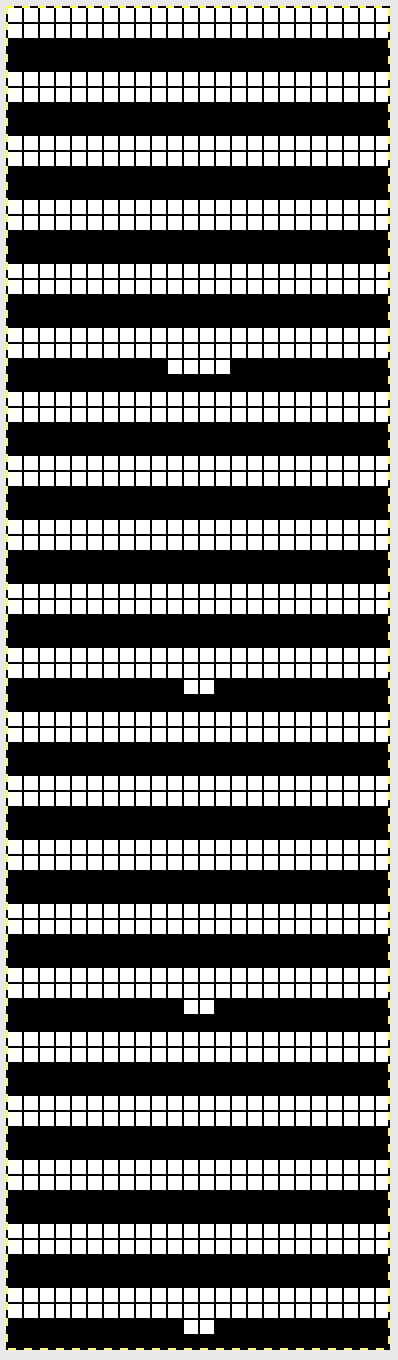
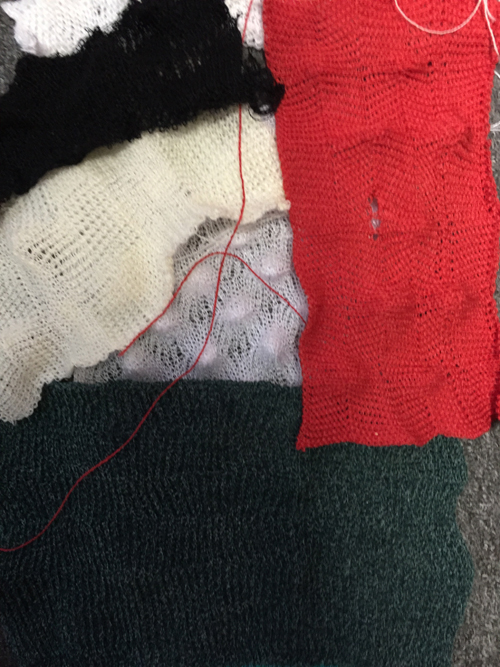
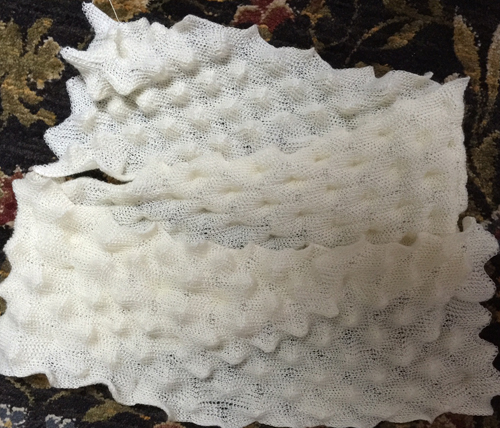
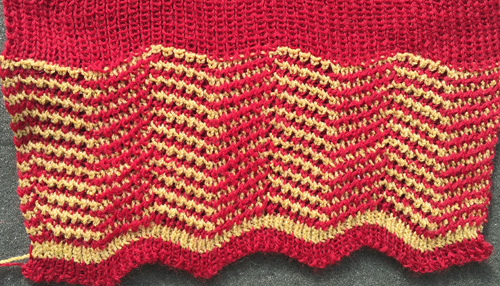
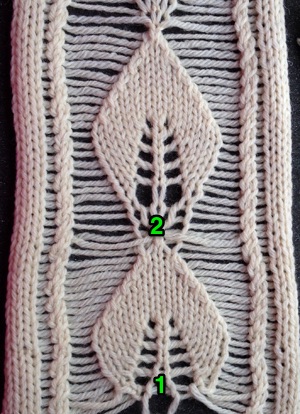
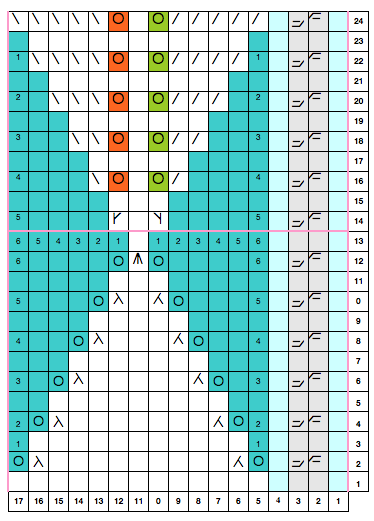
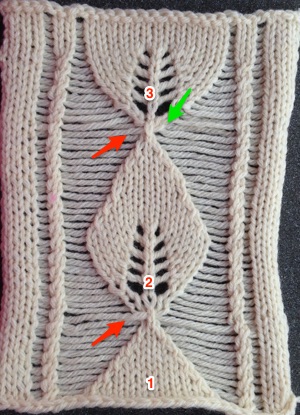
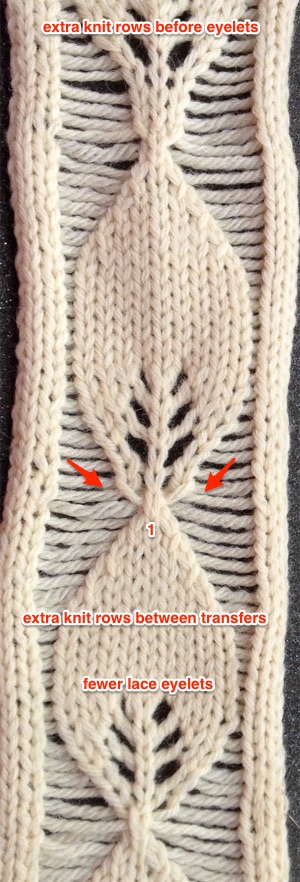
 Adding complexity, there is the possibility of lace transfers meeting fisherman rib
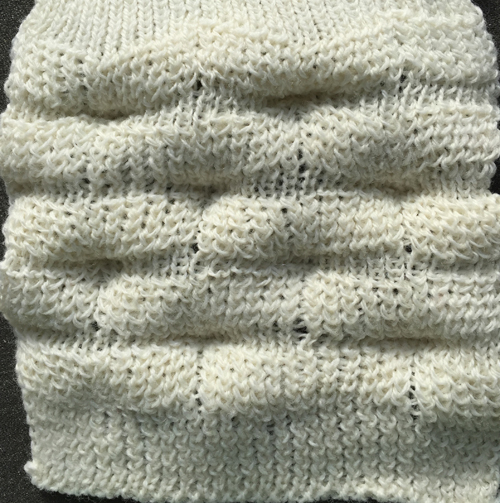
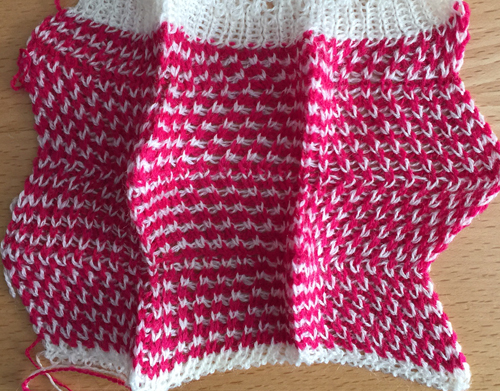
 and a plaited swatch attempting to avoid color changes every 2 rows, the technique is not a personal favorite
 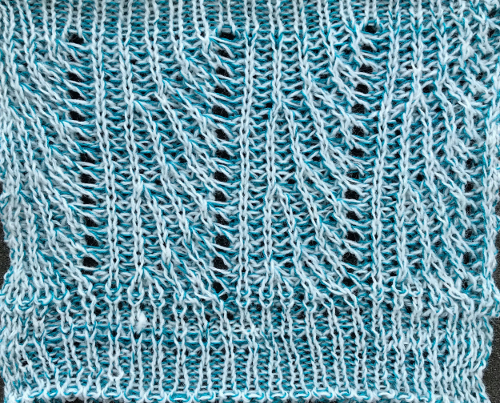 Other related fabrics may be found in posts:
Geometric shapes on ribber fabrics with tuck stitches 1
Geometric shapes on ribber fabrics with tuck stitches 2; knitting with 4 carriages
Geometric shapes on ribber fabrics with tuck stitches 3