Machine knitting cables: single bed, 1

In hand knitting complex cable crossings are often worked on the same, knit side of the fabric, making them a bit easier to visualize and track. Knit and purl combinations in surfaces on either side abound.
In machine knitting, one is always facing the purl side. When attempting to duplicate a hand-knit pattern and the direction of the cables crossings in the machine-knit need to be reversed as seen in an illustration from an earlier post on  machine knit symbols

cable350

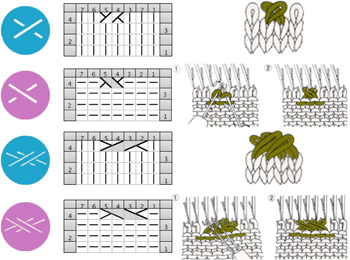
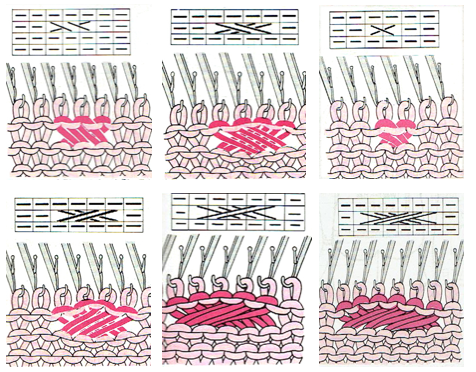
Common representations in MK pubs take into consideration that the purl side is always facing the machine knitter for single-bed crossings:

KCcrosses

Crossings of more than 3 over 3 stitches become difficult on home knitting machines unless special techniques are brought into play.
Methods and suggestions vary, depending on the source.
The least satisfactory one is to knit the whole row prior to the cable crossings at a looser tension. If there is plain knitting between crossings, the change in stitch size across that particular work may be quite noticeable. “All over” cabled fabric will be obviously narrower than plain knit, a feature that may be used in garment shaping to gather the resulting fabric in selective areas ie cuffs, or waistlines above peplums.
Generally, a looser tension will be required than when using the same yarn in stocking stitch knitting.

To start testing the best number of rows knit between crosses, it is a good idea, to begin with at least the same number of rows as the total number of stitches involved in the cross ie. 4 rows for a 2 X 2 cable, 6 for a 3 X 3.

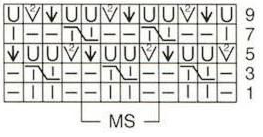
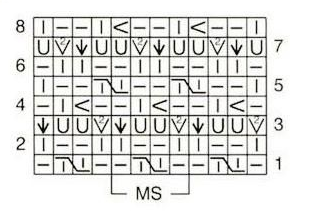
Ladders created by leaving needles OOW may be used as markers for vertical rows of cables. They may in turn be left as created or latched up in segments or at the end of knitting to create purl (or other) stitches on both sides of the cables on the fabric’s knit side. An alternative method for latching up illustrated below, produces tuck stitches in ladder spaces

tuck_latch_up

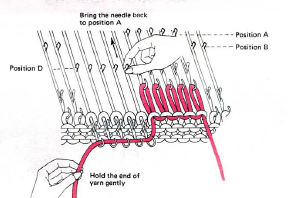
Working the knit on the single bed, extra yarn for a bit more “give” may be created by dropping one stitch on either side of the 2 groups to be crossed. The dropped stitches may be latched up after each cross and will appear as purl stitches on the knit side, or left unraveled for open vertical space on cable sides. Bringing needles with crossed stitches all the way forward out to the hold/ E position helps them knit off more easily and visually check if indeed all stitches have been placed on the alternate group of needles.

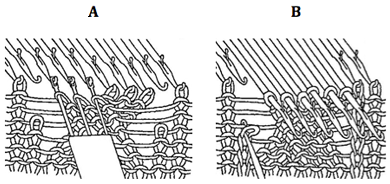
A: crossing stitches, B: latching up the ladder

cross and latch 2

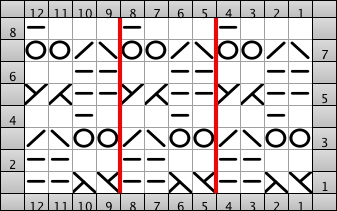
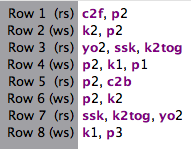
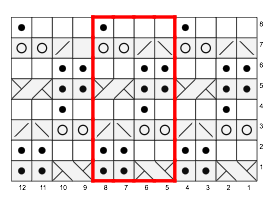
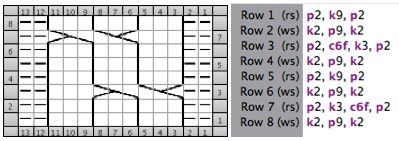
Sometimes the cable configuration may be changed for a similar look to render crossings easier ie. using a 5-stitch cable crossing 2 and 3 stitches respectively,  may be substituted for a 6-stitch one. A larger number of crossings may be broken down into smaller groups ie in this 9-stitch cable modification. The chart below is for hand knitting, created in Intwined, with their accompanying directions. Not all publications or software approach HK and symbols and charts in the same manner, requiring varying degrees of study and interpretation in how to either follow or adapt them.

intwined combo

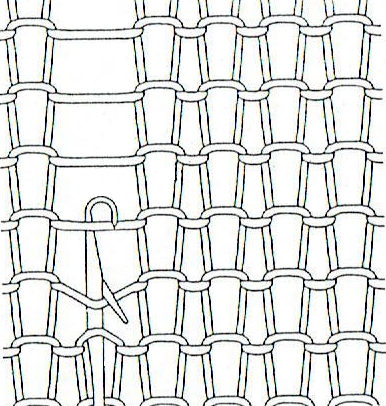
Creating longer stitches to facilitate moving them for cable crosses may be done on any one row by using additional strands of yarn and knitting involved stitches back to the A position, creating elongated stitches. If slightly shorter lengths are needed, cardboard or another spacer may be placed against the rear rail to keep loops even size while pulling yarn back. In the “old” days of MK seminars, a favorite such spacer was made from cutting segments of extra (narrow) strips from window venetian blinds. Bringing needles back into work requires a bit of care and at least a claw weight, to keep long stitches formed from bouncing off the needles. The larger cross can then be executed and made easier if one has adjustable 7-prong tools. After the cross, the larger stitch size may be adjusted slightly by pulling cautiously on the long end of the yarn. The Brother knitting techniques book is available for free download on more than one site, here is one option. It is a very good resource apart from any standard manuals. Creating the longer stitches is described and seen in the illustration below, found on pp 68-69 of the book. Also shown there: how to carry up the yarn rather than cutting it after each cross,  thus avoiding extra ends that later require weaving in

screenshot_13

Larger groups of stitches may be cabled by using holding to shape each section, then removing each of them off the respective needle groups, and crossing them as wanted.

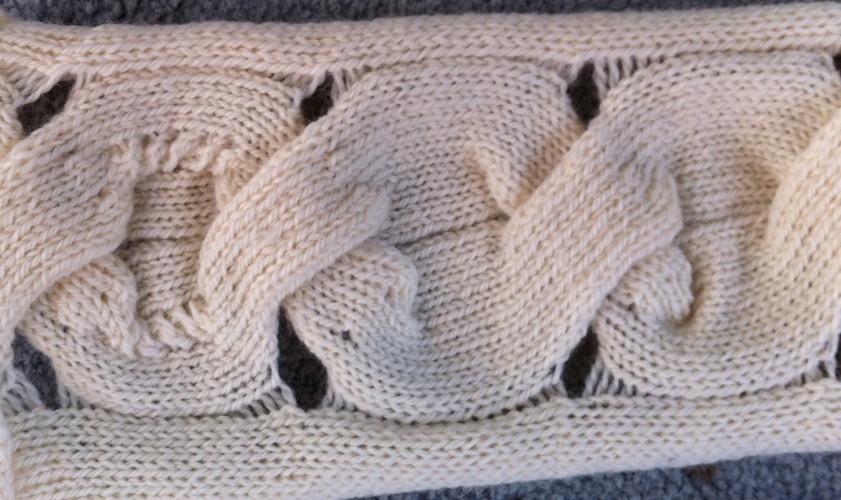
As an experiment: for a single, long crossing strip, I found 7 stitches to be pretty much my maximum manageable width, with tension adjustments. The number was chosen with the intent of using two 7-prong transfer tools to hold and move the stitch groups.

The process: working over a group of 14 stitches for a 7 X 7 crossing.

COR: Set your carriage for holding. I had a needle out of work on either side to make tracking easier.

On the side opposite the carriage bring all beyond the 14 cable sts to hold, and knit one row.

Now pull all the needles out to work except for those involved in the cable. Knit 3 rows across the 14 stitches.

Bring 7  stitches opposite the carriage to hold. Knit an odd number of rows on them (7 in my sample). Yarn will be resting on top of some of the needles that have been on hold, watch that it remains free as you move stitches.

Cross the long strip with the group of 7 stitches towards the front of the fabric, the rest toward its back / the purl side facing you.

Bring the cable group’s 14 stitches and the remaining ones on the side opposite the carriage into work, knit one row, there will still be stitches being held on the carriage side.

All stitches in work: knit desired even number of rows, ending with carriage on the same side as at the start of the process, and repeat the process for crossings to continue in same the same direction.

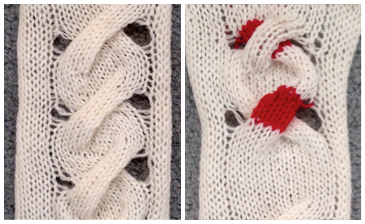
Each cable group may also be knit in individual strip forms and then crossed. At least one of the group pairs needs to be knit with a separate strand of yarn. Some experimentation on the number of rows knit, etc., and attention paid not trapping the yarn in the wrong place when crosses are made is required. Both methods are fiddly, but manageable after repeats are sorted out. My sample is knit in acrylic, which flattens considerably with steaming. On the left are crosses made with a single long strip, on the right, for illustration purposes, the red represents a second strand of yarn that I was able to keep continuous.

combo

To work cables with 2 separate strands of additional yarn, work each cross segment separately, then remove it on waste yarn, dropping it off the needles. Rehang each strip in the desired location, crossing as required in the pattern. Cut yarn ends may be woven in as plain knit rows between crosses are formed if the piece is one color. The experimental swatch below is from one of my much earlier posts on the topic. Though my examples here align in a straight vertical manner, this method allows for placement anywhere on the knit, in desired spacing, repeat, and cross formation.

br4

Large safety pins, hand-knitting stitch holders, and thin circular needles may be used as alternative tools to remove any strips of knitting and in turn, used to ease those stitches onto their new needle placement.

Using yarns that are not fragile or easily broken when tension is applied, and that have some amount of “give” at all, such as wool as opposed to cotton, also renders the process a bit more friendly. Yarns with “memory” such as wool will also retain dimensional qualities and spring back after any blocking.  There are no single best ways to achieve any specific machine knit fabrics; personal preferences and adjustments evolve with experience.

Please enter “cables” as a search topic on the left to visit my previously published related posts.

More on charting, foreign symbols, and cables

This topic has come up as part of previous posts. I recently reviewed links and thought I would re-group them a bit differently here, adding some new.  Please click on continue reading to have the list appear as active links if they do not immediately do so in your browser. The latest additions are at the post bottom.

http://www.stitchmastery.com

https://www.myfonts.com/fonts/adriprints/stitchin-knit/

https://www.softbyte.co.uk/designaknit.htm

http://www.envisioknit.com/features/

https://stitch-maps.com/about/key/

pixelated lettering

http://www.fontpalace.com/font-download/Notice+3+Std/

http://www.fonts2u.com/munro-small.font

http://www.fontspace.com/ten-by-twenty/munro

letters in knit stitches

http://www.fonts2u.com/knitfonta.font

http://www.fonts2u.com/knitfontb.font

http://www.fontspace.com/honey-and-death/knitfont

care labels

http://www.fontpalace.com/font-download/Notice+3+Std/

I have been trying to navigate Mac Numbers again, but in playing at my own latest charting with software after the Yosemite update, I find I am drifting back to using Excel once more as my primary “graph paper”. Charts published in foreign languages and magazines, and particularly those in Russian (where the same symbols appear to have different functions depending on the publisher) provide challenges in translating for using charts provided in hand or machine knitting.

Some sources from/for different countries that may help with interpretations:

http://www.knittingfool.com/Reference/KF_Symbols.aspx

http://www.garnstudio.com/glossary.php?langf=it&langt=en

Anna Burda magazine symbols PDF includes HK how-to illustrations:  ab2  2/1/15

 Verena chart from older pubs easily found on Pinterest

A partial volume of an out of print book on Japanese symbols 

4/24/15: Sconcho is a GUI for creating knitting charts that come with a built-in stitch library. A manual is available. Custom stitch symbols may be created in Inkscape to form personal vector shapes.  X11 may be required to run Inkscape on your computer as well, all are free.

6/14/2020 a free for iPhone and iPad app Knitting Chart  also includes crochet symbols


Knit charting in Mac Yosemite; visualizing knit cables

Some previous blog posts on topic

2013/01/03/chain-cable-hk-experiment/

2013/02/07/hand-to-machine-symbols-4-cables/

2014/07/07/a-bit-of-cables-and-lace-charting-hk-to-mk/

2012/01/28/a-few-to-try/

Updating to Yosemite has provided some interesting issues for me. The first was Safari pretty much becoming unusable. It took a Mac expert and a chunk of his time to resolve the issue. There are still hiccups in other apps. I thought I would revisit some of the methods I have mentioned as usable in knitting charting on Mac via a bit of discussion on cables and visualizing them.

Intwined began having issues in Macs with any custom-built stitch libraries in mid-year 2013. The last update offered and installed in September 2013 has continued to have some functionality issues in later Mac OS versions (Mavericks, and now Yosemite), stripped of any custom stitches built previously, not allowing for their addition. It has become only an occasional go-to for me now. Charts created in the program are easily recognizable.

Inkscape (recommended for creating icons for use in Intwined, a free vector program) will require XQuartz update for Yosemite. Their previous release allowed for its use in Mavericks.

http://xquartz.macosforge.org/landing/

http://xquartz.macosforge.org/trac/wiki/X112.7.8

http://sourceforge.net/projects/sconcho/ is an open-source, free charting software with built-in stitch libraries that may meet many of your charting needs in any OS version

Excel behaves as in the past (my version: Office 08)

Mac Number has once again deleted some familiar menu options, added new ones. My primary font for knit symbols is no longer available, and some of my accumulated knit symbols from other font sources continue to work on the mac, but are unsupported if using the iPad version of the program, where they appear as the original  keyboard strokes, rather than the assigned symbols

GIMP 2.8.4 (2.8.8 did not), HyperDither, appear functional as in past.

Tracking and visualizing custom cables outside the parameters of built-in libraries or fonts/symbols in alternative software, using Numbers 3.5: one of the problems that can be encountered in charting cables is that programs with built-in stitch libraries may not provide for cable crossings specific to your pattern. The charts below have not been proofed executable in a swatch at this point in time, are simply a way of exploring drawing methods, my working notes from some quick experiments, not a step by step tutorial. I have no way of confirming results in previous versions of the software or OS.

available “shapes”

To make them editable, click on the shape, go to format menu, highlight shapes and lines-> make editable. Click on the shape and in turn on the format symbol below in the image below, and windows become available for style and arrangement choices

The knit and purl symbols on the left of my first chart utilizing line with arrow shapes are standard ones. The right side uses a dot for purl stitches instead of a line, and that began to make the whole more readable to me. One drawback is “shapes” do not seem to respond to any copy and paste demands and I had to draw each individually. I preferred to place them outside my chart. Guidelines then appear to suit for easy resizing and the resulting edit may then be dragged and dropped into the appropriate location in the chart, readjusted as/if needed. Color palettes for drawing appear limited to the built-in shades; toggling between available colors may be accessed by clicking on the dots below the pen tool in the first illustration above.  In the chart, purple lines indicate stitches brought forward, yellow the stitches brought to back when working the cables. The number 10 in the left-hand column should be a one.

Cleaning up lines and adding color if needed may be done in Photoshop or GIMP; this makes forward stitches a bit clearer

bucket fill provides an added way to follow the movement of stitches

Utilizing the pen tool in shapes menu to draw custom cable crosses and filling them using the option within the numbers program moves toward an all color chart_ far quicker than using lines and bucket fills. The red segment indicates knit stitches traveling in the back for the cable cross

A lot of information is available on creating reversible cable fabrics using ribbed configurations. I thought I would play with knit/ purl blocks rather than vertical rib lines. The initial chart was begun in Intwined, with bucket tool filled in Photoshop to extend colors within cable crosses. The red border outlines the pattern repeats. Alternate right side rows are shown; all wrong side rows are worked as the stitches appear (knit stitches are knit, and purl stitches are purled). Here the cell colors happen to be reversed from their use in the above, the yellow is used for knit stitches, the green the purls. I opted to indicate knit stitches by color only, no symbol.

This is the resulting swatch, in random acrylic yarn, with varying numbers of rows in between cable crossings my plan is to create a scarf in significantly thicker alpaca yarn, a strictly HK fabric. The photo shows both sides of the fabric.

A hand knit stitch tale 2: a bit of cables and lace, charting, hk to mk

For a while, there was agreement on “international symbols” for charting knits. With the proliferation of programs now and methods for self charting and publishing using fonts and personal icons, things can get a bit confusing. Hand knitting in the circular akin to machine knitting results in stitches always worked on one side of the fabric, another consideration. In the last Russian pattern in the previous post, I was unable to get the repeat to work properly regardless of any common meaning I tried to assign to several of the symbols. I have used Intwined for some charting in the past, am finding it problematic again in Mavericks Mac OS, and my go-to for the moment is the latest version of Numbers (3.2), which appears to include changes that make it even more intuitive and easier to use than the previous version. My symbols library includes the Aire river knitting font and an assortment of wingdings and oddball characters found in some of Mac’s built-in libraries.

my hand knit version

Taking it to the machine: chart’s beginning

tweaking it a bit, taking in consideration only the purl side will be facing

flipping it to achieve the same direction transfers as HK

knit on 260 bulky KM

The large hole at the bottom left of the image is not due to a dropped stitch, but rather to yarn breakage. The sample was knit in worsted weight wool, and I found I needed a far looser tension than I would normally use for the same yarn to allow the double transfers to knit off properly. Eliminating the combinations of knit and purl within any one row as seen in the hand-knit version avoided retooling those stitches as well.

 A revisit on topic, April 2015

I am back now to once again, using primarily excel to create all my charts. Various Russian, German, and one English pub have offered variations of this particular fabric, some needing interpretation, but consistencies in repeats are easily recognized and isolated.

screenshot_11

screenshot_02

this image is from knittingstitchpatterns.com, they call it grand-eyelet-lattice, and provide written instructions for its execution

2838625ae10e2c26a984d498e99d0510

below is another relative, charted in Intwined, with the program’s associated written instructions; repeat is 4 stitches wide by 8 rows tall, border stitches are not represented; cable crosses are reversed after every other eyelet sequence, yet another pattern variable

trellis 3repeats

eyelet trellis how toa chart for same using Sconcho and its built-in stitch library. For software details please see symbols post 

sconcho

4/26/15 a variation found today on knitca, another resource for hand knitting stitch pattern collections; this is their image

lace_6

 1/2/2016 a Ravelry post on the stitch family

Pretend/ mock cables 2

I  had begun this post eons ago, and somehow it became a UFO. A recent discussion on Ravelry re using elastic yarns brought this swatch to mind, and here is the start of a return to the cable pretender category.

Big Pretender: this fabric is thread lace, using elastic for one yarn, and very fine mohair for other: a useful fabric for tightly fitting garments or garment sections, without the hand transfers or the rigidity of an all-over cabled item. The positions for the 2 yarns are reversed, so they both will knit the unpunched areas of the card, and where there are punched holes the elastic will create floats, pulling on the knit only stitches in the alternate yarn, creating the surface blistering.

the punchcard

Some suggestions for working with elastic yarn: the nature of the fabric created when knitting with elastic ie in FI is greatly affected by the yarn used, the elastic used, and the pattern being knit. Larger swatches than usual are required to estimate gauge for use of the resulting fabric in garments, at least 100 sts by 100 rows. If using a pre-drawn motif, doubling width and height may be a quick way to make up for “shrinkage” of the pattern. As with all fussy yarns make certain the elastic flows freely and is not getting hung up on the bottom of the cone. Sometimes if loose tension is not enough to make it manageable, the upper tension dial may be bypassed completely. Edges of fabric will be cleaner if the elastic knits on the end needle at least every other row. This is one fabric that benefits from the use of weights. Steaming helps the elastic to spring back after finishing the piece, test small areas, and best temp on your own iron.

A series of publications using a technique published much earlier in Japanese books as swatch samples “magic cables” by Ricky Mundstock, tuck stitch, and hooking up / ruching stitches combine to create the illusion.

more to follow

Hand to machine, symbols 4: cables

The following begins to address cable translations. I posted some content on cables in January 2012, but this content follows the present vein.
Blue dots continue to represent the hand-knit symbol, below them the fabric is illustrated as viewed on the knit side.
The pink dots and the images on either side of them the machine knit, or fabric as viewed from the purl side.
In the column on the far right, the green dots and the images below them represent the opposing twist in HK and are illustrated only on their knit side.

To execute combinations in knit-purl on the same side of the knit on the machine, a ribber is required (or a Brother G carriage). Purl stitches are on the main bed, and knit stitches are created by the opposing bed. To match the hand-knit here, crossings are actually made in the same direction in both HK and MK


HK pattern, software charting.

I have reached the point where decades old (89 and earlier) magazines that got “saved” are now being peeked at, and if not given away, then recycled. There may be some bleed through here from pages I have “saved” once again. Browsing through I found some designs not appropriate for machine knitting for one reason or another, but still creating interesting surfaces and the chance to explore using intwined’s other features. The program will create text from a chart, or chart from typed text with some limitations. One of the latter is a very large cable as seen in the attached document. PDF exports can happen within the program if one is specific in the sequencing of creating its documents. The 1989 pattern had only text for the repeat; I typed it, and had the chart pretty much created for me except for the problem row 5. Here is the resulting Intwined created PDF with some of my comments: cable_diamond. The following is the graph I edited, with my illustration for the execution of row 5

the blue line separates the slip stitch section, which can serve as a border on each side of the cable panels, the red lines the edges of the 12 stitches involved in the cable. The green stitches are put on a cable needle and brought to the front of the work, the next 6 stitches are knit first, then the ones from the cable needle to complete the crossing.

the swatch: knit side

the purl side

Chain cable HK experiment

Several months ago menswear began to appear featuring versions of chained cables. There are some published sources for such patterns, some available for purchase online ie in Ravelry,  while others may be found in the Barbara Walker Treasury Books. One HK version from the latter may be found here. I decided to play with excel and experiment further. I used Aire River Design font (no longer available) on my Mac to generate the symbols used. Columns and rows may be easily edited to adjust the height and width of repeat to suit the design process. I charted only knit “right side rows”. On purl rows, one simply reverses the previous row’s purl/knit sequences

the first linear repeat (outlined in orange)

I tend to prefer brick repeats in odd numbers across the piece: this instance adds reverse knit rows in the center of the cables as well for more surface texture, seed stitch may be another consideration

a quick swatch testing the repeat in random cotton from my stash

.

Horizontal “cable”

I live in the East Coast of the United States.

In the 80s there used to be a yearly machine knitting seminar that was fairly well attended. There were droves of machine knitting publications. Susan Lazear, the founder of Cochenille, was just beginning to develop her knit design software ideas on the Amiga Computers, and a fellow Californian, who happened to be Japanese, used to travel here with the Pandora box of foreign knit magazines. At the time translating knits from one language to another amounted to guesswork and some leaflets. Subsequently, there were fliers, then articles, and even books on translating from Japanese to English and multiple language translations for knits and crochet.

One year there was a “Guess how this was done and you get a prize contest” for a technique appearing on a sweater with only Japanese instructions. The design was dubbed wisteria by some, has been reincarnated as a trim, insertion, bandings on sleeves and cardigans, and is beginning to reappear in magazines now again.

Here is one method for this “horizontal cable” created by short rowing across the width of the fabric.  Brother machine needle positions are A, B, D, and E, and a lever sets KH for holding in both directions Studio needle positions follow the alphabet, and Russel levers on each side must be set for holding.  The directions below are for Brother.

Reminder: when the machine is set for holding the needles in B or D position knit, needles pushed out to E will not knit. Weight is used as needed, watch for dropped stitches particularly along the edges of the sections as the rows of knitting are built up.

1.cast on the desired number of stitches knit several rows at garment tension, end COR (Carriage on Right)

2.COR, set the carriage not to knit needles in HP (hold position)

3.leave 6 needles at the right of knitting in WP (work position), push the remaining needles out to HP (hold position)

4.knit  10 rows over the 6 stitches, ending COR

5.push back 3 needles to D position at the LEFT of the 6 needles now in WP

6.knit one row from right to left (9 needles in WP) end COL (carriage on left). Push the needles now in WP on the far right to HP; 6 needles will remain in WP

7.knit 9 rows on these 6 needles,  end COR

8.repeat steps 5 through 7 across the fabric row until the last 6 needles remain. Knit 10 rows over  these last 6 needles, end COL

9.set the machine to knit needles in hold (holding lever to N), knit 2  or the desired number of rows across all the needles

10.holding lever on H. Repeat the procedure from left to right, reversing the sequence.

If the sequence is not reversed a bias fabric will be created. For maximum texture use a yarn with memory ie. wool. Anything that can be “killed” by pressure or ironing will flatten considerably and yield a very different fabric.

My demo samples were made out of colors that would make them easy to find, and unlikely to get “permanently borrowed”, so none of these were studies for actual finished garments

this swatch combines a boucle and a rayon; the latter has become flattened over time

this is a wool rayon, knitting is not reversed, resulting in biasing

these samples show the same technique, applied to much larger groups of stitches

a segment of a magazine recent garment photo, no origin given as to source, appears to use the above technique

online source for patterns using this technique

more cable like/structures/textures

A few i-cords and more to try

The top illustration below creates what some demonstrators back in the day would refer to as a heart cable trim. The width of the strips of knit may vary, and the size of the holes need to be accommodated to suit the subsequent threading. The second illustration set results in a more traditional “pretend” cable. I-cord could be used for the second sample. Narrow strips of knitting will curl in, however, and in many instances may be substituted for true i-cords. Because each pass of the carriage knits a row as opposed to slipping alternate rows, the knitting is twice as fast. In the instance below a series of holes are created for threading cording (or other chosen material)

The following illustrates the threading option with a single length of the cording, which will need to be secured at each end with some stitching. Separate colors could be used on alternate sides for more color variation, and other threading sequences as well

some publications with inspiration photos

its online relative

from foreign blog

part of another image

from MonTricot Magazine #26, 2011

from Mon Tricot magazine

A hand knitting book with many ideas for cord and strip use that could easily be adapted for machine knitting

A commercial foreign knit incorporating cables and woven cords link no longer active in 2019