Wednesdays at the asylum: “Barbie” knitter stand

Over the past few months I have been intermittently involved with a local maker space, artisan’s asylum. Beginning November 13th, we are going to try a free fiber arts work night, with the aim of working, sharing, and learning from each other, and with the possibility of classes being planned if the need arises. My background is fibers with an emphasis on knitting. I have long planned on trying a tubular knit in thin yarn that could in turn be knit (whether by hand or on the machine) or crocheted like some of the ribbon yarns now in use onto a background for ruffles or used for insertions, applique, etc. Thinking about what possible random demo/work item I could bring to the first meet I resurrected my Barbie Knit Hits knitter and various cord makers and spools. Managing lengths of the tubes as they are knit with a plastic knitter that likes to wander can be a tad challenging. At one point in time I had the delusions that I would play with kumihimo braiding, and built a crude “stand”, with both a square and a round top and necessity meets invention: the square top turns out to be the perfect size support  and here is my “hobby knitter stand”  in hands free other than for cranking operation

11/20/ 2013: the tape pictured below was knit using the equipment above, knitting a length in  8/4 slub rayon

attempting to use it as “ribbon yarn” on a standard machine: (1) at first I tried hanging a complete stitch/row on each needle on standard KM, the fabric was too flat (2) results were better when hanging every other stitch/row chain on every needle, fabric was heavy and to spread things out a bit more I (3) switched to using EOS/R on 2 km needles, and skipping the third. How to make it go round? (4) remove knitting on garter bar, turn over, “hang” ribbon on garter bar in proper configuration, slide all stitches back on machine and keep knitting. Stitch gauge on 4.5 KM anchors knit tape securely, as tape is tugged at stitches closest to plain knit elongate, edges ruffle

purl side

knit side

inspiration alternatives for similar knit tube http://fashioncollars.wordpress.com/tag/celapiu/

other additional ideas @ http://www.knitting-and.com/barbie-knitter/

Pretend/ mock cables 4: revisiting i cords

Knit tubings/ cords of all sizes have been cropping up on runway photos, interlaced with cables, woven basketweave style, and as the “yarn in giant knits”. My category sidebar has a link to my compendium on the subject (Jan 30, 2012), written nearly a year ago, the making of the cords, and some published references. Additional ideas: in wider trims where a single knit stitch is required on the slip pass because the cord is wider than 4-5 stitches, and/or a flatter, single bed cord is required, one can play with a punchcard for the needle selection. Anywhere there is a punched hole in a blank row, the resulting selected needle will knit when the carriage makes a slip pass on that particular design row. Brother machines do not require a whole card to be punched for such trims since the option exists for controlling the slip facility for single rows by selecting only one of the part buttons. The machine will skip white squares in the direction of the pushed cam button, left or right, and knit every stitch traveling in the opposite direction. A punchcard repeat to serve the purpose:

if multiple knit stitches on slip rows are a consideration, in the image below the dashes and dots are representing needles in work, and width of trim, the black dots themselves also the punched holes in the selected area for the trim

a variant across a row, with 3 stitches slipped in between knit ones

the punchcard repeat for a machine such as Studio, where cam operation is different, the following would need to be punched for the required minimum punchcard height

Open tubular knitting using the ribber is possible in nearly every width. The wider the cord, the more it will want to flatten. Wire, various cording, and plastic tubing may all be inserted into the tubes if more sculptural forms are the goal.

An added note: the easiest cord is a narrow knit strip, knit on at tighter than normal tension, which will roll into itself, helping it retain its shape and in turn be substituted in many of the fabrics using i-cords. For wide strips that need to bend and curve, ribbed strips my work, particularly if knit in English or half English rib. Such ribbed strips may be braided flat, stitched together and in turn applied to sweater panels at their edges, center fronts, etc.

Previous posts: pretend cables 1, a few to try, the making of the cords, and mock aran inspiration from an early Brother Publication

I have been asked about cords on Studio machines. I have not owned or worked on one for many a year. I did find these directions in an early Studio manual available online that may be of help to those trying to create them on that brandTesting concepts need not be done in actual cording. One option is to use an old swatch that can give some markers providing an idea of regular placement. Here I have used a 4 ply yarn as my “cord” to begin to visualize some relative of a swatch found on Spinexpo.com, of which this is a segment, in response to a query I received in a machine knitting group. Eyelets could be created at regular intervals to feed the cord through such as on the left above, where my yarn is stitched through the knit with a needle. Enough length is left free from one anchor point to the next so that the following length of cording may be fed through eyelets to anchor it, be brought around the loop from the previous length, create its own loop, and repeat the process for the desired length.
A few more ideas for cord uses may be found in my post on pretend cables 

Slip/ tuck stitch experiments

These scarves were designed using the same method as described for mazes and mosaics, they are knit in rayon chenille, fringes are composed of  i_cords applied to cast on and bound off edges. The smaller shape/repeat allows for more control over fabric width while retaining full repeats

blue ovals: 11X58 inches excluding 3 inch fringe

BW: 9.5 X 58 inches excluding 4.5 inch fringe

time to stop playing and get back to winter inventory production!

hot off the presses 11/10: tuck stitch 11 X 60 rayon chenille

an unplanned “mutation”

scarves measure and average 9(+) inches in width, 60(+) in length after blocking

11/17/2012: some colorways

.

The making of i-cords

Making narrow tubular cords has also been referred to as spool knitting, corking, French knitting, or tomboy knitting. When using a knitting machine the standard for knitting cords is to operate the carriage so that it knits in one direction, slips in the opposite. Using the e wrap method cast on 3or 4 stitches. Push in the part button on the same side the knit carriage is on ie. if it is on right, push in right part button. Stitches will knit from right to left, slip from left to right creating a float. Since the float is added yarn when knitting is pulled to set it, the gauge on the few stitches will be altered, so it is usually recommended that tension be tightened 1-2 numbers lower than garment tension. The float issue becomes problematic if cording is required that is wider than 4 stitches. Switching to tubular knitting using the ribber will produce tubes of any desired width.
In Japanese machines, the ribber knits tighter than the main bed, if gauge matters a starting point is to loosen ribber tension by approximately 2 numbers. Larger cords tend to flatten, so if a round tube is desired stuffing may be required in the form of cording, plastic tubing that may be joined using appropriate caps from hardware or even pet supply stores, and a range of wires if the intent is to create sculptural forms.
One exception to tightening the tension when knitting cords is when/if they are joined to knit edges in the seam as you knit method.
Addressing the float issue in single bed knitting:
with five stitches the floats could be latched up creating a rib stitch. This same operation in tighter or smaller cords may make them swirl.
If a flatter cord will serve the purpose, an alternative is to have the center stitch knitting on the slip rows. One may accomplish this by hand-selecting needles or using a card. This will seal the tube in the center or periodically across the knit. The punchcard may be locked on any single row with the appropriate holes punched, and the position planned on the needle bed for knitting. The carriage will knit all stitches in one direction, slip/skip all but the stitches where needles are selected in the opposite. Floats may become design elements in some instances; if sewing onto another piece or hanging onto the knit as it progresses they serve as guidelines for doing so. If they are to be applied vertically to a garment, create a ladder to mark your sewing line.
If you are a gadget collector “hand Knitting cord machines” may make them up to 6 stitches in width with the ease of cranking a handle and with a bit of planning wire beaded tubes may be produced on them as well. Some examples are from Bond, Prym, Wyr for knitting metal mesh, and eons ago some companies including Passap and Singer offered their own automatic cord knitters as well.
A recently published hand-knitting book has many ideas for applied i_cords that could also be used on the machine. 
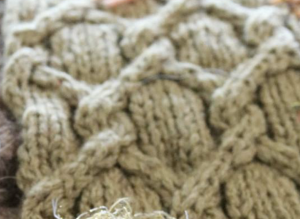
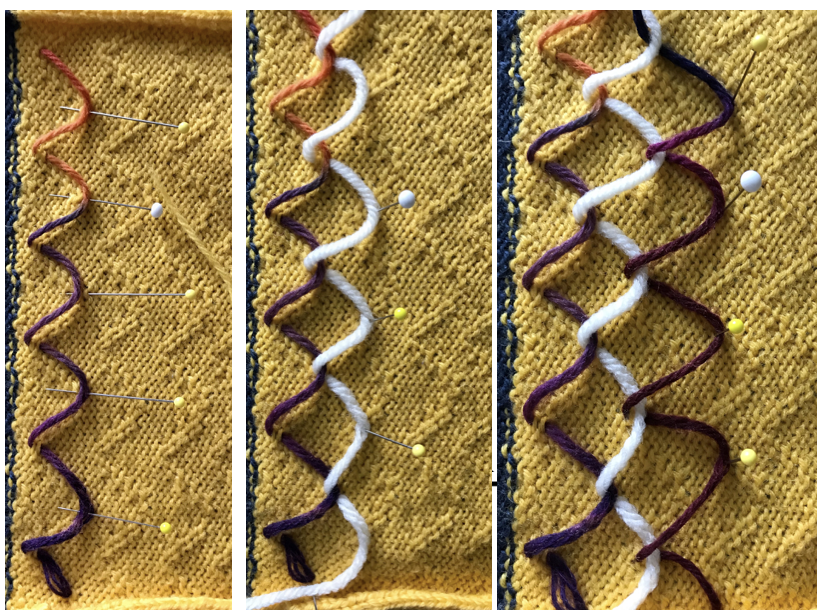
For speed and simplicity, sometimes flat strips of knitting may be substituted for cords in some designs.
Cords or strips may be used to create mock cables, add color interest, applied as trims, or to the bodies of sweaters or sweater edges. They may be braided, twisted, macraméd, etc.
Some published and online resources on the subject:
Erica Patberg article in Knitter’s Magazine #104, Fall 2011. She can be found on Ravelry. Cords and strips may be used as trims. Long ago versions were published by teachers in the seminar circuits, one may be found at 1. Ginger Luters is well known to hand knitters for her books such as her “Module Magic”. Apparently, she also has published a book on trims, now available on DVD online that from cover photo appears to include some suited for this topic.

A page that gives a bit of history and illustrations of spool knitters for crafts/ hand knitting may be found at Hub Pages, and on “circular knitting machines” at How to get what you want.
The Wyr knitter is very hard to find. I have knit 32 gauge wire on other knitters with success, so that particular model is not necessary for wire cords as seen in this piece of mine A curly cord version may be found at Techknitting. More ideas and a knitter at Bond America. And lastly, something to make with those Barbie Knitters.

Illustrated how-tos from Brother knitting techniques book and from a Studio publication:

A few i-cords and more to try

The top illustration below creates what some demonstrators back in the day would refer to as a heart cable trim. The width of the strips of knit may vary, and the size of the holes need to be accommodated to suit the subsequent threading. The second illustration set results in a more traditional “pretend” cable. I-cord could be used for the second sample. Narrow strips of knitting will curl in, however, and in many instances may be substituted for true i-cords. Because each pass of the carriage knits a row as opposed to slipping alternate rows, the knitting is twice as fast. In the instance below a series of holes are created for threading cording (or other chosen material)

The following illustrates the threading option with a single length of the cording, which will need to be secured at each end with some stitching. Separate colors could be used on alternate sides for more color variation, and other threading sequences as well

some publications with inspiration photos

its online relative

from foreign blog

part of another image

from MonTricot Magazine #26, 2011

from Mon Tricot magazine

A hand knitting book with many ideas for cord and strip use that could easily be adapted for machine knitting

A commercial foreign knit incorporating cables and woven cords link no longer active in 2019

Pretend/ mock cables 1: i-cords, holding

I have literally hundreds of machine-knit swatches from the days I taught in a design school program. I periodically revisit them and since cables and their look-alike relatives have recently caught my attention I thought I would share photos of some of the samples in the next few posts.
They are not necessarily resolved fabrics, some of them are the result of random demo efforts/ stitch play.
In any discipline over decades, one cannot help but become aware of how materials and styles cycle, and this is oh so true in fashion and certainly in knitting. For a while more than a decade ago knit i_cord yardage/ tubular yarn was marketed by several manufacturers, and it is now making its reappearance.
One way to create pretend cables in varied color combinations is to apply purchased yarn, or machine knit cording/ tubular knit to the purl facing the knitter side as the piece progresses. The application may be done in an organized manner, using a punch card to select needles on which the yarn will be hung, or more random, even with wide knit strips in contrasting colors.With tubular knit cord in addition to hooking up, anchoring may require some stitching, “seaming as you knit” at planned intervals would make the joins “invisible ” Strips using holding techniques or stitches hooked onto the knit to create texture, in turn, joined in the “seam as you knit method”Cording may also be inserted into single stitch lace “holes”or larger holes created through holding techniquesKnit i-cords, ribbon, twisted cording, etc. may also be threaded/woven through holes created at cable crossing as a way to add color and dimension to standard cables, mimicking their movement on the fabric. A recent foreign magazine cover including a variant of the above technique