Lace patterns for drop stitch: cast on as preferred, transfer MB stitches to ribber, where all stitches will be knit on every row. The main bed will be knitting the stitches that will be dropped (lace carriage will not be used), cancel end needle selection, program your repeat, push in both part buttons. As the carriage moves across the bed selected “lace” pattern needles will knit, the non-selected will be skipped.
Continue to knit until no needles are selected. At that point disconnect the main bed and ribber carriages, change the setting on the main bed to knit, remove the yarn from the feeder, bring the knit carriage alone across for 2 rows, and stitches will be dropped. After the disconnected carriage is returned to the opposite side, rethread, and connect again to the ribber carriages, set the knit carriage to slip and it once again will knit selected needles. Repeat the process for the length of the swatch. If on an electronic machine with 2 carriages: the number of rows is usually an even number, so an additional knit carriage with no yarn could be positioned on the opposite side to the one selecting pattern, set to do plain knitting, holding no yarn, and it will drop the stitches on “plain knit rows” on lace card without requiring the other additional steps and cam button changes.
Transfer lace on the top bed: the question periodically comes up with regards to the possibility of using the lace carriage when knitting every needle rib fabric. The lace carriage does not operate with the ribber bed in use in the standard up position, there is not enough clearance between the beds for it to travel from one side to the other across the needle bed. It is possible to drop the ribber down one click, opening up the space between the beds, supposedly to allow for the use of thicker yarns.
My machine is old enough for the ribber to be bowed in the center, increasing the space between the beds there. Trying to use that position for every needle rib in my desired yarn I got yarn breakage in the center of the bed, some skipped stitches, and the sides of the needle bed were still up too high for the LC to have a clear passage. The problem appeared to be due to its brushes hitting the gate pegs. With the brushes removed, but with some grinding against those same gate pegs the LC was able to move along the top bed. 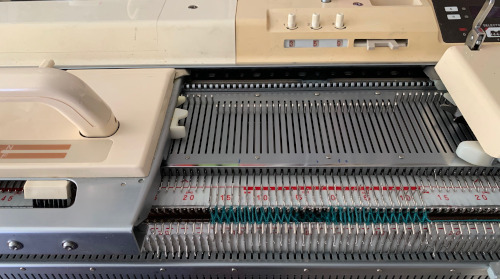 At least on my machine, I am giving up on the idea of using it, even if only to preselect needles, let alone make transfers.
This page is from the Ribber techniques book. The fact that transfers are broken up with blocks where there are no transfers, including some with stitches transferred to the opposite bed, makes it easier to track transfers than if using all over designs. Standard pronged tools are sufficient to move the single stitches or groups of three. 
It is possible to transfer larger groups of needles on the main bed to create lace patterns, done of necessity in two-color brioche, but here I am seeking to modify lace punchcards so that the fabric based on them may be created successfully with as few errors and dropped stitches as possible.
My first attempt was made using a second knit carriage set to slip in both directions to preselect needles for transfers, using a small lace repeat to test the idea. The advantage of this method is that the original lace repeat does not need to be altered in any way. The disadvantage, aside from requiring a second carriage to use, is that the width of the piece on the machine is limited. The ribber carriage is in use and needs to remain at least in part on the machine bed on the far right, limiting the number of needles for possible use on the right side of 0 to about 20.  The same work could be done using only one knit carriage as well, but that would require changing the cam buttons from slip in both directions to knit and back to slip at the appropriate points, one of the methods that make it possible to knit lace on the 260 bulky machines
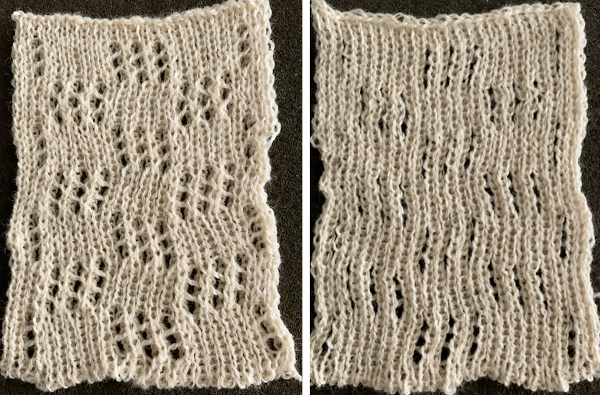
The repeat used is for this swatch is from StitchWorld, and is knit using the second knit carriage for needle preselection. Because each block contains lace transfers in only one direction, the fabric, even though it is a rib, reflects that in the biasing first in one direction, then in the opposite.
It helps to be clear as to whether one is producing lace repeat for use in a punchcard or an electronic model which in turn will require mirroring, such as when using Ayab or when using slip stitch selection with the knit carriage in combination with lace carriage selections to create shaped lace edgings. Testing on a small swatch will help determine whether mirroring is required for any specific design. Electronic machines usually produce the design as seen on the knit side, punchcard machines as they would be seen on the purl, thus making mirroring a requirement depending on the source for the design.
I usually begin by modifying my chosen repeat in a spreadsheet. On the left, the pairs of blank rows in the original repeat are temporarily colored in grey. It helps to be consistent. One repeat begins with a full motif, the other with half, which can be confusing when first starting out. The plan is to begin by producing a trim or edging, an all-over pattern for significant lengths appears daunting. Dropped stitches in single bed lace are no fun, in rib they may not even be noticed until the knitting is off the machine. The difference between the two repeats: the 2 grey rows on the left are replaced by black pixels or punched holes, with a blank row placed above and below each of the black row pairs. The design is now expanded from a 40-row height to a 50-row one suitable for use in a punchcard machine 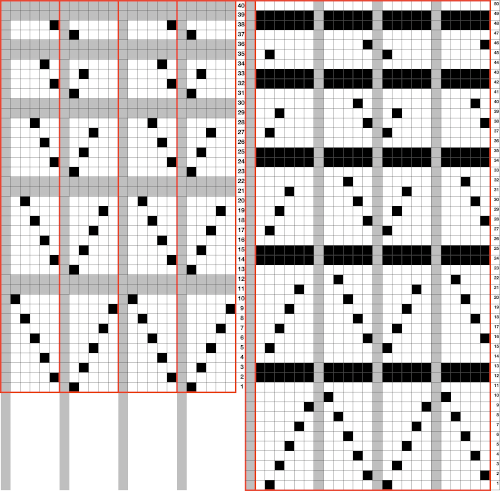 This explains some of the desired knitting actions
 ![]() Using the method described in other posts, this was the screengrab imported into Gimp. The grey line is a reference point. Cropping the image to content will allow the last blank row to be preserved by having the grey one there. After the crop, it can be bucket filled with white, or when the image is, in turn, bitmapped to B/W, you may find it disappears. Image scale is then used to reduce the repeat for knitting.
Using the method described in other posts, this was the screengrab imported into Gimp. The grey line is a reference point. Cropping the image to content will allow the last blank row to be preserved by having the grey one there. After the crop, it can be bucket filled with white, or when the image is, in turn, bitmapped to B/W, you may find it disappears. Image scale is then used to reduce the repeat for knitting. 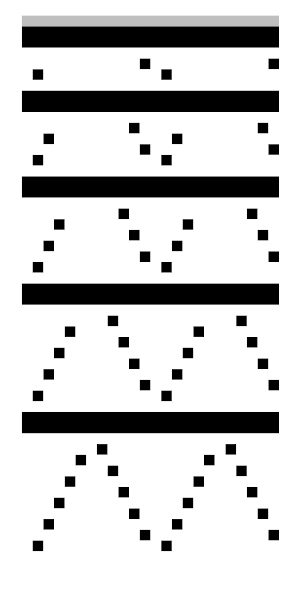 This is the repeat used to knit the swatch in my 930. If working from it, punchcard knitters need to mirror designs from an electronic source such as this and will find it easier to do so by turning the card over, marking the holes that require punching on that side, doing so, and then inserting the card in the reader in its usual orientation.
 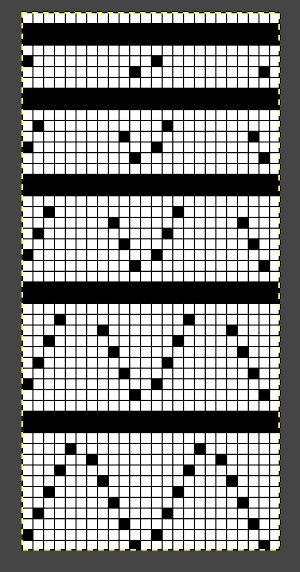 The 930 .png:
 ![]() Prior to knitting the pattern using the ribber, it pays to test the repeat single bed to get a sense of where the knit rows occur and to make certain the transfers are happening in the correct direction and in what place on the needle bed. There should be no side by side empty needles, and in this design, the first pairs of transfers result in 3 stitches on one needle in the center of each shape, not side by side holes as seen here in the false start prior to mirroring the image
Prior to knitting the pattern using the ribber, it pays to test the repeat single bed to get a sense of where the knit rows occur and to make certain the transfers are happening in the correct direction and in what place on the needle bed. There should be no side by side empty needles, and in this design, the first pairs of transfers result in 3 stitches on one needle in the center of each shape, not side by side holes as seen here in the false start prior to mirroring the image 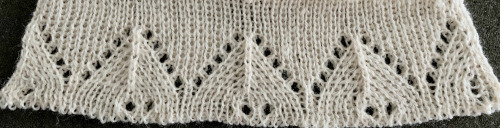 Making things work: both carriages will be operating to and from the left-hand side. The process is facilitated by the use of an extension rail and a color changer. The knit carriage alone will operate to preselect the needles that will need to be hand transferred to create the lace pattern. With the following modification of the repeat, all transfers are made moving away from the knit carriage. So if the KC is on the right, transfer to the left, if it is on the left, transfer to the right. The paired carriages will create the two all-knit rows between lace segments. The blank rows above and below the two all punched or black pixel rows are there to return the carriages to the proper, left side to begin preselection for the next row of transfers. If any end needles are preselected on the knit bed, push them back to B.
It is best to knit 2 rows of full needle rib before beginning transfer, that will ensure that stitches on both beds are formed properly. I did not, had a spot on the cast-on where the loops were not properly placed on the comb, and that is reflected in the area that looks like a stitch was dropped. 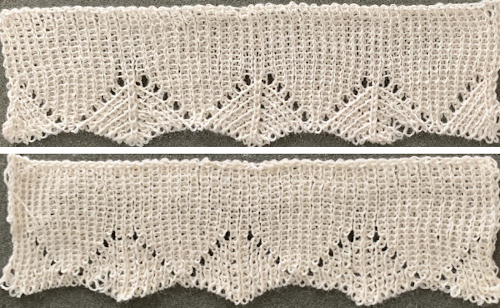 Begin with a zig-zag row from left to right, knit 2 circular rows, carriages will be on the right. Knit a sealing row to the left, followed by 2 all knit rows, ending with carriages once more on the left side.
COL: remove the yarn from the Knit carriage, hold it in color changer by pushing the adjacent feeder number
separate the 2 carriages
cancel end needle selection
KC is set to slip in both directions, it will remain there for the duration of knitting the pattern, make certain all main bed needles are in the B position
KC operates alone to the right and preselects the first row of transfers
COR transfer preselected needles to the left, away from the carriage. Make certain all needles are in the B position before the next carriage pass. KC will preselect for transfers to the right as it returns to the left side. Repeat the process until all needles are preselected for an all knit row as you knit back to the left
COL pick up the yarn, engage the ribber carriage knit 2 rows on all needles
Repeat: *COL: remove the yarn from the Knit carriage, separate the 2 carriages, operate KC alone making transfers away from the carriage until all needles are preselected as you knit to the left. COL pick up the yarn, engage the ribber carriage knit 2 rows on all needles** until ready to continue in every needle rib.
This method is slow, I found it oddly meditative. It offers an opportunity to review stitch formation, thus avoiding dropped stitches. Hand transferring lace preselection on the single bed as well can sometimes make a fabric achievable that is otherwise cursed by dropped stitches and fiber issues.
Starting with a simple pattern can help one get over the hump, making that rabbit hole appear less formidable 😉
Fascinating exploration! Maybe one day I’ll get to play with this. Looks like a bit of a rabbit hole. Thanks for the great assembly of instructions, information and samples. Love it!