While creating the test swatches for a version of single bed 3D scales using the lace carriage 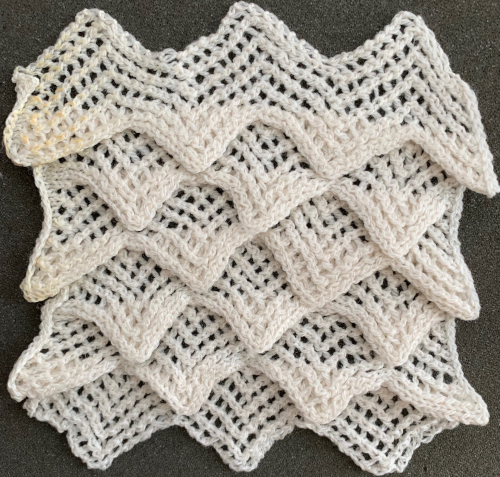 I was intrigued by the chevron effect that became more obvious with color changes
 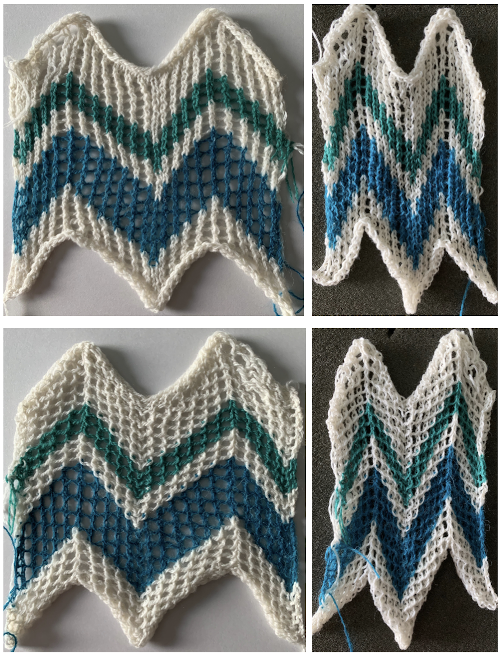 The fabric was capable of changing considerably in look and width that could be encouraged to remain more permanent with blocking. There is a visible asymmetry, with one side of the chevron actually containing an extra eyelet. Still trying to retain the 24 stitches in width design constraint, I began to work with simply counting eyelet transfers matching in number, guessing rather than planning. Tiling the repeats can help get a sense of how things line up horizontally and vertically. Electronic repeats can be minimal unless one is programming the pattern as a single motif that includes edge knit stitches etc when downloading via cable to an electronic or using the Ayab interface.
 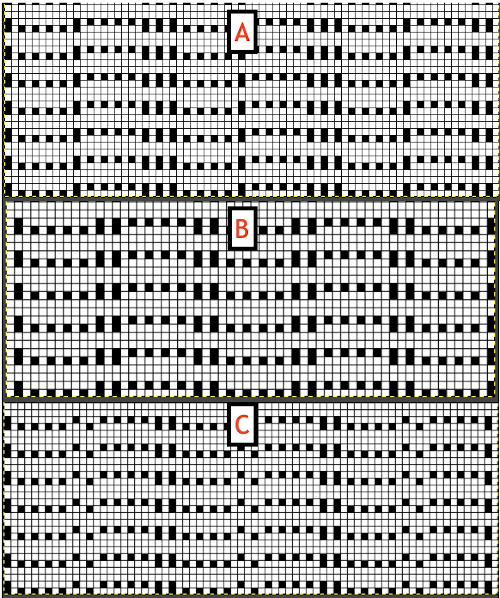 A and B continue to produce uneven numbers of eyelets on each half of the resulting “V” shapes. The greater the number of row repeats of eyelets in a single direction, the more the resulting bias. If asymmetry is the goal, then this may meet the need. I knit most of the swatches on 48 stitches, with more needles added on the right if needed to ensure the edge stitch will be a knit one. Larger shapes require wider tests. The photo is rotated to reduce its length on the page
 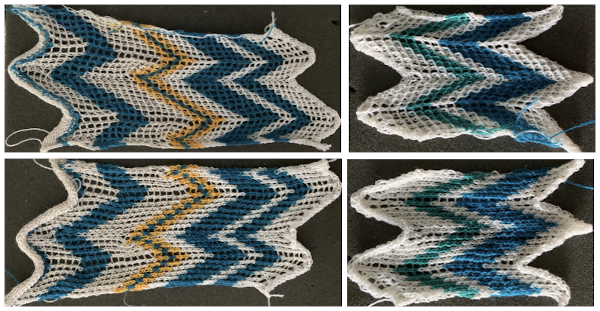 This effort produced uneven sides of the Vs, and the eyelets along one of the vertical center columns were not properly formed, resulting in an added knit stitch
 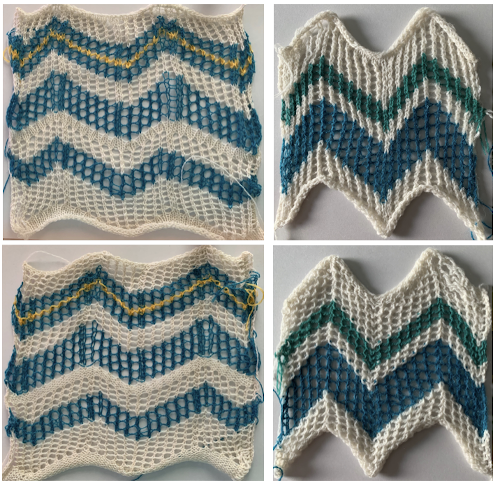 The added eyelets in pattern C produce an interesting change from a sort of V shape to more of a W, but the fabric is still unbalanced
 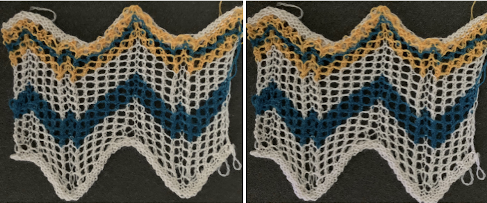 Back to the drawing board: a different mesh, with eyelets in alternating numbers, resulting in a more balanced fabric. Here the charted repeat is shown X2, side by side.
  Different day, same yarns, both were having none of it. When knitting progresses in this manner, it’s a good time for the machine and its operator to practice social distancing.
 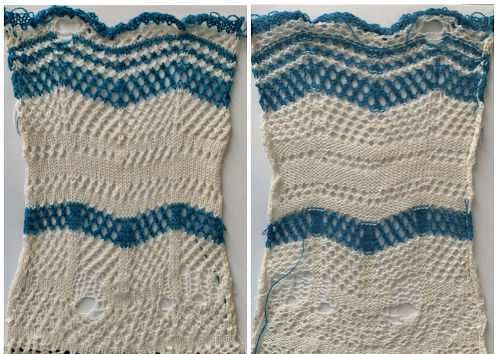 The quality of the lines produced by the mesh was different and heavier than the one I was seeking, though the number of eyelets remained constant on both sides of the center stitches, alternating on the alternate pairs of design rows. Back to charting things out in Numbers: though the LC, usually (but not always) starts located on the left, preselects on its first pass to the right, and begins to transfer to the left on its second pass back to the left, in order to visualize the direction, the repeat is mirrored. Cyan cells indicate actual transfers to the left, and magenta transfers to the right. This 24 stitch repeat shows where 2 transfers wind up on a single needle while an extra knit stitch is also formed in the blank vertical column, seen in the swatch above. In programming an electronic KM the black pixels alone with 2 blank rows above the second set of transfers is enough. I like to program repeats that are a bit larger, and usually will tile them as well, looking for any errors my eye might notice before any actual knitting
  Using electronics one may expand or reduce the number of stitches in the repeat to reach an estimated equal number of eyelets
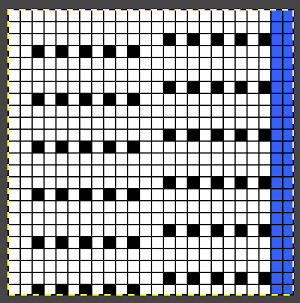
 With any mesh, the number of knit rows may be varied between each pair of transfers. My swatch was knit using a 26 stitch repeat width
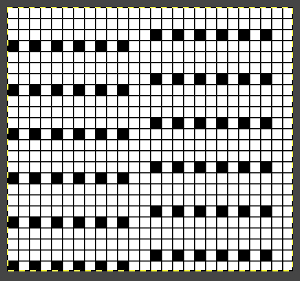
 The cast on used is a temporary one. In final pieces, the quality of any bind off and cast on should be tested as well to accommodate the changes in width lace fabrics may have, increasing the number of total eyelets exponentially. The knitting this time went smoothly. The eyelet count was as planned. That said, I was 6 stitches away from completing the bind off when the yarn simply ran away from me, and chose not to make any effort at rehanging the piece. In the top blue stripe, the number of knit rows between transfers was increased from 2 to 4, while in the top white stripe I alternated between 4 and 2 rows of knitting. Playing with such intervals between rows of transfers can produce interesting differences and perhaps a more static quality in the fabric after blocking the completed item. The knit carriage is set to N, so it has no effect on the advancement of the programmed lace pattern.
 ![]() The white yarn used here is a tightly twisted cotton knit at tension 9, the green a softly spun, slightly thinner rayon
The white yarn used here is a tightly twisted cotton knit at tension 9, the green a softly spun, slightly thinner rayon ![]() On a lighter background behind the swatch, 2 areas at the center are marked: on the left, there are extra knit stitches, which happened because the yarn had gotten caught on a gate peg affecting selection, and that had been missed.
On a lighter background behind the swatch, 2 areas at the center are marked: on the left, there are extra knit stitches, which happened because the yarn had gotten caught on a gate peg affecting selection, and that had been missed.
With lace as with any textured knits, running a finger behind the knit along where the stitches meet the top needle bed periodically helps to find and troubleshoot the problem early.
On the right, there is a small diamond shape beginning to appear which is absent from the much crisper transfers and eyelets created by the cotton.
With these patterns, the number of rows in the striped sequences may be varied throughout the piece 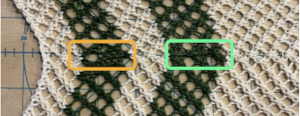 A repeat in this family of stitch repeats was used as a border in some of my shawls
 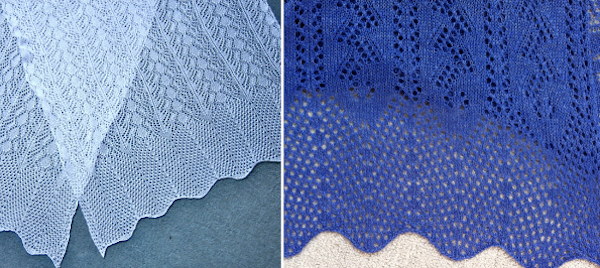 Exploring a smaller repeat, also 24 stitches wide
 ![]() The lace carriage makes 4 passes followed by 2 rows knit throughout
The lace carriage makes 4 passes followed by 2 rows knit throughout
 The white yarn used is the same cotton as in the previous sample, knit at tension 9, the chenille is rayon, 1450 yards per pound, the eyelet patterns are stable and distinct,
 ![]() Here 2 thin yarns are used, and the spacing between color changing is varied in height
Here 2 thin yarns are used, and the spacing between color changing is varied in height 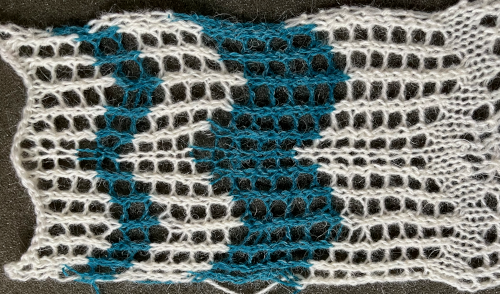 Another variation
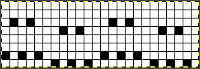
![]() Adding more rows of plain knitting between lace transfers stabilizes the width of the fabric and reduces the number of transfer rows.
Adding more rows of plain knitting between lace transfers stabilizes the width of the fabric and reduces the number of transfer rows.
Here the first row after the planned number of transfers is knit using the white yarn, 4 rows in the contrast color follow it, and a single last row in white is knit before returning to transfers.
Dropped stitches do not run the way they might in other fabrics, and may not be noticed until after knit rows. Such errors here are marked with red dots. ![]() As often can happen in machine knitting, on a different day, the same yarns, same tension, same operator, and stitches drop, get hung up on gatepegs, and perform other unwanted actions.
As often can happen in machine knitting, on a different day, the same yarns, same tension, same operator, and stitches drop, get hung up on gatepegs, and perform other unwanted actions.
This test aimed for that “W” shape using the thinner yarns.
I downloaded an image that accounted for all needles in use for my swatch, so in the 930 using the isolation button on by default with img2track was OK.
Your machine may vary as to which side of the center the extra stitch will be placed when the total number of stitches in width is an odd one. If uncertain, plan the repeat for the next even number, in this case, 52, divide it evenly on each side, and either air knit to sort out selections before casting on or simply transfer that extra knit stitch over one as you begin to knit.
In a final piece, good notes will provide reminders for such small details 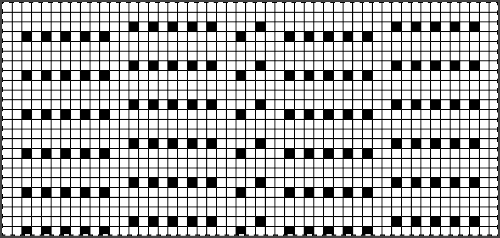 The blue yarn refused to knit off properly, so the different added colors were tried to see if I fared any better using them.
My first swath was discarded, and the second one is shown.
The repeat is sound, the visible “errors” are the result of stitch formation issues. The swatch at first is shown stretched in length, its size could be set with blocking, 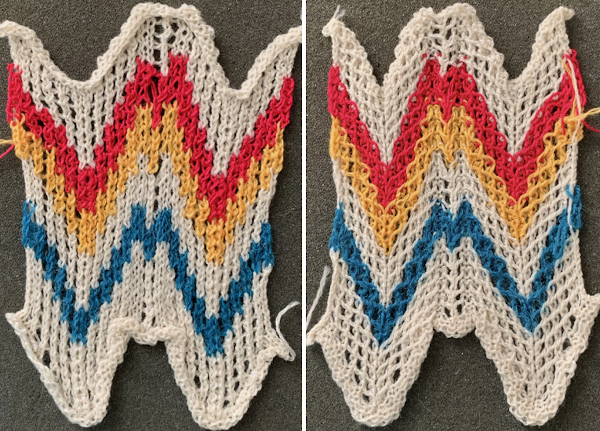 and has a very different appearance when lightly touched with my now fiber burning iron
  On a different day, all other things being equal, the same needle locations resulted in easy success. I programmed for a 60 X 24 repeat, planning for different size V shapes.
 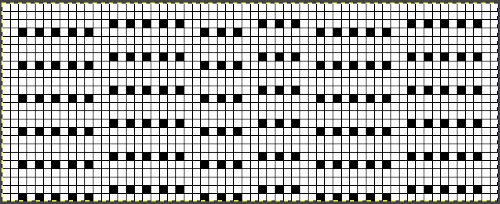 During knitting, these fabrics will appear to be producing straight color stripes
 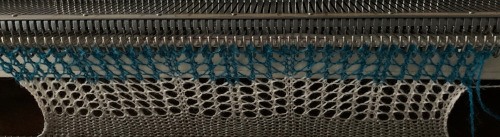 It takes a while for the change to begin to be noticeable
 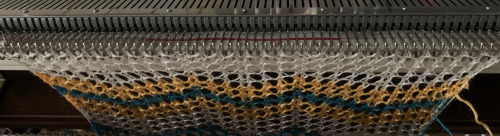 This was the result as the work came off the machine, relaxed, with no treatment of any sort the ribber is in place there are avid beliefs expressed by folks in terms of whether or not to bring the knitting to the front of the ribber, I am a between the beds’ advocate. Also, even with the ribber off my machines’ top beds have always been set up with ribber table clamps in place since having them flat simply never worked as well for me in any of my knit experiments.
 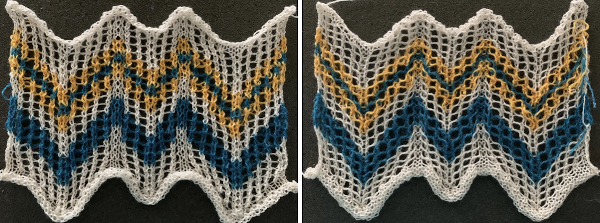 Taking the guesswork out of repeats, one may begin with or use published cards as they are, this is from a Japanese magazine,
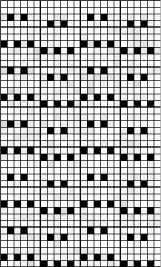
 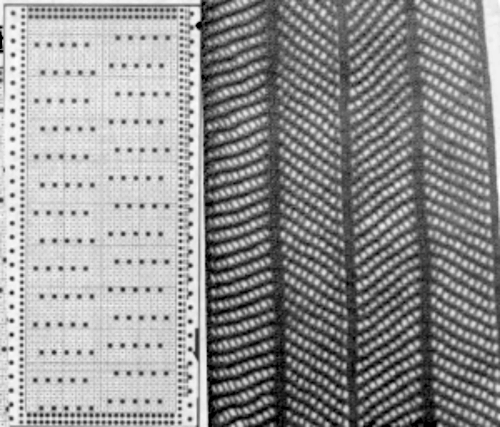 the charted repeat on a grid marked in 6X6 blocks, typical of Brother blank punchcard
 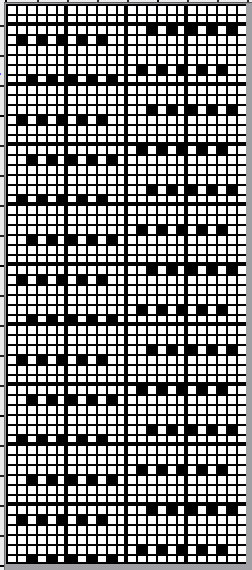 the 24X56 png
 ![]() from Brother punchcard volume 5, click on the images for larger views
from Brother punchcard volume 5, click on the images for larger views  the charted repeat
 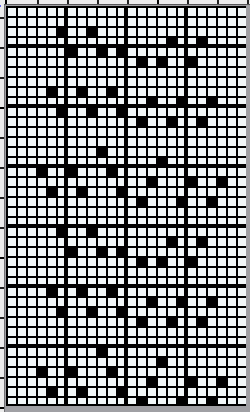 the 24X40 png
 ![]()
 the charted repeat
 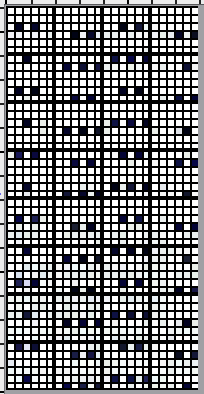 the 24X48 png
 ![]() A knit tested Pinterest find, a Studio lace pattern
A knit tested Pinterest find, a Studio lace pattern ![]() For use on Brother, shift the 2 blank rows at the bottom of the chart to the top,
For use on Brother, shift the 2 blank rows at the bottom of the chart to the top,
the LC makes four passes starting from the left, the KC follows with 2 passes, operating from the right throughout
the charted repeat
 the 24X40 png
 ![]() the proof of concept, including a dropped stitch
the proof of concept, including a dropped stitch ![]() Zig_zags are essentially chevrons rotated counterclockwise, I am including some here. The repeats for knitting them are quite different.
Zig_zags are essentially chevrons rotated counterclockwise, I am including some here. The repeats for knitting them are quite different.
A one-color zig-zag from the Brother punchcard volume 5 book with a different approach could serve as trim or for knitting accessories, note the markings for the location of knit rows and varying numbers of LC carriage passes as typically seen in published lace cards. 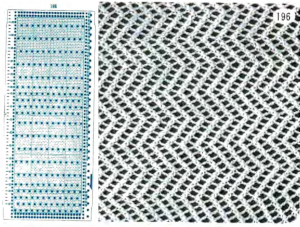 There are limitations in producible width. The stretch of the cast on and bind off and the fact they need to match as closely as possible while allowing the mesh to stretch sideways in blocking must be taken into consideration, as is the fact that every end needle selection will occur regularly and those selected end needles must be pushed back consistently.
Not all lace carriages have the option of canceling end needle selection, found in later models. Point cams could provide another alternative, I personally do not like to use them.
In this attempt, the cast-on followed knit rows in pattern, the manual end needle canceling was inconsistent at the sides, and LTBO (latch tool bind off) around single gate pegs was simply not stretchy enough. 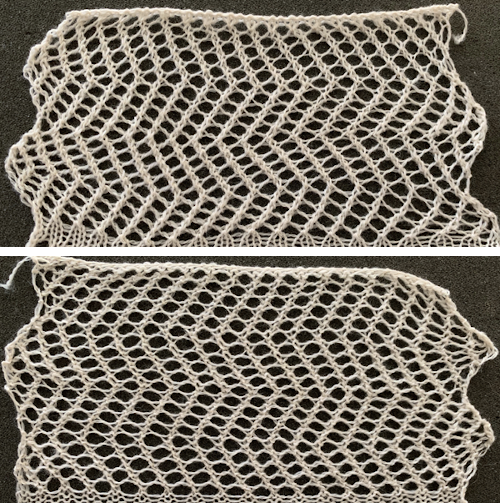 Here the cast on and bind off match very closely. I used the looser cast-on method described by the “answer lady” in the video, but I bound off around 2 gate pegs instead rather than wrapping the needles as shown in the video, a method often used on the Passap
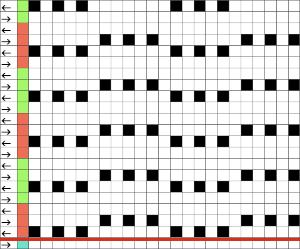
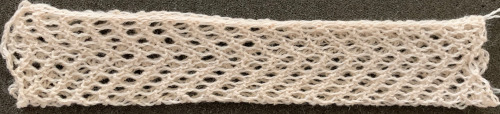 2021 visualizing the punchcard in an added way, using Numbers: transfers to the left occur with LC making 2 passes, the transfers to the right occur with the LC making 4 passes, and both sets are followed by the KC knitting for two rows
 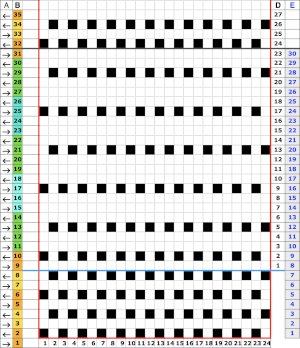 the full punchcard 24X60 repeat
 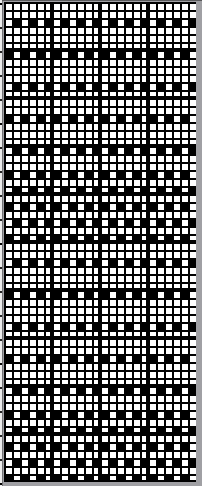 the 24X30 png
 ![]() A new, 48 stitch test in the crisp, tightly twisted cotton knit at tension 9 produced a transfer texture that is more noticeable and clearly retaining the mesh grid.
A new, 48 stitch test in the crisp, tightly twisted cotton knit at tension 9 produced a transfer texture that is more noticeable and clearly retaining the mesh grid. 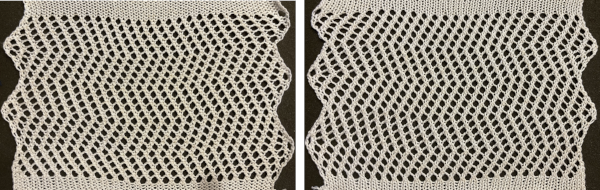 A variation in the shape formation with a number of added knit rows in specific locations which are hard to decipher even in the original paper pub, where the suggestion is for 8 rows of knitting at punchcard rows marked 56 and 24. A personal choice can easily be made both as to the number of knit rows and their location(s).
 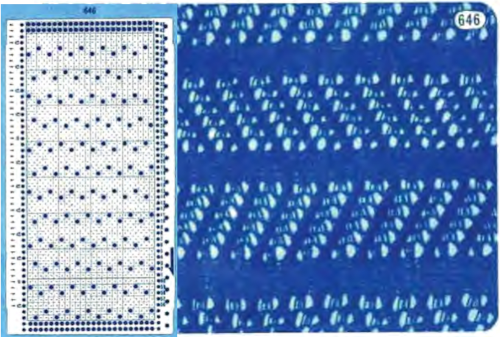 the charted repeat
  the 24X56 png
 ![]() Spacing transfers so zig zags are actually created in knit stitches and transfers are made with the LC passes alternating for 2 rows, and then followed by 4 rows, with each set followed by 2 rows knit.
Spacing transfers so zig zags are actually created in knit stitches and transfers are made with the LC passes alternating for 2 rows, and then followed by 4 rows, with each set followed by 2 rows knit. ![]()
![]() From a Brother magazine, a repeat moving toward a very different type of line, with an echo of the chevron movement
From a Brother magazine, a repeat moving toward a very different type of line, with an echo of the chevron movement 
![]() a more visible chart
a more visible chart 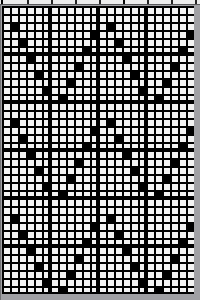 the 24X36 png
 ![]() More information on striping options: a hand transfer lace variant 2014/03/27/striping-in-lace-fabrics-1/,
More information on striping options: a hand transfer lace variant 2014/03/27/striping-in-lace-fabrics-1/,  and another using a stock punchcard 2013/07/26/from-lace-chart-to-punchcard-3-adding-stripes/
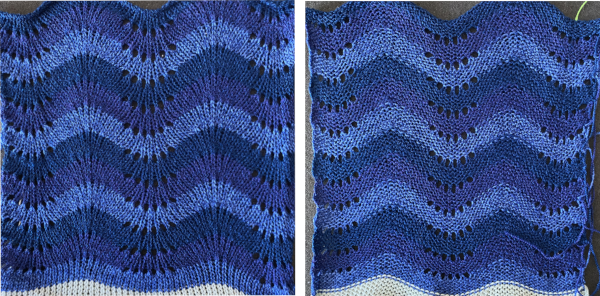 A very different chevron in an advanced technique combining tuck stitches with lace and fine lace patterning
 ![]()