Decades ago, long before English language magazines intended for machine knitters were published, several Japanese language ones were available.
I recall a particular dealer who used to attend seminars and made them available in the associated marketplace, occasionally with free issues for anyone able to execute and knit a “guess how this is made” handout.
Publishers included Nihon Vogue, ZaZa, Studio/Silver Reed, and Brother.
Before electronic machine models became available, pattern repeats were offered for use on punchcard models or simply as hand-knit charts.
This Brother pub introduced counterpane-inspired designs, such as seen in this hand-knit version found online, from an unclear source. 
The circular lace movement is created by the gathers at the cast-on edge of flat horizontal knit bands.
Partial repeats from the pub, a 16X14
and a 20X16
both designs may be scaled in size, adjusting width, height, and the number of transfers.
Many previous blog posts here have analyzed how to convert hand-knit patterns for automated lace knitting on Brother machines.
Hand-knit patterns often show transfers on the knit face side, making it necessary to mirror the charts horizontally to match them on the machine, where only the purl side is in view to the knitter.
Punchcard machines mirror punched designs horizontally automatically.
On electronic models such as my 930, downloaded PNGs are automatically mirrored, necessitating one of 2 choices. One is to mirror the PNG before downloading it to the machine, and the other is to use the built-in image reverse button to do so.
Testing a single repeat first helps isolate pattern errors. If 2 needles are selected by the LC side by side, the cause may be that the image needs to be mirrored due to the machine brand/model or the download software being used.
Assigning colors to the left and right LC transfers is useful in expanding hand transfer charts to automated designs.
Cyan cells indicate transfers to the left, magenta ones indicate transfers to the right, in this 14-stitches by 12-rows repeat.
The expanded chart that follows was created using Mac Numbers to develop a repeat for a square pane using four petals.
A blank column on either side edge will include transferred stitches and will be used to seam the knit.
Yellow/ blank rows do not always reflect knit rows in the chart; in some cases, they include passes needed for the LC to return to its proper location on the left side.
A single design repeat is expanded to 14X44.
Following the built-in machine prompts rather than the row counter, the red cells indicate knit rows after each transfer segment is completed. 

With pattern mirroring, needles 28L to 29R are in use.
57X44 matching the chart, used with the 930 #1 reverse key.To reduce the bulk when the band is gathered at the end of the knitting, e-wrap cast-on every other needle, leaving a long tail to be used for gathering the center of the square.
To gather the loops formed by the cast on, the same yarn may be used, or even a thinner, stronger yarn. Testing on a small swatch helps one make the choice.
The technique can happen off the machine, but it is also possible to thread through the loops close to the start of the piece on the machine.
To knit:
E wrap EON, from right to left
hang the cast-on comb,
knit 5 rows, ending with COR,
begin using the lace carriage,
when the piece is completed, bind off around 2 gate pegs for enough stretch, leaving a long enough yarn end to seam the piece together.
The completed band, ready for bind off
Steam/press the finished band for the initial blocking, and seam it into a tube.
Gather the loops from the cast-on with the gathering thread around, over the join, up to two times, pull tight, and secure the thread.
Lightly block once more into a square.
To knit a pentagon, a fifth repeat is added,
mirrored 71X44 PNG, ready for download and knitting on the 930 needles 35L to 36R![]()
The design can be expanded to achieve a 24-stitch repeat usable for automated patterning on punchcard model machines.
The chart is scaled up first in size to 24X26 to be followed for a possible hand-transferred lace. A single segment was tested on needles 13L to 12R; transfers proved challenging, with stitches dropping, yarn splitting, and generally resisting group moves. Finally, a 2/20 wool, with one operator error, a missing transfer/ eylet, completed the test.
The 24X26 design,
now expanded for use with a punch card, 24X184.
The repeat, rendered in BW.
The PNG for the 4-petal +1 repeat, mirrored and ready to knit on the 930, 97X184,
was divided into two tracks by img2track, with the first 50 rows in track 1, the remainder in track 2, changing the machine prompt numbers if relying on those for row numbers rather than the counter.
A 24-stitch portion of the design, avoiding the multiple tracks.
The swatch was knit on needles 48L to 49R, using 2/8 wool commonly used at tension 8, too thick for the LC to transfer without problems.
I chose to proceed manually with transfers occurring away from the knit carriage, checking that no needles were accidentally pushed back to the A position or that extra stitches were not transferred if wrong needle selection is affected when correcting dropped stitches.
1: the e wrap cast-on on every other needle with the comb in place, leaving a yarn end longer than the width of the needles in work
2: the first pass knits to the opposite side
3: the cast on comb is brought forward
4: the yarn end is threaded through a needle, and gradually stitched over, under the yarn loops moving across the row
5: the completed band, about to be bound off around 2 gate pegs.
After binding off, the piece was removed from the machine and steamed and blocked lightly. After seaming it into a tube, the cast-on edge was then gathered, and a bit more ironing and steaming followed.
Comparing the size of the two square pieces.
This is a throwback swatch, knit in a softly spun rayon, which proved to be out of control in terms of forming a hexagonal seamable shape.
Yarn choice and tension contribute to successful sizing or fails.
The quickest version, a 16X22 repeat forming a pentagon, knits with a programmed pattern to guide stitch transfers beginning with a 7-prong tool.
The yarn is 2/8 wool, knit slowly and with more patience.
The chart may be printed and followed as an added guide.
Needles 40L to 41R,
16X22 PNG![]()
81X22
was programmed in addition with the 930 #1 reverse key selected.
A nylon cord was carefully threaded through the cast-on loops at the start of knitting.
The intent was to steam/ iron the band lightly as the initial blocking before seaming, the universe intervened, letting me know it is time to replace my iron as part of the piece was immediately scorched and the cording spot melted.
Regrouping, the cast-on loops were visibly clear and easy to gather at the center after seaming using a saved long yarn end from the cast-on row.
This pentagon, compared in size to the red yarn version
For some 2D doilies, see:
From automated lace edging pattern to doilies and ruffles
Doilies: Lace meets hold and goes round
Category: Circles and Squares
Return to circles, knit “pies”, miters and spirals 4
I have gotten used to seeing charts for crochet in the round, and prefer charts to written instructions in knitting as well. My hand knitting has usually been project-oriented in terms of experimentation or exploration. Reviewing the information provided by both Zimmermann and Thomas in their early publications has led me to new appreciation and admiration for their efforts and for the knowledge made available to their readers, and not just in their time.
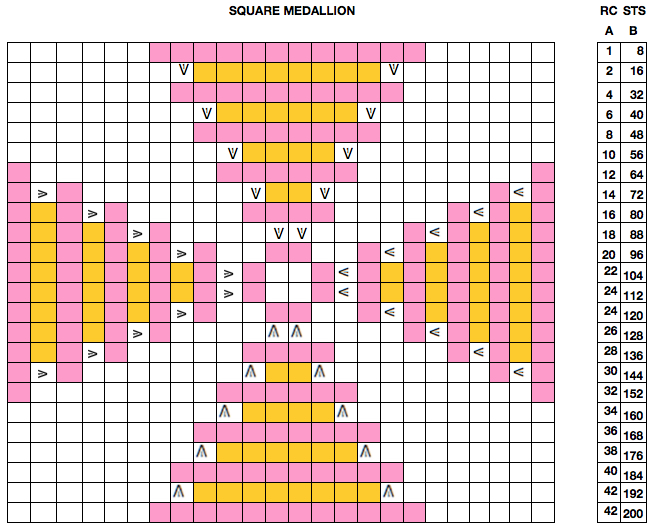
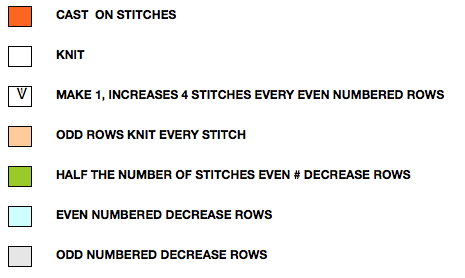
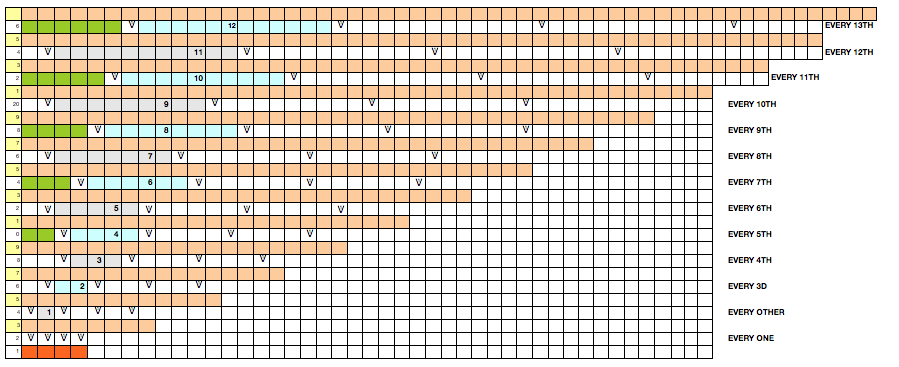
Looking at the additional medallions by Mary Thomas, I thought I would play with attempting to illustrate them, some in rounds rather than individual wedges lining up flat with blank or grayed out squares between them. The first example is my imagined square medallion (straight, geometric), p. 239 in my Dover edition 1972, and created in Excel. The work is begun on 8 stitches, divided evenly among 4 needles, knitting with a fifth. The cast-on is equal to double the number of sides of the square geometric shape, 4. A hexagon would begin with 12 (6X2), an octagon with 16 (8X2). In this instance, the increases are arranged at the beginning and end of stitches on every needle. When compiling information on machine knitting, I generally swatch to proof ideas. I am not planning on making accompanying samples or swatches for these.
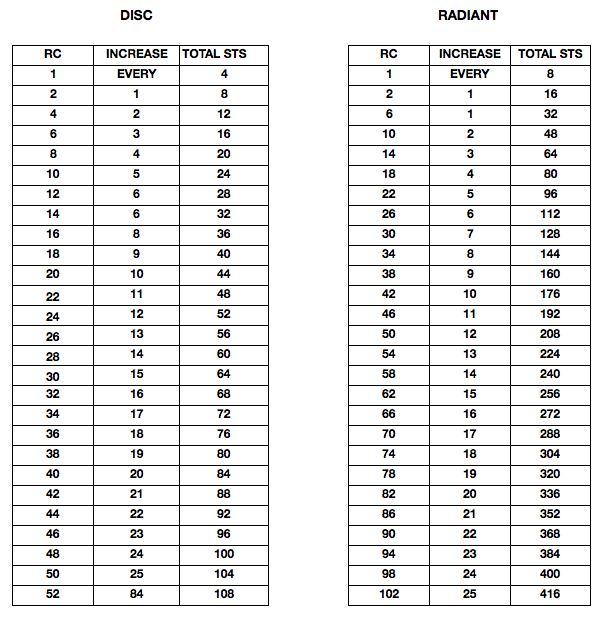
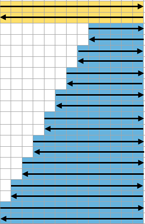
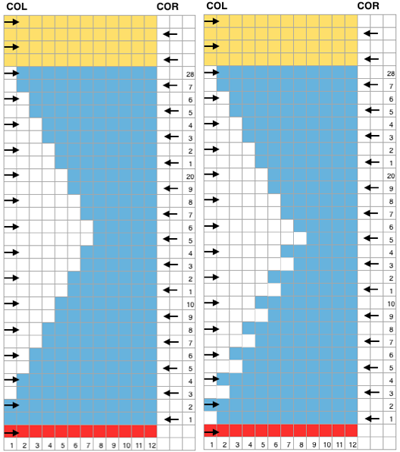
I knit primarily on the machine and prefer hand knitting on long straight needles as opposed to rounds, so I find myself often referring to counts as rows rather than rounds. For square medallions cast on 8 stitches, divided into 4 needles, knitting with a fifth. In all patterns after the cast-on row is divided, the first round is knit in the back of all stitches to flatten them. Stitch counts after increases sorted high to low is helpful when knitting from the outside edge in, and in that instance they become decreases. For the square medallions, they are shown in that order, with counts for many more rounds than those in the illustrations. Beginning with the pentagon, they reflect stitch counts from the start of each segment shown.

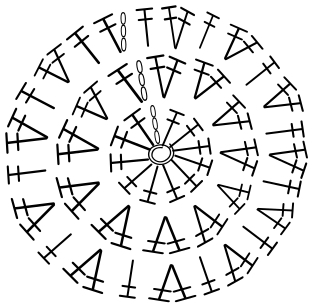
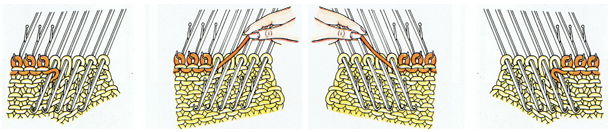
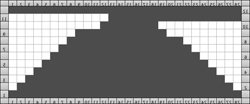
The windmill medallion (square, p. 240) instructions given: beginning on round 6 “M1 into the second stitch from the beginning and the third stitch from the end of each needle. Continue thus on all even rounds”
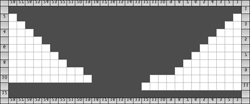
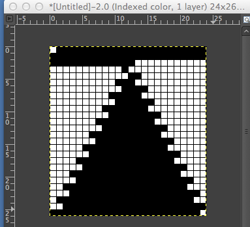
The maltese cross medallion (square, p. 240) lines up the side of the M1 increase, in the center of each wedge. Increases are grouped together at the center of each of 4 needles in use may also be grouped on either side of 2 center stitches
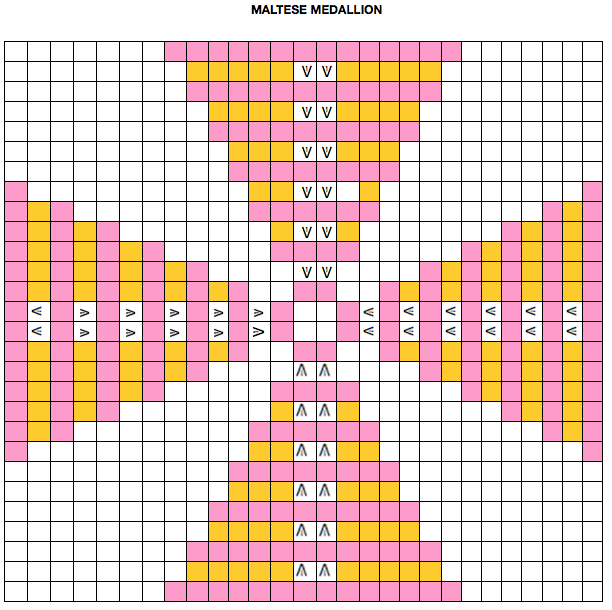
they may also be grouped on either side of 2 center stitches
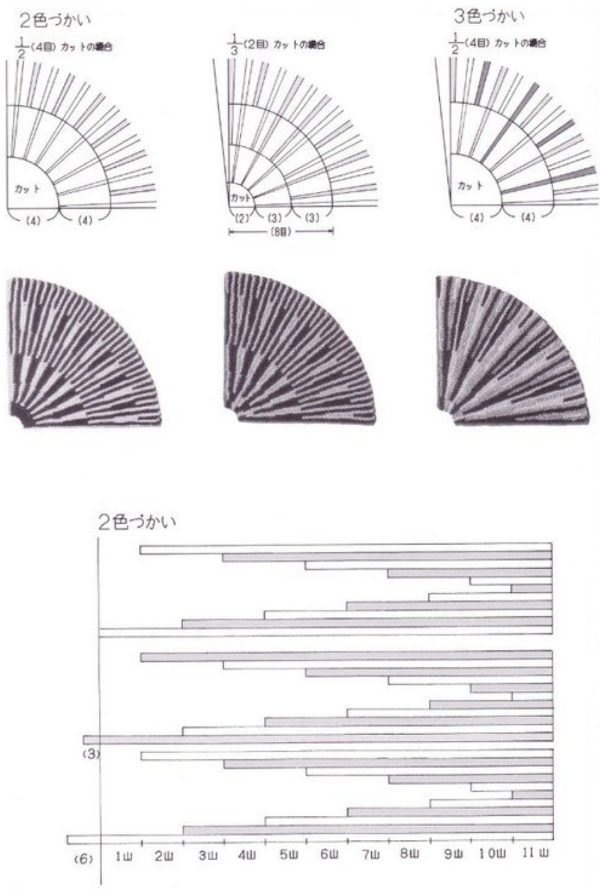
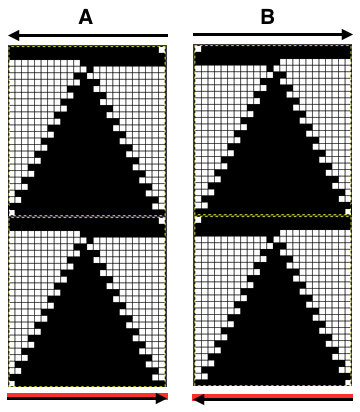
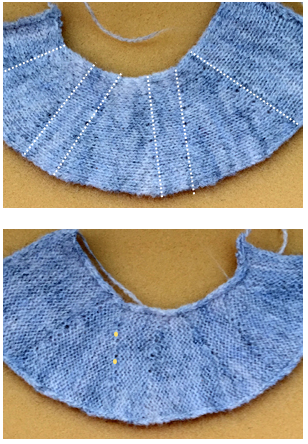
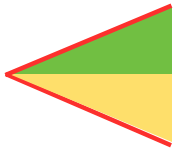
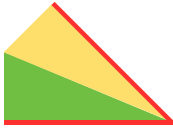
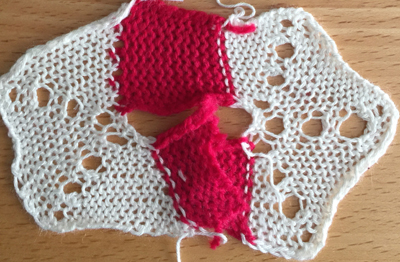
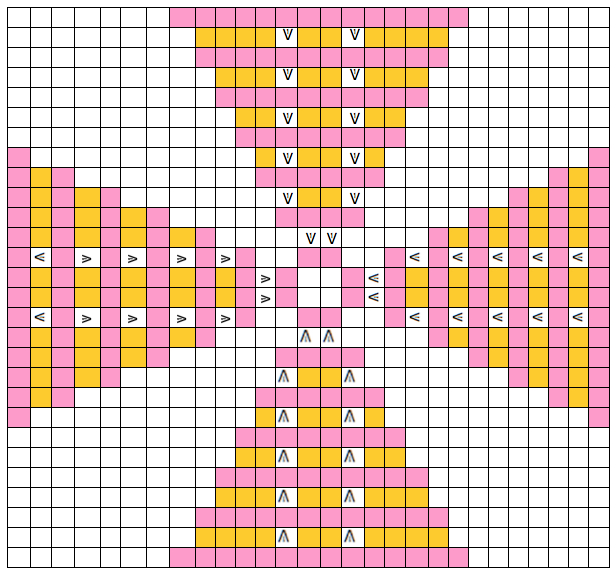
In a square medallion (bias, swirl, pp. 241-242) increases are placed on only one side, at the beginning of each wedge. Yarn overs are used to create eyelets for more ease when attempting to keep the square flat, and the increase round is to be repeated: “as required”. If double yarn overs are used, drop the second yarn over on the next round. They are made before the stitch. Single increases are to be made each round. Here are the wedge shapes side by side
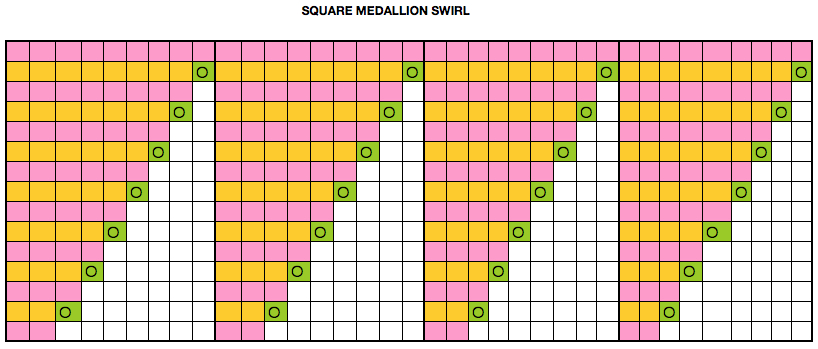
around a center core
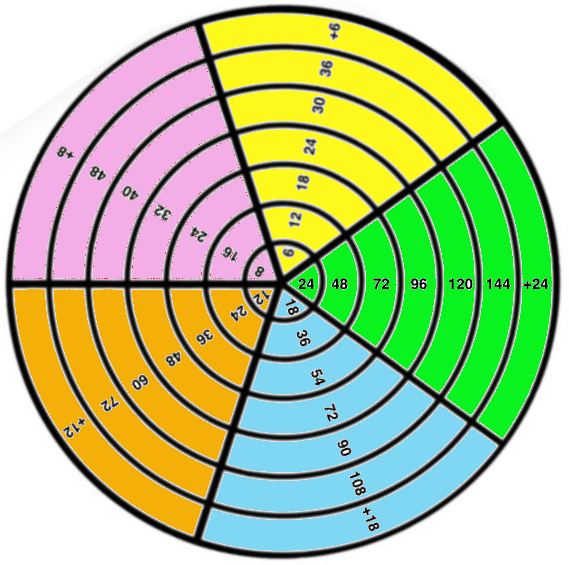
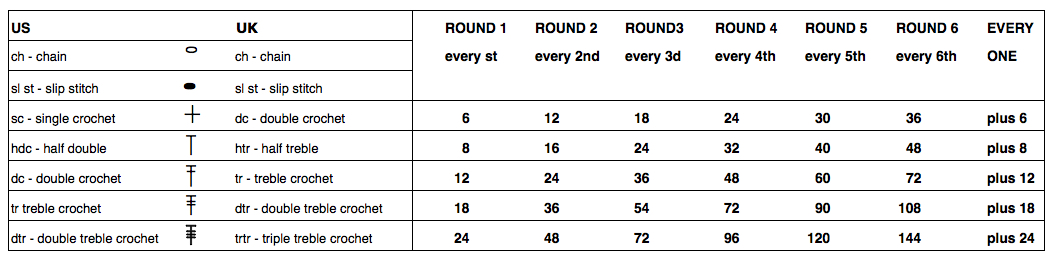
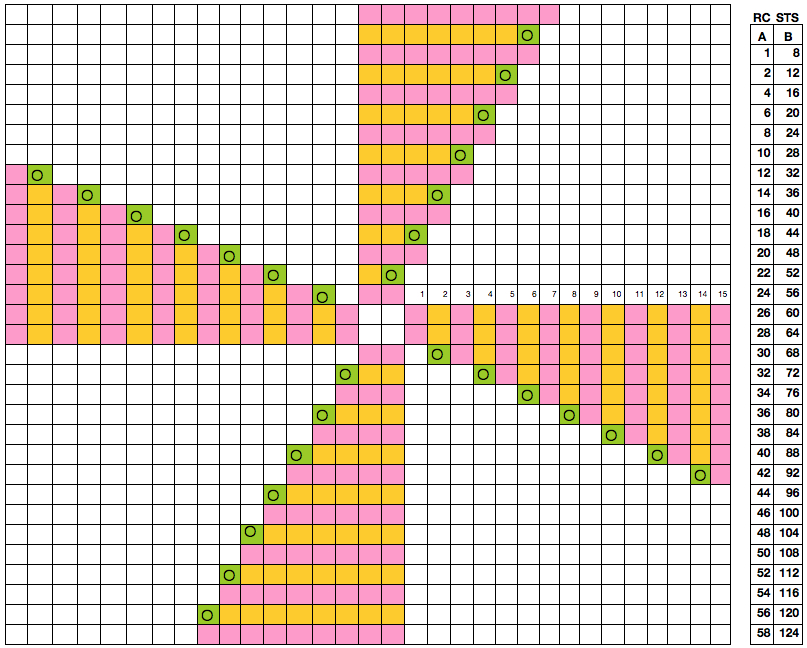
For a pentagonal medallion (pp. 242-43) cast on 10 stitches divided evenly, or as the number of segments increase, work 2 sections or more on any one needle. For the swirl double yarn overs may be needed to keep the work flat. Thinner yarns may require additional knit rows between increases. Stitch counts
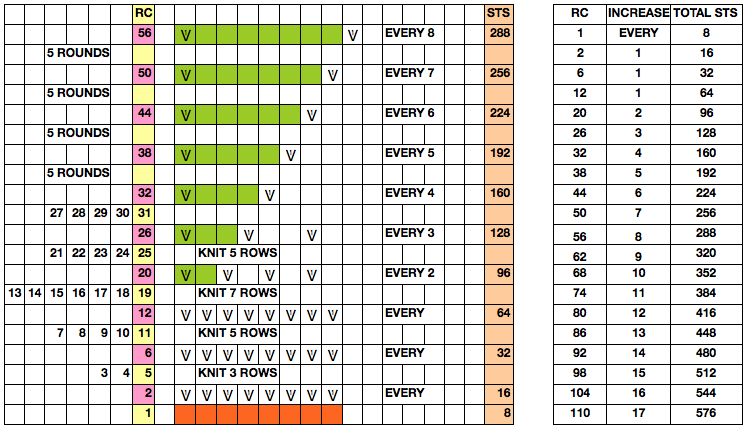
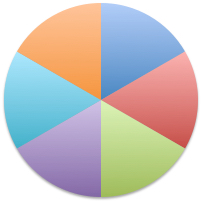
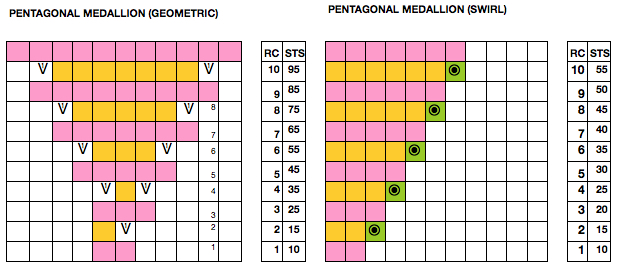
For hexagonal medallions (p. 243) cast on 12 stitches, two sections are placed on each of three needles, knitting is done with a fourth. Each increase round will add 12 stitches; 2 or possibly even 3 rounds may be needed between each increase row to keep the shape flat. STS column reflects their number after increases have been made
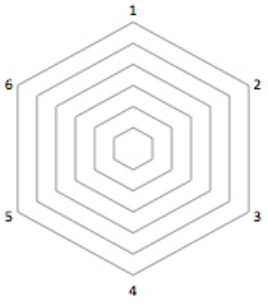
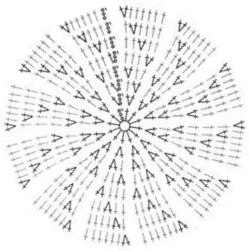
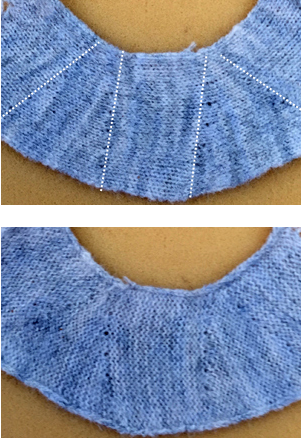
The hexagonal medallion swirl (p. 243) is shown using both M1 and YO increases. Here the rate of increase in rounds is slower than above (2 per needle as opposed to 4), so increase rounds are separated by only one row of knit stitches
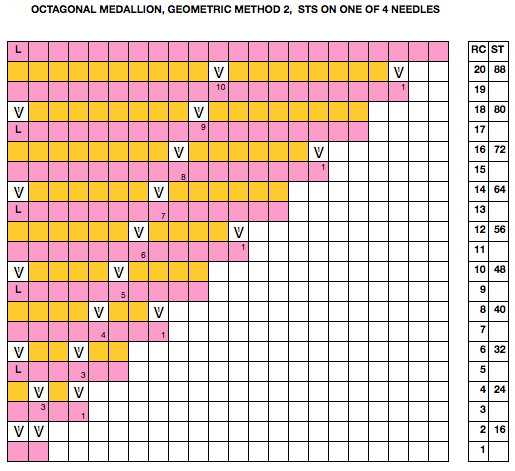
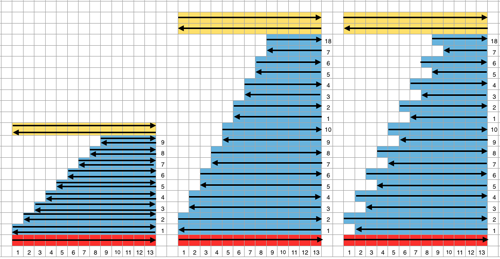
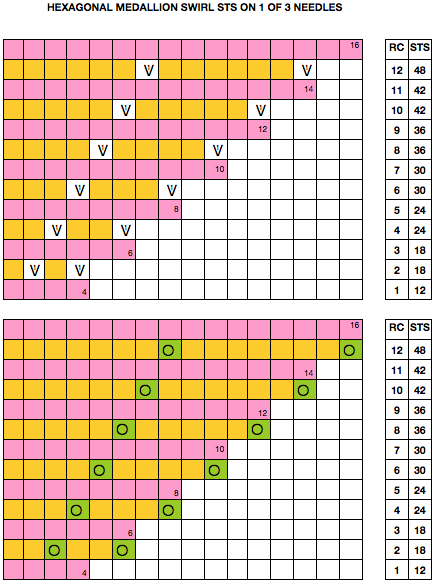
The octagonal medallions (pp.244-245) are cast on 16 stitches, divided into 4 needles, and knit with a fifth. To make a smaller center hole, 8 stitches may be cast on, doubled on the next round, and then divided. The first geometric medallion shows increases (4 per segment, 16 per round) in single rounds, requiring several knitting rounds between the increases. The second medallion uses more frequently (2 per segment, 8 per round), so single all knit rows separate rounds
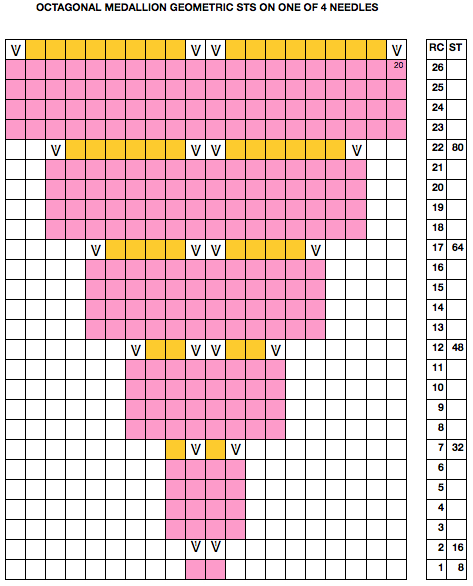
For the octagonal medallion swirl (p.245) directions are the same as for the hexagonal one, with a 4th segment providing extra sides
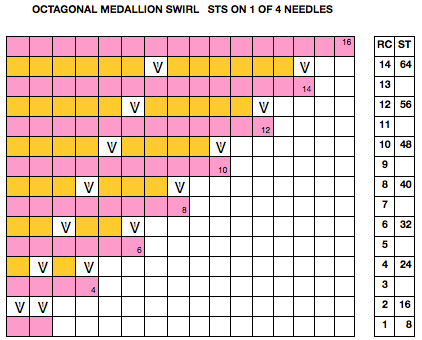
If the perimeter or circumference of the shape to be knit are known, the process may be reversed from the edge in, with decreases replacing increases. The advantage of working from the center out is that adjustments i.e. extra knit rows between increases, changing increases to yarn over(s) for added ease or decoration, etc. may be made far more easily as the work grows. Considerations should be given to leans of M1 stitches so they point in opposite directions on alternating sides. Motif and pattern placement can only be planned after these building units have been sorted out.
Return to circles, knit “pies” 3
Elizabeth Zimmermann provided guidelines for circular shawls in her books and publications, including “Knitting Workshop”. For a basic pi shawl (p. 112, Schoolhouse Press, 1984) the assumption is that each section is twice as deep as the previous section and has twice as many stitches. Below CO row represents cast on stitches if the work is to begin from the center out, Column A the row count on which the increases take place, column B the number of rows knit just prior to the increase row (A-1), and C the number of rows available for any planned repeat (A-2), these are constants. The columns directly below each cast on (CO) number (orange) counts represent the number of stitches when increases are complete. The stitch count doubles when the number of rounds has doubled.
Mary Thomas’s Book of Knitting Patterns, Dover 1972, p.p. 245-247 provides guidelines for circular medallions. She calls her first a “disc” medallion. In executing it the aim is to scatter increases so they are less visible and do not form spokes. Four stitches are cast on, with 4 stitches increased in the total count every other row. The number of stitches between M1s increases by one on every other row. My chart happens to read from left to right. As with any knitting in the round, the process may be reversed, starting at the circumference and moving toward the center. I personally like charts to help visualize results, and have revised her counts in the illustration below so increases are at the same rate but placed a bit differently within the rows. On rows with even numbers between decreases, start row with half that number of knit stitches before the first increase. Because one is knitting in the round, with knit side facing, all rows are knit. If the work were knit on 2 needles, knitting every row would produce a garter stitch. 
what happens if increases “line up”
For her circular “radiant” medallion after the first 2 rows increases are made every 4th round. My chart is renumbered excluding the first 2 rows, so the increase rounds would occur on numbers divisible by 4, making it easier for tracking them. Each “building” round increases the number of stitches by 16.
In her “target” circular medallion, the building increases are arranged in concentric circles. Each increase row begins with a M1. Once RC 20 is reached, a stitch is added between increases on each increase round. This chart reflects the knitting progress, but not the shape. STS column on right reflects the total number of stitches after increases have been made. Each building round after RC 6 increases the count by 32. Formulas for more, varied geometry-based medallions are also offered in the book. I finally “discovered” actually using formulas in Excel! The video that clearly and quickly helped me learn how to: https://www.youtube.com/watch?v=QFVkSnGgZZc
looking at the flow in table form for the first 2 medallions
These formulas do not take into account changes in gauge or stitch type within bands. For similar shapes to be achieved in machine knitting, the number of transfers would be prohibitive. In order to achieve similar shapes, one begins with the radius of the finished circle and the shapes in the family may be knit sideways, using holding.
Hand knitters can work with 4 double-pointed needles, one or 2 (or more) circular needles, and crocheters can follow similar shaping methods. The advantage to long circulars is less bunching up as the work grows, and if you like working flat or want to try the garment on while shaping it, you can use more than one long needle, making the piece or the try on manageable. Working from the top down when knitting such shapes may give one more control over the size of the finished piece i.e. on length of body and sleeves, height between bands, extending a yoke into a shoulderette or cape. Stitch pattern size and repeats add to the math calculations. Garter stitch is the only hand knit stitch that approaches a square gauge, could be used in combination with patterned bands.
The charted patterns above rely on M1 to increases. Yarn overs may be used for decorative holes at increase points. If preferred, the hole may be diminished by twisting the stitch when picking it up on the next round.
When knitting in stripes, the “jog” at the color change in knitting can be eliminated by slipping the old color purl-wise and starting to knit the second stitch. TECHknitting provides more alternatives in her posts: http://techknitting.blogspot.com/2007/01/jogless-stripes.html
http://techknitting.blogspot.com/2011/03/jogless-stripes-pretty-picture-version.html. For a method using yarn ends and a needle when the yarn is cut http://imgur.com/a/NREsH.
For shawl shapes and their geometry using YO increases, see the posts and publications by Holly Chayes.
To start it all from the center out: I am used to doing the magic loop cast on with a crochet hook, and then moving on from there, Kitty Falol shows it worked with DPNs.
Return to circles, knit “pies” 2, round yokes and more
Just as other knitwear styles have varied in style, ease, and fit over the years, round yoke sweaters have also done so. Yokes can be wide or narrow, in patterned or textured stitches, and in varied proximity to the neckline. This is not generally a tailored style. Ease in knits can be calculated on the basis of fashion or personal preference. With some familiarity with slopers, measurements may, however, be adjusted in this style as in any other sweater. Neckline measurements do not reflect the measurements achieved after adding finishes i.e. turtle or round. Depending on the size of the yoke, shaping can begin at the armhole level bind off (seen in the early hand knitting directions in the 70s), while smaller yoke shaping can begin at whatever point is desired, extending to the neckline, or simply to create a design band. The shaping is created by decreases if the garment is knit from the bottom up, and with increases, if worked from the top down. In most styles, the same number of rows are worked from the armhole bind off or held section to where yoke sections meet. At that point, if hand knitting on circulars the 4 sections: i.e. left sleeve, front yoke, right sleeve, and back yoke may be picked up and joined for completing the yoke. My illustrations have been created using Mac’s Pages lines and shapes. They are not to scale.
Beginning to visualize the process: yokes are generally superimposed on raglan shaping
they form part of a flat circle; here is how they might appear in a partially seamed cardigan without front bands. They may be created in varying widths or patterns,
and in a pullover with shaping in the back that raises the rear neckline. Some of the early patterns were executed with front/ back and both sleeves sharing equal measurements and slopes
separate the elements: the yoke 
the front and back can begin to consider shaping at breasts, waist, and those wedges under where the yoke “circle” meets the sweater may be short rowed on each side with the intent of achieving a much better personal fit
Hand knitters are probably familiar with Elizabeth Zimmermann and her daughter, Meg Swansen. Handknitting with Meg Swansen 1995, and Elizabeth Zimmermann’s Knitting workshop 1981, Knitting around 1989, Knitting without tears 1971 are classical references that include information on yoke creation, including these guidelines
Other authors suggest 1/4 of total body and sleeve measurement in stitches (excluding armhole) for a tighter neckline (turtle neck), one third for a more open style (crewneck). Original circumference/ body measurement should include any ease. Though decreases for the yoke: first halfway up 25%(one out of every 4), second 3/4 of the way up 33% (one out of every 3), and last 1/2 inch before full depth is reached 40% (two out of every 5) are the most common, they can be placed and varied to suit your own design.
In drafting your own patterns and partnering with someone, a tape measure or string can be laid on the shoulder line, etc. for an idea as to preferred placement and measurement. Necklines finished by bound-off stitches whether machine or hand-knit, do not stretch, so measuring your head with something that does not as well gives you a guideline. Yokes end in open stitches, so the thing to consider there is what method is used to finish the neckline and its own stretch factor after bind off. Hand knitters have the added benefit of splitting the work onto 2 circulars and trying on the sweater or its pieces on while in progress to double check fit.
Japanese designers began to publish patterns that often included yokes that were constructed on the top of the drop shoulder line, with the back yoke placed higher than on the front. Such yokes also began to be represented in stepped figures showing decreases. In the round calculations are gauge based, not relying on the pi formula.
modified raglan for higher placement of yoke on the back of the body
full pattern with traditional full cap sleeve
pieces meeting at dropped shoulder line: dotted line represents back collar placement, note difference in height between the back panel on the lower back, and front panel on lower right
a sample diagram from a Japanese magazine 
Yoke shaping may be indicated in a stacked format. The final count and frequency of decreases are shown, publishers may vary in language. On the first row here 4 sts – 2X means there is a group of 4 stitches followed by a decrease 2 times, then 5 stitches followed by a decrease 23 times, etc.
Two online calculators are available to help with DIY: 1. the Yoke-U-Lator no longer live, and 2. for Lopi, Icelandic styles. The image below is a screenshot from the latter website, indicating a sample possible result. There had been issues with Silverlight not working in some late OS updates, making the site unusable for many. On 3/12/18 after installing the latest update for the plugin from Microsoft, I was able to run it using both Safari and Firefox respectively.
Jessica Tromp offers free circular knitting patterns with a round yoke, dimensions in inches and ounces.
There are endless possibilities for combining math formulas, gauge, and pi. There are many ways to do decreases. With planning so that much more frequent intervals happen between decrease rounds, the decreases themselves can be fabricated to line up in line, and the resulting texture creates the interest in the sweater as opposed to any color patterning (i.e. along white lines)
“pie wedges” may be placed on neckline, yokes, sweater parts, various silhouettes and garment pieces, or full shapes (red dots outline possible dolman sleeve)
from a Japanese magazine a hint of detail that must be calculated
and the pie may be oriented in different locations on any one piece 
from a Japanese knitting magazine, an idea for long sleeve and side details merging with and becoming part of a circular yoke
For some of the math calculations please see: https://alessandrina.com/2011/06/18/oh-the-math
“Decreases” in rib sometimes can be achieved through changes in needle size if hand knitting or tension changes on the machine. The yoke in machine knitting would need to be split into 2 parts or knit sideways. Plain colored rows between bands of FI may appear noticeably lighter in weight, so using a 1X1 one color FI pattern or double strand of one of the pattern colors may improve the look.
Before transferring stitches on the machine in the single color rows, make your transfers. The lace carriage may be used after selecting appropriate needles and putting them in position. Knit the following row before removing knitting on from the waste yarn or garter bar. If stitches are tight for garter bar use sometimes the row after transfers may be knit at a looser tension to facilitate the process, and the difference may not be noticeable when knitting at “normal tension” is resumed. The carriage should be set to plain knit for row prior to and after transfers. It may be easier to work toward the center from each side when returning stitches to the needle bed. In order to match the pattern at the shoulder seams or when motifs need to stack in position on separate bands, the stitches need to be rehung at specific positions on the needle bed that take into consideration the size of the repeat and its location within the stitch count. Also, take into account the seam allowance. One stitch extra on each of the meeting seam sides will allow the end needle selection stitch or an extra patterning needle to be hidden within a full stitch join. Working on machines that preselect needles or pushers makes tracking a bit easier. It is possible to combine knitting pieces in both directions. For example, knit yoke up toward neck, join shoulders and then pick up appropriate stitches to knit body and sleeves from the top down. Top-down makes any adjustments in length easier prior to finishing the sweater. Short rowing in garment segments underneath the yokes makes for a better fit at the bust line and upper back.
Calculators to help with all that math: online
http://www.thedietdiary.com/knittingfiend/tools/MagicFormulaSleeveTopDown.html
http://www.thedietdiary.com/knittingfiend/tools/MagicFormulaSleeve.html
http://www.thedietdiary.com/knittingfiend/tools/EvenlySpace.html
http://www.thedietdiary.com/knittingfiend/tools/IncreaseEvenlySpace.html
http://www.thedietdiary.com/knittingfiend/EZsweater/catalogSizeChart.html
http://www.thedietdiary.com/knittingfiend/tools/PieWedgeShawls.html
http://www.eskimimimakes.com/knitulator-increase-decrease-knitting-calculator-eskimimi
for purchase:
https://itunes.apple.com/us/app/knitting-toolkit/id960312887?mt=8
https://itunes.apple.com/us/app/knit-evenly-calculator/id370449748?mt=8
Going low tech: if gauge works out to whole numbers, shapes can be plotted out on square grid graph paper (or grid created within the software to suit) where each square represents one stitch, one row. Draw connecting lines, follow the outline, filling in squares (or removing them) as the edge moves a whole unit (k2 tog). Here the goal is to go from 39 stitches to 5 over 60 rows.
Color bands could be added and planned between decreases, which should occur on single color rows. Once a gauge is obtained, charting on graph paper or within programs can be boiled down to connecting dots and following outlines as above. Some simple breakdowns for outlines of garment pieces/ shapes 
more inspiration from an old Japanese magazine
This was a share of mine on FB last March attempting to illustrate shaping by decreases across rows while maintaining the FI design
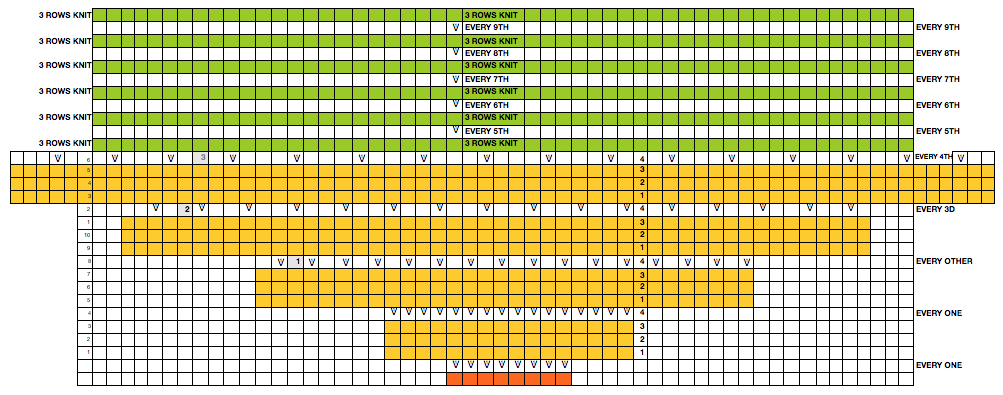
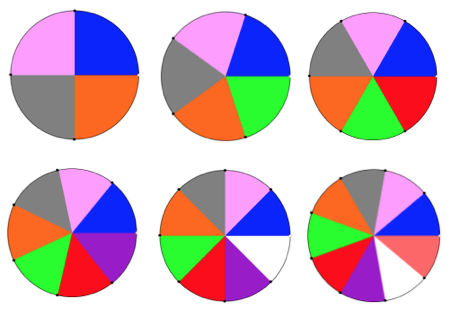
Starting with a square shape and going around.
Garter stitch hand knit samples from a Japanese magazine, elongate X2 on the machine with selection toward the color changer for every 2 rows knit in each color to add striped patterning to modular wedges


Return to circles, knit and crochet “pies” 1
I began a series of posts on miters and spirals created on the knitting machine back in 2011. The oldest posts, knitting math and pies, back to that pie, a bit of holding, and revisiting miters and spirals to form varied shapes begin to address creating flat circles in machine knitting using holding techniques.
Hand-knitting in circular format and crochet share some similarities. There are 2 methods of constructing circular work in crochet. 1: in rounds, (akin to knit miters in shape) where the end of each circular row is joined up to its own beginning to form a ring. A new starting chain (s) is formed to take the row to the proper height for the next row to remain constant. Depending on the pattern, one has the option of continuing by turning the work or not at the end of each row. Doing so allows the opportunity of altering textures and work on the fronts or backs of stitches. 2: in spirals. Rather than joining the ring, one continues on by going to the tops of the posts in the previous row.
With spirals, it is useful to mark the beginning of each round. Knitting markers shaped like safety pins are handy for that purpose. A line in a contrasting color can also be created using a separate strand of yarn and alternating carrying it back or to the front prior to forming the first stitch in the new row.
As with knitting, crocheted circles are not true circles, but rather, they are polygons. The way to make shapes more circular is to scramble the location of the increase points, putting them in different starting positions in each round (always spacing them equally and keeping the formula). Within limits, one may make the starting number of stitches in the first round a multiple of the number of segments in the finished shape.
With the creation of a flat circle in mind, the number of stitches needed depends on the height of the stitch. The taller the stitch, the greater the number of stitches required. If the stitch stays the same throughout, the number of stitches added on each round is constant. Test work regularly at intervals as the work grows by placing it on a firm, flat surface, to see if working only one stitch into each stitch is required / enough at that point to maintain the shape. The more segments, the smoother the circumference.
Unlike in hand-knitting, the first loop on the hook does not count as a stitch until you make it into something.
Spirals or miters knit on the machine begin with their radius; one possible construction method may be inferred from these images
Spreadsheet programs such as Excel and Numbers have pie charts and other tools that can help visualize or even plan the work with symbols. Unlike machine knitting, both crochet and hand knitting may begin and grow from the center out or from the outside in. Calculated shaping with increases or decreases along circumferences at different points on the pie creates the desired shape. For the purposes of this discussion, I will address stitches in US terms. There are various published guidelines with some variations. The fiber content and matching gauge (if required) may need editing of the numbers, but, as starting points:
Single Crochet [sc]: Start with 6 sc and increase 6 sc in each round so that the total stitch count in each round is a multiple of 6
Half Double Crochet [hdc]: multiple of 8
Double Crochet [dc]: Multiple of 12
Treble [tr]: multiple of 16
Some symbols and number of stitches required in base rows in table form, for working from the center out:

the more wedges in the pie, the smoother the circumference no matter what the method. Single crochet is worked in 6 wedges
double crochet in 12 wedges,
wedges may be reduced to simple line segments 
rounds may also be created to log in and track more details 
adding wedge outlines before filling in symbols
single crochet worked with a slip stitch at the end of each row will produce points similar to those seen in miters in machine knitting
spirals produce a rounder shape
double crochet echoes the forms 
Building your own charts requires vector programs to allow for the rotation of symbols around an axis. My chart was quickly produced in Inkscape, which is free to download for both Mac and PC users. Mac users in addition will also need to download XQuartz to run the program. I created the chart with my own symbols and freeform and laid them down while viewing the grid. It turned out, however, that there are 2 published videos on how to use the program for charting crochet stitches, part 1 and part 2 by StitchesNScraps.com
Two YouTube videos on the topic: using Illustrator CS 5.1, Marnie Mac Lean’s video, and using StitchWorksSoftware. An online generator by Stitch Fiddle, and its associated video.
if donuts are the goal: find your round 
An example: in single crochet, if round 3 had been completed, there would be 18 completed stitches. Chain 18, either slip stitch or continue in a spiral to match the count at that point. For round 4: increase every 4th, round 5: every fifth, round 6: every 6th, and round 7: every 7th stitch.
Different stitch heights:
A few sites to see for crochet tutorials:
magic ring start: no chain stitches, no center hole
https://www.youtube.com/watch?v=sLUaywX0-WE
working in spirals
http://snovej.com/archives/freeform-crochet-spiral
a nice ending
https://www.youtube.com/watch?v=W_sW4xX_O70
https://www.youtube.com/watch?v=8L_rtWt78Jw&t=32s
crocheting a flat circle in single crochet: note the start “magic circle”
https://www.youtube.com/watch?v=8oDubbFVE3Y
https://www.youtube.com/watch?v=LZiCnCGP_NQ
changing colors https://www.youtube.com/watch?v=U8cLufFeenU
I tend to swatch in easy-to-see colors, and “friendly” yarn, and use tools that allow moving in and out of stitches easily until I have techniques sorted out. When knitting circles in the round, things get a bit more complex, particularly if one begins introducing items such as round yokes with patterns into garments where gauge matters significantly.
Some of the same principles may be used in hand knitting. For the magic loop start with circular needles: KnitFreedom and on DPs Webs yarn
Charting shapes for automating short row knitting and programming
In machine knitting, stitches are usually brought out to hold opposite the carriage. If multiple stitches are brought out to hold on the carriage side, floats are created. Triangles stacked vertically as seen in the previous post will create a spiral curve along the line where stitches are held. The carriage needs to get to the opposite side and back after each ‘decrease’ or ‘increase’, so pairs of rows are used to execute and reverse angles in short row shaping. When multiple rows are knit independently from the rest of the knit, slits are created. In two-row sequences, these are generally similar to holes created in lace, in longer sequences much larger slits are produced. The latter are often used as planned design elements. The small holes being visible may not pose a problem for the knitter. If they do, wrapping the adjacent needles can help eliminate them, but the doubled yarn in the wrapped needle may create small, sometimes visible bumps on the knit side of the finished piece, creating a secondary pattern.
Reducing eyelet size: in traditional wrapping required needle(s) are brought out to hold, and the yarn is wrapped under and around the last needle in the hold position on the carriage side before knitting the next carriage pass
The “automatic method” for wrapping
Decreasing: if COR (COL), 1 stitch to the hold position at a time, set the machine for holding. Bring one needle on the same side as the carriage into the hold position. Pass the carriage to the opposite side. COL (COR) repeat if shaping is 2-sided, or if shaping is only on the starting side, knit back to it, and with COR (COL) repeat process. Increasing single stitch: bring 1 needle always opposite the carriage into the work position.
Decreasing: more than 1 needle or stitch at a time: if COR (COL), place 1 fewer needle than required into hold on the opposite side as the carriage, knit 1 row to left (right), toward the needle in hold. When COL (COR), bring into hold the last, additional needle. COL (COR) repeat the directions if shaping is 2-sided, or if shaping is only on the starting side, knit back to it, and with COR (COL) continue decreases on the single, opposite side.
Increasing: to remove stitches from holding, COR (COL) place the desired number of needles into the working position on the side opposite the carriage, knit one row, repeat with COL (COR) if shaping is on both sides, or knit back to starting position COR (COL) and continue increases on the single, opposite side.
Charting out shapes knitting or programming stacked equal triangles/spirals: the wedge illustrated in the previous post
“Air knitting” is often used to think out fabric issues before swatching using yarn. Drawing lines to follow the carriage movement direction required to keep the knitting continuous, whether on graph paper or within software programs can help sort out shapes that will work in short rowing. Holding needs to happen in 2-row sequences. Below, black lines and arrows indicate the direction of knitting for each row, in this instance beginning with COR. Blue = knit stitches, yellow = all knit rows at the completion of each wedge (2 or multiple of 2, depending on planned design). This repeat is suitable for knitting a continuous strip with ruffling/spiraling at various degrees, not for ‘pie’ shapes.
Working out the repeat: the red line represents the starting, selection (KC), knit row, the numbers at the bottom the width of the repeat, the numbers to the side its height. The first repeat A results in the fewest punched holes, drawn squares, or programmed pixels, requiring being knit double length. The remaining repeats (B, C) are drawn double length, standard card rotation is used. Eyelets form at the held edge. C takes automatic wrapping to decrease eyelet size at the held edge into account. When any sequences are programmed for knitting using slip stitch, the end needle selection is always canceled by using KCII or turning non-needle selection cams in punchcard models.
A B C
the start of a miter shape: blue repeat, extra knit rows in yellow, auto hold on the bottom right
Going 3D: in many designs, the original repeat may simply be mirrored to be executed. If this is done here, one can see there is no longer a continuous knitting line, directional arrows are moving in opposite directions or toward each other from the center point
restoring continuity
and shifting rows around to create a workable repeat
one shape knit 3 different ways: red row = KC II, all knit
An executable 24 stitch, 26 rows repeat: black arrows alone indicate movement of carriage on the first row of the repeat, black arrows on red line indicate starting point and direction of movement of carriage for KCII rows. A begins to knit repeat with COR, B with COL.
The triangle’s vertex can be squared off, the height of the repeat shortened, to make 3D shapes much rounder 

Not just for electronics: some punch card repeats to try (also suitable for any machine). End needle selection is canceled. Selection rows are always toward the first pair of rows knit in a holding pattern, so for the first 2 cards, they would be from right to left. Single rows are punched but 2-row sequences are needed, so cards must be elongated X 2; miter shaping repeat is shown on the left, spiral on the right. Narrower shapes may be created and knit on the appropriate segment of the 24-stitch repeat needle positions. Use needle tape markings as guides for placement. The preselection row is from right to left, the pattern repeat begins with COL. All punched, extra series of pairs of rows of knitting may be added at the top. Note: just a few rows may not be added with a small segment of an additional card with clips, the whole repeat may have to be split into sections to allow for the extra rows and their smooth passage through the card reader. As an alternative, more rows of all holes could be added to the original card when first punched, tested, and then trimmed if not needed. It is useful to try out the repeat as a hand technique first in any of these instances, to determine personal preference.
Going 3D: punch only actual holes (black pencil marks were originally used to mark squares that needed to be unpunched for the auto wrap on right, not the best choice for B/W scans). Two-row sequences are punched, so no elongation is needed for either repeat. Miter shaping is shown on the left, spiral on right; mem <– indicates the direction for KC row; decreasing angles are auto-wrapped, increasing angles need not be as seen in the top of miter on left, where needles are returned back to work to create the reverse shape.
Some ruffle possibilities: all knit rows were added to the card on left with snaps, and are composed of all punched holes. The number of all knit rows between held segments determines the spacing between wedges and the degree of spiraling of the final fabric. KC row needs to be R to L for A, left to right B. Holding sequences are now staggered, changing the angle of the resulting curves. A short float is created where 2 stitches are brought to hold on the carriage side.
The recommended minimum for punchcard length is generally stipulated to be 36 rows. Card A without the added rows is 28 rows high (the last 2 rows are for card overlap when adding snaps), so the repeat below, with the extra segment removed, would need to be punched twice
eyelet pattern reflects shaping
B: dotted lines outline segment: yellow dots on the purl side, the 1 needle floats
one possible card revision: red dots indicate punched holes, stitches in hold as the carriage moves from the left to the right
any difference in the swatch, in this yarn, was almost imperceptible; results would vary depending on yarn thickness and fiber content.
Revisiting miters, spirals, going square, round, and more
There are times in knitting when math becomes a necessity. With online libraries, tools, and fairly intuitive software, drafting angles and shapes is now much easier. I will be teaching a class that includes miters and spirals at a seminar next month, leading me to revisit the topic. Most published pattern instructions will give starting carriage locations, but shapes may be constructed counterclockwise or clockwise depending on preference. With an understanding of how the shapes are formed and stacked, they may in turn be automated (depending on their size and the type of km) using the slip stitch setting. Stitches that are to be knit on each row are programmed as pixels, black squares, or punched holes.
Miter shaping may occur on the side or in the center of each triangular shape; a minimum of 2 knit rows usually occur at designated spots. Adding more knit rows and playing with angles of triangles will create ruffling effects, other angular shapes, pleats, and more. I have returned to using Mac Numbers, their shapes, and charts to generate most of the images below. Here the colored areas represent knit stitches, white negative (white) spaces stitches in hold. Red lines represent all knit row(s)/ spots for seaming at the top and bottom of sequences. Seaming is easiest when done by joining all knit rows. Stitches are always brought into hold opposite the carriage side and returned to work on the carriage side. In the shaping guide, COL= carriage on the left, COR= carriage on right.
knitting each segment
Yellow triangle segment: bring all needles out to hold, and push them back into work on the carriage side at the determined rate until all needles are back in work. Green triangle segment: with all the needles in work, begin to bring stitches into hold opposite the carriage at the determined rate until all the needles are in hold.
If seaming is desired in miter shaping with resulting eyelets at the sides of the triangle, the full wedge is split between the top (yellow segment) and the bottom of the piece (green segment). Knitting always starts with at least one or 2 rows of knitting (depending on whether the finished shape is to have a grafted seam. For the full wedge: * yellow segment, bring all needles out to hold, and push them back into work on the carriage side at the determined rate until all needles are back in work. Reverse shaping with green segment: with all the needles in work, begin to bring stitches into hold opposite the carriage at the determined rate until all the needles are in hold. End with knit rows (red line) across all stitches*. Repeat from * to * for the desired number of full segments, end at the top with a yellow segment if needed, followed by a knit row(s) (red line) before binding off or seaming.
shaping with resulting eyelets at the sides of the triangle: the final shape COR
the knitting sequence with top/bottom 1/2 triangle segments shown
For miter with shaping and resulting eyelets at the center of the triangle: begin with all knit row(s) (red line) at the start. To shape a full wedge: *green segment is worked bringing stitches into hold opposite the carriage at the determined rate until all the needles are in hold. Shaping is next reversed with the yellow segment, pushing needles back at the determined rate until all needles are returned to work. End with all knit rows (red line) *. The sides of this miter are all knit rows, an easier place to seam/ graft joins if needed.
shaping with resulting eyelets at the center of the triangle: the final shape COR
the knitting sequence
COR COL
a tiny test shaping at side shaping at center
In the following images, the red or blue lines indicate seams or joins
segments composing a square shape
adding squares or rectangles to alter the square
adding triangular segments: hexagon
expanding it with rectangles, shaping at sides
shaping at the center
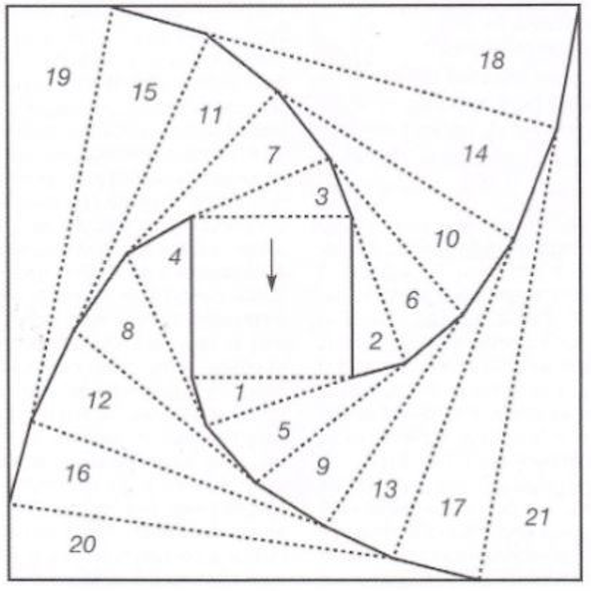
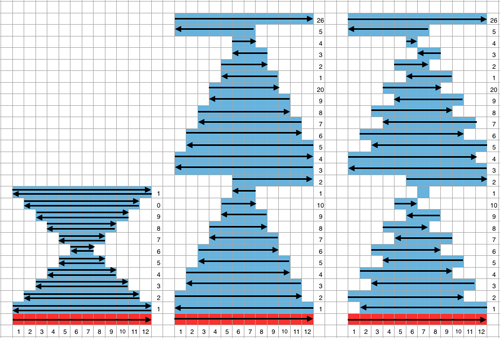
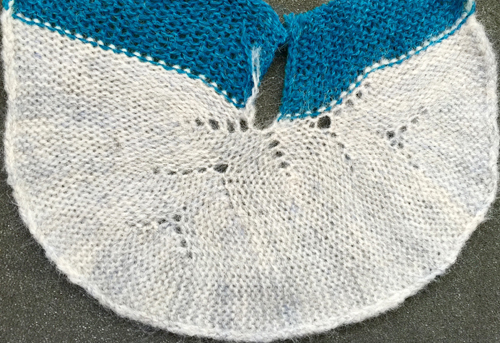
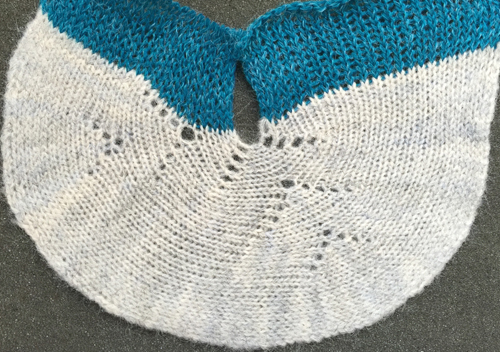
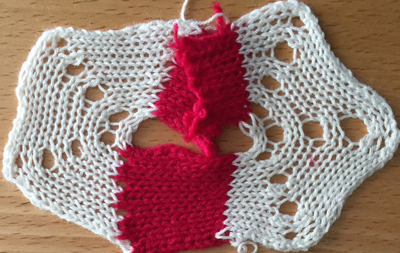
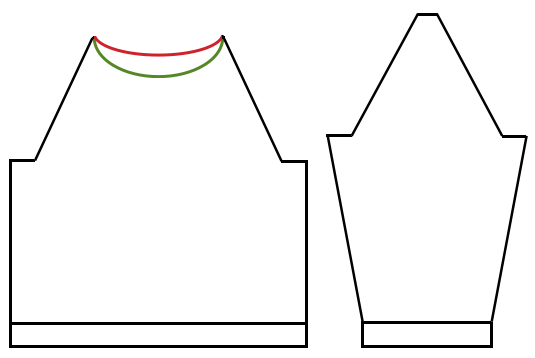
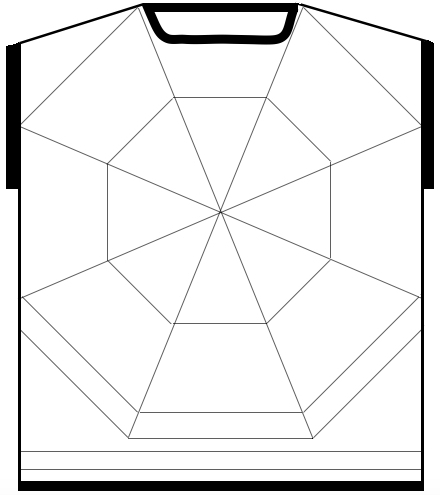
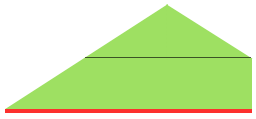
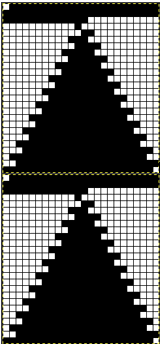
going 3D: triangular pocket with the point at the center 
combining shapes: this one is often seen in tams (hats); bottom shaping is on only one side, and at the top, it occurs on both sides

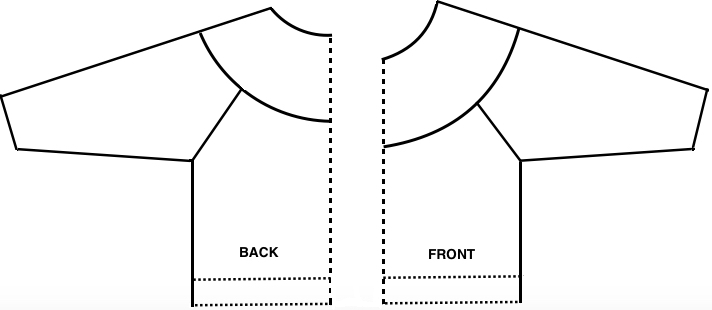
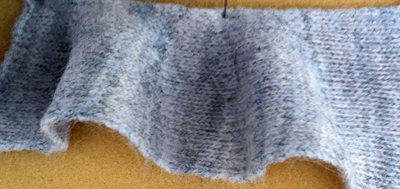
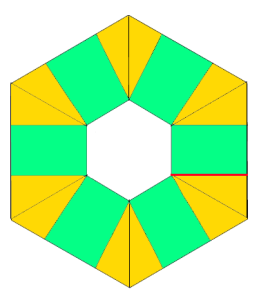
adding rectangles or squares to alter the shape

bringing needles out to hold opposite the carriage
Spiral stack 1/ green full triangle: knit row (s), *with all the needles in work begin to bring stitches into hold opposite the carriage at the determined rate until all the needles are in the hold position, end with all knit row(s) (red line).
Spiral stack 2/ yellow full triangle: knit row (s), *bring all needles out to hold, push them back into work on the carriage side at the determined rate until all needles are back in work, end with all knit row(s) (red line).
If the object is to construct a circular shape, the greater the number of panels, the smoother the outer edge of the piece. Some of the pie-bilities: 
In all instances above the radius and therefore 2 sides of each wedge remain equal in size, and therefore are composed of the same number of stitches. The triangle knit to achieve these shapes are isosceles triangles, where 2 of 3 sides are equal in length and in this case, the number of stitches. The 2 equal sides are usually referred to as legs, the remaining one as the base. The 2 base angles are equal as well. The remaining angle is the vertex one. In knitting, this will be the pivot point for the wedges, the center point of the “pie” shape. In the illustrations below the vertex, angles are marked by blue dots. Its angle value is the first represented in the numbers immediately below each shape, with the other 2 numbers indicating the remaining, equal 2 angles. The sum of all 3 should equal 180 degrees.
Taking it to a shape: octagon (half the total # of wedges shown). In colored shapes spiral, stacking equal triangles is shown on left; full triangle, divided into 2 segment shaping for miter on right.
Oh, yes, the math! The desired shape may be drawn to scale using any number of tools. Wedges may in turn be shaped following the scale drawing on any charting device such as knit-leaders, or stitches and rows required may be calculated on actual full drawing measurements. In knitting, the equal sides (AC, AB) of the triangles are formed by stitches and the height of the triangle (CB) by rows. If the finished size matters, an accurate gauge is required. One approach to calculating the base (CB) is to think of the whole shape as a complete circle, in this case, divided into 8 “pie” wedges, with congruent sides (radius) measuring 10 inches each. To find the circumference of the circle, multiply the diameter (20) inches by pi 3.14 = the total in this case, of 62.8, rounded off to 63. Divide that number by the number of sections (8) = 7.85, rounded off to 8 inches (rows). If the stitch gauge is 6 stitches and 8 rows per inch, each triangle would be 60 stitches wide, and 64 rows high. Holding happens every other row, opposite the carriage, so the total number of rows is divided by 2 = 32 for knitting a spiral. The stitches are distributed along one edge over a total of 64 rows in height. The goal is to reduce the shape down to the next to the last group, followed by two rows knit over all the stitches at the end of each section. This will cause a small hole at the center of each completed pie due to extra rows knit. For a miter 2 triangular shapes are required for each wedge, so holding sequences are recalculated with shaping now occurring over 16 rows for knitting a miter. 
An online calculator is available now via the Wayback Machine to help calculate the number of stitches brought into hold opposite the carriage or into work on the carriage side, sequence preference should be tested on swatches where the gauge is significant. These results were from 2016, the calculator does not appear to work in 2025. Not clear whether that is the result of working on a Mac with latest OS.
Magic formula (X represents times)
In the photo below I chose to start with all the needles out to hold, pushing them back into work across the knit for the spiral. For the miter again, I began with all needles in the hold position, pushing back the required needles into work; for the top half of each wedge needles were returned to hold opposite the carriage at the same rate, forming the upper half of the “pie slice”. The swatch is not worked at the same rate as the shapes calculated above. It is shown on its purl side with color changes to highlight the intersections where wedges begin to repeat. The yarns used are random acrylics, in different weights. 
A previous post on short-row knitting with links to other online sources 2013/12/18/holding-stitches-short-rows/.
A category search in my blog roll for miters and spirals will link to blog posts including pies:
2011/06/18/knitting-math-and-pies1/
2011/06/22/back-to-that-pie-a-bit-of-holding/ breaking and mixing up pie wedges:
2014/07/21/miters-and-spirals-visualizing-charting-and-more-3/ .
A garter bar short row trim:
2013/02/28/garter-bar-short-row-trim/.
Charting shapes: using Gimp and Mac Numbers:
2014/07/14/miters-and-spirals-visualizing-charting-and-more-1/
Executable charts and shapes, automating them with slip stitch:
2014/02/24/holding/ short-rows-hand-tech-to-chart-to-automating-with-slip-stitch-1/
2014/02/20/wisteria-cousin-revisited-holding-using-slip-stitch/
2013/01/21/automating-pleating/ 2013/12/28/short-rows_-balls-tams-3d-rounds/ 2015/09/07/a-tale-of-2-donuts/
2011/03/29/lace-meets-hold-and-goes-round/
2011/03/29/the-doilies/
Miters and spirals: visualizing, charting (and more) 3
SPLITTING THINGS UP leads to a series of quite different fabrics, sometimes creating interesting secondary solid color shapes when striping is added to any of the forms; repeats will need editing to avoid extra rows to keep the designs balanced, or have them added across their width for extending shapes, such as in creating ruffled effects. I have worked on these charts using Numbers, image capture, and resizing and editing again in photoshop if needed. The images below are not intended as a “sit and knit” tutorial, but rather as a start for creating your own designs, on the desired number of stitches, I randomly picked 22
some possibilities on method: SPIRAL original shape
splitting in 2 parts
changing positions and stacking, all knit row edited to bottom of repeat
a mirrored segment
added to first repeat, center line double row edited out for knitting
MITER: original repeat
split repeat
moving parts around
areas for adding plain knit rows in desired numbers across the knit (yellow), keeping in mind how this will affect color changing sequences if striping is used to create secondary patterns; repeat usable for machines with color changer on right
mirroring the whole repeat horizontally for use with color changer on left
Changing colors at regular intervals including every 2 rows will yield secondary, geometric patterns; all knit rows may be added to the right or left of the shapes maintaining color changes, for different effects; if these are planned in extended “white areas”, the holding sequence needs to be maintained every other row; slip stitch setting may be used to automate, with repeats reworked for use on 24 stitch punchcard machines. I find when exploring any of this initially, working repeats as hand techniques helps me understand necessary sequences and editing before committing to punching holes, filling mylar squares, or programming pixels. Swatches and notes, swatches, and notes…
Miters and spirals: visualizing, charting (and more) 2
Visualizing the shapes (using charts in Mac Numbers)
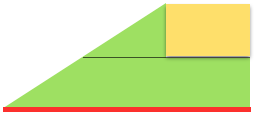
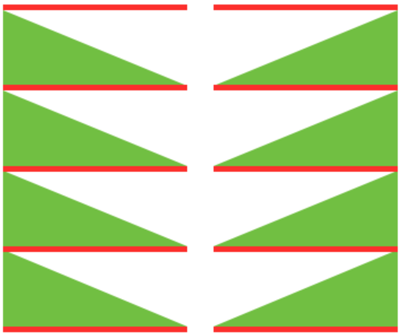
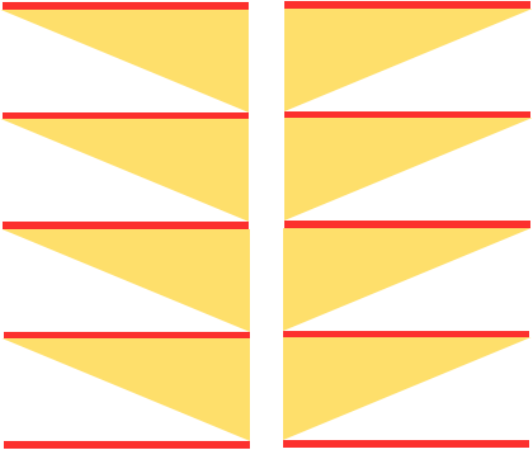
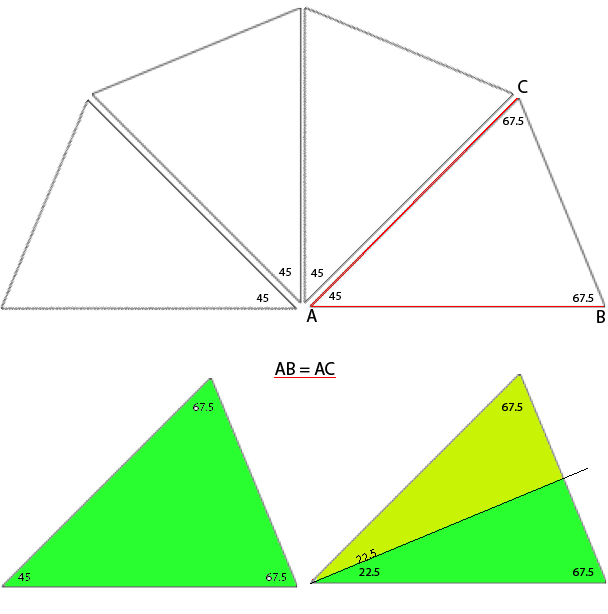
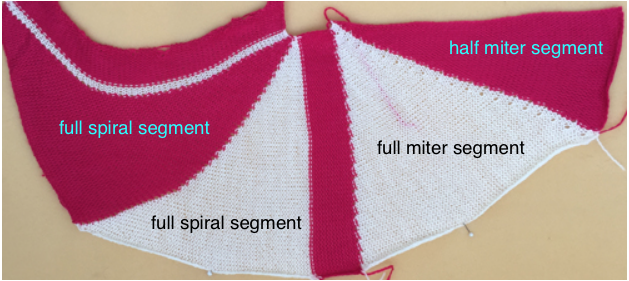
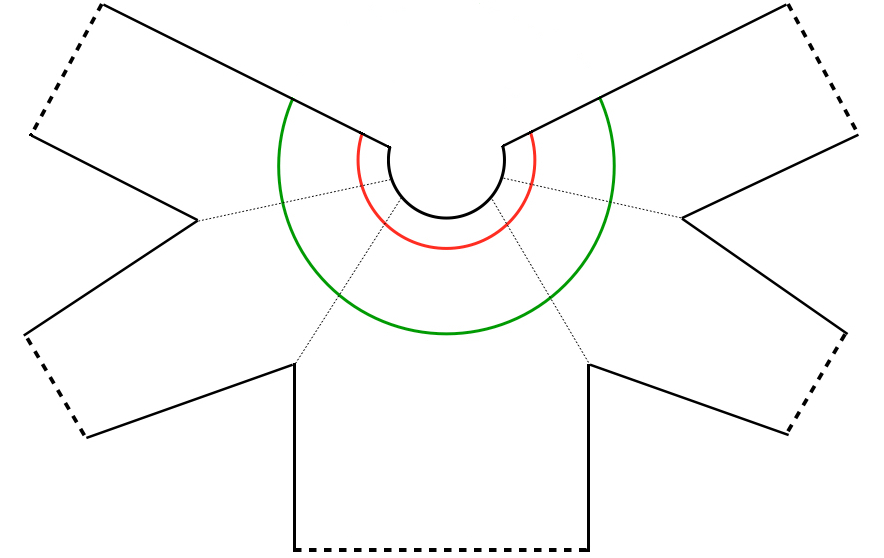
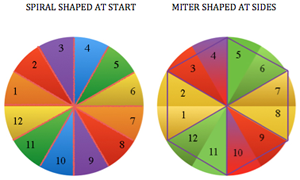
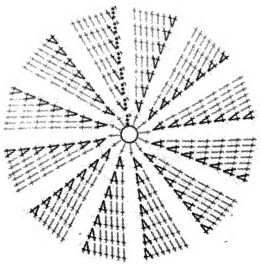
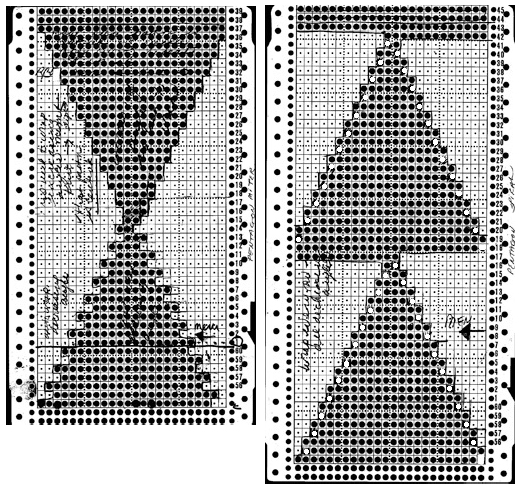
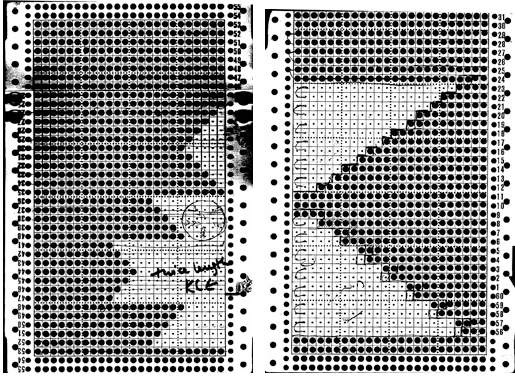
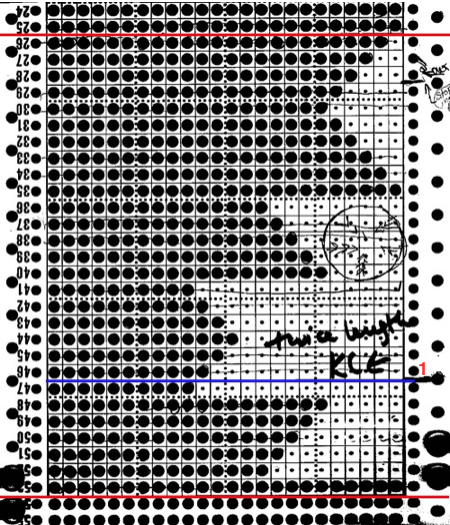
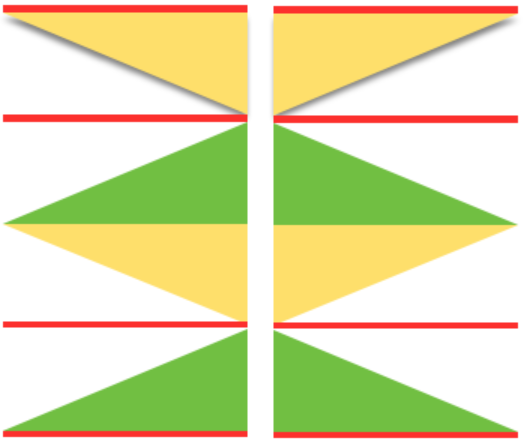
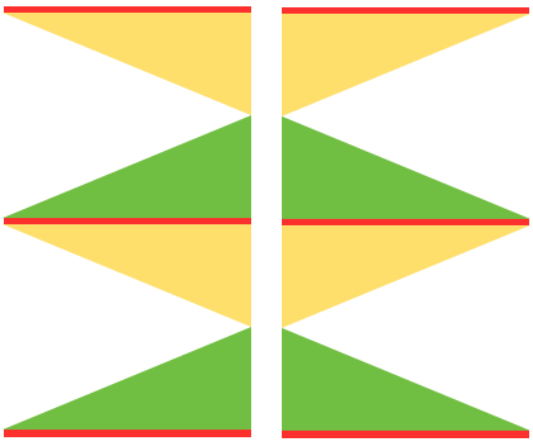
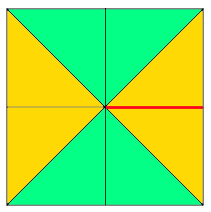
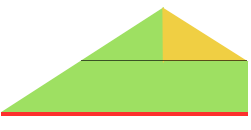
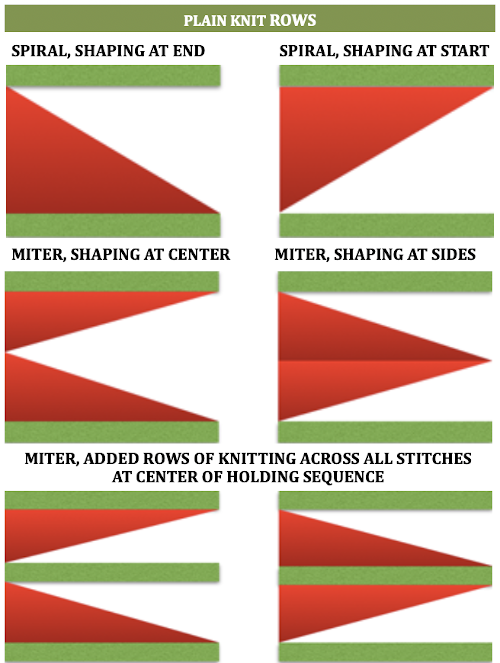
A spiral gore is the first or second half of a miter gore, conversely, a miter gore has 2 consecutive spiral gores, knit in a mirror image.
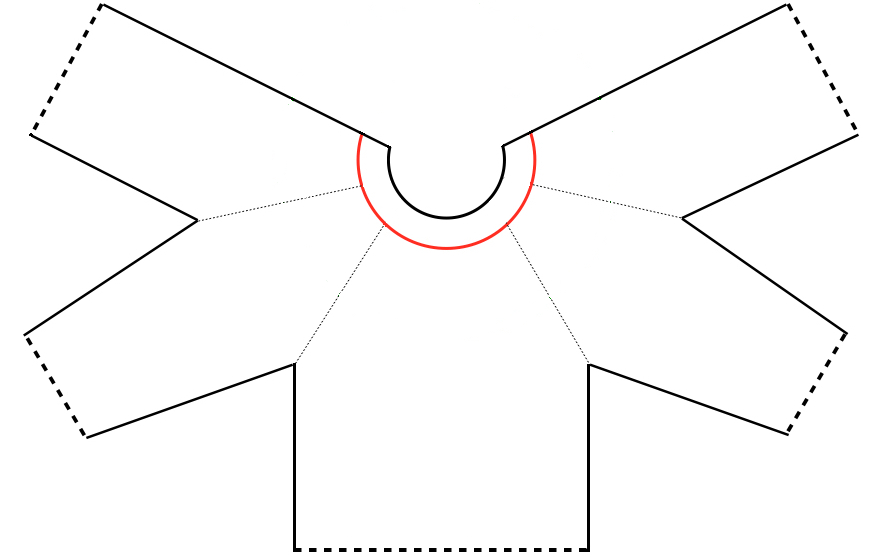
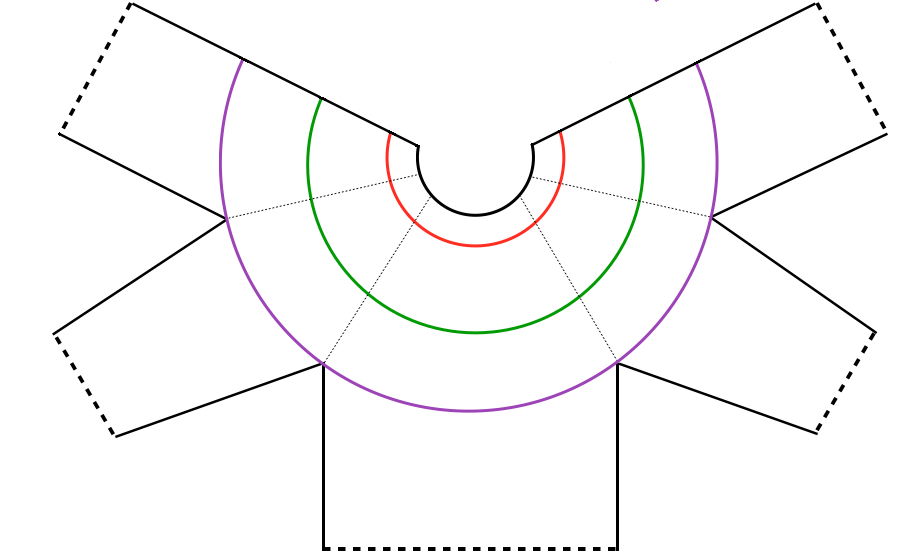
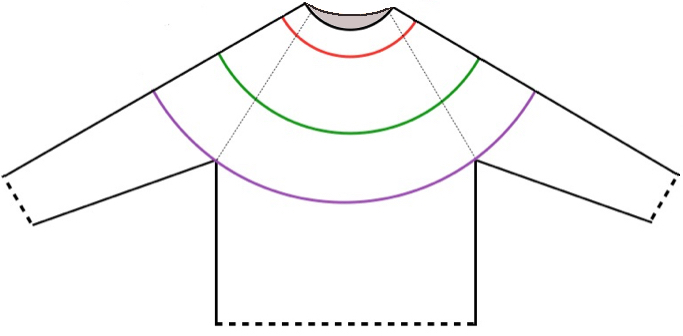
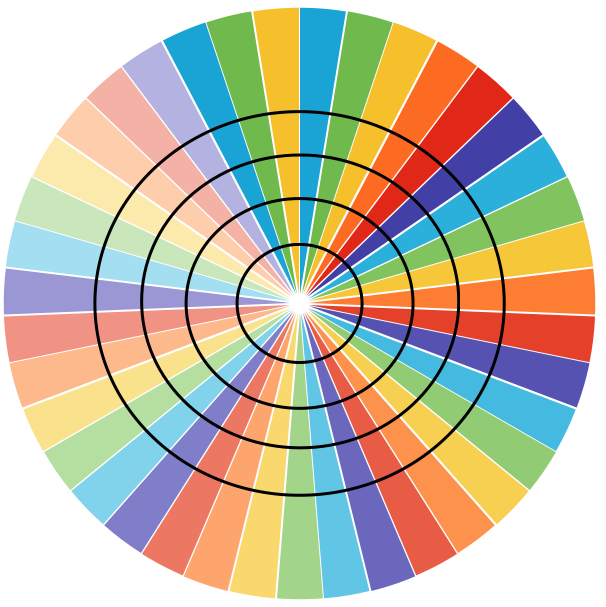
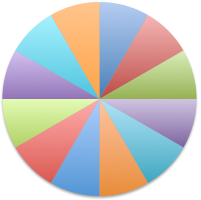
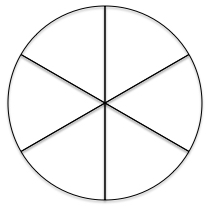
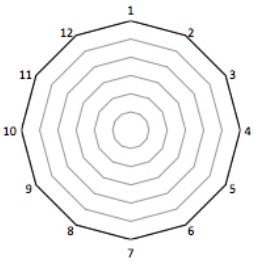
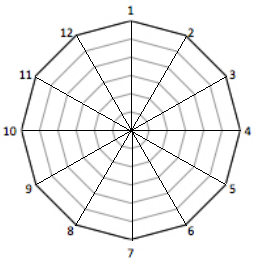
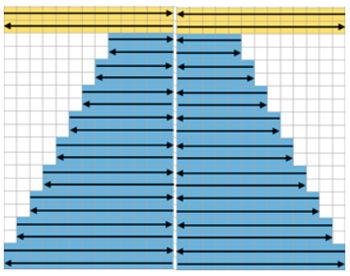
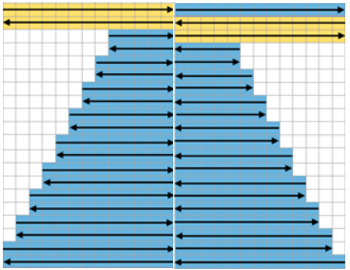
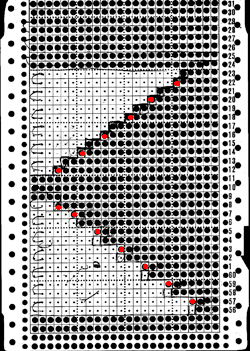
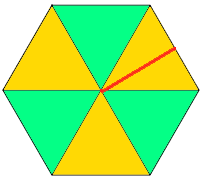
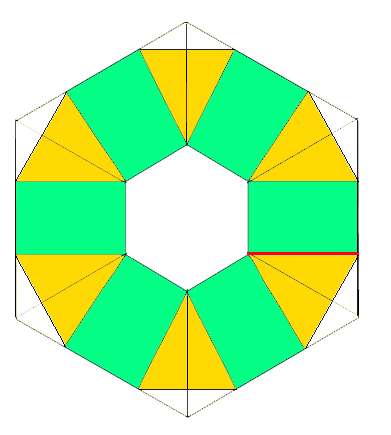
GOING ROUND: numbers 1-12 represent knitting sequence for wedges, thicker lines at segment edges = rows across knit width at end of each sequence, 2 rows or many more depending on planned design shape


Previous posts on related topics:
2011/06/18/knitting-math-and-pies1/
2011/06/24/taking-it-to-a-garment/
2011/03/29/the-doilies/
2013/12/28/short-rows_-balls-tams-3d-rounds/
Miters and spirals: visualizing, charting (and more) 1
Getting my thoughts together on this topic I searched for any of my previous posts that may be related, here is a list
2013/12/18/holding-stitches-short-rows/
2014/02/24/holdingshort-rows-hand-tech-to-chart-to-automating-with-slip-stitch-1/
2013/12/28/short-rows_-balls-tams-3d-rounds/
2013/01/21/automating-pleating/
Even in my earliest days as a hand knitter, I liked charting out my sweater shapes ie sleeves, necklines, etc on graph paper and tracking my place by marking the appropriate row or every other row on the charted image. Many of the formulas for charting math in garment shaping may be emulated by drawing a line on the chart where each square represents a stitch and a row, connecting points, and filling in squares. Averaging out grid shifts is also the guideline to increasing and decreasing for shaping on pixel charts. Though this may be a bit of egg before the chicken, I got sidetracked playing with software yet again.
GIMP
Working premise: using holding to shape a wedge over 36 rows. Stitch multiples are brought into hold opposite the carriage (floats will be created if they are brought into hold on the carriage side), in the instances below each graph row represents 2 rows knit, my fabric width at the start is 100 sts
Set image size _ pixels equal stitches and rows required
Magnify X 1000 (this is what I prefer for viewing and editing, less magnification may be used)
Activate 1 stitch grid/ show grid/ snap to grid
Make certain the whole image is within your window view
Using line shape: click on the upper left corner, press shift key_a drawing line will appear with a + symbol at its bottom right_click on the first square on the bottom right, a line will appear where black squares represent # of stitches to be held each row
bucket fill in the appropriate side of the wedge to represent knit stitches
create a new, larger canvas that will accommodate desired multiple stacked repeats and possible knit rows in between shapes in a new window; copy image from the first window, paste into the new window, move it, and place in the desired location on your screen
return to the first window, flip the image vertically (image menu/ select transform and direction)
again copy, paste, move into the desired location, and insert knit or (patterned) rows (green) when and if desired. On electronic machines, the final image would have to be doubled in length, so those “knit row” pixels/squares would have to be adjusted accordingly to half the desired number
Row by row charting for double-height to represent each row of actual knitting: the process
starting with a repeat 6X6
convert image to bitmapped (repeat at upper right below is a different one, should match the one being resized)
scale image: click on the locked symbol/ chain link, in turn, to alter the aspect ratio, change both pertinent numbers

the repeat twice as long, 6 X 12
going 3D, possible spiral
eliminating squares
shifting things around in order to add “automatic wraps”, begin knit with COL
in further progress
stacked repeat
save in image in format for downloading to machines via cable and knitting using slip stitch setting, or export or screen grab for printing and knitting from chart visually as hand technique. If printing images colored cues may be added for carriage/lock setting or color changes, etc. The question: what about numbers and excel?
NUMBERS
Using the line tool (shapes) will get the line in place, shaping is “eyeballed”
knit squares are filled in
so you want to double the height only? Apple for some reason when they “upgraded” to the latest version of the program (3.2) has eliminated the split table feature, so the only way I can see is through using the table: add rows above or below in the chart, a new row will be a copy of the selected row
EXCEL
the insert row option will add rows only below selected ones, I have not found a tool equal to the line shape in Numbers


