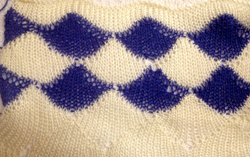
This is the beginning of a thread on modular shapes on the KM. Much is published in the form of both how-tos and patterns for hand knit modules. One of the critical differences between HK and MK as in mosaics is that in HK garter rows may enrich the surface textures. Unless a G carriage is in use, frequent travel between opposing needle beds or turning the work over on the single bed is required on the KM to create the garter rows, which may be considered tedious and impractical rather than impossible. A question from a friend led to my beginning the topic by trying to sort out shell shapes. In the samples below two different weight yarns were used, first because they were conveniently the closest to my yarn mast, and second because contrasting colors are helpful in defining what is going on at the edges of the shapes. The irregularities in spots are operator error, the repeat pictured is sound. This is not a step by step “how-to” for those who have no experience with holding techniques, but rather a starting point for anyone who would like to play with a similar shape
the swatch immediately off the machine has a bit of 3D going on
knit side after pressing
the purl side after pressing
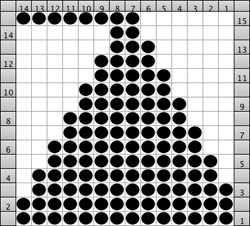
the working repeat: dots represent stitches knitting, blank squares needles in hold for each individual segment
For forming a straight edge at the sides of the finished piece, the first horizontal row of shells must start and end with half a repeat. Set up is on a multiple of 14 stitches. I began working with COR. Stitches are brought into hold consistently on the side opposite to the carriage, when 1 remains at top of half repeat (2 for full repeat), the remaining six of the recently worked repeat and subsequent 14 for the following repeat are pushed into work (21/22 sts), one row is knit across all needles, COL, the 7/8 remaining stitches from the previous group are brought out to hold, the carriage travels back to the opposite side once again on the grouping of 14 stitches, COR, holding pattern resumes opposite carriage, and from right to left. The contrasting color in the second horizontal row of shells begins on left, working on a full 14 stitch repeat, reversing the shaping. I am considering automating the process with slip stitch. The latter would have to occur on an electronic if repeat is to be used as-is since on a punchcard the width would need to be adjusted. If a brick repeat such as above is desired, two different cards or programmed repeats would need working out for the alternate shapes to occur on the same location on the needle bed after completion of each horizontal shell sequence.
It can be helpful to mark up a needle tape or even the needle bed with water-soluble markers to keep track of the repeat’s locations. I used a separate color for each repeat set. A bit of denatured alcohol on a lint-free cloth piece easily removes them. Markings on needle tape pertain to some of my other projects.
…


