I like placing motifs, grounds, and borders myself whenever possible, in any knitting technique, rather than relying on adding or combining them via the built-in KM software. It is simply my strong personal preference in designing and gives me additional controls over patterning. However, the ability to superimpose is a convenient feature, available on multiple machines and worth mentioning. I have used it more frequently in operating my Passap, than my Brother 910. That said, it would appear to be an easy feature to use for programming shapes onto mesh grounds. For illustration purposes, I am using a 24 stitch repeat. Electronics width and height potential depend on the use of mylar or PC download. The “rose” is not a workable, resolved repeat. When electronics were first introduced, at one point Kathleen Kinder wrote a book on electronic knitting (? 1984), exploring the full potential of managing designs by combining settings and flipping buttons for both the Brother 910 and the Studio 560.
A bit of review on machine buttons and functions for the Brother pattern case for those unfamiliar with it. 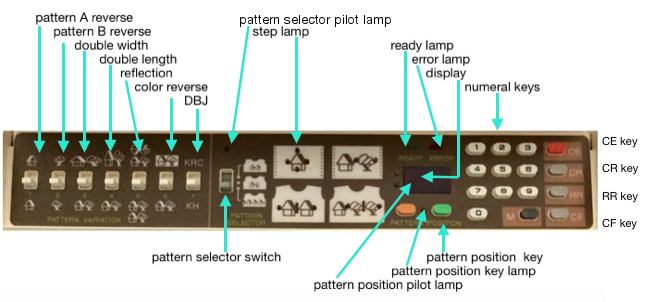 M= Memory: each of the tiny red spots on the garment representations lights up, as specs on motif are entered or reviewed. CE= cancel entry: corrects programmed numbers or cancels the red error light when it flashes. CR= cancel row: press in a number, say 2 on the panel, and the card moves back 2 rows. If you press the button and no number is entered, the error light flashes and the card stops advancing. This is the same as locking the punchcard to repeat a pattern row. RR= row return brings the card back to the set line. This is routinely done before shutting off the machine when knitting is complete or to remove the mylar for editing. CF= card forward. The mylar returns to programmed design row 1. Numbers pressed in using CR or CF do not change those programmed using the M button.
When the pattern selector button on the 910 is down, the pattern is centered on green #1. A reminder: Brother has 2 needle #1 positions, one on each side of 0. When the pattern has an even number of stitches, it will be centered with half that number of stitches divided evenly on each side of 0. For 24 stitches, the pattern’s limits are yellow 12 and green 12. If the repeat is an odd number of units wide, the center stitch then will be placed on green #1 (right of 0). If the repeat is 25 stitches wide, then the pattern limits are yellow 12 and green 13. If using a 24 stitch repeat, the machine automatically knows that the first needle position (FNP) for the pattern is yellow 12. When the pattern selector is in the upper position (motif A) and the middle position (motifs A & B) we can choose the FNP and with A & B the number of stitches separating them. One way to produce filet lace is to program A & B motifs. The lace mesh is the A motif, the “rose” the stocking stitch motif. The A motif can be on the left or right of the mylar, but it is always the taller of the 2. In most cases, it is the dominant pattern. The starting row for the combined motif is shared.
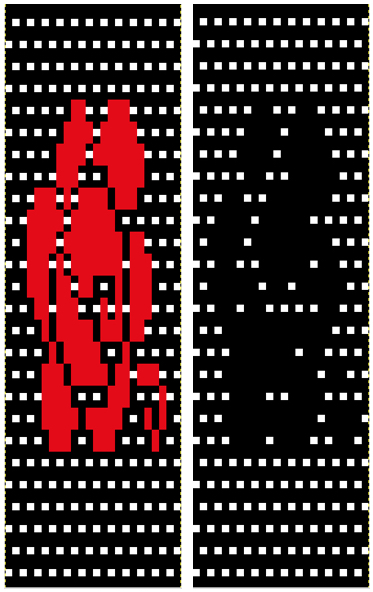
In lace knitting transfers and resulting eyelets are programmed as black squares. Superimposed solid patterns in stocking stitch occur in unmarked areas of the mylar or downloaded image, so they need to be “white squares”. In order to get the 2 to meet, the mesh repeat in the height required (column A in the illustration), and a single width is drawn or programmed in reverse (column B), with the result being read as (column C) when it is programmed as the base for a complete overlap. The basic mesh becomes the A motif in programming the 910, the stocking stitch “shape” is the B motif. If end needles are selected during knitting, they need to be pushed back to B manually or use the orange L cams. It is possible in addition to mark the “L window” on mylar, but the mesh repeat is so regular you may not find that necessary.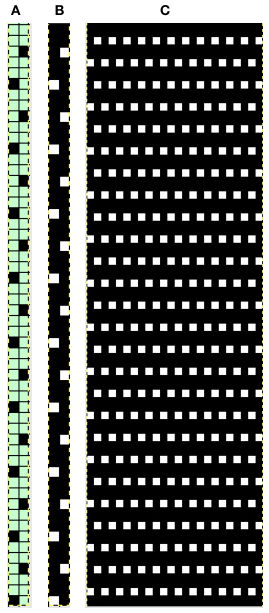 The “rose’ would also need to be drawn in black, and positioned or programmed, with first placement resulting in the image seen below right. The color reverse is then used converting white squares to black, and lace knitting could proceed based on the black markings resulting in eyelets. As is already noted, there is no guarantee the image placement on the mesh the will yield a precise shape or the best possible results for motif edges, its definition, and its segments’ outline
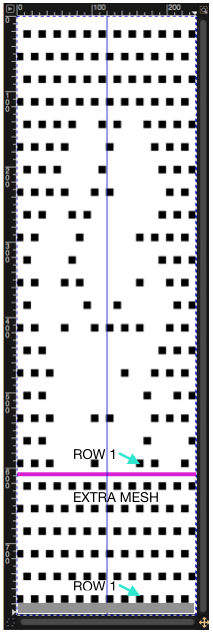
  In terms of placement: if the all-over mesh is programmed centered on G1, and the motif is positioned with FNP other than G1, any simple, extra rows of mesh prior to starting the all-over pattern (below green line), will need to be programmed separately with adjustments also in FNP to match the superimposed segment. The programmed repeat for the mesh “rose” below would begin immediately above the blue line, and the extra mesh rows at the top would provide the transition to the start of the rose once again. The height of the pattern seen in the B column in the first illustration may be adjusted accordingly.
Color reverse (button #6) will provide “black squares” for the creation of transfers to create eyelets. The mesh and superimposed design need to share the same starting row. The image above reversed shows extra white at the bottom of the chart that needs to be eliminated. Brother lace starts on a selection row (black squares), ends with 2 blank rows at the top of the pattern (white squares). This is reversed in Studio knitting.
What happens when starting row placement is the same for both motifs, and the color reverse is used: the first-row lace carriage selection is good to go. The height of the mesh above the rose may be adjusted to suit. Trying to place multiple roses in different locations on the finished piece using this method is more than my brain wants to even consider. 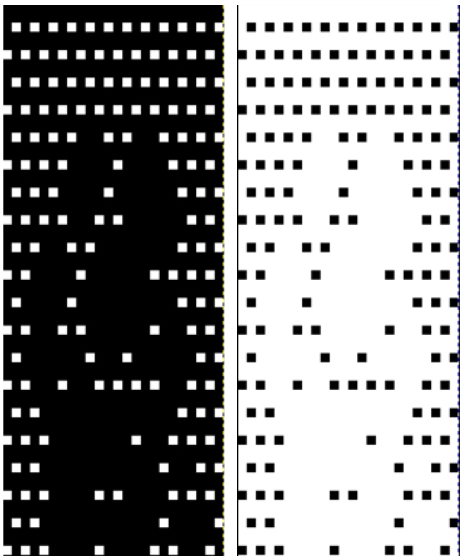 Punchcard knitters are not completely out of the superimpose loop. If you are so inclined, areas on mesh punchcard ground may be taped over to test the repeat. Again, this works best for simple shapes. Tape may be shifted or trimmed as needed. If intended for extended use, trace holes over a blank card, punch the final version, and proceed. Images on punchcard machines are reversed on the stockinette side. If direction matters, flip the card over horizontally, mark and punch, or if the card is already punched, work with lace carriage on right, knit carriage on left. No worries about multiple programs or a mix of starting points, etc. Know the rules for where to begin and end for lace knitting.
Sharp single stitch points are not attainable. In the illustration below, the yellow indicates the “desired point”, red squares indicate the additional stitches knit, adding to the intended shape as the alternating directions transfers are completed. The one stitch start is actually converted to 3 stitches, 3 to 5, etc.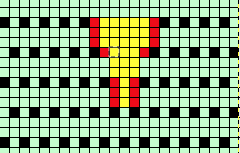 Later model electronics included “stitch world” pattern books. A usable mesh is # 103. Do not use 104, since it leaves 2 adjacent needles empty.
 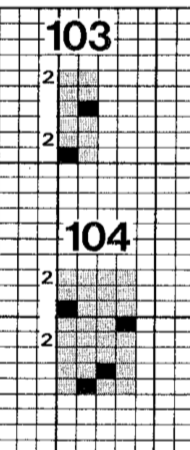 If aspect ratio matters in the superimposed image, knit test swatches to determine gauge. Cell/ grid size may be set to knit proportions rather than square to make visualization of finished shape easier. The mesh created using 103 uses 6 pattern rows for each 4 knitted, so you must add those rows “ to the height of the overlay design. Similar adjustments are needed if other mesh repeats are used. Simply scaling the image may require some clean up as well before the motif can be placed on the ground design.