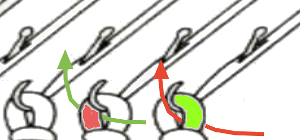
A DBJ discussion re Ayab use recently brought up the topic of ribber bind-offs. My plan for this post is to gather information and illustration on a variety of methods, beginning with those illustrated by Brother, then moving on to others I have come across over the years in a variety of publications. Transfer to single bed methods: transfer all the stitches onto the top bed, then use single bed techniques to cast off. Having multiple stitches unevenly distributed can make the cast-off lumpy, and such techniques may also be too tight for the fabric. For latched-through bind-offs, one way to get extra length/size in stitches on the main bed is to bring every other needle on the ribber back into work after transfers. Set the ribber to half-pitch, knit one row with both carriages set to knit to the other side, drop off newly created ribber stitches by using the ribber carriage only to release the stitches by moving it back to the opposite side, dropping the loops just created, adjust the amount of weight, and bind off. That extra knit row may also be useful in rib configurations that leave empty needles after the transfers. Loops will fill in empty needles. Chain only through stitches, not loops. The latter will help create enough give to bridge the gaps. Technically, once the ribber stitches are moved to the top bed, any single bed bind-off may be used, whether through single or double loops. Some techniques produce more pleasing results than others. Each look is different, as is the amount of stretch. Testing on swatches in specific yarns used helps one determine the preferred method. If a latch tool is used to do a crocheted bind-off after transferring a 1X1 rib it is possible to maintain the rib. Insert the tool from the front of the stitches that were originally on the back bed, and into the front of the stitches that were on the front bed. Stitches have “legs”, inserting the latch tool back to front from behind the right leg will change the direction of the lean in the chain. As one enters the center of the stitch, the left leg is picked up by default. 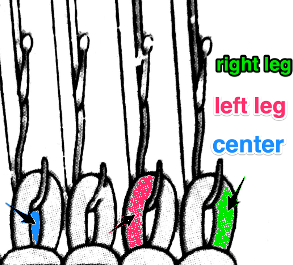 When latching stitches on the single bed after transferring all stitches to it, to keep bind off in the rib, on the purl stitches hook the stitch back to front (red line), on the knit stitches hook the stitch through the center (green line)
 Reviewing approaches to binding off with needle and yarn: working single bed is sometimes performed on the machine and is illustrated below working from left to right. It is referred to as back or stem stitch and “sew off” method, and is shared in many of the old machine knitting manuals. It is easier to achieve if after knitting the last row one knits at least 2 or 3 more rows in waste yarn to make the stitches more accessible. The knit side shows single loops in view upon completion. Dropping small groups of stitches off as one makes progress across the row may make the technique easier, helping with the placement of the other hand to hold the work. On the machine, the fixed distances between needles and gate pegs help to keep the tension even. The backstitching may be done off the machine, but maintaining even tension there may be a bit harder.
Some references advocate this method for binding off the rib after transferring all stitches to the main bed. A row is knit across the transferred stitches prior to stitching through the now single thickness.
The process, whether executed on the machine or off, to my mind is easier with waste yarn knit after the transfers. Here is an illustration of single bed knitting removed from the machine.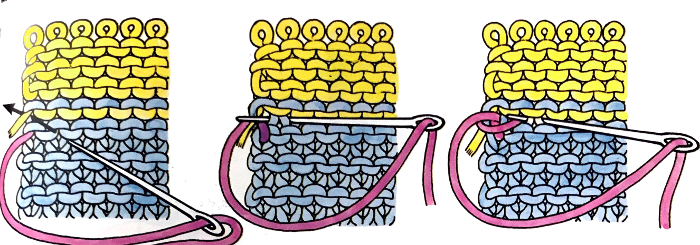
The top of the last row of the body of the knit may then be bound off using a crochet hook or latch tool chain stitch using a continuous thread,  or the needle and yarn sewing method may be used. There is a limit as to the length of yarn used so as not to pose problems. Very wide pieces may prove to be a challenge, requiring more than a single yarn end to complete the bind-off. My own yarn end max limit for sewing up or off is about 18 inches
For folks who prefer to view videos, these are some methods on single-bed bind-offs offered by others on this topic:
latching off through looser stitches any KM, by Diana Sullivan my least favorite,
wrapping around needles, familiar to Passap owners, by Susan Guagliumi
several sinker plate bind-offs also by Susan Guabliumi. The very last method illustrated is my favorite go-to, around gatepegs whether single, double, or more, though I do it a different way.
Latch tool bind-offs without transferring both beds: 1. chaining through stitches on both beds
Knit the last row at a looser tension, and begin by setting it as high as possible in your first experiments. Knit a row to the left.
Lower the ribber slightly 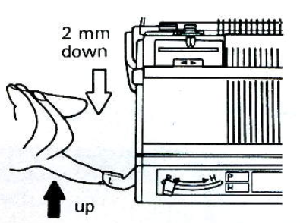 Begin on the side opposite the carriage and the yarn end, moving in a zig-zag fashion.
Go through the center, front to back through the stitch on one bed, moving it behind the latch, then go through the center of the stitch on the opposite bed, hold its yarn in the hook of the needle, and pull it through the previous stitch held behind the latch.
Continue latching until ass the stitches have been picked up and bound off. Break the yarn and pull through the last stitch to secure it. 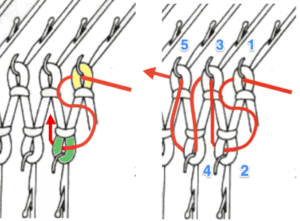 adapted from Passap publications
Video: chain through each stitch on the machine by ArtOfClay.
2. transfer the stitches to the knit bed in Japanese machines, either bed on Passap, and after a plain knit row if textured patterns are in use.
Follow it with a last row of knitting, leaving all the needles on the ribber in work after the transfer.
Moving toward the carriage, using a latch tool, go through the center front to the back of the first stitch on one bed, moving it behind the latch. Then go through the center of the stitch on the opposite bed, holding its yarn in the hook of the needle, and pull it through the previous stitch held behind the latch. Continue across the bed, securing the last stitch.
In bind-offs such as these, the proper loops need to be latched through, or one may wind up with open stitches and no bind-off.
This Passap bind-off variation adapted for Brother machines is described in the post on fantasy fair isle patterning 
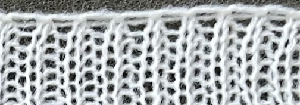 3. Video after transferring to one bed, and taking off on waste yarn by BarbaraDeike
 This edited illustration, also from a Brother manual, expands on the one above, showing how the yarn is threaded through the stitches in numbered sequence according to the stitch configuration for the ribbed fabric
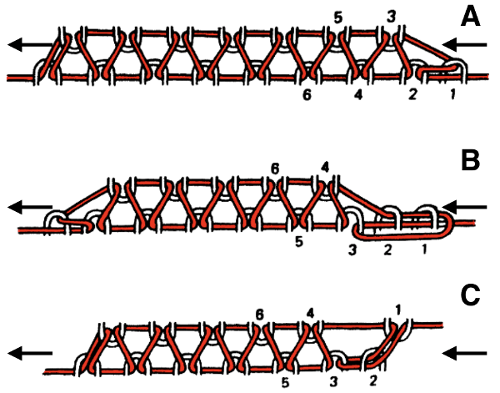 Using waste yarn on both beds:
 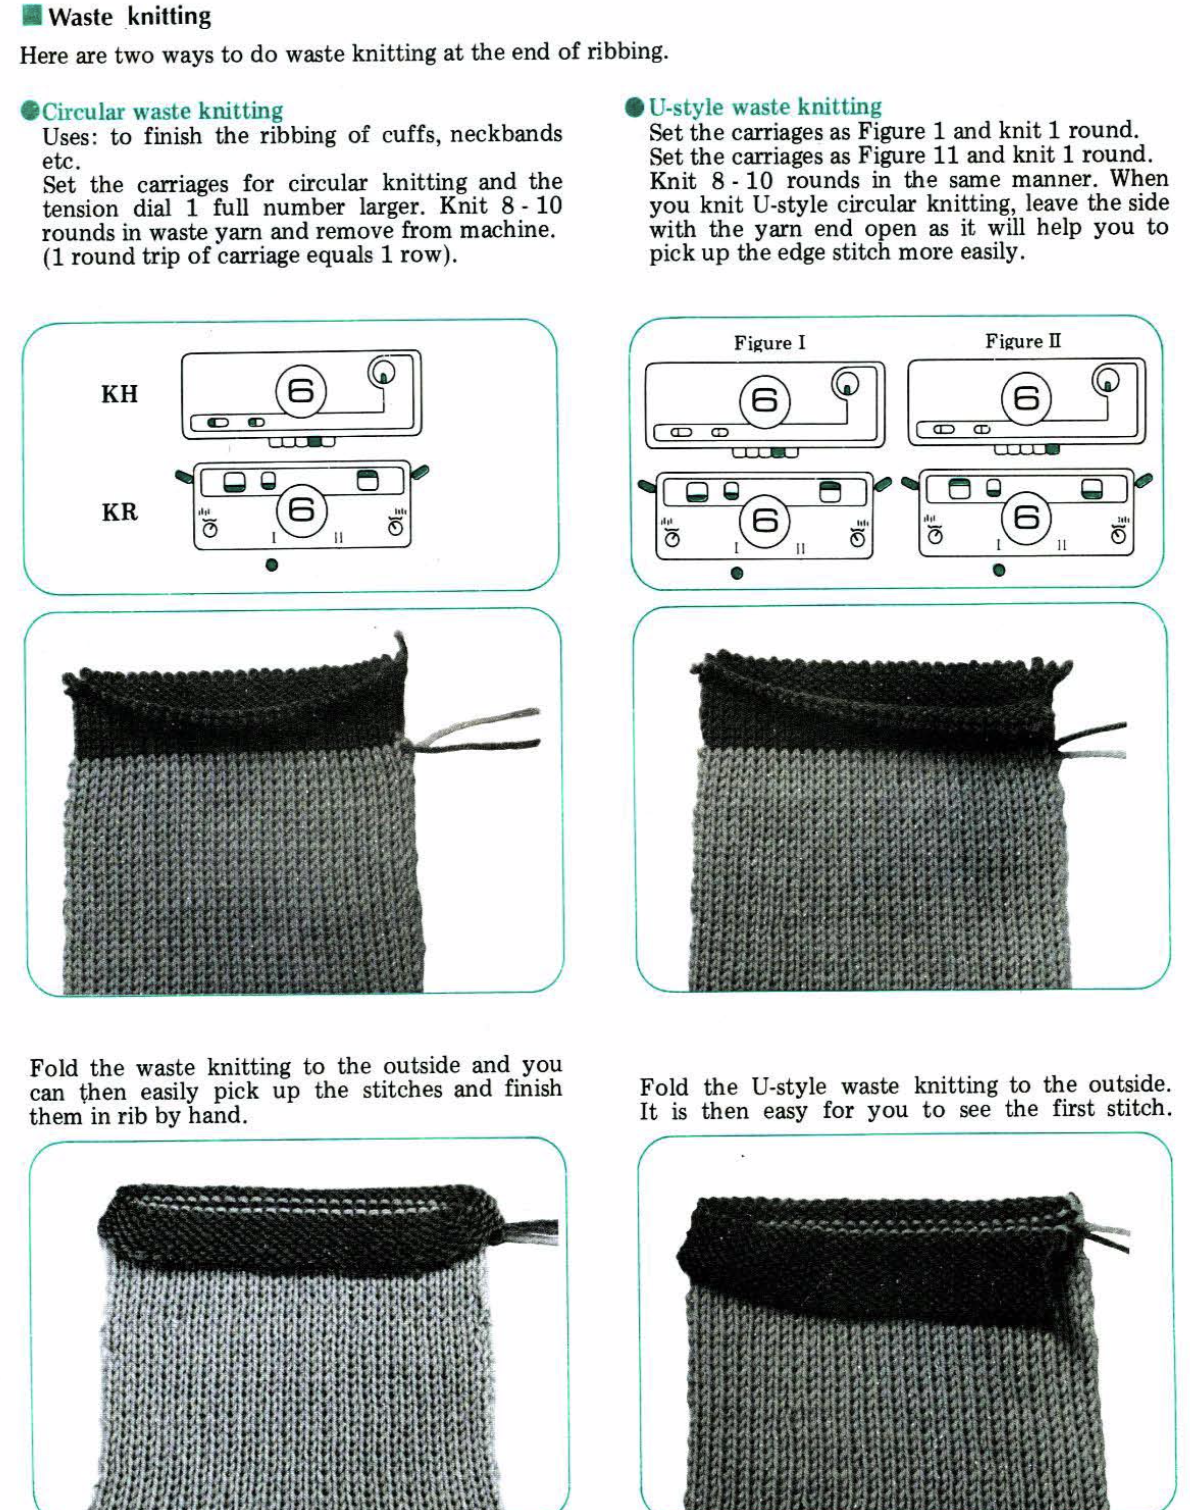 I prefer an alternative method for waste yarn scrap off, ending in place of circular or U knitting: knit the last row in garment yarn. Thread up waste yarn, and knit it at single-bed tension. Knit 4 rows on one bed, with a separate strand or even a second contrasting color of equal weight, and knit 4 rows on the opposite bed. Repeat alternating until there are more than 12 rows on each bed and scrap off. This will allow you to press the waste knitting only, and the flaps are opened up to reveal the tops of the stitches created on each bed. Finishing can then be executed as below.
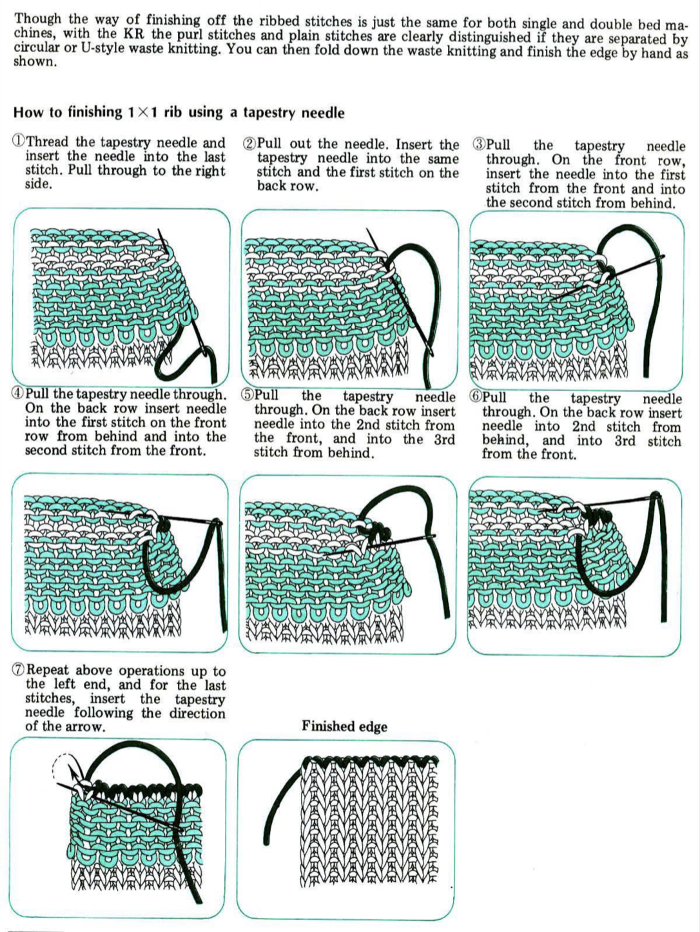
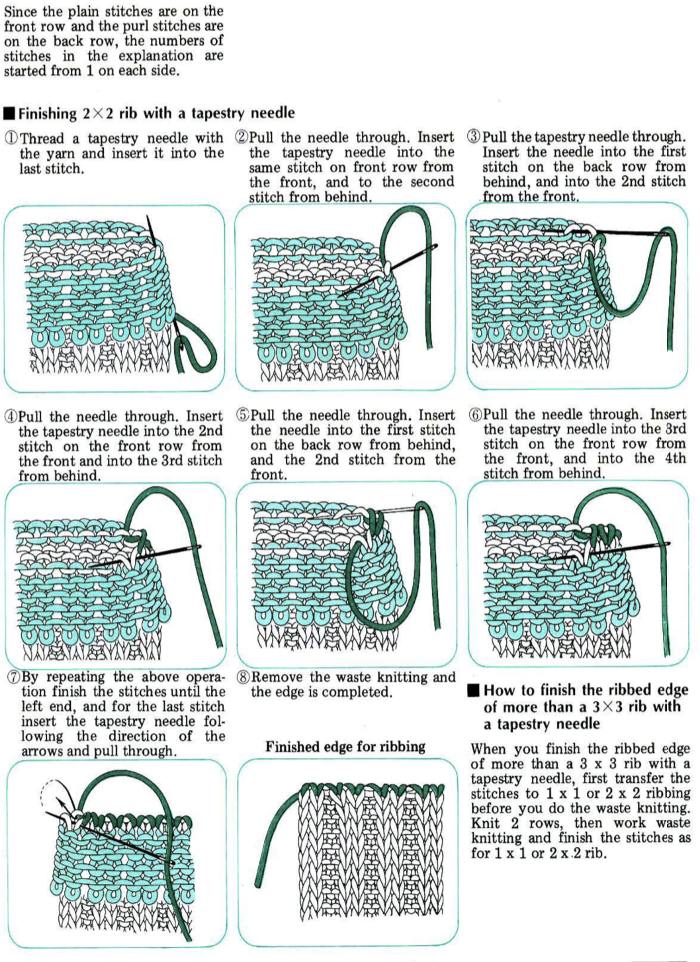
Slip stitch marking row 1X1 rib: EON needle is transferred to the top bed. From right to left: COR stitches that appear as knit ones on the purl ground are brought out to hold, the knit carriage is set to slip from left to right, and purl stitches will slip. Set the carriage to knit both ways, continue with waste knitting, drop the piece off the machine, and continue as illustrated in the circular fold-over method.
Here any waste yarn is folded over, exposing the tops of ribbed stitches. The threading and stitching sequence is numbered, illustrated for both one by one and two by two ribs. Depending on the planned seaming choice, an extra stitch may be added on either or both sides of the knit so that half a stitch or a whole one can be absorbed into the seam, resulting in a continuous rib configuration on the outside of the garment 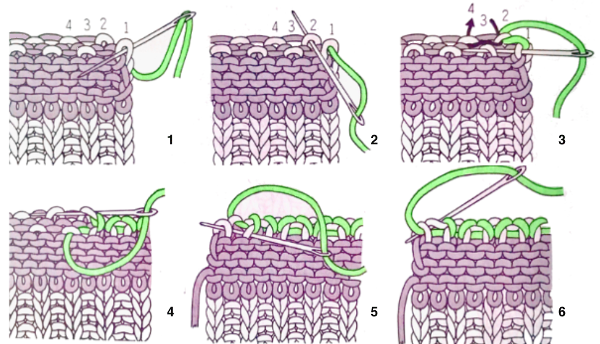 2X2 rib
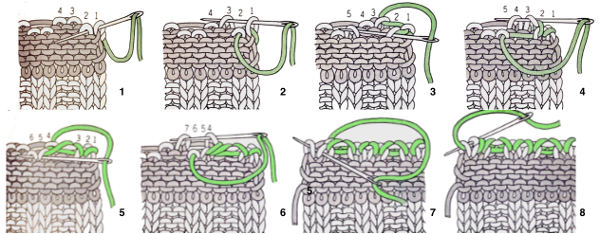
For added information and settings, see later post: More on standard and modified 1X1 and 2X2 ribs

