Though long stitches in a pattern may be created by a variety of methods, I will begin the topic by discussing long stitch stripes across the width of the knit.
The easiest, quickest long stitches are produced by simply working with extremes in knitting tension. There are size limitations in this technique. One example would be fabric produced by knitting 2 rows at as tight tension as possible for the yarn ie. 2, and one row at the loosest tension possible: 10. Testing the yarn will help define the limits.
The loose stitches may have a tendency to jump off, so even weight is required. The tension dial must be adjusted for the appropriate stitch formation. Playing with the number in sequences will change the look of the fabric.
Adding stripes: if 2 carriages appropriate to the machine model are available, each tension dial may be set to different tension numbers. Keeping 2-row sequences or even multiples will get carriages back to the desired location on right or left. The same color may be used, and threading with different color yarns will produce stripes easily, while also making it possible to avoid cut ends that must be woven in.
Another single bed method is to knit stitches back to A position, in turn pulling down on the knit since A position is an alternative one for holding and needles pulled back there will not knit; again, care and weight will avoid the long stitches created jumping off the needles. Weights need to be moved up at frequent intervals.
Leaving needles empty and out of work in either of the above methods will create ladders intersecting the long stitches, opening yet another series of patterning possibilities.
Rows of long stitches may, in turn, be manipulated ie. by cabling, stringing beads at intervals onto selected loops, and solid knit rows may incorporate patterning ie. lace, or tuck. As a larger number of continuous rows are knit or patterning is introduced, the tight tension may have to be adjusted accordingly, and long stitches may then appear inadequate in their height for the desired effect.
The single bed cast-on comb or ribber sinker posts may be used to create longer loops. If using a cast-on comb, secure it with paper clips or lengths of yarn just outside the width of your knit, hanging enough weight on it to keep it from shifting. On the knit carriage side, the item used to secure the comb must be either adjacent to the first stitch to avoid loops on that edge or the yarn may be placed in front of it to avoid them.
Ribbons may be threaded through loops, and drawn threadwork may be imitated. “Cable” groups may be crossed, twisted, pulled through each other, and otherwise manipulated, some such groupings may evoke broomstick lace.
Some people find it easier to wrap yarn around an item of fixed width such as a ruler to achieve the desired loop length.
If a ribber is in use its gate pegs may be used for wrapping the yarn. Enough knit rows then need to happen on the main bed so the loops may be released from the gate pegs.
The yarn is wrapped counterclockwise in most instances for loops, and swatch results to test the desired effect for any twist in stitches.
Long stitches are knit through the preceding row one at a time, long surface loops sit on the surface of the knit, and may need to be e wrapped as they are created to further secure their placement.
Simple horizontal rows of elongated stitches may also be accomplished by knitting with the ribber in use, knitting fabric on the main bed; the ribber is set to slip throughout except for the “long stitch” row where the ribber knits across all the stitches, and at the end of the row those same stitches are dropped by any preferred method.
Any of these methods may be combined with hand manipulation and holding to vary loop sizes, locations, fiber content, color, etc. Susan Guagliumi’s book “Hand Manipulated Stitches for Machine Knitters” is a good reference for several variations.
Transferring all stitches to ribber and having the main bed knit in selective patterns and techniques opens up a whole other area of textured, lacy fabrics, referred to as drop stitch lace.
On the Passap long stitches of even size across a whole row may be further manipulated ie to imitate broomstick lace begin by casting on every other needle, some weight may be useful, and transfer all stitches to the back bed.
With a strand of yarn taken from the feeding eyelet manually knit every stitch one at a time to the out-of-work position, carefully pulling to keep the stitch length even.
Pull down on the fabric. Rear bed needles will now be returned to the work position.
Depending on the specific variation in grouping loops the locks may be brought to the opposite side before knitting the next row. Since the stitches are in the out-of-work position, they should remain unaffected. Alternately if there are wide open spaces as part of the design the yarn on the left may be used to cast-on across the row while knitting together gathered stitches, and then return to the right side for additional knitting will have been achieved.
For swatch photos please see the post and for how-tos see a bit on the method
Category: Machine knitting (MK)
My newest lace patterns
In the past, I knit several shawls using the alpaca and silk blend mentioned in my posts. The colors purchased in the latest shipment for some reason, however, have refused to knit without creating enough problems in dropping stitches that I gave up on each of the projects attempted using them.
My latest two shawls proved to be one of those instructive cases where the knit behaves just fine in smaller samples and is cranky and hard to manage when a larger number of needles is in use, resulting in switching fiber content to get the piece made
space-dyed that was unsuccessful

the finished shawl in wool/rayon blend

one disadvantage in deeply colored space-dyed is that some of the surface texture I lost, and patterns may become less evident
here is another version in wool crepe in what I am now calling my “firecracker” pattern

Below is my latest effort. The card that produces it is 90 rows in length and 22 knit rows are completed at the end of each of its rotations. The blue yarn is actually a multi-strand rayon, thicker than the alpaca/silk, was knitting pretty well until the individual thin strands began to break frequently and the partial shawl got added to the future “do something else with” stash of UFOs. There are many rows where 2 or 3 stitches are moved together onto the adjacent needle. I have some Tencel blends that are lovely colors, that when swatched consistently dropped stitches in areas of those transfers, probably because of lack of any “give” in the fiber. Going back to a wool rayon blend, I was able to actually complete a piece, which now awaits blocking.
the rayon multi-strand rayon swatch

the blocked, completed piece in wool crepe, 20X76 inches

With the huge supply of alpaca/silk and other yarns that will not transfer well, I am now considering taking a break from transfer lace and returning to tuck, tuck lace with NOOW, and similar fabrics for a “break” from the routine of this past year.
Large diagonal eyelet lace
This card may appear vaguely like the one used in my previous post using tuck stitches to fill in some “extra” empty needles to create large eyelets (April 15th, 2011: so hard to believe more than a year has passed!). I wanted to create a large, diagonal mesh for some trial new shapes that would allow me to get the movement without short row holding or angling the fabric 45 degrees.
This was the original card, using a repurposed one with “mistakes”, taped over, and more tape over new punching errors. OK for short term use, but probably not for any extended knitting
Here is the final card: orange lines are visual marking rows where knit carriage travels for 2 rows from right to left and back, pencil lines mark each design pattern repeat, blue lines the visual marking row for the end of each pattern repeat. The latter becomes important if one wants to flip the card over to get the eyelets traveling in the opposite direction, and knitting the fabric with lace carriage on right, knit carriage on left, keeping the repeat intact. In this instance, the first preselection row with the LC moving from left to right is made with the card locked.

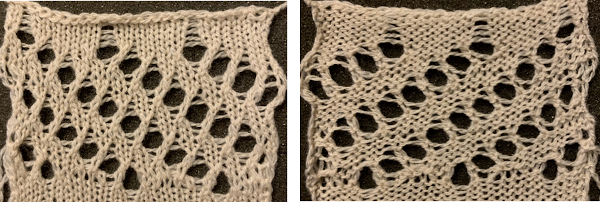
The lace is created by single transfers in opposing directions, resulting in 2 adjacent needles being left empty immediately prior to knit row sequences. When 2 needles are empty, ladders occur unless they are alternately filled in. If the lace carriage is not engaged and the knit carriage continues to make passes, ladder stripes will break up the pattern and can be a design feature. Here the problem is eliminated because the lace transfers to the left help anchor down one of the two loops. The diagonal mesh sequence is easy: 4 transfer rows followed by 2 knit. The KC is set to knit throughout. The selection with alternating groups of pairs of needles do not affect the pattern, they provide a clue to the fact the opposite carriage is used on the next carriage pass and from the opposite, right side. Proper tension and weight for the used fiber are important to keep the fabric from getting hung up on gate pegs. The patterns using the concept may be varied by knitting more rows between transfers, creating smaller eyelets by changing sequences, starting transfers from row 2 and with lace carriage on right, and more. Two sample trial swatches:
 A brief return in 2020 analyzing the actions of the lace carriage a different way
 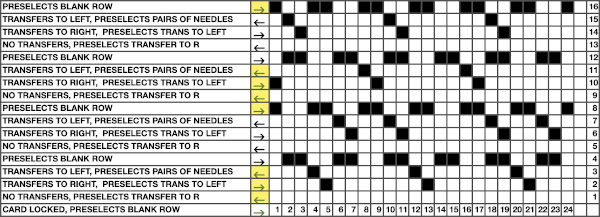 and a new test swatch
…
Back in the saddle
My latest shawls use a flower motif on mesh base, evocative in part of filet crochet. This is a detail shot of border and motifs in one

the finished shawl measures 20X80, is knit in a rayon/nylon blend with a metallic very fine filament twisted into the yarn

this is a space dyed version using Denis Brunton Magicolor

…
My latest finished shawls
The leaf shawl, finally completed and blocked, 16.5 X 76 inches
am contemplating its sibling in an alternate color

a mulberry version of the vine shawl, 17.5 X 64 inches

both shawls knit using 2/14, 80% alpaca, 20% silk from WEBS
The joys of lace on the KM
I long ago learned the famous three hour KM sweater was not going to exist for me, I may now be on my way to my first 300 hour MK scarf. Dropped stitches continued in spite of my visually checking each row after transfers. At one point it took well over an hour to try to get back to a row where I could manage a “repair”. When I got a dropped mess in the same spot again I went the route of intentionally taking the knit off the machine, here is the baby (I have to admit I am beginning not to love these leaves so much anymore!).

I decided to go the route of steaming the piece to help set the stitches at the upper edge of the knit before attempting to rehang,

unraveled back to an all knit row, and got the masterpiece back on the machine after checking needles and gatepegs, changing a lone needle of questionable slight bent and here it is back on and “ready to go”

I chose to clip the yarn I unraveled because of the crimp. Back knitting again I noticed more dropped stitches where I could not identify any after lace carriage passes. This pattern at one point requires 16 transfer rows before any knitting takes place. I have used this yarn before, but the dye lot is new. It is alpaca and silk, a bit fuzzier than the previous dye lot and I am beginning to think that what is happening is what sometimes happens when machine knitting mohair. The multiple passes raise the fuzz even more than what is produced in the spinning process, and that is what “catches” at times on knit rows, is not easily visible, and by the time the stitch ‘runs’ the situation is a pretty mess. May have to give waxing the yarn a try…
Follow up: decades ago for a while I decided to make children’s knits. The presumption in part was that they might take less time than adult sweaters but between scaling back motifs, and having a penchant for complicated, I soon found production was not practical in terms of financial returns. I remember at one point a green sweater I made that caused me so much grief I swore off using that color ever again. All knitters experience dropitis: the bliss of having the knitting magically falling off the machine = great fun at row 900+ of DBJ or double bed tuck long scarves and shawls! In the instance of this piece, I have found it actually takes less time to unravel back to knit rows off KM and rehang than to try to correct dropped stitches on the machine. The yarn continues to split and is being a nuisance. Then there are moments intended to keep one humble: after a huge hole cropped up, taking the knit off, rehanging it, knitting 5 more rows of repeats I noticed I had accidentally at some point close to the start of that adventure accidentally pushed into work one of the needles that had been out of work creating the ladder in that location, and off it all had to come again. Whether beginners or experienced, knitters absolutely get the opportunity to play Penelope in knits from time to time. This apple green may be the new color I will avoid for a very long time.
.
They’re everywhere!
Leaves are getting more attention from others as well yet again in hand knitting pubs and youtube videos.
As for my own leaf pattern: here is a wrap in progress on my knitting machine. Knitting is slow, with many transfer rows between knit ones. Though I am still using the now-familiar silk alpaca blend it took some fussing with weights and tension to avoid the “deconstructed” lace that was not part of my intended pattern. The added success comes from visually checking transfers each row, and increasing skill at sorting out where to put dropped stitches back onto the needle bed.
 …
…
On two needles
This is my present HK project, another scarf. Stitch pattern blocks are broken up by rows of solid knit and solid purl alternately, giving the fabric a slightly “pleated” effect, different from the usual square block configurations. The yarn is 60% silk, 40% wool as the last lace HK, all wool would probably have a crisper wave effect. A trial cotton swatch flattened out almost completely.

I am able to get good edges on my HKs, tend to never use the method suggested by some of slipping the first stitch, knitting it only on alternate rows. Such an edging could be added if preferred.
the chart below is the working repeat

My intent is to end the scarf with a partial repeat followed by bind off as seen below

…
Getting there
I have been continuing to experiment with “automating” some versions of the staggered leaf, and have reached a “final” punchcard version. Wanting to add a border on the top and bottom and getting the 2 ends to “match” without a center pivot point led to the resulting fabric below (the swatch is not properly blocked).

The punchcard for the leaf pattern is over 100 rows in length.
I actually had never purchased anything on eBay. The length of the card repeats I want to play with led to my looking for punchcard rolls. “Back in the day” the ones available were clear, and not numbered or marked in any way, a relative “pain” to use. Through an online search, I found this item and purchased it. The order was filled very quickly. The roll is of sturdy stock, with Studio numbering so a bit of added markings are required for use on Brother KMs. I live in an area with no local suppliers for this sort of thing, so buying directly from overseas was an option I had not considered before and proved to be a positive experience for me.
Staggered leaf scarf
The staggered leaf scarf based on the repeat from the Japanese magazine that originated many of my recent posts is now completed.

The scarf is knit in 60 % silk, 40% wool on number 8 US needles, measures 7.5 X 62 inches after blocking. The design is my personal adaptation. Here is a document including working graph and essential information for your personal use should you wish to attempt hand knitting the project final_leaf_scarf.