I recently brought my knitleader out of mothballs after a long period of no use, tend to use the magic formula for most of my simple charting
oh the math! Magic formula
online generators in includes a variety of calculators and methods for designing knit shapes
When using the knit leader you do not have to match the given yarn or gauge for a published patterns, they can be adjusted for size and for the type of yarn used in the specific project.
See Intro to knitting: gauge swatches for added guidelines and tips.
- Manuals for 6 different knitleader models may be found for free download online at sites such as machineknittingetc.com .
KL-116 model, and a beginner’s guide to using the knitleader
 Measurements are in mm, and taken with the ruler provided with the accessory or a substitute if the original is missing or lost.
Drawing on the sheets should start with a reference line at least 2 inches above the bottom of the sheet.
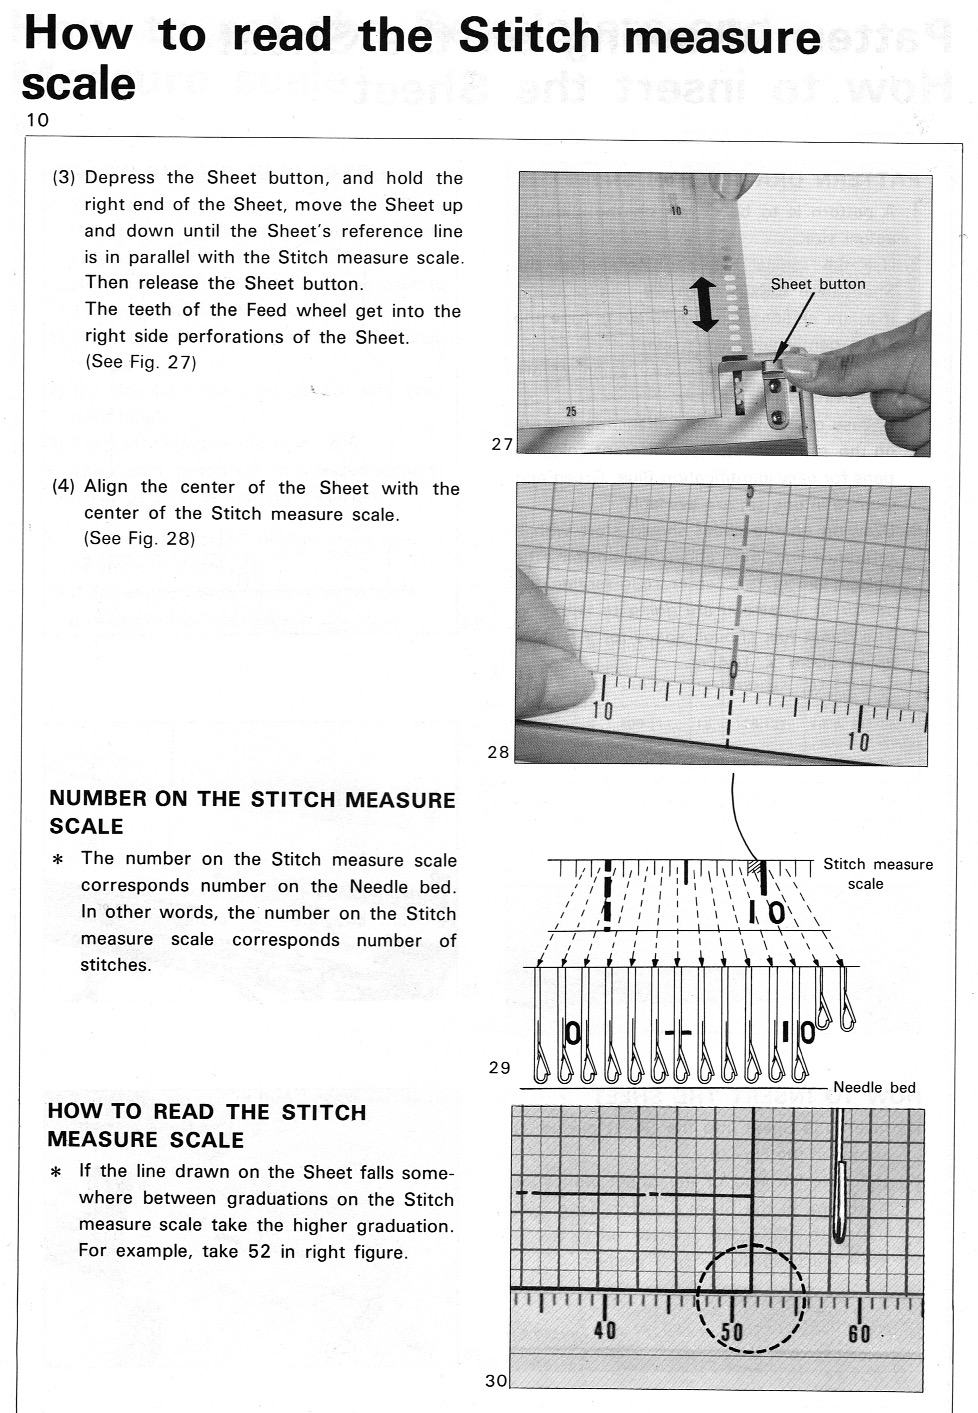
The midpoint dotted line represents the center of the piece.
The sheet is divided into 5 mm X5 mm squares and by thicker lines every 5 cm. The drawing space measures 63 cm (app 25 in) X 103-5=98 (app 38.5 in)cm allowing for starting line position.
The desired shapes are drawn on the sheet in actual size, using any water soluble pen. Multiple garment pieces may be drawn on the same sheet, it is easier to follow the respective lines if they are drawn in different colors.
Sheets may be used again and/or cleaned for next project. If the drawing happens on the reverse side of the sheet for some reason, take care in cleaning it off, the blue grid may be wiped off and lost in the process.
Do not bend/ crease mylar sheet or stitch measure scales.
Waste yarn and ravel cord are used prior to any permanent cast on to allow for knitting to begin on the starting drawn horizontal start guide line and with the yarn for the project.
When shaping narrower pieces on one side ie at neckline to shoulder or in holding techniques, be sure to move the carriage until it passes the feeding lever, so as to advance rows accurately.
These pages, from my own knitting KL-116 model, show some of the basics related to KL use Parts:


From a manual for a different model, shaping suggestions: 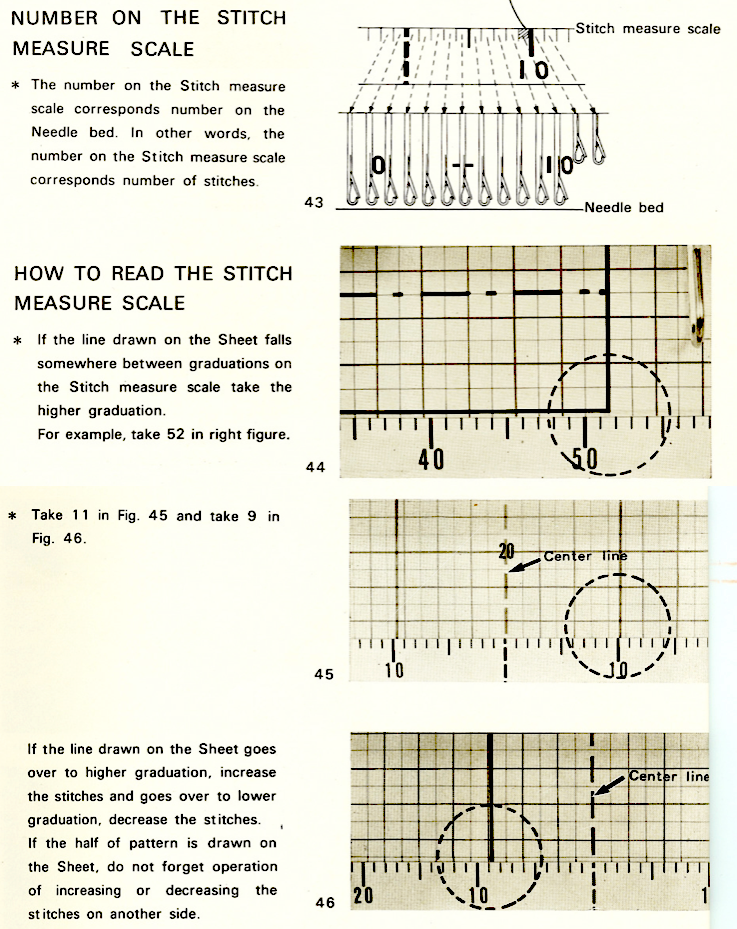 Check ruler markings against the gauge swatch after the initial selection. Each ruler offers 4 options in terms of stitch markings, sometimes rotating the ruler or flipping it over to its opposite side is needed for a closer match.
  Bulky knitting machines use a different set of rulers. Besides the obvious difference in the distances between stitch markings, the standard rulers are identified by the same number on both sides, 1-20, while bulky rulers advance by single numbers on each side, are numbered 1-24.
Standard machine:
Vertical control: before you can shift gears you must depress the clutch. Tripping the feeding lever will usually release it.
Video on cleaning and lubricating the knitleader offer hints on maintenance or repair.
Testing for accuracy: set the row regulator to 150 mm and turn the knob 20 rows. The mylar should move the distance between 2 heavy lines, 5cm or approximately 2 in.
After measuring your swatch: draw a small horizontal line on the mylar sheet, followed by a vertical one to match cm +mm measurement for 60 rows, and a small horizontal one again.
Air knit 60 rows, beginning at the bottom mark, and at their completion, the top mark should be reached.
For ruler accuracy: there should be exactly 40 stitches between 0 and 40, lining up the tape on your swatch stitches and corresponding lines should match. If they do not, select another ruler close in range, until they do.
The pin is usually set in the feeding lever in the hole on the left.
The hole on the right is used when the length of 60 rows is less than 6.0 cm, which can occur in textured stitches such as tuck and slip, or fine gauge. In such cases, the row measurement is doubled, and the pin is inserted in the right side hole.
Single motifs may be placed anywhere on the drawn garment shapes, which in turn may be rotated to any angle required for the specific piece. 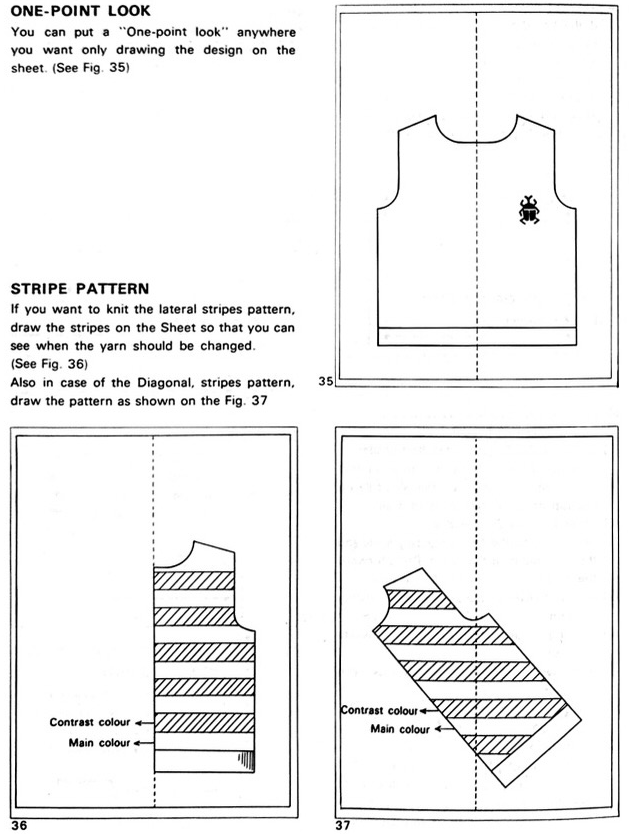 Using the knitleader on the bulky:
A different set of rulers for the lower stitch/inch gauges is supplied with the machine purchase.
Make swatch as directed. Swatch guidelines from the manual (pp 45-47):  I prefer to measure the full width in more than one place, then dividing the chosen result by half rather than relying on 2 single points as shown for the width measurement.
The bulky machine included stitch rulers when purchased new.
There are 2 gauge numbers on each corner instead of 1.
Every 20 stitches and 30 rows should match the numbers used for measurements.
With the pin placed on the left hole of the feeding lever, the arm will be tripped twice with each pass of the carriage. The shorter tripper on the back left of the knit carriage trips it once, the longer row counter tripper on the right also trips it on the travels from one side to the other.
For ribbed fabrics with high numbers of rows per inch: illustration from Brother ribber techniques book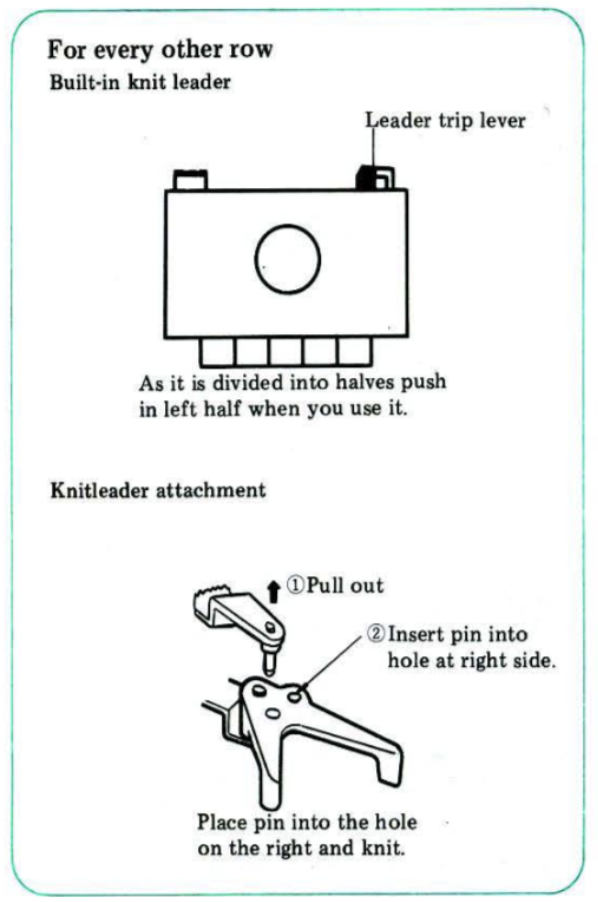
Using half-scale patterns on brother’s full-scale knitleader.
Make the usual 40 by 60-row swatch (on the bulky 20 X 30 rows), or your preferred size and adjust measurements accordingly. Measure swatches with any centimeter ruler.
The stitch gauge: 1: follow outline but double the number of stitches indicated at all times, or 2: purchase a set of studio half-scale rulers and the accompanying “green ruler”. The S side of the ruler is used to measure stitch swatches over 20 stitches. The number just inside the right marker corresponds to the number of the correct stitch scale to be selected from the set. Each mark indicates one stitch. Measurements are based on 10 cm (4 inches).
Plastic rulers need to be taped into position. If there is a handy copier, paper rulers can be printed and placed/adjusted to suit, after checking on the accuracy of the reproduced scale.
For the row gauge: On the knitleader, the central peg is normally put in the left hand of the 2 holes on the plastic fingers in the front. If you put it in the right-hand hole, however, the chart only moves every 2nd row, which balances out the 1/2 scale in length. Program as always, setting cm and mm after pressing the clutch, but drop the connecting pin into the right hole of the feed lever.
Every other needle knitting: measure the swatch in the usual way, divide it by 2, and count every other line as a stitch, or use a ruler that factors in the number of needles as “stitches” before needles were put out of work. If the row count is higher than the highest number available on the regulator, divide the total by 2, and draw the outline half scale.
I like to measure a large swatch and get my final measurements via math to the second decimal point. It is possible on my model to shift tape to change the center 0 position. For sideways knit or wide pieces tracings of rulers can be made with 0 marking at the far left or right as needed. My math starts out with measurements to the second decimal point, rounded off up or down at the last possible minute.
The mylar sheet may be turned over, shiny side down for use in asymmetrical shapes that need reversing/do not have a central axis. Again, take care in cleaning it, the blue grid may be wiped off and lost in the process.
Drawings on mylar may be followed for colored intarsia or intarsia weaving.
Altering the scale of pattern drawings: the studio half-scale ruler was quite handy, pictured

Studio gauge rulers: depending on your machine, there are different numbers of stitches and rows marked. For 4.5 standard gauge you need to isolate 40 stitches and 60 rows; mid-gauge needs 30 stitches and 40 rows, and the bulky needs 20 stitches and 30 rows. To use the rulers: one side has an “S” and the other side has an “R” marked on it. Place the gauge ruler with the “S” side up to measure stitches. Place the cut edge of the ruler is against your chosen markings for stitches. Where the edge of the yarn marks lay, note the number, this is the value for the stitches in 4 cm.
Flip the gauge ruler over to the “R” or rows side and place it vertically to measure rows. Place the cut edge and the bottom of the first stitch in the main color yarn. Look up to the top where the main color yarn meets the contrasting yarn row, This is the value for rows in 10 cm or 4 inches.
tt-30-stitch_scales / Studio tips and techniques #30, now available for free download online from multiple sites includes more information on their stitch scales
scale and technical drawing; instructions for creating printable rulers
Water-soluble markers are helpful for colored cues for garment segments, multiple drawings on a single sheet, etc. I use  template marking pencils may also be found in colors
It is possible to use various sources for the pattern drawings. If measurements are given in a diagram they can be drawn as given in inches or centimeters, and matched.
Sewing patterns may be traced, generally the seam allowance is eliminated since knitted pieces are joined by as little as half stitch on each side.
When attempting to match hand knit instructions, match the given gauge with the settings and ruler on the knitleader.
Load a mylar, with a horizontal line 2 inches above the bottom of the sheet as a starting guide. The shape will then be “air knit”.
Begin with the row counter set to 0.
Using a water soluble marker place a dot on the sheet at the original width and then every time shaping in or out is performed.
Marking with an added small line when a row count is reached ie at the start of armhole or neck shaping provides a roll back to point if marking becomes confused or needs to be double checked for any reason.
When all shaping is complete, remove the mylar and connect the dots.
Change the knitleader settings and ruler to match the swatch gauge for the planned piece, insert the mylar, and knit.