There are many ways of casting on and binding off both single and double-bed. Ultimately, if it is important to have the top and bottom of the piece match as closely as possible in finishing, the only way to achieve that is to start with waste knitting and a long enough yarn end (wrap around all needles at least 4 times to be “sure” not to run out). After binding off, rehang the bottom and finish on the top bed, or treat the first row of the knit above the waste knitting with the same method as the cast-off at its top. Brother publications are now easily available online. The images below include some of the material that was included in my handouts as black and white copies. I am now also adding scans from both the Brother Manuals and the respective books for Techniques on both the single bed and double bed. The advice on methods differs slightly depending on the source, and at times one explanation makes more sense when offered in one way rather than another. Some of the techniques are illustrated below more than once, offering different ways of exploring.
Any cast-on or bind-off can begin on either the right or the left side. If the yarn is to be used to manually knit off stitches, then one must begin on the side where the yarn end resides. If long stitches are chained through each other, then the yarn end needs to be opposite to the starting side, so that it can be used to seal the last bound-off stitch.
Anyone preferring video format when learning can find excellent presentations by others online. Roberta Rose Kelley is a prodigious YouTube contributor along with Diana Sullivan, and Susan Guagliumi has also expanded her online presence there as well as both on her earlier website and blog
2023 a follow up post: More on casting on and binding off, random tips
CASTING ON as mentioned is possible in either direction. Remember that the needle head will have to pass through the chain stitch or e-wrap, so do not pull the yarn too tight as you move across the row of needles. If you are going directly into pattern knitting after casting on you will find it easier to have some waste knitting to hang weights from if needed, and to avoid problems with stitches forming properly for the first few rows after your chosen start. To do this, cast on with some waste yarn, end with a ravel cord row, and cast on once more with “garment” yarn. There will be a waste ravel cord stitch and a new e-wrapped or chained cast-on stitch on each needle. Waste yarn can be removed upon completion of the piece. I prefer to do so a little after a short distance, to make certain no errors occur. If weights are used it is best to move them up frequently. The rule for casting on is the same as for many other machine knit fabrics: no two directly adjacent needles on the same bed with loops on them will ever form a separate stitch on each needle on the following pass of the carriage. Simply making a pass with the carriage over the needles will create a series of side-by-side loops. If a cast-on comb is used, it is possible to continue knitting, but when the comb is removed the stitches will run. That said, it is an easy method to use particularly when a piece is begun with waste yarn or is intended as a quick test swatch.
 This tip for anchoring an open cast-on may also be used after any cast-on row when stitch formation appears uneven or unpredictable for the first few rows knit
 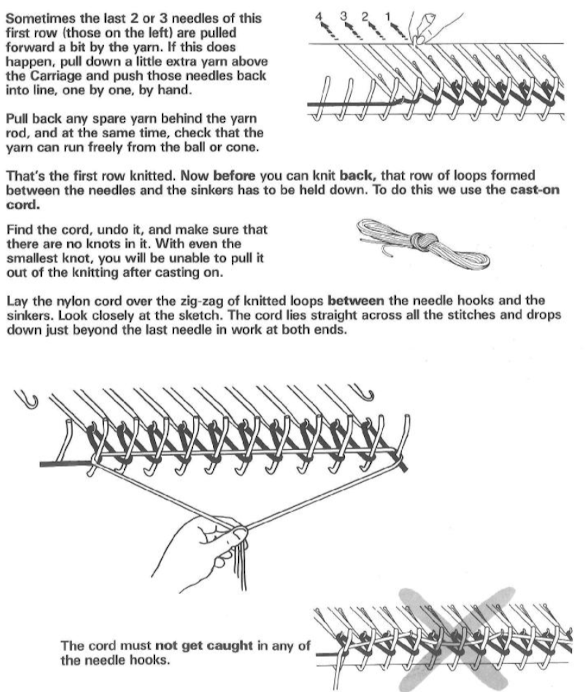 Single fully fashioned increase for reduced jags on the knit edge
  Fully fashioned single increase made with multiple transfer tool
  Increasing multiple stitches at the side of the knitting by e-wrapping
 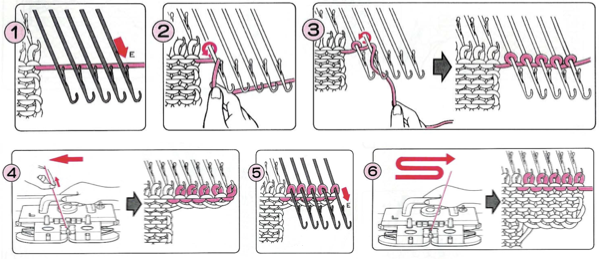 A single increase on both sides is possible to achieve at once. Generally, the issue with the result is that the stitch formed on the carriage side may be a different length than that on the opposite one, so care needs to be taken with managing the difference ie. by adding a small weight to one side only.
 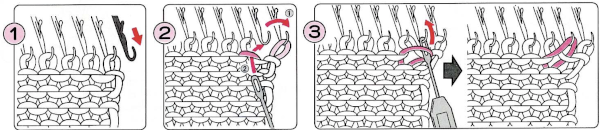 An open cast on either bed may be achieved single bed using the ribber cast-on comb.
 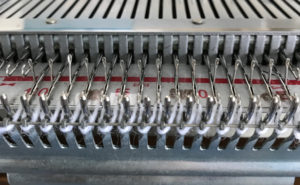 There are other cast-ons that will produce an edge that will not run but are not stable as permanent edges at the beginning of a finished piece.
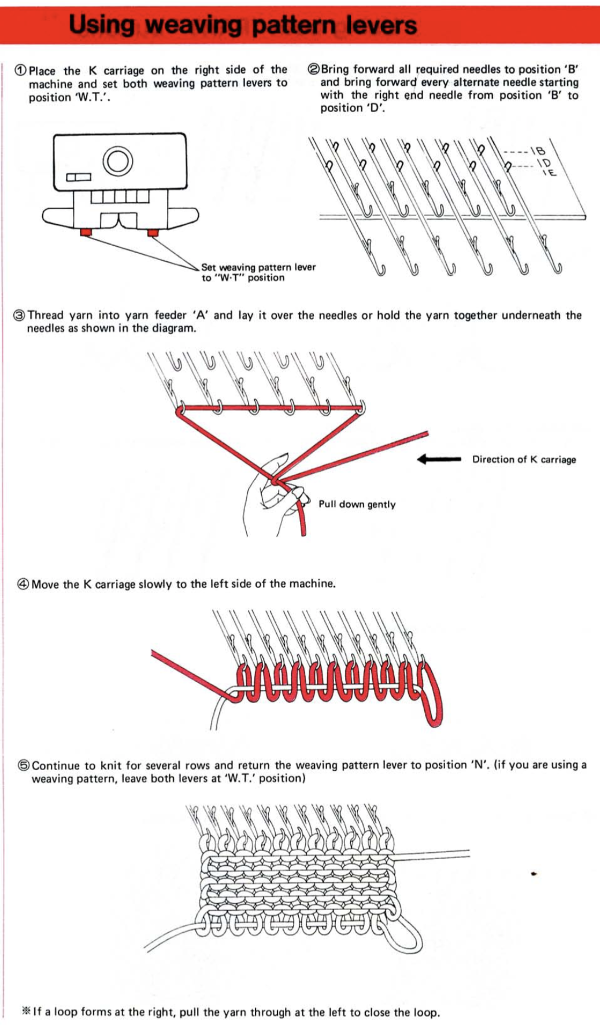
Slip stitch cast-on: bring every other needle out to hold position, knit one row at stocking stitch tension, and knit one row. Now bring the in-between to previously selected needles out to hold, and knit a row to the other side. Do this at least once before continuing, the more rows used the firmer the edge. 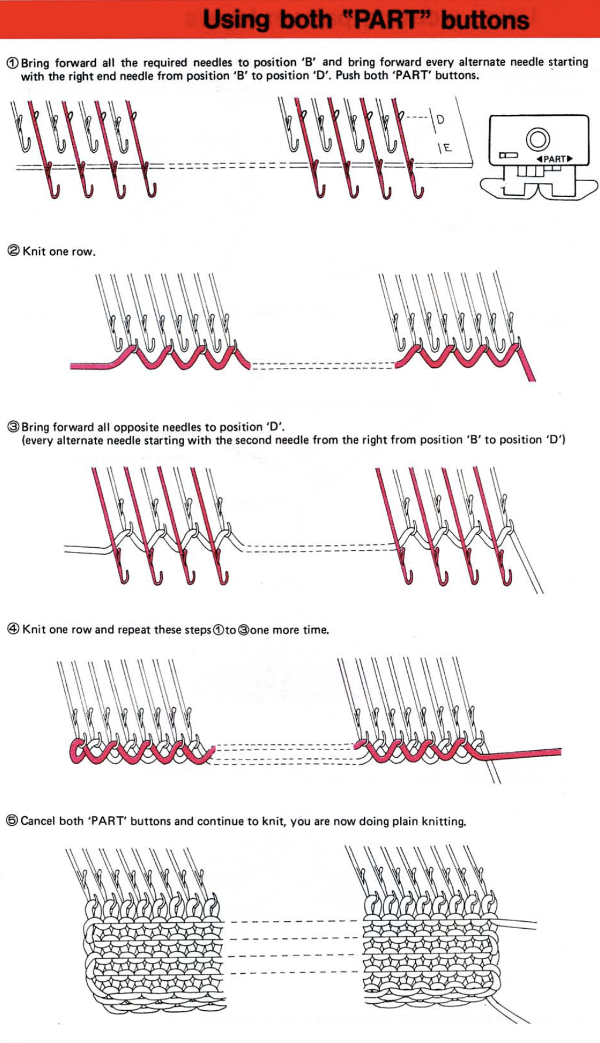 Weaving cast-on only works on machines with weaving brushes ie Brother. I tend to knit with weaving brushes down no matter what the fabric is unless using them results in problems ie the particular yarn being used has a tendency to get caught up in them.
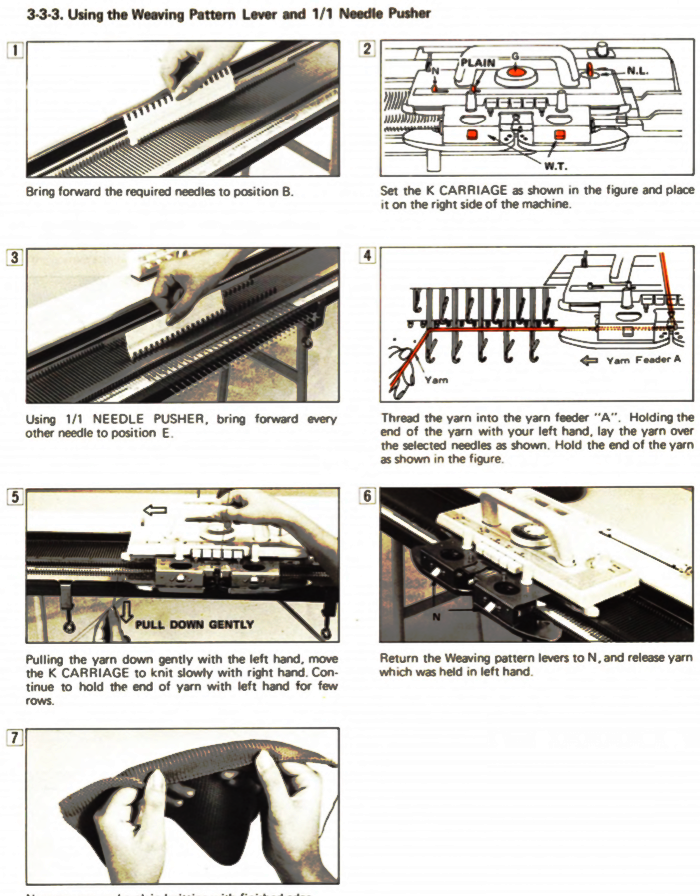
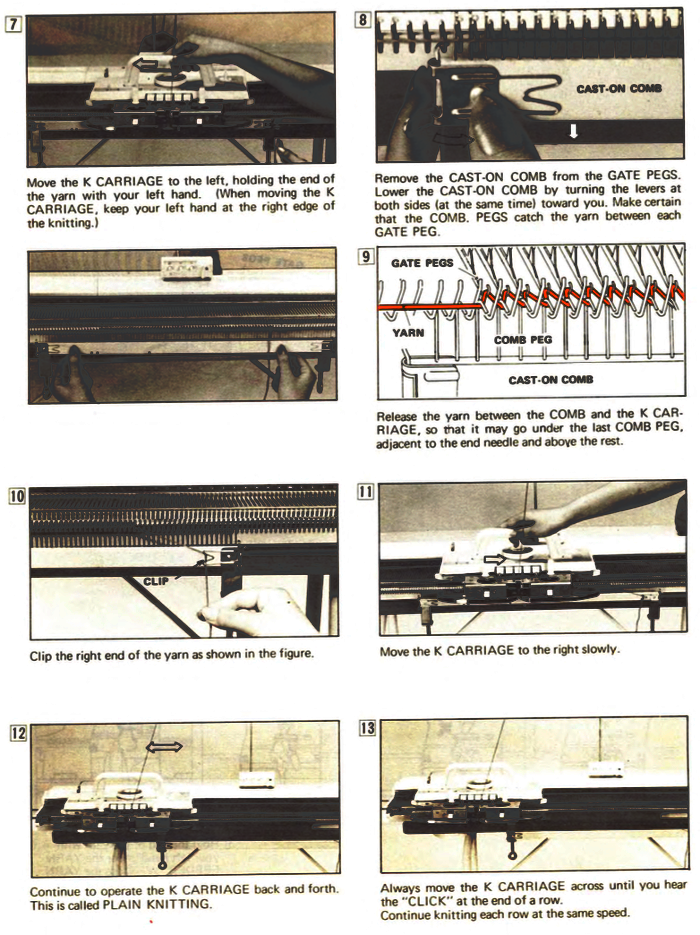
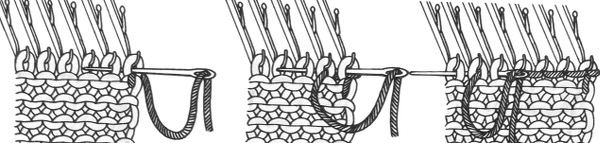
 Every other needle cast ons (EON) can be a quick way to make a gathered top for a hat knit from the top down or to gather the inner edge of a flower or other shape. The nylon cord cast-on shown below is an alternate for open stitch cast-ons when no combs are available. Any yarn that does not break easily is smooth, and does not shed fibers when removed may be substituted for the ravel cord. A ravel cord may also be placed over the gate pegs, in front of the needles as shown in the cast on the illustration below for a single row after troublesome cast on rows. Two or three rows of knitting then follow, and the waste yarn is removed prior to continuing to knit.
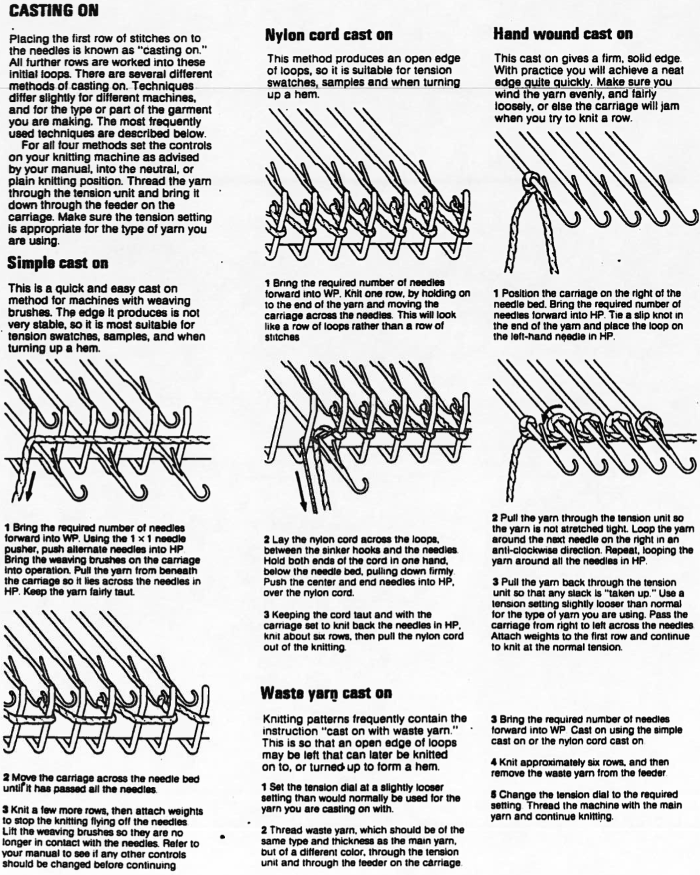
E-wrap cast–on: the comb is not necessary. If the first row after this type of cast-on is completed has issues knitting off properly, bring all needles out to hold for a couple of rows prior to knitting each of them, and that should solve the problem. With any cast-on, any too-loose loops may catch on gate pegs, if too tight, the yarn may break or the “stitch” will not knit off the needle over the closed latch and hook. The last needle on the side next to the carriage may be left empty and will pick up a loop when the next row is knit. Variations of this technique may be used to produce decorative edges.  A variety of e-wraps and chains may be used to cast on or as hand embellishment or added within the body of the knit. EON configurations of the same wraps on the standard with the same movements allow for use of significantly thicker yarns
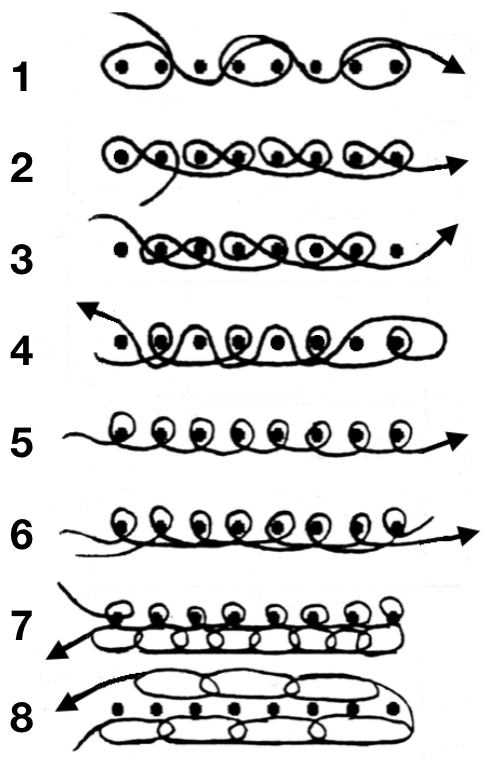
1-3 e-wrap loops as shown
4 e-wrap every other needle then weave over empty needles and under e wrap
5 e-wrap every needle
6 e-wrap every other needle with color 1, e-wrap every other needle with color 2
7 e-wrap every needle with color 1, chain every needle with color 2, may be done every other needle as well
8 chain every other needle with color 1, continue on alternate needles chaining in reverse, or use color 2
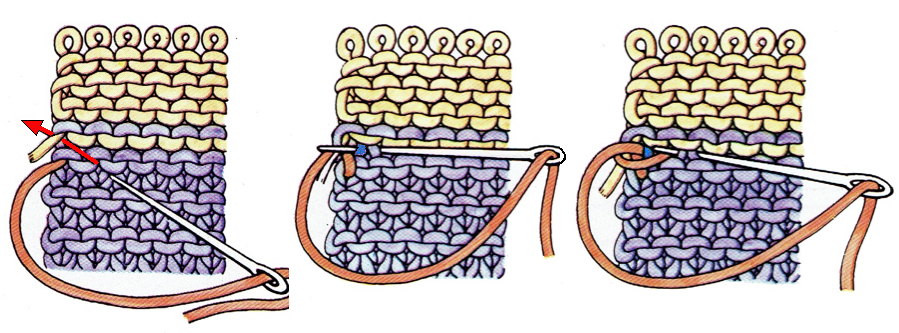
Chain or crocheted cast-on: the illustration is from Brother, the cast-on comb is not necessary
It is possible to produce a looser chain in a variety of ways. The easiest may be to cast on using a needle or latch hook from a bulky machine. A video of an alternate method that involves wrapping the previous needle for cast on and the previous gate peg or needle for bind-off in order to achieve matching width at the top and bottom of the piece may be found here.
Cast on problem-solving hints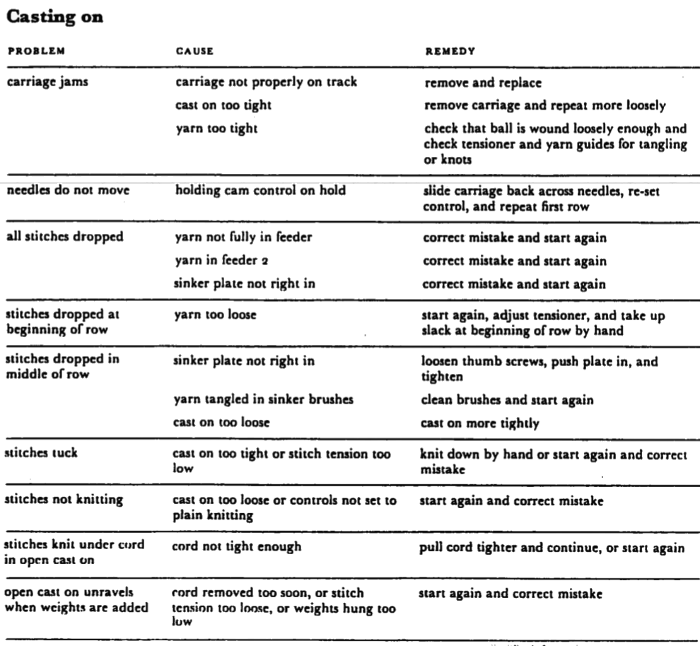
Increasing stitches at the side of the knitting:
BINDING OFF
From a Brother magazine, this copy is quite dark. I no longer own the original magazines to rescan and thus make any changes in clarity, but the text is clear
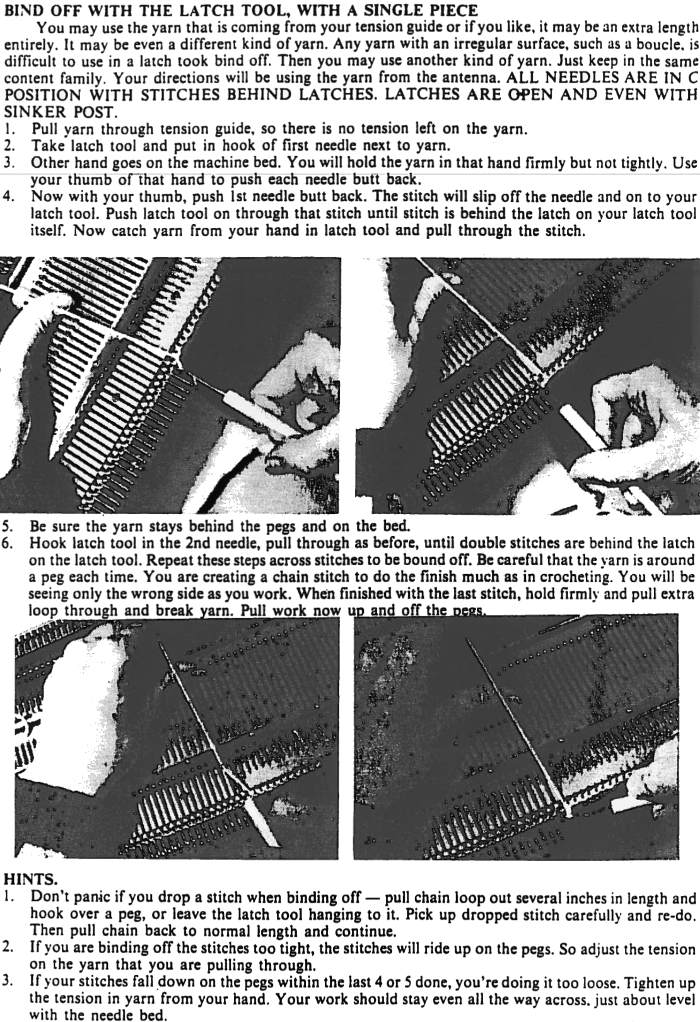
For the latch-tool bind-off without using gate pegs, suitable on any machines including plastic beds and Passap see video
Single-eye tool bind-off
I have always been hesitant to sew off or bind off live stitches directly on the machine, prefer working several rows of waste yarn, and then continuing either with the work remaining on the machine or after scrapping it off.
When using this method, a stitch is made manually through the stitch on the last needle on the carriage/yarn side and is then transferred onto the next stitch. Both are knitted through, and those two steps are repeated. The main problem is maintaining even tension and equal stitch size. One can bring the emptied needle from out of work forward to hold-position for a more even length of yarn, bring the yarn under, around and over it, knit it through the adjacent needle with 2 stitches on it, return the empty needle to out of work position, dropping the wrapped yarn. Knit through the two stitches, and repeat the process. Use a small weight and practice to keep the tension even. Continue until the last needle has 2 stitches on it, and secure yarn as usual.
As an alternative *transfer the stitch on the second needle from end #2 onto end needle #1. Then transfer the double stitches back onto the second needle from end #2. Put the now empty end needle #1 out of work*.
Repeat across the row
![]()
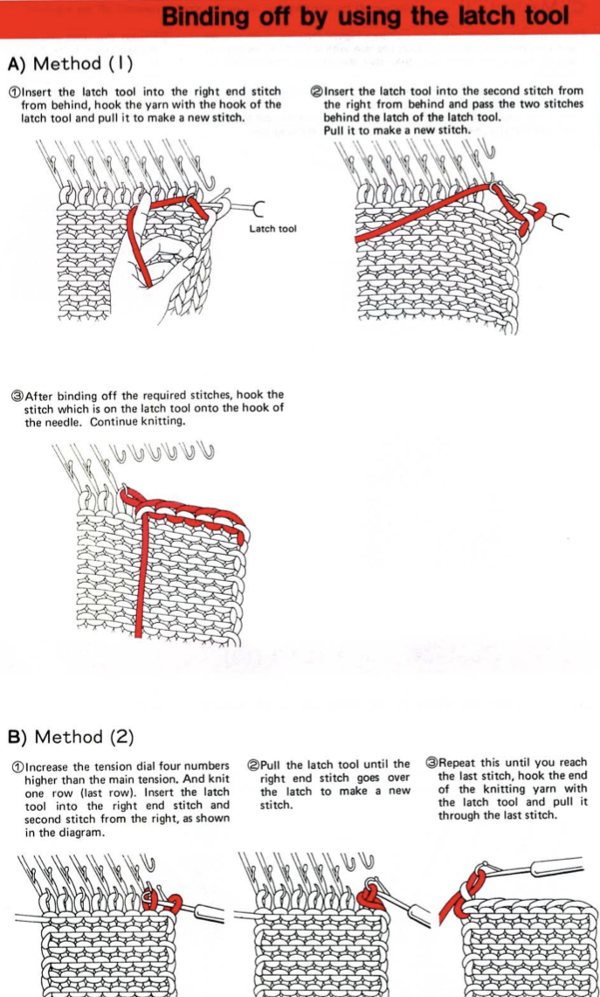
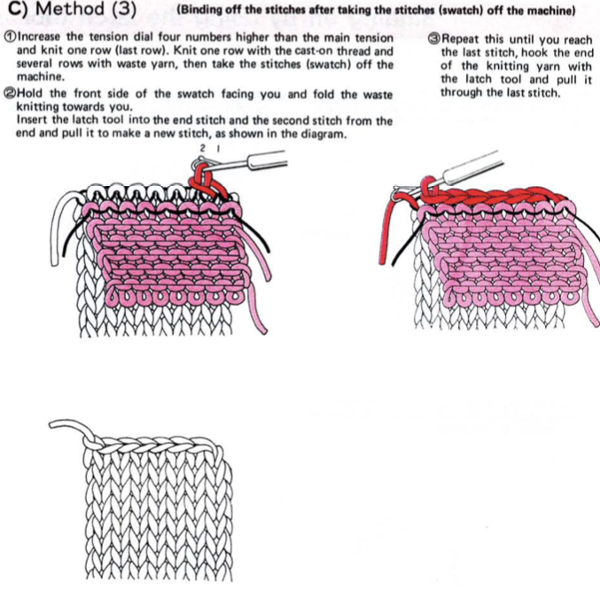 A crochet hook could be used in place of the latch tool.
Sewn bind-offs on the machine, and after several rows of waste yarn.

Using the sew off method to join open stitches to a finished edge
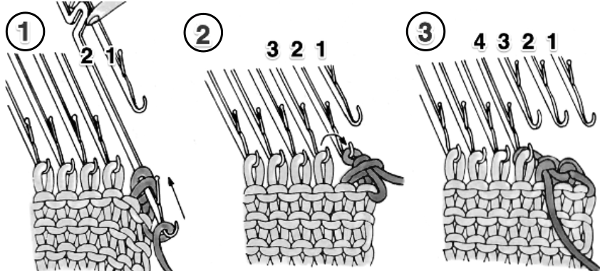
Slow, less often used, figure 8 cast-off was introduced to my knowledge by Kathleen Kinder. It is slower, and supposedly has a lot of stretch. Bring out the first needle and hand-knit a new stitch. Make that new stitch a bit larger than the ones already on the needle bed.
Start on the carriage side using the transfer tool, inserting it from back to front from left to right, toward the center of the end stitch on that side. Swivel the tool clockwise, the tool will now be in front of the gate pegs.
Do not remove the first stitch from its needle. The stitch on the tool is now twisted, creating a sideways figure 8. Use the tool to hang the twisted stitch on the adjacent needle, the two needles involved now share the transferred half stitch.
The second needle now holds 2 loops.
Knit the half stitch through the one behind it prior to hand-knitting a new stitch, or (easier) bring the second needle out, and hand-knit a stitch through both loops on it.
Continue across the row with actions illustrated from right to left. 
A quick swatch shows the potential amount of stretch in this bind-off. I tried dropping the stitch remaining on the right after it was shared with the needle on its left and both “stitches” were knit through by hand about halfway and just proceeding across the remaining row without dropping until the bind-off was completed. The latter was easier and faster for me. Once the knitting was completed I could see no difference between the two methods. 
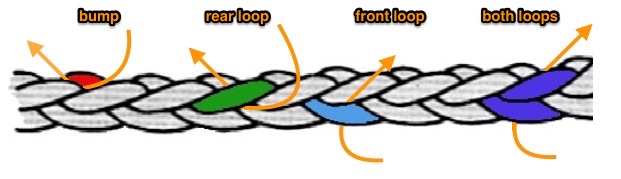
Potential for both top and bottom edges of knits: “Crochet” meets machine knitting techniques: working with “chains”
 For mock rib executed on the single bed, for double rib as well, see post
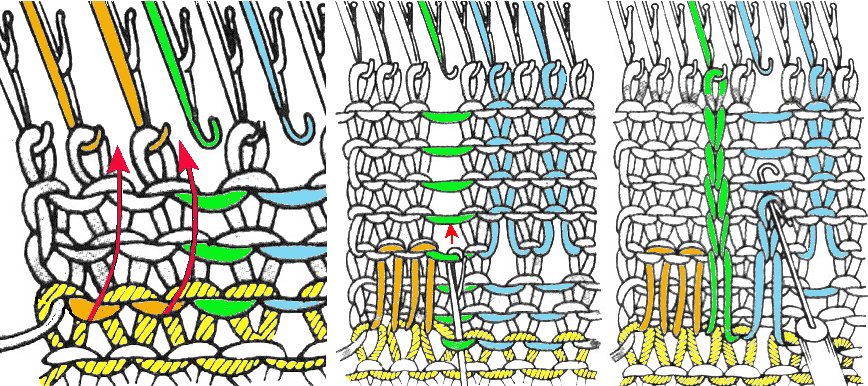
Video references found online:
Sinker-post-bind-offs using single eye tool and latch hook Susan Guagliumi
A variety of sinker post (gate peg) bind-offs Susan Guagliumi
Binding off around needles rather than gate pegs Susan Guagliumi
Latch Tool Bind Off around gate pegs single stitch at a time Diana Sullivan
My least favorite, loop through loop Diana Sullivan
Finishing tips
Seaming, joining, picking up stitches 3, ribbed knits
Seaming, joining, picking up stitches 2
and seaming, joining, picking up stitches 1