A look at single bed mock rib

The Brother Knitting Techniques book has a series of illustrations on how to manage a mock rib in various configurations on pages 7-15. The manual is now available for free download online and is an excellent reference.

This technique requires a waste yarn start, followed by a row of ravel-cord. The resulting knit creates ladders or stitches that will, in turn, be dropped, then latched up and reformed into knit stitches on the purl ground. Reducing the knit tension by as much as 2-3 numbers is recommended after the ravel cord row.

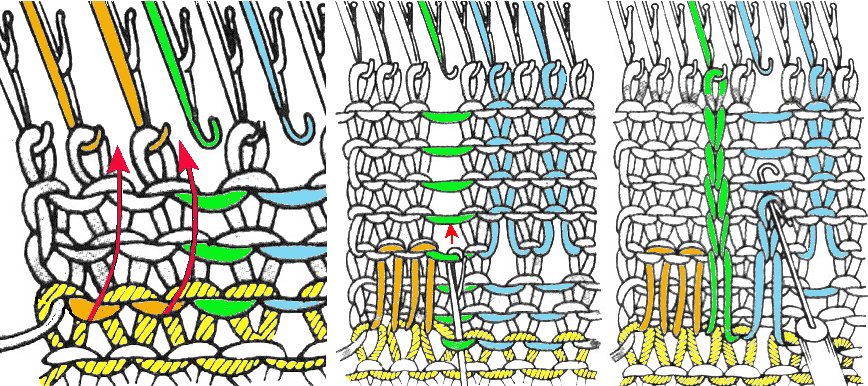
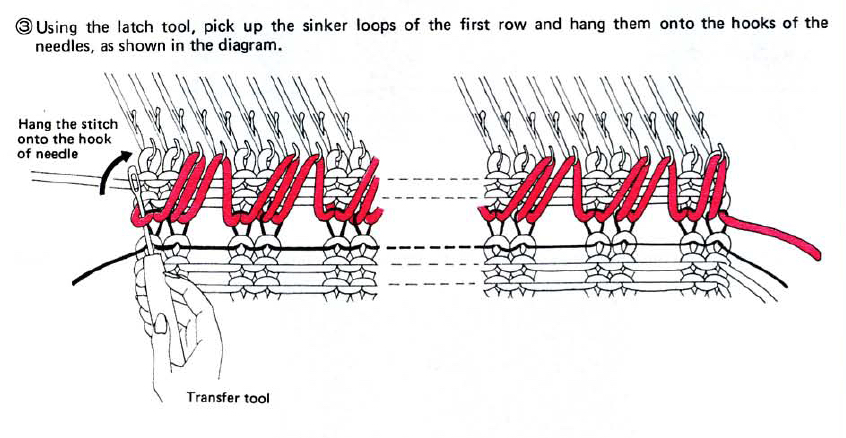
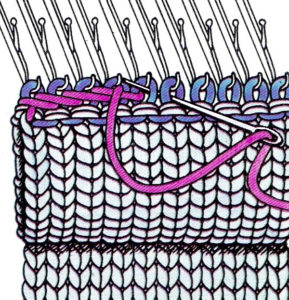
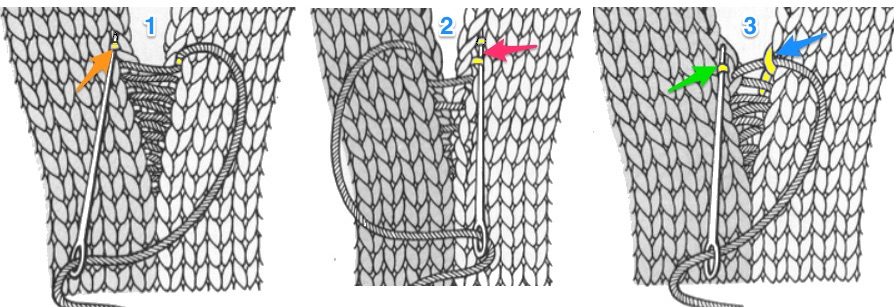
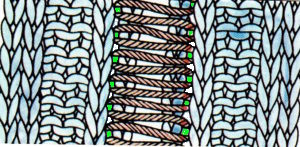
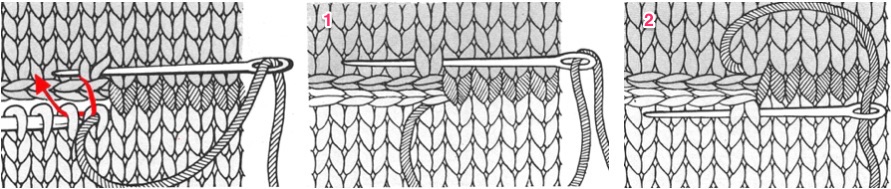
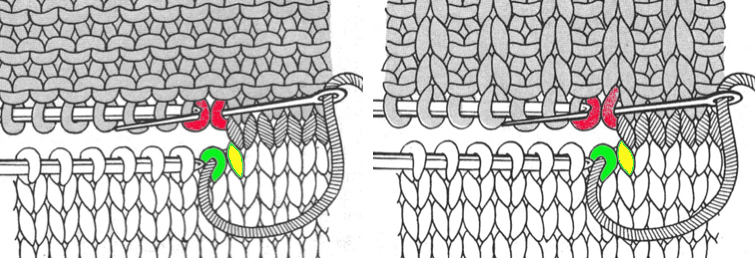
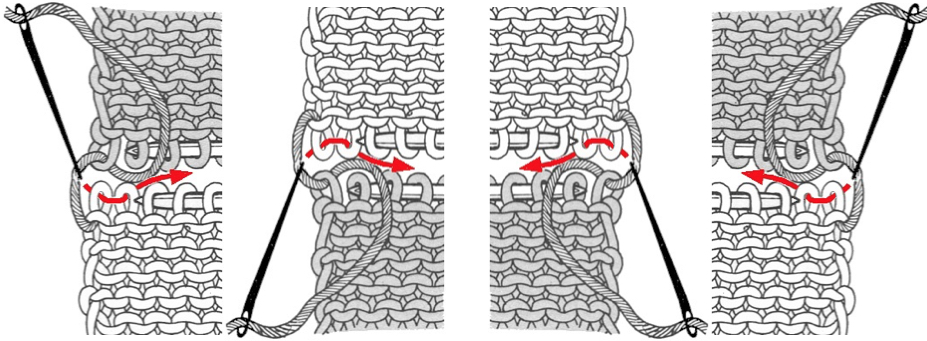
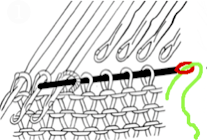
The needles marked in blue and green in the first image below are needles that are pulled back to the A position prior to starting the piece.  After the waste yarn and ravel cord (hatched yellow) start, three rows are knit with the garment yarn. Using a transfer tool, pick up the sinker loops from the first row knit (orange), and hang them on the corresponding needles on the diagram (follow the red arrows).

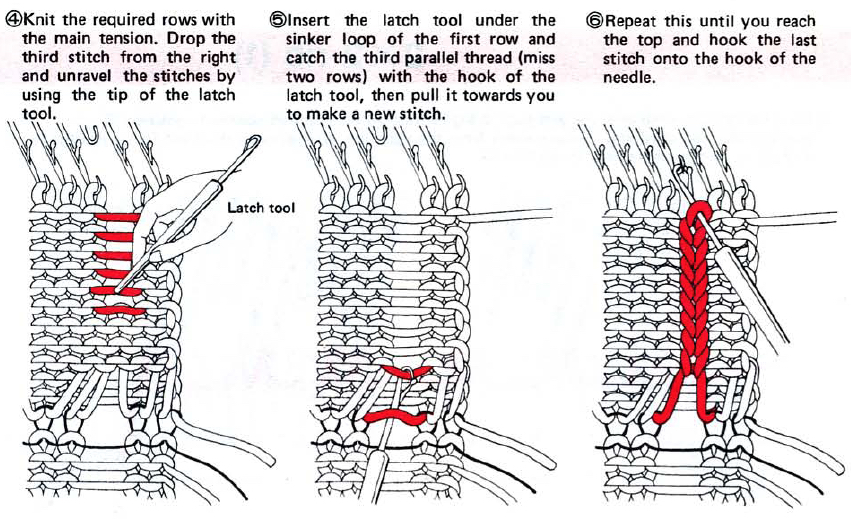
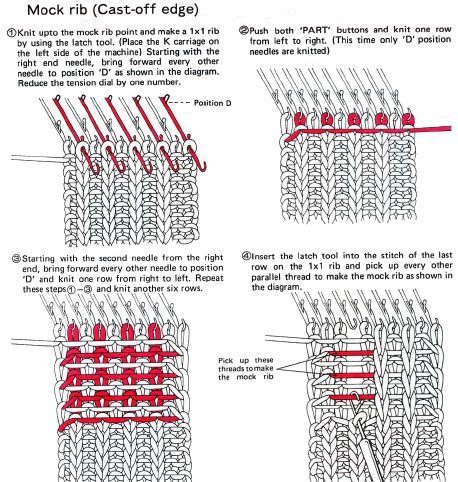
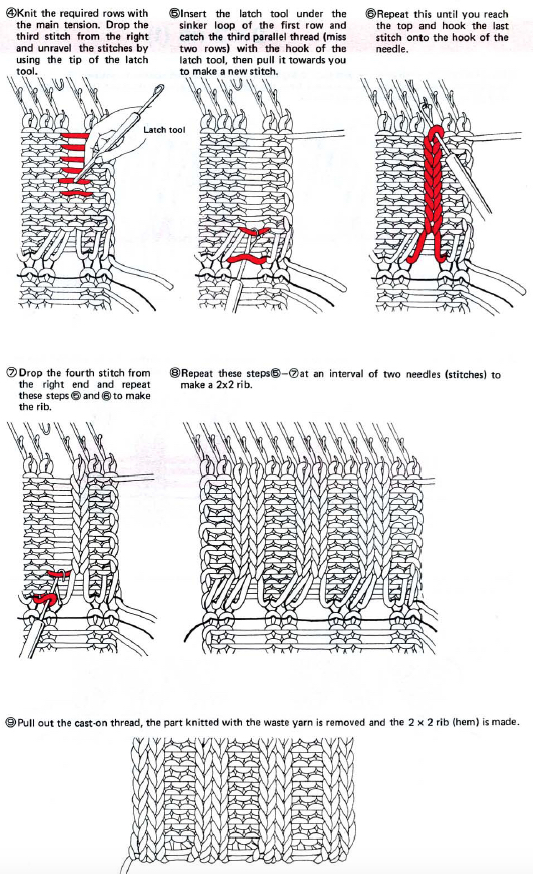
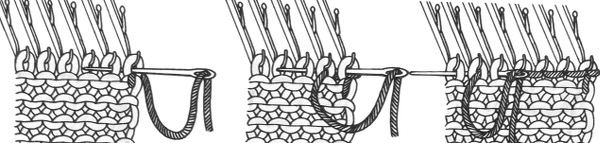
One may at this point continue with needles (green) left out of work, or return the needles (blue) to the work position. If needles are left OOW, ladders will continue to be created. If they are returned to work, a loop is created on the empty needle on the first knit pass, formed into a stitch on the second pass, resulting in an eyelet. Every needle treated in this manner will now be knitting. If stitches rather than ladders are formed for the height of the rib, then those stitches (blue) will need to be dropped, and in turn, latched up. In both instances, the latch tool goes under the first ladder created, and 2 rows are skipped, the latch tool then catches the third parallel row, and pulls it through the first to make the required knit stitch. The process continues up the height of the “rib”. In this illustration, the main yarn begins to knit with COL.

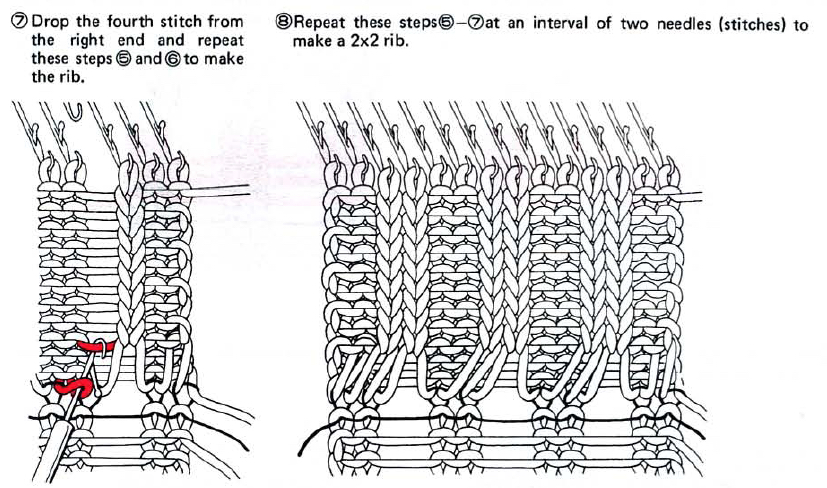
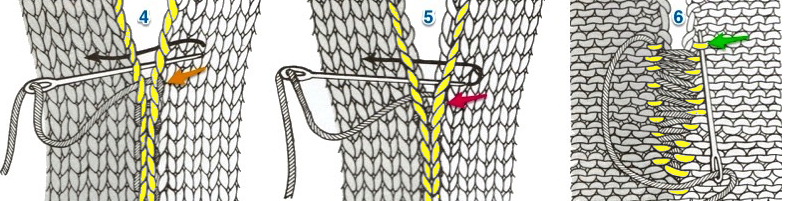
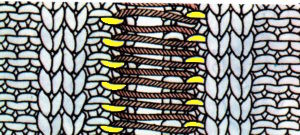
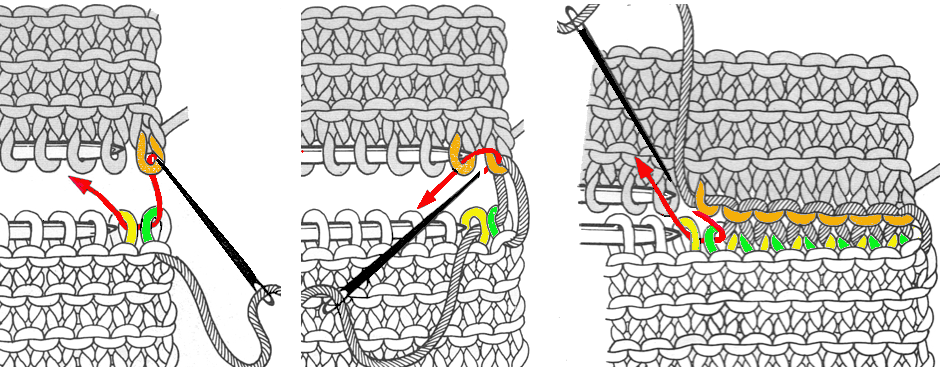
A 2X2 rib is possible. From the Techniques book: cast on with waste yarn and ravel cord (1, 2)

an alternate: cast on with waste yarn and and ravel cord, knit 3 rows

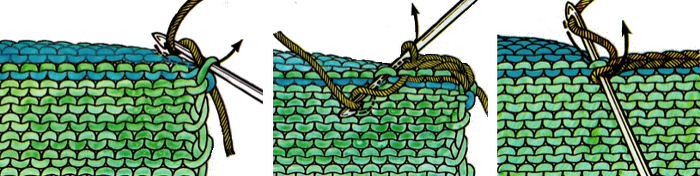
pick up the sinker loop from a knit stitch, hang on 1 of  the 2 NOOW (R)

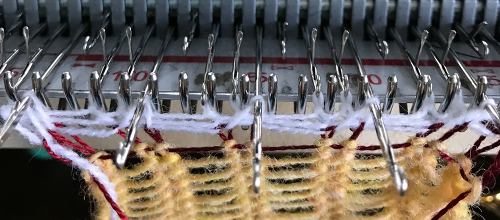
knit height of the rib 

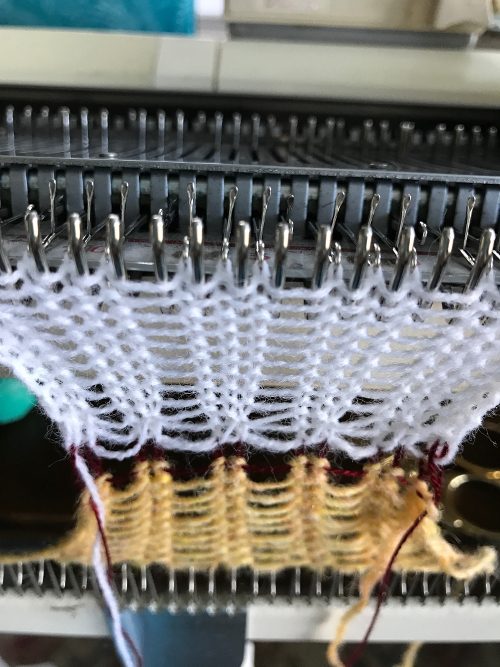
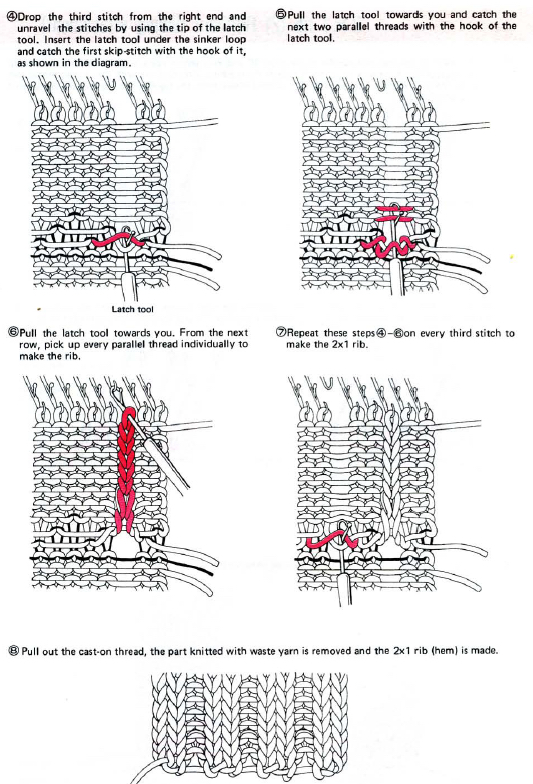
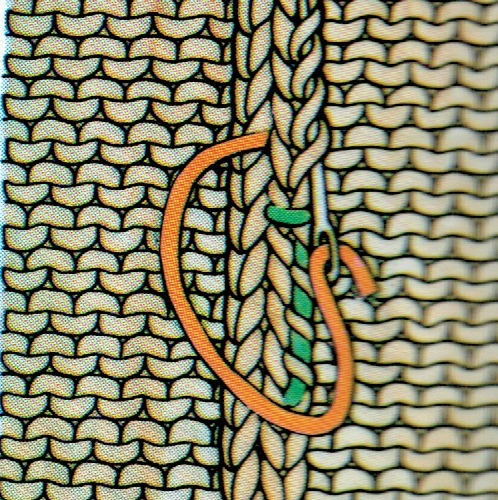
latch up the ladder as shown in drawings above 

drop/ unravel the second stitch to be latched up (L)

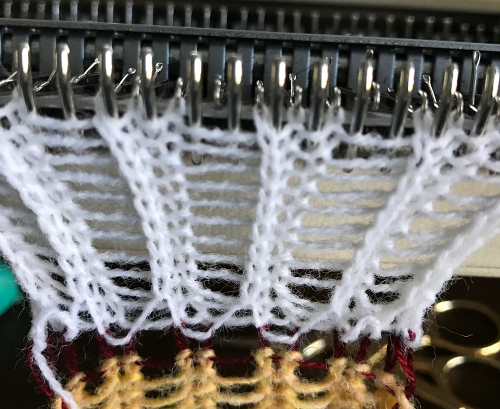
dropped stitches reformed for rib 

continue across the row, then proceed with the main body of the knit 

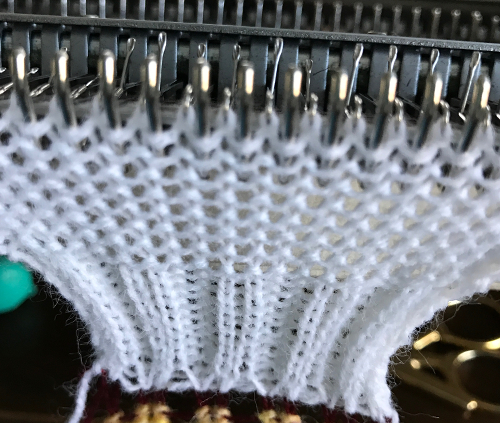
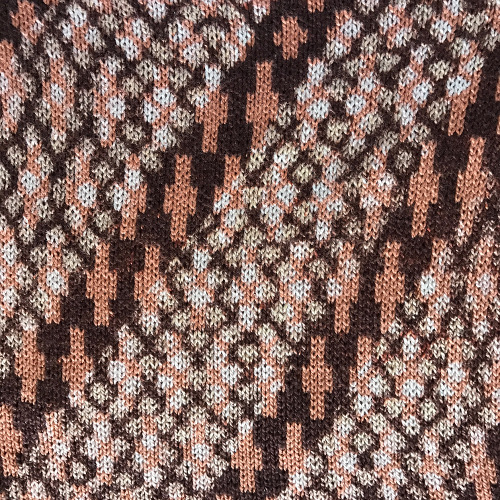
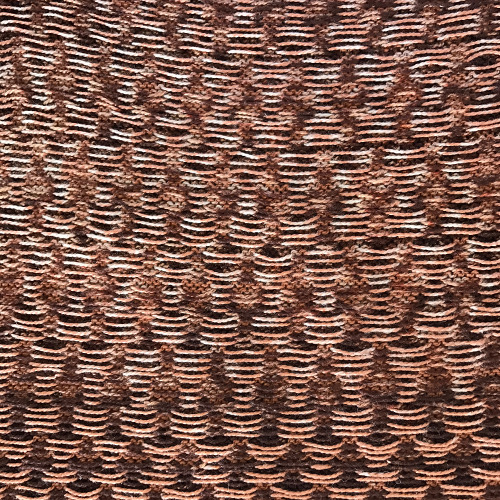
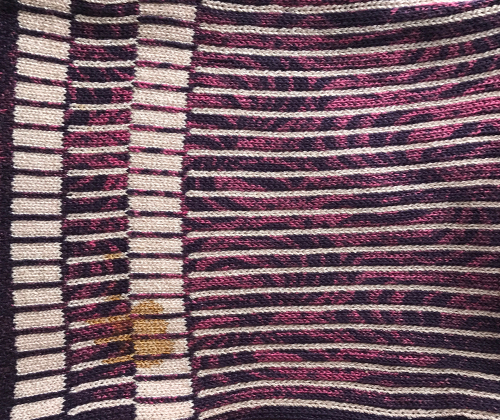
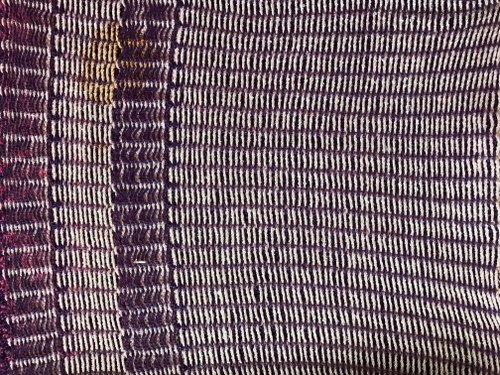
the rib, off the machine 

stretched out

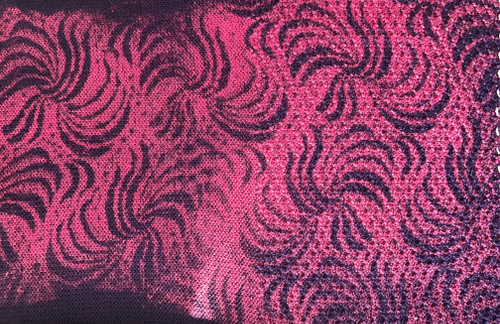
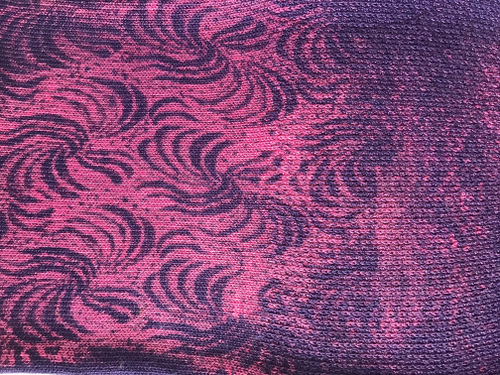
My sample was knit in a 2/15 acrylic, a bit thin for this technique, and if pressed, the fabric would be flattened permanently. If the intent is to have the rib retain its “spring and stretch” it is best to use a yarn with memory, such as wool. If slip stitches or FI are to be used for the body of the knit, they will create a much denser fabric. The yarn in the rib may in turn need to be doubled to produce enough substance. As always swatching is recommended before committing to a large piece in any technique.

From the Brother Techniques Book a few more to try: 

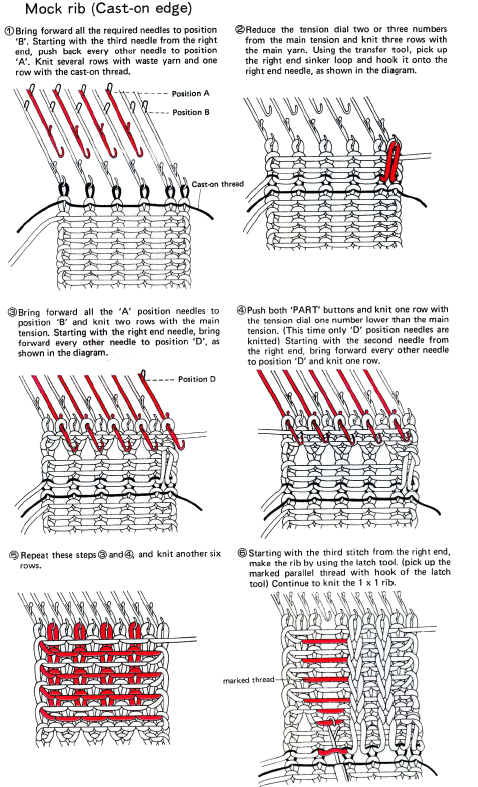
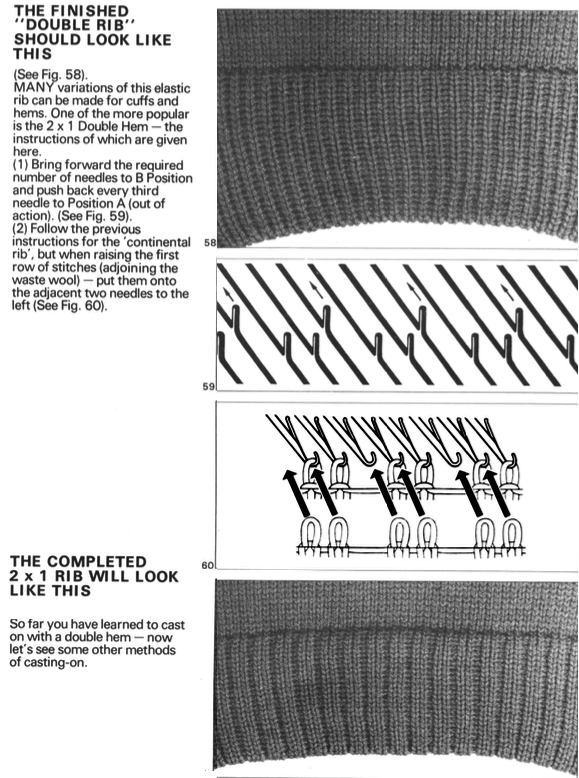
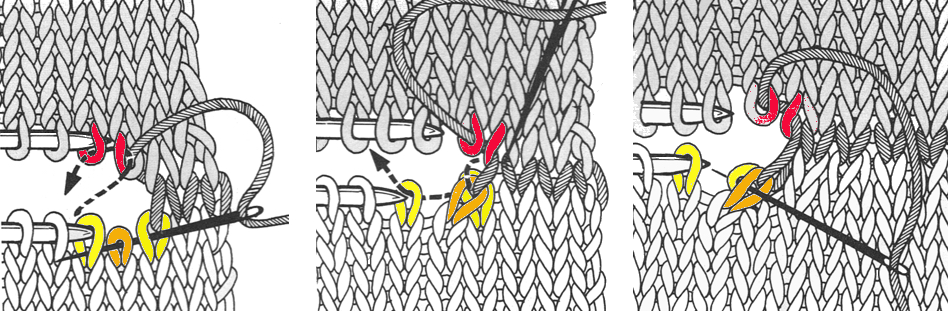
2X1 rib using slip setting 

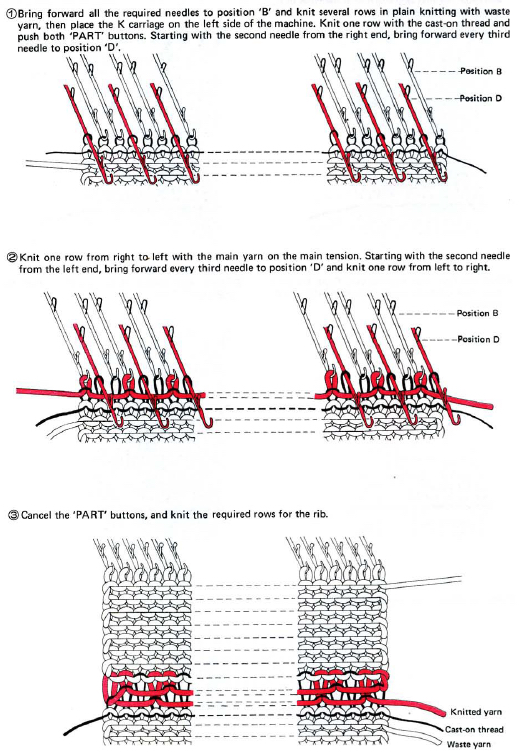
2 X 2 rib: working with Brother cast-on comb, full text
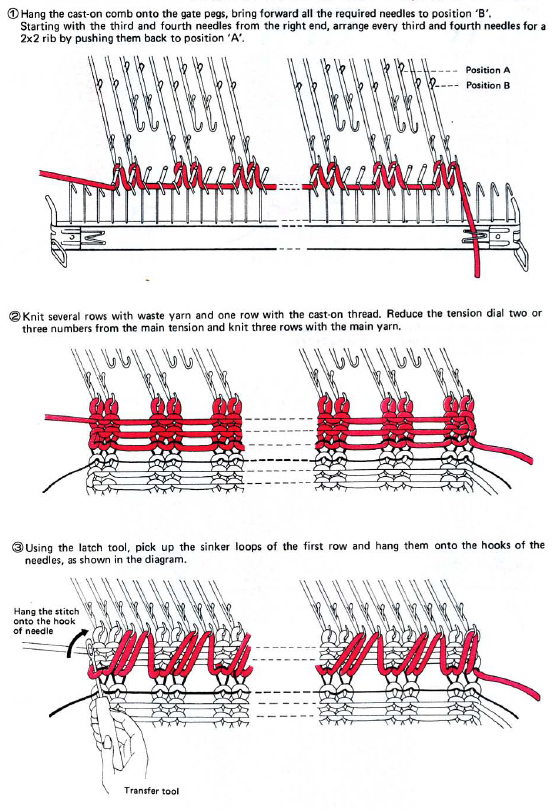
  using waste yarn

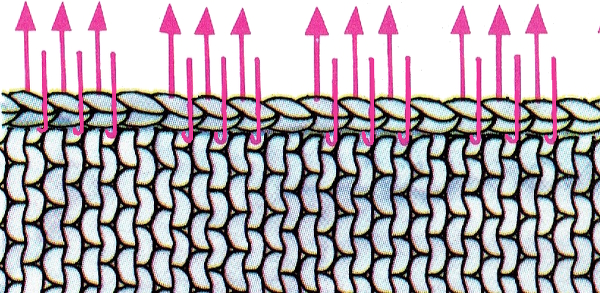
From the KH 800 manual, a double welt. Knitting the single joining row of hems at a looser tension will help the place where the two layers meet lie flatter

Seaming, joining, picking up stitches on knits 2

I have an extensive library of both hand and machine knitting publications. I am not the originator of the base drawings for these illustrations. However, they have been accumulated from various decades-old sources, edited by me for content, color, size, etc. My editing program is Gimp. I will review, alter, or add to this library over time.
Sewn bind-offs on the machine 
knitting taken off on waste yarn joining a hem 
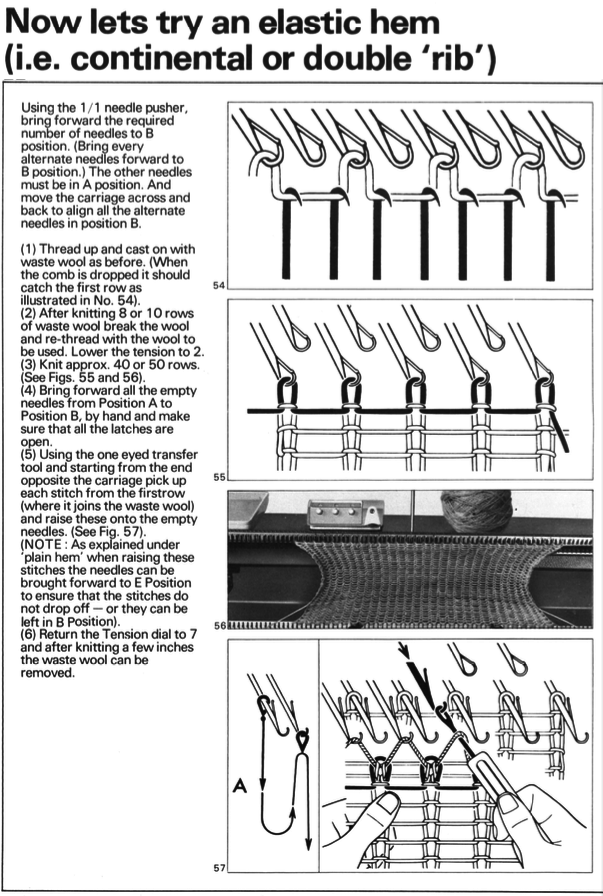
open stitches to finished hem crochet bind-off through the top or bottom of stitches in the last row respectively  weaving in yarn ends across a row on the purl side  Mattress stitch: work a few rows with loose stitches so entry and exit points are visible, then pull on yarn and tug on finished segments as you go to adjust stitch size
1. under the single bar between a full knit stitch on either edge of knitting, best for bulkier knits
2. under double bars between a full knit stitch on either edge of knitting, faster on smaller gauge knit
3. worked half a stitch away from the edge, every  row, under the bar on left, loop on the right

4. running stitch along and through the center of edge stitches, alternating sides every row
5. running stitch one full stitch away from the edge, alternating sides every row
6. joining purl stitches in every row

garter stitch 
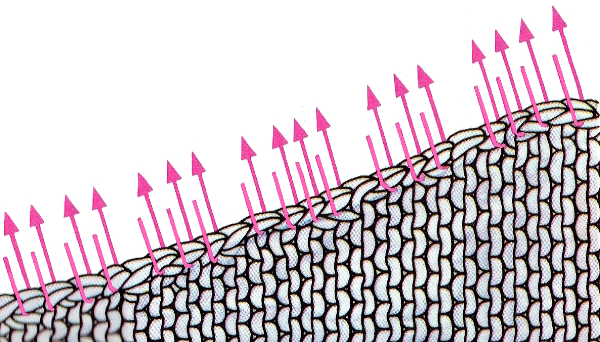
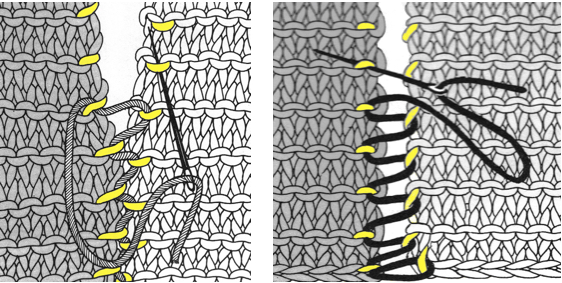
1. mattress stitch, knit side out, one full stitch away from the edge, adding a second strand of yarn to finish the join
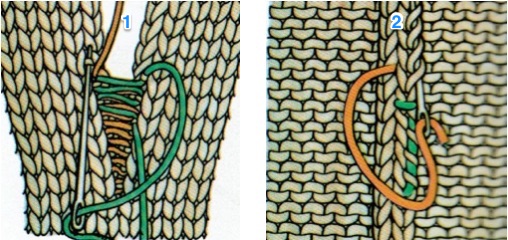
2. weaving in joined yarns along the inseam, traveling in opposite directions

2 X 2 rib ending with one knit stitch  2 X 2 rib ending with 2 knit stitchesrib join through “edge loops” of knit stitches  2 X 2 rib join ending with 2 knit stitches, 1 full stitch from edge 2 X 2 rib join ending with 2 purl stitches, 1 full stitch from edge For more illustrations in addition to the above for joining ribbed stitches see the later 2022 post
Picking up stitches to continue knitting or joining on the machine: straight edges,    curved edges open sts to bound off; bound off sts to bound off  (steps 1 and 2)knit to purl; knit to rib garter-stitch decreasing evenly at intervals across a row grafting with purl side facing if you are left-handed or the yarn end is on the alternate piece,  rotating the image or flipping it horizontally or vertically will provide guidelines.  There are many alternatives for increasing and decreasing stitches. These pages are from the KH 800, a Brother model made in 1970-71, and cover the basics and the often underused technique of using a knitting needle to remove stitches from the machine for any reason, here intended for decreasing evenly across a row as an alternative to scrapping off on waste yarn or using a garter bar.
Long and thin double-pointed needles are best on the standard, and sizing is more flexible when working on the bulky. If a double-pointed one is used, have a needle stopper on one end, and swap it out to the opposite side when shifting stitch positions. The work could be turned over with this technique as well. There are wide varieties of stitch holders that may be used to store or move stitches around when tools with enough prongs to serve the purpose are not available, as well as safety-pin-like plastic ones that can hold single open stitches or serve as markers at the edges of the knit. Sometimes appropriate lengths of ravel cord and a yarn needle can serve the purpose as well.

Seaming, joining, picking up stitches on knits 1

Bleach discharge on knits

I have an I would rather die than dye attitude. Back in late 90s at a Studio Seminar I  attended a workshop on bleach discharge on knits. A sweater using the technique by Dawn Ortel was published in Studio by White Design, Spring/Summer 1995. At some point while still teaching I developed a set of swatches using the technique, removing color from finished fabric rather than adding it. Since then, other alternative, safer  methods and agents for discharge have been developed and become available. For this exercise the mix used was 1 part household bleach and 3 parts water in a spray bottle. Masking tape, stiffened lace, clear stick on shelf liner, rubber templates, and any non porous material may be used as the “stencil”. All non design areas need to be protected. A spray bottle that allows for mist control is required. The activity is best done out of doors. When the color reaction looks as intended, remove any “stencil” carefully to avoid any bleach spilling  onto the rest of your piece. Wash in neutralizing solution of 1 cup white vinegar to 1 gallon of water to halt process.

Masking tape was used to create the diagonal stripes below. The original 2 colors used for the FI can be identified in those areas. A rubber “stencil” populated with evenly spaced dots was used in addition. The combination produced the illusion of multiple colors per row. The yarn used was 100% mercerized cotton.

img_4130img_4131here 6 lb fishing line is used as color 2larger shapes: plain knit on FIon slip or tuck patterning plain knit on L / slip stitch on Rlocked FI, wool/rayon as col 2, coffee stain selected areas details (extra colors from fabric markers)