As with the tuck stitch, the knit carriage ignores the needles that are not selected in the pattern. All holes in a punchcard, black squares, or black pixels in electronic programming knit. A great deal of dimensionality may be achieved since the tuck restriction of the maximum amount of yarn being held in the hooks of the nonselected needles does not apply. The effects on the width and length of the fabric vary depending on the number of needles ignored in the pattern. If slipping in long vertical areas, the yarn that is held in the non-selected stitch(es) needs to be held for that long without breaking. Multiple colors per row patterns may in some cases require specific color separations, but as usual, a good place to start is with published patterns.
Stitch formation: the needle that is not worked holds a stitch that gets longer until that spot on the needle bed is selected again, resulting in a knit stitch being formed in that location with the next carriage pass. Floats are formed between knit stitches as the held stitches are skipped. The height and width of the bars created by unpunched squares or white squares or pixels need not be fixed and may be extended in both height and width, breaking tuck rules. Many patterns are impactful both with the use of single-color yarns or with color changes. With color changes, the elongated stitch carries its color up in that location on the knit side until it gets knit off (not always or necessarily in the same color).
Here stitches are held for 4 rows,  a planned color change on the next row would require needles that had been skipped, marked in red, being pre-selected forward for knitting back toward the color changer and returning to the previous or next planned color selection
 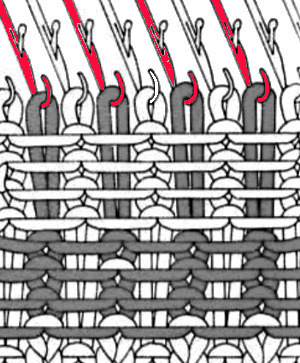 In textured knitting, fiber choice can be significant. It is best to use a yarn with some memory, such as wool. If yarns such as acrylics or rayons are used and in turn are pressed the fabric may become permanently flattened, which is not desirable unless it is a purposeful design choice.
Depending on the KM brand, the space between slipped repeats may be altered. In some cases, no matter what the programming method, and especially when using multiple colors, the length of the required repeats may grow exponentially no matter what machine is being used.
It is possible to use slip stitch in only one direction to create knitted cords, often referred to as i-cords. The technique is sometimes the introduction to using the stitch type. Used for all-over patterning the possibilities for textures and 3D effects and shaping are endless.
Slip stitch patterns tighten the work widthwise, as well as shorten it in length. To achieve more drape in the resulting knit use a tension dial number 2 higher than that used in stocking stitch for the same yarn.
To retain a flatter fabric shape off the machine it may be best to slip no more than 2 side-by-side stitches. The number of rows for which stitches are slipped contributes to density. Some of the single bed patterns may be used double-bed as well, but the discussion here is for single bed patterning.
Some repeat ideas for working with diagonals from a punchcard reference, and one from the basic factory pack supplied with machines: 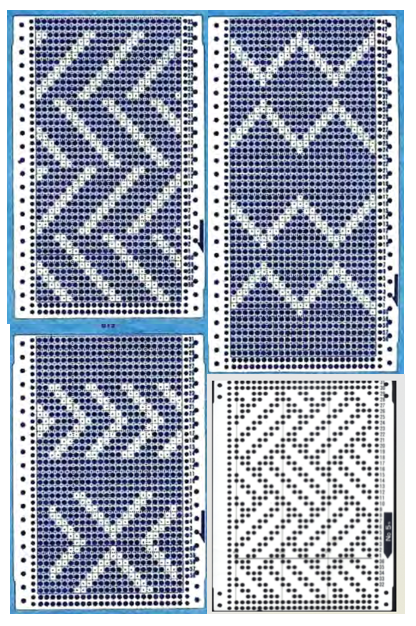 Remember that punchcards knit the image as viewed on the purl side of the fabric, so to match any swatch photos given in published pattern books, the exact repeat unless it is perfectly symmetrical, will usually need to be mirrored horizontally for use in electronic machines.
Similar shapes to the above, arranged differently: in A, arrows point to punched holes that create a vertical line containing 2 slipped rows followed by 2 knit ones, B is problematic because the long vertical white lines would mean the stitches corresponding to those locations on the needle bed would slip for the height of the punchcard, C is B color reversed to solve the problem, and suitable for slip-stitch knitting. An alternative for using B as is would be to have needles not selected in those all blank locations out of work on the main bed creating ladders (or transferred down to and in use on the ribber). As in any pattern knitting, if needles on the top bed are out of work, end needle selection must be canceled. If it is not, the needles adjacent to out-of-work needles will knit on every row, altering the planned pattern.
 The same shapes can be edited for use after rotating the original
 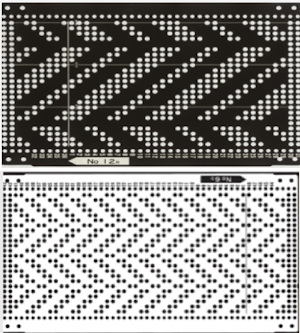 The 24-stitch repeat for the bottom option is shown, punchcard knitters would have to punch the height x4. The minimum electronic repeat is highlighted with a red border
 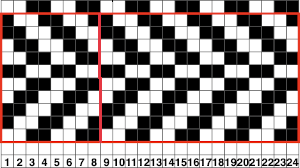 tiling to check the alignment of the 8X10 repeat.
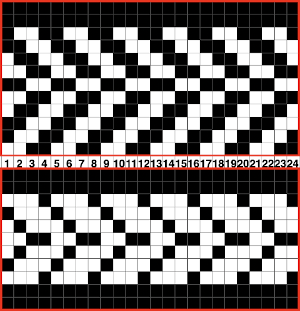
 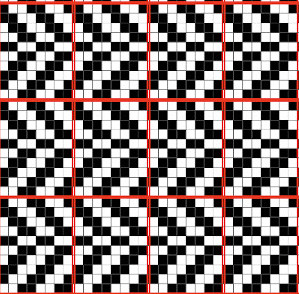 More repeats using similar lines, varying in density and consequently in their height: all knit rows (no white squares) make for easy to recognize color change possibilities and transitions
 ![]() other possibilities using checks rather than solid lines
other possibilities using checks rather than solid lines  When evaluating published repeats, keep in mind the basics; these are suitable for electronic KMs that will allow for color reverse
 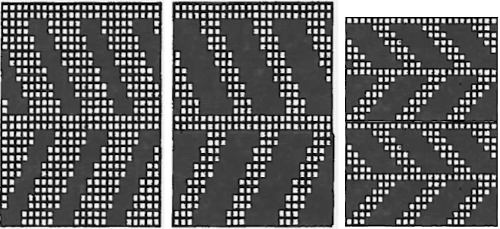 punchcard knitters would have to punch white squares, resulting in this arrangement
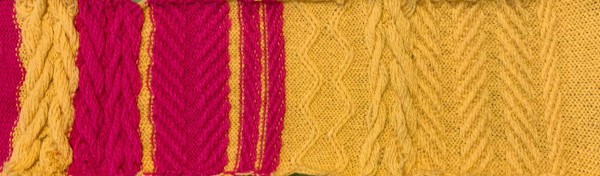
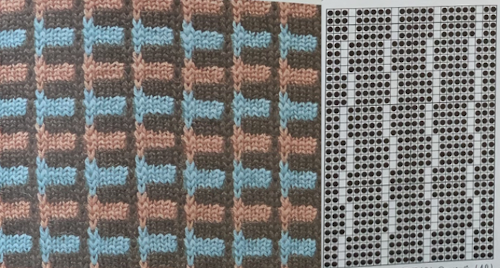
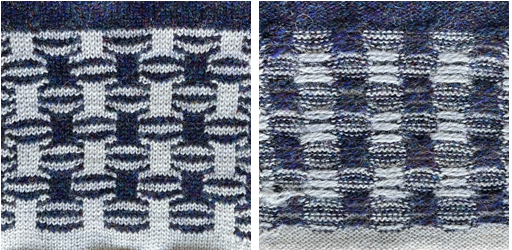
 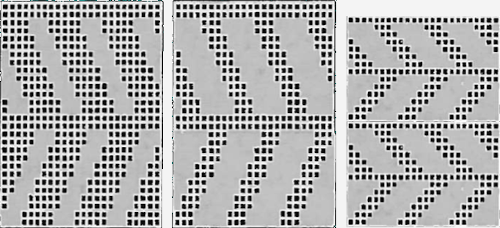 The knit side is not necessarily always interesting. With knit stripes in a different color breaking up the textured segments a secondary pattern will begin to emerge. A closer look at the samples below reveals one repeat is actually the other, drawn double length. This is an easy option, even in punch card machines. When knitting long pieces especially, however, I prefer not to use double-length built-in features, finding it easier to sort out where I am in terms of design rows if errors occur.
 ![]()
![]()

 Returning to a couple of the tuck stitch illustrations, adjusting the repeats for use with the slip stitch setting. Some of the color change sequences are suggested on the right side of the charts
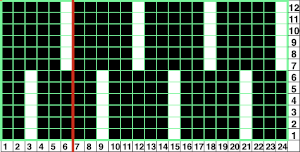
 The tuck stitch version,
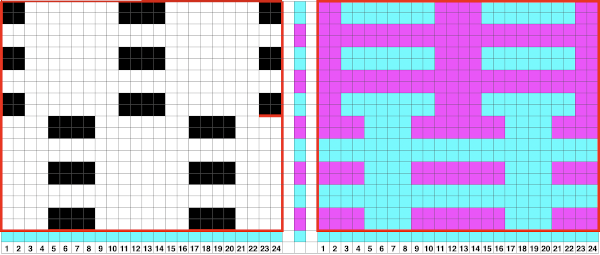
 modifying it for use in slip stitch B, adding all knit rows between repeats A, and visualizing color placements on the knit side of the fabric.
 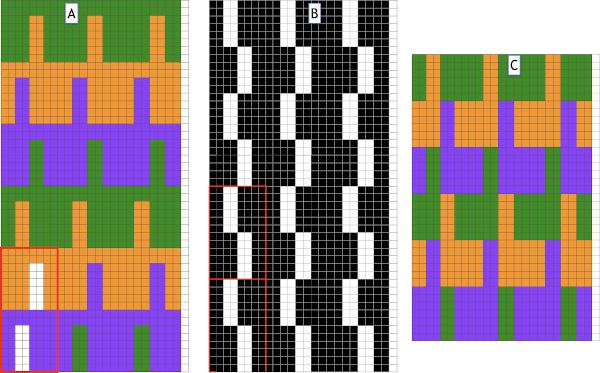 Depending on your machine ie Passap Duo requires 40 stitches punched repeats or modifying for electronics, vertical black columns or additional white squares may be added to the original design repeat units. The corresponding cells are filled with the color gray
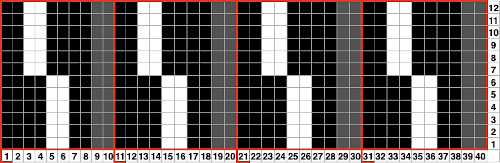
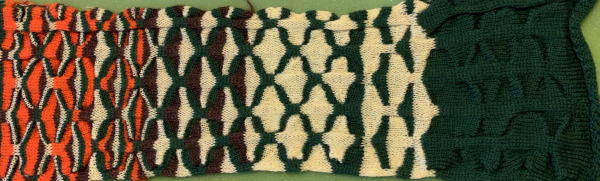
 Testing the waters: a swatch using 4 colors, beginning with color changes every 6 rows, ending at the top with every 2, more variations are possible.
 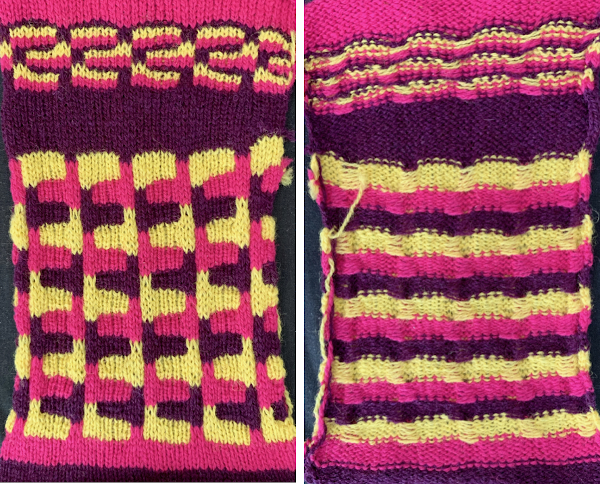 I have begun including .pngs with some of my posts. Check that your import method does not automatically change the mode to RGB. It is a common problem with such grabs from FB. If that happens, index the image to B/W and save it again before using it in download to KM software.
Making those shapes move: color striping variations for using 3 or 2 colors are seen on the right of the chart. The final surface may also work very well in a single color ![]()
 The resulting swatch is shown sideways for the sake of space. I usually begin tests with some striped knitting so I can be certain the color changer is threaded properly, that each color gets picked up without crossing or other issues, and that tension for any one color is not in conflict with that used with remaining colors. I am not a fan of the Brother single bed color changer, but it is a great convenience in fabrics such as these. A reminder when using it: add a lace extension rail on the left side. The carriage needs to clear the color changer far enough on its left for all colors to be picked up and changed properly
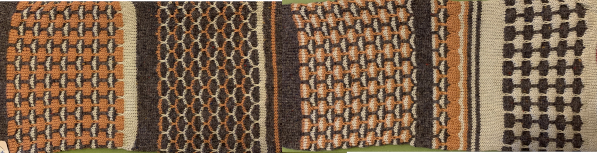
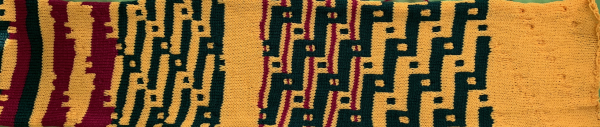
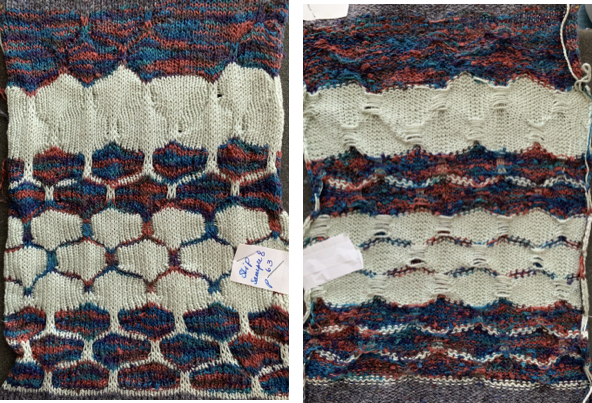
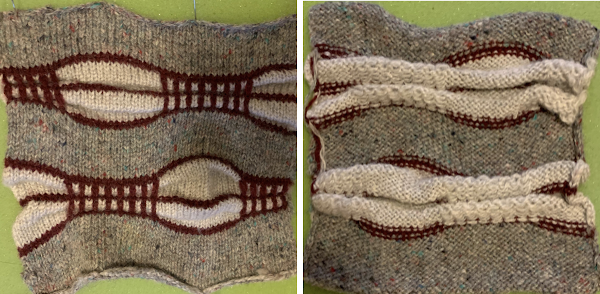
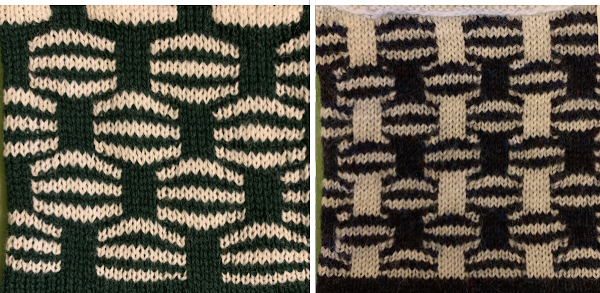
 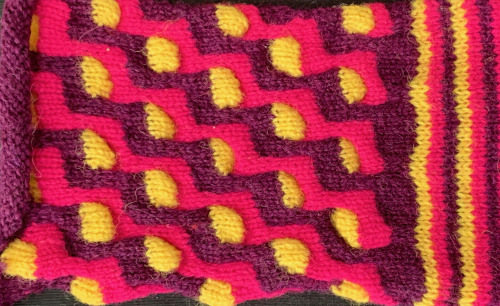 From long design studio inspiration swatches: the secondary shapes are created by varying the number of rows in the color change rotation and placement, the bottom swatch shows the purl side of part of the completed length. Float counts can help duplicate the repeat or color placements if notes are skipped during knitting.
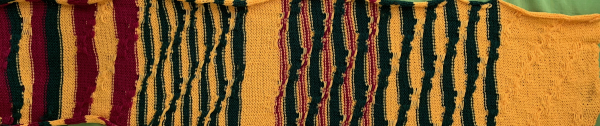
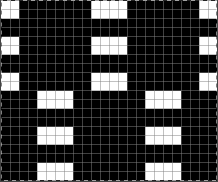
 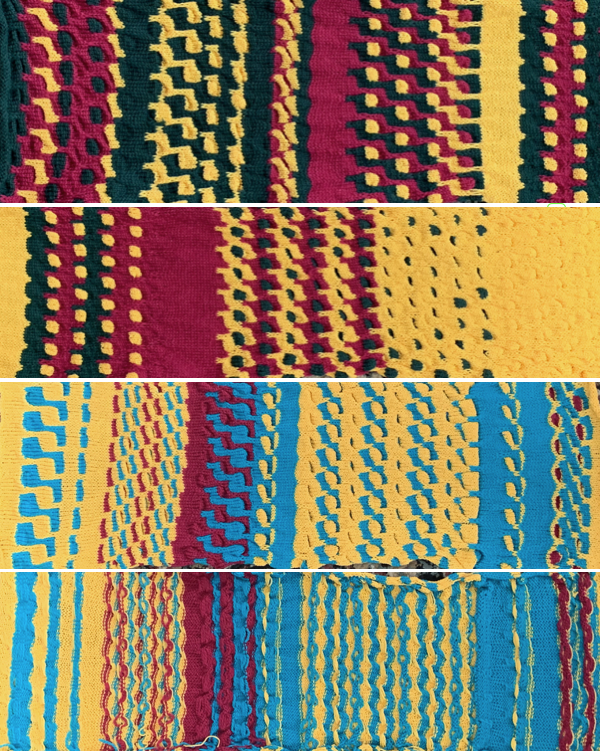 Working with multiple slip stitch “bars”: this shows my punchcard, marked with color changes once the final rotation was decided, remembering to begin markings 7 rows up from the bottom for Brother (5 for Studio).
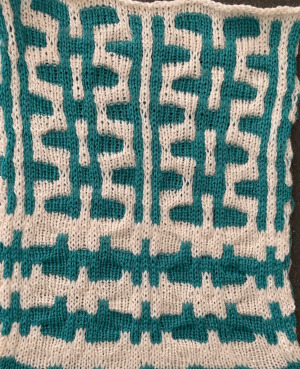
 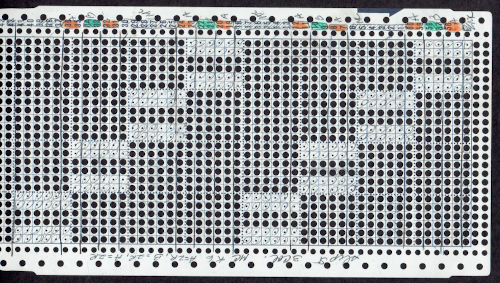 This design produces a fabric that is fairly flat on both sides: the .png is in the same orientation as the punchcard repeat, which you can see is produced with shapes reversed on the knit side in the swatches below it. Instructions on how the repeat was converted to .bmp for download using Gimp in post
 ![]() The working chart, along with an effort to visualize the location of possible color changes in order to create secondary patterns. Color changing on “wrong rows” or starting preselection from the left rather than the right will result in random, not necessarily successful designs
The working chart, along with an effort to visualize the location of possible color changes in order to create secondary patterns. Color changing on “wrong rows” or starting preselection from the left rather than the right will result in random, not necessarily successful designs 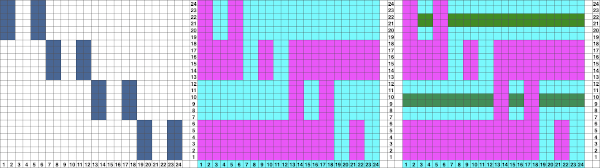
 This swatch segment illustrates the possibility of removing the slipped stitches from the needle bed and bringing them to the purl side, rehanging them on the same needles, bringing all needles out to hold before executing the next all knit row. The “floats” at the bottom of the swatch are from threads that were missed and not brought to the back of the slipped stitches
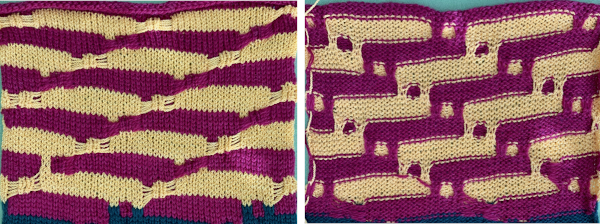
Attempting to visualize color changes using a larger, staggered repeat  which makes more sense when the image is tiled
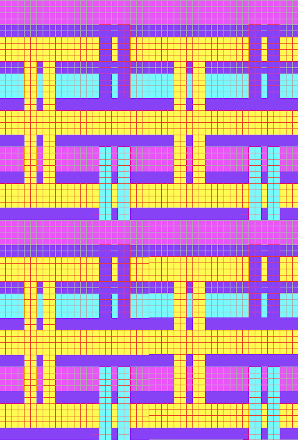
 Reducing the number of slipped rows
 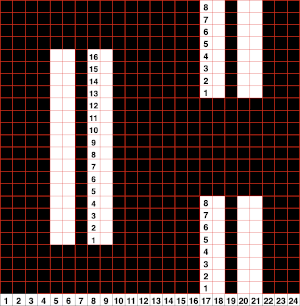 reducing columns to produce a trim, being certain as to placement on the needle bed
  This repeat produces a ruched fabric when no all knit rows are included, and a sort of “honeycomb” effect when additional color changes on all knit rows are added. The first long swatch
 ![]()

 The working repeat does not need to be symmetrical, using space-dyed yarn may result in a surface with an unrecognizable texture
 ![]()
 Shifting slip stitch units to form shapes
![]()

 If the slip stitch units begin and end with the same color knitting just before them and immediately after, the color carried on the knit side will be consistent throughout.
 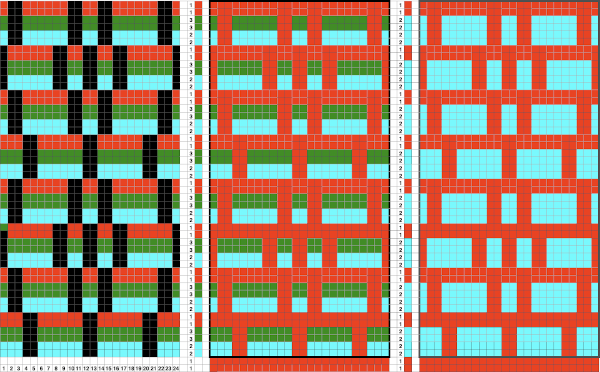 A sure way to get the shapes to match your design is to assign a number matching the number sequence in the color changer for your machine to each of the yarn colors. Imagining the results in a spreadsheet or even graph paper
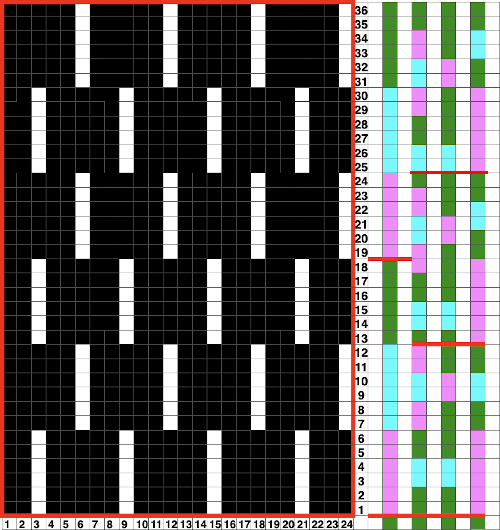
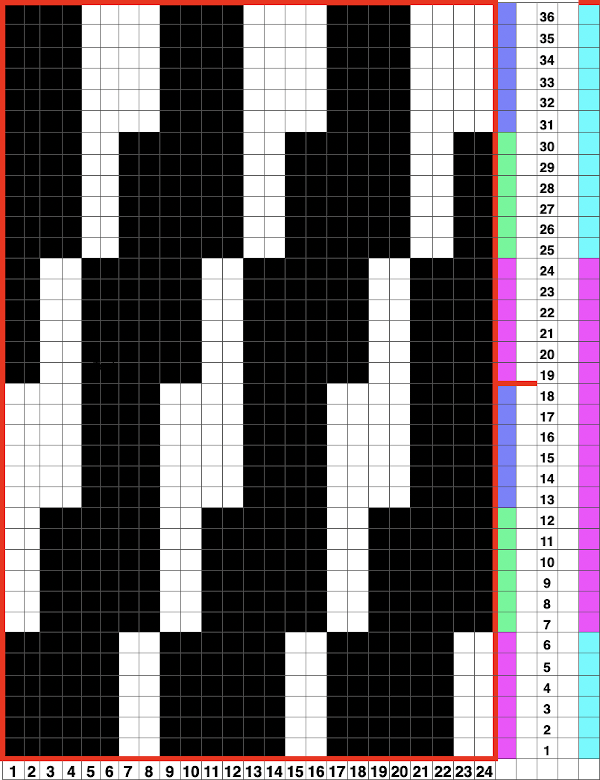
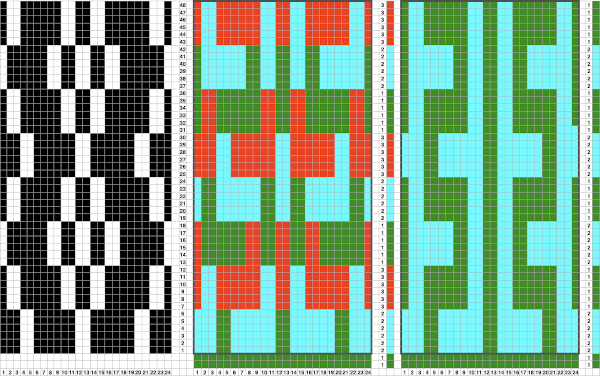
 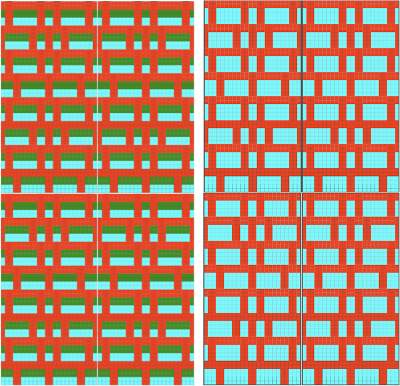 Expanding each section to 8 rows, the repeat now becomes 64 rows high and allows for 3 colors to show behind the slipped stitches in the chart on the left. On the right, the color-changing order shifts to 6 rows at a time in sequences 1,2,3,2,1,2,3. Design row 1 would begin the piece using the color red, the last row in the repeat is blue, shifting the color then carried up the front of the piece to blue.
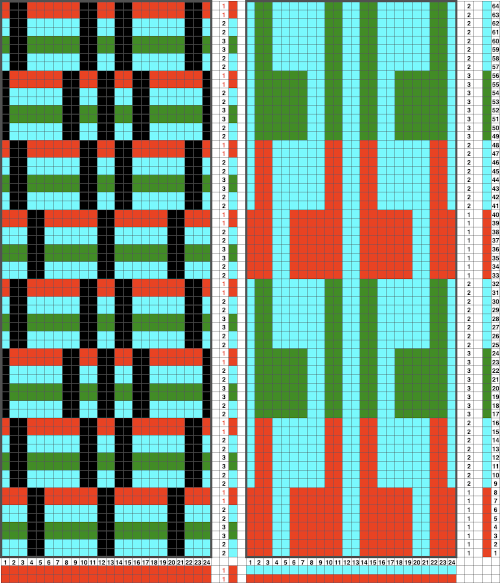
 Once the basics are understood, changes in scale and amount of ruched textures along with fiber content are easier to execute
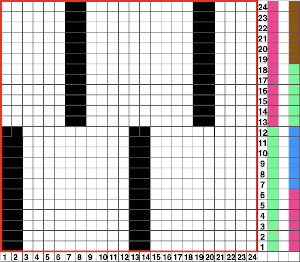
 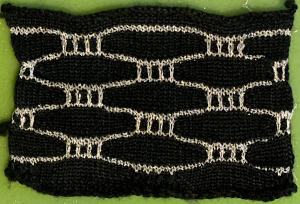 The chart for the sample below is 30 stitches wide by 84 rows high, and is shown turned counterclockwise
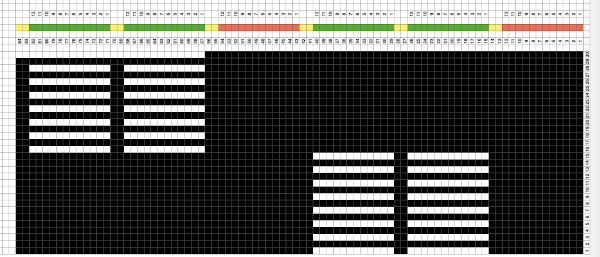
![]()
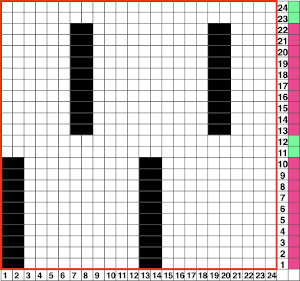
 This fabric has a more compressed shape, the blocks of slipped stitches are in a vertical arrangement directly above each other. A possible building unit for similar structures:
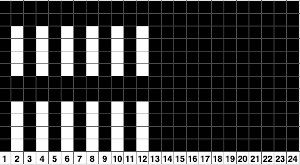
 An all-knit border on either edge will automatically create a ruffle on each side.
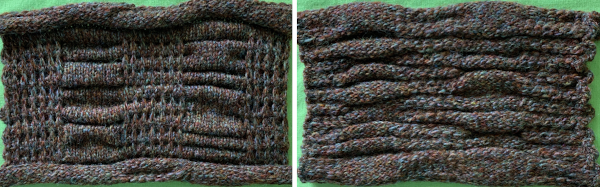
Here the repeats on the left need to be color reversed prior to knitting, punchcard users will need to punch all white squares, leave the black ones unpunched, and repeat all once more in height. On the right, some rows are omitted, reversing the color placement for the “solid” shapes with the next knit row. 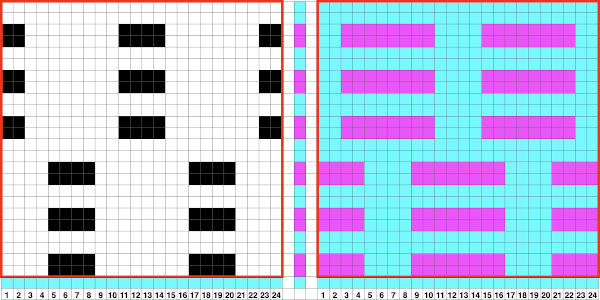

 The 24X20 repeat for the swatch on the above right, with the floats easily identified on the purl side of the swatch
 ![]()
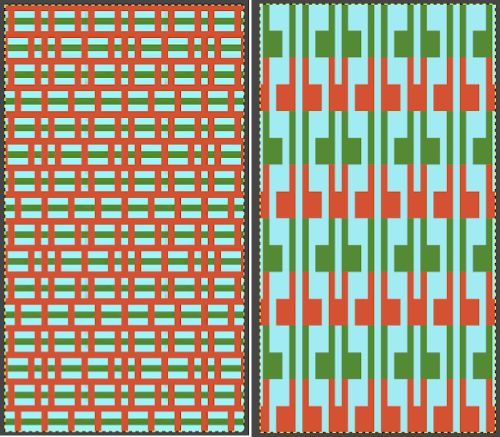
 Blocks of slipped stitches (black squares in the chart, prior to color reverse) may be used to create 2 color fabrics that have no long floats in the ground color, electronics allow for more complicated shapes
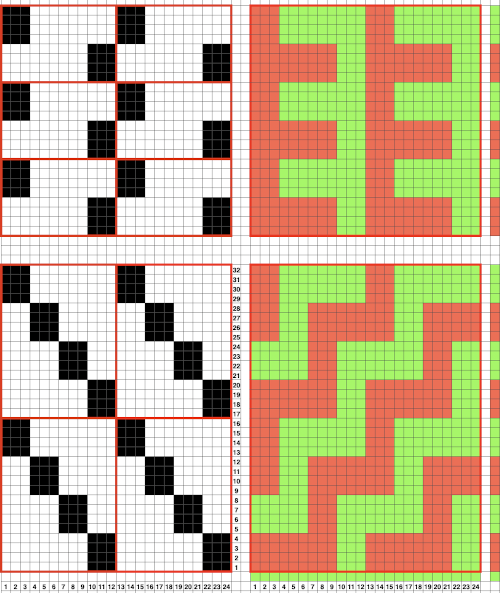 If the goal is to produce specific shapes, then the way to achieve them is to use a color separation suitable for multiple color DBJ, knitting the fabric either on the single bed. The machine does not know whether the ribber is actually in use or not. Using DBJ software built-in options or even the Ayab middle color one twice merit their own future post.
Previous slip-stitch-related posts
2015/04/07/more-slip-stitch-experiments/
2013/09/02/a-random-slip-stitch/
2013/05/09/block-slip-stitch-separations/
For mosaic and mazes, execution, and design links to historical posts see 2020/09/21/single-bed-tuck-…s-2-adding-color/
The slip stitch setting may also be used to automate a variety of fabrics, some of which involve organized color striping as well, the topic is discussed in other blog posts