Each row of double jacquard consists of at least 2 rows of patterning, one with ground yarn, the other with contrast.
The total number of rows knit to complete each design row and repeat vary with the number of colors used in each row of the design.
The appearance of the knit patterns in front and back faces vary based on the settings used ie, tuck, slip, or normal knit, and their consistency or combinations of in the same piece.
Punchcard knitters are not excluded from producing such fabrics, but the color separation is done manually or using software, marking matching squares to pixels or colored cells on the cards before punching.
Early on pads of graph paper appropriately sized for drawing onto punchcards or mylar sheets followed by tracing were easily available for developing motifs.
The size of the repeat is less important in creating interesting knits than the choice of yarns, colors, and technique choices.
In early art-to-wear days, pre-electronic home knitting machines, large, nonrepetitive images were created by breaking down the full size images into several vertical panels the width of the punchcard repeat plus seaming allowance. The cards could be joined sequentially to an endless number of rows of design height.
Upon completion, the panels were joined side by side to create the final image. The work of Nicki Hitz Edson illustrates some finished items using the method.
Ribber settings for DBJ apply across models in principle and may need adjustment or even a different carriage than the one supplied with the ribber purchase depending on the model, age, and brand of the machine.
If working on a bulky machine, consider using the ladder-back method.
The common method for the color separation suggested in instruction manuals for Japanese knitting machines for two colors per row DBJ is used in these samples.
The repeats for punchcards have a maximum width 24 stitches. Factors of 24 ie 2, 4, 6, 8 also apply.
Each group in the total 24 stitches in each design row is repeated in fixed locations across the needle bed.
Shifting the complete design position in the body of the knit involves moving the needles in work to a different portion of the knit bed.
Before electronic models appeared on the market, old manuals and pubs offered the basis for the share below, the same work may now be accomplished using present software within a few minutes and several clicks of a mouse.
The results can be printed to scale so as to make them traceable onto a blank card with both placed over a true or an improvised lightbox.
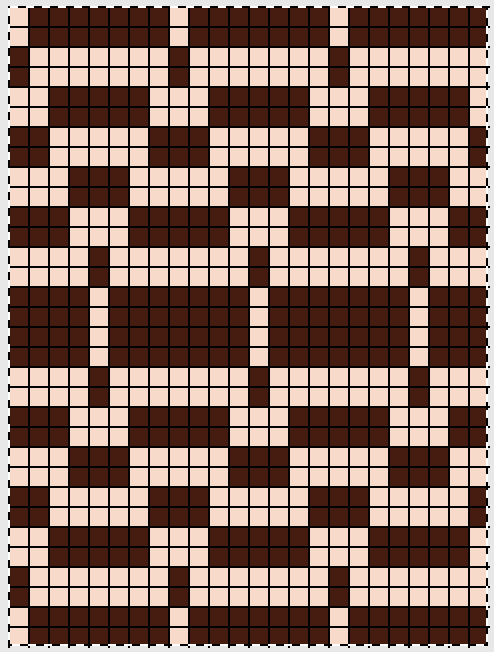
A charted view of an initial design:
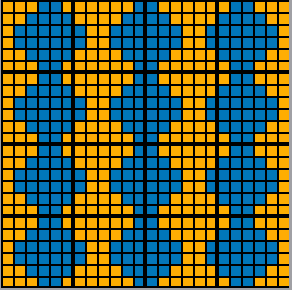 One design row of pattern requires 2 rows of punched holes in the in the card, each representing two carriage passes from and back to the color changer.
The step-by-step separation for the design on the left repeated across the 24-stitch card width follows.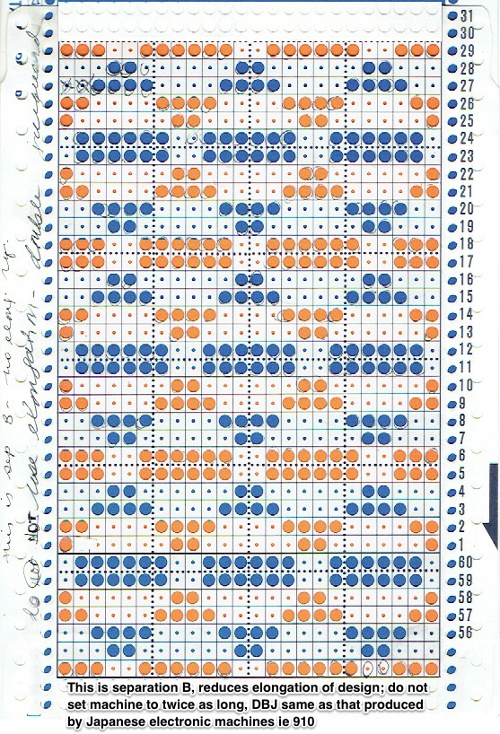 Helpful tools: on one blank card color each section of the card, representing color change sequences. This may be used later to check color separation.
Box the edge numbers in pairs, beginning with numbers 56 and 57, skip two rows to numbers 60 and the factory-marked row 1, the first visual row when the card is in the reader, and so on. as seen on the right.
This separation splits the first and second row of color 1 between the first and last row on the punchcard.
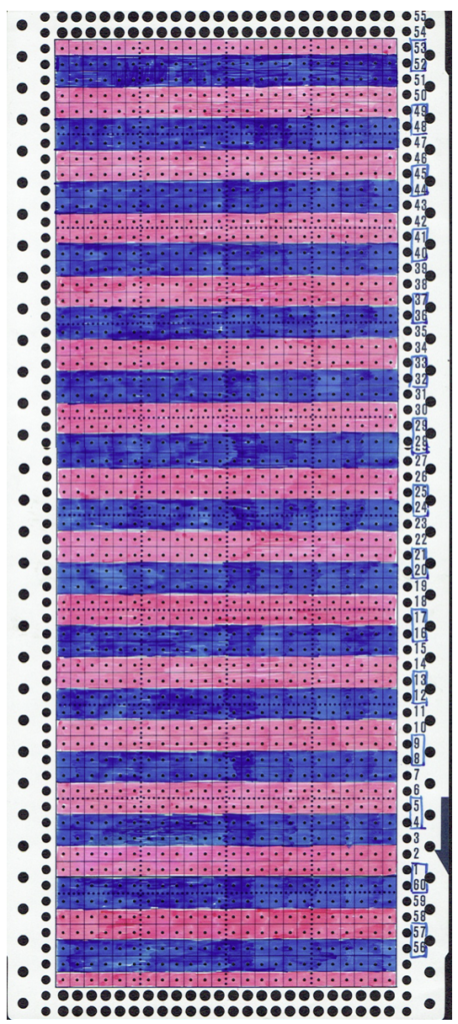 On a second blank card, prepare a master.
The first row is left blank, then 2 rows are punched out, followed by 2 rows left blank, repeat, ending with a blank row. Again working upward, number each row you have punched out on the left-hand side starting with number 54, then 55-56, 57-58, etc, ending with a single row, 23. This will result in number markings matching both sides at the bottom of the card, below the #1 factory mark.
My own master began on the left with the # 53. I also added corresponding design row numbers for each row on the far left. (1 and 2, 3 and 4, and so on). Written notes on right: an even number of rows need to be knit in each color, so in this method, the pattern must be an even number of rows in height, boxed numbers represent rows knit in ground color.
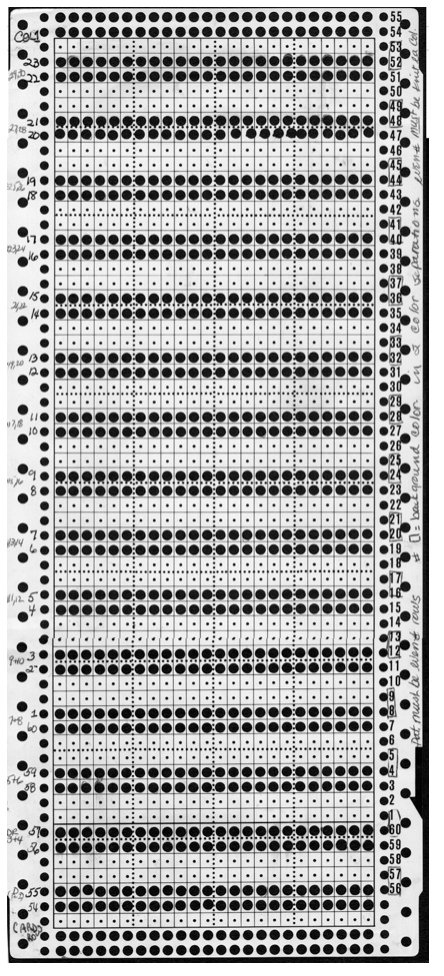 1: In this method, each color in each design row knits only once, reducing the elongation of the height to width aspect ratio in the knit.
The initial design is rendered in color, twice as tall.
A minimum of 36 rows are required for the card to advance properly in the reader.
Take a blank card to be marked with 2 colors, and put the master card on top, fastening the 2 cards together with snaps.
You can now mark holes to be punched with a dark third color.
Copy the first 2 rows of color 2 on rows marked 54 and 55 (or 53 and 54 in my case), and repeat in pairs for the required height.
I like to mark the card to be punched with colored pencils that differ sharply for each color. They have the benefit of being erasable and can help with keeping each row distinct when punching.
 When the completed repeat is marked, unfasten the snaps and move the card down by one row. You will now see the marks you have made through the top row of each set on the master card. Mark through each lower row any blank squares in the row above.
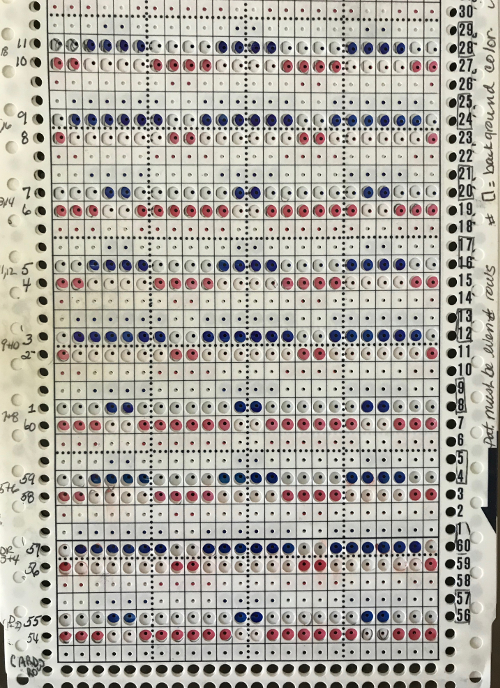 Again, after completing the repeat unfasten the snaps and slide the master up by 2 rows. The card will now be back to its original position, and up by one row. Now you will see the marks you have made on the blank card showing through the bottom of each row of the master card. Mark through each upper row on any square opposite the ones marked in the row below.
 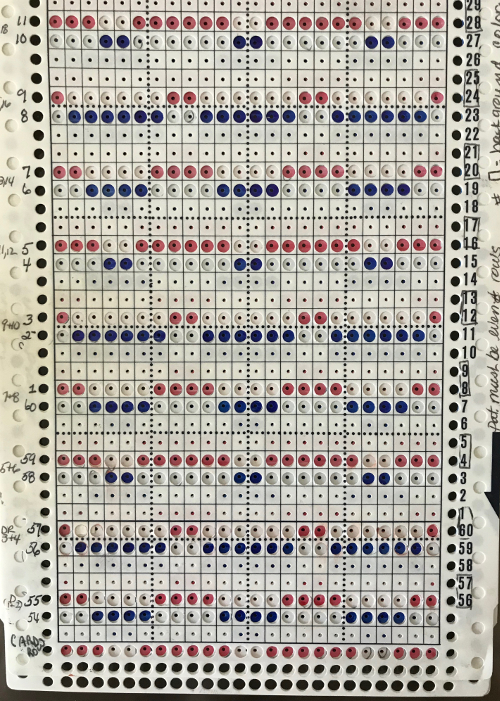 After the repeat is completed, make certain to punch across 2 final rows for the card to create the overlaps for a continuous pattern, as with any other stitch type. Punch out all marks, and you are ready to knit. To check your design visually lay the finished card over the colored master, and correct any errors if noted. Your card is now ready to knit DBJ.
The first preselection row is from left to right with color 1, which will knit in pattern from right to left, moving toward the color changer where colors are changed every 2 rows. This color separation will not work for fabrics that require the same needle selections repeating for pairs of rows throughout.
2: A second master that may be used with the same approach, for a different type of color separation: 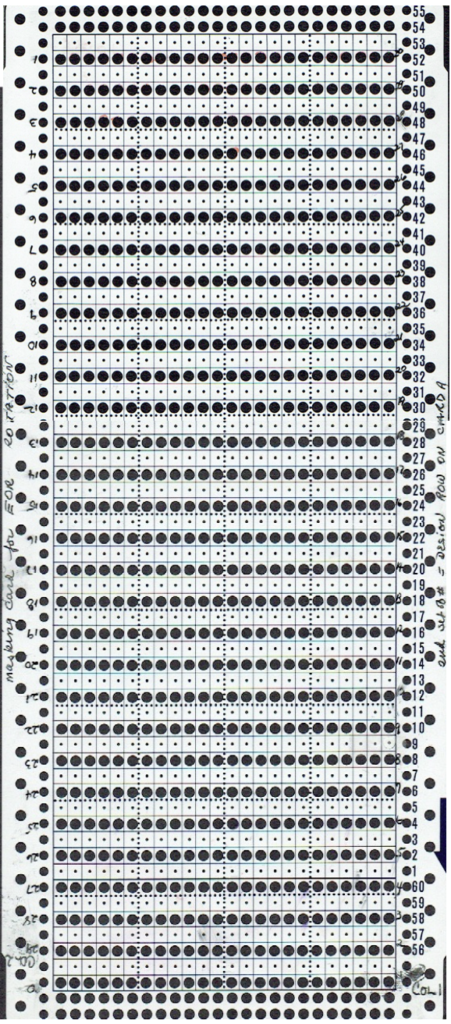 This separation works with any number of rows. The design will be elongated X2 in height because each design row knits twice in each color, with 4 rows completing it.
The finished knit will be thicker as well, so use thinner yarns when working it. Draw shapes in colors that are chosen for clear contrast, not because they are to be used in the finished piece.
Here I am back to those triangles used in earlier posts. The choice of which color you begin with, whether in the separation or in the knit is ultimately up to you.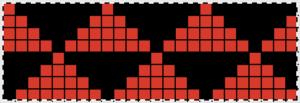 With the masked card, the first row is marked on the very bottom of your new design, I began with the red, which would produce the equivalent of this
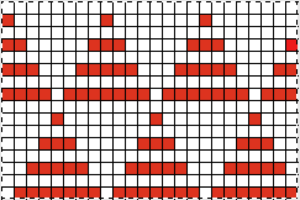 Remove the mask. Beginning with the second row from the bottom, mark any square not colored in the row below in a contrasting color
 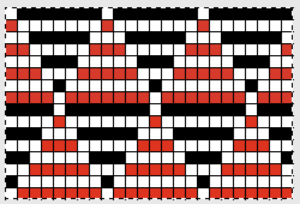 Punch all colored squares and you are ready to knit. I prefer to not rely on built-in elongation if I am making a garment or a long piece of knitting. If errors are made or correction of dropped stitches, loops, wrong color selection, etc. is required, unraveling rows is complicated enough without having to also sort out exactly where you need to be in relation to where the card did or did not advance. Black squares represent punched holes, a segment one separated by the red line in repeat width could be used on mylar or for electronic download.
 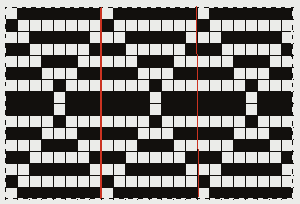 3: Another master for the elongated design, advancing every row, numbers represent rows being filled in, beginning with odd in this orientation, and even with the card rotated for marking even # rows in color 2
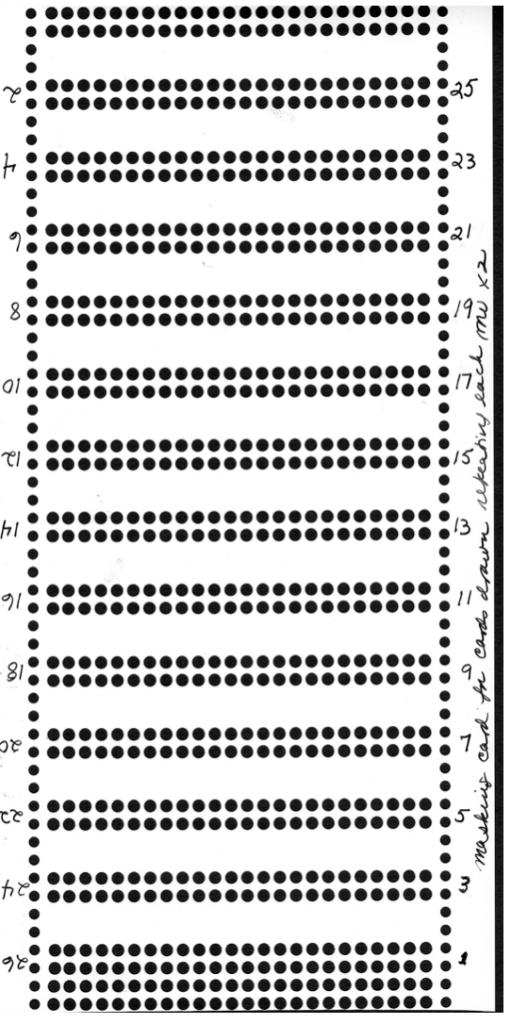 This is the same repeat, color-separated, and elongated X 2; proceed as with the directions above, but in this instance, each row in each color is marked twice. The expanded repeat:
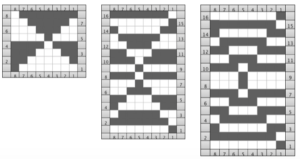
 The first preselection row is made from right to left toward the color changer, where colors are changed every two rows.
I have used these images to illustrate color separations in far older posts.
 The reason the resulting separation here looks so different from the one above is simply that in this latest series of charts the color selections have essentially been inverted. The inversion creates a mirror
 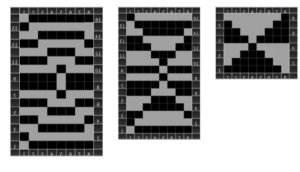 mirrored back to the original orientation with the inverted colors in place, and the color reverse is now recognizable
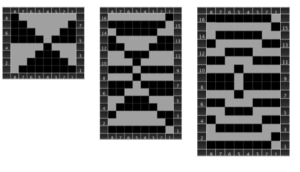
As a matter of course it is helpful to be consistent in the choice of starting color when separating motifs. Any single repeats isolated from above are usable in electronic machines, reduced to black and white pixels.
Electronic automated separations vary in terms of choosing black or white squares for the first row knit, whether you download an original image or work with built-in ones. With the preselection of needles in Brother or pushers in Passap, with an easy-to-count color repeat and some air knitting, planning starting color of choice and needle placement can be sorted out for more confidence when actual knitting starts.
If you would prefer to work on graph paper that matches the size of your punchcard, there is a downloadable PDF and word doc with some guidelines in my previous posts more-low-tech/ and creating knit graph paper. The posts were in 2011 and 2014, with illustrations drafted in earlier versions of OS and apps. Working in Pages I was now able to print an image just about to perfect scale to part of a blank factory card. Here is part of the first repeat in this post traced through the punchcard holes onto it:
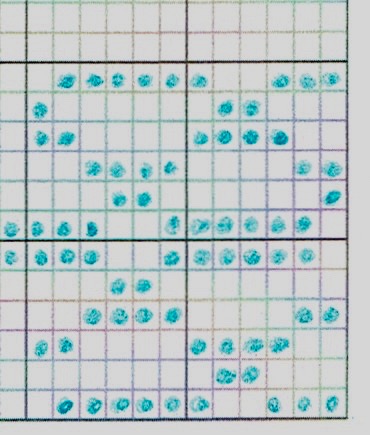 I then exported 2 documents, one to Word, and the other to PDF. The first printed image and the PDF one (opened in Preview) were printed to an identical scale using my Epson Printer, and a Brother one in 2025.
Here are the new docs to try, they may need tweaking.
I cannot proof the Excel exports.
My measurements, adjusted in Pages were 11 cm by 18.2, for 30 rows in card height: PDF no numbers card, prints out to scale. Word doc for same exported from Pages no numbers card is untested.
I have found squares of the blank card PNG opened as BMP may be filled in either GIMP or Paint, but the printed size is not in the same aspect ratio as the printout of the original blank cells PDF.
If the scale does not matter and you prefer convenience, this is a numbered “full” punchcard template as PDF scaled to fit on a single page punchcard numbered, and as an editable Excel document exported from Mac Numbers: punchcard templates_ excel