These images provide partial views of garments shown in a recent Facebook MK group post, followed by the “how-to” question 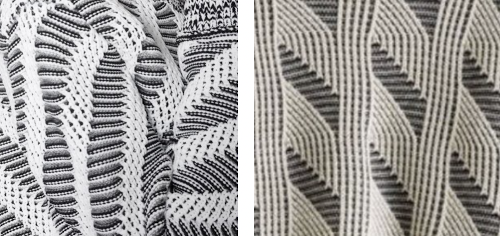 A quick analysis leads to a list of assumptions that both are double bed fabrics, with stitches subtracted or added to create moving shapes on a striped ground. A color changer will be in use, so each color must be carried for 2 passes. The color used in the traveling shapes (red in my swatches) knits on both beds, the second color creating the alternate stripe on the background knits on only one bed. The second row of the red stitches is slipped while the white knits, so they become elongated, something that is reflected on the striping on the reverse, as well as on the knit side.
Though the ribber is in use, this is not a standard dbj fabric, so if automation is the goal, the color separation for the knit needs to be hand-drawn.
It is possible to move stitches to and from needle beds when knitting true DBJ with striper backing. This is one of my ancient swatches, every needle is in work on both beds except for areas where stitches have been transferred down to and up from the ribber. The main bed is set to slip in both directions, the ribber set to knit. 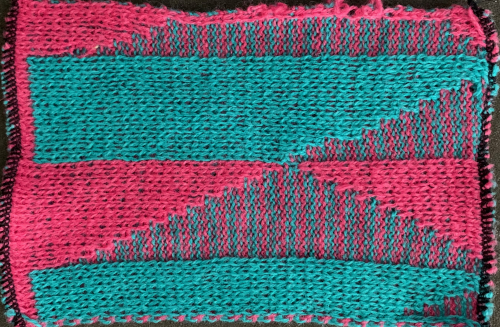
 The suitable dbj separation is the one where each color in each row knits for 2 rows, whether performed by hand, using the 3 colors per row separation in img2track or the default separation in Passap. The Ayab HOP separation is awesome, works for any 3 color design with as little elongation as possible, but is not suited for this purpose. How-tos for DIY separations and their automated versions by programs for knitting more than 2 colors per row have been discussed in other posts.
The process may be reversed between beds. Stitches can be picked from the opposing bed to fill in needles emptied by transfers or brought into work empty for increases. The resulting eyelets may be left as a design element or filled in by picking up from adjacent stitches or ones on the ribber bed.
In the first swatch, all stitches will be in work on the knitting bed, while patterning stitches will be in selected groups on the ribber. When testing a concept it is best to start with a simple shape, contrasting colors, on a limited number of stitches. To begin with, I went the easy route and tested the concept with a small racked pattern using only 5 ribber needles. The ribber slips for the 2 rows knit in the contrasting color in the ground, knits the pattern for 2 rows, requiring cams to be switched every 2 rows  The goal is to be able to see and understand stitch formation. Production got cut short when I was faced with dropping individual stitches followed by the whole piece falling to the floor. In one of those drat it moments I realized that for the first time ever, with the knit carriage properly set to N, I had not, however, engaged it beneath the metal bar on the back of the bed, leaving it with its rear floating freely.
 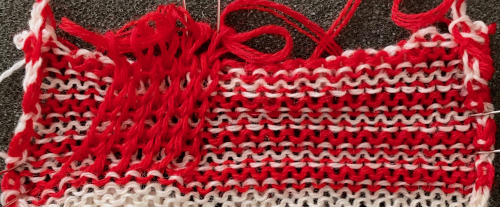 A similar process on the Passap allows for playing easily with both racked colors because of the possible arrow and pusher settings on the back bed, but on Brother, this would require hand selection on the ribber on every row or a specific color separation for needle selection on the top bed
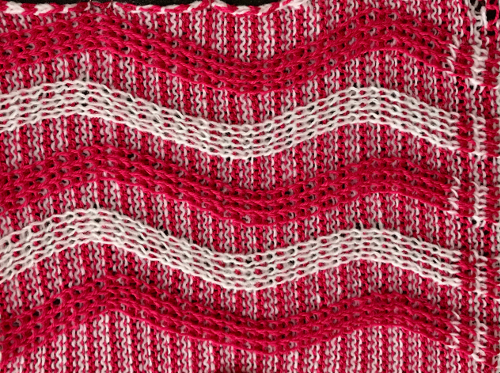 Seeking automation, keeping things simple, here is a basic zigzag pattern in a repeat also executable on punchcard machines. The ribber is now set to knit throughout (N/N), the main bed to slip in both directions. End needle selection must be canceled when using the slip setting selectively or when working patterning with needles completely out of work
The color separation: the desired design needs to be expanded, with 2 blank rows between each pair of design rows 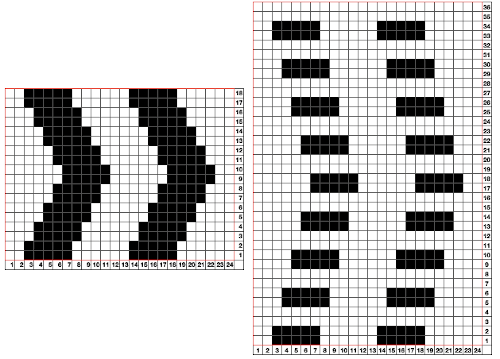 The pattern on my 930 is knit as it appears in the chart, on the purl side. Punchcard knitters or users of other programs may need to mirror it to match my output
 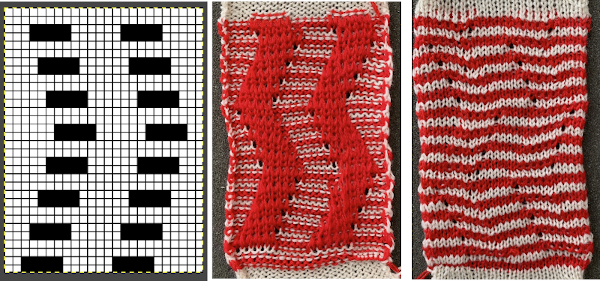 The process using 3 colors: the patterning color will be knit on needles preselected on the top bed. As shaping is about to begin, in this pattern, one needle preselected out indicates the location for an “increase”, one preselected back to B position a decrease
 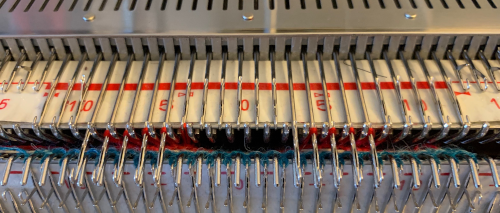 To perform the decrease, using a double eye tool to transfer the B position stitch down onto the ribber needle adjacent to the first needle in D position on the top bed
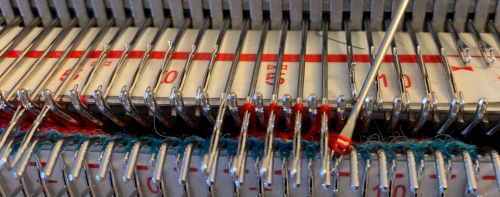
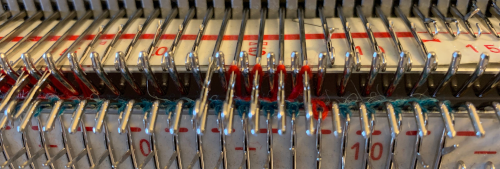 As the carriages move to the opposite side a loop will form on the preselected empty needle, creating the increase on that side, keeping the width of the patterning stitches constant
  In order for the patterning to remain correct, all needles on the top bed must be maintained in B position while not in use, or preselection may be incorrect, and increase loops will not be created, so, not this
  A sideways view (for space consideration) of the knit still on the KM begins to show the distortion in the knit created by the movement of the stitches. The red yarn creates a single line where stitches are skipped on the reverse, a double one when it knits for 2 rows
 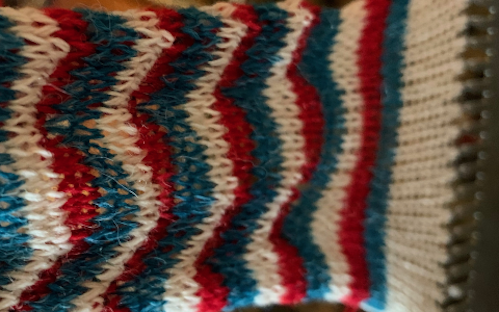 The repeat and the knit shown on both sides:
 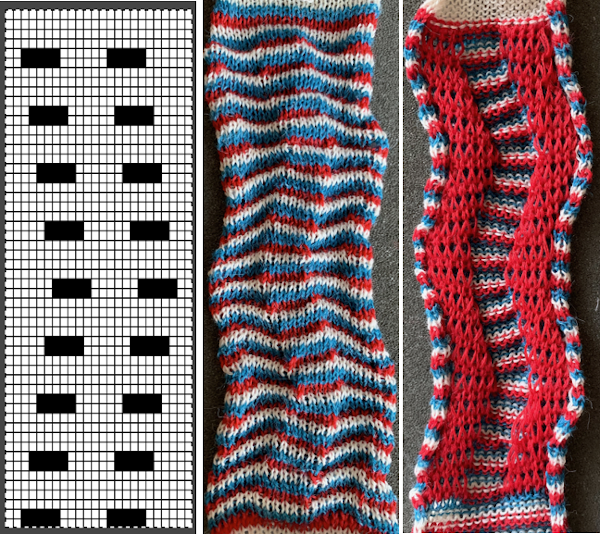 Comparing the 2 color and 3 color versions: aside from the obvious increase in length, note that the slipped segments in red on the 3 color swatch are now composed of longer stitches since they are held for 2 additional rows, and the overall fabric is more puckered than the 2 color version. The curling at the sides is the nature of edge stitches, especially if the yarn used is wool. At times that may be used intentionally, as a decorative edge.
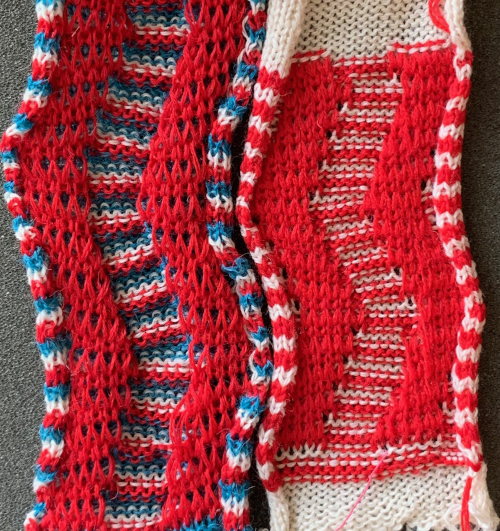
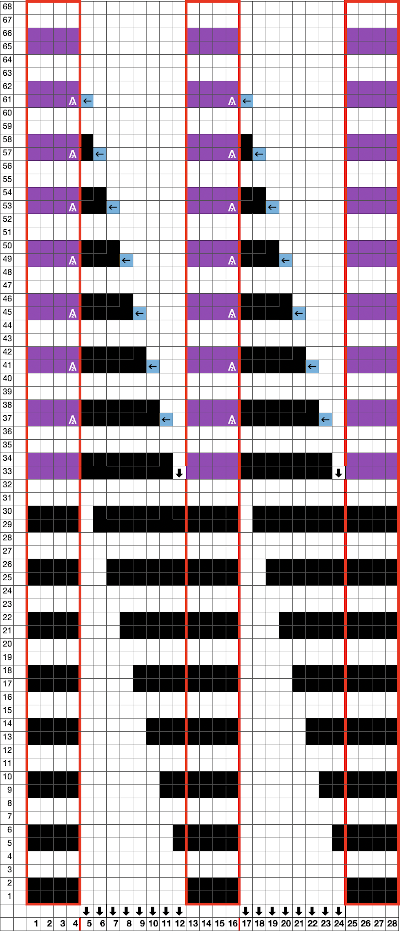
Repeats where the design charts require expansion to accommodate techniques quickly grow in length. The simple zig-zag doubled in length from 32 to 64 rows. I work things out in a spreadsheet, open a screengrab of the final choice in GIMP, index mode the result, scale it, and save the PNG for download to the 930. Long color separations are harder to achieve cleanly in GIMP alone but are also possible.
Returning to the 2 color pattern in the inspiration image and limiting the width to the 24 stitch punchcard restriction: a way to begin is to design a 2 color shape to approximate the repeat in the desired fabric and as in any other designs, check for repeat alignment by tiling prior to knitting to find any easily visible errors. The first single (ultimately 24X32) repeat, suitable for standard DBJ, has not been cropped properly in the top illustration. It is followed by the correct one 
 Using the same color separation as for the simple zig-zag shape, the design is expanded to include knit bed rows that will be skipped completely, resulting in the ribber alone knitting in the second color for those rows. It is now twice as long as the original, 24X64
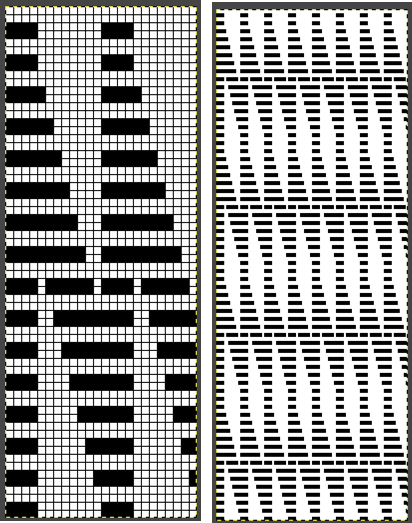 The planned proof of concept added a 4 stitch border on the right for a 28 stitch swatch centered with 14 stitches either side of 0. Tiling the repeat X2 again in height made it easier for me to plan how to manage transfers to expose the varying stripes in the ground. Visual comparison to the movement in the inspiration knit:
 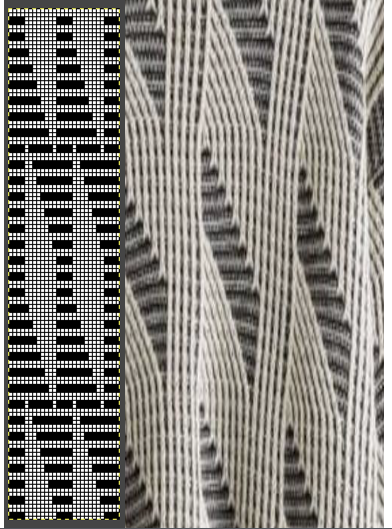 As the number of needles in work on either of the 2 beds is increased, it is likely tension or yarn changes may be required. The first preselection row is from the right, toward the color changer. The stitches on the non selected needles are transferred to the bottom bed
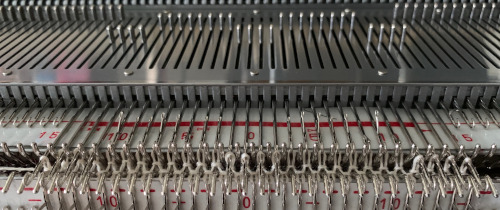
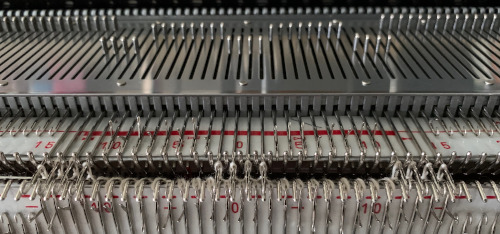 with the color change, only preselected needles will knit on both the top and bottom beds moving to the right
 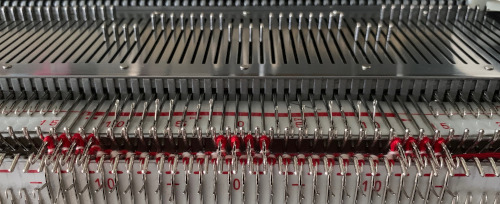 and will do so again on the return to the left while preselecting an all blank row
 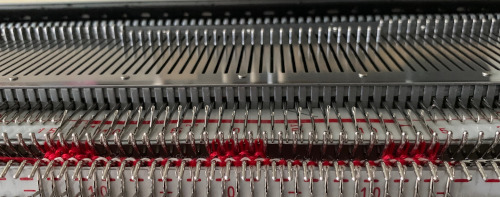 on the next pass to the right only the ribber knits in the ground color;
  on the following pass to the left the second ground color row is knit on the ribber, with preselection happening at the same time for the next row in the pattern color
 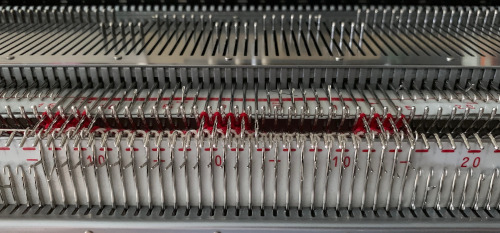 The red, 3 strand cash-wool was giving me grief, so I switched it out for the blue. Both yarns are on the thin side but OK for testing the concept. The initial partial striped lozenge shape is finished with straightforward knitting
 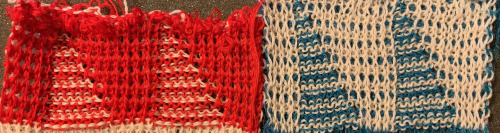 The solid ground stitches in the inspiration fabric, however, have a sideways movement as the next striped lozenge gets shaped. In any standard knit such movements are achieved manually by using multiple stitch transfer tools. Planning ahead in a spreadsheet helps. My first test of the full repeat approaches the desired result, but the transitions beginning at design row 30 for the decreasing angle in the white yarn is a bit clumsy and requires a redo to make it easier and with clearer instructions
 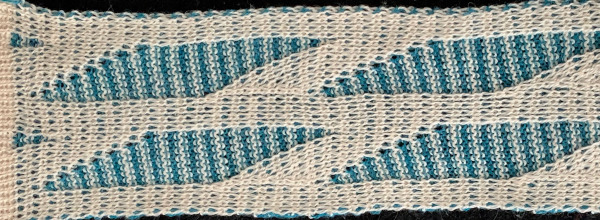 Back to the drawing board in order to reduce the number of hand manipulations involved, with a shift in the center transition, the repeat in my spreadsheet is now 24 stitches wide, plus an additional 4 stitch border, and gets marked up with colors. I prefer to program the width of my knitting as opposed to a single repeat for all over patterning
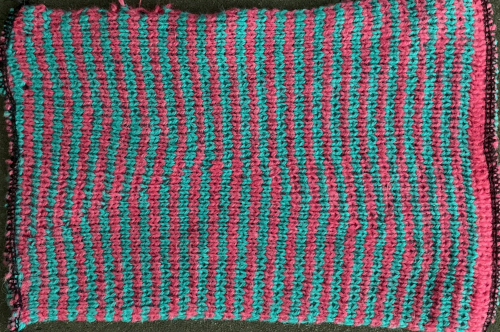
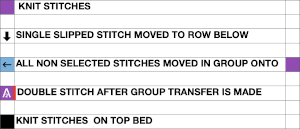
 The resulting final 24 stitch repeat with the added 4 stitch border, now 68 rows high
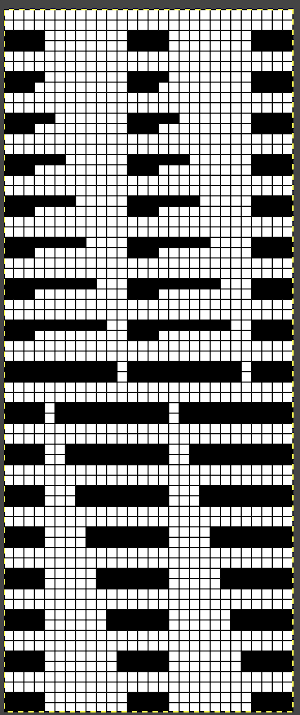 The choice can be made based upon the preference of moving stitch groups to the right or to the left with the horizontal direction of the repeat adjusted for your KM model or software used.
 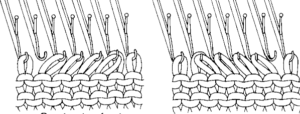 I planned the transfers in this swatch toward the color changer after picking up the proper color, white, and before knitting the next row using it. The 930 png:
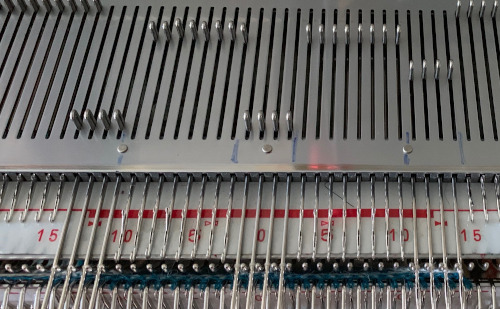
 ![]() The preselection row is from right to the left, toward the color changer. End needle selection is canceled. All stitches not selected on the main bed are moved down onto ribber needles beneath them. Needle selection takes care of the increasing angle in the surface yarn (white), as less of the striped ground becomes exposed. At this point, row 34 on the 930 counter, the single elongated slipped stitch is moved down onto the ribber.
The preselection row is from right to the left, toward the color changer. End needle selection is canceled. All stitches not selected on the main bed are moved down onto ribber needles beneath them. Needle selection takes care of the increasing angle in the surface yarn (white), as less of the striped ground becomes exposed. At this point, row 34 on the 930 counter, the single elongated slipped stitch is moved down onto the ribber.  The next preselection will require the first transfer on the top bed, row 38. In my case, the movement was to the left. After the transfer is made, be certain to leave any empty needles in B position, and to bring all transferred stitch needles out to hold so they will knit in the slip setting as the carriage moves across the bed to the other side. The preselection will insure all necessary stitches will knit on the way back to the left
 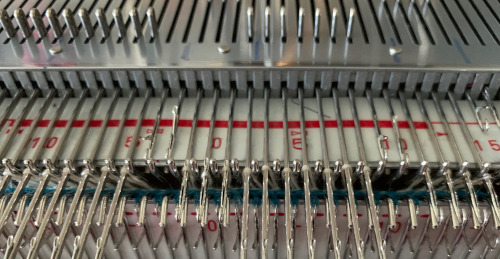 When the top of the repeat is reached, row 68, the only needles selected will be those of the 4 stitch vertical columns and the design repeat will return to its start
 My proof of concept swatch is 3.75 inches wide
 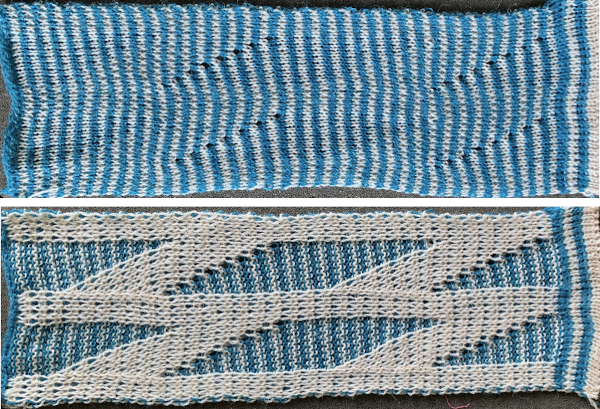 The inspiration sweater was knit using a wider repeat and significantly thicker yarn, reflected here in the small number of repeats composing the sweater body front
  Amending the 24 stitch repeat is possible, its length will grow in proportion to the increase in its width. The ratio of rows/ stitches to maintaining shaping by single stitch increases or decreases as in the original remains at 2.8. The lozenge is likely to remain elongated. Since at any point, the ribber will be knitting a large number of stitches single bed, the tension on its carriage needs to accommodate that. When the majority of needles are selected on the top bed, the fabric is knitting in every needle rib, which requires a tighter tension than when using the same yarns single bed. As a result tension adjustment to reduce the height of the knit repeat may be very limited.
The last test is now 84 rows high, with 5 stitch vertical bands. An added 6 stitch border on one side changes the programmed width up to 36 stitches so I don’t have to think about positioning the pattern on the needle bed. The extra stitch was eliminated at the start of the piece: 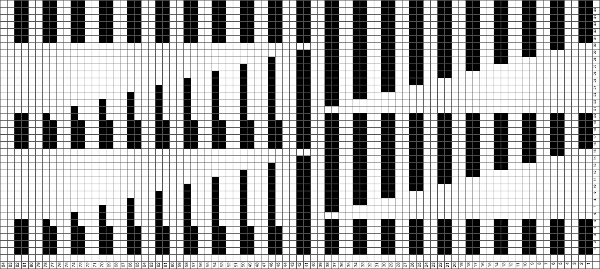 The off white yarn used here was the same thickness but not fiber content as in the previous swatch, 2/18 wool-silk vs Australian wool in the former. It is not as smoothly spun. The result shows an interesting similarity in length, though there are 16 additional rows in the pattern repeat. This time I programmed my repeat for stitch transfers on the knit bed to move away from the color changer.
 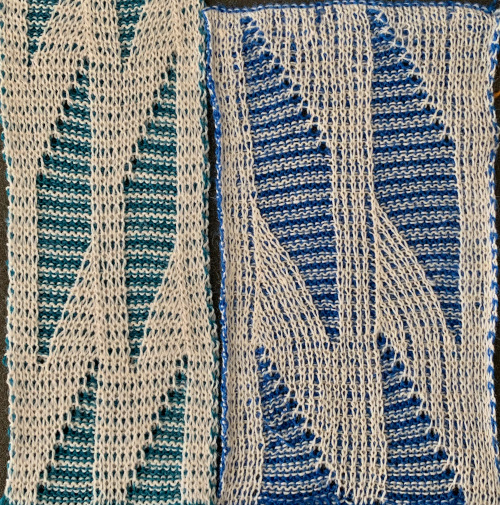 Eliminating the border on one side, a double repeat (30 stitches) measure 4 inches in width. To put the difference in scale to the sweater in perspective, an oversize garment with 40 inches in chest diameter would require 20 inches in width for the front piece. Ten single repeats, as opposed to the inspiration’s sweater 4, bring the total required the number of stitches to 150. With the added border of 5 stitches for matching side edges, the fabric is in the realm of possibility for producing a garment on the home knitting machine. My tension was set at 3/3 for all the swatches, with some teasing required on occasion to encourage stitches on the main bed to knit off properly. Ribber height adjustment can also have an effect on those numbers. I tend to do all my knitting with the slide lever in the center position. The double 30X84 repeat with no added border
![]()
you are very welcome, I enjoy your youtube videos @https://www.youtube.com/c/JuliKnit/videos
thank you very much for the idea and detailed description