My usual fall inventory is in production once again, new this year: an abbreviated version of my scarves to be worn as a buttoned “cowl”. Length is approximately 29.5 inches. Width varies slightly depending on small variations on yarn weight/thickness, averaging around 9 inches or a bit more. Below are images of my first sample/ ideas on “how to wear”
A baktus tale
A Baktus is a very simple triangular scarf/shawl. I have many oddball skeins of sock yarn, it is possible to knit a small baktus with a single one. An online search will yield many free patterns, most for hand knitting, easily adapted for the KM. Many patterns are free, including some in the latest catalog at Garn Studio.
Such scarves may be worn in hoodie and bib styles, or as neck/ shoulder wraps.
I am not personally fond of triangles with no shaping, so I thought I would try a KM version, rounding the bottom point of the triangle.
Here are the results, with yarn tails still attached.
front view
back view
I began with casting on 5 stitches, and increasing one stitch every 4 rows on one side up to the required length, then adding a short row “spiral” section, and removing that piece on waste yarn from the KM. A second identical piece was knit, and the 2 halves in turn joined on the KM. Part of the goal was to evaluate alternate joins for future lace shawl triangular pieces.
Finished measurements after blocking were: 36 in in length on straight edge for each half, 12.5 in @ widest point.
The width is in the common range for handknit versions, the length of 72 total longer than the common 55-63, but suitable for a loose tying of scarf.
This piece will be in my “consider qualities” pile for a while. Personal taste and preference do not necessarily match that of others, or those receiving item as a gift or purchasing it.
A new use for waste yarn
It truly does help to look up once in a while. I was totally engrossed in my lace transfers. Ikea large footstool places me at perfect height for really good view of stitches as they are formed. Both extension rails now have suspension help since I am using most of the needle bed and carriages need to go far off the bed. Stops are set up at rail ends so enthusiastic movement of the one carriage cannot send the other one flying off the rail and crashing onto floor. Got a great rhythm going. Yarn began to “pull” and lo and behold this is why! The pink cocoon is the waste yarn used in knitting the white shawl in the previous post.
Shawl evolution
So many ways to add to my grey hair
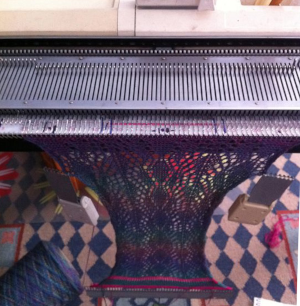
I am trying to knit a shawl in the latest lace scarf pattern repeat. Using most of the needle bed is making it necessary to take KH far off the end of the KM, ergo the bungee cord (which may keep the extension rail from going out the window with the KM if I reach the appropriate frustration level).
Knitting in black is great on aging eyeballs! My studio is my attic space, and as can be seen, this punchcard machine is nestled at the moment in a very “neat” corner of it. I own 2 lace carriages for Bro punchcard machines, one is appropriate for this KM, the other for a later model. The usual mantra is not to exchange carriages between models without cautious evaluation, it is sometimes simply not workable. For lace, I found the “correct” carriage drops stitches easily, the “incorrect” one is harder to push, but drops far less often.
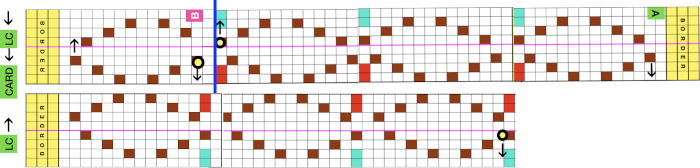
I mark the punchcard rows on which the arrow markings occur/ need to be placed by drawing across that row with a colored pencil; in addition to serving as a reminder for when the knit rows with the opposing carriage need to happen, this gives me reference points for the beginning of each transfer sequence for correcting mistakes when unraveling back to last knit row. Because this lace is much more labor-intensive than that used in the previous shawls the plan is to knit in a border at its top rather than on rehung open stitches, one at a time, sideways (this can take several hours and a lot of patience).
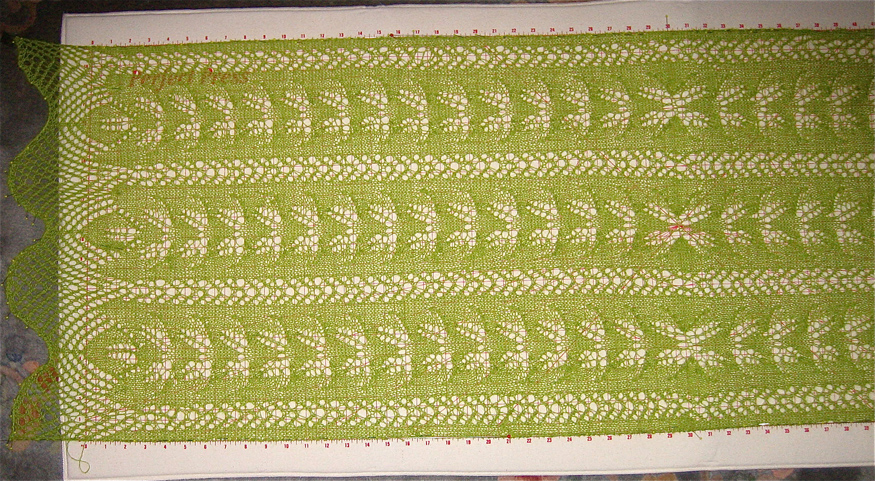
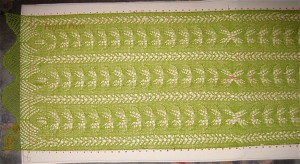
More lace thoughts: lace repeats don’t necessarily have to begin on row 1 of any repeat. Here I chose to begin on RC 33 of my card so as to “go” for complete diamond shapes centered on the bottom and top. If the first knit row of the scarf/shawl is rehung at half of the desired finished length, a vertical mirror pivot for the lace pattern is created. When this is the plan, a contrasting thread may be placed where the 0 marking is on the needle tape, between the 2 needle ones (one of the brother oddities is the 2 needle one positions, R and L of 0) on the first row knit after the waste knitting; marking the needle tape with water-soluble markers along easily identified repeat points can also assure proper placement on the needle bed. When the knit is rehung for mirroring, the loop where the marker sits is placed on needle 1L, rehanging away from the center, every needle will be “filled”. Those needle tape markings may spare the grief of missing any stitches after rehanging, before removing waste yarn. On the standard KM single-width may max out at 18-20 inches. Steaming the edge that will be rehung helps make stitches more stable and visible prior to doing so. This is an image of a small border test with dropped stitches along with the mirror point, and a 2 gate peg bind off
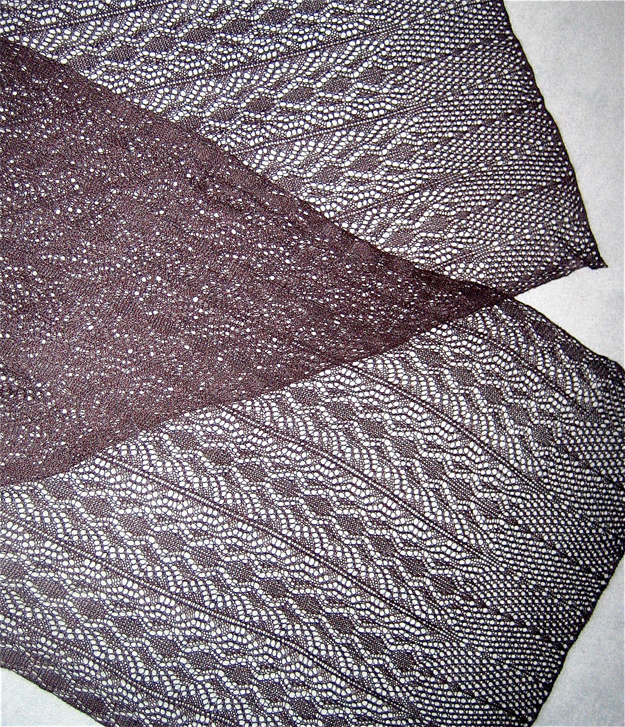


Knit 2 or 3 rows, and place a yarn marker between the 2 number one needles at the very start of the piece. If 3 rows are knit, one is unraveled after the piece is rehung, being aware that the yarn end will have formed a knot that needs to be eased open before doing so
Knit the first half with LC operating from the left, add a border at the top of the planned pattern length if desired, bind off loosely
Rehang the open stitches using the marker as a guide to place the stitches back on the bed from the center marked spot out, the knit rows will be followed by transfers in the reverse direction. When stitches are rehung, a stitch is lost, so add one on the side on which that happens.
Release the card. Knit in pattern to match the length of the previous half piece, add the border if planned, bind off loosely. Lace fabrics stretch in width when blocked.
This is not a true lace repeat, the design is only for illustration purposes

Back to knitting and lace
My new production line of lace scarves, of varying fiber content, after pressing. There is an average of 10 lace carriage passes for every one row knit. Though a bit daunting for production, I am considering knitting some shawls in the same pattern and am in the process of exploring repeats for shawl borders.
Taking it to a garment: 3b
A large gauge swatch is important: I suggest 100 sts by 100 rows. For a bolero style garment with a “shawl” collar, a place to start is with bottom and top sections measuring at least 6 inches in height, and for the middle rectangle to measure 22in W by 23in L. Again, a muslin in a purchased knit of the center section will help decide how much of it needs to be seamed to allow for an armhole opening, keeping in mind that the opening in the machine knit may have less stretch than the test muslin knit. The number of stitches cast on is based on those required for section B, with adjustments made to allow for lining up pattern repeats in seaming up the finished piece.
Beginning the knit with a cast on that allows for maximum stretch, test out rib pattern (A), transfer to a mostly single bed for (B), bind off, and treat the swatch in the same way the finished garment will be: ie. steam, wash, etc. Testing the stretch in the cast-on edge and its immediate fabric neighbor will define how the large a “shawl collar”may be achieved. A more “circular” shape when worn may be obtained by adjusting height while keeping in mind that a true circle would have a circumference approximately 3 times its diameter which in this test would be based on the stitch count obtained in knitting the width of the swatch in the B pattern.
If a significantly larger “donut” is required in the design, every needle rib can be ended in a row of stocking stitch after transferring stitches to the main knitting bed, taken off the machine, and rehung on fewer stitches prior to knitting B. Same step is taken when joining the last section.
Trial basting side seams will ensure armhole fitting comfortably. If more of a cap sleeve is desired, stitches may be added in the location of armholes during knitting B, or bands may be knit onto or stitched onto armhole after completion of the piece. Suggestions for cast on will follow.
Taking it to a garment: 3a
Now to coaxing a “circle” from a rectangle. Understanding how different stitch structures affect the length and width of fabric can help make it possible to “cheat” in shaping. The circle’s circumference needs to be significantly wider than the inner “square/rectangle”. The disparity in width between every needle rib and single bed fabric is one way to help create the desired conclusion. Tuck stitches yield a knit that is short and fat. Combining them in every needle rib with one or both beds tucking increases width dramatically when compared to single bed fabrics. One possible way to construct it is to begin with every needle rib: figure A, switching to single bed fabric: figure B, and returning to the same “shaping” as A.
The completed outer edge needs to have stretch so as not to break as it folds over into a collar and surrounds the shoulders. Routine knitting of this form as one piece will give one cast on and one bound off edge. It is possible by a variety of methods to have both edges match. My first sample even though binding off was quite loose, wound up with the yarn breaking on wearing. A more successful approach was to knit section A as a tuck rib, B as a fabric that was mostly knit single bed, and removing the piece onto waste yarn and off the KM at that point. Section A was knit once more in the same manner as at the bottom of the first piece, and then joined to A+B
The finished “garment” gets folded in half, and seamed toward its center, leaving an opening for armholes. Upon its wearing, the joining seams on sides rotate to the front of the body, so a good join is important. The alignment of the pattern repeat may have to be taken into account in addition to stitch gauge in grading for different sizes.
Entrelacs
Entrelacs abound in knitting at the moment. In thinking about perhaps composing my thoughts for a post on the subject, I searched online and found some very good sources on this subject. One is found at howtoknitasweater.com. The author, Cheryl Brunette also shares an article on lace . Here are 2 of my teaching samples, executed on 4.5 mm machine
front view
a rearview with ends woven in
Taking it to a garment 2: donuts
Removing a circle from the center of our pie yields the “donut”. The purpose and size of the “donut hole” can vary from the size needed to apply a central motif whether in knit, crochet, or other forms, to one large enough to allow for insertion of a “back piece” that can be anything from a “square” to one that included a bit of shoulder, armhole, even neck shaping and an optional curve at the waist/hip area. Additional rows of plain knitting in the “donut” itself alter the final forms. Seaming can occur where preferred; the direction of pattern repeats if in use further influence choice of seam placement.
If miter shapes are created in the knitting method, the corners of the triangles will want to “poke out”. This can be a purposeful design feature. If they are not wanted one way to soften them is to have stitches for at least an inch at the outer circumference of the circle knitting with no shaping in that area, adding a border, going the spiral route. Swatching helps determine preference in creating personal designs. Small scale paper collages sorting out geometric shapes and joins can inspire the large form variations.