A confession

I have to admit I can and do hand knit but now operate in life is short mode, and have decreased patience for projects that require a huge time commitment (relatively speaking) to complete. At a knitting seminar in the early 90s a demonstrator (who happened to be male) used to tour with a sweater he had “completed on the machine”  that had more than 3,000 (yes, thousand) cables in it: complex twists inside larger diamonds in turn formed by cables. IMO such a garment would be faster done by hand. One of the advantages in hand knitting is that errors are more easily seen since one has the opportunity to observe what happens on the knit side closer to the event. The fixed spacing on the machines that twists must travel can be a challenge in forming fabrics, particularly in all over patterns.

One possible solution is to combine machine and hand knit panels. Hand knit center arans may be joined to plain side and sleeves knit in stocking stitch on the KM (also a solution when larger sizes are required), and stitch patterns may be used in isolated areas or selectively rather than all over the garment. Patterning shifts in the knit/purl ground in garter stitch patterns may produce knit and purl “illusions” of shapes otherwise created by moving stitches in cables.

I have recently been playing with this crossing idea. The original intent was to try it out in an all over pattern in a brick repeat, and only one row of knit in between transfer rows. With yarn at maximum tension, after the first round of transfers the second round of them became impossible to perform. Am still at the drawing board, but the idea may well simply end with a 2 inch patch as opposed to anything larger. Wonder if Barbie is in the market for a lapghan?

Follow up: the new working repeat with 2 rows of knit between cable crossings

a test on standard KM: the ladders were a “surprise”, a by product of the distance the stitches were moved

the same fabric with ladder “floats” being hung on adjacent needles to diminish ladders and produce holes

the stocking stitch fabric top and bottom of this last swatch is considerably wider than its cabled portion, a possible consideration for trims or insertions based on this idea; “you can’t always get what you want” but sometimes one can still quite work with what one gets.

A baktus tale

A Baktus is a very simple triangular scarf/shawl. I have many oddball skeins of sock yarn, it is possible to knit a small baktus with a single one. An online search will yield many free patterns, most for hand knitting, easily adapted for the KM. Many patterns are free, including some in the latest catalog at Garn Studio.

Such scarves may be worn in hoodie and bib styles, or as neck/ shoulder wraps.

I am not personally fond of triangles with no shaping, so I thought I would try a KM version, rounding the bottom point of the triangle.

Here are the results, with yarn tails still attached.

front view

back view

I began with casting on 5 stitches, and increasing one stitch every 4 rows on one side up to the required length, then adding a short row “spiral” section, and removing that piece on waste yarn from the KM. A second identical piece was knit, and the 2 halves in turn joined on the KM. Part of the goal was to evaluate alternate joins for future lace shawl triangular pieces.

Finished measurements after blocking were: 36 in in length on straight edge for each half, 12.5 in @ widest point.

The width is in the common range for handknit versions, the length of 72 total longer than the common 55-63, but suitable for a loose tying of scarf.

This piece will be in my “consider qualities” pile for a while. Personal taste and preference do not necessarily match that of others, or those receiving item as a gift or purchasing it.

Taking it to a garment: 3b

A large gauge swatch is important: I suggest 100 sts by 100 rows. For a bolero style garment with a “shawl” collar, a place to start is with bottom and top sections measuring at least 6 inches in height, and for the middle rectangle to measure 22in W by 23in L. Again, a muslin in a purchased knit of the center section will help decide how much of it needs to be seamed to allow for an armhole opening, keeping in mind that the opening in the machine knit may have less stretch than the test muslin knit. The number of stitches cast on is based on those required for section B, with adjustments made to allow for lining up pattern repeats in seaming up the finished piece.

Beginning the knit with a cast on that allows for maximum stretch, test out rib pattern (A), transfer to a mostly single bed for (B), bind off, and treat the swatch in the same way the finished garment will be: ie. steam, wash, etc. Testing the stretch in the cast-on edge and its immediate fabric neighbor will define how the large a “shawl collar”may be achieved. A more “circular” shape when worn may be obtained by adjusting height while keeping in mind that a true circle would have a circumference approximately 3 times its diameter which in this test would be based on the stitch count obtained in knitting the width of the swatch in the B pattern.

If a significantly larger “donut” is required in the design, every needle rib can be ended in a row of stocking stitch after transferring stitches to the main knitting bed, taken off the machine, and rehung on fewer stitches prior to knitting B. Same step is taken when joining the last section.

Trial basting side seams will ensure armhole fitting comfortably. If more of a cap sleeve is desired, stitches may be added in the location of armholes during knitting B, or bands may be knit onto or stitched onto armhole after completion of the piece. Suggestions for cast on will follow.

Lace punchcards_use on the Brother 260 Bulky

There are a number of ways to “play with” this technique, transfer lace on these machines becomes a hand technique aided by needle selection made by the card reader, based on punched holes mylar markings.

Method 1: single carriage using published cards that are for lace carriages that transfer only (Brother, Knitking, Toyota, Studio/Knitmaster fashion lace started on the appropriate row ).
1. Lock card on the first row as would be done on a standard machine.
2. KH carriage starts out on the Left side with end needle selection canceled.
3. Remove yarn from the feeder, store on left. Deactivate the row counter (flip automatic tripper back ).
4. First selection row is made left to right. Transfers can then be made by hand in direction of arrows, moving stitches on the selected needles to their left, away from the carriage. All needles must be returned to the B position.
5. Push in both part (slip) buttons.
One thing to keep in mind: when the KH carriage is set to slip, it is the selected needles that actually knit stitches. If the carriage moves across those same needles with no yarn in the feeder, selected needles will drop their corresponding stitches.
6. Set card to advance “normally”, move the carriage to the left.
7. Continue to make transfers that the lace carriage would have made in the direction as marked on the card until knit row markings are reached and no needles are selected. 
8. Release part buttons, leave KC engaged.
9. Put yarn back in the feeder and the row count tripper back into work or advance RC by hand for the required number of knit rows
10. Knit 2 rows or if lace pattern requires 4 or more rows of knitting between repeats KC needs to be turned off for 2 rows less than needed, then turned back on for the last 2 knit rows. A lot to keep track of, but still quicker than hand knitting. Forgetting to put yarn in the feeder for knit rows or to set carriage back to slip for transfer selection rows will result in what I have come to fondly refer to as drop-itis. 

Method 2: using 2 carriages, extension rails.
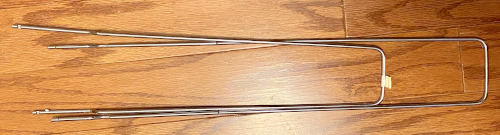
Bulky extension rails are shaped differently than those for the standard KM, their front “arm” quite a bit longer than the rear one. Rails are handy when knitting very wide pieces, a necessity when multiple carriages are in use, and especially when both are set to KC and engage the belt. 
This method’s movements mimic those of traditional lace knitting in the standard Brother machine.
1. The “lace” carriage on left is set to slip in both directions, its RC tripper is in the off position.
2. The KH carriage on the right set to knit, its row count tripper on. 
3. End needle selection is canceled on both carriages.
4. Left carriage operates “like” the lace carriage in terms of needle selection, but it is the knitter who hand manipulates the transfers, which are made in the same direction as the marked arrows on the card, away from the carriage.
5. When no needles are selected and the black arrow markings for knit rows on the lace card is reached, the “Lace” carriage is returned to its position off the bed on the left
6. The R, KH carriage then knits required rows, returns to rest on the R rail, and the process begins over again. 
Since the KH carriage is not on KC and the card does not advance on knit rows, no adjustments need to be made to its settings if multiple knit rows are required.

Method 3: using studio simple lace cards (those cards that are not “suitable” for brother KMs). These cards are intended for machines that select and knit with each carriage pass
1. Using Studio card with A-side up lock card on row 3. 
2. Knit carriage: KC in use, cancel end needle selectionno cam buttons throughout (this results in needle selection, but fabric created is in stocking stitch).
3. Row counter on 3
4. Make the first selection row right to left. Transfer stitches selected onto adjacent needles toward the same side as carriage (in this instance from right to left). All needles must be returned to the B position. 
5. Release card, set card to advance normally. After each selection row, hand transfers continue to be made toward the carriage.

I found it easier to track the direction of transfers by remembering to move toward the carriage than to follow the direction of arrow markings on the card which do match, with even-numbered rows transferred toward the right, odd-numbered ones toward left.

The simple lace cards may also be used on the standard punchcard brother KM. Two carriages are selecting needles, so usual precautions for such knitting must be used, with each carriage off the bed and on the extension rail while the alternate carriage moves toward it from the opposite side. As the carriages are switched, operating from the opposite side, the previous selection is repeated.
1. Studio punchcard is locked on Row 3, KC (knit carriage) on right. The main carriage is set to KC, end needle selection is canceled, no cam buttons are used, it will knit with every pass it makes and selects the needles for the subsequent transfer row. 
2. Release card, knit one row from right to left
3. KCOL, the Lace Carriage is engaged on the opposite Right side and moves toward the knit carriage to make the transfers. As it travels across the bed it will reselect the same needles (now empty). After transfers are completed, make a second pass with the lace carriage, and remove it from the needle bed.
5. The KH carriage is now free to make its pass for the single row of knitting to the opposite side, from Left to Right.
6. The lace carriage is engaged opposite to the knit carriage (now the left) and makes transfers toward it once again. It makes a second pass to its original place on right and is removed from the bed to be used again from the left. The process is repeated for the pattern. The Studio simple lace card may of course be redrawn with extra rows needed for standard use on the Brother KM.
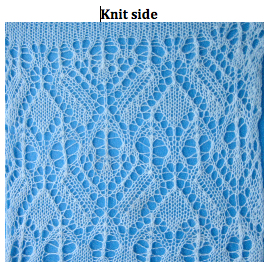
the punchcard 
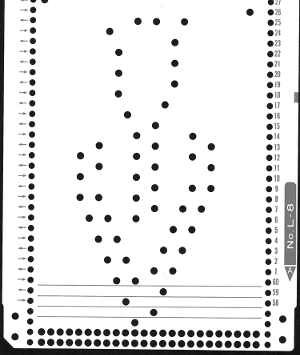
the resulting transfers on both the bulky and standard Brother machines
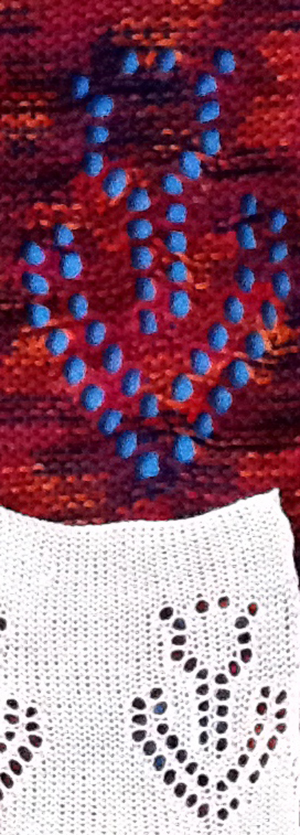
Extension rails for the bulky machine are available for purchase, are handy when producing wider pieces and particularly if knitting on the whole bed. Be aware if purchasing them, that the rails for the 9 mm machine are a different size, noticeable in the photo below. The bulky rail has a white tag on it

To mesh or not to mesh 3

Many articles were written in the 1980s in Australia, New Zealand, and Britain, some finding their way to newsletters published in the USA at the time investigating this subject. With the advent of electronics the process became “easier”. Kathleen Kinder author of several books on Machine Knitting covering myriad topics (one whole text on lace), also authored Electonic Knitting: an Introduction for Brother and Knitmaster Knitters (?1989) that investigated the move from punchcard to electronics, including lace techniques that in the instance of “filet look alikes” introduced superimposing designs as a quicker method to achieve such fabrics. The common motifs used were often that of a heart or a rose.

One of the many confusing things in lace, is that the punched holes or mylar squares do not represent actual holes in the final fabric. Alternate rows of holes represent first transfers to left, then transfer to right. Brother and Studio punchcard sets included with purchase of machines both include pre-punched cards suitable for this type of mesh. Numbers sometimes varied with machine model year. Studio No. L-6, Brother No 17J (also 20G etc.) are 2 such samples and are vertical mirrored images of each other. Superimposed motifs constitute blank areas of card. Depending on preference some readjustments may be required after a test swatch to alter placement of some of the mesh holes. My fabric below was knit using the basic faggot lace Brother mesh, the corresponding “card” close to 180 rows in length to achieve the brick repeat.

a portion of the card

sideways view of resulting fabric, knit side facing

To mesh or not to mesh 2

The amended “square mesh card”; grey areas indicate more tape use on the reverse. In basic analysis knit “squares” consist of blocks of blanks on card 12 squares tall by 3 wide, essentially removing 6 lace transfers (holes in all over card) in those locations; this could be done with software and planned ahead of punching any holes. Electronics capable of programming 2 different motifs increase ease in drawing out patterns as well as the possibilities in planning larger repeats and repeat sequences

the corresponding swatch viewed on purl side after a quick steaming

flipped 90 degrees

To mesh or not to mesh 1

A good online grouping of mesh repeats is one place to start exploring this topic. Most proprietary large pattern books from machine knitting companies include at least a few suitable cards/mylar samples. They can be used for “all over” fabrics, borders, striping in mixed bands of varying styles, etc. I am presently interested in pursuing filet crochet-like structure by superimposing knit areas onto lace mesh using “low tech” punchcards or mylar sheets. Filet crochet is often built on a system of solid squares on the more open “ground”. Emulating this type, to begin with, here is a punchcard for use on Brother KM resulting in a “square mesh”

a lazy way to explore how adding solid areas to any pattern card is to mask a portion of the card using tape ie. in this case painter’s tape on the reverse side; this is not the best long term solution, but OK for “testing the waters” and sorting out the final repeats. Here is the resulting card reverse side

the card was extended for a full, alternating blocks repeat: the first run at a swatch result showed that oops! I am not quite there with alternating blocks of 4: no worries, more tape is on hand. Below is my preferred, sideways view of the present fabric. There is a difference in ridges/ lines as viewed horizontally, every other is thicker because of the location of transferred stitches. Knitting sequence is 4 rows of transfers with lace carriage, followed by 2 rows knit with KH throughout. A good starting point.


Lace: from electronic repeat to punchcard

At about the time I began my recent lace obsession, and pre my trying to actually use excel instead of simply knowing it lived in my computer, a friend was trying to work on a lace repeat that was found online as part of Staceyjoy’s knitting stitch portfolio, now part of the site. As a result, the downloadable pdf below bears the name it does, includes my how/to suggestions for the journey from electronic single repeat to punchcard, and the resulting swatch. One additional tip: when working with copies it is good to mark tops and bottoms clearly, especially if combining pieces of patterns so as to avoid marking/punching and vertical mirroring mistakes.

redlipstick PDF