Interlock is produced commercially on special circular machines and some double system flatbed knitting machines. The patent for the associated circular machine was applied for in 1907, and a copy may be found in the google patents archive. The stitch originally commonly used cotton, in machines that were able to produce a gauge of 20 stitches per inch, often used in T-shirt knits. As technology expanded so did the possibilities for a wider range of gauge and expanded structures.
I have found references to accordion, fleecy, Piquette, cross mix, and bourrelet interlock versions, enough to make one’s head ache when considering forming them on home knitting machines.
The fabric lies flat, relaxes in width but is fairly stable in height. It has good shape retention, raw or cut edges don’t curl, and it will unravel only from the last row knit. There are many variations including eight-lock, bourrelet, Ponte di Roma, and waffle weaves. Many directions are included in Machine Knitter’s source. Interestingly enough, they are shared in the chapter on knit weaving. The instructions given are for punchcard machines, often accompanied by a hand selection of needles in either or both beds. Hand selection on the ribber is easier to track by having an even number of needles in work on the ribber, bringing the first up on the left, then the first up on the right, so the illustrations for stitch formations are written that way, the selected needles knit. Lili button selection begins with slipping the first stitch, followed by knitting the second stitch on both sides. In most fabrics, as long as the remaining repeat aligns starting with a slip stitch on the ribber does not matter, as the complete repeat is shifted over by a needle. 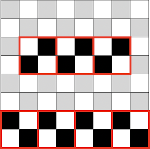 The structure can be knit with color changes to produce vertical stripes of various lengths. My initial proofs of concepts are usually in single colors.
In interlock, alternate stitches are knit on each bed, so it takes two complete carriage passes to complete a single row of knitting, making the resulting fabric thicker and heavier, with the same appearance on both sides, making it reversible. Carriage passes need to be distinguished from design rows. Charts indicate both, but not necessarily numbers reflected on mechanical row counters.
The usual rib configuration 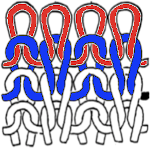
 Planning for interlock:

The fabric may be executed on Brother knitting machines by programming 1X1 needle selection on the main bed, with the smallest component bordered in red. The Brother ribbers have a matching needle selection to 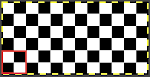 when the lili buttons are used with the machine set to slip in both directions. Studio or Knitmaster knitters would require an RJ1 ribber carriage. I refer to the marks on the Brother ribber needle tape as blanks and dashes. When lili buttons are in use, one must work on an even number of needles. Pairs of both are required. The starting placement on either of the 2 marks does not matter, the first needle on the carriage side on the left will always slip, with the last stitch away from the carriage always being knit. This observable if one “air knits”, slowly moving the ribber carriage from side to side. As in any pattern knitting, needles selected to D or E will knit, the ones lined up in B position will slip or tuck.
 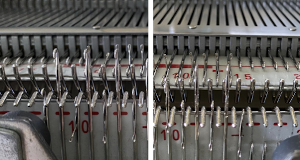 The needle selection needs to be coordinated so that needles opposite each other are not selected at the same time. Since the first needle on the ribber will slip, the first needle used in the pattern preselected on the main bed must be selected forward to knit, and the number of needles in work set up accordingly. Many published illustrations begin patterning from the right. I prefer to do so from the left. My final repeats were planned with needle placement shifted over by one so as to begin with a knit stitch on the top bed, a slip stitch on the ribber due to the fact that the ribber lili selection is fixed to always begin with a slipped stitch. Starting with the carriages beginning on the left side, the first needle in work on the ribber is on the left, the last needle in work on the top bed is on the right, an even number of stitches are in work on each bed. The setup after the first preselection row, with COL:
 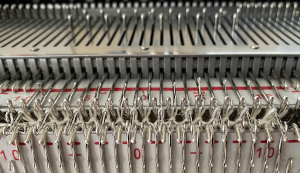 Imagining the sequences required to complete a single row of knitting. I prefer to start with a knit stitch on the left, top bed, end needle selection is canceled
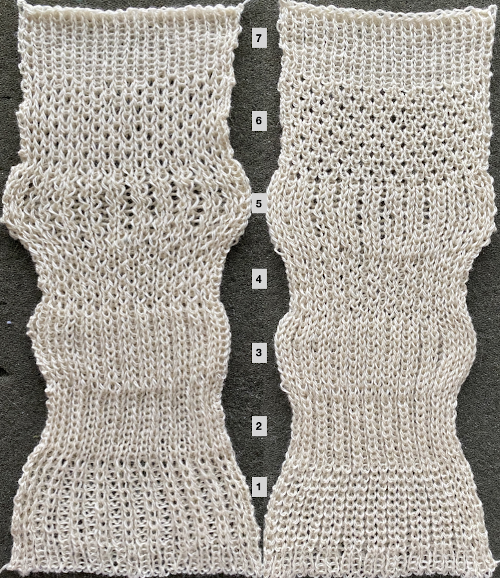
 When testing new ideas, particularly in rib setups, I often begin on a small number of needles and in a way that feels “safe”. This was my first test, with the ribber set at half-pitch. There is an obvious difference in rib before the slip stitch segment and the every-needle, EN, segment.
 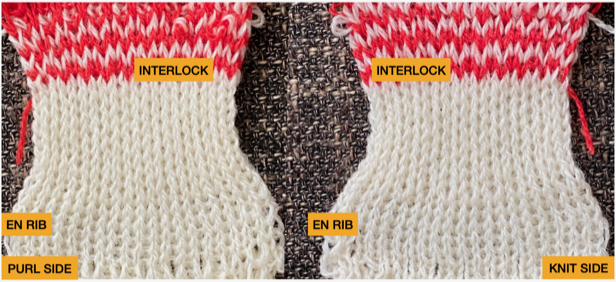 Using a very thin space-dyed cotton, tension 4 on both beds, produced a soft, drapey, squishy fabric. Because once the cast on and needle set up are complete, the knitting occurs on every other needle in alternate directions, full-pitch is used without any problem even though every needle is in use on both beds.
 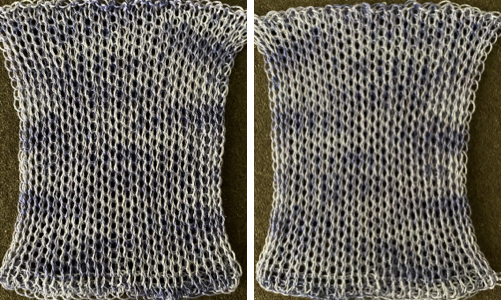 These fabrics will knit both at half-pitch and full-pitch once the pattern needle selection is established. The difference may not be noticeable depending on yarn choice and tension, or ribs may appear to group together in pairs. Pleating in interlock may be produced by removing needles alternating from each group. The tuck setting may be used in these experiments as well, resulting in additional width.
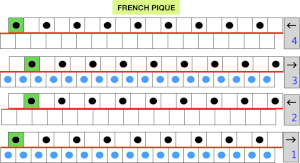
Pique variants: rows 1 and 2 complete one row of knitting using both beds
row 3 knits on the main bed alone
rows 4 and 5 complete one row of knitting using both beds
row 6 knits on the ribber alone
charting out possible actions and repeat adjustment. 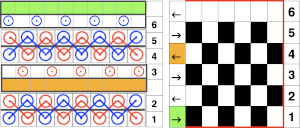 The rows where only a single bed knits will create long stitches due to their being skipped on the opposite bed. Reversing and alternating the selections make the fabric reversible. The tricky part would be canceling out lili action on the ribber every 6 rows when the top bed alone needs to knit, row 3 in the design repeat. To accomplish this, after row 3 is preselected with the carriage on the left by releasing the ribber carriage, lean it forward so it will not engage any needles in work on the ribber resulting in dropped stitches, and moving it to the opposite side of the machine. One can actually get into a rhythm doing this.
 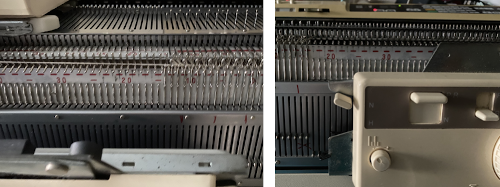 As the knit carriage moves from left to right, only the main bed needle selection will knit. When the KC reaches the right, engage the ribber carriage, and knit until the same design row is reached. The blank row at the top of the 6-row repeat automates and allows for the carriages to knit from right to left on the ribber only, again creating some long stitches on skipped needles.
The selection continues to be EON after proper needle set up, so the full pitch setting is used once again prior to continuing in the pattern. 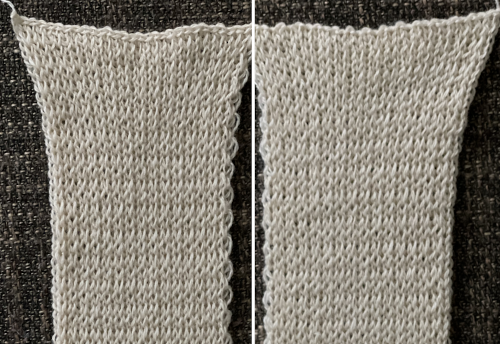 This is an instance of cast-on and bind-off edges that will tend to be pulled a bit wider than the remaining knit. Depending on the final use for the fabric, that may or may not be a consideration.
I usually begin with tentative charts in a spreadsheet to consider what components may be automated and what might be the most advantageous selection of patterns on the main bed. At this point, my solution for no stitches knitting on the ribber for single rows remains to knit the carriage forward and remove it from the equation for that row.
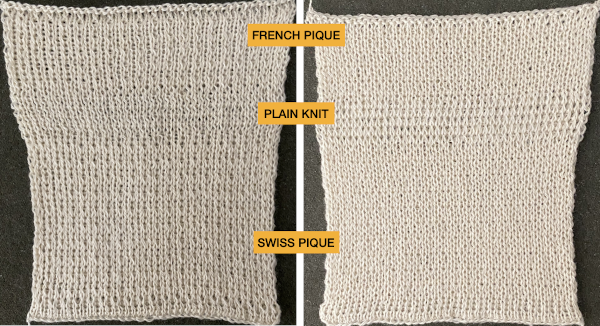
Swiss pique or overknit is a half-pitch fabric. It looks like French pique but is a little narrower. Looking at completed knit rows, identifying the top bed patterning, isolating patterning selections 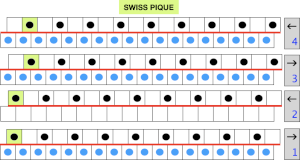
 carriage passes required
 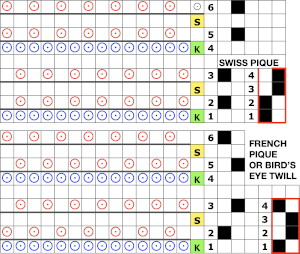 The ribber here knits in one direction, slips in the other. The first preselection row is made toward the color changer, needle set up is checked as for previous samples, the ribber is set to knit to the right, slip to the left
 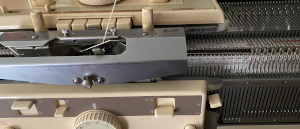 the appearance of the stitches when both carriages knit
 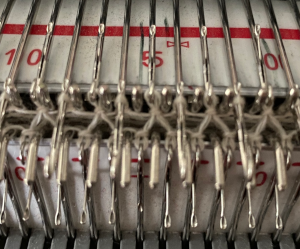 after only the top bed knits with slip stitch floats behind every skipped stitch, which, in turn, will appear longer on the knit face
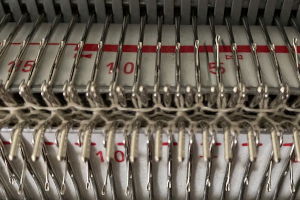
 Ponte di Roma
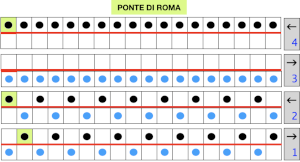
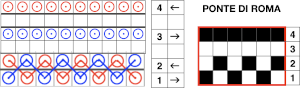 the modified version of the repeat used in my test swatch
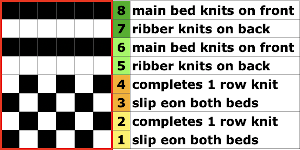 Pairs of rows of interlock are followed by pairs of circular rows. The repeat was changed and the second color was used to define the difference in stitch formation between the two groups, color changes were made every four rows.
 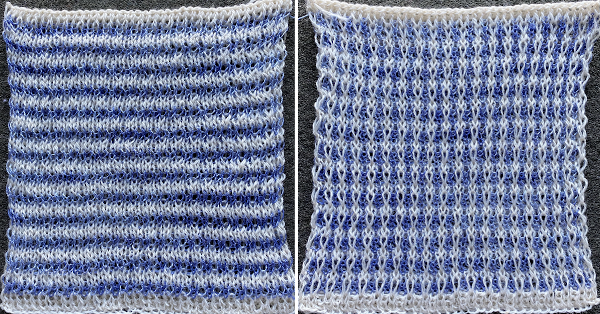 Using a single pair of carriages and having to constantly change cam settings appears far too complicated to manage for producing any length of fabric. My hack for making things easier and faster was to resort to knitting with 4 carriages. One pair was set for interlock operating from the left, the other set so as to achieve tubular knit. The ribber carriage is set to knit from right to left and to slip from left to right when the main bed knits. The knit carriage is set to slip in both directions so that the pattern selection remains continuous. It will slip all stitches while moving to the left on rows with no needle preselection, knit on all preselected needles on its return to the right.
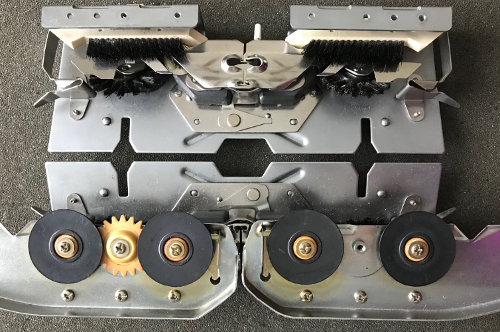
Extension rails are used since both KCs are selecting patterns. I wrote about the concept of using 4 carriages in 2019, in the Geometric shapes on ribber fabrics with tuck stitches: knitting with 4 carriages post. The difference here is that the carriages on the left do not have the added benefit of support from the color changer. The elastics placed as shown may have been more for my psychological well-being than for the continued proper function of machine parts. There is a limit to the width of knitting that may be produced this way with the carriages coupled on each end. The knit carriages may travel off the top bed and onto the extension rails safely, but the ribber carriages must remain anchored enough on the rear rail so as not to go flying off on their own while clearing the end of the belt on each side. 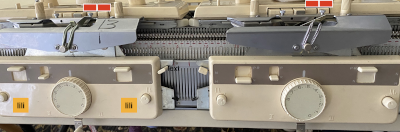 I prefer leaving the slide lever in the center position in all my rib knitting and am not convinced as to a visible difference between knitting at half or full pitch in the swatches with the yarns I have used so far.
Bourrelet is characterized by horizontal relief ridges on one side, is made with an interlocking base, is sometimes referred to as ottoman rib or ripple stitch, is sometimes referred to as Evermonte, is knitted at half-pitch. The combined carriages knit for 4 rows, followed by four rows knitting on the top bed alone.
 Seeking a workaround other than disengaging ribber carriage or canceling lili selection and leaving the carriage on the slip setting in both directions on rows where only the top bed knits, one option to speed up the process is to hack a main bed sinker plate. The result is the ability to use a second knit carriage to select and knit patterns on the top bed only, operating from the opposite side. Four passes on either bed complete 2 rows of knitting. The post on ribber fabrics produced with 2 knit carriages selecting needles describes the process in more detail.
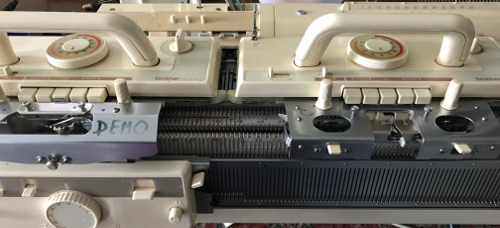
 To use the yarn from the right, only before the first carriage pass to the left, its end needs to be knit through a stitch on that side to anchor it. A different cone or ball of the same color and weight yarn may be used, or in my case, I used a thin, different fiber in a second color.
The swatch was knit in four-row sequences, there is a subtle ridge apparent on the knit side created when only its rows knit, which could easily have enhanced by knitting more rows on the single bed. 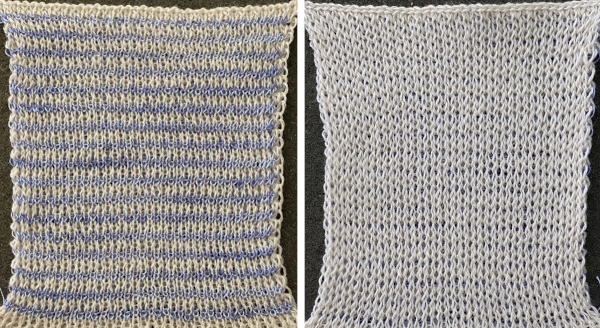 In eight lock hand selection is required on the ribber, the technique reminds one of the double-faced aka reverse jacquard fabrics.
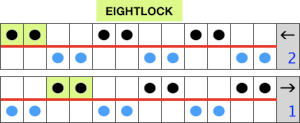
 My initial test was to knit twice as wide a repeat, thinking it might be easier to identify stitch formation, working on 4 X an odd number of stitches, in this case, 36, beginning and ending with knitting on the top bed,
  but 1: I actually cast on 34. In a swatch, such adjustments 2: are easy to make. The only automated selection of needles on the ribber is EON using lili buttons, in any other configuration there is no choice but to hand-select needles in between selected needles on the main bed. Casting on at half-pitch begins with the first needle in work on the top bed, the last in work on the ribber. Once the first row has been preselected, and the pitch is changed to P the ribber moves to the left, leaving an even number of needles in work opposite each other on both beds. Both carriages are set to slip in both directions. The knit carriage will knit the automatically selected needles, slip the unselected, while the ribber knits needles brought up manually to D position, skips the remaining ones in B.
A 2X2 needle selection tool for a 9 mm machine or a 7 prong transfer tool may be adjusted and used to help bring up the proper needles to E position on the ribber. 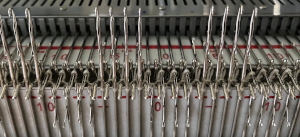
 single row pockets are formed.
 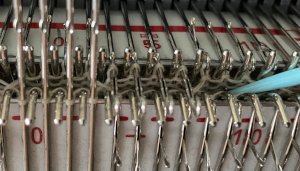 Even though the needles are in full pitch, if an error in needle selection 3: happens across a row a tip-off will be that floats are created on the main bed between selected needles, and there will be a textural change across the row of knitting unless the error is corrected.
If another yarn end or a second color is added, as always, check and make certain the first few stitches knit. Proper lighting and using a yarn color and thickness that can actually be distinguished on the needle bed are useful to avoid 4: dropped stitches not being noticed. The color change 5: shows that a single row is indeed completed with every 2 passes of the carriages, and there is a shift visually in the linear pattern.  The same process could be applied to the charted repeat. A needle selector can speed up the manual work on the ribber for 2X2 selection
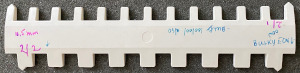
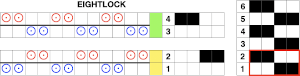
Tuck variations: tuck, cross tuck, royal, texi plique. So far these are my tentative charts for the stitches, each pair of rows represents a full single row of knitting. There are situations where cam settings would require changing from slip to tuck and some locations where the same needle selection repeats on subsequent rows, leaving lots to ponder about and proof, my starting charts are often edited and at times abandoned as the work progresses and both eyeballs and brain have had a break. In this instance, the topic will be reviewed again in a future post. 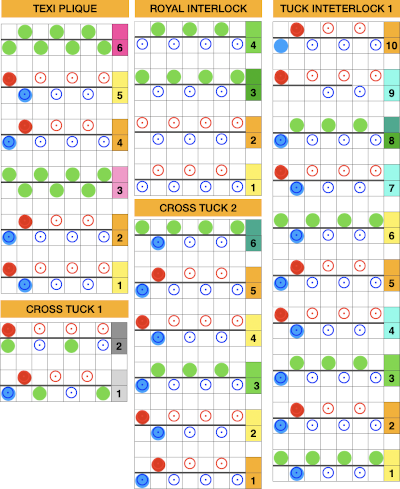
Since most of my swatches are experiments and I work by trial and error, I am now rethinking my repeats and reached the what am I doing? point.
I have some interesting or even pretty fabric swatches so far. Illustrations in published sources are often shown for interlock fabrics on every other needle, my supposition has been that with every needle in use on both beds, at half-pitch placing the needles on one bed in the center of those on the other and working in thin yarns the same repeats would work for achieving knits in these families, so in my illustrations, the symbols are placed to represent needles in work between each other on alternate beds, rather than truly on every other needle. To review, the differences between pattern selection using the slip or the tuck setting: with every needle in work on the ribber, the repeat  is programmed on the top bed with the first preselection row from right to left, the needle setup, depending on the starting and ending needles used.
 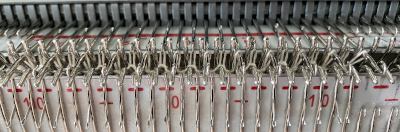 With both part buttons pushed in, in every needle rib, the needles in D will knit, the ones in B get skipped completely. As the carriage passes to the right, the needles for the next row are preselected, come forward holding only the skipped stitches in the row just knit, while the alternate needles are set up to be skipped on the next pass to the left
 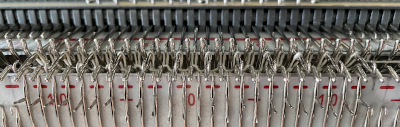 After the two passes one full row of knitting is completed on the patterning bed. The needle preselection is now on the next row of the repeat, in this case, row 1.
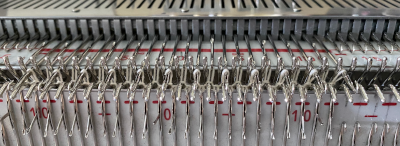 Tuck setting using the same repeat behaves differently. With both tuck buttons engaged, by default, the needle on either side of the tuck stitch will knit, with every carriage pass. The starting preselection is the same as for the slip stitch version, after the first pass to the right, the preselected needles to D will have been knit, with tuck loops formed on the previously non-selected needles. Because the repeat alters needle positions every row, as the right side of the bed is reached, the tuck loops from row one will appear on the shank of the newly preselected to D position needles, ready to be knit, and the alternate group of needles is held back to create the next row of tuck loops as the carriages return to the left.
 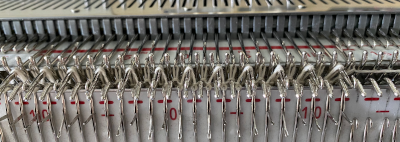 The process repeats throughout. Two passes complete a single row of knitting. The carriage actions for completed passes 1 and 2
 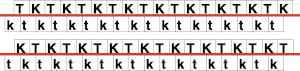 The result is a very pliable fabric that when relaxed off the machine and stretched shows the tuck structure more, is reversible. The basic repeat elongated on the top bed creates a vertical striped pattern if color changes are added, coordinated with needle selections, and are made every 2 rows. As an experiment, the double-length patterning was tried at the top of the swatch. At that point, the fabric is no longer reversible unless the 1X1 fixed needle selection is altered manually on the ribber. My yarn is thin, and the tension used on the loose side.
 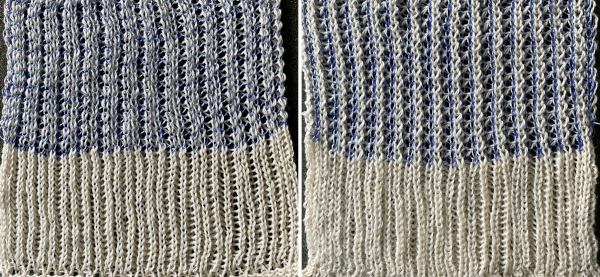 The close-up begins to make the tuck loops a bit more visible. The swatch was knit at half-pitch. Using full pitch in patterns that allow for it, diminishes the appearance of “ladders” between rows of stitches, indicated by cyan arrows.
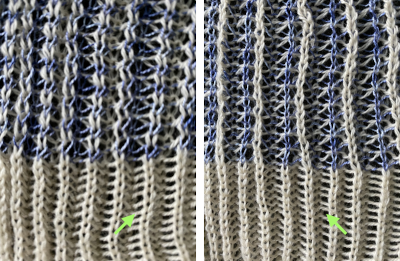
More basics: on the ribber, whether using lili buttons or not, these are the lever and change knob positions available 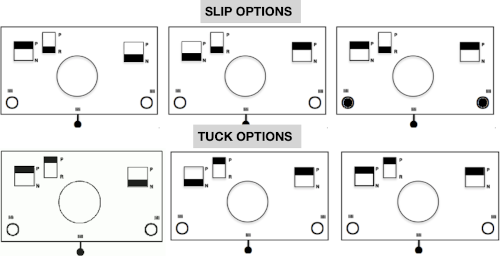 Manually the tucking lever position can be changed from R to P for a single row or more of tucks and then returned to the R placement. Switching between the 2 stitch types on the ribber is far easier and less complicated than changing cam buttons on the main bed, however, there are no rows where only tucked loops are created without knit stitches beside each of them if the lili buttons are in use. Using the slip-tuck Brother selection on the main bed allows for slip and tuck settings to be used at the same time in the same row as long as opposite cam buttons are in use. Some of the old punchcard books include patterns referred to as “lace-like” using the setting. The starting side makes a difference in results as to whether one leads with a slip stitch float or a tuck loop in the actual knitting. Swatches in this post have begun with the first needle in work on the ribber and a forward, to be knit, stitch selection on the first needle on the top bed, with an even number in work on both beds. The end needle selection is canceled unless stated otherwise. The cam setting used for these tests
 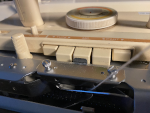 the setup row with the first preselection row knit from the right, ending COL
 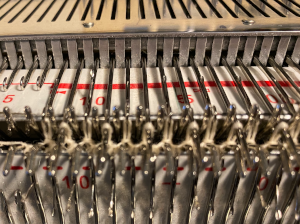 as the carriage moves back to the right, the previously not selected needles will slip and get a tad longer while being preselected forward to D for the next carriage pass. Once the pass is completed, the needle selection has reversed, the now non-selected needles will tuck as those same needles are preselected for the next pass from the right.
The appearance COR 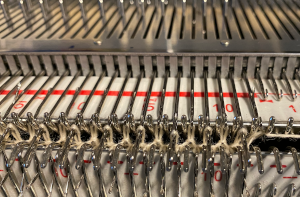 After the return pass to the left, the tuck loops are evident on top of the needles preselected forward to knitting position on the next pass to the right. Two carriage passes fill one row of knitting, here ending COL.
 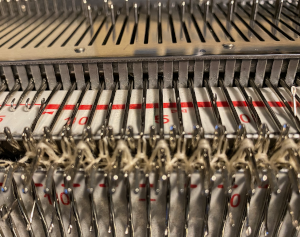 On the ribber, as seen in the thumbnails, one may choose slip or tuck in one direction alternating with an all knit row in the other, or tuck or slip in both directions in an alternating pattern EON_EOR, on an even number of needles with the addition of lili buttons. The appearance on the ribber of the formation of the loops echoes that seen on the main bed changing needle placement unless the carriage is set to tuck in only one direction.
 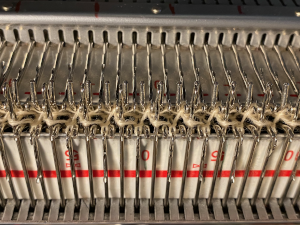 A variant of the single bed capability for changing stitch type formation with direction may be achieved on the ribber by manually changing the tucking lever from R to P when the other side of the knitting is reached.
 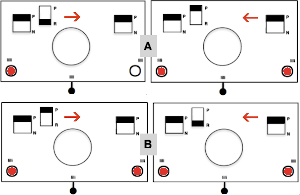 A test can quickly be made to observe the stitch formation with the main bed set to knit every row. I chose the left tucking lever down to R when the carriages were on the left, up to P when the carriages reached the right. The tuck stitches with no further action line up over the knit stitches in the previous row
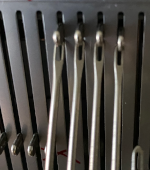
 ![]() There often are aaargh moments in knitting. This has happened to me with some 7 prong transfer tools before, here it did with a double eye tool on my transfer row prior to binding off. There must be a split in the eye of the tools not visible to the human eye resulting in the stitch entering the eye. So far I have been able to rescue the stitches involved, but not without lots of fiddling and some cursing
There often are aaargh moments in knitting. This has happened to me with some 7 prong transfer tools before, here it did with a double eye tool on my transfer row prior to binding off. There must be a split in the eye of the tools not visible to the human eye resulting in the stitch entering the eye. So far I have been able to rescue the stitches involved, but not without lots of fiddling and some cursing 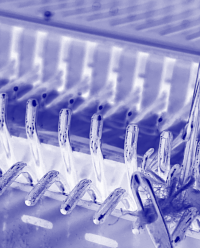 Experiments outside the interlock family: the two-by-two repeat is supplied in most packets of cards that come with the purchase of a punchcard machine. At one point in time, Kate Armitage published a book containing 104 variations of knitting using the card, both single bed and combined with ribber use. There was also the equivalent for card #3, the point being variations are limited only by time and imagination.
 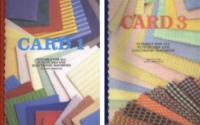 Because I am now completing posts over time online as opposed to working offline and then publishing, the opportunity is there to share mistakes as well as what appear to be successes at the moment. Once again I fell into the not-writing notes because it is so obvious mode and there was enough time lapse between my first knit swatch below and my writing about it that I was no longer certain about the settings used when sharing it. The knit has more stretch and texture than seen in the photo
 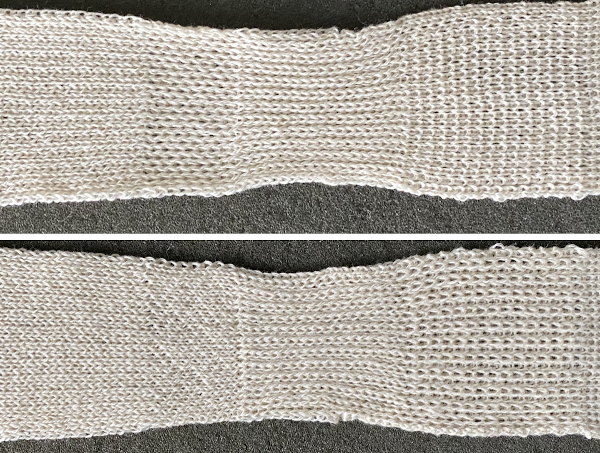 Re-swatching for possible variations, with notes this time and with lili buttons in use. If the cams are not in the up position on the ribber carriage, stitches will knit, not slip. N is king, without cam buttons in use in either bed, stitches will knit even if a pattern is being selected. There is an adequate stretch at the top allowing the fabric to relax achieved by transferring to the main bed and using a latch tool bind off around 2 gate pegs. The possible variations are endless, note to self: remember to keep good notes.