Most variations using tuck settings will loosen the fabric structure, slip stitches will narrow it. The behavior is consistent in working on both single and double beds. Color changes may be added.
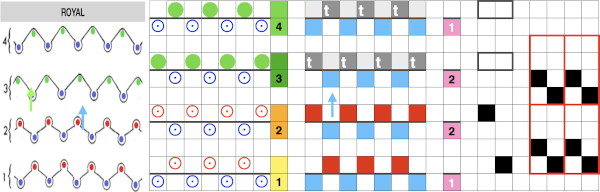
There are only very short descriptions and schematics for the more complex tuck interlocks online, making attempting them a puzzle, where efforts at piecing it may not necessarily lead to correct answers, but still produce interesting knits. The ISO (the International Organization for Standardization) is a worldwide federation of national standards bodies that draft international standards for subjects including knitting. My charts for the tuck interlocks were personal interpretations based on a few of their illustrations, among which is this for cross tuck 1, which appears to be the most straightforward, with every needle knitting on one bed, while the other works the basic 2X2 stitch alternating repeat on either one of the 2 beds  translated for knitting, patterning may be used on either bed, with the opposite bed set to knit every stitch. If patterning is on the ribber, have the first and last needles in work on the main bed.
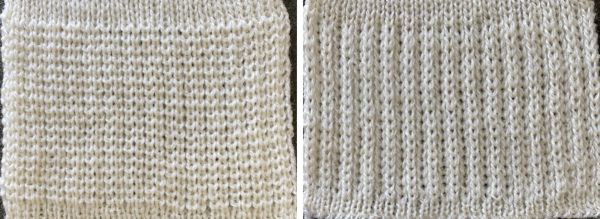
  The top bed is set to tuck in both directions, the fabric is shown lightly stretched
 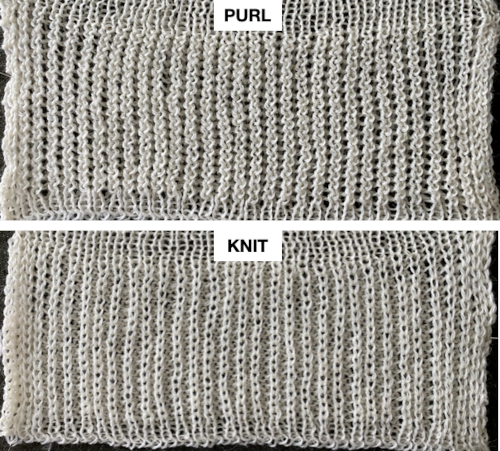 and could conceivably be used to create a ruffled edge when followed by narrower stitch types ie. every needle rib or Milano variants
 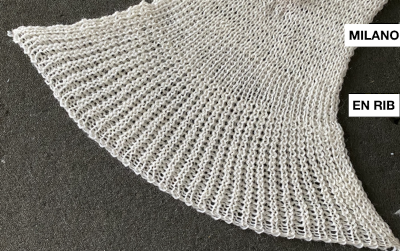 Changing settings: with the knit carriage set to slip in one direction, knit in the other, the ribber knitting every row

 Needles may be taken out of work to create pleats in every needle ribs, alternating their placement between the 2 beds. Knit stitches stabilize tuck ones. Here every other needle is taken out of work on only one bed. The tuck loops are more visible in any open spaces between the vertical rows of ribbed stitches. The ribber will knit every row on the same needles aligning directly above each other, thus ruling out full pitch.
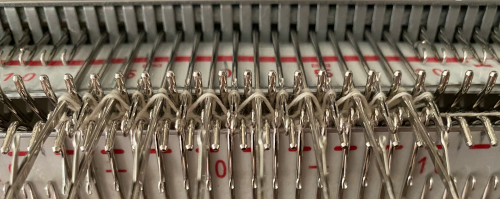
 The needles are set up so that the first and last are in use on the ribber, ensuring that a knit stitch will be on the side of any tuck stitch selected on the top bed,
 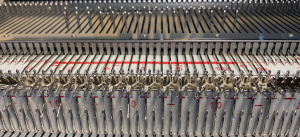 on the top bed the every other needle tuck selection reverses as the direction of the knit carriage does, needles brought forward knit, the ones skipped hold tuck loops in their needle hooks,
 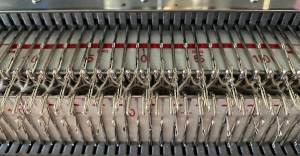 the resulting fabric
 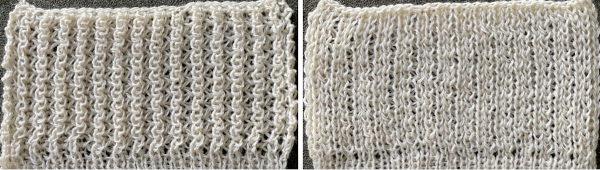 Other explorations with needle out of work:
Milano waffle: single color, 4 passes with every needle knitting, 4 passes tubular, more passes of each may be added to distribute color changes. The number of needles in work on the main bed remains fixed. 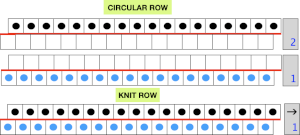 Choosing spacing between needles in work on the main bed
  A working repeat with 4 circular rows, 6 full rows knit
 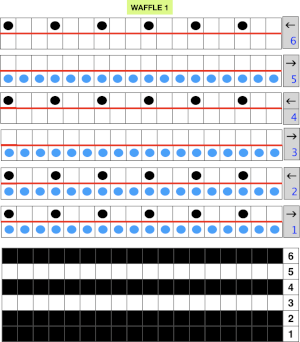 My first swatch in the technique was in response to a Ravelry member share describing the stitch pattern used in a finished garment
  The main bed is programmed, set to slip both ways after the first preselection row. After 2 rows knit on both beds, the ribber is then switched to slip in one direction, knit in the other in response to needle selection on the top bed. Main bed needles out ribber slips, main bed needles in B, ribber knits. After 4 circular passes, the ribber is again set to knit for 2 rows. The appearance during knit rows
  followed by float formation when only the top bed knits
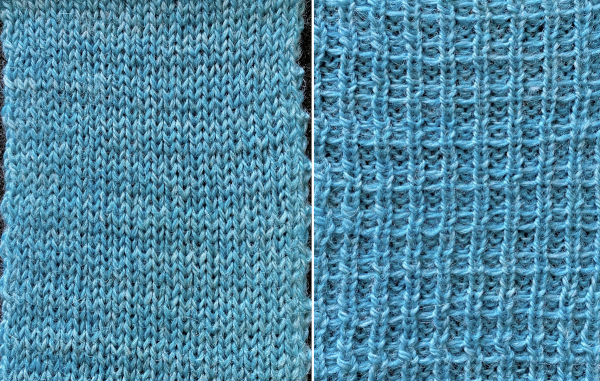 The resulting grid may be used as a guide for hand techniques off the machine in isolated areas or all over
 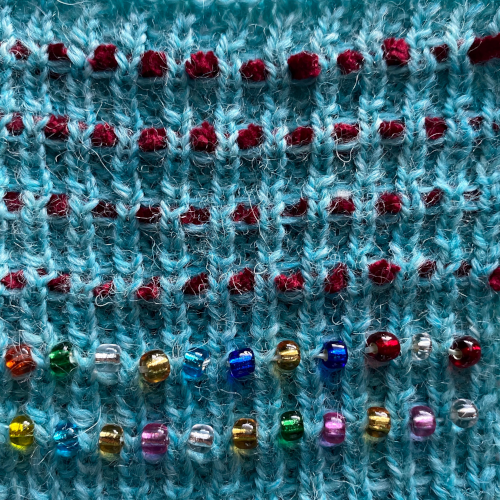 Repeating the experiment with 2 stitches on each edge, this time disengaging the ribber and knitting 2 rows only on the top bed only rather than knitting circular rows and changing ribber settings. The floats are brought closer together, the fabric is far quicker to knit.
 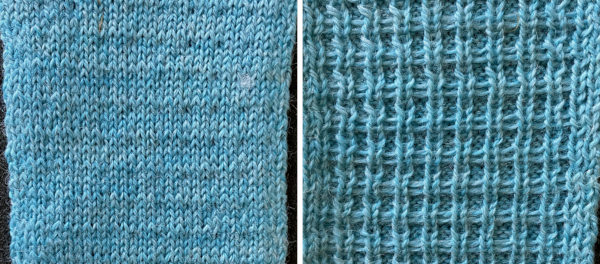 Needle arrangements may be varied to accommodate thicker yarns, or alter the texture by varying both the number of knit rows and circular ones
 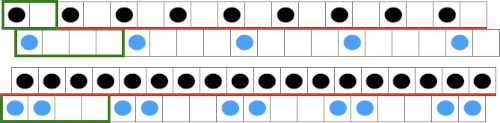 Windowpane bourrelet: beds are supposedly at full pitch, I had better success at half-pitch. The same bed is used for single bed rows as for basic bourrelet, a color change to try: every 6 rows
 ![]()
 Because the top bed needles are in pairs, the EON selection remains evident, each of the first 2 passes completes one row of knitting.
 When only the top bed knits, floats are formed between the needles in work
  Knitting went more smoothly when 3 needles on the top bed were used on each end
 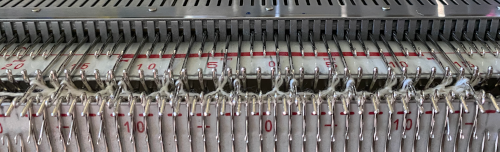 The ribber carriage was disengaged to allow the pattern to knit only on the top bed. When there are needles out of work, floats will be created between the needles in work. The length of the swatch was determined when I noticed the yarn was not properly placed in the feeder, and I had already begun to drop stitches on the left side. It is one of the things to watch for, and which may merit a small preventive hack to keep the yarn from accidentally slipping out of its proper place.
 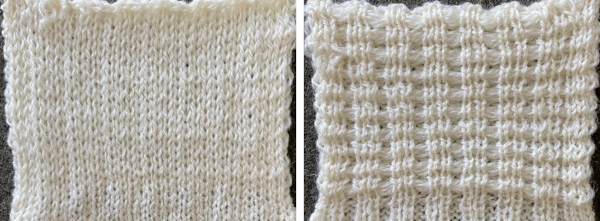 Half Milano with tucked long stitch: the main bed needles will tuck one row, then slip one row. The ribber needles will first knit a row, then slip a row while the second bed knits both rows. Then the ribber needles knit one row then slip a row while the second bed knits two rows.
 ![]() I have had no success with trying to execute my interpretation of the directions without getting floats on the top bed, and the photo in Machine Knitter’s Guide to Creating Fabrics is not clear enough to distinguish if there indeed are floats on the surface of the fabric. The experimental repeat
I have had no success with trying to execute my interpretation of the directions without getting floats on the top bed, and the photo in Machine Knitter’s Guide to Creating Fabrics is not clear enough to distinguish if there indeed are floats on the surface of the fabric. The experimental repeat 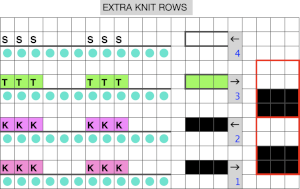 Having the ribber knit every row produces many more rows on the purl side than on the knit, so the vertical all knit columns do ripple a bit. In this stitch version, with pattern knitting beginning from the left, the main bed is set to alternately tuck and slip using the half-pitch setting
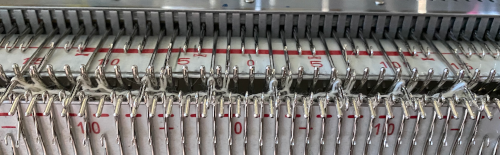
  row one preselected for knitting
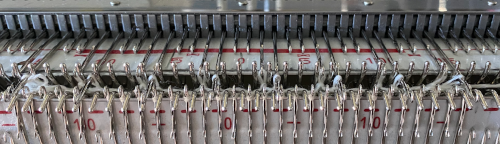
  the first row has been knit, the second knit row preselected
 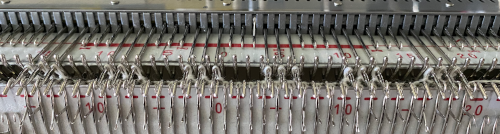 the second row knit, no preselection for tuck or slip
 the tuck row is formed with the knit pass to the right, no preselection
 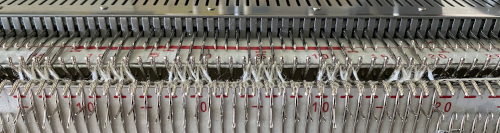 the row of stitches is skipped on the way to the left, preselecting for the next first knit row, tuck loops visible on top of the hooks of the selected needles
 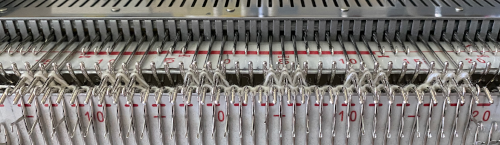 the process is repeated. The resulting fabric:
 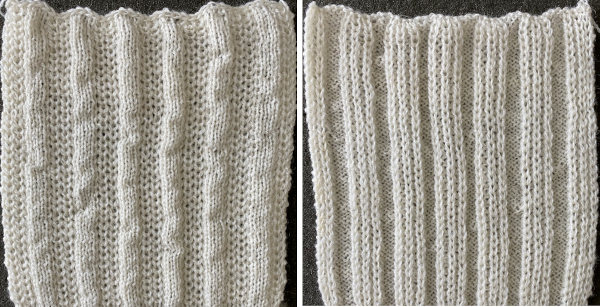 Tucked pique: knit the same as for pique, but with cams set for tuck on the top bed, set beds at half-pitch.
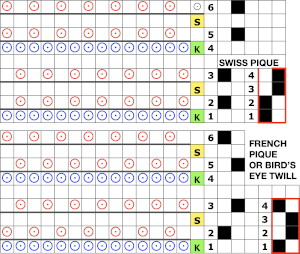
 In DIY the potential for exploration is endless. As always, if needles are out of work on the main bed, end needle selection is canceled. Here slip setting in both directions is used, along with needles out of work on both beds, the 1X1 needle repeat is programmed.
![]() Set up is with ribber needles in work between needles preselected for knit stitches on the top bed.
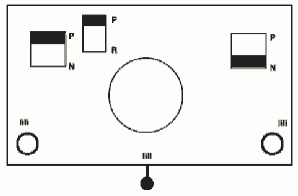
Set up is with ribber needles in work between needles preselected for knit stitches on the top bed. 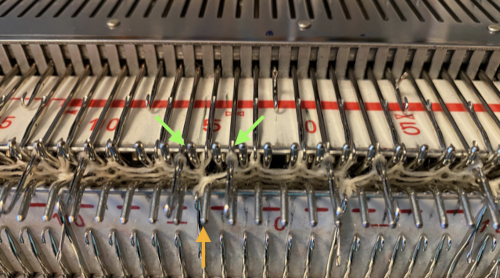 Beginning patterning on the left after the initial preselection from the right, the ribber setting:
 the result has floats on the purl side, a slightly pleated look on the knit side.
 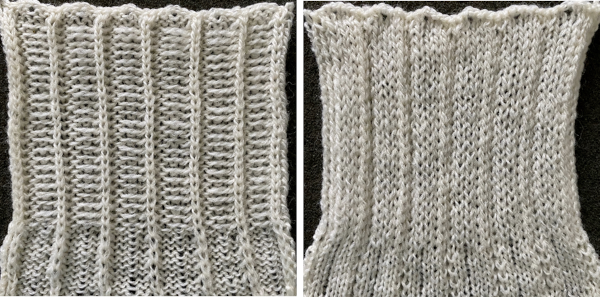 Playing with color and texture: use 2 or 3, change colors every 2 rows, every 4, or at the end of each full pattern repeat.
Change one or both cams from slip to tuck.
Try adding racking when using tucking on the main bed
Vary working needle arrangements with interlock settings.
The ISO illustrations gave clues as to whether the same number of needles are at work in any pass on each bed. The intent with the second pass in each pair of passes is to create a slipped, tucked, or knit stitch in between the alternate needles on the opposite bed.
Cross miss interlock: in this instance, tuck loops alone with no in-between knit stitches are created on the top bed, in the same spots where stitches were slipped on the previous pass. Starting side does not matter, but being consistent makes experimentation easier to understand and follow. The lili buttons, set to slip in both directions remain unchanged on the ribber carriage throughout. The knit carriage is set to slip in both directions as well as to hold. My swatch began with a knit stitch selection on the top bed, marked with a red line the length of the repeat below, and needles were arranged accordingly. The tuck loops are created using a hand technique and holding combined with patterning
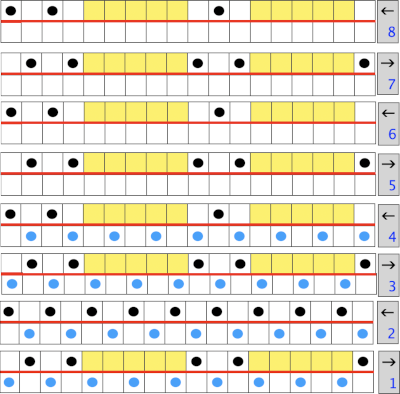
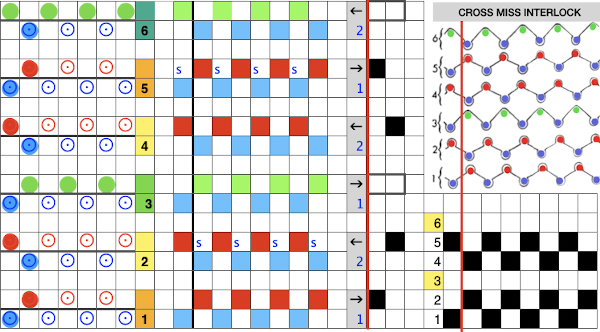 This shows the elongated stitches between ones that will be knit on the next pass. On rows 3 and 6 of the pattern, there will be no needle pre-selection, but the elongated slipped stitches will still be identifiable.
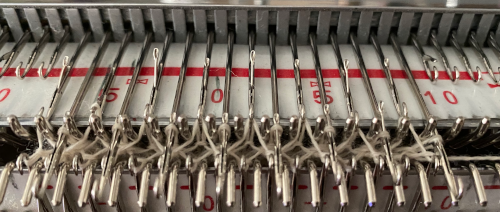
 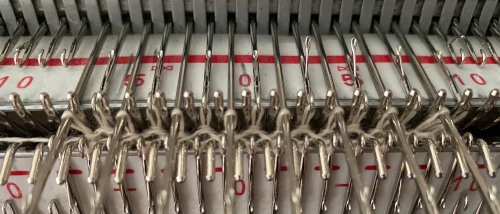 After both no preselection row bring alternate needles out to hold using any EON needle tool. In my case, COL, I began with needle 1 on the left on row 3, alternating beginning with needle 2 on the left on row 6. The number of rows in between hand techs is an odd one, so sides for the hand tech will alter as well. This shows the tuck loops formed EON as the carriages travel to the right.
 Prior to resuming pattern knitting, needles with loops on them need to be returned to the B position, maintaining the EON needle preselection for the next pass
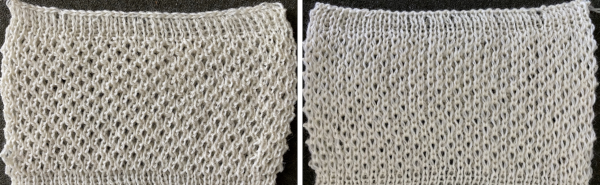
 Repeat the process when design row 6 is reached, beginning with needle 2 on the left. The texture appears on the purl side of the piece, shown on the left
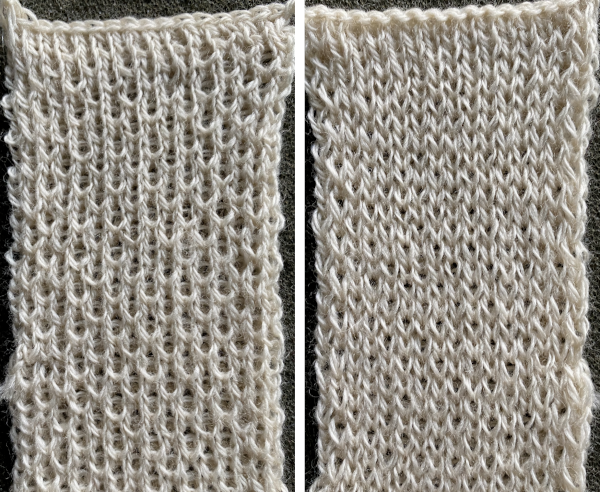 This repeat uses 6 passes as well. The tuck loops on the top bed occur above slipped stitches in the previous pass, which may be replicated, but the real problem is that every third row on the ribber is also having to tuck on specific needles with no knit stitches between them. The tuck loops happen directly above knit stitches formed in the previous row if the tucking lever is changed manually from R to P on those rows. That is a lot to juggle, a no.
 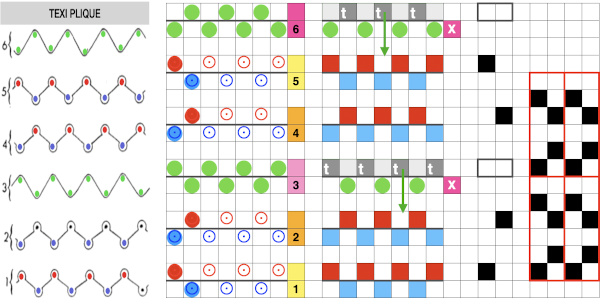 Here the eon tuck would fall on slipped stitches in the previous pass, so that is doable. It is possible to fool the lili selection into believing there are extra needles in work on each side of the ribber, which can “make” the first stitch on either side knit rather than slip or tuck. The method is used in creating a striper backing in Brother DBJ and would require fiddling with needles on the ribber in an irregular selection repeat as well as the hand technique on the top bed. Another definite no.
 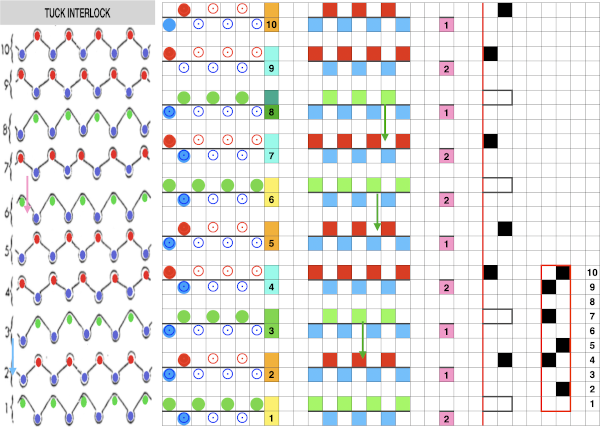 This pattern repeat is a short one, the changes are more regular on the ribber. The hand tech tuck stitches could be formed for 2 rows with all stitches getting worked back to B position in between those preselected for the next pattern row. The lili buttons need to get fooled after alternating pairs of rows, the start of several nos for me.