WORK IN PROGRESS
In the FB machine knitting groups questions about tuck-lace trims have once again surfaced with regards to their design and use as edge finishes or decorative details. Some automated potential details have been covered in previous posts
“Crochet” meets machine knitting techniques: tuck lace trims (and fabrics 1)
Tuck lace trims (and fabrics 2)
Ribber trims 3: one trim, four variations
Ribber trims 2
Ribber trims/edgings 1
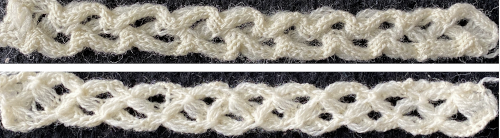
The trims, however, may easily be created on any machine using hand needle selection and holding techniques. Over the years a number of names have been assigned to such trims, from idiot’s delight to shell, cockle shell, double shell, and scallop shell.
Trims are generally knit vertically, are often quite “lacey”, applied upon completion, generally with their knit side out. Some people think of them as mock crochet. They can go from tiny to heavier double-edge versions.
Generally, they benefit from being knit slowly with some weight to help hold the stitches in place and have the groups of tuck loops knit off properly. Start with a few rows of waste yarn and ravel cord to anchor to hold the weight, follow with a permanent cast on-on needles represented by grey squares in each group. Knit 2 rows on all needles and begin in the pattern. The method for creating tucked loops manually is to bring needles out to hold after setting the knit carriage accordingly. Until those same needles are pushed back into work loops will build on their shanks and will be knit off when the involved needles are pushed back into work. The limit with automated patterning for tuck in 4.5 mm machines, unless very thin yarn is used, is often 4 rows. There is greater tolerance in tucks created by hand techniques, but as with any fabric, it is best to test on swatches prior to committing to significant lengths of fabric.
When knitting trims and ruffles, end with several rows of waste yarn in a contrasting color, allowing for unraveling and binding off after application if the trim is too long, or for unraveling to a knit row and knitting more if the initial length is too short. Seam-as-you-knit might not be the best method to use if the intent is to retain the shell-shaped forms trim sides.
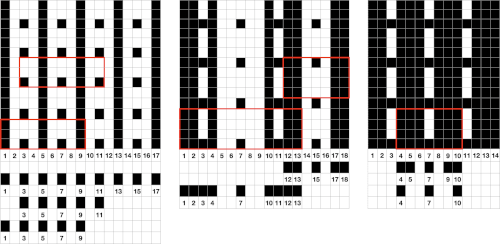
It is possible to visualize repeats both singly and in groups using tools from simple graph paper to spreadsheets. Japanese machines may not tolerate more than 4 rows of held or tucked loops unless the yarn is on the thin side, machines like Passap or Superba have a far greater tolerance.
Pivoting around a center stitch and adding width in vertical trims makes them foldable around a finished edge. When using electronic machines the garment’s finished edge may be picked up and the repeat for some of the trims can be programmed on the width of the piece for a predetermined height and bound off. If one is using a punchcard with single repeat vertical patterning or for more than one vertical trim with blank spaces in between them, the card would not be suitable for a finish on a horizontal knit edge.
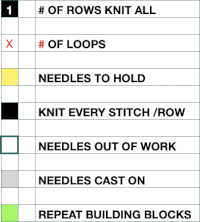
To knit: bring needles in positions represented by yellow squares out to hold, push back to knit by the number of rows indicated in the chart.
A good source for pattern ideas can be found in punchcard volumes in the sections marked for thread lace. To add to the mix, once the repeat is worked out, transferring needles intended to be left out of work on the main bed may be transferred to the ribber when knitting trims as well.
 Segments marked with green cells may be grouped in a variety of ways to create repeats in different widths, asymmetrical ones are also a possible consideration
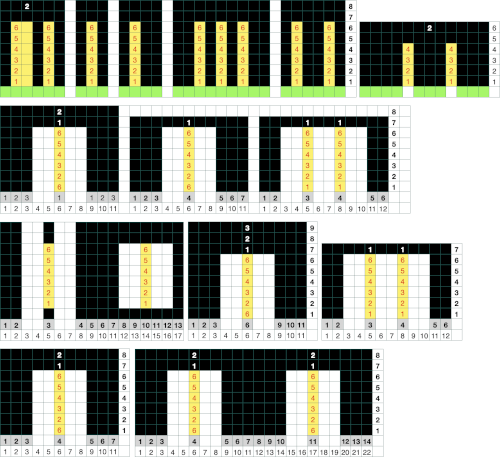 Two repeats on a single card
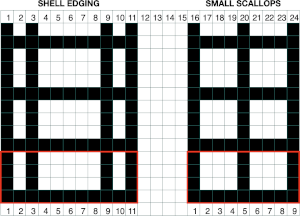 The process for knitting a sample as a hand technique:
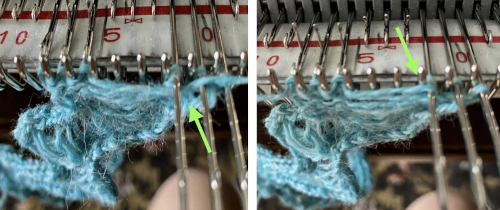
 ![]() Cast on the 7 stitches marked in work, bring needles2, 6, and 10 to holding position
Cast on the 7 stitches marked in work, bring needles2, 6, and 10 to holding position ![]() set the knit carriage to hold
set the knit carriage to hold
knit 4 or chosen number of rows
push needles back into work position and knit one or chosen number of rows
return needles 2, 6, and 10 to hold
repeat the process for the desired length
bind off or remove onto waste yarn
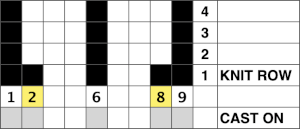
An electronic or punchcard repeat for 4 tuck row: I like to start my repeats with an all knit row when possible. The design may be knit as a single motif, and though it is symmetrical whether the machine model used flips the image horizontally or not can have an effect on whether the uneven number of needles will be to the left or to the right of 0. If there is any question a few air knit rows will clarify pattern needle placement.
The automated repeat: 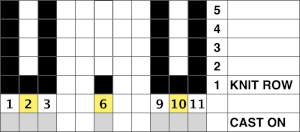
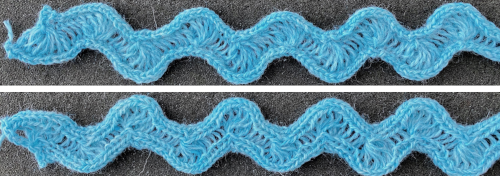
![]() The samples below were knit using a 2/8 wool, at T4, are shown folded along their center on the right of the photos, with the open edge on the left as they came off the machine.
The samples below were knit using a 2/8 wool, at T4, are shown folded along their center on the right of the photos, with the open edge on the left as they came off the machine. 
![]()
 The usual single bed tension for this yarn might be 7 or 8, depending on stitch type. The greater the number of knit stitches on either bed, the closer the tension will have to be adjusted to that used in stocking stitch for the same yarn. Wool also has memory, will want to roll to knit side at the top and bottom, to the purl side along vertical edges, steps often need to be taken to reduce the rolls. Using this repeat
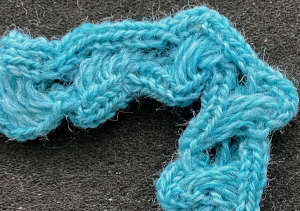
![]() as a stand-alone, the roll is severe, with the cast-off edge picked up, continue from there, a rolled edge with no stitching required is formed, no further finishing required, is shown after light steaming
as a stand-alone, the roll is severe, with the cast-off edge picked up, continue from there, a rolled edge with no stitching required is formed, no further finishing required, is shown after light steaming 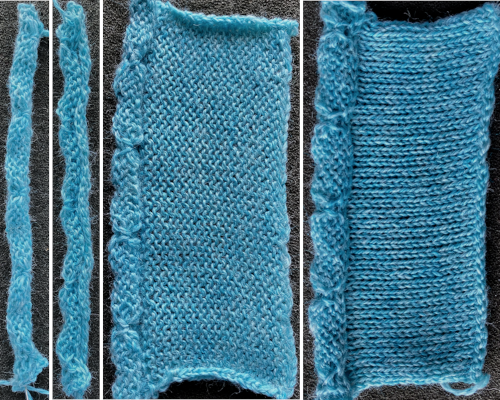 Even if a repeat for automating the trim or edging is designed and may have been used before, it is best to test the repeat as a hand technique in any new or untested yarn first to see how many loops can build up before the stitches on each side may not knit, or the loops themselves might not knit off properly as a group on the next all knit row. Five rows were the limit for this yarn
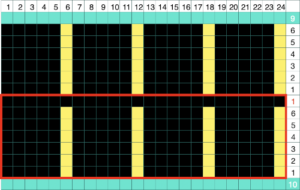
 A bound off edge was picked up, purl side facing, a side edge could be as well. Test to see which side facing may suit your piece best. Ten plain knit rows were followed by holding for 5 rows on every sixth needle, followed by a central single all knit row, 5 more rows held on the same needles locations, ending with 9 rows knit on all needles, and the trim was bound off. It may be folded to the purl or the knit side before being stitched into place and is likely to require some blocking.
 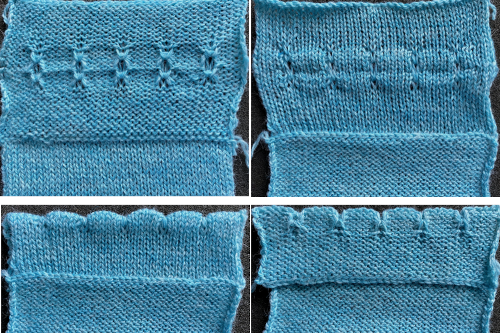 A variety of edgings may be produced by simply hooking up ladder floats created by leaving needles out of work after X number of rows. In this instance chain cast on over 11 needles, dropping the center 5 chains and taking the corresponding needles out of work.
Knit 12 rows.
Pick up six floats and the chain from the start of the piece, bring them to the front of the knit, and place them on the needle marked with red cells at the right.
Knit 6 rows, pick up 6 floats again, place them on needle marked with red cells to the left,
repeat 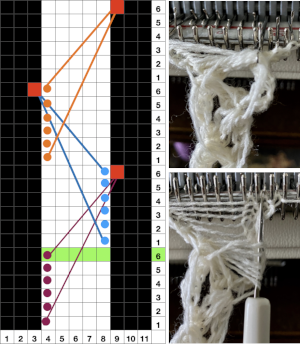
 This variation uses the thicker blue yarn, knit at tension 4; 12 rows are knit before hooking up the lower groups of six ladders, which makes the floats easier to pick up or count using a single eye tool. Repeating selection on the same side allows the trim to be easily bent around corners
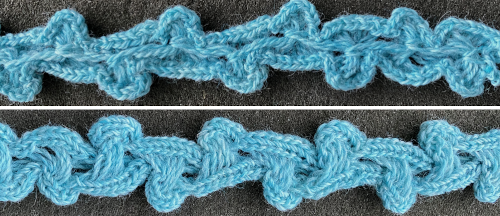
 Trims using holding alone border on the possibility of automation using slip stitch programming. A simple one to start: cast on 7 stitches, with the center needle out of work. Knit a few rows, set knit carriage to hold.
COR: push needles at left out to hold position
knit 8 or chosen even number of rows on needles 5, 6, and 7 on the right
COR: push needles 1, 2, and 3 on left to D position, knit 3 or a preferred odd number of rows, ending with the carriage on the left
COL: reverse the holding sequence 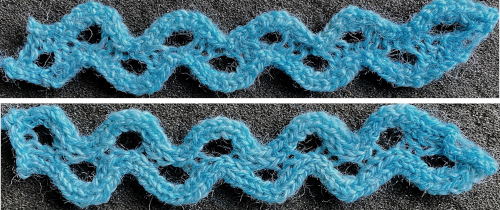 The single out-of-work needle produces a ladder that nearly disappears after the trim relaxes, any our of work needle arrangement may be tried between the two groups of 3 needles in work.
Adding holding: cast on needle arrangement shown. The 3 stitches will roll to the purl side creating an edge that looks very similar on both sides of the trim. knit 3 or more rows, end COL
bring the 3 needles on the right out to hold, knit a row
COR wrap the inside needle of the 3 in holding, knit back to left 5 times
COR knit 5 rows (or DIY odd number), ending on the opposite side
COL reverse shaping