I taught in a design school in a lab with Brother Punchcard models, four 910s, and 2 bulky machines. My previous experience had been using Passap and Studio electronics, and a crash course in Brother models followed my being hired.
My E 6000 was purchased from a sewing machine center at a time when the owner decided knitting was not for her.
The 560 Studio model was later upgraded with a change in their box in exchange for my publishing some patterns for the Studio Design Magazine but was sold years ago.
There were years the Passap was my production machine for garments and accessories knit double-bed. Single-bed knits for the same end use were easier to knit on Brother, with a clear view of stitch formations vs the issues with seeing the fabric or correcting errors when working with the ribber in place.
The immediacy of easy testing with img2track on the 930 results in nearly all of my recent blog swatches.
There are still days I admit I do love the E6. The console commands along with the lock setting and pusher options on the back bed make a range of fabrics possible that are far harder to achieve in Japanese model KMs.
Looking back, these are some of my previous shares including Passap mentions
Machine cross reference chart 3/18
Brother/Passap: traveling between brands 11/18
Pile knitting on Passap/ Brother KMs 4 1/20
A racking tale: Passap/Brother 3 9/19
Translating Passap model book pattern/use on Brother 1 8/19
Fisherman_ English tuck stitch rib 1_ checks patterns_ Brother, Passap 10/18
Tubular machine knit fabrics: fair isle, Brother/Passap 11/17
Pile knitting on Passap and Brother KMs 2 7/15
Pile knitting on Passap, Brother, and Studio KMs 1 7/15
Drop stitch lace, 2 colors per row, Passap KM 10/13
Back to leaf lace, add rib, and take it to the Passap 3/12
Japanese punchcard motifs used in Passap E 6000 machines 4/11
FB shares have led me down rabbit holes I may not otherwise have entered.
In the machine knitting group, someone recently shared a series of scarves knit using the E6, providing the Duo80 diagram and the E6 technique number. The setup is for a 2/2 rib, reverses the pusher positions, but produces the same knit Duo 80 symbols
 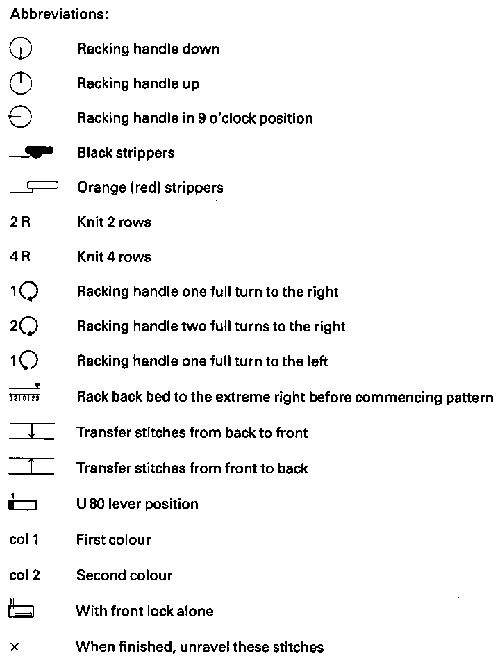 AX = Tuck, setting is the same in both the Duo and the Passap back locks
AX serves the same function in the Duo, and is replaced by KX on the E6 front lock
The arrow keys on the back lock work the same on both machines.
Passap preselects and works on pushers initially placed in work or rest on both beds, whether manually or by console selections in the E6.
Brother preselects needles in the planned pattern on the knit bed subject to punched holes or programmed pixels, but not on the ribber, other when using lili buttons, and that comes with rules and the sole automatic repeat ie the that the number of needles in use on the ribber must be even.  On the Passaps there are no such rules on the back bed.
With no arrow keys selected the same action is repeated until the lock setting is changed, so in the above, the change is made by manually setting the back lock to N for 2 rows, then back to AX for tuck on both Passap models.
The front bed in the Duo also has a fixed pattern selection, requiring the lock change to N there as well. The E6 built-in pattern selects the all-knit rows, so its lock remains in the KX setting.
The initial pusher setup is manual on both models but not location-dependent in this particular design.
The E 6 console will select the proper pattern based on the pushers in the work position. A look at pusher positions from the E6 manual. Each machine brand has its own specific vocabulary for parts and techniques. 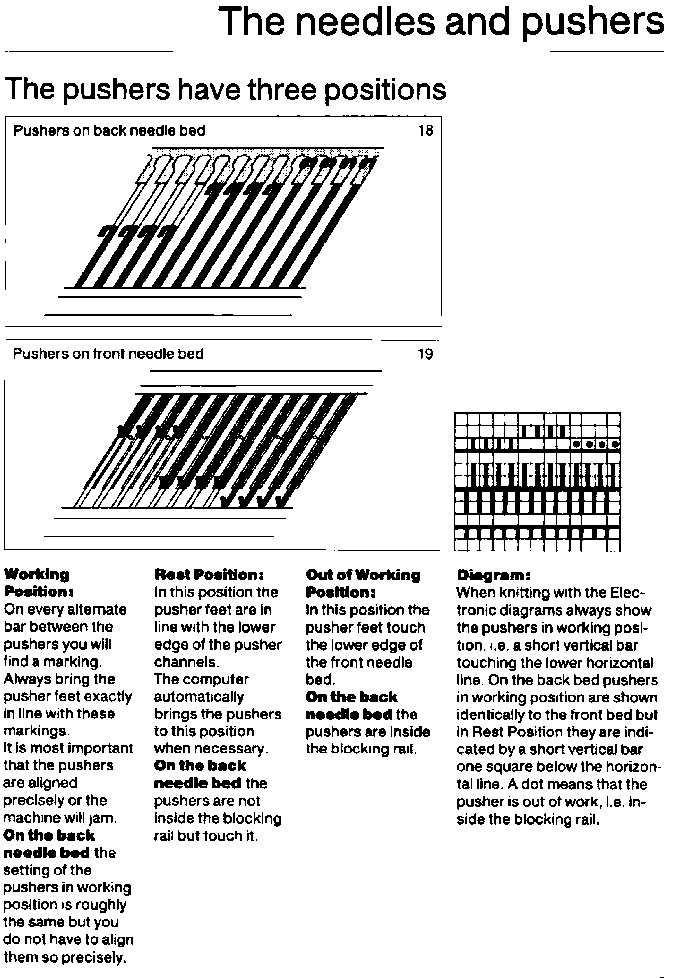 Things get a little more complicated on Brother, it is helpful to have an understanding of stitch formation on both beds before tackling more complex knits.
In Brother the needle placement on the main bed matters as it does in tuck lace, so it needs to be verified before any knitting. “Air knitting” is one easy way to do that. Rows 5 or 6 would provide the necessary preselection.
In any punchcard model or Japanese electronic machine, the knitter is usually in charge of keeping track of racking. The E6 provides console prompts for racking positions in this design, facilitating the process.
An attempt to visualize what actions need to happen on the Brother models: the needle setup will match the Duo or the rotated E6 version  Considering the required patterning for each bed, empty columns in my charts represent needles that need to be pushed back to A and left out of work on both beds. Textured ladder spaces will not be formed on either bed as is seen when using similar repeats on the single bed.
 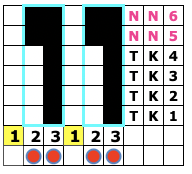 Adding the ribber position and configuration
 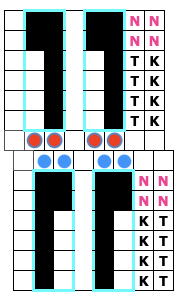 The top bed can be programmed, this 24-stitch version is suitable for use in punchcard machines.
 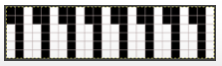 The main bed will knit all needles programmed with punched holes or black pixels and will tuck unpunched squares or white pixels.
The ribber requires setting changes after the initial four and after the last 2 rows of each 6-row repeat.
In addition, there are racking changes after each repeating segment.
In this setup, there will be a knit stitch beside each tuck one up to the all knit rows, helping to anchor the tuck loops. Ribber carriage settings are noted.  Anytime there are needles out of work, cancel the end needle selection. Depending on the machine model being used the repeat may need to be mirrored horizontally to match my in-process photos, true in my 930.
Using design row 5 or 6, air knit a row to find needles that need to be in work on the knit bed. Push non-selected needles out of work, and back to the A position. After doing so, reset the pattern to design row one.
The setting for the racking indicator does not specifically matter. It is often best to consider this before casting on. Here racking is only by one position, avoid 1 or 10. Starting at 5 centers stitches in relationship to each other stitches. As knitting progresses, where the ribber needle positions become obvious and less reliant on checking numbers.  Cast on bringing appropriate needles into work on the ribber.
The original needle setup. 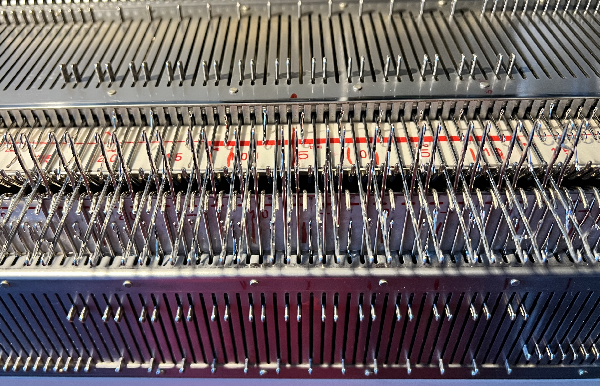 Use any favorite cast-on method.
Starting side does not matter unless one is planning on using a color changer, in which case the first preselection row needs to happen from right to left.
Since needles will be manually pushed up to the hold position, make certain that the ribber carriage is not set to hold. 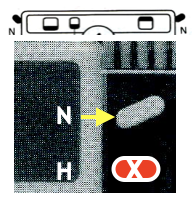 In a test swatch, knit several all-knit rows before beginning the pattern. If planning a piece, start with waste yarn and ravel cord prior to casting on with “garment” yarn.
A tool that aids in selecting every third needle is extremely helpful  The initial carriage setups used for rows 1-4
 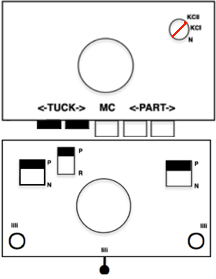 The placement of the first needle on the ribber with respect to that of the first on the main bed
  The first needle in each pair of rows on the ribber needs to be brought up to the E position in every row for the first 4 rows of the 6-row repeat, I began with the first ribber needle on the left.
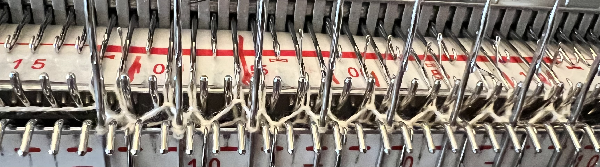
 The needles brought up to E will knit, and help anchor down the knit bed tuck stitch on their left, and the needles on their right will tuck. In turn, the main bed selected needles will anchor loops formed on the ribber, the nonselected will tuck.
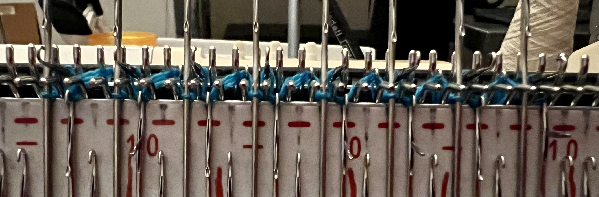
The appearance after the tuck loops have all been formed and the needles holding them up to that point are preselected forward just prior to the 2 all knit rows. 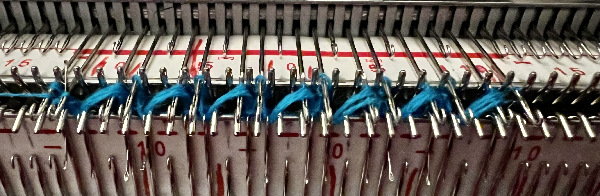 The knit carriage is left on tuck in both directions, while the ribber is set to knit for 2 rows. It is not necessary to change the P lever to R, with the other buttons set to N, knit is king.
 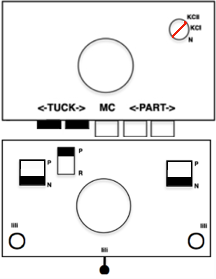 Time to rack so that the first needle on the ribber will now be to the left of the first on the main bed. Push down lightly on the first 2 ribber needles on the left before racking in case those first stitches are a bit snug, to avoid starting needles crashing into each other as you move needle positions.
 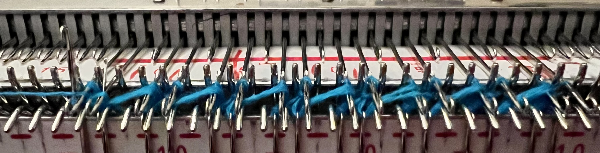 Knit 2 rows.
Rack again to the initial position, change ribber settings again, and repeat the process as described. The proof of concept: the error shows what happens when one misses changing the ribber settings back to tuck. 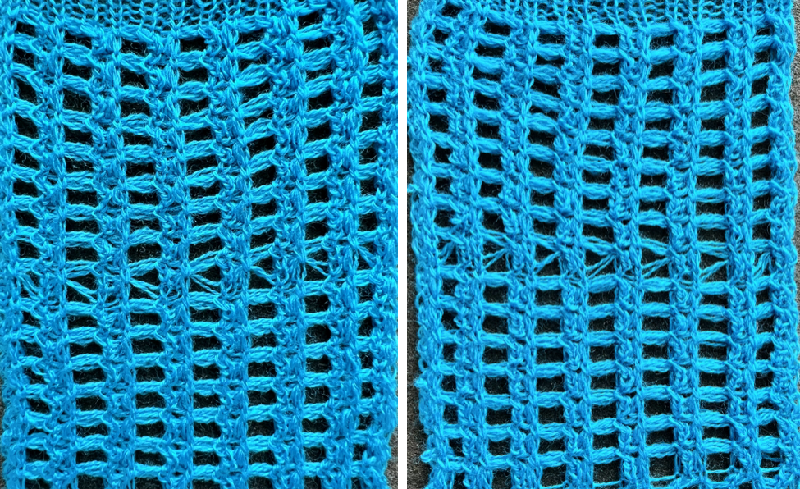 If that is not challenging enough, add a color change, knitting the first 4 rows using color one, and the 2 all-knit rows with color 2.
 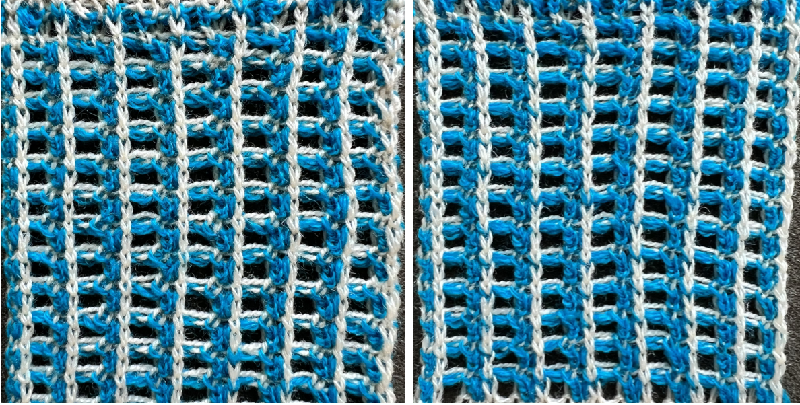 I used to tell my students to develop a sort of tune that could be sung (mentally) as a reminder of the steps in complex fabrics ie bring up 1, 2, 3, 4, rack, change color, change settings, knit 2, rack, change color, change settings, bring up, etc. but my advice if you really want to knit this fabric in a full piece is to borrow and E6 or pay someone else to knit it for you 😉