I am a member of a few Facebook groups, recently joined the img2track one out of curiosity, and wanting to explore the possibilities of an interface other than an Ayab/910 from a kit, which has proven to be of limited use to me. I have been charting original patterns and color separations for years, first in Excel and occasionally and now exclusively using Mac Numbers. Up to last December, entering designs for knitting on my 910 was limited to filling in squares carefully one at a time or small blocks and lines on mylar sheets in order to knit the repeats designed in charts in either program. Working with small, individual repeats and filling cells one at a time or in limited groups in GIMP to create duplicate pattern downloads was an easy transition out of sheer habit. A FB group member, Julie Haveland Beer shared a file on how to Convert Mosaic Knitting Chart to KM Skip Stitch Diagram (shared with her permission) that sparked a light bulb moment. I began to explore using the method in her share on files available in other printed materials and punchcard collections, wondering about those lace cards with so few holes that can go awry when building from scratch in order to download. Often I use Scanner pro on my phone (rather than a full-size scanner), save images in black and white, share them via photos, and open them up on my Mac for further editing. The full-size scanner saves of 60X150 patterns may be found at the bottom of the post.
The first repeat was from
I happen to own a hard copy. The book offers endless repeats that might be adapted for knitting 2 color fabrics (or more with experimentation in some instances). They are categorized by height and width, so even punchcard owners can find whole pages of workable repeats. Another group member shared the link to the Compendium for online browsing https://archive.org/details/dictionaryofweav00poss
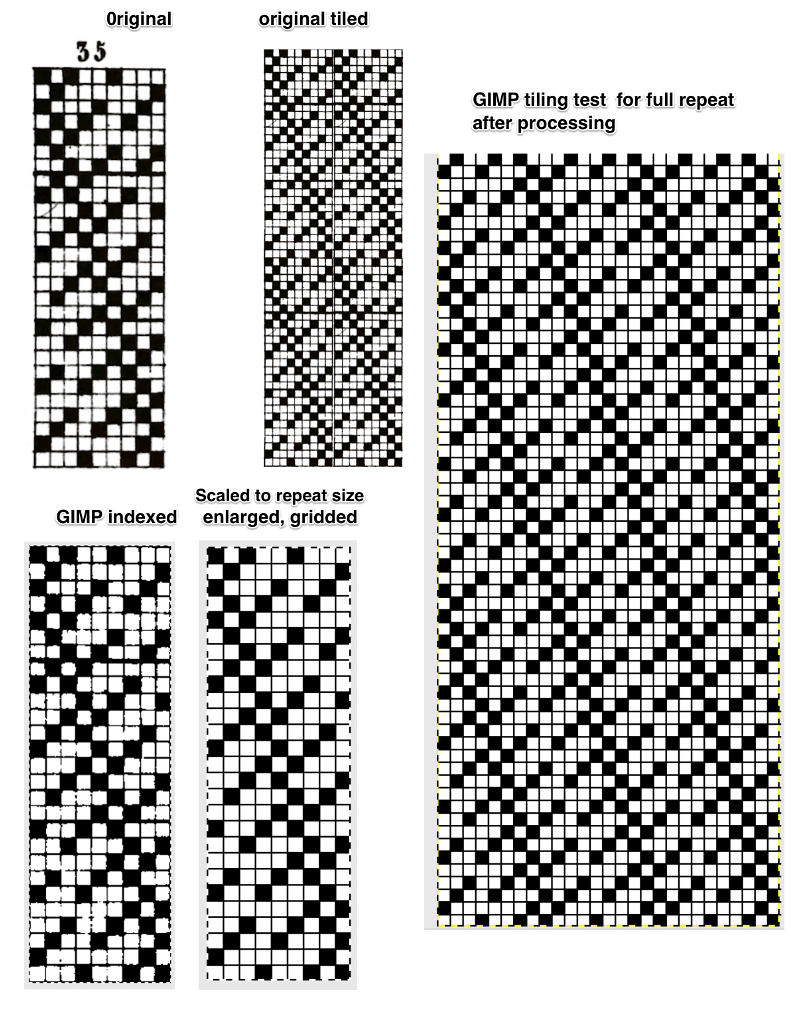
I have written several previous posts on using GIMP, including the use of the tiling option to visualize how groups of repeats line up prior to any actual knitting. The enlarged, “original” gridded image below would be the final repeat, reduced in size, grid gone, made ready for download in required image format.
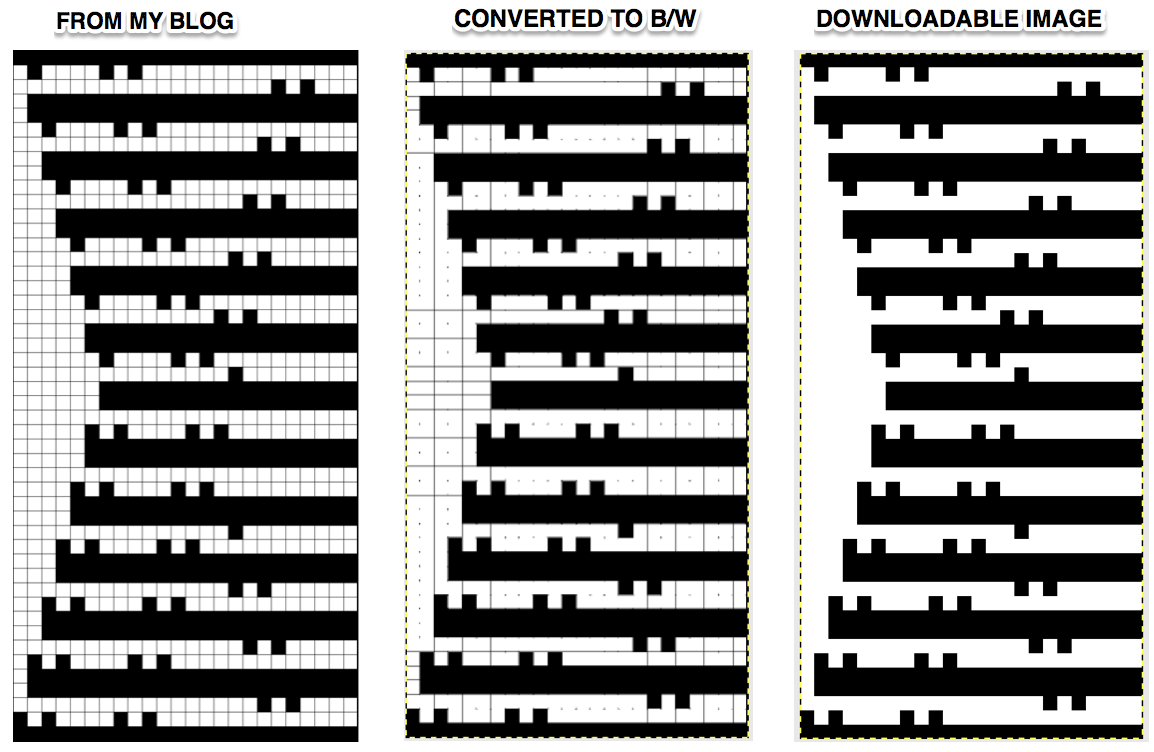
 A chart from my blog: the image is converted to B/W, then scaled to stitch and row proportions with just a few keystrokes
From self-drawn mylar, with a subsequent one-pixel correction 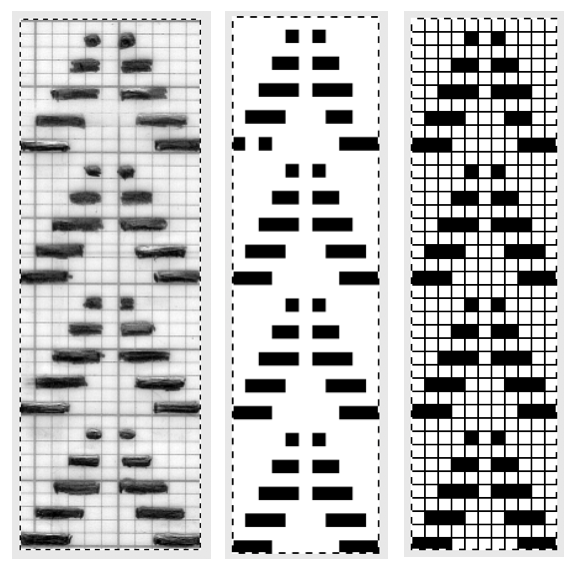 From colored repeats in Brother electronic collections: with some color adjustment after a first attempt that required some clean up of pixels, the conversion and scaling are easily achieved. The originals were designed on a rectangular grid, within blocks defined 6 wide by 10 tall
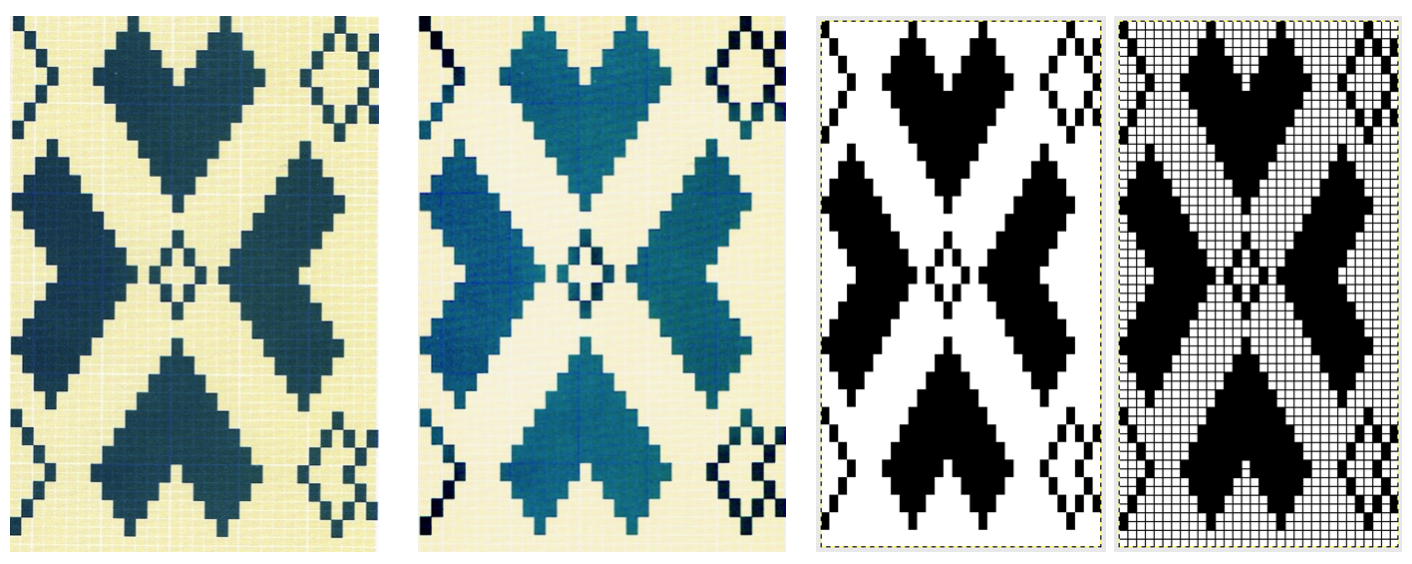
 the repeat tiled, for an added visual check
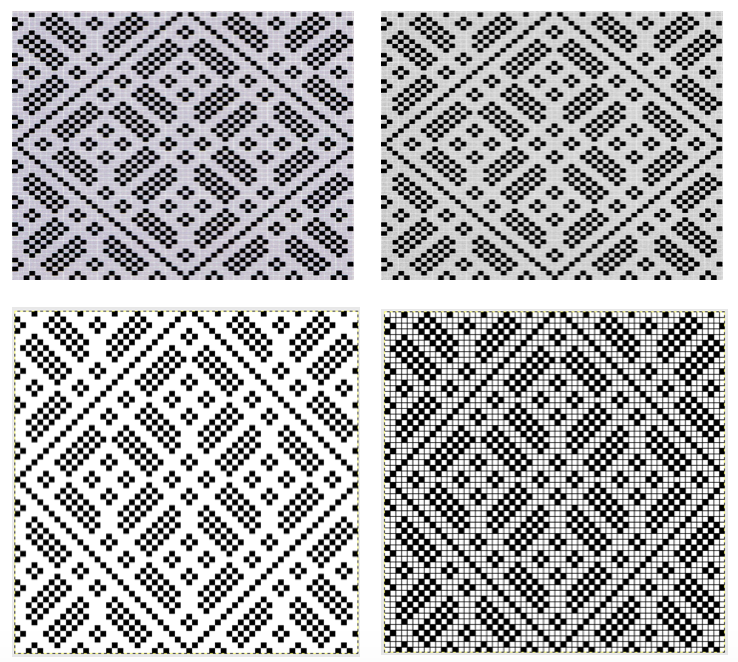
 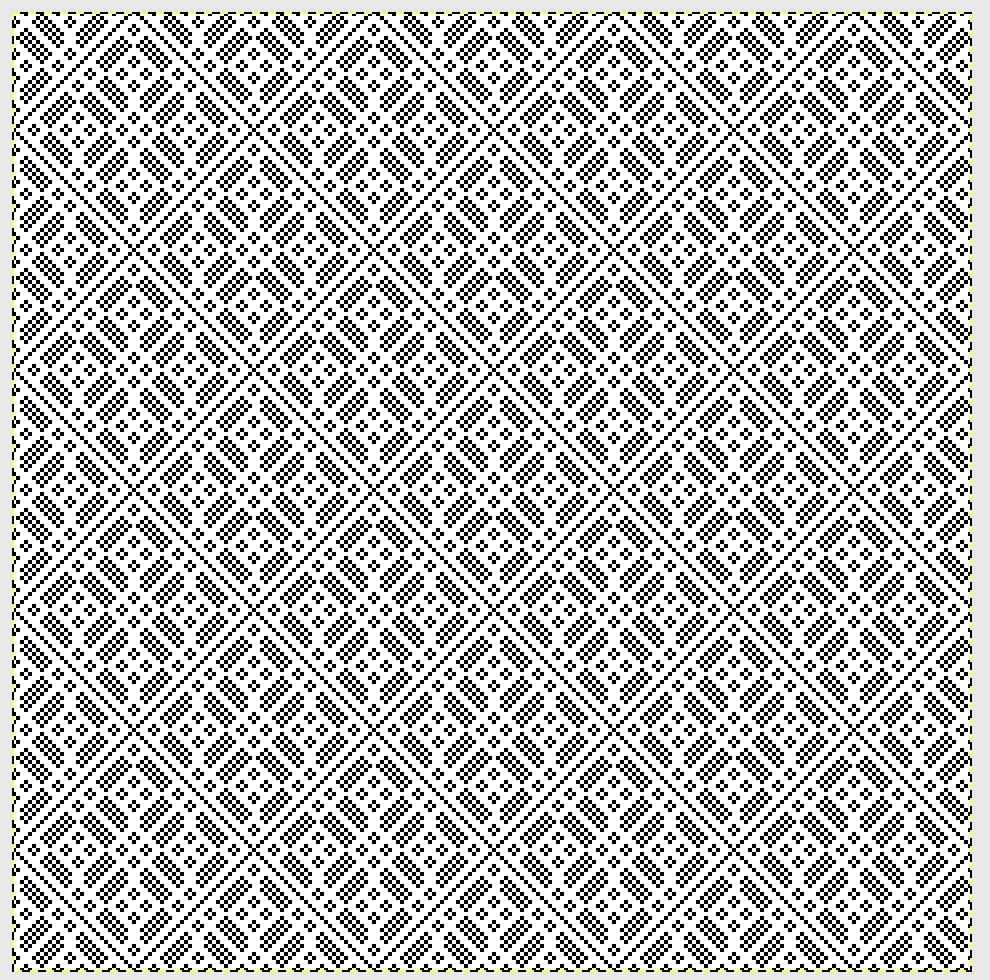 Another Brother published in color repeat, scanned in B/W, imported directly into Gimp, mode converted to indexed, then the image was scaled to the size of the original illustrated repeat 34X36
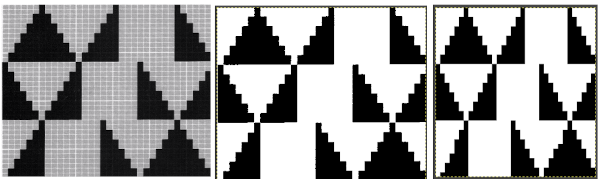 Check the scaled repeat on a grid for any missing pixels against the original
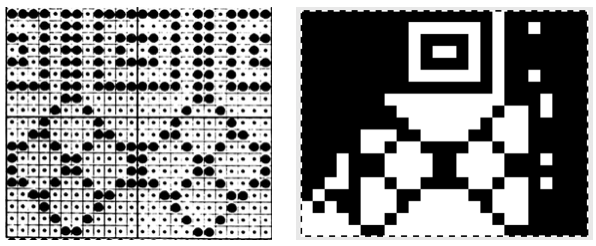
 From a Brother electronic lace publication a simple BW bitmap conversion followed by scaling (60X120 repeat). The appearance of difference in width is due to the fact that the published image is on a rectangular grid, the bitmapped on a square one
If the electronic published repeat appears to have the core of the cells outlined clearly in white something to try: reduce to indexed BW, use bucketful to remove as many gridlines as possible, scale to appropriate repeat (24X48), edit the results 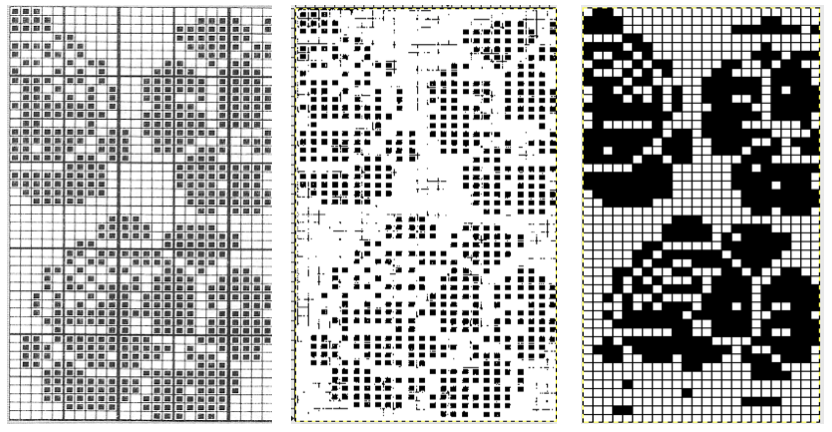 A “straightforward” conversion for a repeat from a scanned punchcard with its darkest black line removed
 and one from a BW punchcard reference pub
My last post on working with numbers to create knit charts includes info on creating tables, working with cells, keyboard commands, and more
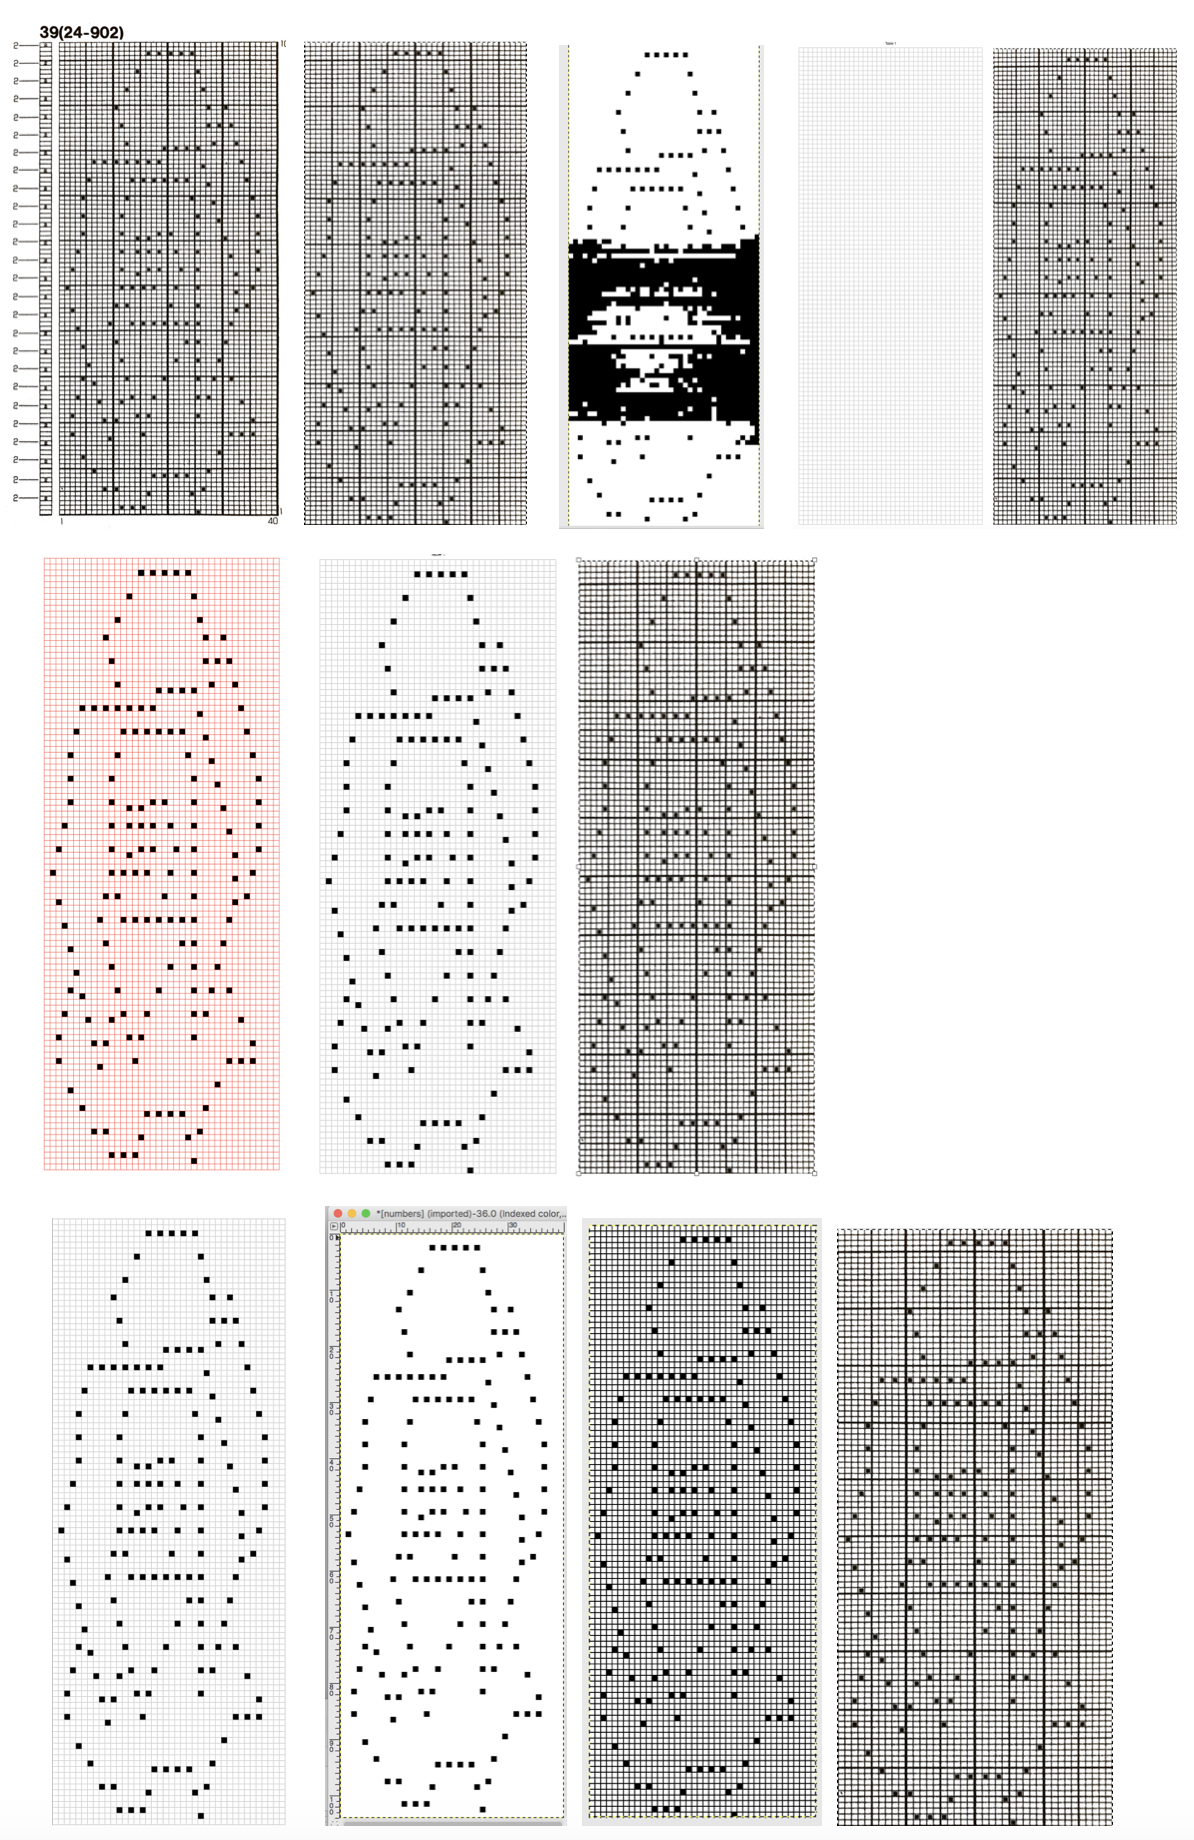
using the combined programs: 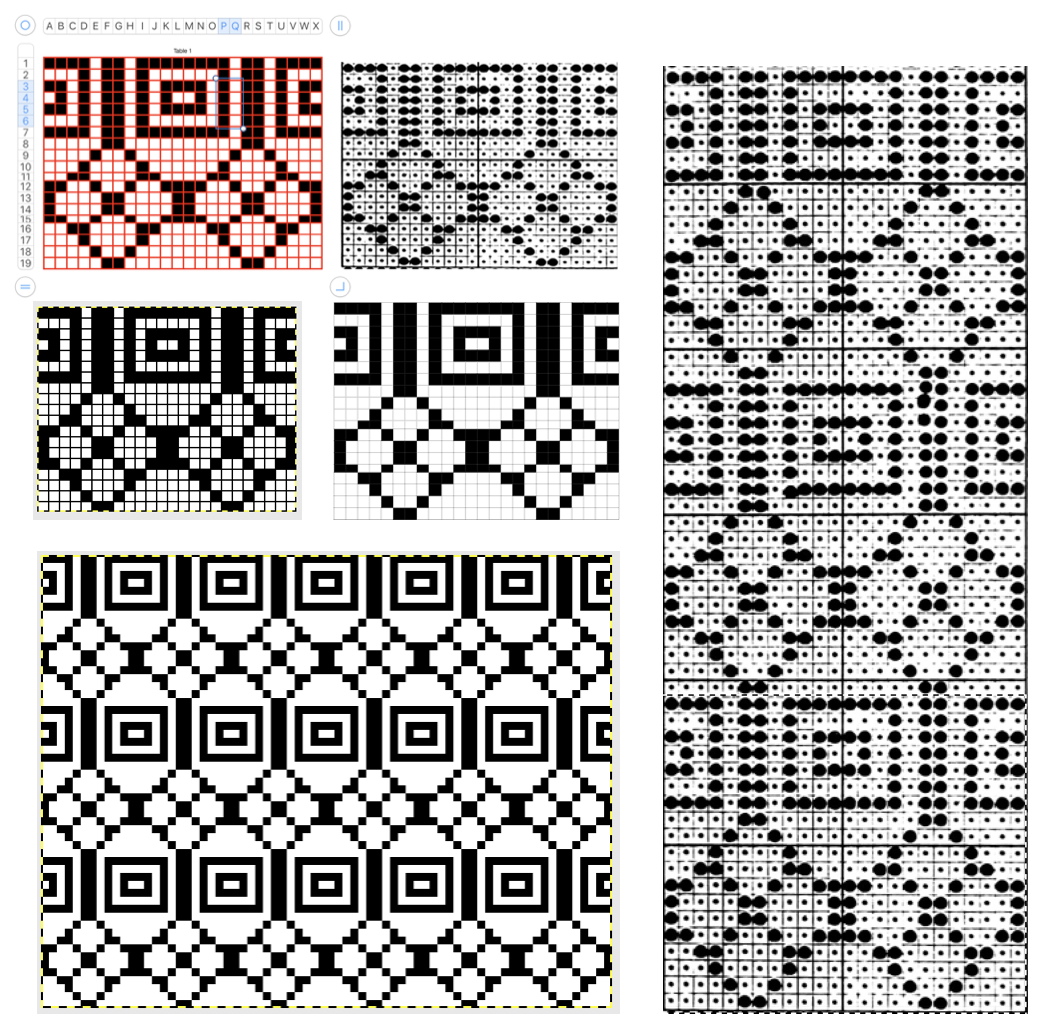 Things got more complicated again when I tried to work with a lace repeat from an electronic pattern book. The straightforward method resulted in an unworkable image. Part of the problem may result from varied densities of lines in the original, its cells not being fully filled in (ie dots in squares or rectangles), and illustration with units in a rectangular rather than square format, so they do not scale properly in a ratio of 1 pixel per row and stitch. After isolating the repeat, I for this repeat I entered it in numbers with the plan to superimpose a table grid over the repeat and fill in squares/cells where needed. Cell borders may be created in varied thicknesses and colors, and are easily changed or removed altogether. Having a red cell border to superimpose on the image made the process significantly easier for me. In the middle section the red border is switched to a significantly lighter one, and lining up the repeat beside the images helps one visually check for any errors. In the bottom row, the image is shown magnified after scaling, gridded in the magnified version again to check the repeat against the original.
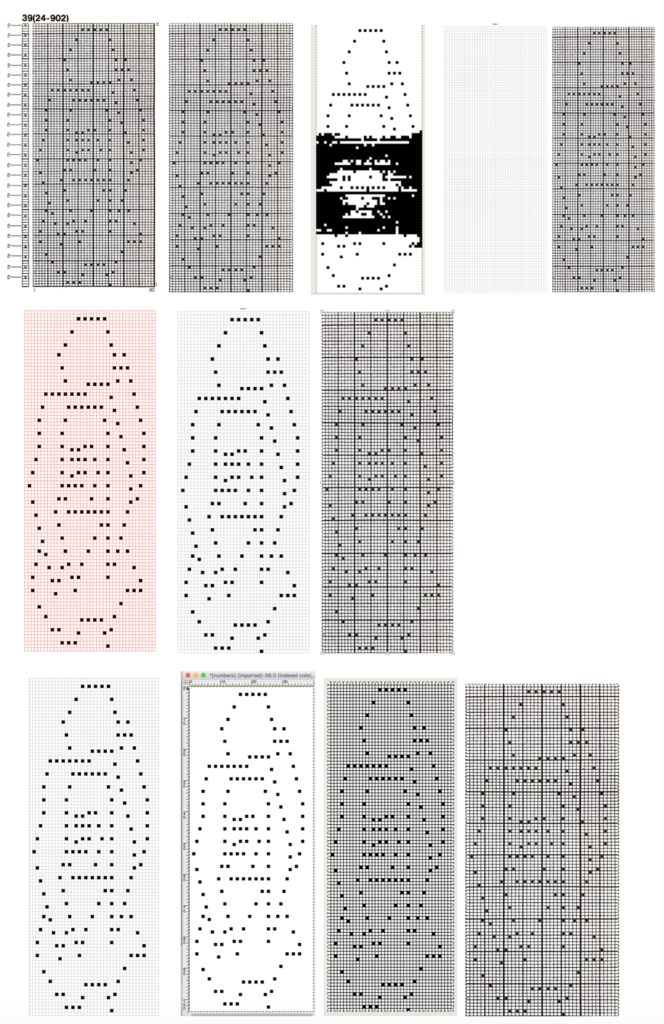
Another lace image with table cell margins adjusted, and a reminder that borders may be in any configuration or color that makes it visually easier for you to proceed with filling in cells that correspond to black squares in the original image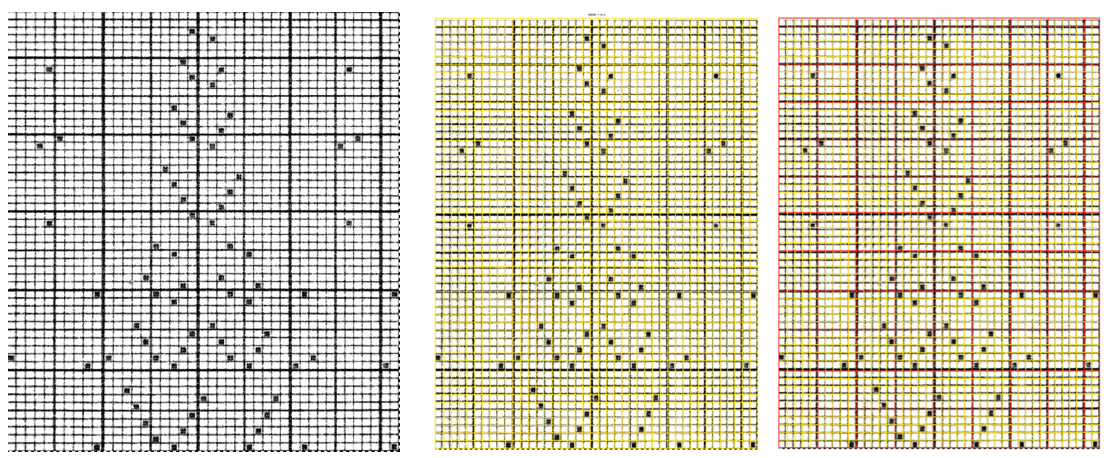
The steps in progress, with the processed image ready to knit, shown in magnified, gridded final GIMP scaled repeat on far right. With a bit of familiarity with both programs, this process is far faster than any counting and filling in of pixels one at a time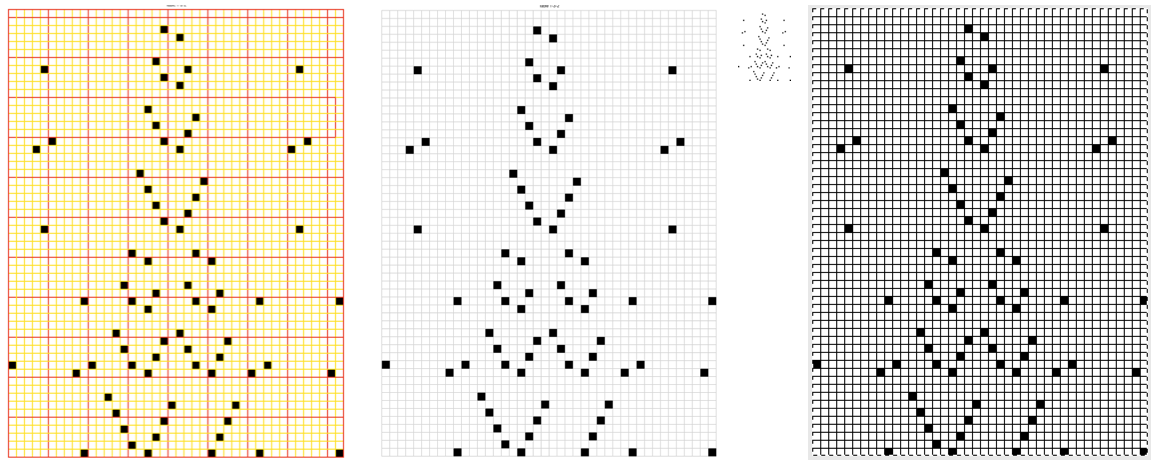
This lace card was not cautiously cropped at the top and bottom edges, the final repeat when scaled is shown first, with obvious errors, but workable when done “the long way” from the same image or hand-edited

Taking the time for a more careful crop for another card and easy peasy: crop, open in GIMP, convert to bitmapped BW image, scale to stitch and row count of the original repeat (in this instance 24X56), verify gridded by GIMP in magnified image version, then save for download in reduced size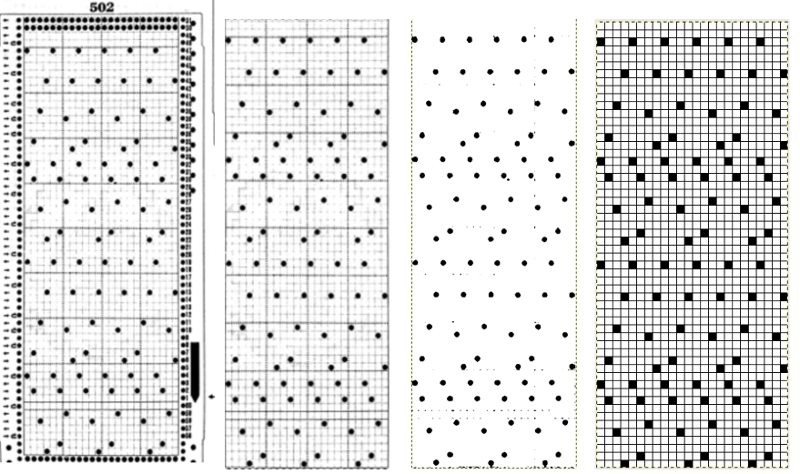
GIMP magnified and gridded final repeat above on left, one obtained working the “long way” between programs to its right 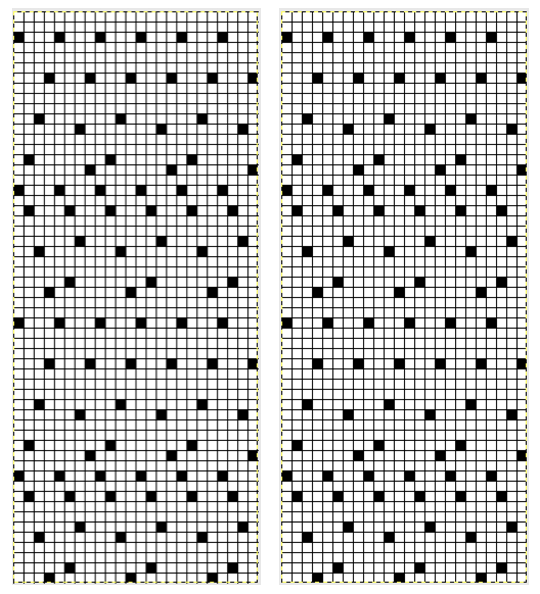 Conversions issues may happen also when there are large areas of black squares or working with color adjustments or with the option to “photocopy” in GIMP in images that do not translate cleanly
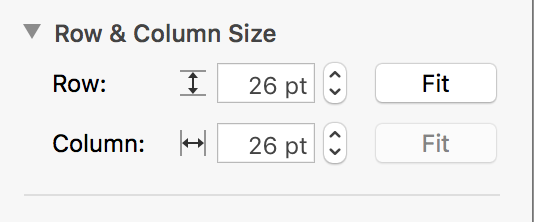
 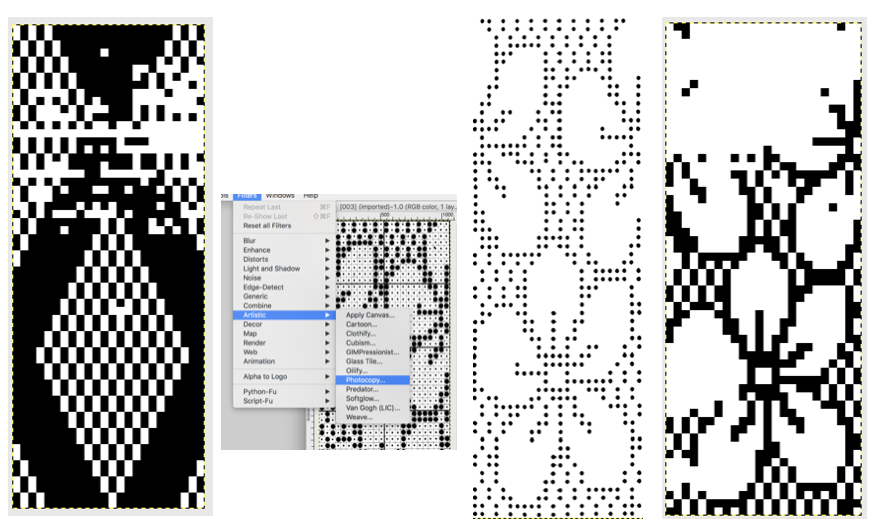 Working with repeats that do not convert easily using both programs: the greater the number of squares or dots, the slower the process, but ultimately faster than counting then and entering them one at a time. In Numbers, create a table that will be superimposed onto the desired repeat. I like to work in cells that are 24 X 24 points. Columns are marked in letters, so 24 is 2 letters short of the full # of letters in the alphabet (X), and row counts are numbered top down on left and easily adjusted. Lace repeats would be the easiest to translate, as they are likely to have the lowest number of cells that will require to be filled in. The cell borders may be created in any color. To my eye, the red grid made it easier for me to view its lines when superimposed on the black image. The BW center image was then dragged/dropped into the numbers sheet. Checking via the table format arrange option, the table was shown to be 553 X 1440. The image arrange option showed my black and white image to be adjusted visually by me using the corner handles to 496 to 1440. On the far right, the BW image is in turn adjusted to match point values for the table. Check your typing, adjust accordingly. Here my width on right is actually 3 points off.
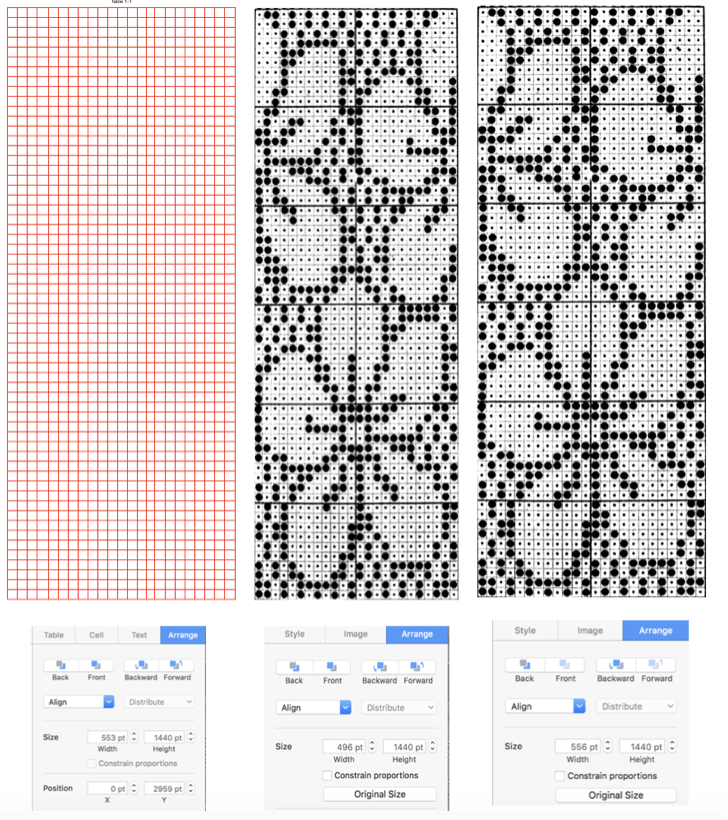
Drag and position table onto a BW image. Use image format arrange to move the image to the back of the table (box to left below “Style”). Magnify screen to easier working view by adjusting the zoom. It may be helpful to alter some row heights or column widths to get a cleaner view and matching cells to be filled into dots (center). Click on any row or column, adjust by in turn clicking on up or down arrows that correspond to their respective size. 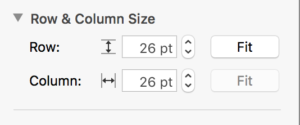 Using command-click and color fill options, cell fill on top of the black dots. When done, or to check periodically, the table may be slid off the image and back on if needed.
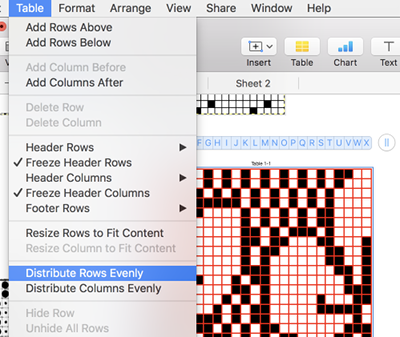
 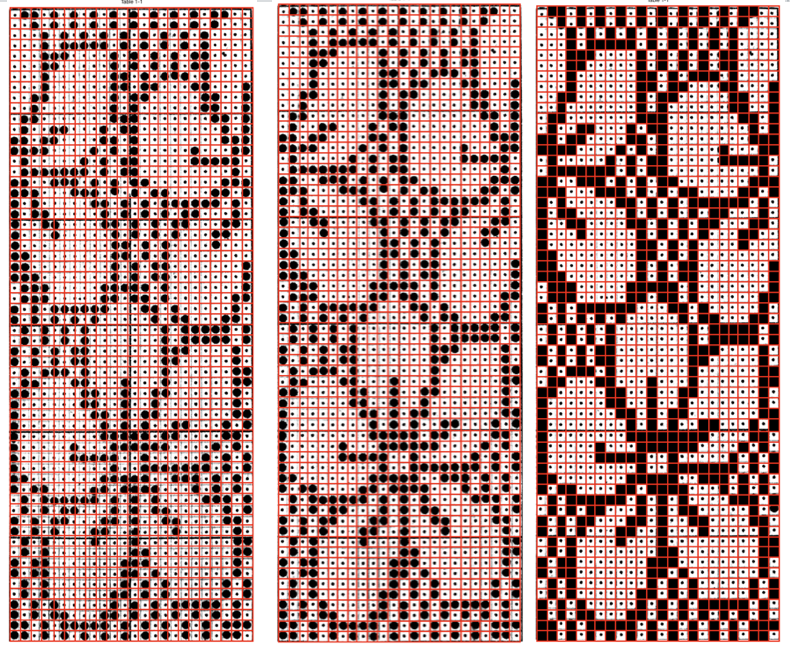 With the table completed, if any columns or rows have been altered in with or height, choose from the menu to distribute rows and columns evenly, restoring all square units.
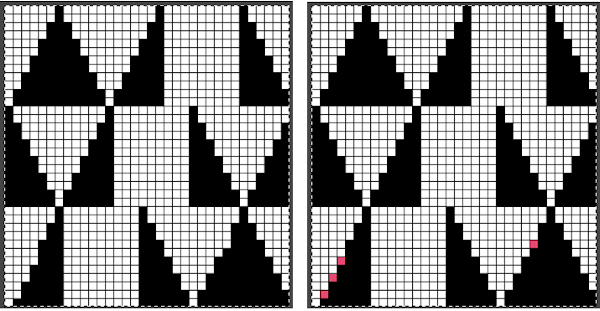
Change border selection to light, thinner color, capture image and save as png. Load image in GIMP, convert to BW bitmap, scale to 24 by 60, save in downloadable format. Results are magnified in GIMP final images on the right. Showing grid allows an added visual check if preferred, against the original repeat. 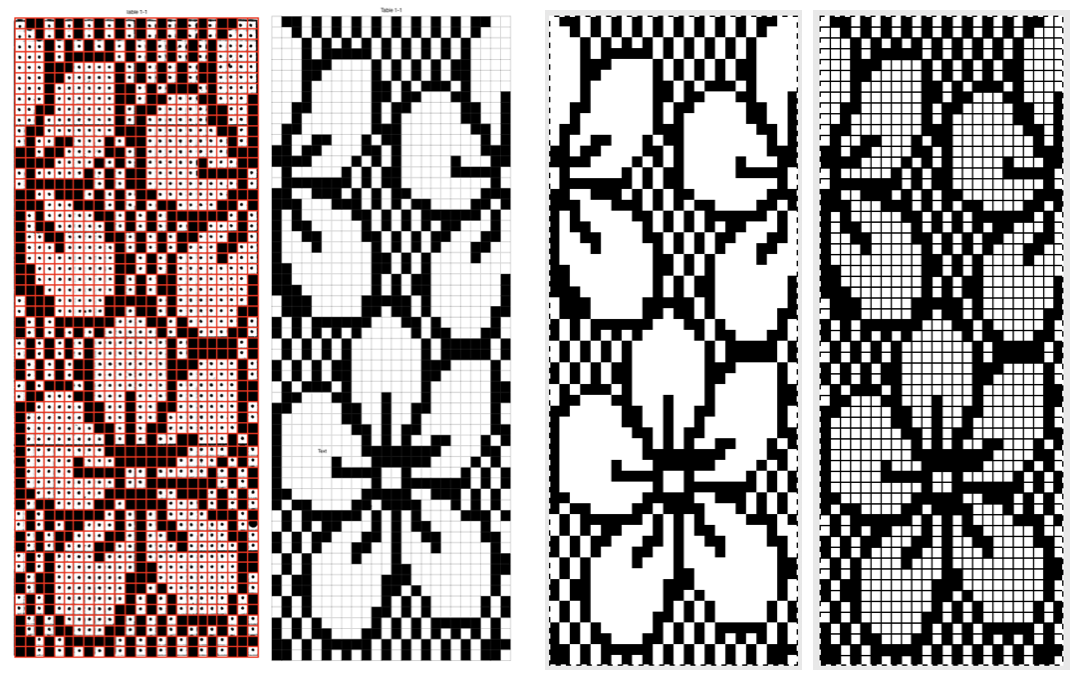 The final repeat tiled, as opposed to punchcard repeat tiled helped me see one missing square I found bothersome, an easy edit
  the culprit marked in red
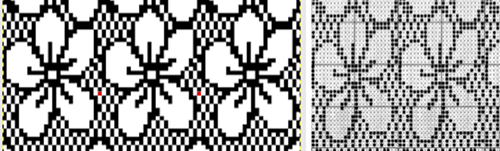
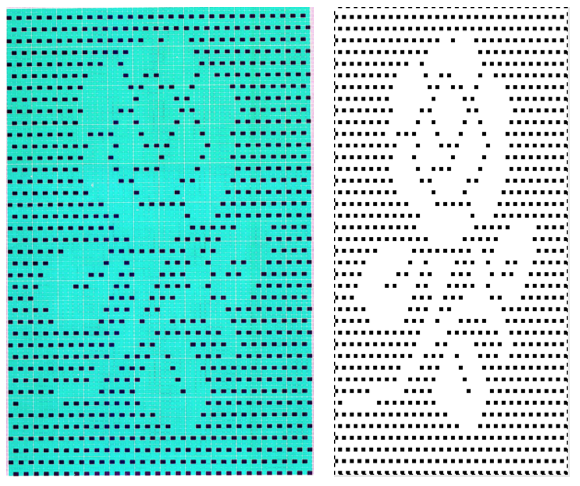
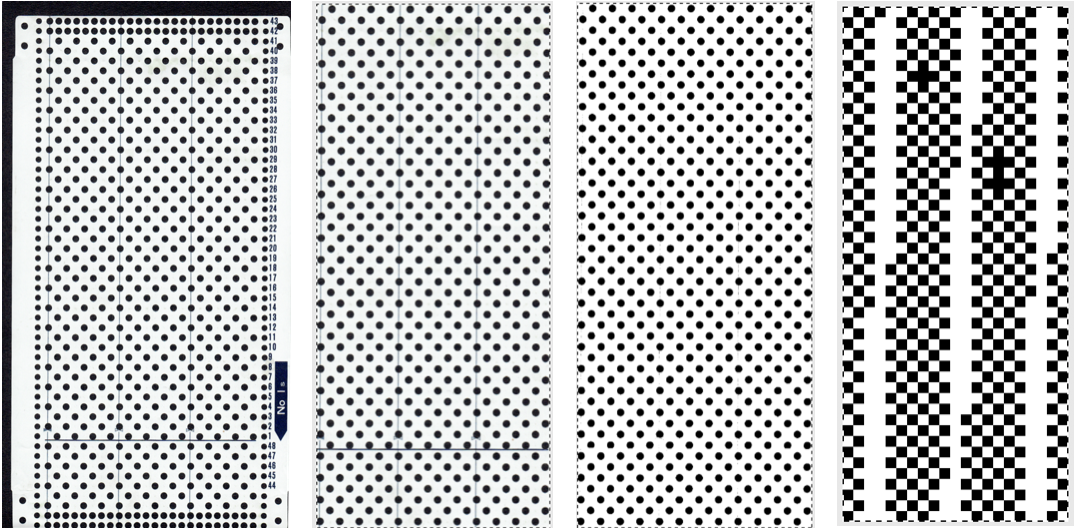
The easiest conversion of all? a full-page factory mylar sheet. Here is one for lace with a simple adjustment of sharpness and contrast, magnified, and with superimposed rectangular grid after converting to BW bitmap for saving,  to then discover that the blue grid disappears in a quick mode change to indexed in this factory mylar. The images on the far right are again the magnified scaled image and shown with a superimposed rectangular grid to check match against the original crop
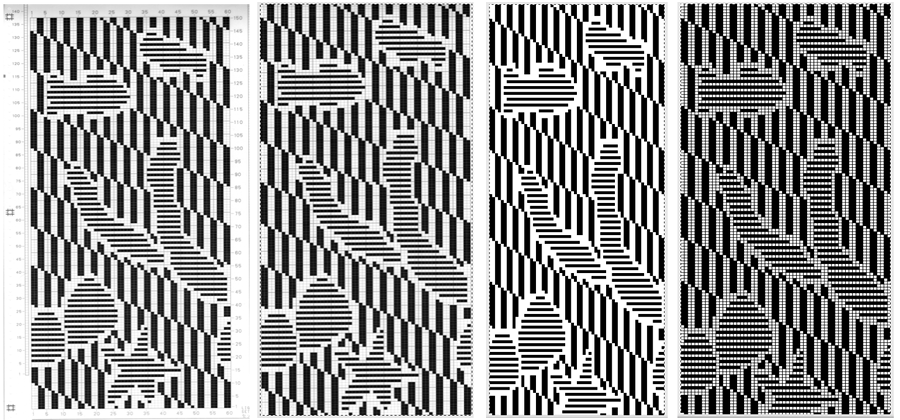
Rethinking those dark cards: this is a partial repeat grabbed from Pinterest, the image was loaded into GIMP, color inverted, the threshold was adjusted while in RGB mode. The adjoining 2 images show the magnified, scaled, indexed image and its color reverse. When working in RGB mode choose color invert, and when working in indexed mode, choose value invert for color reversal of the image and its ground. Other image adjustments may require toggling between the 2 modes. The bottom pair of images indicate menu location for adjusting grid size and color, and the magnified, scaled image now with a GIMP single-pixel grid is also shown
This method, however, did not work for the flower? thread lace motif (partial repeat) or the FI repeat. That said in the days of glitched knits, perhaps executed in DBJ accidents such as this could make for interesting experiments or transitions. Here we have the original not planned result, followed by some flipping horizontally and vertically, then resized. There usually is no right or wrong, and it is important to find one’s own voice and the tools required to express it.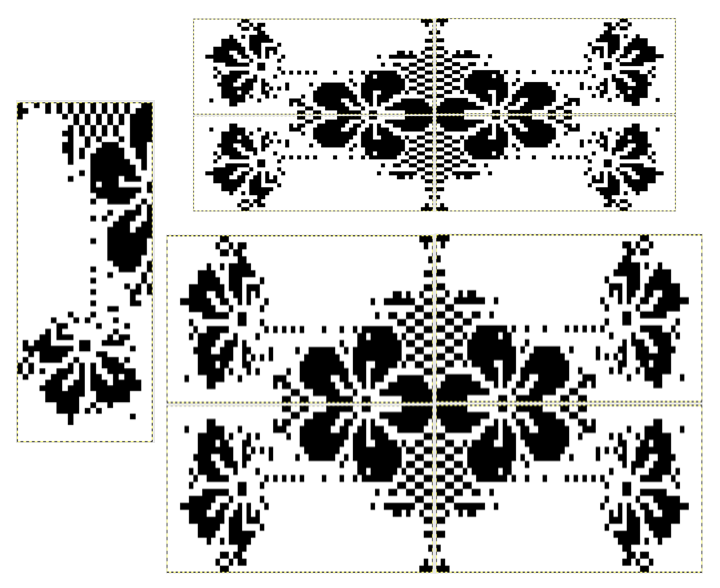
my favorite glitch textile artist: Phillip Stearns
for more on gimp editing see post
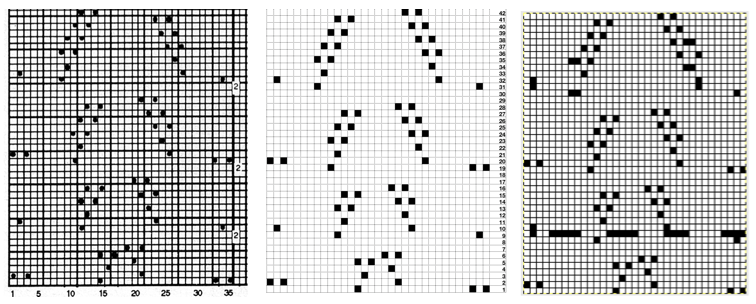
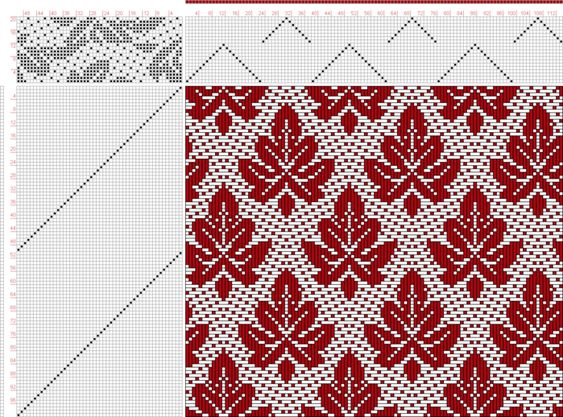
4/15/19 I have always been curious about weaving drafts and patterns being translated to knitting ones. I wrote a post on some of the basic possibilities in 2015, in my Excel days. Lately, I have come across many tempting charts shared on Pinterest from many sources. Some are more difficult than others to translate cleanly. Having a periodic leaf obsession, I came across this chart, which also will show some of the issues found in mesh grounds, thread lace, and other fabrics when there are regularly spotted grounds. 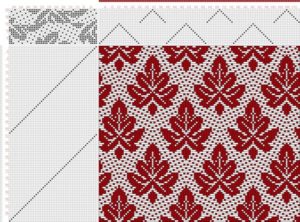
I found the easiest way to work with the repeat was to overlay the table over the image using a much thicker cell border. The repeat was isolated, its colors reduced to black and white out of habit. Adjustments were made to the image eliminating aspect constraints, and it was laid under the grid to the closest visual match for stitch and row units cell size. Command select makes quick work of filling in pattern cells. When done, the table border was selected and rendered in a much lighter outline, the captured final image was saved, opened in GIMP (insured it was indexed), scaled to 38X50 pixels, and produced something in theory now knittable. 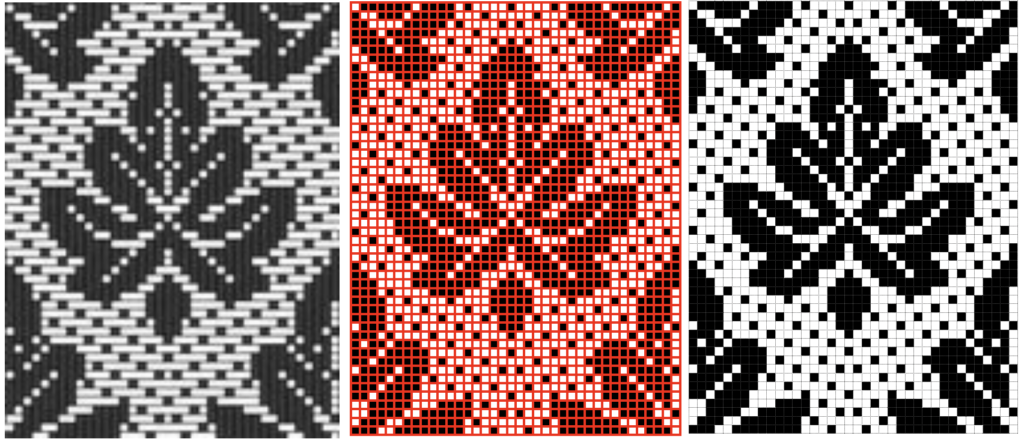 Tiling is as always a good test to see if the final repeat meets your expectations prior to knitting and offers the opportunity for any other adjustments with the use of the grid and magnification
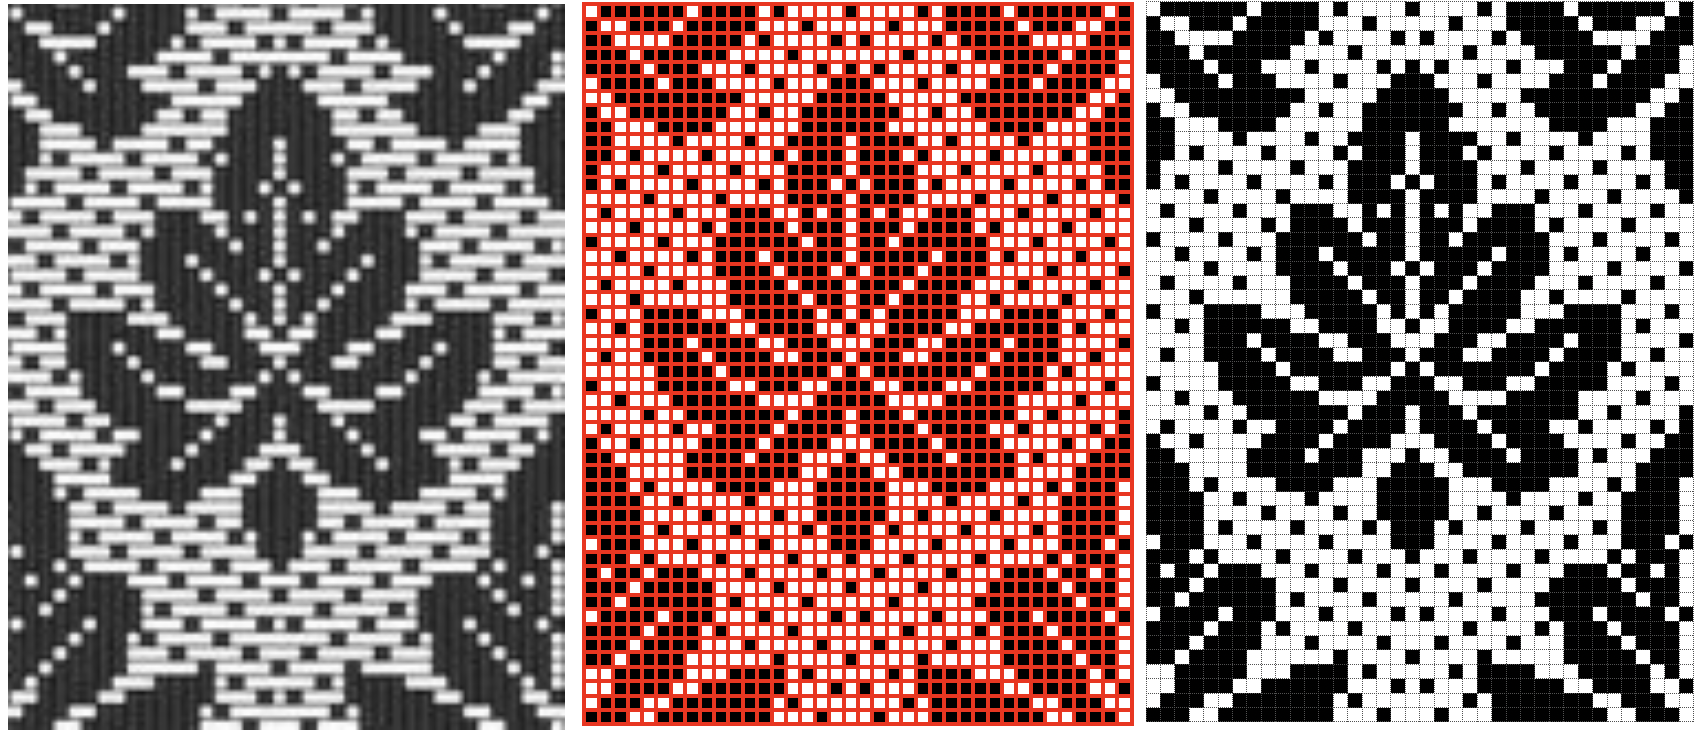
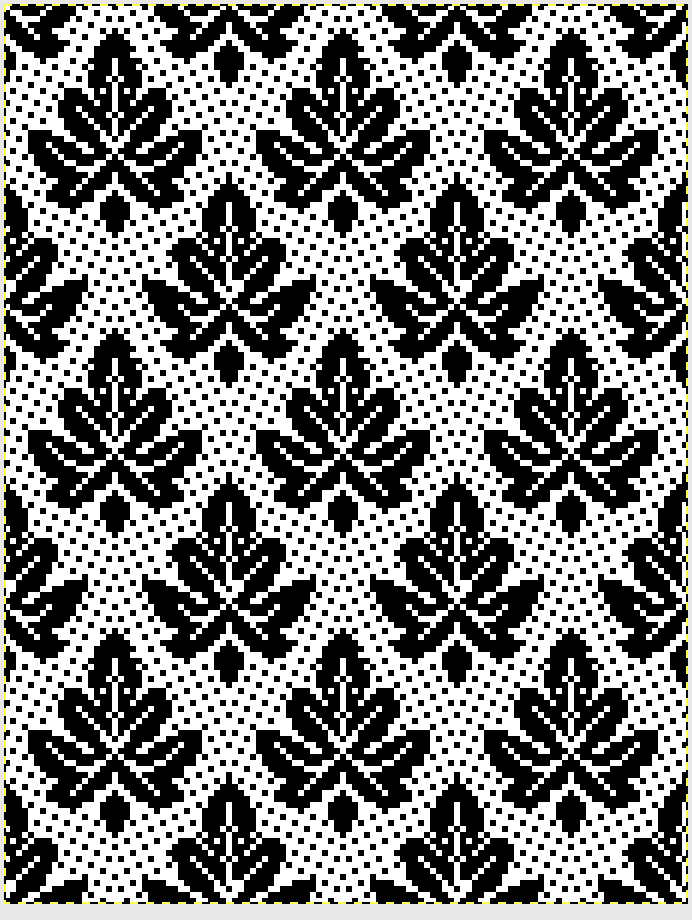 even easier approach: use the same grid method on the original, in the original color isolated repeat. The table may be shifted slightly in its front position as one advances through the repeat, filling in cell content.
 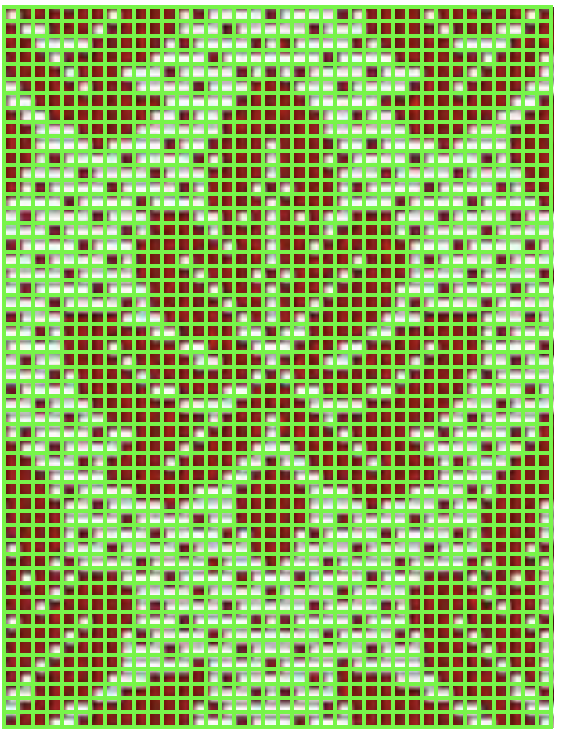 another in progress repeat and its tiled BW counterpart using this method
 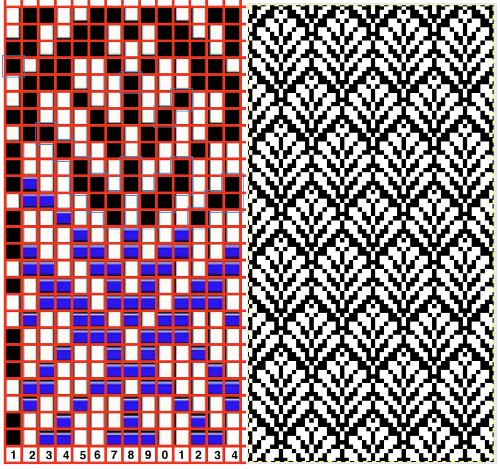 Luminescence is an online weaving program developed by Andrew Glassner. There are ample instructions and help files on site with regards to weaving. A related post, updated with information on processing images using a combination of Mac Numbers and Gimp, beginning with this draft
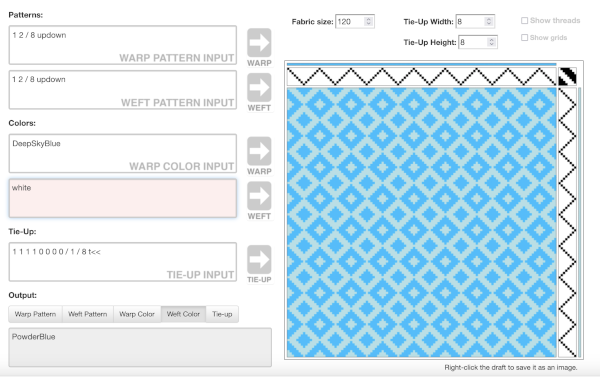
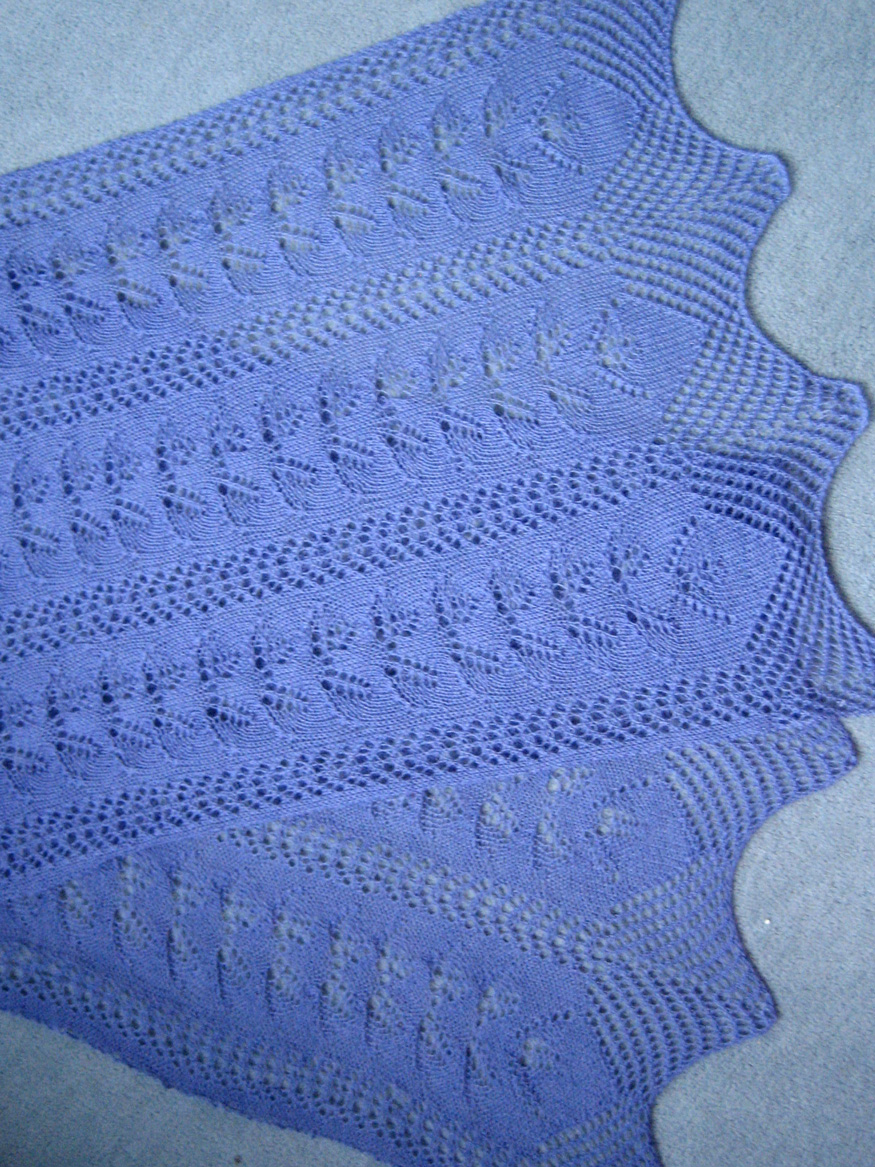
 Back in 2011, I had quite a lace obsession. One of the shawls I produced is shown below in one color on a blocking board, and in a completed other
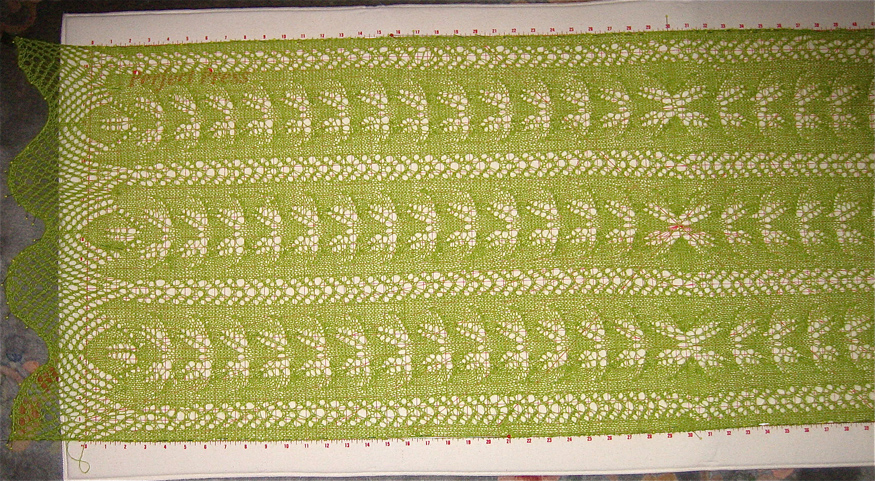
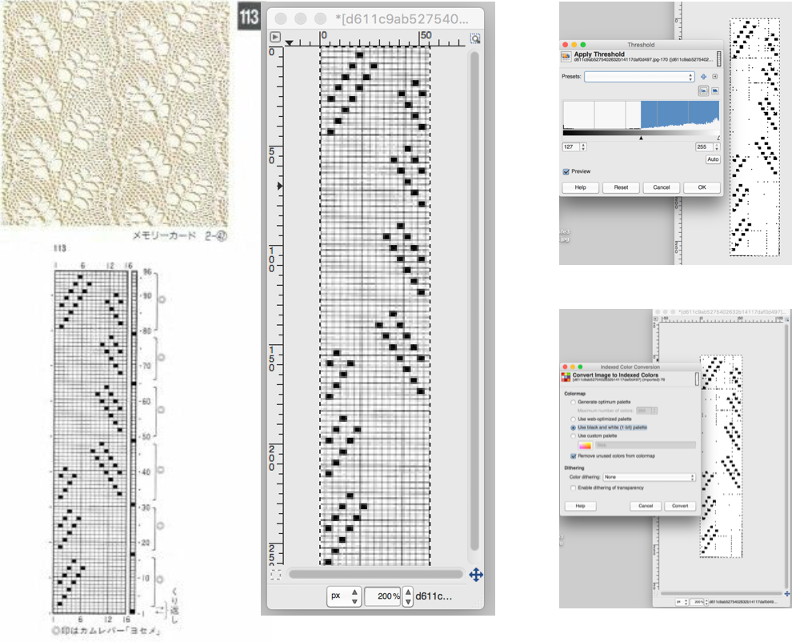
 The knitting took place in my mylar on 910 days and I still recall the tenacity it took to reproduce the lace pattern accurately from a small image in a publication, to a repeat 150 rows in height and 35 wide on the mylar. The original lace pattern was part of a series of motifs used in a lace shawl published by Susanna Lewis in issue # 5 p 43of Macknit, a short-lived machine knitting magazine. I now used the method illustrated with the woven leaf above. A thick cell border table was laid in front of a scaled scanned image of the original repeat, filling in cells, and then using the image grabbed from numbers in gimp to produce the final BW .bmps for download via img2track to my 930. Once I realized that the original image grabbed from numbers needed to be large enough to produce a clean scaled .bmp in gimp and broke the pattern into 3 segments 50 high each to accommodate the screen size of the Mac and an easy to count grab, within minutes I had my lace pattern for download
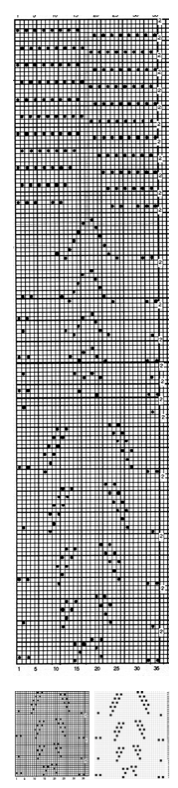 subsequent proof of concept swatch was easier and quicker to produce as well now that I have a much better understanding of how lace transfers work, it was not quite centered, but appears to be correct
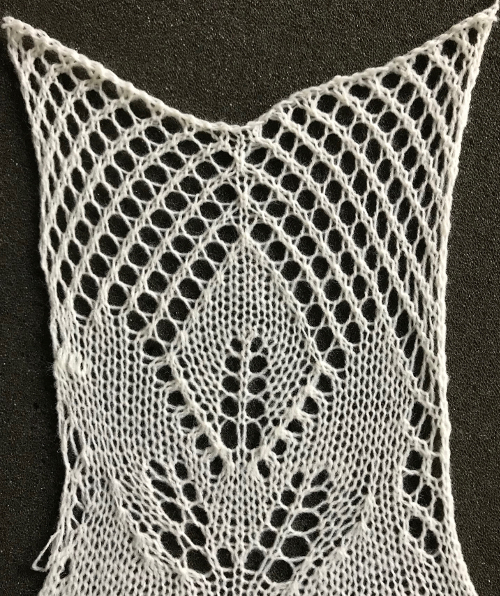
A bit on method:
Cell size minimum 24X24, at this size I was able to grab 50 rows at one time
Colored Border 6- 8points when filling in individual cells
Zoom 75%
Fill in cells with black
Change the cell border to 1 point dotted
Screengrab desired repeat as cleanly as possible, this makes a difference with straggler dots
Open screen grab in gimp, trim if necessary, convert to mode indexed 1-bit palette
Image scale to grabbed a repeat cell count. On occasion one of the 2 numbers may be off by one or 2 pixels, can be rounded off by breaking the chain symbol used for keeping aspect ratio constraints
If there are stragglers they can easily be edited with side by side comparison. There may be fewer with larger grabs. The method worked seamlessly for me yesterday, today I am getting extra black cells. Comparing with the screengrab and editing at 800 to 1000 X with grid, snap to grid preferences will make for a quick edit, still ever so much faster than drawing on mylar.
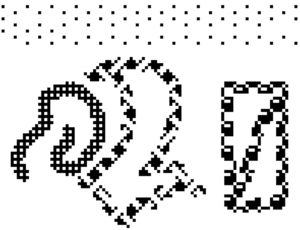
“straggler” illustrations for clean up in GIMP prior to saving for download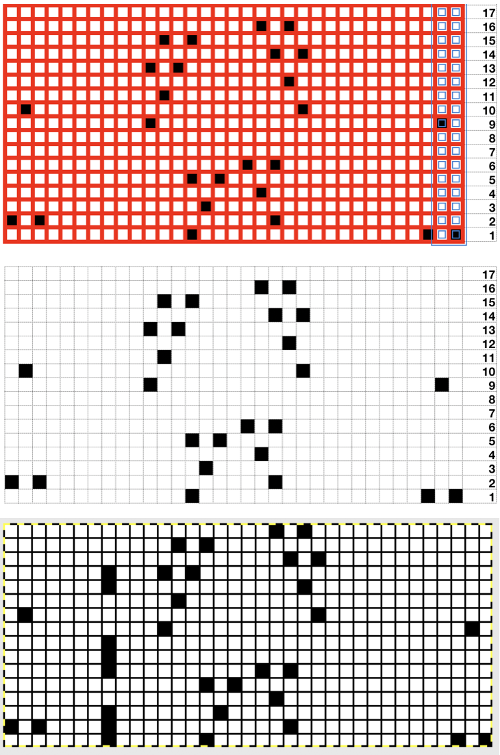
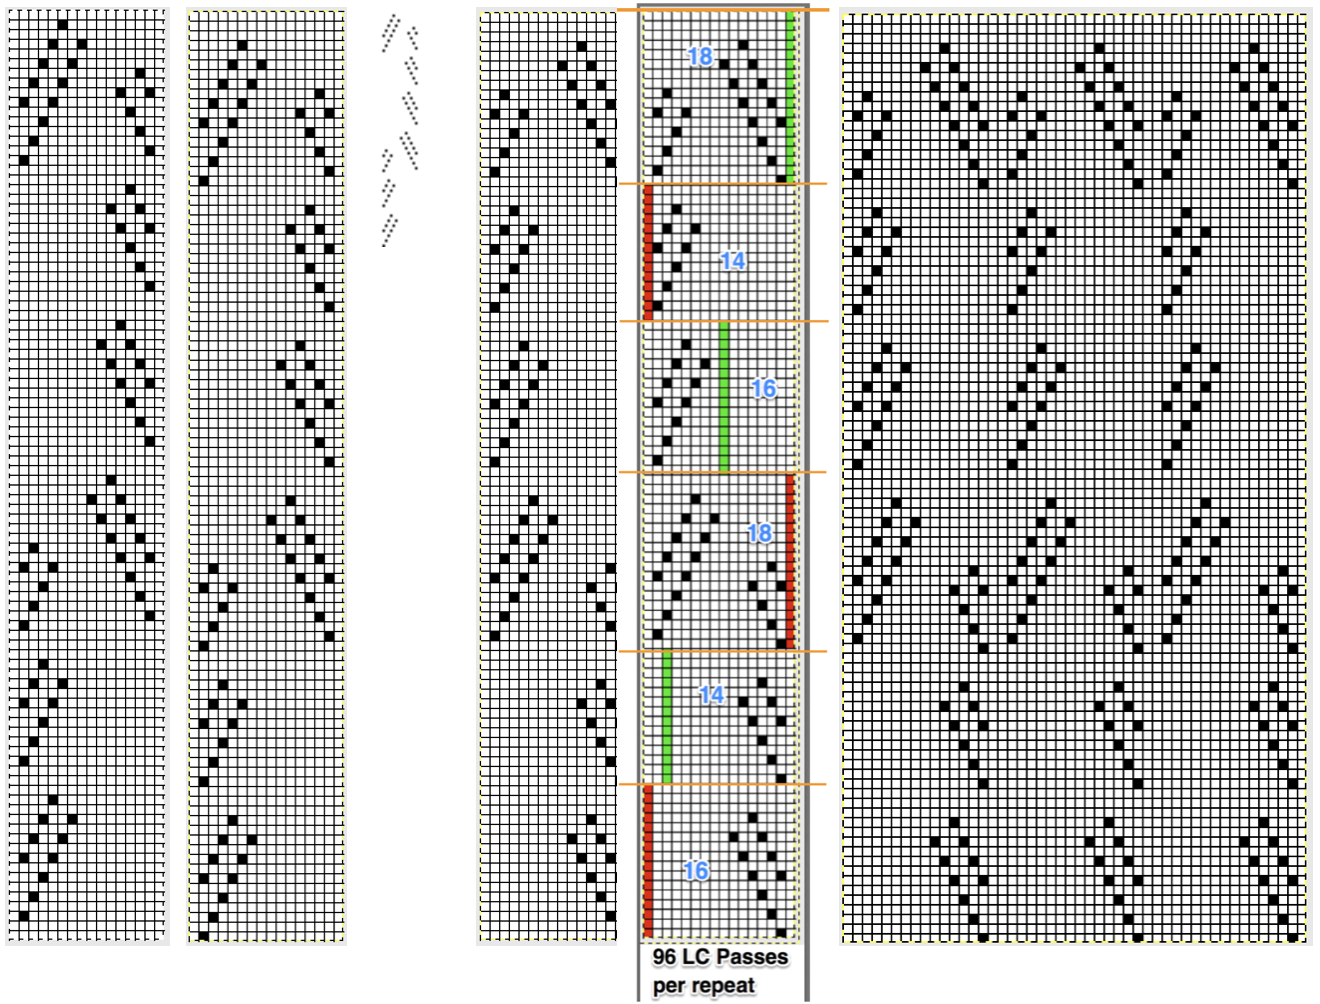
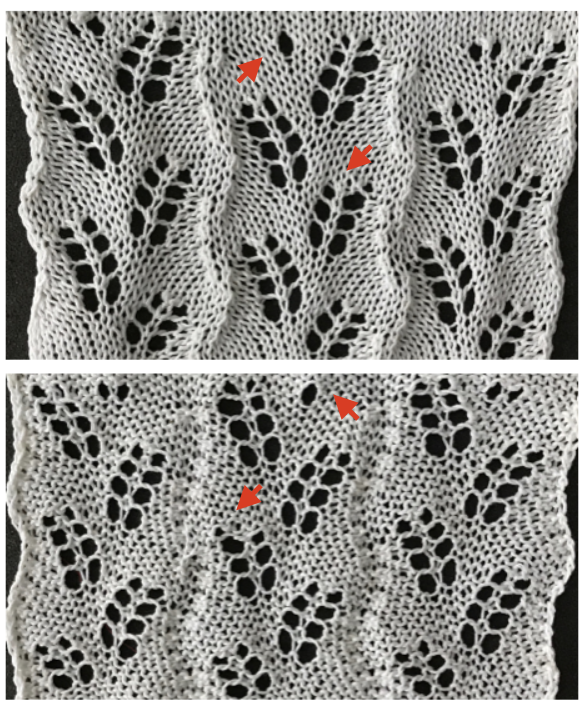 Lace repeats that have even numbers of rows for both and LC transfer and knit ones are easy to follow. Punchcards are also easily annotated and if knitting is interrupted needle selection is easy to return to or restore if necessary. In electronics, there may not be any memo to indicate row # location for each carriage pass in the pattern, or when to switch carriages. Because in this instance there are so many transfers (some of the multiple stitches) between knit rows and dropped stitches are best corrected as noticed during knitting if possible, I created a “cheat sheet” of sorts to help keep track of actions. Each block outlined in red here represents one full repeat, read from the bottom-up, with blue borders at the center and red at the end of each half sequence. A visual check at the end of each segment’s # of rows in the series is well worth it to prevent unnoticed runaway dropped stitches and large holes. A check-in box next to # could indicate the completion of transfers. and a number added manually in that same row for that sequence, record the row on which knitting was interrupted ie. stopping on row 8 out of 16 to fix dropped stitches would be a reminder that 8 more LC passes are required before the next visual check.
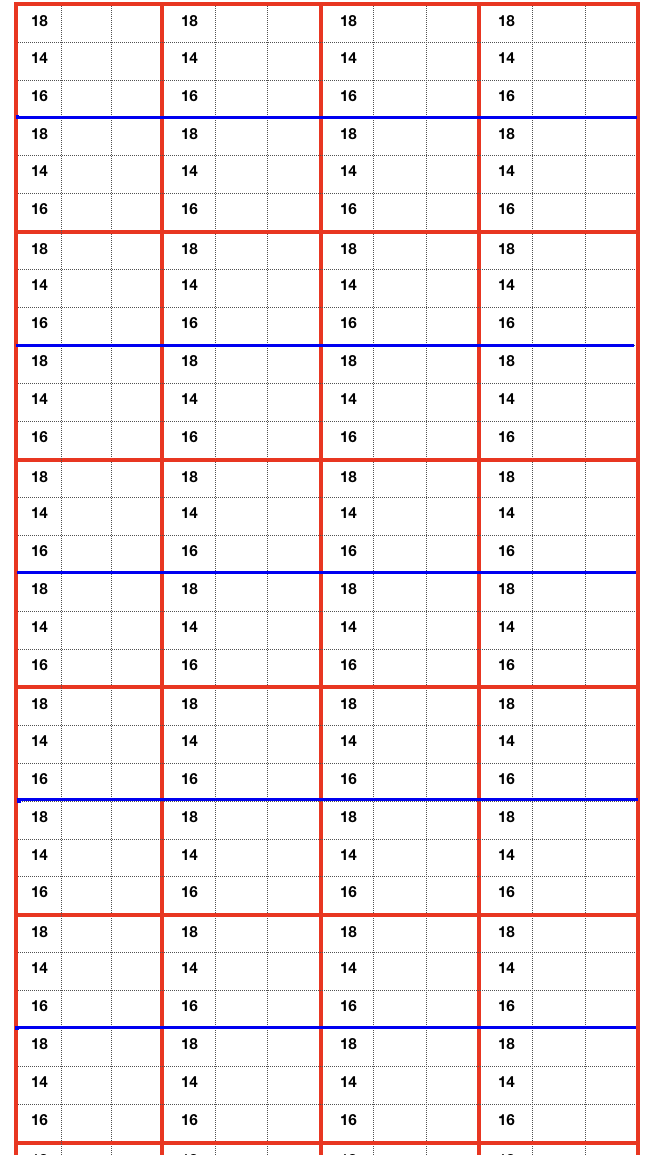
 In testing the pattern with img2track I found the LC passes are still counted, but the memo window is absent upon download. I generated a chart in Mac Numbers, reads from the top-down, expanding on the one above. It illustrates the number of LC passes (left column) required to produce any significant length of fabric. Patterns such as these are not for the faint of heart and require a friendly yarn. 2168 passes of the LC (33 full repeats, outlined in green; red line separates half repeats) are accompanied by 396 rows of “actual” knitting.
  In actual knitting, the pattern advances from row 1 to 96, and back to 1 again. A check-off list can be much simpler if one is desired. The numbers on left appear in the LC window in a 930, when reached 2 rows are knit with the KC. The numbers at the top reflect completed repeats. Boxes can be checked moving to the right as those rows are completed
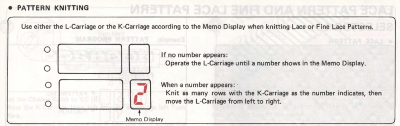
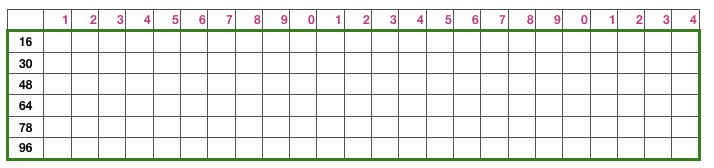 Another option is to download the pattern in img2track, and then enter memo information prior to knitting it. Two youtube videos that show how to enter memos in machine models that allow it, 930 included https://www.youtube.com/watch?v=S0tXNT76v10 and https://www.youtube.com/watch?v=nR8MheT5Bao. The number 2 may be entered after numbers on the left appear in the LC passes count window, and provide an easy guideline to follow. And this is what testing lace patterns can look like. In this instance, a tighter stitch tension, a bit of change in weight, and visually checking after each row of transfers brought me some success. This is not a stitch pattern that lends itself to easy “repairs”.
 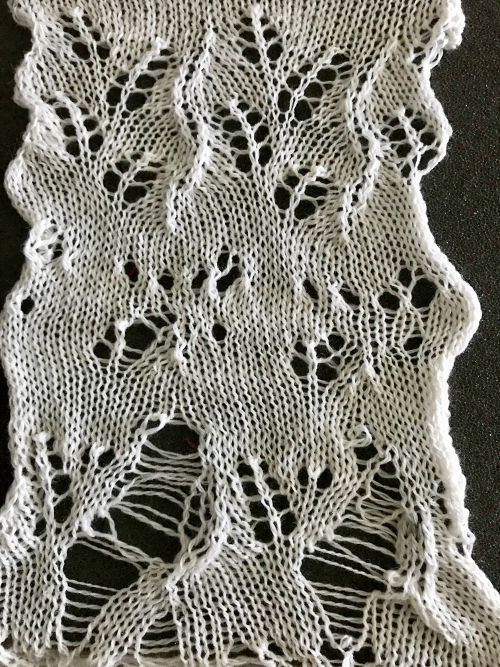 A more successful sample knit also on the 930 using the shared repeat as given, knit in wool-silk 2/18
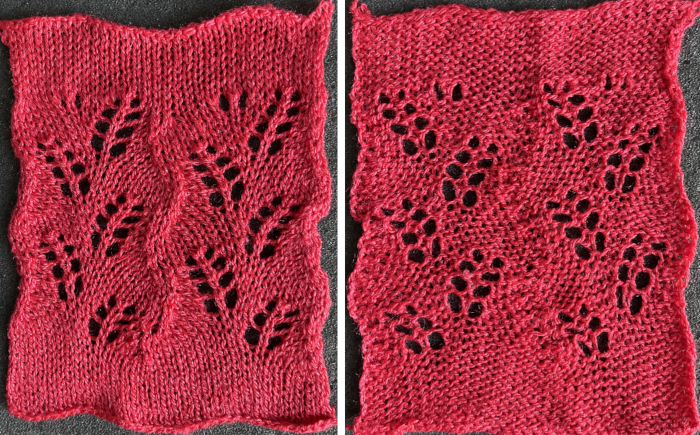

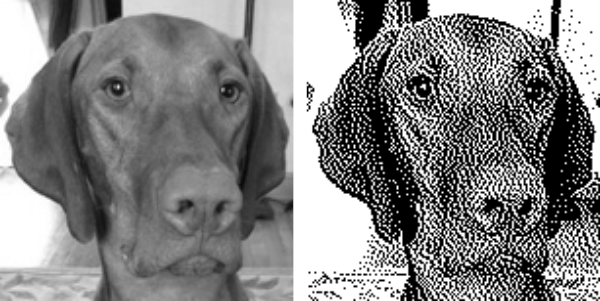
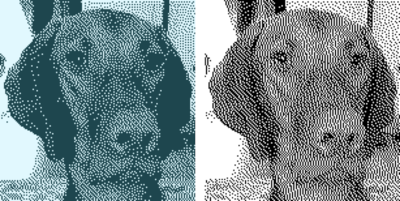
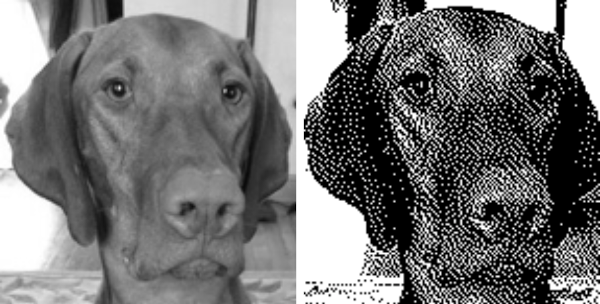
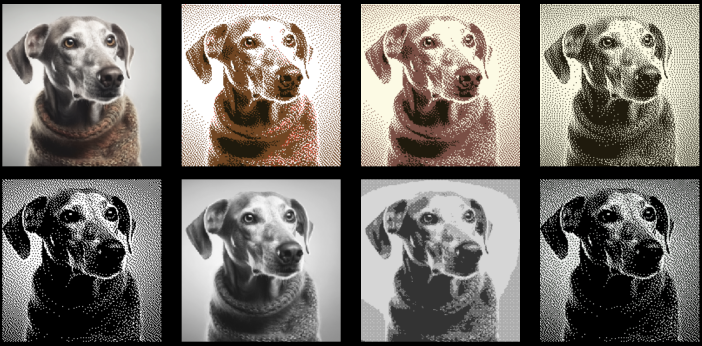
 The image is used with the kind permission of Rocco’s owner. I have used this image before, when I posted previously on some ways to reduce colored images to B/W for possible knitting using a Mac computer, please see post on 013/03/14/ color-reduction- conversions-mac-os/. Gimp offers some alternatives to the familiar dithers and is available, free, for both PC and Mac platforms. Tutorial links on Gimp edge detection available online as of May 2019 are listed at bottom of the post.


 Difference of Gaussians


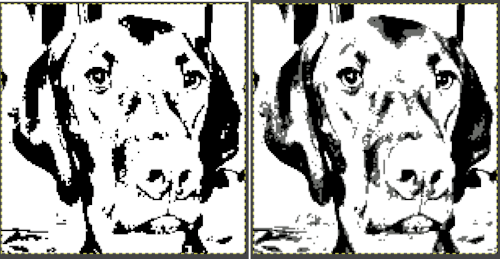
 adjusting B/W with Threshold
 after a bit of “tweaking”
  Image_Mode_Indexed, rendering it “knittable in 2 colors”


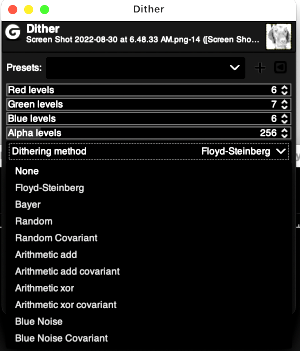
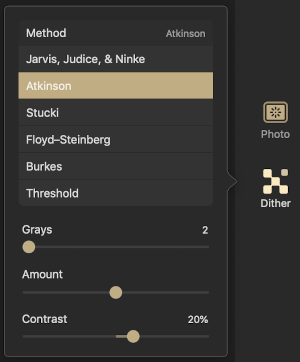
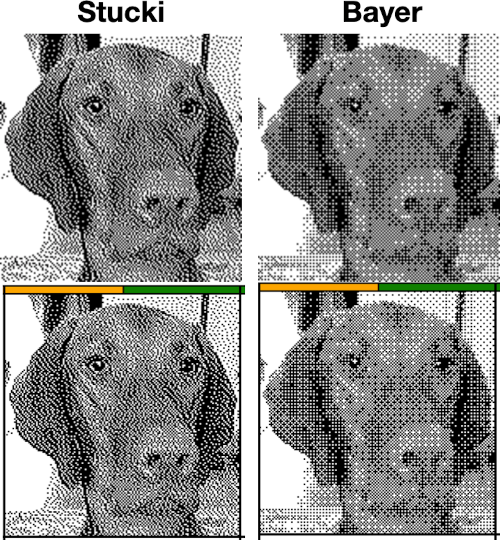
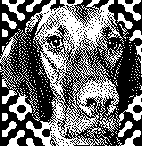
 default Stucki
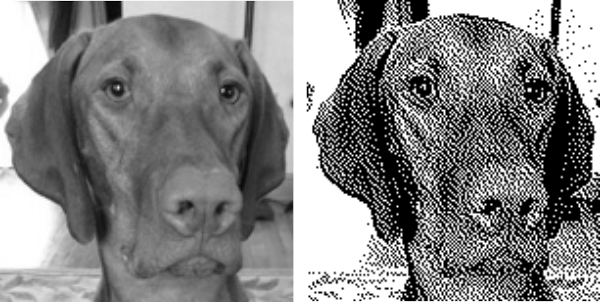
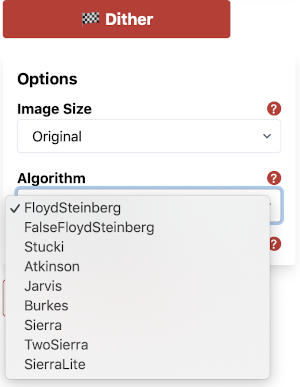
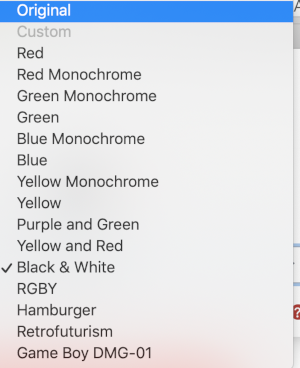
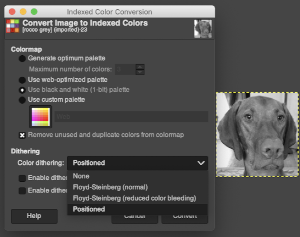
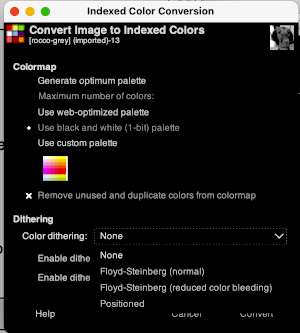
 Check dithered results, downloaded images may be in RGB Mode. Prior to any knitting, they will need to be converted to B/W indexed.
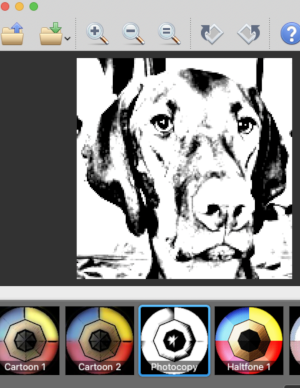 imported the result into Gimp and saved it in indexed 2 color BW and in turn, 3 color indexed mode, no color adjustments, finding the result pleasantly simple
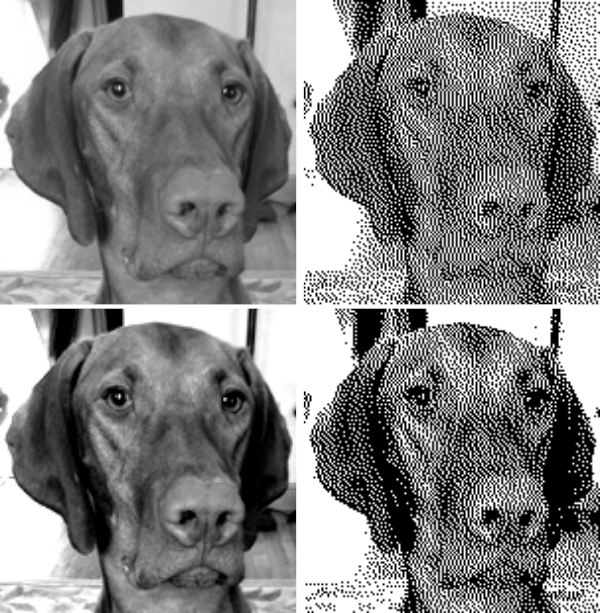
 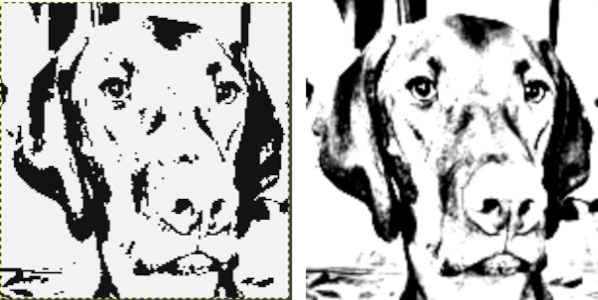 beginning with the greyscale generated image followed by Mode changes in Gimp, indexed 2 color BW, then indexed 3 color, there appear to be very subtle differences with a bit more detail:
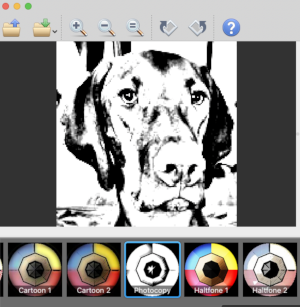
 It is possible to reduce images to 4 or 3 colors using the program as well: a slider for color count is used to choose the final number of colors in the reduction. Again, these instances have no added manipulation
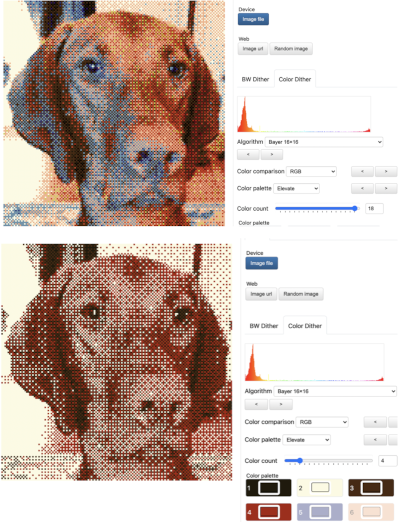
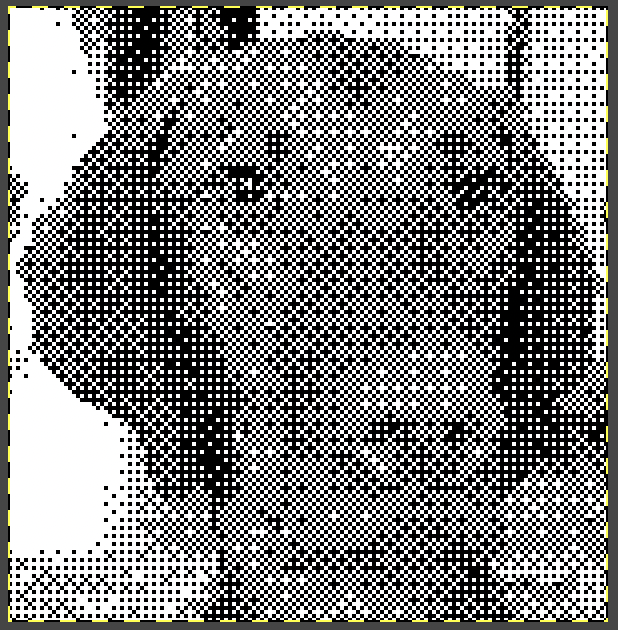
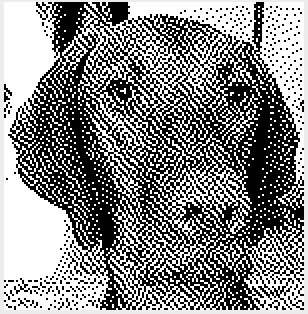
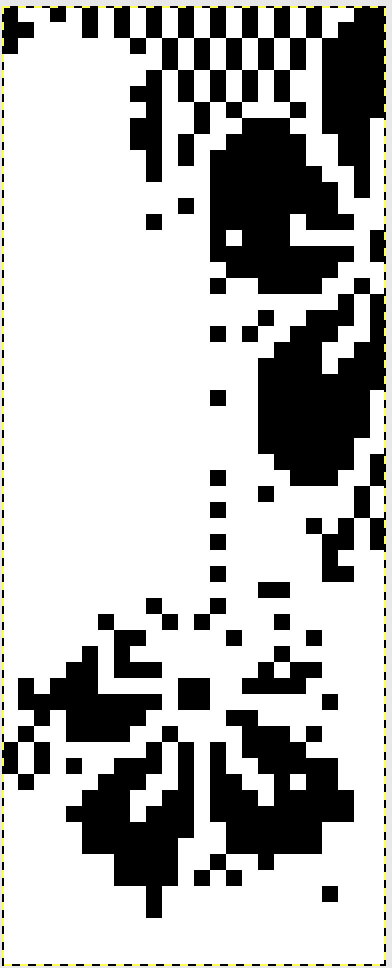
 To retain the quality and size of the dithered image, download it, rather than using a screen grab. The software used to separate the chosen dither may alter the result somewhat. I am writing my posts using an iMac M1 with OS 12.0.1. At this point Ayab is not operable, img2track does open images, but in this case, with interesting distortions, and it does not download any files at all.
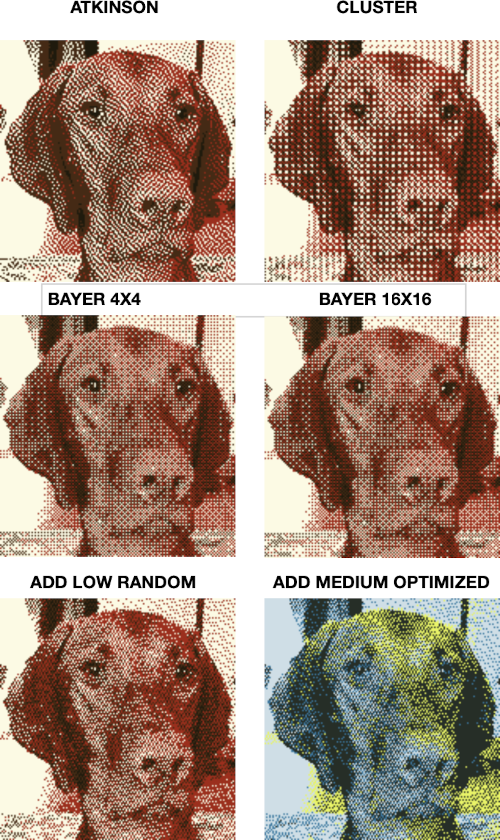
 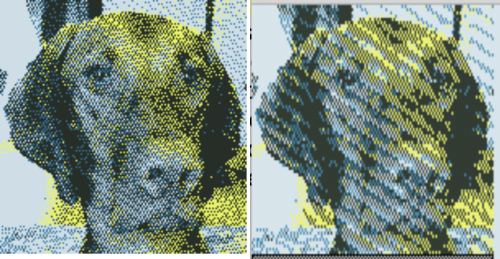 Yet another dithering
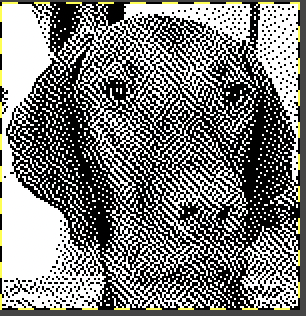
