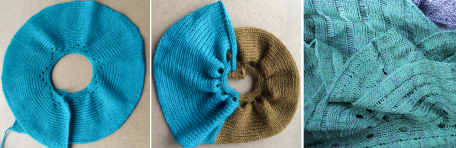
A recent Instagram share led to my being asked how the ruffle attached to the piece as partially shown on the left was created. The images on the right illustrate 2 of the color-way explorations prior to committing to a final one, all knit in rayon chenille yarns. 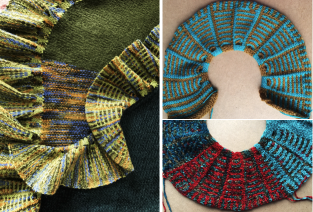 At that time a punchcard was used. The repeat technically is 24 stitches wide and 18 in height, repeated twice to meet minimum punchcard height requirements, while for electronic patterning the 18 row segment is used.
 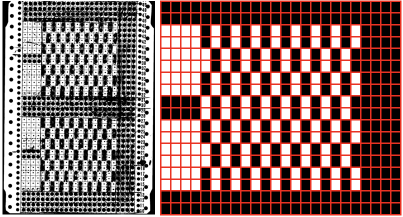 That said, repeating and shifting the minimum pattern repeat in a paint program or spreadsheet allows for visualization of possible color change sequences,
 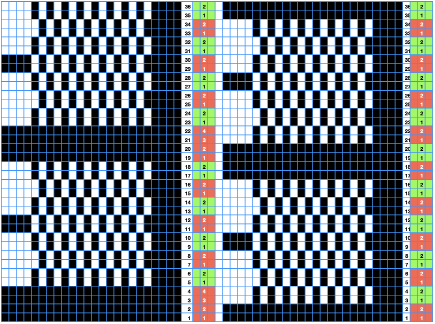 A 24X36 electronic repeat beginning with 4 all knit rows:
 ![]() Knitting does not always need to be programmed to start on the first design row.
Knitting does not always need to be programmed to start on the first design row.
When miles of trim ie when it is planned as an edging for items such as shawls are planned, there are other considerations.
I prefer to use the seam as you knit method. Since rows will be joined to rows, use a 1 to 1 ratio. Doubling up on stitches happens every 2 rows along the knit border’s vertical edges.
After estimating the number of rows in the final piece, any trims can be knit separately, taken off the machine on waste yarn, and joined as the piece progresses. If needed, after removing the waste yarn, more rows can be added to the trim or unraveled to shorten it before binding it off.
The other option is to finish the body of the knit item, and then join the trim as it is being knit.
The process is rendered easier if the ribber is off the machine.
Switching between punchcard and electronic models, it can get confusing as to whether the design needs to be mirrored horizontally or knot.
In this case, the png was used on my 930 in the same orientation as the punchcard design.
To reduce the roll to the purl side, it may be best to use yarns that will block flat ie rayon, or acrylic.
The knit is centered on the needle bed. My 930 has a punchcard needle tape in place, I prefer programming based on 24-stitch needle selections to avail myself of the position option available on the electronic.
The first preselection row is made toward the color changer.
End needle selection is canceled, or unwanted floats will be formed, pulling in the edge of the knit.
When the color changer is reached and the proper color is in the yarn feeder, set the machine to slip in both directions.
Continue color changes in the preplanned sequences.
In proper pattern selection, the slip stitch column/non-selected needles occur on the right (1).
The all-knit stitch column/ selected needles occur on the left (2). 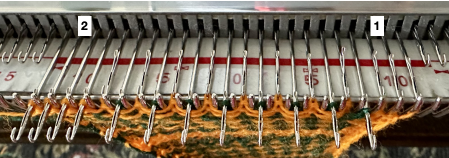 Rows, where every needle is preselected, will knit a solid color with the next carriage pass.
 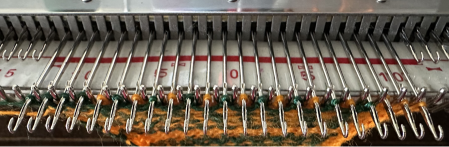 As colors are changed small floats will be created between the stripes, a light edge weight may be needed, depending on the yarn used and its fiber content, to keep the edge stitches from being reduced in size or even gathered.
1. the same color is used for 4 consecutive rows when all needles are selected and are followed by color changes every 2 rows until all needles are preselected once more
2. color changes are made every 2 rows
The cyan arrows illustrate the floats on the purl side the differences in the stitch shapes on the knit when the end needle selection is on, and the lack of proper formation of color blocks, especially if the goal is a reversible knit. 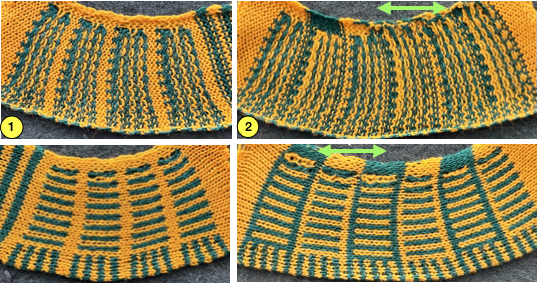 Added knit rows will result in less of a flounce, offer the opportunity to play with striping, and more colors may be added, accompanied inevitably by cut yarn ends
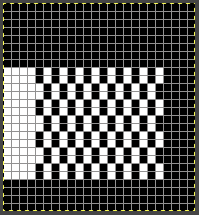
![]() For a reduced roll on narrow edgings, add a 2-3 stitch every other row border,
For a reduced roll on narrow edgings, add a 2-3 stitch every other row border, 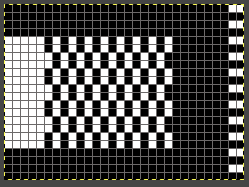 the result illustrated in this close up of a different slip stitch ruffle, also joined to the shawl using the seam as you knit technique.
  Ruffles may be created with other stitch types ie tuck, which shortens and gathers the knit stitches aside them in areas where they are used.
 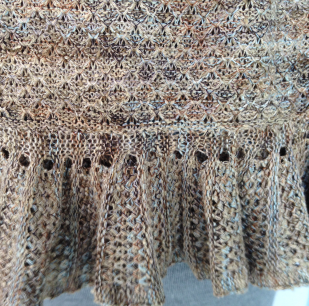 For those not familiar with slip and tuck stitch formation, it is reviewed in the post: Single bed tuck and slip stitch fabrics 1. Here hand-selected short-row techniques form the wedges, with ladders added for more surface interest on the far right.