This is an attempt to duplicate the results of Passap tech 185 used in knitting multiple colors per row drop stitch “lace” fabrics.
The method may also be used for more colors per row, expanding the repeats accordingly to the number of colors per row X 2 for each motif row. For example, here 2 colors per row are expanded to 4 rows for each color in length, 3 cols per row would need to be expanded to 6 for each design row.
This fabric widens considerably when completed, so at the top and bottom edges, cast ons and bind offs, need special consideration and planning.
In this instance, the design has been separated for the dbj method wherein each color in each design row knits twice. The second row in each pair of rows is then cleared of any pixels which results in no needle selection, providing an opportunity for the loops formed on the main bed to be dropped with the assistance of a stitch ditcher.
The fabric may also be executed using the original separation, but the opportunity to use an accessory to facilitate stitch dropping is lost’
The method for swatching: cast on for every other needle rib, knit 2 circular rows followed by one row of all knit rib, and transfer all main bed stitches to the ribber. For an open stitch cast on directions and photos see later post.
COR Set up needles on both beds for every needle rib with an extra needle in work at each end on the main bed, cancel end needle selection (KC II). With the main bed needles in the B position, set the knit carriage to slip in both directions so as not to pick up loops across the whole row as the first pass toward the color changer is made, needles will be preselected for the first pattern row
COL: the ribber remains set to knit every needle, the main bed to slip in both directions. A piece of tape in front of needle butts of needles in A position aside from the edge needles in work helps keep from accidentally moving extra needles into work when dropping whole rows of stitches
change color, as the carriage moves to the right, selected needles will pick up loops on the main bed that will form the long stitches when dropped, while the next row of pattern is selected, so by the time the carriage has reached the right side of the machine, needles will have flatlined due to the all blank rows in this type of color separation
COR: use any convenient tool to bring all needles involved out to E, and use the same tool to return all stitches back to the B position, dropping the loops on the main bed which will form the long stitches. With this type of color separation, it is also possible to use a modified Studio P slider Directions on altering the studio tool for use on Brother machines to drop stitches from right to left before continuing to knit.
Check that all needles are empty and that loops free and between the beds.
As the carriage moves to the left again toward the color changer, the ribber only will knit all stitches (does so every row), needles will be preselected for the next row of long stitches, selected needles are not knitting.
Colors are changed every 2 rows
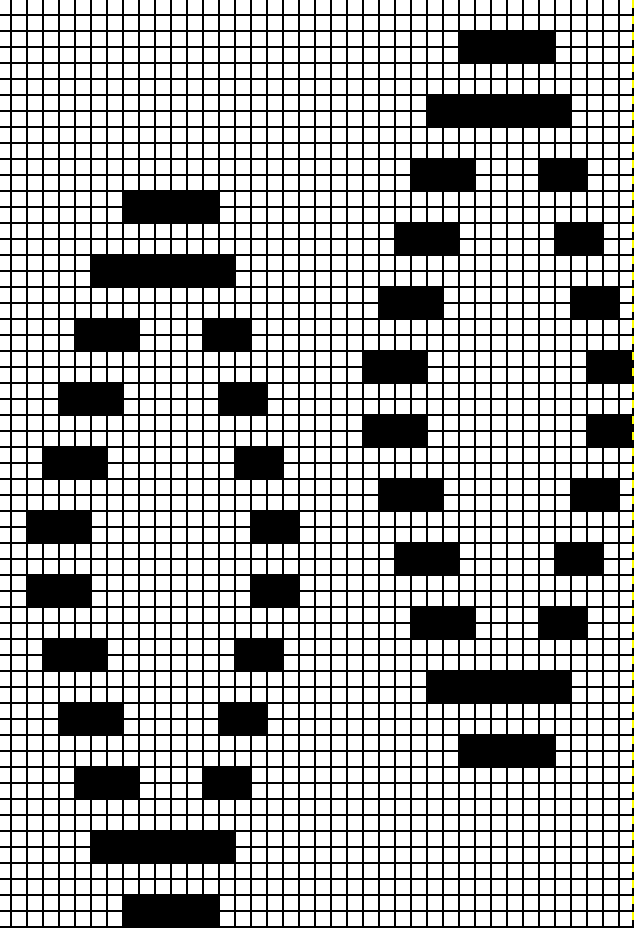
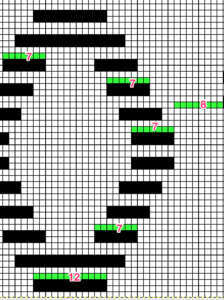
The pattern and the “color separations”, were achieved using Gimp Images from left to right
1. motif lengthened X 4
2. every other row erased (non-selection rows)
3. 2nd pattern row (every other row of design now left) color inverted
4. pattern marked in 5X5 blocks for easier tracking when drawing on the 910 mylar sheet
 A downloadable PDF of basic info 185_brother
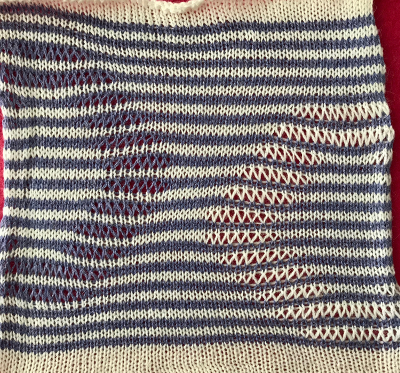
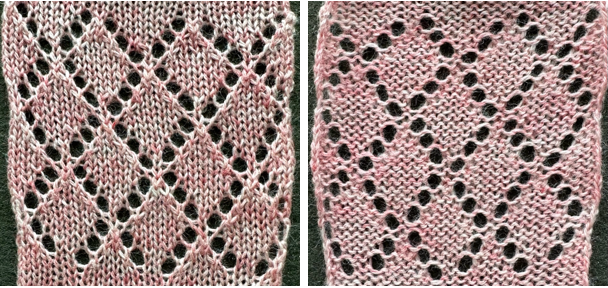
sideway views: knit side 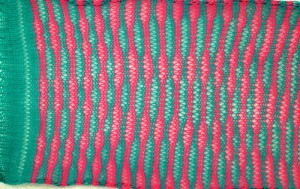 purl side
 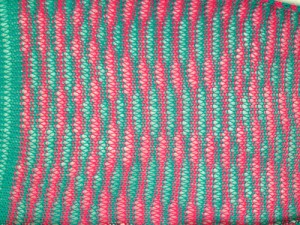 The emerging pattern can be seen, and to be noted is the elongation factor involved as in many color separation DBJ fabrics
For a later review of cumulative posts on the topic see: revisiting drop stitch lace
For the design method for staggered shapes in drop stitch see Ayab software-related post.
In other electronics, a single repeat in both height and width is adequate and machine selections will determine whether the design is knit as a single motif or as all-over patterns.
Ayab’s preselection is always from left to right. In unhacked 910s, the first preselection row can be from right to left, so no accommodations need to be made for shifting the last row to the first of the design repeat.
For machines accepting electronic downloads, program the repeat with the first design row containing black squares in it, and adjust the spacing between repeats as preferred. This particular version is 80 stitches wide 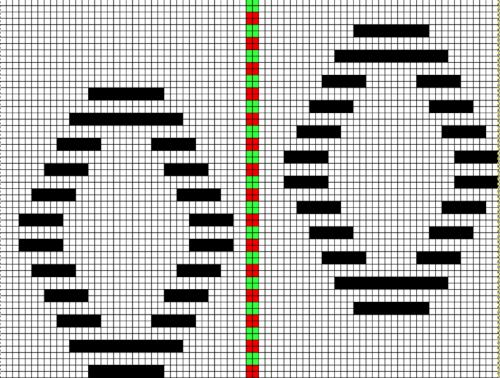
 In an unaltered 910 with the ability to double the width of the programmed repeat, mylar users are not excluded from exploring a similar fabric. The repeat above may be rescaled to half the width, drawn that way, and then use the twice as wide built-in feature. In Gimp scaling this design to half-width, note the right side of each repeat contains an odd number of squares, the left side an even one. The repeat may be used as-is or redrawn, adding or eliminating black squares if symmetry in each shape matters. The free program Paintbrush produces the same image, mirrored.
 The explanation: further analysis of the original design reveals the fact that some of the pixel numbers in the design black square blocks are uneven in width. In this instance, 3.5 is half of 7, and half pixels cannot be rendered, so the software assigns the split to 4 and 3.
 A Passap sample


 I had tested template markers on Brother mylars when ink pens were discontinued and I had no luck with permanent markers, found they shed a bit and pencils tips broke easily, while I could not be as neat in rendering small markings as simply by going the route of using a number 2 pencil on the mylar’s back ( I prefer the Mirado Warrior HB 2). Drawing with enough density “within the lines” on mylars is rendered far easier with one of these templates, at one point made available from Brother. Similar ones may sometimes be found in stationary or art/ drafting supply stores.
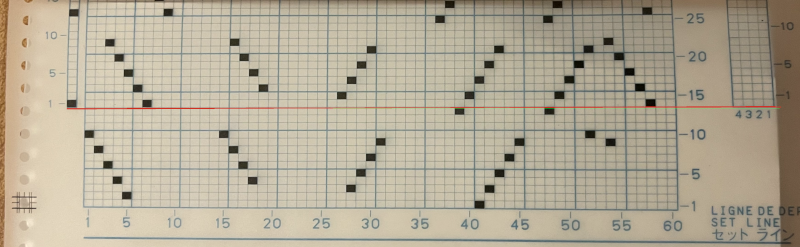
  The images below show my first “new” tests: on the left, I drew with the template marker over previous pencil markings, the squares repeat over # 36 was made with multiple layers of a sharpie (which smeared even after what would seem like adequate drying time), the ones over #42 are made with the template marker. The sharpie did not get scanned properly by the reader, all other marks did. There is a guiding pencil line placed where the set line familiar to Brother users would be. In the first narrow column to the right, the pencil marking corresponds to the first visible row (design row 1 in reader). The column on the far right (absent from Brother) could be used for additional cues in knitting ie. color changes, knit rows between lace transfers, etc.
 while Studio scans 10 rows below
 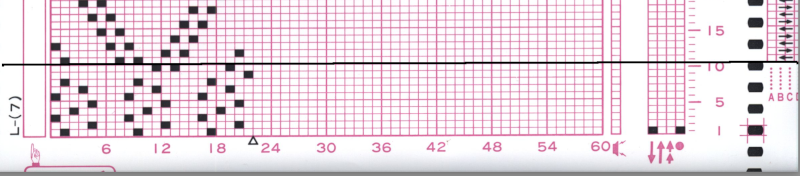 This explains why the columns intended for memos extend up and beyond the last row which can have cells marked for pattern in each brand.


 The holes for movement of the mylar occur in just about nearly the same location. The first issue at hand is to draw a set line in the proper position for Brother pattern reading (traces of pencil line on the red studio mylar may be seen underneath the blue brother markings). Some machines are fussier than others with the set position, and I found drawing the line by placing the denser studio card over the brother one on a light_box surface made that very easy.
 #4 pattern in Studio programming would begin on row 11, ending on row 14, to program same in Brother beginning row is 14, ending row is 17; stitch locations remain unchanged, but a reminder: Brother sheet is marked in 5X5 blocks of squares, Studio in 6X5.