My original posts on exploring automating shell shapes were written in my 910 electronic days using mylar sheets in early 2013: Thinking of modules: a shell “diary”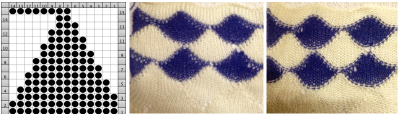 “Automated” shell shapes
 The repeat produced a visually successful fabric. I received a question on FB about executing the shells on a punchcard machine, and another on how I “come up with these things”. The repeats are not quick inventions, they take working out, sometimes through several first failed attempts.
Since the early posts posts my approach to explanations has changed as I became increasingly familiar with newly available software and updates, and a 930 and img2track made downloading pngs possible in a new way.
iPhone cameras make it far easier to “shoot and share”.
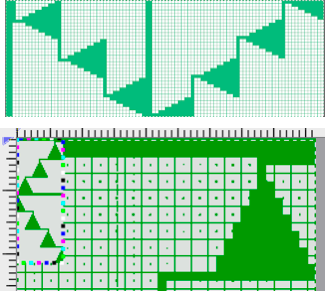
My original mylar repeat entered as separate programs in days when each mylar sheet was precious. 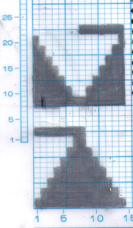 The 910 in my default setting produced the “image’ as drawn on the knit side of the resulting fabric. The post was written prior to my tiling the repeats as a matter of routine to check their alignments. Doing so would have shown a couple of missing pixels, and pointed to any other errors in filling in mylar squares.
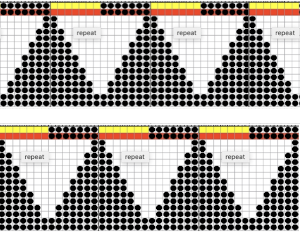
 All transfers were made in the same direction.
The start of the visualizing the shell shapes with errors later observed and resolved. 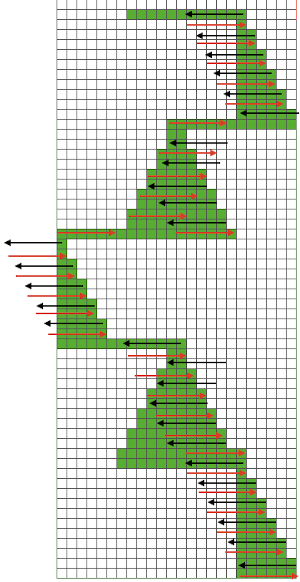 As always, ideas need error-proofing and refining, easier done in a chart if possible prior to any actual knitting.
This type of design begins to address an uninterrupted repeat on the electronic on a limited stitch count, whether all in a single direction or reversing every other full row of shapes. It is applicable to joining several punchcards, but only on single 24 stitch widths.
 There are a number of changes to make if it is necessary to get the pattern to reverse direction in alternate rows of completed shapes in a brick layout.
My first tests were planned with knitting moving only from left to right. To execute such a pattern on a punchcard KM, the repeat needs to be altered from 14X2 to 12X2 in width. This is the start of sorting that out: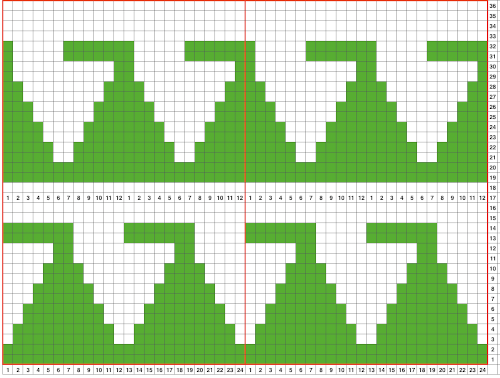 Attempts to visualize holding can happen in spreadsheets, documents, image processing canvases, or even simply on graph paper, moving/ “drawing” back and forth across the cells mimicking carriage movements and marking them accordingly.
Large staggered repeats can be programmed in electronic models
All shapes are limited in terms of the width of the repeat occurring across the number of available needles on any machine.
Some previous posts on electronic knitting such repeats:
Holding/short rows: hand tech to chart to automating with slip stitch 1
Ayab: short rows automated with slipstitch
A return to short row shapings: bumps and slits
The 910 produced the design as programmed on the knit side. On the punchcard machines, the image-as-drawn is produce on the purl side.
Lettering is likely the most familiar instance where mirroring is required for punchcard machines to produce it correctly, a consideration here as well. 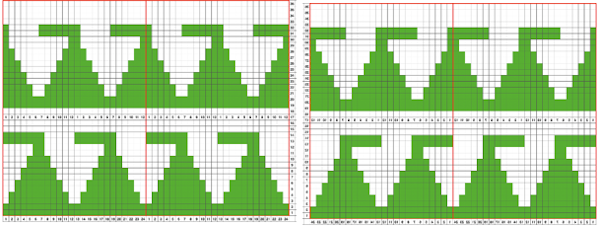 The 930 automatically mirrors downloaded motifs, if direction matters, as in these samples, either mirror the design horizontally prior to saving the png for download to the machine, or use the mirror button selection on the operation panel after the download.
I find it easier to fill in the shapes in the direction I wish to have them appear on the knit side.
An attempt at a continuous 24 stitch repeat, with the same technique applicable to electronic models while avoiding programming 2 different repeats and having shapes in different colors across full repeat segments.
This proved to be a fail.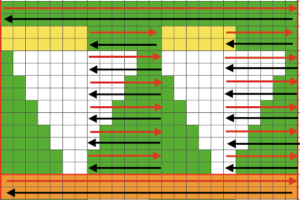
 With larger gaps between changes, the yarn may be changed every X rows manually, making an easy fix to breaking rules for when using the color changer.
The next step is working out 12 stitch repeats with patterning needles to be brought in and out of holding position as well. The options on a punchcard would include 8, 12, and 24 stitch motif widths.
The machines will be set to slip in both directions throughout, end needle selection must be canceled. This method is not executable easily on km models that do not offer that option, electronics use KC II.
Note that machines sold in Europe in comparable models may have different names for the same functions, ie. SM in some instances is the equivalent of KC II, whereas in US it signifies a Single Motif.
Punchcard settings for end needle selection:  I do not have any blank punchcards to test a repeat on at the moment.
The 930 essentially behaves the same way by producing the entered pattern on the purl side, making it possible to use the unaltered final designs.
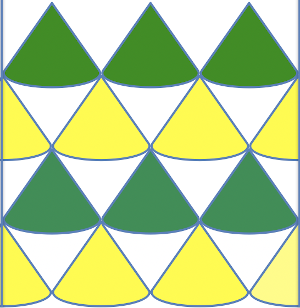
The starting 24 stitch brick repeat  Other shapes have previously been explored using slip stitch, and later, slip stitch combined with holding. A brief return to previous turns at holding and slip stitch used to create alternating color shapes: in 2013/02/12/an-entrelac-pretender/, a continuous slip stitch only card was used. The result on the knit side,
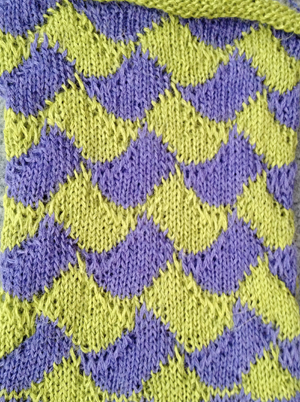 while on the reverse floats between alternating shapes are the norm
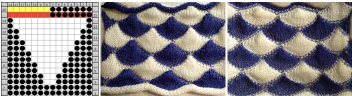
 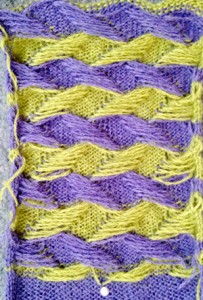 Results with no floats are found in the swatches in the posts, two designs are programmed alternately upon completion of each full row of shapes : 2013/02/21/entrelac-pretender-2/
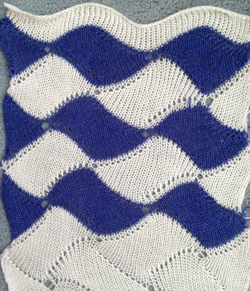 and a larger, 24 stitch motif used on a punchchard machine as a continuous repeat : 2013/04/11/entrelac-pretender-3/
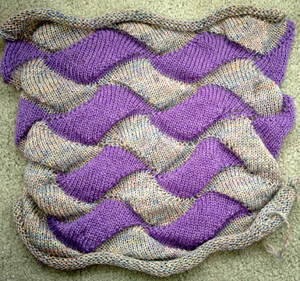
Returning to the goal of the moment: to knit the shells in a float-less way, using a technique executable on a punchcard machine as well. The repeat as initially drawn is 28 rows high.
If the punchcard or the electronic advance every row with each pass of the carriage, the alternating shifting blocks of the repeat will be selected in full with every 28 passes.
In this instance, one returns to the start of the design repeat every 28 rows. Identical shell full shapes are created across the knitting rather than the shifting shapes desired in alternating full row repeats.
Separating the 28-row repeat into 2-14 row ones.
The 12 stitch repeat is tiled X2 horizontally, beginning with a half shape, 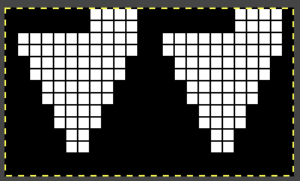 while here the repeat for all full-size shells is planned,
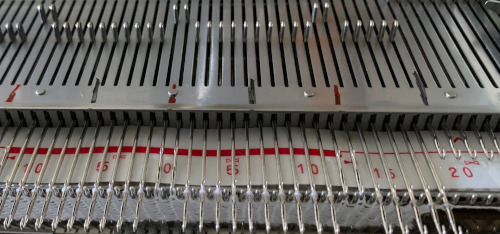
 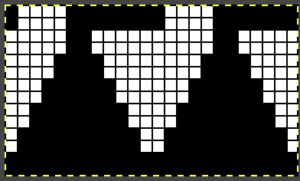 Marking up the needle bed with water-soluble markers or pencils helps track placements of repeats across the desired number of needles in work: dark lines indicate placement beginning with the mark for half a repeat to maintain straight side edges on the finished piece. Red lines mark the placement of the stitches when they are moved to the left in order to knit the full shells across the bed.
 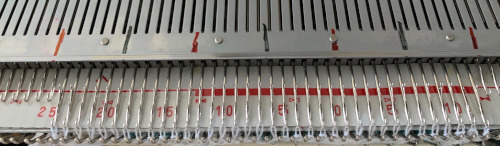 On a 930, the image will be knit in the direction of the pattern as drawn on the knit side, as it would be on a punchcard machine.
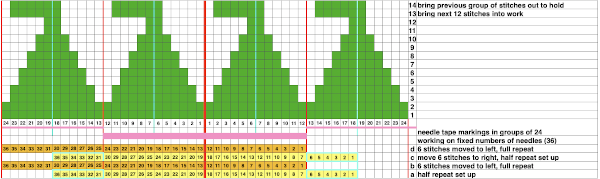
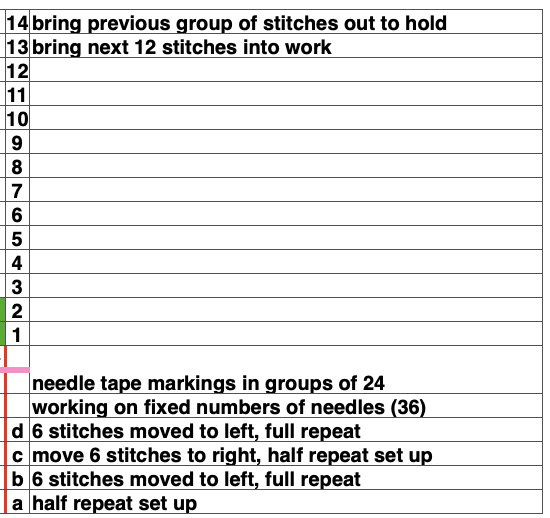
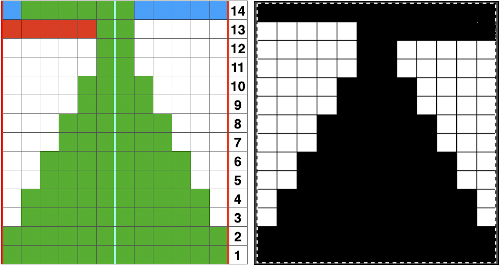
To begin knitting the shells with COR, since the pattern is fixed on the needle bed, one option is to move the work in one direction or the other on the needle bed using a garter bar, so that the knitting is in the proper place for the desired anticipated needle selection. This was easier in my own mind than reprogramming the pattern repeat for each full row of shells whether by entering a new download or altering placement using the position option at the start of each row. One of my first working repeats amended later in several steps is shown here mirrored in black and white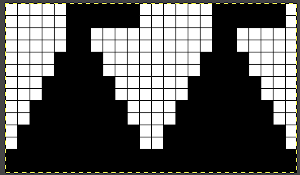 Visualizing the process on the needle bed
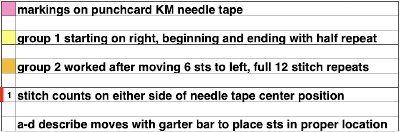
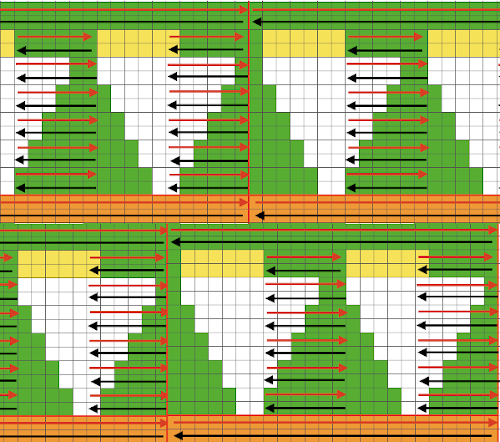
 Scaling the image to render it a bit more legible:
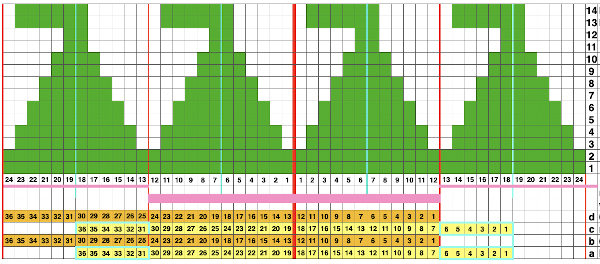
 The machine will be set for slip stitch in both directions and holding. End needle selection is canceled.
The first preselection row is from left to right. Every needle will be preselected and will knit every stitch for the first 2 rows in the desired shell color.
Color changes are made manually.
At the completion of a row of shells, its corresponding color ends on the left side, a free pass is made, returning to the right. Knitting with the new color for the alternate groups of shells begins again on the right side.
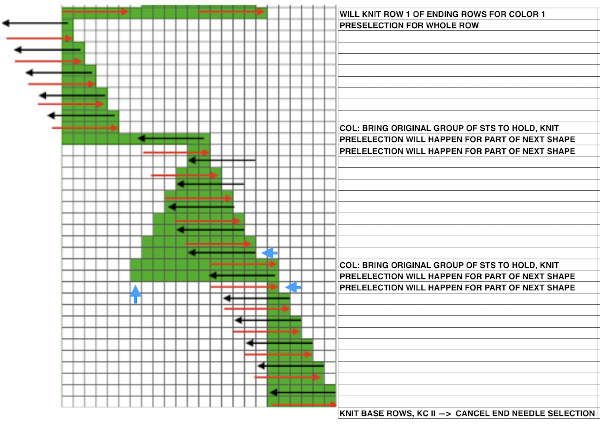
After the first 2 all knit rows, as the carriage works its way back to the right on the following pass, preselecting will occur for a decreasing number of stitches. This is the first-row holding selection when using the above repeat:

 Moving stitches on the needle bed avoids having to program separate repeats after each full stripe of shells.
Beginning piece with half a shell on each side: all but the first 6 stitches are brought out to hold. When more than the single needle is selected at the top of the first half-shell (6 sts to start, 1 at the end), COR: bring the next group of 12 stitches to the left into work, knit to left.
COL: bring original 6 needles out to hold. Bring into work any needles not selected in the group of 12 into work as well.
Continue knitting, repeating the process across the bed.
On design row 14 of the last half-shell remove work on a garter bar.
To execute full shells across the next row of shapes: using a garter bar move the work 6 stitches to the left.
Return emptied needles to A position (out of work, OOW).
With all remaining needles in B preselect the next row (1) from left to right. Cam settings need not be changed.
Change color if desired, knitting 2 rows across all the stitches.
Bring all needles out to hold except for the first group of 12 sts between red marks, and repeat the process previously described across the bed.
When the last shell is completed, design row 14, remove the work on the garter bar again, shift it 6 stitches to the right.
Push back the now emptied needles back to A (OOW).
With all stitches in the B position, make a free pass to the right, row 1 of the half shell row will be preselected, change color, continue across the pattern row as described. This yarn is far too thin but makes stitch formation easy to identify.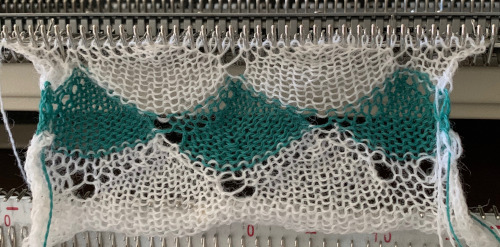 I used two repeats side by side to eliminate having to consider and choose the position option on the 930 needle bed, resulting in having the pattern centered in each 24 stitch fixed segment of needle selection.
Using a needle tape for punchcard machines electronic models make transitions when using published or DIY 24 stitch designs.
It is possible to add all knit rows or even patterned ones between shell rows. On an electronic KM with 2 carriages available, adding a FI band would be simpler than trying to manage to change cam buttons in addition to the other number of steps already involved with the slip stitch and holding combination along with moving the knit on the needle bed.
Contrasting color row stripes can be programmed by adding 2 or more/ even number rows of all black squares (or punched holes) at the top of each 14-row segment of the final repeat. Reverse shaping of shells appears to not be necessary to avoid biasing on my limited tests. The proof of concept swatch: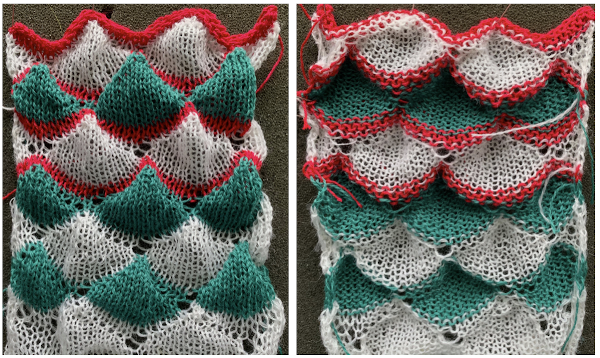 I was too aggressive with clipping yarn ends on the left side, especially while in the process of changing colors, not ever a good idea. Automating the pattern fully on electronic models using only slip stitch patterning is possible. The length of such patterns grows exponentially in proportion to the size of the repeats. Reviewing errors in the beginning concept
 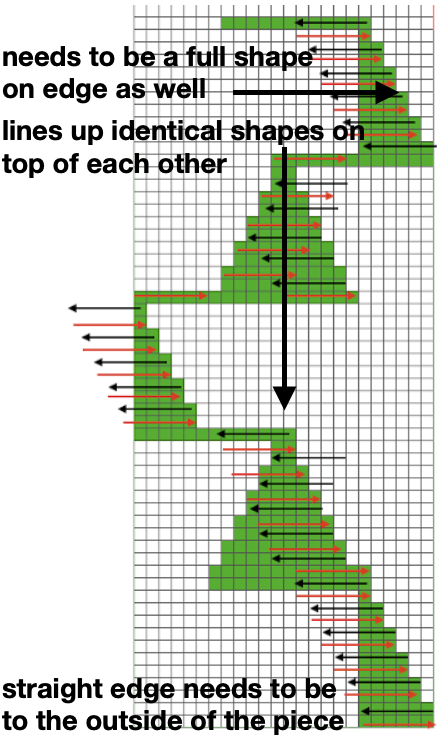 An attempt to visualize the placement of the shape variations in the finished piece using the shell motifs beginning with the shapes created in order to create a straight side edge
Redrawing the pattern for a 36 stitch test. On the left is the drawn image of the pattern, on the right the mirrored image for downloading to my machine to produce it in the desired direction. Much of the time is invested in developing and testing the final and correct image for download, the knitting that follows that is fairly quick. My repeat is 36 stitches wide, 98 rows high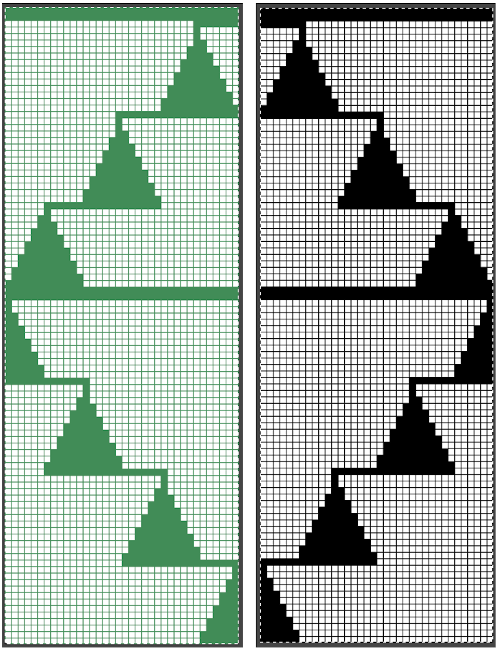 COR: knit a base row in color one from right to left
COL: KCII (no end needle selection) to right, the only needles preselected will be those corresponding to the programmed black squares, the remaining will be in B position. Knit to the right.
COR: set the machine to slip in both directions. Knit slowly and evenly. All needles in work on the bed must be cleared with each pass of the carriage.
Continue in pattern across the bed, checking that all stitches are knitting off properly.
When all needles are preselected, change colors for the next set of shells. These rows create the base for the next group of shapes. If a stripe or other pattern is wanted regularly, those rows are best added to the programmed pattern itself.
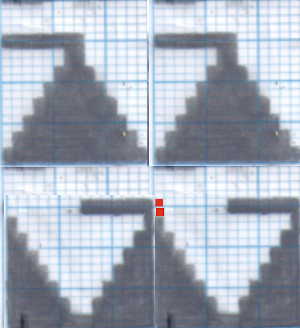
The automated test swatch: 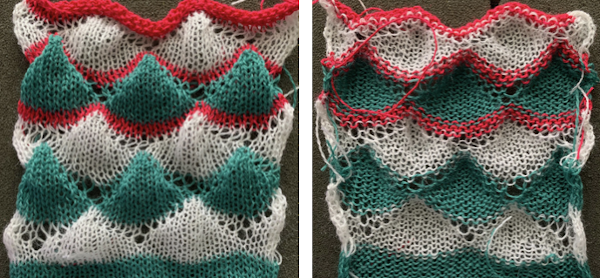 Preserving the 3D texture relies on using yarns with “memory”, ie wool and avoiding aggressive blocking. Using thinner yarns makes the stitch formation more evident. Hard pressing, in this case, knit using acrylic yarns, flattens the fabric considerably, and often, permanently. Both the hold/slip (top) and fully automated swatches (bottom) are shown.
 2023: a screen grab from the shell charts was cropped to its outline, opened in ArahPaint, and using the program’s tool “guess weave from grid“, the 36X98 png was obtained with a few mouse clicks,
![]()
Isolating like modules and looking for any differences in each of them to prepare for a larger number of repeats across the needle bed in each half of the design  There are several methods for securing yarn ends both during and after knitting in the final pieces using these techniques. Testing such methods on swatches is the best way to determine what works for yarn and colors used as well as our own personal preference.
The pattern width may be adjusted to create considerably larger shells if desired. Punchcard knitters are limited to 8, 12, and 24 stitch repeats. For them, this would be the maximum size, including an added number of rows for contrasting color stripes, in this instance 4. 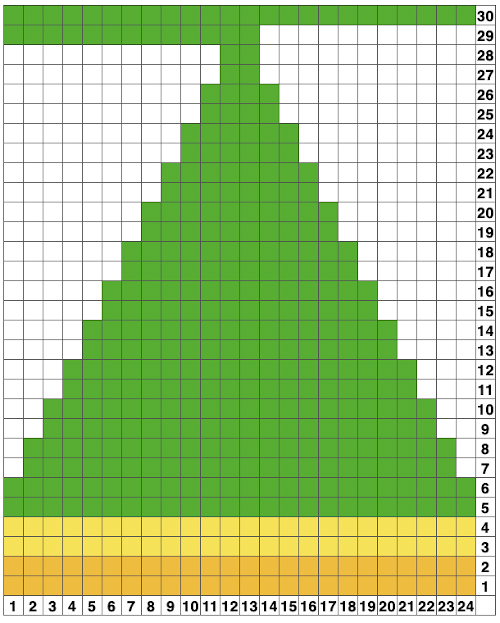 A return to the original 14 stitch repeat, illustrating a way to begin editing for an extra row in width at the bottom of the shape and ending on 2 stitches rather than a single stitch at the top
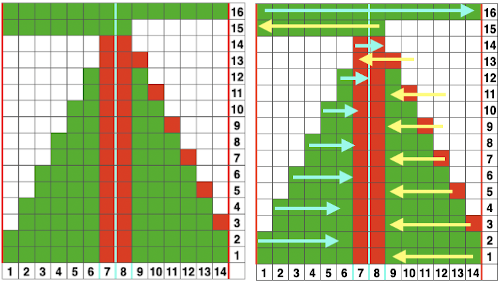 Imagining adding increases and or decreases for shaping at sides, which in turn could lead to an evaluation of switching to entrelac approaches when creating large shell shapes for similar effects. The 3D qualities and distortions are obviously missing from these illustrations.
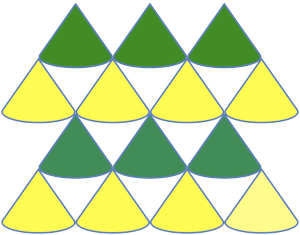
 A Prada sweater using similar shapes
 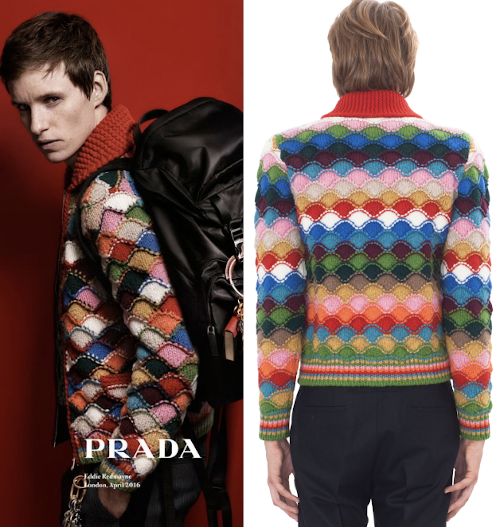 If you are interested in any large size clamshells, and intarsia appeals to you whether in hand or machine knitting, Cheryl Brunette has thorough directions for many such shapes, including 2 videos on shell shapes Part 1, and Part 2
More online inspiration using large shapes:
from a Russian blog
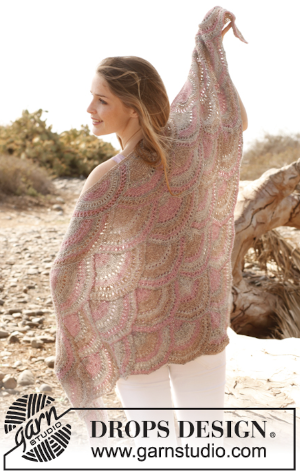
 a hand-knit blanket from Garnstudio
 ![]() the common illustration for shaping triangular shawls using such motifs
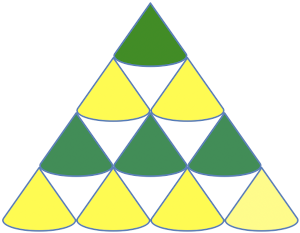
the common illustration for shaping triangular shawls using such motifs 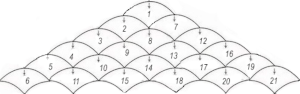 Similar pattern repeats are at times also referred to as scallops, fans, or scales. A “scallop” design
 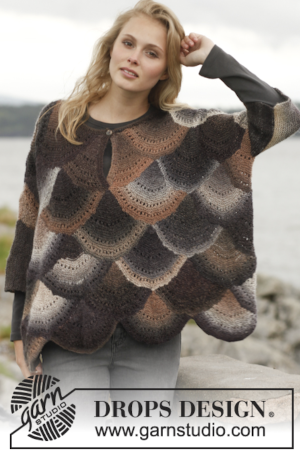 a “fan”