As our knitting experience grows, there are likely to be some techniques that engage us and others we choose to avoid completely if possible. Cables are in the latter category for me. I have hand-knit complicated pieces using them but dislike knitting them on the machine immensely. That said, I am periodically drawn to revisiting the topic in my blog, the resulting swatches are as proof of concept.
Small crossings may be used in sequence to create more complex cables, and charts illustrating them may be simplified, using little or even no added color. 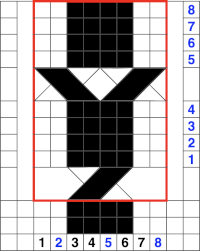 The repeat is 8X8 and the above movement can be seen in the purl view.
Ladders and knit columns between vertical sets of cables make the process easier to track, one needs to be alert to accidentally bringing the ladder back into work resulting in knit stitches, seen in the bottom left of the knit side swatch. 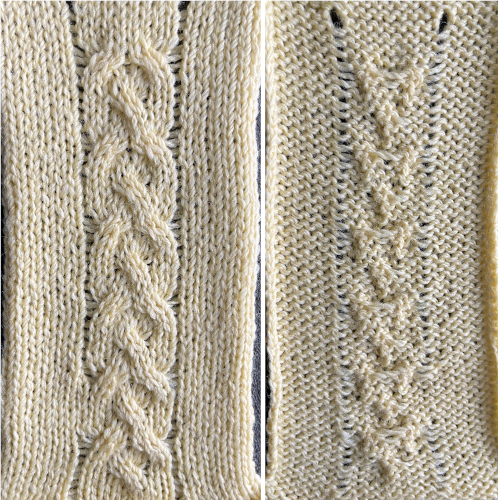 A spreadsheet table may be created to help with tracking multiple series of cables across a knit and their direction. It can contain as little or as much information as one wishes. Included here: the RC for possible crossings, and their direction on the purl side for machine knitting (reversed for hand knitting). Columns may be added including how many needles are left in or out of work between cable knit spaces or other info.
 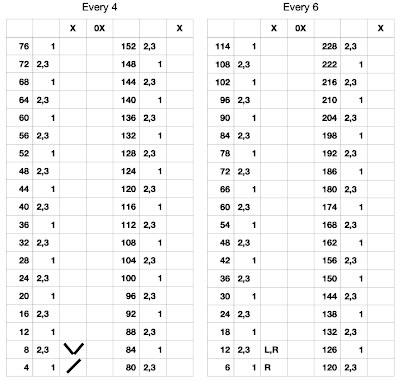 It is also possible to print a custom needle tape to place underneath the involved groups of needles instead of marking the needle tape or the knit beds. On a standard km, the needles are 4.5mm apart. A conversion reference for needle spacing point values
 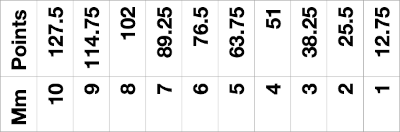 Four needles X 12.75 =51 points, the width of the table cells, which in this instance are all equal in size. Colors and any other info may be added within each cell. Print in landscape orientation, making certain the image is not set to fit the page, but at 100%.
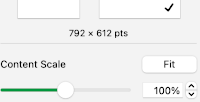
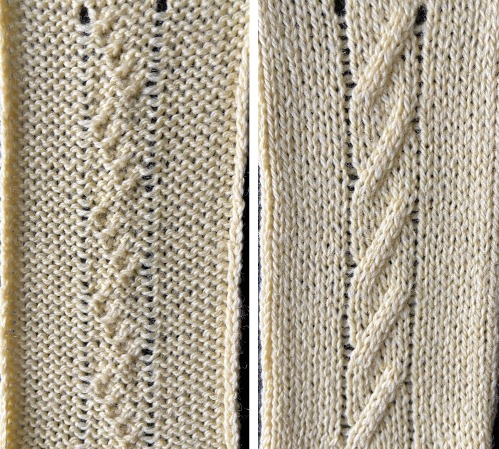
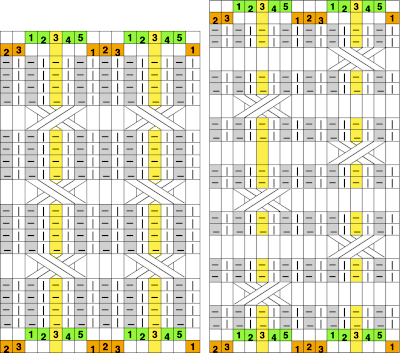
 A narrower series of twists are made after every 2 rows knit, the chart shows crossings on the purl side on the left, as opposed as to how they would appear on the knit side on the right
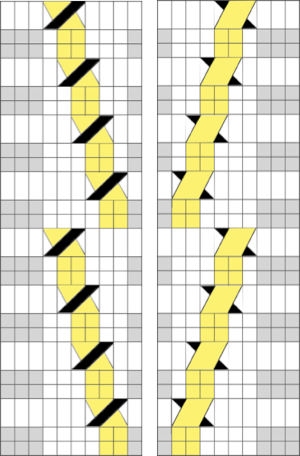
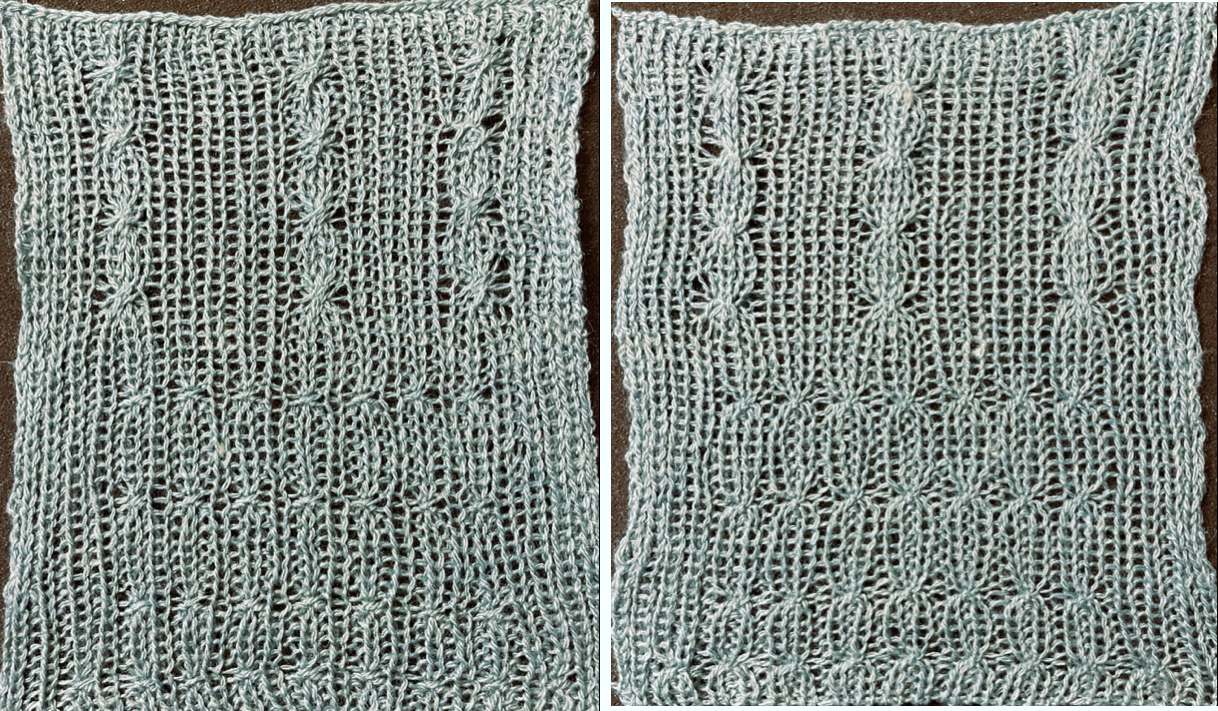
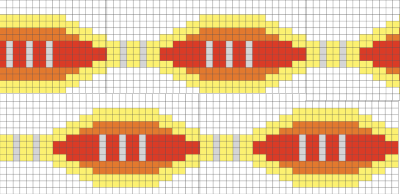
 Which leads to the topic of creating shapes by combining the repeats
 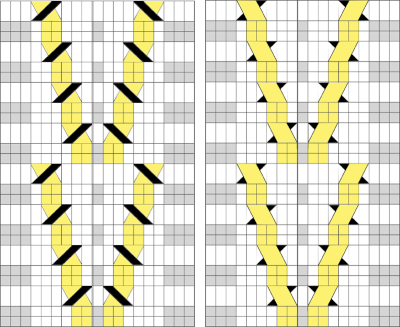 A brief effort containing at least 5 errors leads me to wonder about programming needle selection to help track crossings more easily and avoid mistakes. The center ladder here was latched up during knitting.
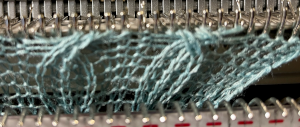
  Adding the ribber: the simplest knits using the ribber are made with transfers to the ribber of single or multiple stitches to create what is sometimes called trailing stitches, with cables occurring at determined distances and appearing as knit stitches on a purl ground. Some samples of elongated ribber stitches with crossings on a striped ground may be found in the post on Slip stitch patterns with hand transferred stitches, double bed, the technique may be executed in a single color, or as shown here with color changes every 2 rows.
 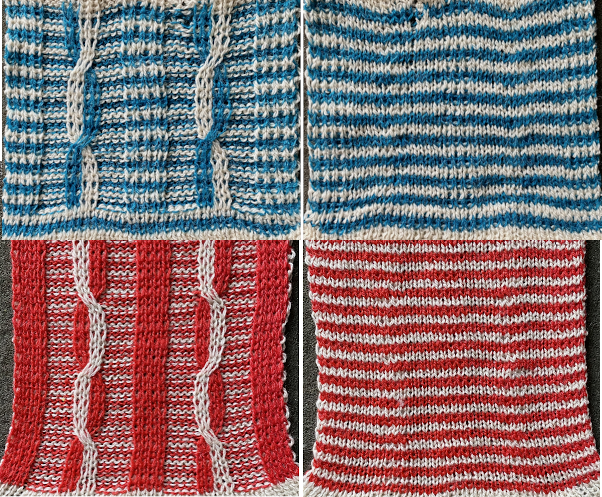 If only the knit stitches or purl stitches are crossed on one the same bed when knitting ribs, they will appear so on one side only. One example
 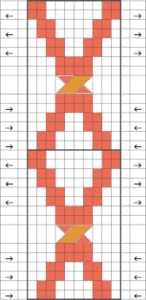 If the start is on the top bed, stitches on the ribber may be created by picking up bars from the top bed
 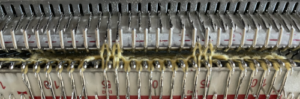 the yarn above was a 2/8 wool, which refused to cable on the ribber, and having the crossing was preferred to not
 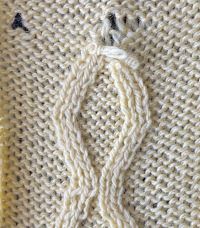 changing to a thinner wool-silk solved the problem.
 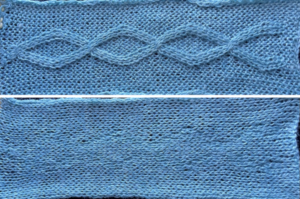 Using a punchcard or electronic program to track movements and cabling on the knit bed, each stitch in each pair of punched holes or pixels is crossed over or under the other. This is a very time-consuming fabric, not friendly to distractions or interruptions. Any crossing mistakes in the swatch were due to “operator error”.
 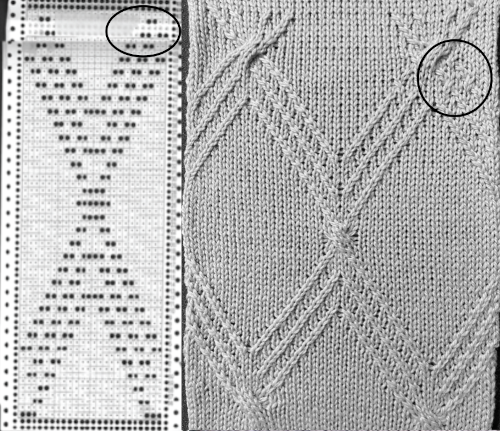 In reviewing the post after linking to it here I realized the now marked punchcard error at its top. The amended longer chart reworked in Numbers is also added to the older post. It is shown here aside from its tiled chart, checking for alignment, a habit developed as my skill and comfort in using spreadsheets grew,
  A png of the repeat, 24 stitches wide by 72 rows
  Tiled for alignment in Gimp as well.
 It is possible to use the repeat working 1 X 2 stitch crossings for a very different look.
A large swatch is worth doing before committing to a large piece.
Correcting crossing errors (purple arrows) after the fact will be harder than doing so in some other instances or in a bulkier knit.
Keeping the fabric visible as opposed to between the beds begins to show a pattern on the reverse, which can also guide the direction of movements.
There are spots in this repeat where the center larger cables are not possible because of cables in opposite directions already occurring on either side of the group of selected needles (red arrows).
Transfers occur by bringing single needles forward and crossing pairs of stitches behind them, moving away from the center of the triangular half of the diamond as it is formed. The sequence is retained until after the wider cabled segments occur (black arrow and line), where there is no other needle selection aside from stitches to be crossed.
The number of plain knit stitches between crossings is always even.
The cabled knit areas have a depth that makes them project out and appear almost beaded in texture. 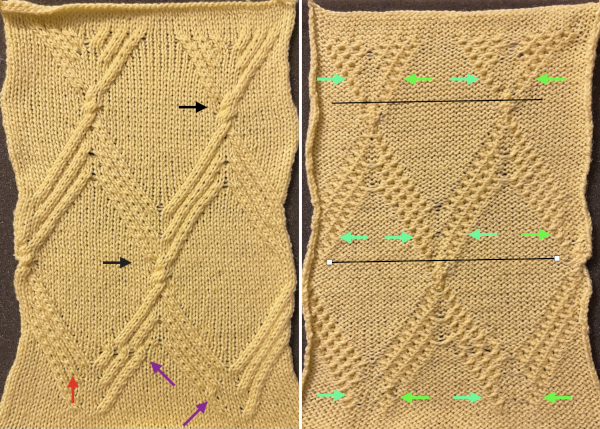 Assigning colors to crossings in a chart may be helpful or too much info depending on one’s perspective, the bottom of the repeat is on the right.
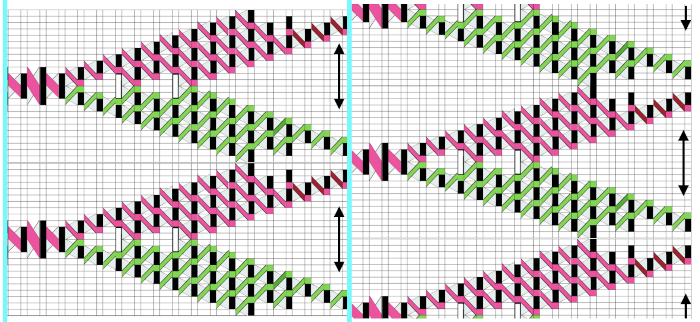
Periodically, the topic of reversible cables turns up in discussions for both hand and machine knitting. They are possible when working in ribbing on the knitting machine.
Keep in mind that ribs narrow when off the machine, cables do as well, so a looser tension is generally required, and the basic fact that knit stitches are purl stitches on the other side and vice versa.
Cable crossings are made over purl stitches that separate them or the reverse. Changing rib needle arrangements will result in fabrics that may not always “match”, appearing different on one side from the other.
Using the half-pitch position before any transfer rows brings needles closer together, G carriages may be a boon but may have a hard time knitting the row immediately following the cable crossings and even jam.
On the machines, a 3X3 crossing is likely to be the limit. A general starting guide when trying out repeats is to knit the same number of rows between crossings as there are stitches in the cross, so 6 rows knit before a 3X3 cable.
A published illustration of bringing the ribber into play. 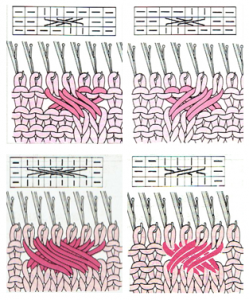 Creating extra slack if possible on the row before stitches are moved is helpful here as well as when working on the single bed.
Stitches may be crossed on either or both beds. If trying that out, crossing on one bed, knitting a row, then crossing on the other is another thing to try. As with any ribber fabric, the view of results is limited, dropped stitches may be easily missed.
A straightforward idea to test: in a wide vertical rib make cables on both beds, testing whether it is necessary to reverse the direction of the crosses or not, the number of rows to knit plain, etc. The chart shows a staggered arrangement. The number of rows between crossings can be changed to suit. 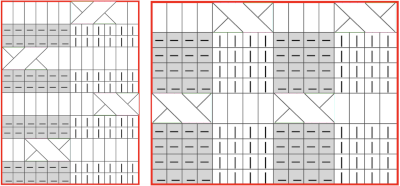 In my first test crossings occur on both beds and on the same row. Even using the thinner blue yarn at maximum tension the transfers were hard to execute. I had more success when I added 2 empty needles between the vertical ribs and brought one on each side of each rib into work on the top bed prior to knitting the last row between transfers, creating a bit of extra yarn to ease the crossings.
After the row is knit the same needles are pushed back to A position, dropping the yarn, and crossings are made before continuing to knit.
Results vary depending on the yarn, tension, machine model, and operator patience. The arrows mark the location of what appears to be a damaged needle, the tuck stitches were not deliberately planned.  Here the repeats are staggered, the edge with the ladder close to the end stitch is shown again to be far less stable than the one with more knit stitches. Spacing is varied, exploring the tolerance for the yarn to be crossed. The setup while working:
 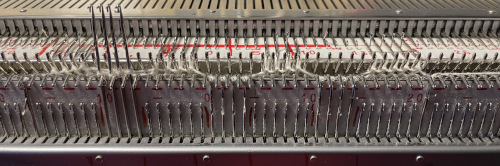 If transfers are made after every 5 rows knit, crossings on multiples of 10 could be assigned to one bed, while row counts containing the number 5 could be made in the other. Sporadically pairs of transfers on the same bed may provide more surface interest.
The set up after transfers to top bed prior to binding off 
 Trying out a simple repeat in smaller rib configurations will provide some idea as to whether the technique falls into the love of or not something to do simply because one can.
Charting can happen using the same method as in illustrating crossings in color, with some alterations, sometimes less information is more or enough.
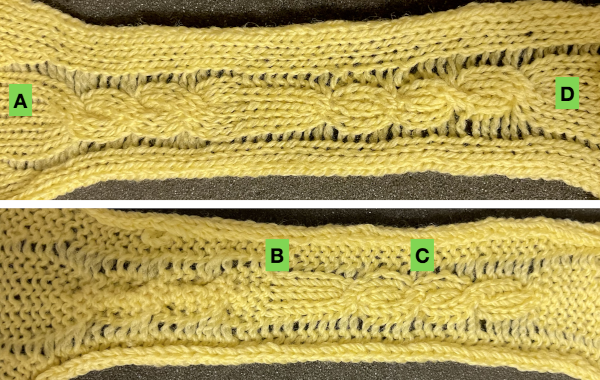
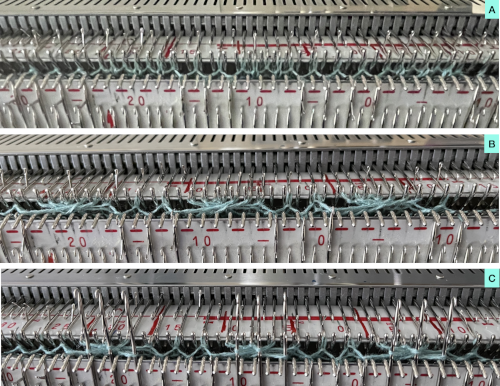
The first repeats were knit with most stitches on the main bed, and a 2 stitch ladder on either side of the ribs involved in cabling to help visually with keeping the stitch location constant. The grey, purl cell blocks are as viewed from the back, the white cells represent stitches on the ribber. 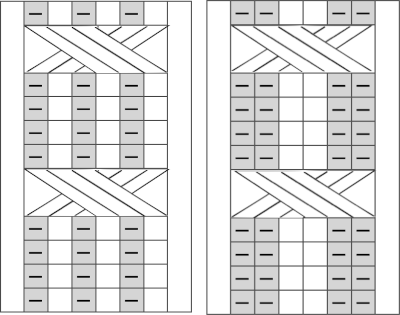 A: the set up single bed, with needles out of work on each side of the planned cable space, tension is tested and 3X3 crossings every 6 rows are made first only on the single bed
B. the ribber needle configuration is set up
C. the cables are made after transferring ribber stitches up to the top bed, and then the same stitches are returned down to the ribber before continuing to knit
D. the ribber stitches are transferred up to the top bed, and the swatch was bound off. Note the difference in width in areas where no crossings are made.
 The step-by-step instructions apply to both instances: the chart shows 4 rows knit between crossings, instead, here 6 rows are knit in both tests.
The photos documenting the 2X2 rib: the single bed starting point
 the rib configuration set up
 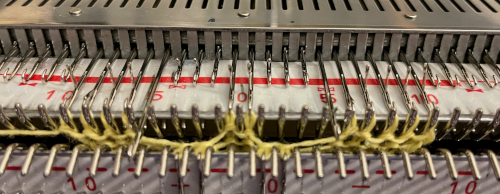 1. after 5 rows knit, bring an extra needle in work on the top bed to pick up extra yarn for the cross
 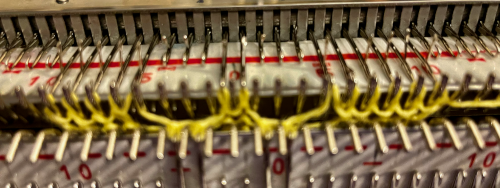 2. drop the extra loop, make certain the empty needle returns to A position
 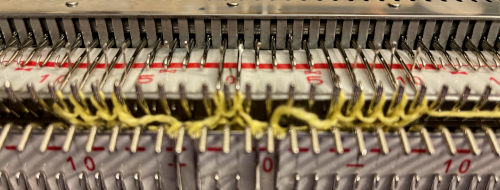 3. transfer all cable ribber needles to top bed
 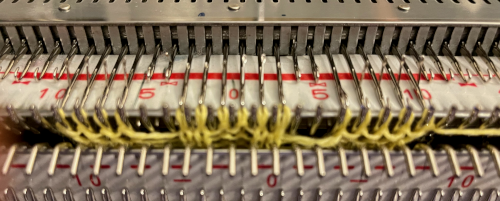 4. cross the stitches with two three-prong tools
 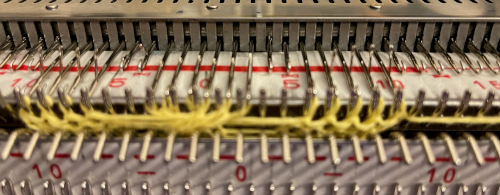 5. transfer stitches back down to the ribber
 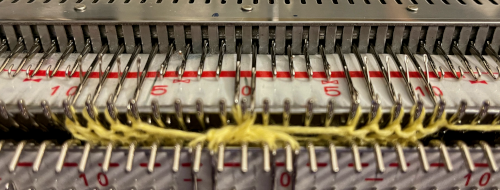 knit 5 rows, repeat steps 1 to 5.
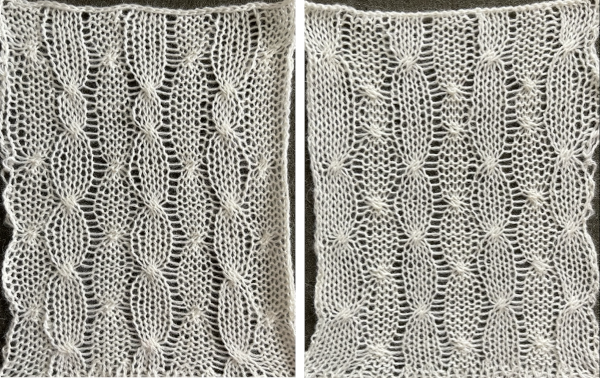
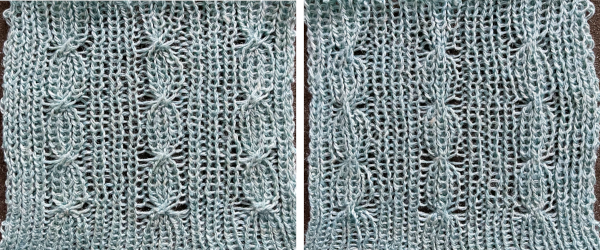
The appearance of each side of the fabric differs
A: the knit was begun on the single bed
B: the ribber configuration was set up
C: cable crossings were made as shown above
D: stitches were transferred to the top bed and bound off 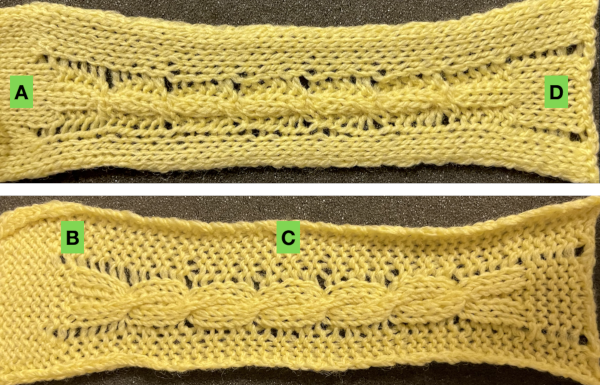 An attempt at a larger swatch using 1X1 ribs:
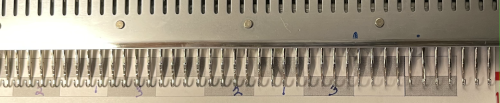
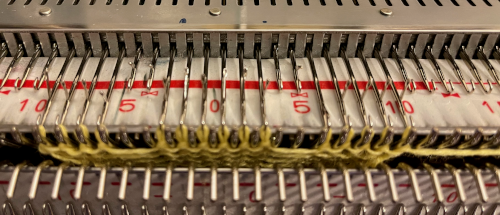
the intended concept, 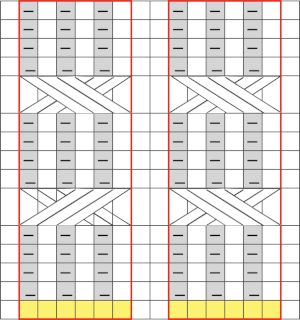 a custom needle tape
  rib set up for the yellow yarn
  the cable crossings using it were impossible, starting over with a thinner yarn at the same tension
 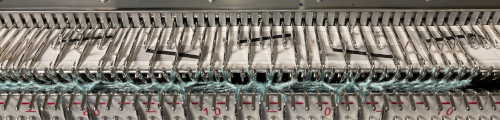 the ribber may be dropped after transfers up to the main bed, keeping stitches and crossings visible, making it possible to make corrections in any cables if they are needed before re-engaging the ribber and transferring stitches back down
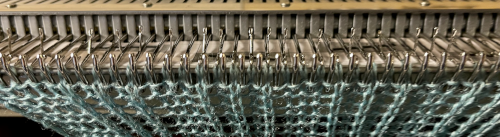
 The concept is an interesting one and many arrangements based on the idea are possible.
 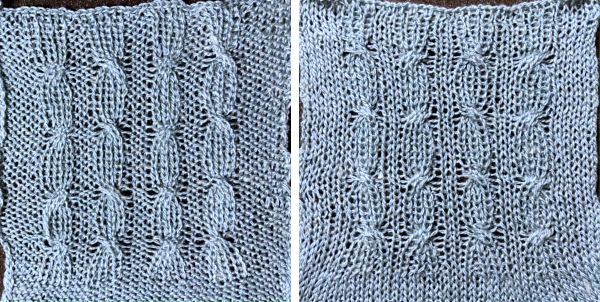 In the above swatches, when any transfers were made to the top bed, after crossings, a row was knit before returning stitches to the ribber. The extra row may or may not be noticeable, depending on the yarn and colors used.
More variants, analyzing columns in color using a crossing over single center stitch first and eliminating the extra knit row, and transferring stitches back down to the ribber immediately after making the cables. The rib will have a tendency to spring back when relaxed and off the machine, so the texture may be hard to see. Using a fiber that allows for some spreading out with some blocking helps to make the work more visible. A reference chart can be developed ahead of time for repeat variations.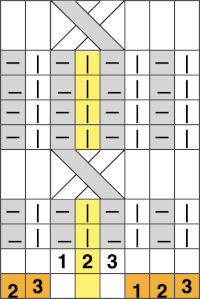
 The number of rows between crossings can vary. When the crossing row is reached:
A: stitches are moved up from the ribber to the main bed
B: cable crossings are made
C: stitches that had been moved up are returned back to the ribber, keeping the original ribber needle configuration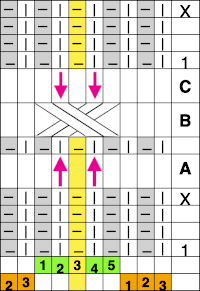

 Assigning colors to columns reveals that stitches are not moved onto the same stitch type when moved over a single, undisturbed, fixed center stitch.
  Shifting the needle arrangements when cabling, moving across a center column of two stitches that remain fixed on the main bed, the cable direction as it would appear on the purl side on the left, the knit side on the right is straightforward here:
 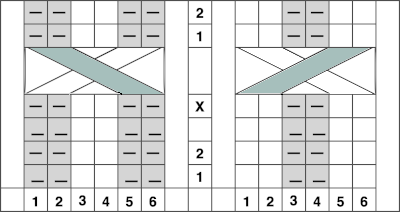 I found the above impossible to knit, even with ladders for extra slack, and the swatch stopped when the yarn broke
 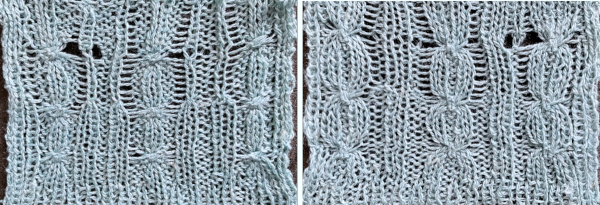 Returning to 1X1 rib, looking at the column alignment in color
 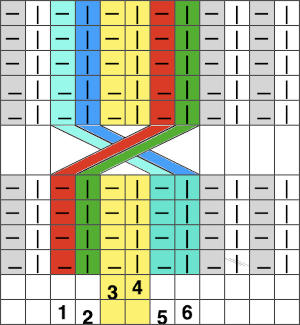 There appears to be enough slack produced in the formation of stitches between beds to make the planned crossings possible.
A: the needles transferred to the top bed
B: crossings are made over the 2 center stitches
C: the stitches that had been moved up to the main bed are now returned to the ribber. Bringing cable stitches out and or up to the hold position helps ensure that they will knit properly on the next carriage passes.
The similarity between both sides of the fabric is increased
 From a Brother pub, small crossings for a smocked effect
  The same approach may be used to create fabrics in tubular tuck patterns, easy to execute in one color. Once yarn, possible crossings, and their minimum frequency have been determined, the start of far more complex shapes can be explored using colors to represent the necessary direction of movements before any decisions are made has to how frequently to cross the cables and to get some idea of negative spaces created between traveling stitches. In hand knitting, a purl ground is easier to plan and maintain.
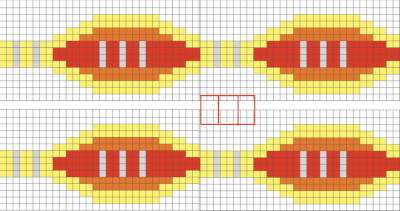
 Adding and removing rows in the tables or even changing colors is easy and quick in a spreadsheet, tiling in repeat with scaled screengrabs provides a quick reference for possible improvements/corrections before any actual knitting takes place
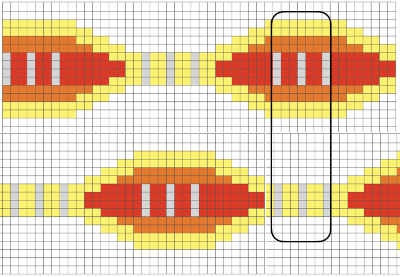
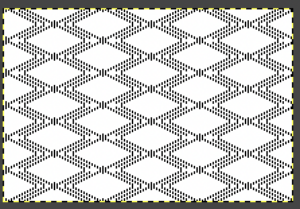
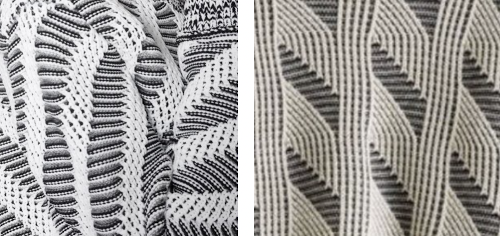 The inspiration fabric recently found online, source not known
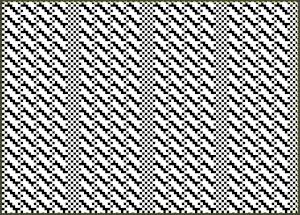
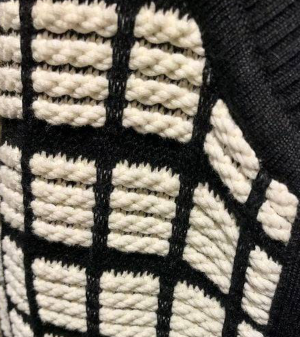 Analyzing the structure: it appears the fabric is knit with slip stitch textured patterning on the top bed, and occasional needles in work on the ribber creating elongated stitches that float on top of the light-colored rows.
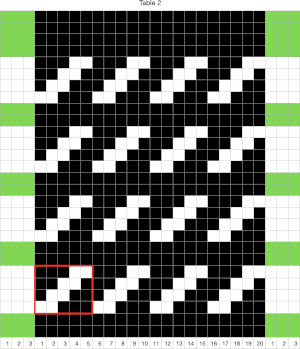 In slip stitch patterning the white pixels slip, the black pixels knit. This repeat is 20 stitches wide, so not usable for a punchcard machine. The first draft is 20 stitches wide by 32 rows high
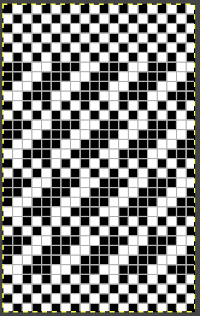
 Any adjustments in the dark color stripe between will need to be made within the repeat itself, the floats in the light color will be wider by using a simple color reverse. The color reversed, modified repeat is now 20 stitches wide by 28 rows
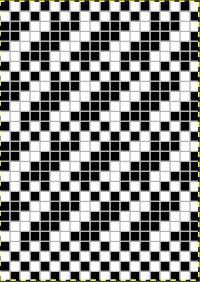
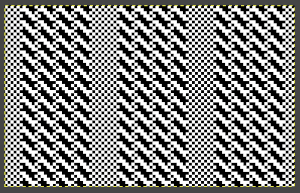
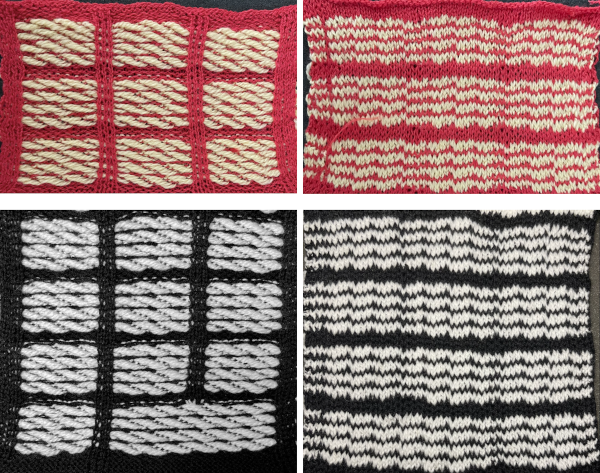 A comparison to the mirrored original inspiration, likely knit in thicker yarns
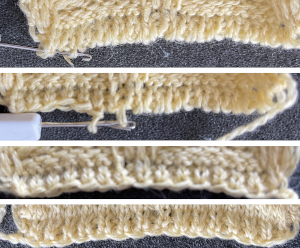
 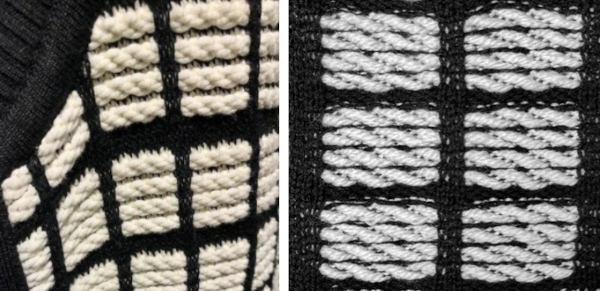 The knitting process: with any textured or very lacy knits casting on and binding off require special consideration.
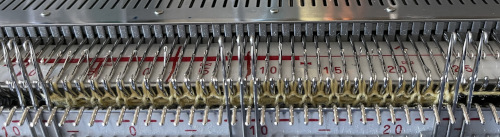 Read the first row of the pattern, cam set to KC1 to ensure end stitches are knit when patterning occurs only on the top bed.
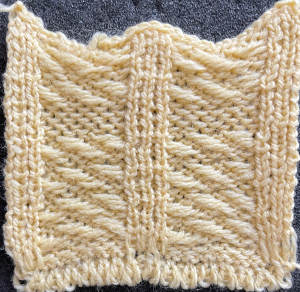 The cast on was deliberately loose. To tighten it up at the edge of the body of a narrower knit, every other loop can be picked up with a latch tool or crochet hook moving toward the yarn end at the cast on edge and is pulled through the previous one, producing a chain stitch. When the end of the row is reached, the yarn is pulled through the last chain and secured.