Plarn/tarn/ tarn my way

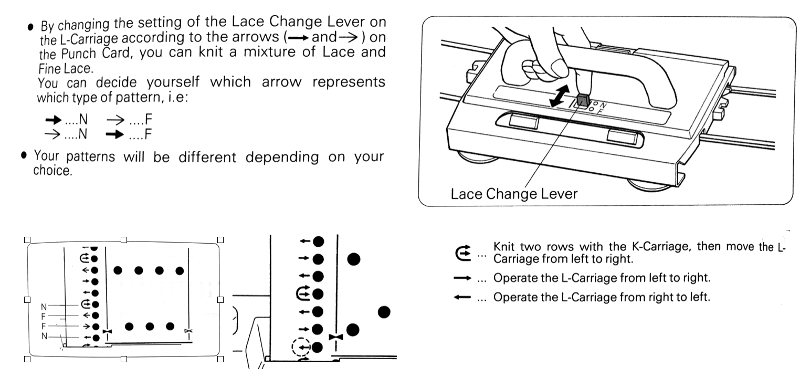
When I first shared plarn information here, I was under the impression the term applied to anything cut into strips and in turn used as “yarn” in knitting or crochet. Now, however, it appears the term “tarn” is in use when t-shirts or fabric are used. There are many ways to create tarn easily found online, including youtube videos by several authors, and even commercially dyed and prepared skeins/balls for purchase. Since I machine knit, I am interested in producing “tarn” that may knit on the bulky KM, which results in limitations that do not apply if one is to knit it by hand or crochet, where needle and hook sizes are far less limiting.
In my sewing stash of “rulers”, I had one product by June Tailor which since my purchase appears to have evolved. Its closest cousin by the same manufacturer is the shape-cut-ruler. It is a convenient cutting guide that I have also used on felted wool to produce even slits for later manipulation such as chaining.In this case, I began by cutting off the sleeves and upper body from armholes to neck, resulting in a tube, which in turn I pressed and folded in half, leaving a single fold edge for later cuts to produce the continuous strip.

Below the ruler is positioned over T-shirt tube folded almost in half in this case, with single fold border at top for later continuous cutting into tarn yardage

this is a better view of upper edge; rotary cutter moves within slits, inverted “teardrops” at the top serve as stops for the cutter, leaving an even, upper border intact, I tend to use rotary cutter moving from bottom up; this is not a hard and fast rule and may be adjusted to suit your preference

follow cutting guides through slits across the piece; a sharp blade helps considerably; when finished with the first pass, move ruler along each cut line, and make a second pass with the cutter to eliminate any areas skipped on the first pass and thus uncut while applying even pressure on the ruler; this is quicker and neater than using scissors; in turn, release the strip and lift away from the ruler, move ruler one strip over ( I am right handed, so moving from right to left), repeat process across fabric width

one T shirt down!

here I like to use a long curtain rod, broom handle, or anything else on hand and slip the slitted but partially intact tube onto it

here is the above rod, perched with ends resting between my kitchen table and the opposing countertop. The black marking line indicates the location of the first border cut from right towards left, and cutting (with scissors) continues in the same movement across the width of the fabric

time to make a ball! beginning in this case with “yarn end” on right, “milk” about an arm’s length of the strip (as you pull on the fabric it narrows and curls inward), and begin winding the result into a ball. As you move across the supporting rod the ball will have to be moved over and under it at regular intervals to keep the fabric flowing easily. I did so at the end of each loop circumference, which was easier for me than lifting the right end of my rod to free the “yarn”. The result:

the “yarn” superimposed on the ruler for an idea of the change in fabric width after pulling/stretching

a sample knit EON on the 260

Using punchcards to track cables and twists in pattern 2

This post was originally written intended for punchcard machines only, with the passage of time electronic pattern tracking, samples and associated repeats were shared.
Links to some later posts including cable manipulation and patterning
2023/05/30/a-return-to-plaiting-and-double-bed-hand-transfers/
2021/03/11/slip-stitch-patterns-with-hand-transferred-stitches-double-bed/
2021/02/01/slip-stitch-patterns-with-hand-transferred-stitches/
2021/05/09/double-bed-embossed-patterns/
2012/01/19/using-punchcards-to-track-small-cables-in-pattern-1/ 

2011: Cables seem to be in vogue once again in myriad permutations. They pose some interesting issues when created in machine knitting. Interweave Knits Winter 2011 published an article on “Cables 101” that includes a way to color code and graph cable crossings. “Back in the day” of regular, worldwide machine knitting seminars, several authors provided collections of machine-knit cables including George Le Warre at Passap universities (copyrighted, George presently in England).

Simple crossings are a good place to begin and produce texture. If one is not interested in freeform but rather constant, recurring patterns it is possible to use punchcards to produce visual cues when stitch twists and crossings are to occur. This is not an option in Studio Machines, easy on Brother because of the fact that needles pre-select, and Passap pushers may be used for a similar set of clues with a bit more fiddling.

When color-coding information for referencing as one knits, it is possible to be generous with symbols or edit down to bare elements. For example, one way to approach a schematic follows below, where knit stitches are illustrated as well as cable crossings. Red indicates stitches moved to the front, and the green indicates those traveling to the back in each cable set. In hand knitting, vertical or horizontal bars would represent knit and purl stitches. Since these are identical in this HK graph, they could all be eliminated

A

B the isolated repeat

The choice then remains whether or not to revert the crossings to match the HK pattern. One way to do that is simply to reverse positions for colors. The mantra becomes “red moves first, green moves second and over red”.

With all machines, if the knit carriage is left set for normal knit, even if the patterning option is engaged (KCI or KCII if there are any needles out of work) needles will be selected, but the fabric produced is stocking stitch. The usual considerations are in order: the number viewed on the card outside the machine corresponds to the design row being read by the reader, but the punchcard holes in view are not necessarily the same as the design row selected. Because one is producing the cables on the purl side of the knit, if hand knitting charts are used the cables themselves will be mirrored. In many instances, this may not matter, but if one is using the twists for representational crosses ie. in trees, owls, diamonds, and other geometric shapes, it is a good idea to scan the repeat, mirror the image vertically, and then begin translating it into machine knit interpretations. Relatively easy with simple scanning and printing software (ie. the flip horizontal function in Preview, a bit harder by hand.

When I can I color code my cards: ie. with lace I draw a line across the card when I reach each knit row sequence with a color pencil. This provides me with an easy-to-follow visual cue as to when the rows must occur, and also facilitates returning to the previous selection sequence when mistakes in patterning occur.

Some basics: with a punchcard, there is no row length limitation, but repeats are limited to 24 or a factor thereof. In this particular use wherever needles are selected, one has a visual reminder to move those needles in the desired direction.

I used the cards below to illustrate the idea in my intro to knitting classes. When needle selection occurs in the first, remove the selected stitches off the machine with a 3 prong tool in each desired location, then insert a second 3 prong tool back through the front of those same stitches, in turn removing from the initial tool used. Rotate the twice transferred stitches 180 degrees consistently either clockwise or counter-clockwise throughout, and return them to their original position on the needle bed. The result is a consistently textured fabric with no counting stitches or rows between repeats.

a swatch using it

This card begins to address regular cable crossings, mine was punched in repeat the full 60 rows. Color may be assigned to help with opposing twists’ directions ie. to left (pink) or to right (green) when the corresponding color bar appears just above the card reader.


More low tech

I am continuing to sort out issues that might help make lace shawls, scarves, and garments that require a finite length of time in their actual knitting. Punchcard machines are friendlier than electronic ones in terms of picking up the pattern after interruptions, and visual cues when correcting mistakes are easier to track and see. I design knits in a way similar to the way I cook. With several sources and ideas in front of me, I pick, choose, and “go for it.”

My most recent blank punchcard purchase revealed that Taitexma (Brother clone company)  is now producing pre-numbered cards for machines printed in RED! Does not affect function, but is distracting to me visually. In the past, it used to be the color red vs blue card blanks was another distinguishing factor between machine companies. Studio cards are traditionally marked in red, Brother in blue (with pre-punched lace cards being their exception).

The cost of cards has increased, and punching lace repeats at least for me are prone to errors. In a previous post, I discussed my way of marking up cards to make the process easier. Now, however, I was searching for a way of working out repeats on something equal in size to the punchcards that would allow for tracing holes, shifting pattern centers, be easily edited, and provide a size-specific visual template when the final design is reached, thus avoiding lots of taped over holes and mistakes on the actual punchcards. This brought me back to the drawing board, literally.

While drafting a new post revisiting graph papers and more on 4/21/18 I created a new document, saved as pdf, that presently prints to scale for me scale card extra2

Polymer tales.

Switching to the abbreviated cowls/collars I found I needed lighter weight large “buttons”. These are hard to find or often expensive enough that in production the added cost would affect pricing significantly. As an avid collector of craft and multi-media supplies, I have a significant stash of polymer clay dating back from months to decades. In an ah ah! the moment I made prototypes for what I thought might solve the button weight and supply problem. After the fact, I began to do searches on the care of polymer clay buttons and methods used in making them, which in turn led to a big oops! moment.

I recommend dry cleaning for most of my items unless they are felted ones, in which case hand washing or even a gentle washing machine cycle in cold water works just fine. Polymer clay it turns out does not like dry cleaning chemicals. If used on items cleaned that way it is recommended that the button be covered with plastic wrap and aluminum foil prior to exposure to cleaning agents. Hot water washes and driers also damage the clay, cool water hand /machine gentle washing appears to not be a problem.

Here are some online sources on these related topics: for a wealth of information on polymer buttons. Ready-made molds and ideas may be found here. Button shanks are available if that method of securing the buttons is desired.

The option I am choosing to pursue is making the button removable when the item is cleaned, which led to a search for button covers. Local chains that carry sewing notions had not even heard of them. A local mom-and-pop craft store, however, had an endless supply in their “backroom” dating back to when they were “in vogue”. Have to love elderly owners that are the shop version of inventory software and can just “go to” things that have not been out on the selling floor in years.

For anyone not familiar with them, here is an image of the item, available in a few sizes depending on the source.

The plan of the moment is to affix the baked clay to the flat metal surface with glue such as E6000 and further test the idea. Having the removable cover also means clay could be painted and finishes could be varied in ways that would not be possible if the item was to undergo dry cleaning. My sample first efforts which I will torture/test are below. If not buttons perhaps all that clay may mutate to use in shawl pins.

So many ways to add to my grey hair

I am trying to knit a shawl in the latest lace scarf pattern repeat. Using most of the needle bed is making it necessary to take KH far off the end of the KM, ergo the bungee cord (which may keep the extension rail from going out the window with the KM if I reach the appropriate frustration level).

Knitting in black is great on aging eyeballs! My studio is my attic space, and as can be seen, this punchcard machine is nestled at the moment in a very “neat” corner of it. I own 2 lace carriages for Bro punchcard machines, one is appropriate for this KM, the other for a later model. The usual mantra is not to exchange carriages between models without cautious evaluation, it is sometimes simply not workable. For lace, I found the “correct” carriage drops stitches easily, the “incorrect” one is harder to push, but drops far less often.

I mark the punchcard rows on which the arrow markings occur/ need to be placed by drawing across that row with a colored pencil; in addition to serving as a reminder for when the knit rows with the opposing carriage need to happen, this gives me reference points for the beginning of each transfer sequence for correcting mistakes when unraveling back to last knit row. Because this lace is much more labor-intensive than that used in the previous shawls the plan is to knit in a border at its top rather than on rehung open stitches, one at a time, sideways (this can take several hours and a lot of patience).

More lace thoughts: lace repeats don’t necessarily have to begin on row 1 of any repeat.  Here I chose to begin on RC 33 of my card so as to “go” for complete diamond shapes centered on the bottom and top. If the first knit row of the scarf/shawl is rehung at half of the desired finished length, a vertical mirror pivot for the lace pattern is created. When this is the plan, a contrasting thread may be placed where the 0 marking is on the needle tape, between the 2 needle ones (one of the brother oddities is the 2 needle one positions, R and L of 0) on the first row knit after the waste knitting; marking the needle tape with water-soluble markers along easily identified repeat points can also assure proper placement on the needle bed. When the knit is rehung for mirroring, the loop where the marker sits is placed on needle 1L, rehanging away from the center, every needle will be “filled”. Those needle tape markings may spare the grief of missing any stitches after rehanging, before removing waste yarn. On the standard KM single-width may max out at 18-20 inches. Steaming the edge that will be rehung helps make stitches more stable and visible prior to doing so. This is an image of a small border test with dropped stitches along with the mirror point, and a 2 gate peg bind off

With half the shawl completed, the snugly around 2 gate pegs bind off ran completely away from me (slippery rayon and black = o goody!) and it took a couple of hours to rescue the piece and get back in the pattern. The wavy border idea is now ditched in favor of not having a repeat of the above experience. My shawl will now have a far straighter top and bottom edge as a design feature.
The second half of the shawl is planned over the next couple of days. “Grecian formula” where are you?
…..
The final join was nearly invisible 
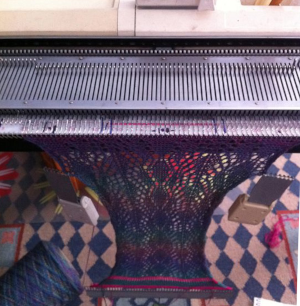
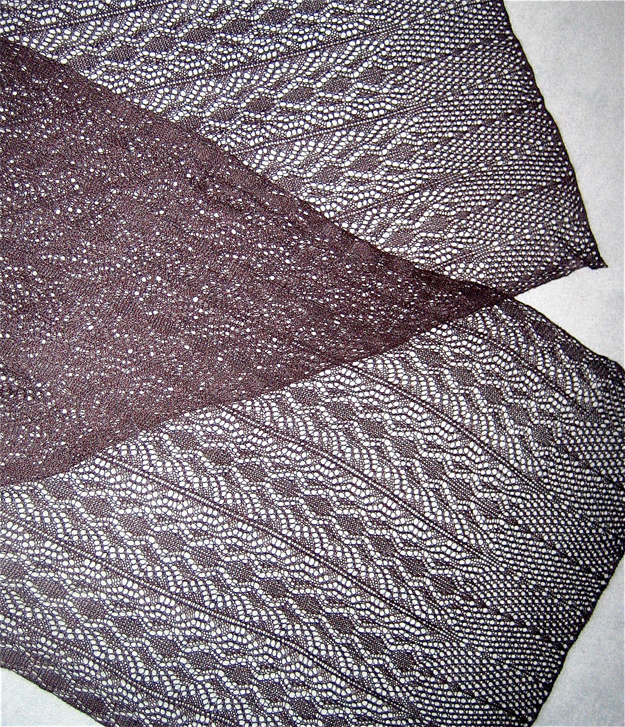
Part of half a scarf on the machine, there are added temporary markings on the needle tape for needles with specific vertical areas in pattern repeat,
while in this case, the pattern forms a secondary, mirrored single design at the center of the shawl
11/2021 Revisiting the approach to designing the scarves in the above method: begin with waste yarn and ravel cord, choose a pattern and an intersection for mirroring based on locations of all knit rows
Knit 2 or 3 rows, and place a yarn marker between the 2 number one needles at the very start of the piece. If 3 rows are knit, one is unraveled after the piece is rehung, being aware that the yarn end will have formed a knot that needs to be eased open before doing so
Knit the first half with LC operating from the left, add a border at the top of the planned pattern length if desired, bind off loosely
Rehang the open stitches using the marker as a guide to place the stitches back on the bed from the center marked spot out, the knit rows will be followed by transfers in the reverse direction. When stitches are rehung, a stitch is lost, so add one on the side on which that happens.
Turn the card over with the starting point for the pattern intersection clearly marked. For the first row of transfers to be made to the left, lock the card, make the first preselection row with the LC from left to right. It will continue to operate from and to the right for the top half of the piece while the KC will operate from and back to the left for knit rows between lace transfer segments.
Release the card. Knit in pattern to match the length of the previous half piece, add the border if planned, bind off loosely. Lace fabrics stretch in width when blocked.
This is not a true lace repeat, the design is only for illustration purposes

To mesh or not to mesh 4

The following illustrate some of the processes involved in planning out fabric akin to the one in the previous post. Black borders outline blocks of 6 stitches/rows, reflect markings on blank Brother cards. In option A: the motif is planned and drawn. In this instance, it is colored in green (1), the area it covers will ultimately remain unpunched on the card or blank on mylar. Graph paper may be used to work this out, knit design software, or as in this case, an excel spreadsheet. A grid is created with every other square blacked out or colored in (2). The motif is superimposed on grid (3). Repeat is expanded adding 2 blank rows above each design row (4). Rust squares represent punched holes in the card or black squares in mylar.

Option A

Option B: the same motif is lengthened X3 (5). The lace mesh base is drawn out (6). The elongated motif is then superimposed on mesh (7). Electronic patterning on 910 allows for minimal drawing using all black squares, in turn making it necessary to color reverse for lace. Two separate motifs are used, the method for programming such repeats is in 910 manual. However, there are considerations for needle position and pattern selector placement for this “shortcut” to work properly, the steps are described by Kathleen Kinder and others. I prefer to work with what I “see” in terms of punched holes or squares, this is the method used to develop my previous flower motif swatch. The short supply of mylars may also be a consideration in using them or not for such large, and perhaps limited use design repeats. If interface cables and software are available, other options abound.

Option B

Large scale mesh, breaking rules

The goal is to produce a large-scale mesh without hand techniques or extra steps.
In both slip and tuck, every punched hole, black square in mylar, or pixel in electronic downloads that bring a needle out to D position (for some unfathomable reason Brother needle positions go A, B, D, E, poor C got skipped) will result in a knit stitch. In the slip setting the non selected needles get skipped creating floats, while in the tuck setting, the non selected needles will hold a loop in the needle hook until that needle is returned to the D position. Side-by-side loops are troublesome in any stitch type. That said, tuck can be employed to sequentially lay down loops in some patterns where the lace carriage moves to produce side by side empty needles as part of the planned design.

The usual caution with such fabrics: extension rails must be used since both carriages engage the belt. The yarn needs to be “friendly” enough to not break easily. Since stitches travel across a wider gap than in single eyelet lace, the tension needs to be looser as well. Small changes can make a big difference, and so can patience. If end stitches are selected prior to the lace carriage making the next row of transfers, push them back to B manually so as not to produce decreases or dropped stitches.
Working the punchcard on a punchcard machine:

The lace carriage is set for normal lace, preselects the first row of knitting with the punchcard not locked on its first pass to the right. The KH carriage is set on KC I with both tuck buttons depressed. Each carriage works in sequences of 4 passes throughout.
Actions performed by the carriages as they make their next pass to the opposite side:
Lace carriage 

COL: moves to the right with no preselection
COR: no transfers, preselects for transfers to the right
COL: transfers to the right, preselects transfers to the left
COR: transfers to the left, preselects for the first tuck row. There will be 3 single needles with 3 stitches on each of them and two empty needles on each side
Knit carriage:
COR: knits first tuck row, makes the same preselection
COL: knits second tuck row, preselect the next tuck row, on a different needle position
COR: knits third tuck row, in the alternate location, preselects for all knit row
COL: knits all stitches, preselects blank row

Some observations: the top bind off as seen in the swatch below, was tight for the fabric. To maximize its width, the bind-off should be around at least 2 gate pegs, even 3 if needed. This allows for completing the task on the machine without adding more work and adding hand techniques. Tuck stitch produces a knit that tends to be short and wide, lace wants to open up with blocking as well, so this fabric definitely will want to spread. The top approximate 1/3 of the swatch below was kit using the same white yarn but in standard single needle mesh, making the size difference in “holes” created with the tuck method easy to see. The white is a 2/8 wool, the other a 16/2 mystery fiber I usually use as waste yarn.

For me this experiment will probably fall in the “now that I’ve done it, broken several rules, and have a good result I am over it” category.


Look Ma, missing holes! A saga begins…

Transferring any single stitch to the adjacent needle will create a loop in that empty needle on the next pass of the knit carriage, and form that loop into a completed stitch on the second KH pass as it travels back to its original position. There are some constants in knit fabrics. For example, in lace, if all transfers are made in one direction, particularly in meshes, the fabric biases. Great if you want a bias fabric, not so if the original plan was to produce a balanced one. The cure: to alternate the direction of transfers sequentially, or in series. If done in series the result is a vertical zigzag with movement in the edges of the fabric to echo the bias direction in the knit.
If two adjacent needles (or more) are left empty, the first KH pass will create loops on those same needles. Without the knitter’s intervention and manipulation of at least some of those loops the space rather than creating holes, will be producing “ladders”. Ladder fabrics whether in combination with lace holes or not can be interesting, often involve hand techniques to make them more so, but the topic of the moment is transferred lace.
For knit stitches to form in/with the single second pass of the knit carriage, at least every other needle must have a loop or stitch on it. If two adjacent needles are empty one of several ways to achieve a larger round hole is to knit the first row, drop off one of the 2 “loops” created, continue knitting; this technique will create a secondary smaller hole in the fabric, it is a matter of preference as to whether this effect is acceptable.
To avoid a secondary “hole”, the method I prefer is to insert a one-eyed transfer tool back to front through the dropped off yarn, twist 180 degrees either direction, forming an “e”, and rehang the twisted stitch on the empty needle, thus “casting” that stitch on. This technique is sometimes used for buttonholes (not the best for that purpose). It is one way to bring the familiar e wrap used at the beginning of some knits into the body of a swatch/ garment. As the second knit row is completed the larger, “round” hole is now achieved.
In “automatic” slip small slits/holes appear where sequential rows of knitting occur, creating secondary patterns (seen in doilies).
It is up to the knitter to decide which trade-offs are acceptable ones. “Automating” functions add to design time and sorting out modifications to repeats but can speed up the final knitting process and facilitate accuracy when one transits from swatch to garment construction.
Lace cards can be planned to incorporate some larger holes, adding hand techniques to the mix.
And then there is the purposeful loss of holes, ie. in fine lace where the yarn is not transferred to but rather shared with the adjacent needle, creating a textured look rather than a hole filled one unless very thin yarn is in use.

Lace: from electronic repeat to punchcard

At about the time I began my recent lace obsession, and pre my trying to actually use excel instead of simply knowing it lived in my computer, a friend was trying to work on a lace repeat that was found online as part of Staceyjoy’s knitting stitch portfolio, now part of the site. As a result, the downloadable pdf below bears the name it does, includes my how/to suggestions for the journey from electronic single repeat to punchcard, and the resulting swatch. One additional tip: when working with copies it is good to mark tops and bottoms clearly, especially if combining pieces of patterns so as to avoid marking/punching and vertical mirroring mistakes.

redlipstick PDF

So many machines…lace punchcard knitting

There are several brand KMs still around and in use, but most are no longer being manufactured. Questions often come up on using one KM brand pattern card on another. Card readers inside the machine are below eye level, so exterior number/other markings on cards or mylars reflect that, providing the knitter with a visual cue as to where they “are” in the repeat. If machines pre-select, the needle selection may not bear any relationship to the actual design row on the punched card or mylar as opposed to what one “sees”. In addition to this variable in lace one often has 2 carriages in use. It is possible to develop cards etc. from lace hand-knitting graphs, but there is enough “going on” so a good place where to start experimenting is with pre-drawn ones. Lace preselection on any single row may have no apparent relationship to where the lace hole will ultimately end up.

Here are some random facts gathered from both sources and experience, they are applicable only if the knit carriage is set for plain knitting and no other function ie. slip or tuck is involved; plain knit rows do not advance the card reading mechanisms. In mixed-structure fabrics, the rules change.

the Brother and Toyota lace cards can be used on studio punchcard machines as long as they are patterns that have 2 blank rows after each transfer sequence

Brother and Toyota have U-shaped arrows to identify when to knit with the knit carriage, both brands read cards 7 rows down

the first row on Brother is transferred from right to left, while on Toyota it is transferred from left to right; Brother and Toyota cards are interchangeable provided the card is mirrored vertically (or a simple cheat: use carriages on opposite sides of usual)

for Studio knitting find the row number of the U-shaped arrow and circle the 2nd and 3d rows below that row that number to identify rows in which the carriage is changed/set to knit

The Brother ends with 2 blank rows

while Studio starts with 2 blank rows

on Studio begin brother card by locking card 4 rows before row 1, on row 3

Brother/Knitking lace carriage does not carry yarn, does not knit or trip the row counter; the stitches get transferred in the direction that the lace carriage is being pushed

Studio/Singer has a lace carriage available that transfers as it knits; on more complex laces one is sometimes instructed to set the carriage not to knit for a specified number of rows, the yarn may be removed, and other adjustments are often required

though Studio and Brother lace cards are not directly interchangeable; aside from the numbering issue the transfer method is different, so a studio lace card “working” on Brother or vice versa is a happy accident and likely to result in a “different” fabric

Brother information is applicable to its “new” clone, Taitexma.  The possible settings and symbols:

Lace point cams may be used on the punchcard machine to create vertical bands of lace. This is also achievable on the electronic by programming for knit stitches between vertical (or horizontal bands).

More information in posts:
Lace knitting tips including card and electronic markings for transfers and knit rows 
 Revisiting lace repeats, symbols, and charting

A few references :
Machine Knitting: the Technique of Lace by  Kathleen Kinder
Knitting Lace and A Machine Knitter’s Guide to Creating Fabrics by Susanna Lewis
Machine Knitting: the Technique of Pattern Card Design by Denise Musk
John Allen’s Treasury of Machine Knitting Stitches
The Harmony Guide to Machine Knitting Stitches (their Colorful Guide to Machine Knitting Stitches does not include lace)
322 Machine Knitting Stitches (Sterling Publishing,1988)
Both Brother and Studio published punchcard volumes, now out of print.