Knitting continues

I have been working on a series of tuck reversible chenille scarves. Color changing occurs every 2 rows. I do use 2 carriages. IMO the brother 2 color single bed changer was one of the worst designed accessories ever. The chenille is cranky, knitting is slow, and one is looking at the back of the knit so the pattern is not immediately obvious to the eye. These are a few colorways

thinking I had the knitting down, got to # 12 scarf, realized I needed to knit 10 more rows after canceling needle selection, “corrected” for row count, finished knitting the pattern, completed the edging, and realized the “corrected” rows were off and that this whole scarf has a mystery repeat. Here is an image of the front of the piece after unraveling edging and back to a row ready for rehanging next to a previously knit “how it should look”

it is an interesting variation of the pattern repeat, but without fiddling with starting rows, I have no clear idea how to duplicate it should I want to. Knitting rooms seem to have days when they are full of goblins.

I have some issues with my back and right arm was looking for an easier way to manage the knitting of these things and the reach required to get the carriages off the beds while knitting with the opposing one and had forgotten about this particular “stand”. A few years ago I broke my right shoulder, and as I began to regain use of the arm I went looking for an adjustable height, stable KM “stand”. A friend found this for me. It is what I can only be described as an ancient, asylum quality hospital bedside stand. It is probably at least part iron since magnets stick to its metal parts, are very heavy, has a huge adjustable height range, and does not budge during knitting in spite of the fact it is on wheels, while it is easily moved when one wants to do so. It was “free” as well, an added bonus.

When knitting fabrics single bed I do not work with the ribber engaged, have no idea if the added weight would be an issue or if the clearance is adequate for attaching it to the “stand”, but using the ribber clamps with the main bed at an angle seems to make crankier fabrics easier to knit. The crank for raising/lowering the height easily stores lace extension rails.

A kitchen timer is handy to get an accurate gauge as to how long the items actually take to knit from beginning to completion in helping set retail prices for new items, and kitchen scales to weigh cones before and after (grams or ounces) aid not just to gauge the cost of materials, but also to be certain that yarn quantity is adequate to finish the piece.

In static season some of the problems with yarn management or electronic KM pattern shifts can be resolved by both having a grounding wire, and using a humidifier. One such model may be seen in the lower left of the photo, is very inexpensive, designed for use in nurseries, on the noisy side, but requires no special care other than occasionally cleaning out the water container, and uses tap water.

Canned air can help remove fiber dust during knitting so it does not become part of the finished piece when using a brush or small vacuum is impractical, it is best not to use it in places where the fuzz is likely to get blown into springs and electronic parts, however.

Paper towel holders can serve as yarn cone holders for ones that tip over easily, and the extra straight arm they sometimes have in models similar to the one below can help hold upright yarn wounds on tubes of various sizes, an alternative to the usual horizontal ways of managing such.

Craft ribbon holders can serve the same purpose if one wants to feed tubes horizontally in addition to the old super low tech tricks of HK needles poked through a variety of holders with caps to help secure them in place

.

Slip/ tuck stitch experiments

These scarves were designed using the same method as described for mazes and mosaics, they are knit in rayon chenille, fringes are composed of  i_cords applied to cast on and bound off edges. The smaller shape/repeat allows for more control over fabric width while retaining full repeats

blue ovals: 11X58 inches excluding 3 inch fringe

BW: 9.5 X 58 inches excluding 4.5 inch fringe

time to stop playing and get back to winter inventory production!

hot off the presses 11/10: tuck stitch 11 X 60 rayon chenille

an unplanned “mutation”

scarves measure and average 9(+) inches in width, 60(+) in length after blocking

11/17/2012: some colorways

.

Mosaics and mazes: machine knits_ from design to pattern

Maze patterns have long vertical and horizontal lines broken by regular gaps and the pattern lines change course from the vertical to horizontal, and vice versa. Maze cards can be identified by completely punched sections, some alternating with every other square marked for two rows, usually geometrically shaped. Areas of stocking stitch produce horizontal colored stripes, and alternating pattern stitches that slip or tuck cause the vertical stripes, which are sometimes pulled nearly diagonal by the influence of tuck or slip. The fabric will be unbalanced because the number of needles slipping or tucking will not be the same on every row. Odd rows form 2 color horizontal stripes, even rows vertical stripes, with color changes occurring every 2 rows.

Mosaics have a brick arrangement (tessellae), with clear perimeters and cores, and stepped diagonals (frets) that are partially formed bricks, their positive and negative spaces are created by the use of contrasting colors. The stripe sequence is not as obvious. The punchcard looks even less like the original design.

In single bed work, the reverse of the fabric will show the original design in the texture of its slip or tuck stitches. There usually will be no floats longer than one or two stitches.

The knit side may look like a fair isle but the back lacks the usual long floats, hence the name “float-less fair isle”

The row gauge is compressed. Tuck fabrics are short and fat, slip ones tend to be short and thin. Some patterns elongate in washing. The tension used is usually one number higher or more than that used for stocking stitch for slip patterns to reduce their narrowing, tuck patterns may also have to be adjusted to suit. Smooth yarns in contrasting colors are the easiest to establish and test the pattern, then the choices can be far more personal.

Designing your own: traditional “rules”

  1. if scale matters consider that the height of 2 rows may equal the width of one stitch
  2. start small, let each square on your graph whether on graph paper, in a design program or spreadsheet/vector program cell equal one stitch, each line on the graph represents 2 rows of knitting, when knitting the pattern double-length specific to KM may be used. The unfilled squares represent the lighter color/color1, the colored squares represent the dark/color2
  3. no more than one stitch to tuck, two to slip at a time
  4. row 1 and all odd-numbered rows (most stitches knit) can have any number of squares marked, the slipped (tuck, or slip/part tuck in alternating directions) are represented by blank grids (no more than 2 side by side for slip, single for tuck), they are generally knit in the lighter color/color1
  5. even-numbered rows must have single squares marked, they are generally knit in the darker color/color 2, there should be no more than 2 “light squares”/ unpunched holes side by side, the slipped (tuck or part/slip tuck in alternating directions) are represented by marked grids
  6. vertical lines must begin and end on odd-numbered rows
  7. vertical lines must always consist of an odd number of rows in total
  8. the finished design must be an even number of rows to allow for traveling back and forth to the color changer for picking up and carrying the subsequent color
  9. if the design is not to be elongated check to see that every light square to be worked in the dark color is present in the row below, that every dark square in the row to be worked in the light color is also present in the row below

Susanna’s chapter on mosaics has information on fabrics where “rules” get broken. Changing the order of the colors or introducing a third color may yield pleasant surprises. Knitting is started on a non-patterning row with first-row selection toward the color changer in Japanese machines. If you have a machine that preselects needles: color must always change when the needle selection changes. Four movements of the carriage are required to produce two rows of knitting.

One approach with a design that breaks rules:

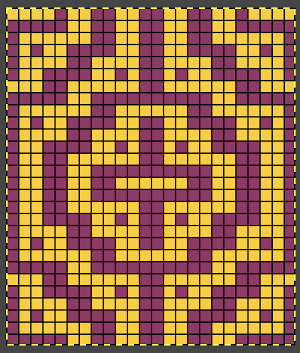
masking alternate rows and “separating them”: odd rows knitting in color 1

dark squares get punched out/ drawn, light ones tuck or slip depending on cam settings

color 2 knitting even rows:

light squares are punched out/drawn and will knit, dark squares ones tuck or slip depending on cam settings

colored areas below are those to be punched overall

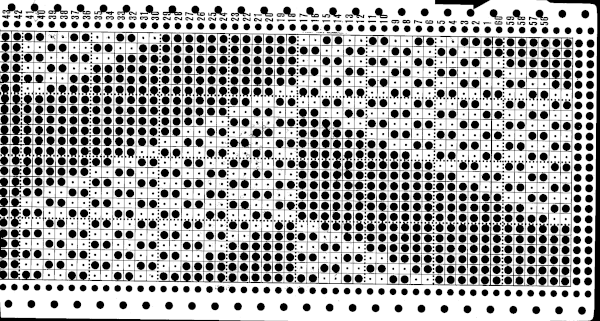
I used Excel to eliminate yellow fill on odd rows, darker fill on even. Many articles on this subject date back to graph paper, pencil, and eraser days. Quick color fills including empty make the process quicker with software. Still finding the image above confusing, it may be easier to decide what to draw on the card/mylar if all areas to be punched are dark, blank squares can then be more easily identified and marked, punching everything else or coloring them in and using color reverse if your machine has that ability. In the image below the lighter color is replaced by a darker one

the resulting card, which needs to be elongated X2

The swatches were knit using both the slip and tuck settings (also breaking the usual rule). Some of the tuck rows have a bit of color scrambling likely due to the amount of side by side tuck loops in the repeat not knitting off properly in those spots

slip stitch front

the back

tuck front shows the repeating trouble spots

tuck back

point grids for developing designs are of 2 types

in turn, the pattern may be drawn over them

staggered units may require some cleanup and “erasing”, as represented by pink squares

when the shape is what one desires, color separation follows as for the design at beginning of the post

Susanna Lewis at one time did publish a technique that could be entered in the E6000 that essentially did the separation; wincrea does not presently download techniques, there are other programs that can, and/or a combination of card reader sheet and computer download may be used, but that is for another day.

Mosaics and mazes from “FI” “universal” patterns

Many punchcards that obey the usual restrictions for tuck, in particular, may be used to create “random” mazes and mosaics, with color changes happening every two rows. Test swatches will show differences in surface texture, patterning, width, and height of the knit. It is useful to use clearly contrasting colors to study how the structure of the fabric is affected by different techniques. This test series explores the quality of the stitches created, along with using different knit carriage cam settings, although this repeat does not produce designs typical of either mosaics or mazes.
The swatches were knit during a class demo, for easy visibility, not as studies for finished garments or accessories. They were produced on Brother punchcard KM, using a single bed color changer. Electronic KMs advance a row for each pass of the carriage regardless of its beginning position/side. As noted in later blog post shares, such fabrics are produced more quickly and easily if an electronic is available with  2 compatible carriages for use.
Yet another single color variation, missing here, would be to use opposing buttons for tuck/slip.
The first preselection row is toward the color changer.  The FI pattern front with a bit of bleed-through where floats were hung up on the purl side

tuck 1 color slip 1 color  tuck 2 colors slip 2 colors  last but not least, slip stitch adding a third color front, still changing colors every 2 rows

This is a factory punchcard design, a smaller repeat. 
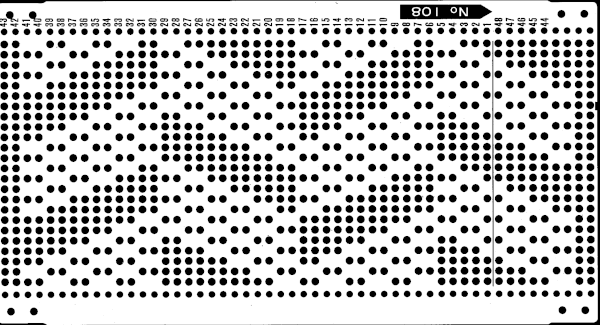
The repeat enlarged and punched for use in the pictured samples

Mosaics and Mazes: knitting on the machines

Two great books on the subjects by Kathleen Kinder:

another article/printable PDF resource by Susan Guagliumi (this link no longer works, subscription and login are presently required on her site for access to her free pubs)

Susanna Lewis:  “A machine knitter’s guide to creating fabrics” pp. 71-78, 1986. “Designing your mosaics” and “Figurative designs in machine knitting” were published in To and Fro Magazine, and presented at Passap University app. 1992

Denise Musk: “The technique of Slipstitch” pp. 36-46 1989

Barbara Walker Mosaic knitting companion CD by Morgan Hicks 381 motifs “charted and converted for your electronic knitting machine or crochet, .pat or .pcx format”.

A DVD stitch compendium salute to Barbara and an interview with her. Most reviews online describe as it being most suitable for beginning knitters. For a treasure of her treasury patterns including some cable stitches, one may visit The Walker Treasury Project. The group’s photostream may be found on Flickr.


Large scale mesh, breaking rules

The goal is to produce a large-scale mesh without hand techniques or extra steps.
In both slip and tuck, every punched hole, black square in mylar, or pixel in electronic downloads that bring a needle out to D position (for some unfathomable reason Brother needle positions go A, B, D, E, poor C got skipped) will result in a knit stitch. In the slip setting the non selected needles get skipped creating floats, while in the tuck setting, the non selected needles will hold a loop in the needle hook until that needle is returned to the D position. Side-by-side loops are troublesome in any stitch type. That said, tuck can be employed to sequentially lay down loops in some patterns where the lace carriage moves to produce side by side empty needles as part of the planned design.

The usual caution with such fabrics: extension rails must be used since both carriages engage the belt. The yarn needs to be “friendly” enough to not break easily. Since stitches travel across a wider gap than in single eyelet lace, the tension needs to be looser as well. Small changes can make a big difference, and so can patience. If end stitches are selected prior to the lace carriage making the next row of transfers, push them back to B manually so as not to produce decreases or dropped stitches.
Working the punchcard on a punchcard machine:

The lace carriage is set for normal lace, preselects the first row of knitting with the punchcard not locked on its first pass to the right. The KH carriage is set on KC I with both tuck buttons depressed. Each carriage works in sequences of 4 passes throughout.
Actions performed by the carriages as they make their next pass to the opposite side:
Lace carriage 

COL: moves to the right with no preselection
COR: no transfers, preselects for transfers to the right
COL: transfers to the right, preselects transfers to the left
COR: transfers to the left, preselects for the first tuck row. There will be 3 single needles with 3 stitches on each of them and two empty needles on each side
Knit carriage:
COR: knits first tuck row, makes the same preselection
COL: knits second tuck row, preselect the next tuck row, on a different needle position
COR: knits third tuck row, in the alternate location, preselects for all knit row
COL: knits all stitches, preselects blank row

Some observations: the top bind off as seen in the swatch below, was tight for the fabric. To maximize its width, the bind-off should be around at least 2 gate pegs, even 3 if needed. This allows for completing the task on the machine without adding more work and adding hand techniques. Tuck stitch produces a knit that tends to be short and wide, lace wants to open up with blocking as well, so this fabric definitely will want to spread. The top approximate 1/3 of the swatch below was kit using the same white yarn but in standard single needle mesh, making the size difference in “holes” created with the tuck method easy to see. The white is a 2/8 wool, the other a 16/2 mystery fiber I usually use as waste yarn.

For me this experiment will probably fall in the “now that I’ve done it, broken several rules, and have a good result I am over it” category.


To block or not to block

Pattern repeats are sorted out, out of work needles correct positions critical, many false starts, then onto yarn crankiness. Two “shawls” are now knit, approximately 16 inches by 64 inches, one in off-white cashmere, the other in over spun wool. They are large enough to drape around shoulders, lightweight enough to wrap for warmth as scarves. Both required washing to remove sizing, are now very different in body and touch. My favorite way to “block” laundered items is air drying on a wool rug after a couple of spin cycles in the washer. I use pressing/steaming if appropriate to fiber, do have blocking wires,  but they have only ever seen daylight as substitutes if I “lose” ribber cast on comb wires. Next in this family will be a shot at knitting this item with a thin ribbon. Here is the completed drying twosome with their purl side public face. The Knit side is interesting as well, duplicating the hand technique swatch exactly. Yarn weights used are pushing boundaries for KM, knitting is extremely slow after design/yarn problems are all sorted out. Though this online post follows camera documentation that began yesterday, the actual process has occurred over the past 2 weeks.

A shawl tale

I have always been interested in mock crochet stitches executed on the knitting machine, have done a bit of experimenting in the past. The ones that are the most interesting to my eye are usually knit on the double bed, often making them reversible, which in turn may require hand manipulations. Browsing through old knitting magazines I came across this baby sweater and became determined to produce a similar fabric, in a manner that might be more manageable for production. In this instance the back locks are changed in sequences of 3, 1, with button changes, the yarn is fine. The first sample I produced was following the pattern stitch instructions.

The fabric as a hand technique, dropped stitches included

The challenge: creating a downloadable stitch pattern that will automatically select appropriate needles and duplicate this texture. Yarn used will be varied and have different weights. Pusher/needle set up both beds critical, then there must be an edging…more to follow.

Trying to coax a rectangle into a square.

Blocking is one of those topics open to endless debate both as to method and necessity. In most of the items I produce using conventional yarns, I restrict it pretty much to washing/pressing/ironing as needed, thus avoiding all those blocking wires, pins, etc. In this instance, however, the wire item is in need of some help in changing into and retaining the desired shape: my partial solution is seen in the photo above.

For the curious: Magnet wire or enameled copper wire is a copper or aluminum wire covered with thin insulation. It is used in the construction of transformers, inductors, motors, headphones, loudspeakers, hard drive head positioners, potentiometers, and electromagnets, among other applications. However, it is not usually magnetic itself. Magnet wire insulating films used (in order of increasing temperature range) include polyurethane, polyamide, polyester, polyester-polyimide, polyamide-polyimide (or amide-imide), and polyimide. Kynar wire is an instance of a color-coated member of these families and is used in my “colored” jewelry items. For knitting on a loom, I prefer 32 gauge or thinner (higher numbers), which can be plied successfully for more drape but are nearly invisible singly; 30 gauge or less(lower numbers) moves into the hand crochet/knit coil domain for me.

I enjoy using materials designed for uses other than those for which they were designed, the inherent challenge, surprises, and problem-solving.