Back to lace

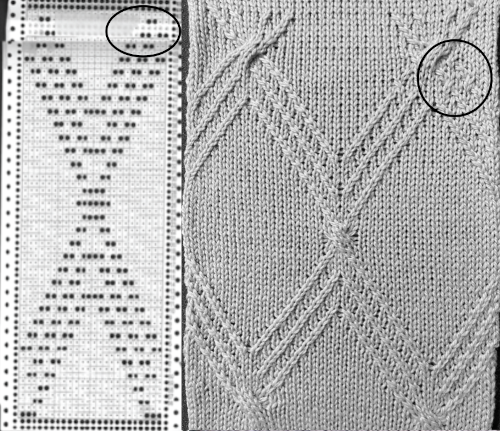
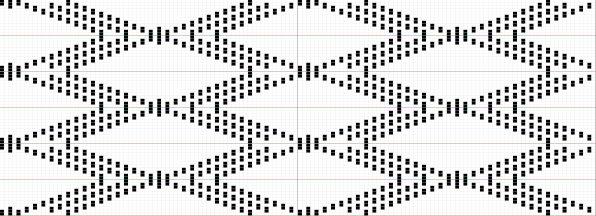
Recently I came across a photo in a magazine with what I thought of at the time as an unusual knit leaf. One of my first instincts upon viewing such patters is often to explore whether I might be able to reproduce the knit on the machine more quickly and whether in addition there may be a way to “automate the design” by coming up with a repeat that would work with the use of the lace carriage. I will share some of the many ways to explore such transitions in a series of posts. As written they will specifically apply to knitting on Brother/Knitking/Taitexma brand knitting machines.

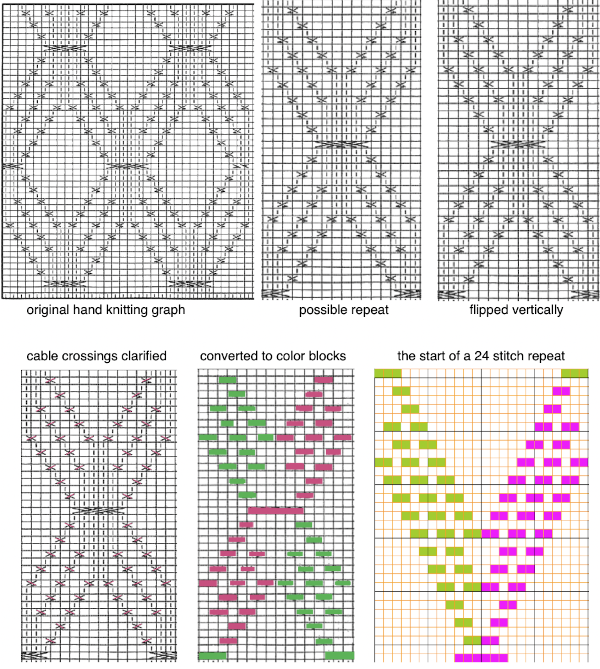
The original “culprit” pattern:

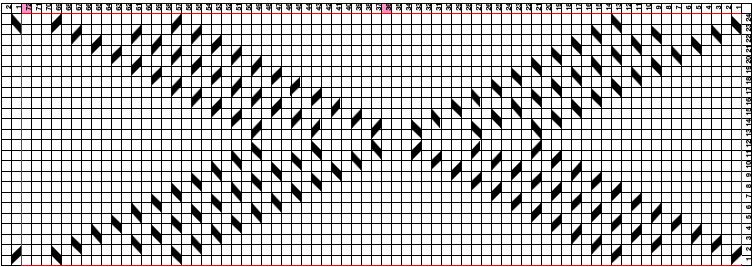
One way to interpret those triple stitches leaning to the right and left in HK is to knit three together for right-leaning, and slip, knit two together, PSSO for left-leaning on RS (“right” /knit side). The same steps on the KM would involve moving around those triple stitches to achieve the correct lean of the leaf edge on the knit side of the fabric. The number of rows for transfers to achieve a similar look makes the fabric impractical to knit using a lace carriage on the KM, so back to hand knitting.

In yet another instance of “it’s a small world” since I first came upon the repeat and began looking for interpretations, I did find several hand-knit patterns on Ravelry and some magazines using the same or similar motif.

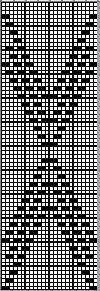
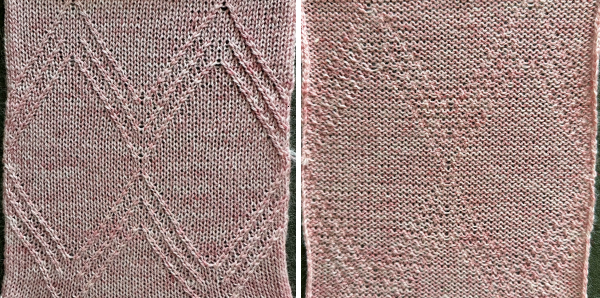
The pattern repeat in my first hand-knit sample in a 4.5/inch gauge wool

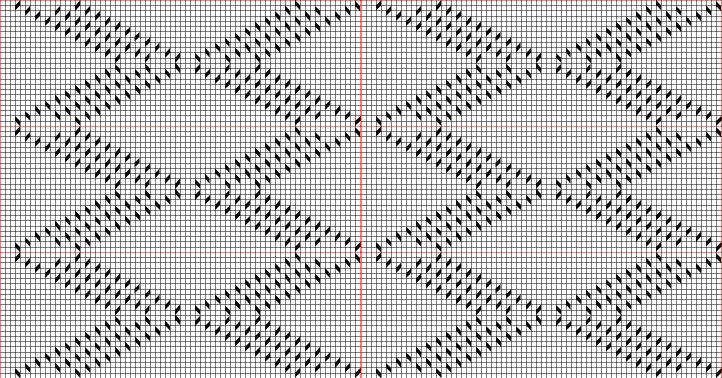
In turn, this led to my developing my own repeat design, which is now on 2 needles, becoming a scarf for my granddaughter, which can be shared in the future.

I work predominantly on a Mac, OS Lion. Last year finally got turned on to using excel for knit design after finding excellent online tutorials such as those by Marnie MacLean and Fleegle’s blog. Over the past week I finally got around to playing with iWork, using Numbers instead of excel, and in conjunction with Pages have come up with final images such as the ones below. Am pretty much flying by the seat of my pants in this, so I can’t really share a step-by-step method but have been pleased with the instinctive qualities of the Apple programs and the results.

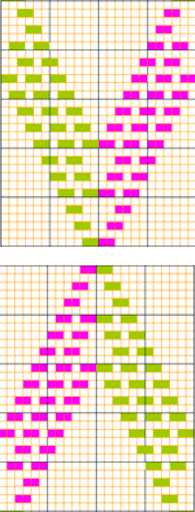
In subsequent graphs: blue represents knit as it appears and may be worked on the knit side, while pink represents how the knit appears and may be worked on the purl side, and as such on the KM to achieve the same design

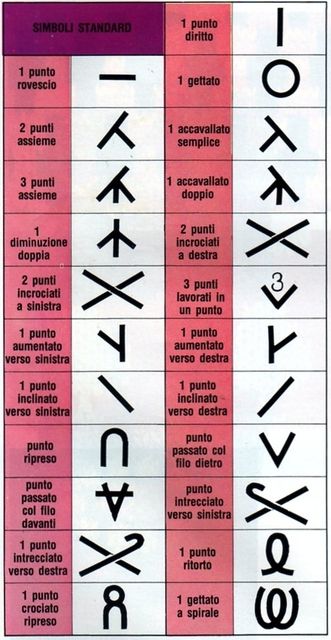
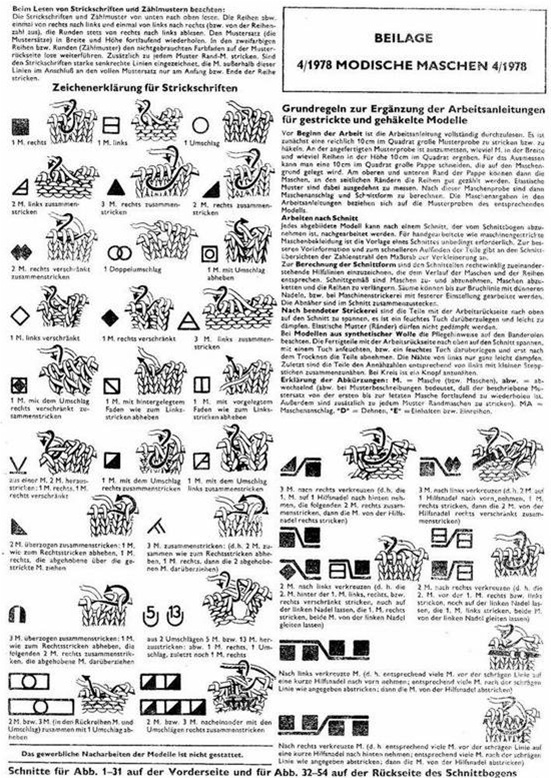
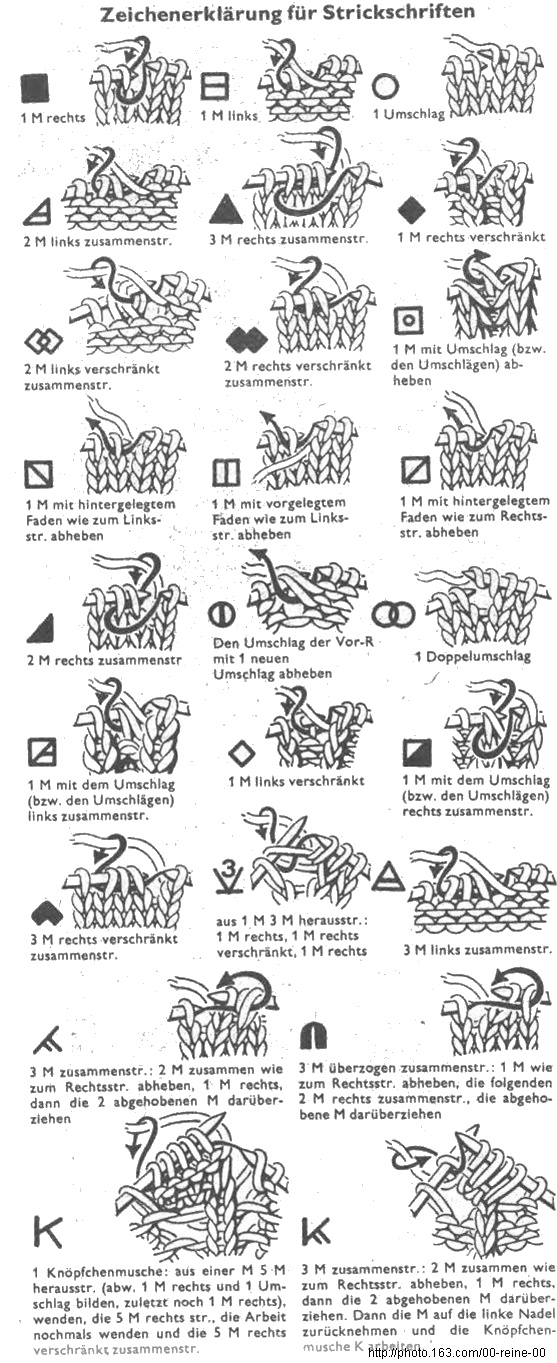
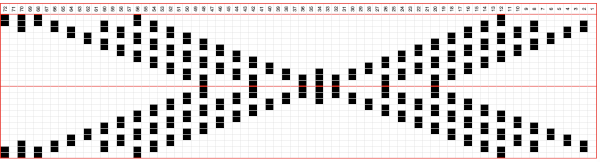
Common Lace transfers and symbols

moving multiple stitches

now: starting to play with a hand-knit repeat with the intent of translating it for use on the KM: triple stitches in one location in any single row are eliminated, as well as sets of double lace holes in any single row while retaining the diagonally slanting leaf motif

garter stitch will be eliminated by adding a needle out of work in its place, creating a ladder space between repeats; repeat will be adjusted to work within restraints of punchcard limitations in terms of stitch width and row height requirements, more on next post.

_____

“Wisteria” 2

A follow-up to the previous post on the “horizontal cable“: it has a relative that produces a flat or textured “lacey”  fabric depending on the number of rows knit in each segment.
The relative: after some initial rows of knitting (whether waste yarn or edge of actual piece or swatch), beginning with knit carriage on the right-hand side, moving right to left, the knit is created by knitting on a multiple of chosen # of stitches plus needles out of work (OOW, A position). In the instance below a multiple of 9 + 8 is cast on, with an OOW needle (represented by blue) between repeats. The ladders created where needles are in A also make it easier to visually identify stitch groups that need to be moved in/out of work

an attempt at a graphic representation of the corresponding knit the swatch knit side, orientation as knit    the swatch purl side, rotated 90 degrees as it would appear in a sideways knit the knit tends to curl along edges to purl side as seen above, could be embellished with stitching for more contrast and color
To knit:
first pattern row:
the numbers in parentheses reflect markings on the last colored image
COR: knit 8 rows on the first group of stitches on the right (1)
push the second group (2) into work and knit 8 rows
push the third group (3) into work and knit one row
push group (1) on its right out to hold, knit 7 rows across the remaining  16 stitches
bring a new group on the left into work, knit one row
bring the group to its right out of work, repeat the process across the  row
when the second to last 2 groups on the left (6 and 7) are reached, knit  8 rows on both,
push the second to the last group out to hold (6)
COL knit 8 rows on the last group on the left (7)
second pattern row:
COL: reverse the process from left to right for the second pattern row, begin by knitting 8 rows once more on the first group on the left (9), that first group will now have been worked for 16 rows
The row that picks up the adjacent group of stitches helps create a joined fabric, with movement resulting from the direction in which each “pattern row” is knit.
Varying the ladder space and the number of rows knit will change the overall look of the fabric.
Turning the fabric sideways after varying the size of the holes across the now horizontal rows could also affect the overall shaping ie narrowing and widening of segments.
Going from larger holes on one side to narrower in the opposite will make the knit “ruffle” on the edge with larger holes, etc.
If one knits vertical segments that are 8-16 rows in turn, cutting the yarn at the end of each sequence, then there will be straight slits/ strips that may, in turn, be left as such when knitting is resumed, twisted in a variety of sequences with alternate groups as one would a cable, rotated on their axis once for 180 exposing some of the back/opposite surfaces of the knit single or multiple times as desired.
A strip of slits may, in turn, be “latched up” in a chain, stitched, or otherwise altered after the knitting is completed.
A sample with wider ladder spacing and a slightly different sequence. Note that the first row of holes is smaller than those achieved when shaping begins to be reversed. Ending the pattern can be planned to match its start.

Knit terms: translations

Prior to google translate, google chrome, etc. barring having friends that spoke the language and knit, there were some resources for translations:
Brother: Japanese symbols for knitting (booklet)
Key to Japanese patterns by Jody Foster (booklet)
Japanese for machine knitters by Mary weaver  (book 1983), now partially available for free download online 
Knitting Languages by Margaret Heathman (book 1996) includes limited vocabularies in 10 languages

August 1/2020 update:
Garnstudio knitting terms translated into 17 languages; their glossary of knitting terms 
another international glossary of knitting terms 

a few in ItalianGerman

From/for different countries
http://www.knittingfool.com/Reference/KF_Symbols.aspx
Anna Burda magazine symbols PDF includes HK how-to illustrations:  ab2  2/1/15
Verena chart from older pubs easily found on Pinterest

Russian to English 

Japanese
tata-tatao for Japanese basics and charts
dancingbarefoot’s japanese pattern tutorials
series of topics updated 2020 link Clearwater knits 
Fleegle’s blogspot
garment instructions 

Machine knitting: some grabs from electronic and punchcards books follow, giving an indication of the variety of fabrics that may be produced on Japanese knitting machines. They are in a large format for easier visibility. The names of some of the stitch types have evolved over the years or differed from one brand of KM to another. From Silver Reed publications

and from Brother 

In addition, for English machine knitting abbreviations see Jessica-tromp.nl and  sewwhatyvette.com

Horizontal “cable”

I live in the East Coast of the United States.

In the 80s there used to be a yearly machine knitting seminar that was fairly well attended. There were droves of machine knitting publications. Susan Lazear, the founder of Cochenille, was just beginning to develop her knit design software ideas on the Amiga Computers, and a fellow Californian, who happened to be Japanese, used to travel here with the Pandora box of foreign knit magazines. At the time translating knits from one language to another amounted to guesswork and some leaflets. Subsequently, there were fliers, then articles, and even books on translating from Japanese to English and multiple language translations for knits and crochet.

One year there was a “Guess how this was done and you get a prize contest” for a technique appearing on a sweater with only Japanese instructions. The design was dubbed wisteria by some, has been reincarnated as a trim, insertion, bandings on sleeves and cardigans, and is beginning to reappear in magazines now again.

Here is one method for this “horizontal cable” created by short rowing across the width of the fabric.  Brother machine needle positions are A, B, D, and E, and a lever sets KH for holding in both directions Studio needle positions follow the alphabet, and Russel levers on each side must be set for holding.  The directions below are for Brother.

Reminder: when the machine is set for holding the needles in B or D position knit, needles pushed out to E will not knit. Weight is used as needed, watch for dropped stitches particularly along the edges of the sections as the rows of knitting are built up.

1.cast on the desired number of stitches knit several rows at garment tension, end COR (Carriage on Right)

2.COR, set the carriage not to knit needles in HP (hold position)

3.leave 6 needles at the right of knitting in WP (work position), push the remaining needles out to HP (hold position)

4.knit  10 rows over the 6 stitches, ending COR

5.push back 3 needles to D position at the LEFT of the 6 needles now in WP

6.knit one row from right to left (9 needles in WP) end COL (carriage on left). Push the needles now in WP on the far right to HP; 6 needles will remain in WP

7.knit 9 rows on these 6 needles,  end COR

8.repeat steps 5 through 7 across the fabric row until the last 6 needles remain. Knit 10 rows over  these last 6 needles, end COL

9.set the machine to knit needles in hold (holding lever to N), knit 2  or the desired number of rows across all the needles

10.holding lever on H. Repeat the procedure from left to right, reversing the sequence.

If the sequence is not reversed a bias fabric will be created. For maximum texture use a yarn with memory ie. wool. Anything that can be “killed” by pressure or ironing will flatten considerably and yield a very different fabric.

My demo samples were made out of colors that would make them easy to find, and unlikely to get “permanently borrowed”, so none of these were studies for actual finished garments

this swatch combines a boucle and a rayon; the latter has become flattened over time

this is a wool rayon, knitting is not reversed, resulting in biasing

these samples show the same technique, applied to much larger groups of stitches

a segment of a magazine recent garment photo, no origin given as to source, appears to use the above technique

online source for patterns using this technique

more cable like/structures/textures

The making of i-cords

Making narrow tubular cords has also been referred to as spool knitting, corking, French knitting, or tomboy knitting. When using a knitting machine the standard for knitting cords is to operate the carriage so that it knits in one direction, slips in the opposite. Using the e wrap method cast on 3or 4 stitches. Push in the part button on the same side the knit carriage is on ie. if it is on right, push in right part button. Stitches will knit from right to left, slip from left to right creating a float. Since the float is added yarn when knitting is pulled to set it, the gauge on the few stitches will be altered, so it is usually recommended that tension be tightened 1-2 numbers lower than garment tension. The float issue becomes problematic if cording is required that is wider than 4 stitches. Switching to tubular knitting using the ribber will produce tubes of any desired width.
In Japanese machines, the ribber knits tighter than the main bed, if gauge matters a starting point is to loosen ribber tension by approximately 2 numbers. Larger cords tend to flatten, so if a round tube is desired stuffing may be required in the form of cording, plastic tubing that may be joined using appropriate caps from hardware or even pet supply stores, and a range of wires if the intent is to create sculptural forms.
One exception to tightening the tension when knitting cords is when/if they are joined to knit edges in the seam as you knit method.
Addressing the float issue in single bed knitting:
with five stitches the floats could be latched up creating a rib stitch. This same operation in tighter or smaller cords may make them swirl.
If a flatter cord will serve the purpose, an alternative is to have the center stitch knitting on the slip rows. One may accomplish this by hand-selecting needles or using a card. This will seal the tube in the center or periodically across the knit. The punchcard may be locked on any single row with the appropriate holes punched, and the position planned on the needle bed for knitting. The carriage will knit all stitches in one direction, slip/skip all but the stitches where needles are selected in the opposite. Floats may become design elements in some instances; if sewing onto another piece or hanging onto the knit as it progresses they serve as guidelines for doing so. If they are to be applied vertically to a garment, create a ladder to mark your sewing line.
If you are a gadget collector “hand Knitting cord machines” may make them up to 6 stitches in width with the ease of cranking a handle and with a bit of planning wire beaded tubes may be produced on them as well. Some examples are from Bond, Prym, Wyr for knitting metal mesh, and eons ago some companies including Passap and Singer offered their own automatic cord knitters as well.
A recently published hand-knitting book has many ideas for applied i_cords that could also be used on the machine. For speed and simplicity, sometimes flat strips of knitting may be substituted for cords in some designs.
Cords or strips may be used to create mock cables, add color interest, applied as trims, or to the bodies of sweaters or sweater edges. They may be braided, twisted, macraméd, etc.
Some published and online resources on the subject:
Erica Patberg article in Knitter’s Magazine #104, Fall 2011. She can be found on Ravelry. Cords and strips may be used as trims. Long ago versions were published by teachers in the seminar circuits, one may be found at 1. Ginger Luters is well known to hand knitters for her books such as her “Module Magic”. Apparently, she also has published a book on trims, now available on DVD online that from cover photo appears to include some suited for this topic.

A page that gives a bit of history and illustrations of spool knitters for crafts/ hand knitting may be found at Hub Pages, and on “circular knitting machines” at How to get what you want.
The Wyr knitter is very hard to find. I have knit 32 gauge wire on other knitters with success, so that particular model is not necessary for wire cords as seen in this piece of mine A curly cord version may be found at Techknitting. More ideas and a knitter at Bond America. And lastly, something to make with those Barbie Knitters.

Illustrated how-tos from Brother knitting techniques book and from a Studio publication:

A few i-cords and more to try

The top illustration below creates what some demonstrators back in the day would refer to as a heart cable trim. The width of the strips of knit may vary, and the size of the holes need to be accommodated to suit the subsequent threading. The second illustration set results in a more traditional “pretend” cable. I-cord could be used for the second sample. Narrow strips of knitting will curl in, however, and in many instances may be substituted for true i-cords. Because each pass of the carriage knits a row as opposed to slipping alternate rows, the knitting is twice as fast. In the instance below a series of holes are created for threading cording (or other chosen material)

The following illustrates the threading option with a single length of the cording, which will need to be secured at each end with some stitching. Separate colors could be used on alternate sides for more color variation, and other threading sequences as well

some publications with inspiration photos

its online relative

from foreign blog

part of another image

from MonTricot Magazine #26, 2011

from Mon Tricot magazine

A hand knitting book with many ideas for cord and strip use that could easily be adapted for machine knitting

A commercial foreign knit incorporating cables and woven cords link no longer active in 2019

A new use for waste yarn

This photo was actually taken last April. Part of my studio is in my unfinished attic, explaining the foil ceiling and boxes. It oh so truly helps to look UP from your knitting once in a while! I had just begun my lace experiments, things had been going so well in terms of avoiding dropped stitches I was mesmerized by the needle bed and my intact fabric…

Using punchcards to track small cables in pattern (1)

Symbols in knitting have evolved considerably through the years since the day when all instructions were longhand and it was abbreviations used that would need de-coding. This is true of cables as well.
I came across a magazine graph that led me to explore its conversions from hand to machine.
In the BW original graph cable stitches are represented by solid lines and dashed lines, and stitches are moved in the direction of the upward slant.
The “needles” with the solid lines will be moved first, and the dashed lines will follow to replace/fill the empty needles.
The repeat below is 64 rows high, so if a card is used it would need to be created in two pieces, the last row on the graph is not part of the repeat itself.
As is seen in knit alphabets, however, punchcard patterns are mirrored vertically when the design is executed.
That needs to be kept in mind if punched holes are used to track the cable repeats, particularly in complex arans.
Assuming mirroring is required to match movements in the hand-knit original graph, colored cells representing punched holes in the first colored card repeat are also mirrored. Using the card
green color blocks :
the left half of the crossed stitches are moved first, taken off on the tool, held to the side
the right half of the crossed stitches follow and are placed on the empty needles on the left
the first held stitches in turn are then placed on needles now empty needles on the right
magenta color blocks :
the right half of the crossed stitches are moved first, taken off on the tool, held to the side
the left half of the crossed stitches follow and are placed on the empty needles on the right
the first-held stitches in turn are then placed on needles now empty on the left
The markings on the punchcard machine’s needle tape correspond to needle selection for 24 stitch repeat, and that can be used as a guide, needles selected are intended to move toward the center at the bottom of each half repeat, and away from it in the top half, creating the diamonds.
If electronics are used and the repeats are other than 24 stitches wide, the needle tape may be marked with a water-soluble pen or removable color tape strips may be placed between the needles that are first and last in each repeat.
The initial imagined diamond shape is tiled in width.   The start of a possible chevron shape  Those 3X3 cables are likely not easy to knit, especially after only one all-knit row. One alternative would be removing the crossing, disregarding the 6-needle preselection, thus adding another knit row between any 2X2 crossings.  In writing a 2022 post on using Numbers and Gimp for charting cables and revisiting this post I realized there was an alignment error at the top of the punchcard repeat used to knit the earlier associated swatch. The image below now has the problem area in the card marked.
A circle also marks the spot where operator error occurred with some twists made in the wrong direction,  The amended, now rendered 72 rows tall card: 2024: The result of further editing, a table representing the direction of the stitch brought forward in each crossing, while the magenta numbered cells indicate spots where the crossings begin to reverse direction. All crossings are now planned 1X1. The top 2 rows from the above chart have been shifted down to the bottom to create a point at the start of the diamond shapes, and the resulting repeat is tiled to check alignment and possibly ready for printing a guide.  The associated 24X72 PNG and markings in 6 stitch blocks for punchcard users The proof of concept swatch:
Such techniques may be used in isolated portions of garments instead of all over.
A “simplified” interpretation of a similar knit pattern is seen below. Related posts:
Using punchcards to track cables and twists in pattern 2 
Using punchcards (3) or electronics to track small cables in pattern


Some “real” cables on KM

2/8 wool

slippery rayon: fabric flattens with pressing and remains that way

a couple of twist samples: wool/rayon blend

Fair Isle, any punchcard locked on a single row of every other stitch selection: there were whole books of HK patterns based on this idea, sequence of moving stitches can create a variety of secondary patterns. On the KM fair isle is essentially a slip stitch, short and skinny, tension needs to be loosened considerably to try this, stitches in cables cannot be brought out to “hold” position to ease knitting off on the next row, as this will affect the color pattern. Larger crossings are possible, but more difficult

another FI and cable variant: mistakes are probably from needles that were out just a bit too far and knit in the alternate color

a blast from the past: knit on my metal no punchcard bulky (first KM) and ribber more than 2 decades ago. Ribs at waist and armholes are hand knit twisted rib

Pretend/ mock cables 1: i-cords, holding

I have literally hundreds of machine-knit swatches from the days I taught in a design school program. I periodically revisit them and since cables and their look-alike relatives have recently caught my attention I thought I would share photos of some of the samples in the next few posts.
They are not necessarily resolved fabrics, some of them are the result of random demo efforts/ stitch play.
In any discipline over decades, one cannot help but become aware of how materials and styles cycle, and this is oh so true in fashion and certainly in knitting. For a while more than a decade ago knit i_cord yardage/ tubular yarn was marketed by several manufacturers, and it is now making its reappearance.
One way to create pretend cables in varied color combinations is to apply purchased yarn, or machine knit cording/ tubular knit to the purl facing the knitter side as the piece progresses. The application may be done in an organized manner, using a punch card to select needles on which the yarn will be hung, or more random, even with wide knit strips in contrasting colors.With tubular knit cord in addition to hooking up, anchoring may require some stitching, “seaming as you knit” at planned intervals would make the joins “invisible ” Strips using holding techniques or stitches hooked onto the knit to create texture, in turn, joined in the “seam as you knit method”Cording may also be inserted into single stitch lace “holes”or larger holes created through holding techniquesKnit i-cords, ribbon, twisted cording, etc. may also be threaded/woven through holes created at cable crossing as a way to add color and dimension to standard cables, mimicking their movement on the fabric. A recent foreign magazine cover including a variant of the above technique