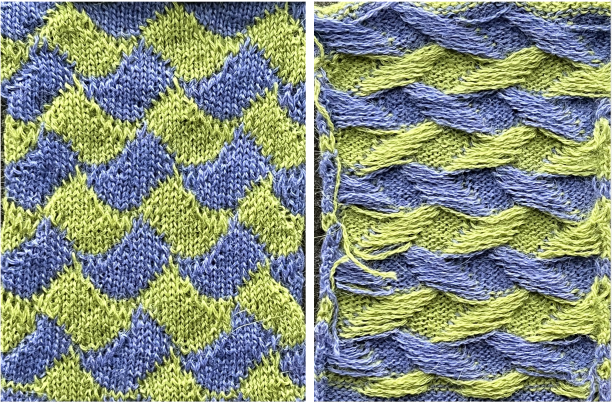
Garter bar/ short row trim

A recent MK forum request for a HK trim look alike led me to the following experiment :

the hand-knit trim

There are multiple ways to achieve knit and purl combinations on the KM. Brother garter carriage will do so “automatically” albeit slowly, ribbers may be used in combination with main beds, ladders may be latched up by hand, or one may use the garter bars to turn work over. When large widths are required the options are to use multiple panels, or to knit the fabric sideways letting the width become the length. Some HK fabrics are impractical if not impossible to duplicate on standard home knitting machines, and compromises are chosen. I tried to create a distant relative of the proposed trim, with a bit of family resemblance.

Below the short section to my garter bar is pictured. I mark every 10 eyelets with nail polish on my GBs to help with tracking stitch counts (do same with centers of ribber combs). The photo shows it in the position in which it needs to be held to take stitches off the machine prior to turning them over. The hollows under the eyelets (1) provide room for the needle hooks to slip under the yarn and catch the stitches when work is flipped over. Hollows under eyelets occur on the side with the convex ridge (2). There are many online sources for using the bars, now available in multiple gauges, including an article by Susan Guagliumi.

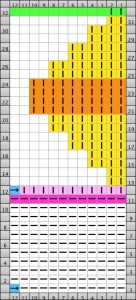
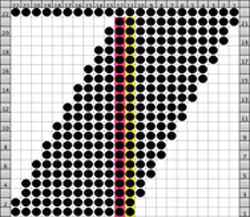
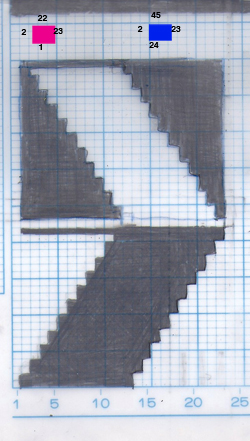
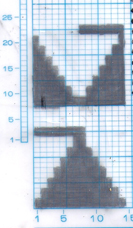
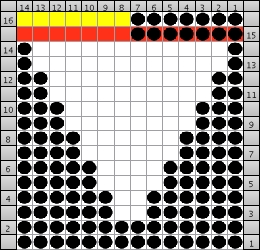
my working graph

I worked my edging on multiple of 12 stitches. The purl/knit symbols represent how the knit will appear when viewed on the side where the held shape is convex. Work begins by knitting foundation rows and using waste yarn at the start with open stitches on the first row of knitting if the ruffle is to be seamed/joined at its ends upon completion. The magenta/green rows represent respective whole rows to be turned to the reverse side using the garter bar after each knitting sequence is completed. Testing first is required to establish the optimum stitch size for a gauge that will allow for easy stitch movement in transferring stitches on and off the garter bar:

arrows on the blue ground indicate the position of KC at beginning of sequences

end knitting of first “purl” section COR, turn work over (magenta)

COL: knit one row across all stitches, carriage moves to the right (pink). I find it easier after holding starts to move the carriage to the opposite side by taking it physically off the machine and leaving settings alone, results in fewer yarn tangles and problems for me.

COR: set the machine for hold except for the first 2 stitches on right. I tried one stitch at a time first, but the wedge was too deep, so I began working bringing stitches to hold 2 at a time, carriage side first. Stitches could be held opposite the carriage as well, but that created a set of additional holes when one returns to knitting those stitches in the opposite direction, and a pointy edge  (segment marked with dot #2, more on a later post on miters and spirals). The number of stitches brought to hold can be varied as needed, the goal here is a symmetrical result.

COR: when only 2 needles at left are left in hold opposite carriage, knit an even number of rows (orange area, I chose to knit 4, then 6 rows in my test)

COR: when the last 2 stitches on right have been knit for 2 rows (green) transfer all the stitches to the garter bar

Get carriage to left, COL: return stitches to needles, knit for an odd number of rows (magenta, COR), turn work over

COL: knit one row across all stitches to right (pink)

COR: begin holding sequence again

I began the sample with 5 rows in between the mitered shapes and then tried 11. This is labor-intensive if produced in significant lengths, so a choice can be made depending on personal taste and patience. Though it could be attached as one knits the item it is intended to trim, there is enough going on I would probably estimate the length, take it off on waste yarn, and hang it onto the larger item. If longer, the trim may be unraveled to suit. If an addition is required it may be added on but at least working with the much larger bulk of materials will not be for the duration. Holding lever may be set to knit for single passes prior to turning work over in sections using holding, or stitches may be pushed into work by hand.

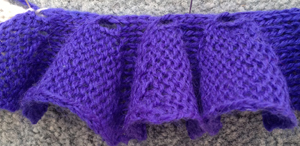
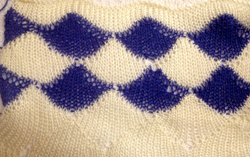
dot 1 rests on “killed acrylic”  repeat test, the remaining sample is knit in wool: dot 2 marks the extra holes when the holding sequence is changed   as described above

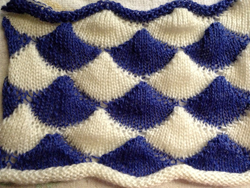
with five “purl” rows between turning and holding

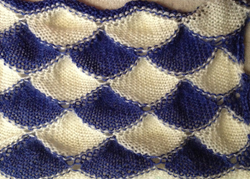
11 “purl” rows between turning and holding

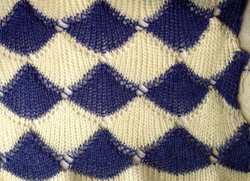
the reverse side

about half the wool portion of the ruffle was pressed, the knit became smoother, the edges less rolled. Those are properties that can become a design choice/decision

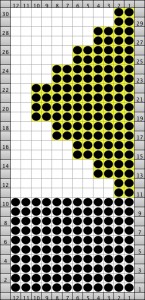
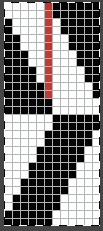
If an all stocking stitch ruffle serves the purpose this could be the start of the working repeat for using slip stitch to knit programmed needles selected to patterning position; here the black dots represent areas that knit, white squares stitches in holding. The repeat must be an even number of rows, using it as drawn, the starting side depends on whether one is using a punchcard machine or electronics

For some hints on how to use the garter bar see later post 

Knit QR codes 1, repeats from BW images

A video on this topic. I work using Mac OS 10.10 at the moment. When I first wrote on this topic, I downloaded a then free converter The app, Aztec Code Generator, is now no longer free (11/2015) but costs $ 1.99 to purchase. There is a still free, online QR generator

my beginning code

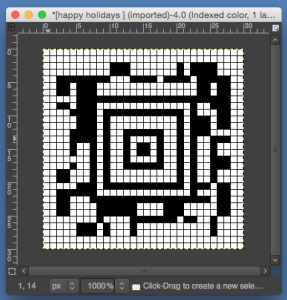
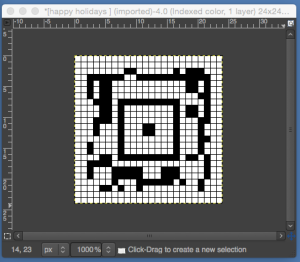
the original image size was reduced to 60 pixels square, and in turn to 40 pixels square respectively, then magnified to 600 times for superimposing the single stitch grid as described in the video; screen-captured image saves are needed for saving gridded images

the 60 stitch repeat

the 40 stitch repeat

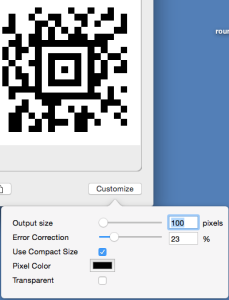
using the Aztec code generator to control output size

Screen Shot 2015-11-13 at 9.30.23 AM

saved

Untitled

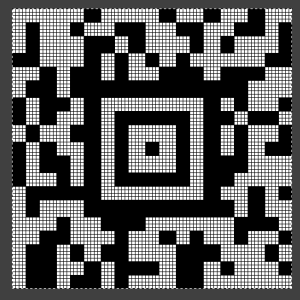
X1,000, cropped and gridded

screenshot_43

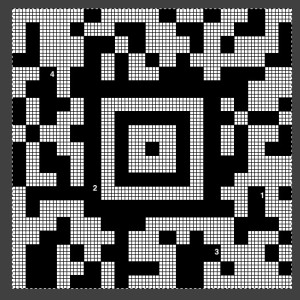
not all units are created equal: areas numbered indicate where some of the horizontal units are 5 wide rather than as most 4, and closer inspection will reveal the same for some vertical units. Reconfiguring the grid ie to 4X4 pixels would be an alternative way to “resize” the image, but fails because of the disparities when the unit is applied overallscreenshot_43

trying the same process on this BW jpeg, the resulting repeats require further cleanup and editing along edges of shapes

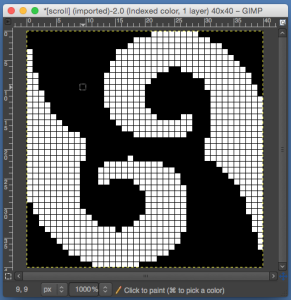
using GIMP: 40 stitch repeat, no additional scaling, converted to 1bit BW, could use a bit of clean up, I prefer to work with a black grid

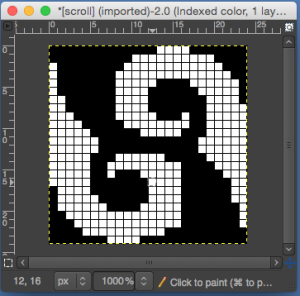
40s scroll

24 stitch24s scroll

as an afterthought: results using img2track to pixelate the same image before gridding

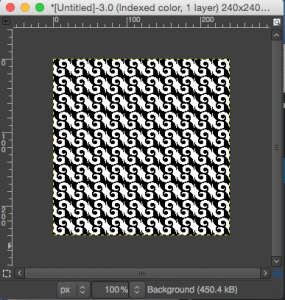
please note these scroll graphs are not accurate working repeats to be knit as they are

it is always a good idea to test tiling for any “surprises” before any actual knittingscreenshot_41

11/2015_Knitting’ low resolution is reflected in the number of stitches and rows per inch or per repeat. In this instance, Gimp was again used to scale and process the image

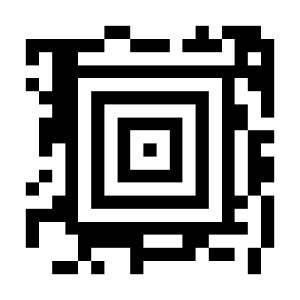
Today’s generated image: happy holidays QR code, Aztec code generator, 300 pixels square including white border

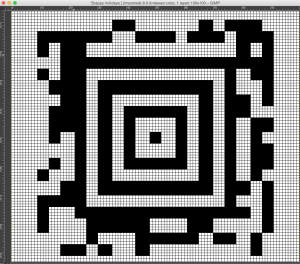
happy holidayscolor mode converted to 1-bit B&W; 100 stitch repeat

&H100

scaling, gridding for 30 stitch repeat

HH30st

for 24 stitch repeat: note loss of detail as stitch and row counts are reduced

h&h24

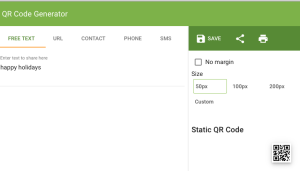
and happy holidays via the free, online generator static_qr_code_without_logousing the generator options to control available output size

QR generator

The above begs many questions. Upon investigation, it appears there are 18 2D bar code variants, some static, some dynamic. Qrme is a UK site that provides information on trackable QR codes, forums, and more. Their page shows scaled in size codes modules.

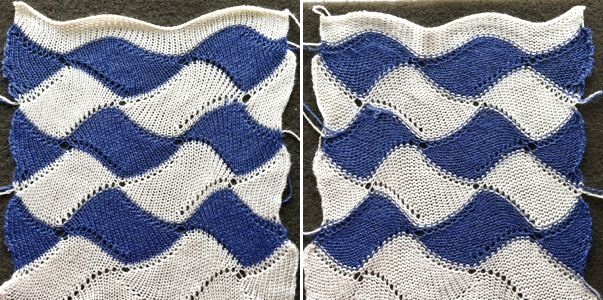
Entrelac pretender 2

This is another fabric combining holding and slip stitch to create shapes. Below is my first working repeat, the colored lines indicate a dividing line that would give me a black square on either side for setting up the second, split repeat to reverse the direction of the knit stitches.
I am sharing not to provide a pattern or specific how-to, but to provide some ideas for technique experimentation by readers with some experience and familiarity with the combined use of patterning and holding.

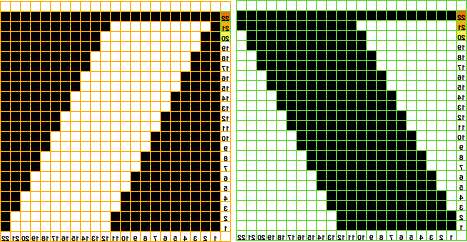
My mylar repeat as used on the 910 appears in the direction as drawn on the knit side, while punchcard models using suitable width repeats knit repeats in the direction as drawn on the purl side. Later electronics automatically mirror programmed repeats, true of my later model 930. Depending on the model in use this electronic repeat may require mirroring before or after downloading.  A newer chart of the design, with row numbers requiring actions highlighted on the left of each repeat.  Machines that automatically mirror would be selecting this  Air knitting is a good way to test pattern placement on the needle bed prior to any knitting.
When the slip stitch setting is used and segments are worked on only part of the needle bed or with needles out of work, end needle selection is usually canceled. On electronic machines, this is done using the KCII cam setting.
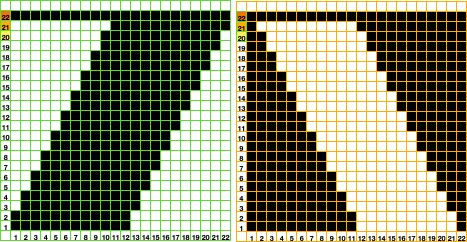
Each 22-row program is used across one full row of “entrelacs”.
The bottom repeat as given above preselects KCII <–,  knits left to right, and the top repeat preselects KCII->, knits right to left on the 910.
Each horizontal segment knits on groups of 22 stitches and ends on “half” a repeat.
The half repeats combined with the reversal of the knit direction result in a balanced fabric.
As the direction is reversed, the alternate repeat needs to be programmed. A bit on method:
COR for bottom mylar repeat KCII <- knit all stitches color A,
COL set the machine to slip <->, bring all but the first 22 sts on the left to hold, and knit 20 rows.
The resulting shape is being created from left to right when the top is reached the stitches at the left of the sequence will be in the B position, and the ones on the right will be in work.
COL: at this point push the next 22 sts into work, knit to the right.
COR: return first repeat 22 sts to hold position, and continue in pattern for 21 rows.
COL: bring the next group into work, and knit/move across the selected number of needles.
COR: bring the previous grouping of 22 out to hold. Repeat as needed for the desired width.
When the full row of shapes is completed and the last group of needles is preselected, COR: cancel holding and slip, knit one row on all stitches to the opposite side, and change color to B if desired.
COL: program subsequent repeat, KCII, select ->.
COR: set cam buttons to slip <->, KC to hold, bring all but the first 22 needles on right into work, and reverse the full sequence.
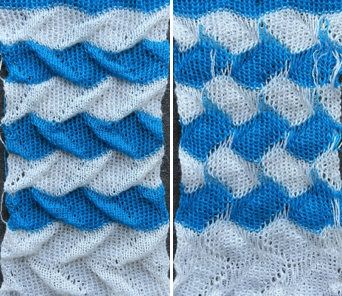
My swatch was worked on needles 34L to 21R and had an interesting 3D texture until I pressed it.
The differences in the size of the eyelets at the tops and bottoms of the shapes are due to the fact that when stitches are brought out to hold on the carriage side, an automatic wrap is created, reducing the size of the small slits usually formed in short row knitting.
I like to press the initial studies to have a clearer definition of the edges of the resulting shapes and the location of color changes so as not to disrupt the pattern.  There will be yarn ends to be dealt with where color changes occur, some could be knit in with the same color while making the piece. I can imagine that if the 2 rows of all knit stitches are eliminated between entrelac rows, even more variations could be done with added colors, but I personally am not “going there”.

“Automated” shell shapes

March 2020: in attempting to fill a request for a punchcard repeat, I am finding added ways of looking at the topic, will share in a later “revisit” post.

This technique combines holding with the slip stitch setting. When KC is set to slip it is the punched holes/black squares that result in needle selection and stitches knitting. Blank areas in cards or mylars are slipped/ skipped.

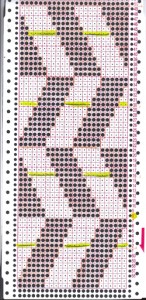
my mylar repeats for each segment

the swatch before pressing knit side

the purl side

the dimensional texture is flattened out  when pressed

the purl side, flipping the shell shape horizontally

using a yarn with memory and tighter tension would help retain the 3-dimensional quality if that was the  original intent

A bit on method: the repeat used for the hand technique in the previous post was changed to an even number of rows, with other adjustments.
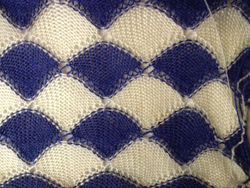
The execution was in a brick configuration

all knitting begins on and moves right to left; needle bed may be marked to help track repeats

. for straight side edges program second mylar repeat first; I knit my sample on needles 22L – 34R

. some needles will need to remain OOW, cancel end needle selection = KC II

. COL: first selection row is done L to R with the yarn color used for the next shell sequence in A feeder

. COR: the machine is set to hold non-working repeat groups, and the KC is set to slip <->; in the half-repeat working the first half-shell takes place on the first 7 needles on right

. COL: when the top of the repeat is reached the orange row will be selected left to right

. COR: after needle selection of previously held stitches happens on that row, bring the total number of stitches for the next repeat on the left into work manually, knit one row across the 21 needles

. COL: stitches in the yellow area will be in B position; bring all stitches to their immediate right to hold, then the “yellow group” to work by hand, continue to knit in the same process across until the horizontal row of shells is completed

. COL: program machine for full, alternate pattern repeat (bottom of mylar) for a row of all whole shells

. COL: depending on personal preference, holding may be canceled for the first selection row, or stitches may be pushed back to D position and carriage kept set to slip <-> before knitting back to right and resuming working on each pattern unit

. COR: repeat process, working on groups of 14 stitches at a time from left to right

. COL: on completion of the row of full shells return to the first program, continue the process until the desired length is reached

To match casting on and binding off  I often start with waste yarn, make the decision as to how to end the piece in a way that I like based on my test swatches, then rehang the stitches from the first row and treat them as I did those in the last row of knitting.

Thinking of modules: a shell “diary”

This is the beginning of a thread on modular shapes on the KM. Much is published in the form of both how-tos and patterns for hand knit modules. One of the critical differences between HK and MK as in mosaics is that in HK garter rows may enrich the surface textures. Unless a G carriage is in use, frequent travel between opposing needle beds or turning the work over on the single bed is required on the KM to create the garter rows, which may be considered tedious and impractical rather than impossible. A question from a friend led to my beginning the topic by trying to sort out shell shapes. In the samples below two different weight yarns were used, first because they were conveniently the closest to my yarn mast, and second because contrasting colors are helpful in defining what is going on at the edges of the shapes. The irregularities in spots are operator error, the repeat pictured is sound. This is not a step by step “how-to” for those who have no experience with holding techniques, but rather a starting point for anyone who would like to play with a similar shape

the swatch immediately off the machine has a bit of 3D going on

knit side after pressing

the purl side after pressing

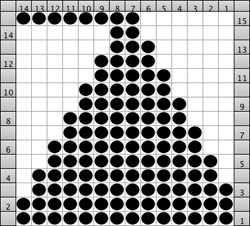
the working repeat: dots represent stitches knitting, blank squares needles in hold for each individual segment

For forming a straight edge at the sides of the finished piece, the first horizontal row of shells must start and end with half a repeat. Set up is on a multiple of 14 stitches. I began working with COR. Stitches are brought into hold consistently on the side opposite to the carriage, when 1 remains at top of half repeat (2 for full repeat), the remaining six of the recently worked repeat and subsequent 14 for the following repeat are pushed into work (21/22 sts), one row is knit across all needles, COL, the 7/8 remaining stitches from the previous group are brought out to hold, the carriage travels back to the opposite side once again on the grouping of 14 stitches, COR, holding pattern resumes opposite carriage, and from right to left. The contrasting color in the second horizontal row of shells begins on left, working on a full 14 stitch repeat, reversing the shaping. I am considering automating the process with slip stitch. The latter would have to occur on an electronic if repeat is to be used as-is since on a punchcard the width would need to be adjusted. If a brick repeat such as above is desired, two different cards or programmed repeats would need working out for the alternate shapes to occur on the same location on the needle bed after completion of each horizontal shell sequence.

It can be helpful to mark up a needle tape or even the needle bed with water-soluble markers to keep track of the repeat’s locations. I used a separate color for each repeat set. A bit of denatured alcohol on a lint-free cloth piece easily removes them. Markings on needle tape pertain to some of my other projects.

An entrelac pretender

“Automating ” normally labor-intensive hand techniques cannot truly duplicate them. Below is one effort to produce an “entrelac-like” fabric using the slip stitch setting. The biggest advantage of this is the knitting speed as opposed to creating the individual cells using holding and picking up stitches. Some drawbacks: slip stitch floats on the reverse make for a dense fabric, and may be an issue in a garment. There are elongated stitches along the edges of the shapes at the color changes, these cannot be avoided. I am not a fan of the Brother single bed color changer so I opted for changing the color by hand. “Air knitting” helps one sort out where to set up the pattern on the machine. The fabric is knit using the slip setting, so I chose placement on the KM where I had needles selected on each side of the knit on my first row.
The pattern is begun on row 8, card locked, COL.
The first-row preselection is to the right.
COR, card to advance normally, KC set to slip in both directions, change color after 8 rows of knitting, then every 14 rows.
As in any slip-stitch design, punched holes will knit stitches, unpunched holes will skip them, creating floats on the purl side between knit stitches.  The green dot on the right of the card indicates the starting row for the first repeat, row 8, subsequent lines are reminders to change color before knitting across that particular row, taking into account the fact that the card reader is reading below the line of sight on the machine’s exterior.   Note that before the color change the yarn in use will create a float in the area that will be skipped by, and knit in the same area as the subsequent color will; at first, this may seem counter-intuitive, but it is correct, and the effect may be seen on both sides of the swatch.
If changing color by hand, remember to “close the gate” after each color change to avoid dropping the knitting off the machine if the yarn in use moves too far forward to be “caught and knit” by the appropriate needles.
With necessary adjustments in starting row and settings, technically this fabric may be knit on any KM brand.

The yarn in this test is the same alpaca/silk blend used in my shawls, at tension 6. If a color changer is used, the KC row must be from right to left with knitting rows moving left to right and back to the color changer.

2023
The same repeat may be used double-bed as well, using single or multiple colors, with the potential for variations in striping.
The minimum electronic size repeat is 12X28 pixels.
The red cells in the chart indicate the greatest number of rows, 12, that any one stitch will be held until a black pixel knits that same now very elongated stitch on the next pass.  The main bed is set to slip in both directions, and the ribber is set to knit in both with the first and last needle in use on the ribber.
The skipped stitches get quite long, thin yarn may be used but watch for any breaks or issues with gate pegs, adjusting the tension as needed.

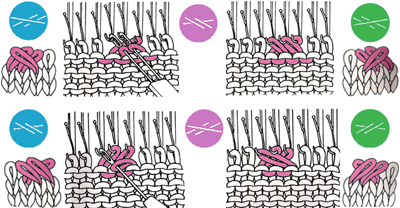
Hand to machine, symbols 4: cables

The following begins to address cable translations. I posted some content on cables in January 2012, but this content follows the present vein.
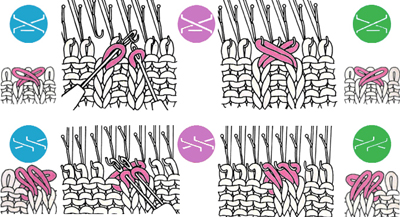
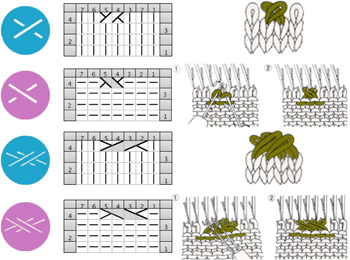
Blue dots continue to represent the hand-knit symbol, below them the fabric is illustrated as viewed on the knit side.
The pink dots and the images on either side of them the machine knit, or fabric as viewed from the purl side.
In the column on the far right, the green dots and the images below them represent the opposing twist in HK and are illustrated only on their knit side.

To execute combinations in knit-purl on the same side of the knit on the machine, a ribber is required (or a Brother G carriage). Purl stitches are on the main bed, and knit stitches are created by the opposing bed. To match the hand-knit here, crossings are actually made in the same direction in both HK and MK


HK pattern, software charting.

I have reached the point where decades old (89 and earlier) magazines that got “saved” are now being peeked at, and if not given away, then recycled. There may be some bleed through here from pages I have “saved” once again. Browsing through I found some designs not appropriate for machine knitting for one reason or another, but still creating interesting surfaces and the chance to explore using intwined’s other features. The program will create text from a chart, or chart from typed text with some limitations. One of the latter is a very large cable as seen in the attached document. PDF exports can happen within the program if one is specific in the sequencing of creating its documents. The 1989 pattern had only text for the repeat; I typed it, and had the chart pretty much created for me except for the problem row 5. Here is the resulting Intwined created PDF with some of my comments: cable_diamond. The following is the graph I edited, with my illustration for the execution of row 5

the blue line separates the slip stitch section, which can serve as a border on each side of the cable panels, the red lines the edges of the 12 stitches involved in the cable. The green stitches are put on a cable needle and brought to the front of the work, the next 6 stitches are knit first, then the ones from the cable needle to complete the crossing.

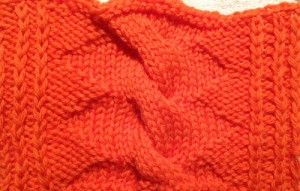
the swatch: knit side

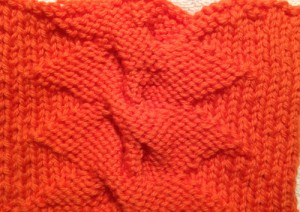
the purl side

Hand to machine, symbols 3

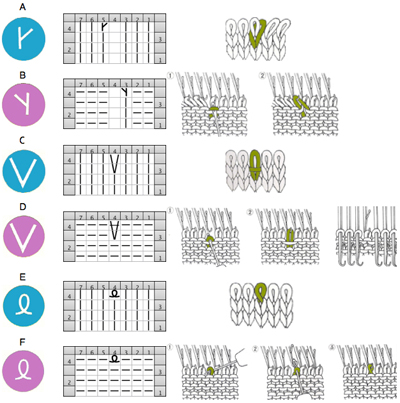
In the following series the blue dots and accompanying diagrams continue to represent the fabric as it would appear on the knit side if hand knit, or after the work is removed from the machine. The pink dots and accompanying graphics represent the matching stitch on the purl side and as it may be executed on the knitting machine to match the original fabric.

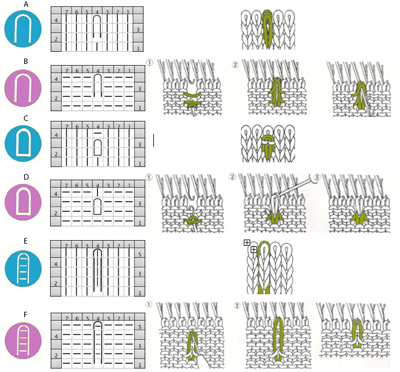
A/B revisit increases within the row. The same motion may be used on the KM to increase single stitches at the garment edge, allowing for increases on both sides at the same time (if they always occur mostly on the same side however, one side will have consistently tighter end stitches, and be shorter). C/D revisit slipped stitches. In D the image on the far right shows the position for the needle about to be skipped/slipped. If working slip stitch through hand selection, the needles that are out to 3rd position, or out to “holding” will knit. E/F revisit twisted stitches within any one row.


Revisiting tuck stitch, and ruching: in the tuck stitch formation in A/B, B has the added illustration showing bringing out to “holding”, (D, or E position depending on machine brand) any needle that has multiple loops on it prior to the next row of knitting all stitches. C/D are variants: in addition to combining loops, the top stitch is reformed to show as purl on the knit side, knit on the purl. E/F illustrate ruching where single or multiple stitches are pulled up to gather fabric and create texture, for any desired/varying number of rows

Below the first row illustrates ladders resulting from a few methods in hand-knitting to emptying needles and leaving them out of work (A position) on the KM. The second row represents a wrapped increase on the edge of the knit, on the KM this is known as e wrapping.

Cable crossings may be represented in a variety of ways, below are just a couple; the grayed-out areas after the first chart IMO help define forward-facing stitches on completion of the transfer for the cable, whether on front of the knit or on purl side facing the knitter on the machine.

Other fabrics such as ribs and more on lace will be explored at a later date.

Symbols to punchcard 1

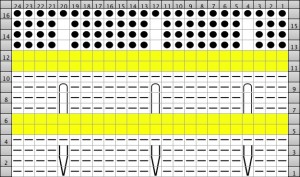
In the chart below pattern repeats take into account the punchcard limitation of 24 stitch maximum repeat. In the sections separated by the color stripe, the bottom shows a purl side symbol chart for slip stitch, the center the purl side symbol chart for brioche/ tuck stitch, the top the repeat punched out for use on the KM with black dots representing punched holes. Keeping in mind there is a 36 row minimum for the card to roll adequately through reader, this repeat would need to be punched 9 times. If one wants to use the color changes in other than totally random manner, then the pattern repeat must be an even number of rows in height. One option is to use double length, but unless the yarn used in the repeat below is very thin, for tuck stitch that may be beyond the limit of the KM. I also prefer when knitting lengths of fabric not to use elongation; for me that makes it easier to correct mistakes. A reminder: the punchcard selection mirrors the design horizontally (particularly noticeable in letters), so the hand knit repeat need not be reversed for a match.

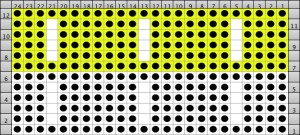
Below is a more manageable tuck repeat reconsidered for color changes (shown in change of ground behind punched holes). The first row selection needs to be from right to left toward the color changer in Japanese machines (Passap is on right, but console takes that into account). This is not the only color change sequence possible, only a place to start.

With very rare exceptions, tuck stitches generally must have a knit stitch/punched hole on either side of the unpunched square. This is because side by side loops jump off on the next pass, rather than knitting off in a group, making a long float in in some cases an interesting mess. Because slip stitch skips needles creating floats rather than depositing loops in needle hooks, the tolerance for side by side slipped stitches if far greater, and the number of rows that the individual stitches are not knit is limited by the strength of the yarn, and the tolerance in the machine. Both tuck and slip stitch fabrics benefit from being evenly weighted, with weights being moved up regularly during knitting. Canceling end needle selection and having the pattern repeats line up with tuck/slip on each edge may produce interesting side edges. If texture is the goal yarns that can be “killed” by pressing/steaming should be avoided.