To mesh or not to mesh 2

The amended “square mesh card”; grey areas indicate more tape use on the reverse. In basic analysis knit “squares” consist of blocks of blanks on card 12 squares tall by 3 wide, essentially removing 6 lace transfers (holes in all over card) in those locations; this could be done with software and planned ahead of punching any holes. Electronics capable of programming 2 different motifs increase ease in drawing out patterns as well as the possibilities in planning larger repeats and repeat sequences

the corresponding swatch viewed on purl side after a quick steaming

flipped 90 degrees

To mesh or not to mesh 1

A good online grouping of mesh repeats is one place to start exploring this topic. Most proprietary large pattern books from machine knitting companies include at least a few suitable cards/mylar samples. They can be used for “all over” fabrics, borders, striping in mixed bands of varying styles, etc. I am presently interested in pursuing filet crochet-like structure by superimposing knit areas onto lace mesh using “low tech” punchcards or mylar sheets. Filet crochet is often built on a system of solid squares on the more open “ground”. Emulating this type, to begin with, here is a punchcard for use on Brother KM resulting in a “square mesh”

a lazy way to explore how adding solid areas to any pattern card is to mask a portion of the card using tape ie. in this case painter’s tape on the reverse side; this is not the best long term solution, but OK for “testing the waters” and sorting out the final repeats. Here is the resulting card reverse side

the card was extended for a full, alternating blocks repeat: the first run at a swatch result showed that oops! I am not quite there with alternating blocks of 4: no worries, more tape is on hand. Below is my preferred, sideways view of the present fabric. There is a difference in ridges/ lines as viewed horizontally, every other is thicker because of the location of transferred stitches. Knitting sequence is 4 rows of transfers with lace carriage, followed by 2 rows knit with KH throughout. A good starting point.


Large scale mesh, breaking rules

The goal is to produce a large-scale mesh without hand techniques or extra steps.
In both slip and tuck, every punched hole, black square in mylar, or pixel in electronic downloads that bring a needle out to D position (for some unfathomable reason Brother needle positions go A, B, D, E, poor C got skipped) will result in a knit stitch. In the slip setting the non selected needles get skipped creating floats, while in the tuck setting, the non selected needles will hold a loop in the needle hook until that needle is returned to the D position. Side-by-side loops are troublesome in any stitch type. That said, tuck can be employed to sequentially lay down loops in some patterns where the lace carriage moves to produce side by side empty needles as part of the planned design.

The usual caution with such fabrics: extension rails must be used since both carriages engage the belt. The yarn needs to be “friendly” enough to not break easily. Since stitches travel across a wider gap than in single eyelet lace, the tension needs to be looser as well. Small changes can make a big difference, and so can patience. If end stitches are selected prior to the lace carriage making the next row of transfers, push them back to B manually so as not to produce decreases or dropped stitches.
Working the punchcard on a punchcard machine:

The lace carriage is set for normal lace, preselects the first row of knitting with the punchcard not locked on its first pass to the right. The KH carriage is set on KC I with both tuck buttons depressed. Each carriage works in sequences of 4 passes throughout.
Actions performed by the carriages as they make their next pass to the opposite side:
Lace carriage 

COL: moves to the right with no preselection
COR: no transfers, preselects for transfers to the right
COL: transfers to the right, preselects transfers to the left
COR: transfers to the left, preselects for the first tuck row. There will be 3 single needles with 3 stitches on each of them and two empty needles on each side
Knit carriage:
COR: knits first tuck row, makes the same preselection
COL: knits second tuck row, preselect the next tuck row, on a different needle position
COR: knits third tuck row, in the alternate location, preselects for all knit row
COL: knits all stitches, preselects blank row

Some observations: the top bind off as seen in the swatch below, was tight for the fabric. To maximize its width, the bind-off should be around at least 2 gate pegs, even 3 if needed. This allows for completing the task on the machine without adding more work and adding hand techniques. Tuck stitch produces a knit that tends to be short and wide, lace wants to open up with blocking as well, so this fabric definitely will want to spread. The top approximate 1/3 of the swatch below was kit using the same white yarn but in standard single needle mesh, making the size difference in “holes” created with the tuck method easy to see. The white is a 2/8 wool, the other a 16/2 mystery fiber I usually use as waste yarn.

For me this experiment will probably fall in the “now that I’ve done it, broken several rules, and have a good result I am over it” category.


Look Ma, missing holes! A saga begins…

Transferring any single stitch to the adjacent needle will create a loop in that empty needle on the next pass of the knit carriage, and form that loop into a completed stitch on the second KH pass as it travels back to its original position. There are some constants in knit fabrics. For example, in lace, if all transfers are made in one direction, particularly in meshes, the fabric biases. Great if you want a bias fabric, not so if the original plan was to produce a balanced one. The cure: to alternate the direction of transfers sequentially, or in series. If done in series the result is a vertical zigzag with movement in the edges of the fabric to echo the bias direction in the knit.
If two adjacent needles (or more) are left empty, the first KH pass will create loops on those same needles. Without the knitter’s intervention and manipulation of at least some of those loops the space rather than creating holes, will be producing “ladders”. Ladder fabrics whether in combination with lace holes or not can be interesting, often involve hand techniques to make them more so, but the topic of the moment is transferred lace.
For knit stitches to form in/with the single second pass of the knit carriage, at least every other needle must have a loop or stitch on it. If two adjacent needles are empty one of several ways to achieve a larger round hole is to knit the first row, drop off one of the 2 “loops” created, continue knitting; this technique will create a secondary smaller hole in the fabric, it is a matter of preference as to whether this effect is acceptable.
To avoid a secondary “hole”, the method I prefer is to insert a one-eyed transfer tool back to front through the dropped off yarn, twist 180 degrees either direction, forming an “e”, and rehang the twisted stitch on the empty needle, thus “casting” that stitch on. This technique is sometimes used for buttonholes (not the best for that purpose). It is one way to bring the familiar e wrap used at the beginning of some knits into the body of a swatch/ garment. As the second knit row is completed the larger, “round” hole is now achieved.
In “automatic” slip small slits/holes appear where sequential rows of knitting occur, creating secondary patterns (seen in doilies).
It is up to the knitter to decide which trade-offs are acceptable ones. “Automating” functions add to design time and sorting out modifications to repeats but can speed up the final knitting process and facilitate accuracy when one transits from swatch to garment construction.
Lace cards can be planned to incorporate some larger holes, adding hand techniques to the mix.
And then there is the purposeful loss of holes, ie. in fine lace where the yarn is not transferred to but rather shared with the adjacent needle, creating a textured look rather than a hole filled one unless very thin yarn is in use.

Lace: from electronic repeat to punchcard

At about the time I began my recent lace obsession, and pre my trying to actually use excel instead of simply knowing it lived in my computer, a friend was trying to work on a lace repeat that was found online as part of Staceyjoy’s knitting stitch portfolio, now part of the site. As a result, the downloadable pdf below bears the name it does, includes my how/to suggestions for the journey from electronic single repeat to punchcard, and the resulting swatch. One additional tip: when working with copies it is good to mark tops and bottoms clearly, especially if combining pieces of patterns so as to avoid marking/punching and vertical mirroring mistakes.

redlipstick PDF

So many machines…lace punchcard knitting

There are several brand KMs still around and in use, but most are no longer being manufactured. Questions often come up on using one KM brand pattern card on another. Card readers inside the machine are below eye level, so exterior number/other markings on cards or mylars reflect that, providing the knitter with a visual cue as to where they “are” in the repeat. If machines pre-select, the needle selection may not bear any relationship to the actual design row on the punched card or mylar as opposed to what one “sees”. In addition to this variable in lace one often has 2 carriages in use. It is possible to develop cards etc. from lace hand-knitting graphs, but there is enough “going on” so a good place where to start experimenting is with pre-drawn ones. Lace preselection on any single row may have no apparent relationship to where the lace hole will ultimately end up.

Here are some random facts gathered from both sources and experience, they are applicable only if the knit carriage is set for plain knitting and no other function ie. slip or tuck is involved; plain knit rows do not advance the card reading mechanisms. In mixed-structure fabrics, the rules change.

the Brother and Toyota lace cards can be used on studio punchcard machines as long as they are patterns that have 2 blank rows after each transfer sequence

Brother and Toyota have U-shaped arrows to identify when to knit with the knit carriage, both brands read cards 7 rows down

the first row on Brother is transferred from right to left, while on Toyota it is transferred from left to right; Brother and Toyota cards are interchangeable provided the card is mirrored vertically (or a simple cheat: use carriages on opposite sides of usual)

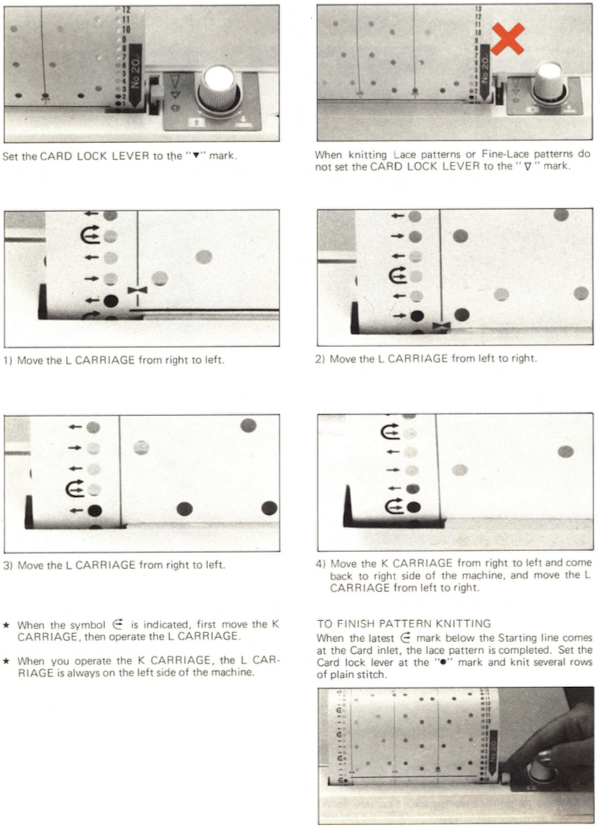
for Studio knitting find the row number of the U-shaped arrow and circle the 2nd and 3d rows below that row that number to identify rows in which the carriage is changed/set to knit

The Brother ends with 2 blank rows

while Studio starts with 2 blank rows

on Studio begin brother card by locking card 4 rows before row 1, on row 3

Brother/Knitking lace carriage does not carry yarn, does not knit or trip the row counter; the stitches get transferred in the direction that the lace carriage is being pushed

Studio/Singer has a lace carriage available that transfers as it knits; on more complex laces one is sometimes instructed to set the carriage not to knit for a specified number of rows, the yarn may be removed, and other adjustments are often required

though Studio and Brother lace cards are not directly interchangeable; aside from the numbering issue the transfer method is different, so a studio lace card “working” on Brother or vice versa is a happy accident and likely to result in a “different” fabric

Brother information is applicable to its “new” clone, Taitexma.  The possible settings and symbols:

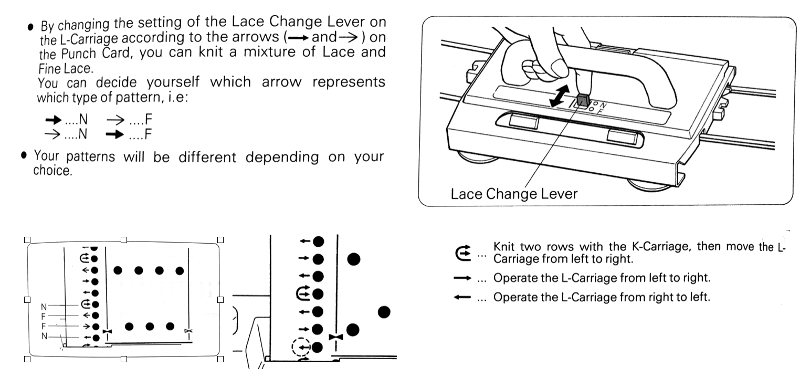
Lace point cams may be used on the punchcard machine to create vertical bands of lace. This is also achievable on the electronic by programming for knit stitches between vertical (or horizontal bands).

More information in posts:
Lace knitting tips including card and electronic markings for transfers and knit rows 
 Revisiting lace repeats, symbols, and charting

A few references :
Machine Knitting: the Technique of Lace by  Kathleen Kinder
Knitting Lace and A Machine Knitter’s Guide to Creating Fabrics by Susanna Lewis
Machine Knitting: the Technique of Pattern Card Design by Denise Musk
John Allen’s Treasury of Machine Knitting Stitches
The Harmony Guide to Machine Knitting Stitches (their Colorful Guide to Machine Knitting Stitches does not include lace)
322 Machine Knitting Stitches (Sterling Publishing,1988)
Both Brother and Studio published punchcard volumes, now out of print.

Knitting with 2 carriages

Recently there has been a lot of press about a particular personality using 2 carriages in her knitting. This is not a new idea. Some points to ponder: if color changing is required there many ways to deal with it, beginning with doing it manually and devising a yarn holder of sorts to slip into space where the needle retainer bar sits. Then there are color changers, an absolute necessity in double bed work for DBJ. Not all machine models have changers that will work on both beds, Brother happens to be one that does not. Though Passap Autocolor will change colors automatically, the Brother single bed one is operated by one’s fingers pushing buttons, is a bit fussy, and it is really good not to hit an empty holder and go across with “no yarn”, since the object is usually not to have knitting fall off and onto floor.
Extra KH carriages are a bigger expense than color changers. Many production knitters have backups for their machine models. It is obviously best if both carriages are the same model year. Sometimes sequential model ones may be used, and all that may be required is a sinker plate adjustment, other times the carriages are incompatible with the new knitting beds though changes may appear to be small ones to the eye.
Unless I specify otherwise, my comments usually pertain to Brother KMs.
Aside from the fact that punchcard models have no power source, the pattern rotation is also different and that needs to be taken into consideration when punching holes in the card. Electronic machines advance a design row for each carriage pass on each side. Punchcard models do not.
In knitting stripes, the second carriage may house a thinner or thicker yarn, same yarn at a different tension, or hold the alternate color for frequent color changes.  It may also be used with different cam settings than the other ie one for fair isle, the other for weaving or tuck, etc.
If combining stitch types a clear understanding of how punchcard holes and mylar or computer interface “squares” relate to needle selection and fabric formation is helpful and boils down to planning selection for needles one actually wants knitting. Patterning sequences must happen so each carriage makes an even number of passes, and returns home to its “side” for “automatic” use. Lace extension rails must be used and the alternate carriage is off the needle bed to avoid belt breakage.

The image below is a lo-tech “color changer” marketed decades ago. Old credit cards can be used for a DIY version.

Doilies: Lace meets hold and goes round

This post was written originally in 2011, in one of my lace “phases”, with test swatches knit on a 910 using a mylar sheet or on my 892E Andare Brother punchcard machine. Early on many of the posts were used to record what I had made, sometimes providing the repeats, but not usually step by step instructions. The shares were intended for anyone with previous experience who might want to create their own version of such fabrics. Now in 2020, my swatches are usually knit with download cables img2track on a 930 or less frequently on a 910 using ayab, via an iMac. In revisiting those early posts I sometimes find myself wondering about the content and how their fabrics were achieved. At the time, as now, I tried to respect copyrights. Since then many machine knitting publications are now downloadable for free online and I began to include information from them, and when possible, links to the source.

There is an excellent online resource for the Bond Machine. Techniques are applicable to other KM models for those who enjoy hand techniques. The round lace tablecloth series provides a number of “doily” charts.
The slip setting in both directions is used on the KH for automatic shaping, end needle selection is canceled. It is critical that carriages be off the machine and on the lace extension rails while the alternate carriage is in use as they both engage the timing belt. The latter can be broken if pulled in opposing directions at the same time.
Comparing a pattern on 2 machines: one of the critical differences when using 2 carriages to select patterns, is that on electronic machines such as the 910 or later models, with each carriage pass the design repeat advances one row. With Brother punchcards, the first pass of the second carriage does not advance the card as it makes its first “trip” from the opposite side, the previous preselection and function are repeated.
When operating the lace carriage on a punchcard machine, one of the critical differences is that the preselection row from left to right made with the lace carriage is performed with the punchcard not locked as usual, but rather, set to advance normally. From:  Any circular knit that is shaped with sideways holding segments will need to be seamed when completed. Taking that into account, at least one row is knit with “doily” yarn from left to right after several rows are knit in waste-yarn before the transfers to create open stitches are begun. It is a personal choice and preference whether upon completion of the required number of segments to join by rehanging open stitches and binding off on the machine or grafting (the method I prefer) with the work off the machine after several rows of waste yarn and dropping the work off the KM.
When 2 carriages are selecting needles from opposite sides, the “rule” as provided in the manual is broken, the card starts in the locked position on one side, is released when it reaches the opposite one, as is standard in knitting other stitch types. In this chart, patterning begins with the locked reader and the LC used for the initial preselection row 
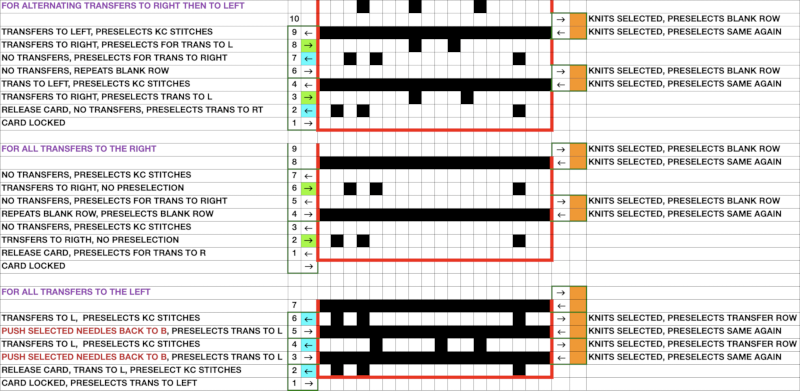
Beginmomg with the LC on the left, the end needle selection is canceled. The two positions in LCs for both punchcard and electronic KMs
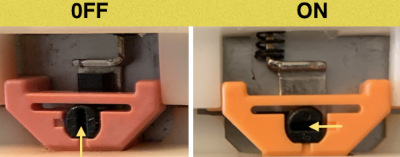
Back in 2002 exchanges with a fellow member of an Australian Yahoo Group, OzMKers, led to her final edit of this half punchcard repeat for the test doily. All transfers are in the same direction, to the right
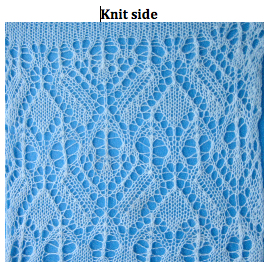
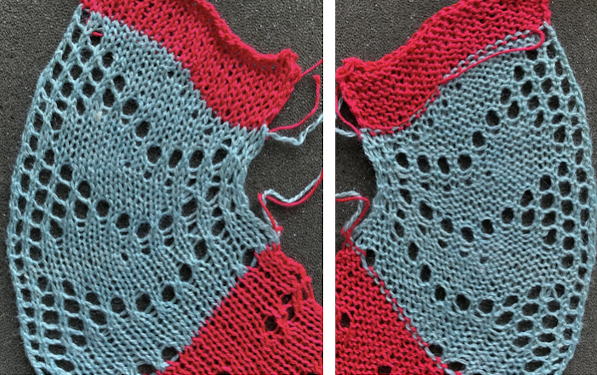
A 24 stitch sample, knit in cotton yarn. The center of the circle needs to be managed as opposed to simply gathering it in order to keep the finished shape flat. It is possible for the lace carriage to transfer while at the same time preselecting every needle to be knit by the next pass of the knit carriage from the opposite side. An expanded view of part of the repeat:  
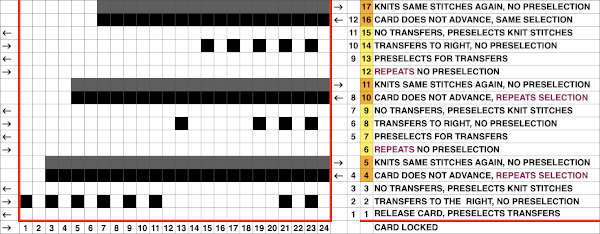
In order to get the repeat working properly, I found I needed to edit out one of the punched holes at the start of each repeat, revised card  The original and the amended start of each segment are shown below, I skipped the extra knit rows numbered 21-23 on the original punchcard with the intention of eliminating extra knit rows at the very center, making the circumference at the closure of the doily smaller. I prefer to start with knit rows, in which case the first preselection row would take place from the right. Note that lace transfer marks are directly on top of the solid lines representing knit stitches     
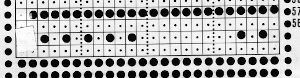
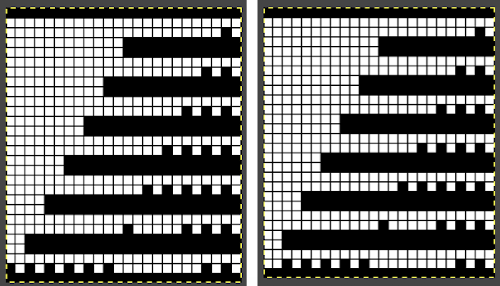
If drawing on the back of mylar for use on the 910, either image may be drawn as is, with the number 1 pattern case “A” selector reverse lever to up position.
Repeat design principles are shared in creating edgings, ruffles, and more.
The amended 24 stitch repeat with all transfers to the right knit on the 930 after a few rows misstart. The download is automatically mirrored. The end needle cancellation setting on the 910 LC for the pattern to work properly with the carriage in use. 
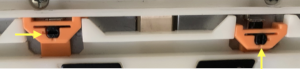
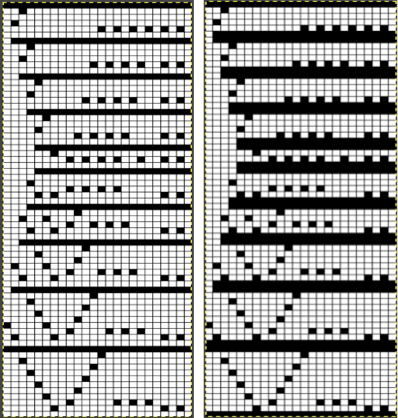
In turn, this repeat as given was used in 2020 for a pattern test on my 930 for all transfers to the left. Note: here the knit stitch black pixels are followed by a blank row, and the transfer marks occur on design row 3, directly below the next series of all black pixels 
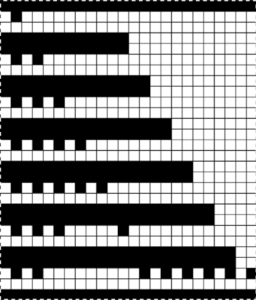
Depending on the machine model, the .png for the repeat may, in turn, need to be mirrored horizontally.
The preselection row for my test swatch is from right to left, using the knit carriage (KC). All black pixels will preselect needles. When the left side is reached, the KC is set to slip in both directions and will knit all preselected needles on its way back to the right. Subsequently, the slip setting will be performing the function of bringing stitches in and out of hold opposite the carriage. Each carriage pass advances the repeat one row. The lace carriage preselects for transfers from left to right, transfers to left, and preselects for the next knit row as it returns to the left and onto its rail. 
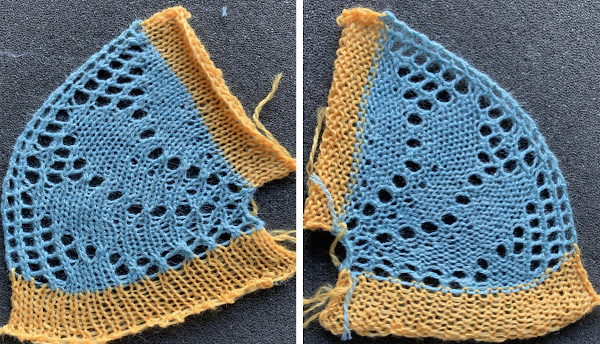
A 40-stitch adaptation from the Bond site to try A 60-stitch repeat also inspired by the Bond post knit on the 910 using a mylar. Gauge still matters, more than the recommended 16 sections to form a full circle would be required using this particular yarn The electronic repeat as drawn on the mylar,    the 60X66 png   In the post on lace edgings automated with slip stitch on Brother machines written in 2020, I shared a modified version of a punchcard published by Susanna Lewis in “A Machine Knitter’s Guide to Creating Fabrics” (1981), the ultimate resource for punchcard knitting for knitters with any amount of experience. The chart on p 223 was modified by me since I like to start my lace edgings on the widest number of stitches in the pattern. The punchcard repeat on the left below is shown after being reorganized to start with a knit row on the full 24-stitch width. On the right, rows of black pixels are added, for a version of the full repeat to be used on electronic machines. The slip stitches are substitutes for manual holding techniques, used to knit rows that are in turn form increases and decreases to alter the outside edge of the trim. The lace pattern resulting from the transfers changes along with their direction as the outside edge does. This image is for the desired effect on the purl side of the fabric. Again, depending on the electronic model or the download program, it may in turn need to be mirrored. 
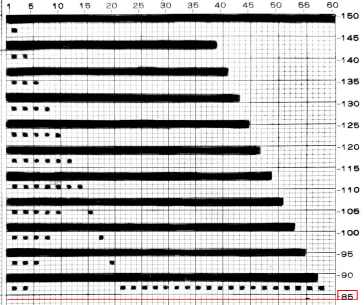
Subsequent posts on knit edgings:
Lace edgings on Brother machines- automated with slip stitch
Lace edgings on Brother machines- automated with slip stitch 2
From automated lace edging patterns to doilies and ruffles 

A limited production item

This shawl has a rhythmic, simplified lace repeat allowing for consideration in making it as a limited edition production item. It begins and ends on live stitches, which in turn are joined in seam as you knit fashion as the border is created. The transfers in the border regularly switch directions creating a reverse bias that in turn may be blocked into pointed edges.