A lace “shell” want to be, a few ways

I recently saw a semi circular HK shawl pattern that used graduated lace shell motif bands, and went hunting for a possible such repeat with the intent of subsequently knitting it on the machine. Taking into consideration the chart lenght required if using the lace carriage, I began with a “small” hand knit possible repeat

the text (Intwined)

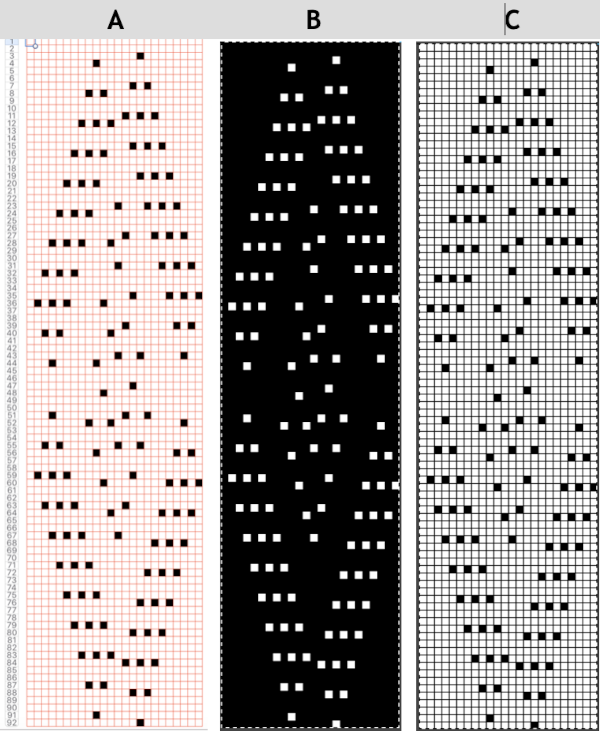
pictured below is a mylar repeat worked out for use with the lace carriage with 2 programming options: A, B. Notations in this instance were made using a free mac program (for my the first time), Skitch, which allows one to work with screenshots and basic image-editing tools all in one place. The middle column of numbers indicate the number of passes required for the lace carriage for each repeat prior to pairs of rows of plain knitting. The transfers are made all in one direction, so the spacing between each set of transfers and knit rows is different from the traditional 2 rows of blanks. I find it easier to have multiple blank rows before selections for transfers as a place to pause, check my stitches, and have clearer starts if knitting needs to be unravelled; this repeat takes that into consideration

option A was knit with a ladder, NOOW set up:

the resulting swatch in acrylic yarn, steamed, fairly straight edges

option B eliminates the ladders, a ridge is created by the transfers highlighting the “shell shape”. The sample clearly illustrates the issue with lace fabrics where transfers are all in one direction: note the resulting bias, which could be a problem or a design feature, depending on  one’s perspective. It is particularly noticeable in the area of the color change. The top yarn is a rayon, the ridge created by the transfers flattened with pressing but is still in evidence, the occasional noticeable problems are operator errors (and laziness in changing bent needles), not pattern ones.

shortening the repeat: I found this one a bit more confusing to follow, black horizontal marks on right edge of mylar are a visual cue to rows on which knitting needs to occur; note there are no occurrences of 2 consecutive blank rows, only singles

the fabric is identical, with the same problems in terms of biasing

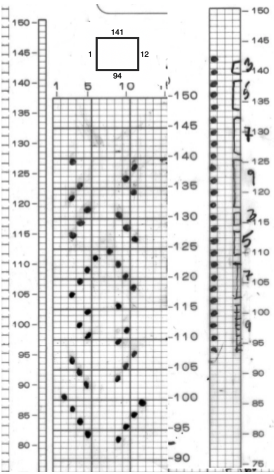
taking out the swing, moving in 2 directions, and back to a hand technique: the black squares indicate groups of stitches that will be moved to create lace holes. In the boottom segment selected needles are transferred to the right, lace holes will move in a curve, transfers double up on the same needle location on the bed. In the top segment, beginning with the doubled up stitch from the last transfer to right, direction of transfers is reversed, moving toward left, and always beginning with the same needle position. Markings on mylar on the far right indicate direction in which the stitches are transferred. This repeat is 7 stitches wide by 12 rows in height, could be adjusted to suit. Adjustable transfer tools make the work progress faster.

the corresponding swatch, without blocking, much more “straight”

4/11

a mylar repeat for use with lace carriage, 910

in the image on left the repeat is hi-lighted by the green border; in the one on the right there are visual cues  for operations. The vertical lines indicate which side of the bed the lace carriage needs to be placed for the next group of transfers, the horizontal lines mark the end of the transfer sequence, when a single row of knit occurs. Respective carriages need to be taken off the bed after most passes to allow use of the opposing carriage and maintain proper direction of moves, a different sort of “hand technique”. Below is a swatch, the red spot is a poorly corrected dropped stitch.

the technique is manageable for experienced knitters, this was my second try at a hurried repeat (weight adjustments and dropped stitches on first) and photo as I get ready to travel to the opposite coast.

Striping in lace fabrics 1

Colored stripes combined with lace patterning can produce interesting fabrics. Many variants may be found in Missoni’s knitwear. At times the lace holes themselves may nearly disappear, while the stripes become distorted by the transfers, the change in gauge, and the creation of the holes, which in combination begin to create a bias direction in parts of the knit. Below is a simple sample illustrating some of the above points:

the working chart (Intwined)

the text for hand knitting created by the program the additional knit rows creating garter stitch in part of the pattern provide added texture in a hand knit, but are impractical in a machine knit

Rather than deal with working out the lace transfers for use with the lace carriage for my swatch, I chose to use a multiple transfer tool, and begin with a 7 stitch transfer as opposed to a larger number one. Below are some of the tools that may be used to hand transfer stitches in larger numbers than with the tools usually provided with KMs, a garter bar may be used as well

The image below  shows the fabric as it appears on its knit side. The bottom illustrates the repeat in one color. The red mark indicates where the transfers were made after knitting the first row of each color, the yellow indicates transfers made before each color change. In the former the “twist”  apparent as the transfer knitting is completed, has one yarn wrapping around the other. In the latter, the “twist is all one color”. The yarns used were a rayon and an acrylic, on standard km. If a color changer and lace carriage were to be used in combination, only the second option would be possible (more on that in a later post).

the purl side

Below is a hand knit sample with a wider repeat, adding garter rows. The yarn used was a worsted weigh wool on size 8 needles. Of note is the difference in undulation in bottom and top edges

knit side (red mark here indicates garter stitch row detail)

purl side

a possible use for this pattern might be a center or recurring panel in a wider knit

From punchcard to hand technique or hand knit

Emulating the repeat in the post Studio transfer lace knit on Brother 910  and Revisiting use of lace patterns Studio vs Brother machines

here is a chart for reproducing it as a hand knit, generated in Intwinedthe accompanying text generated by the programexecuting ssp from Knitters Brewing Company

I tried the pattern as a hand knit and had difficulty keeping track of the reversals of twists front and back, so I headed back to my more familiar territory, machine knitting, and to the bulky machine to make the number of transfers a bit more manageable. The repeat is 14 stitches wide, outside the range of an effective repeat for a punchcard, but with transfers every row there is another way to use a card that requires no punching. Observing familiar rules, and text or symbols that are meaningful to us for the particular project (ie also for racking sequences), the card is used for notekeeping rather than needle selection. The carriage is set to KC, set for normal knit, no cam buttons in use. Because no holes are punched, there will be no needle selection. The card is locked on row 1 as usual prior to the first row of any pattern knitting , set to advance normally, and in my scribbly version it reminded me of several things. Each pattern segment is 5 rows, with the dark stripe indicating the beginning of each new segment. The numbers on alternate sides show the number of stitches that need to be transferrd with the aid of tools,  leaving an empty needle that will create the hole, and overlapping stitches on either side of a center point in part of each motif. I worked with 2 repeats. On rows 1-5 as marked on punchcard, stitches were trasferred beginning on the right, toward the right side edge of the knit,  then following the remainder of the partial chart repeat. When the next segment of rows was reached as indicated by numbers appearing on the left of the card, beginning on the right edge again,  the first group of stitches was transferred away from the knit side edge, once again following the chart segment. As the lines of holes begin to show, it is easier to see the direction in which one needs to move as is the resulting pattern. The ridges created as the stitches overlap on either side of the center single knit stitch also can serve as guides in keeping track. I used no weights, just the opposite hand to pull and guide as needed. The number of moves is likely to require a looser tension than usual for any familiar yarn.the swatch, knit side, using worsted weight, tension 6its purl side

Studio transfer lace knit on Brother 910

Eons ago I had “saved” a random copy of a japanese punchcard pattern in the someday I will figure it out pile. I was attracted by its opennes and what appeared to look like ladders as well as holes in the small B/W photograph. I have more experience in knitting and understanding of lace now, and in the process of studio clean up and paper possible recycling I found my “future project” and thought I would “tackle” it

the card

As can be noted in numbered markings, the card is a studio lace card. In addition, between series of transfers there is a single blank row = a single row of knit as opposed to the 2 rows commonly seen in brother’s kms’ lace

my mylar repeat, with notes on R sidebar as to # of LC passes, rows knit

the method: with no repeat adjustments or conversions

I began with lace (LC) carriage on left (OL), knit  (KC) carriage on right (OR). Because a selection row is required for the first transfers row to occur, I added one row to each of the suggested lace pass sequences marked on the punchcard. The LC as a result travels an odd number of rows. It will begin on the side opposite from, and move toward the KC. At the end of each of the odd numbered row sequences it will reach the same side as the KC. At that point there will not be any needle selection. The LC is released from the needle bed, and the KC knits only one row to the opposite side and remains there. The LC returns to the bed opposite to the KC, and the sequence is below is repeated:

LCOL  9 passes, release 
KCOR knit one row to left 
LCOR 7 passes, release
KCOL knit one row to right
LCOL 5 passes, release 
KCOR one row to left 
LCOR 3 passes. release
KCOL knit one row to right 

I used a waste yarn acrylic for my swatch, which became scratchy, flat and stiff, losing any texture when pressed, and shrinking a bit so as to almost looking felted, yet another reminder  test small swatches fefore committing to larger pieces.  Here is the result

knit side

purl side

a new day, a different fiber, the joy of not noticing dropped stitches

“unblocked”, rayon yarna bit closer, after light pressing

for sample knit on 930 with img2 track please see later post 

Hand knit lace to KM: combining different meshes, alternative methods

This is a blog post I actually began working on in November 2013, and never quite completed. A Ravelry thread on a hand-knit lace to machine knit pattern translation made me think of it, so here are my working notes on one approach to charts designed for hand knitting that require transfers every row, with the intent to automate them for possible use with the lace carriage for transfers rather than working from a chart as a straight out hand technique.
The Japanese publication hand knitting chart

the hand knitting chart in Intwined

the HK instructions generated by the program to match the chart

the chart flipped horizontally for machine knitting could be achievable using LC on the right side of KM, which would require the method used in the previous post: elongation X2, 2 passes LC toward KC, followed by one row knit  A.

In this chart note the 2 cols representing opposite directions for transfers, not a physical possibility when using the LC

here the chart is amended, keeping like colors together on the same row, starting with LC on right,  LC 4 rows of passes followed by 2 rows knit

repeats can be adjusted so spacing matches more closely between motifs after swatching (B);  if the first row of transfers is to the left, lace carriage must make a pass to select from left to right, the second pass will transfer from right to left; in row 1 and 4 there are no transfers, rows 2 and 3 transfer selections from the previous rows; row four lets the LC return to its original position

knitting with the mylar: in transfers observed on the purl side of the fabric, facing the knitter: the lace carriage transfers selected needles in the direction in which it is moving on the needle bed; if first row transfers need to be transferred to the right, the lace carriage starts out on right for selection row, and will transfer to right on its second pass, from the left to right

moving things around for a possible brick layout

the mylar markings for selection from right to left: A and B, C from left to right

A is technically an incomplete repeat for continuous use, 2 more rows would be needed

that fabric swatches:  CBA

the tuck pattern Passap 1030 using the method of elongation X2 as described

the resulting mesh, with some yarn issues

Previous related posts:
2013/09/19/studio-simple-lace-on-brother-electronics/
2013/11/30/a-bit-of-seasonal-lace/
2013/12/05/lace-mesh-motif-charting_-mac-numbers/
and the previous posts on translating HK patterns for use on punchcard or electronic machines
2013/08/29/from-lace-chart-to-punchcard-6-to-electronic/

Lace mesh motif charting_ Mac Numbers_ a touch of Excel

October 2021: I periodically return to old posts and find much has changed since they were written in terms of software or in my thinking on the specific technique.
Rebuilding the working 24 stitch repeat from the colored chart here is now quick and easy. More detailed instructions on using both Numbers and Gimp may be found in my posts in subsequent years.
In summary, the expanded colored image of the repeat was cropped to 24 cells wide, 92 cells high. A table with cells measuring 20 by 20 points, 24 units wide, and 92 units high was created with a red grid. The image of the repeat was sized to match the same width and height as those of the table. The table was then arranged in front of the image, and black was filled in cells over the colored cells below. The new table was then screengrabbed with all interior cell borders removed, but with a thin border around all content, opened in Gimp, changed to indexed mode. Because lace has so few black dots I find scaling to punchcard size is more accurate if colors are inverted first, and again after scaling to the 24 by 92 required repeat, shown on the right. the associated png  Previous content:
The symbols here were disregarded in building the repeat here, but they matter when developing designs for use with the lace module in DAK.
This lace “separation” was based on a mesh technique, created using Mac Numbers, for use on a Brother knitting machine, with the Lace Carriage operating from the left side. The final design requires 4 passes by the lace carriage followed by 2 rows of plain knit throughout. 
Hand knitting: a brief list of symbols, and a few of their associated directions 
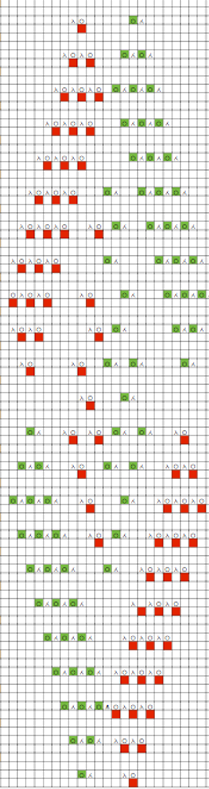
The hand-knit motif inspiration and symbols remain unchanged in this post, The colors were assigned for coding the direction of transfers to maintain the mesh transfer sequence splitting rows, is an option eliminated by apple in later versions of numbers copy and paste the above in a “blank” part of spreadsheet creating a new table; resize cells by selecting all in the new table, and clicking/ dragging on the bottom line of any of the grey, numbered row cells on left to number/ measurements of cells in the original document. Release the mouse, and all cells will be uniform in size.
In later versions choose the round symbol on the top left of the table to select the whole table or select all cells in it, in the table menu on the far right, cell size may be adjusted to any numbers one desires. If the final file is for scaling in other programs, it is best to have both numbers match. I have grown fond of 20 by 20 as I continued to work between numbers and Gimp. Note: after elongation, on first and all odd-numbered rows colors occur, but no symbols. On even rows, there are both colors and symbols. On odd rows (no symbols) now “erase” the green, on even (symbols) erase the red, results below,  on the right

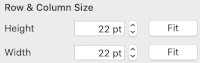
mark the outside of motif on the above right with a third color, beginning on the second row; cut and paste complete motif in a “clean area of your sheet so it is surrounded by blank space, this will save a lot of “erasing” (technically this creates a new table)select and copy blank rows as wide as your motif (blue outline on left)click on 3rd color square beginning at the bottom left, use the insert copied rows command, adding 2 blank rows between pairs of rows that will become markings for lace transfers,  moving up the design, ending with 2 blank rows as well the resulting “separated” mesh repeat is now 92 rows long:  spacing between repeats and number of knit rows at its top may be adjusted to suit preference/ taste. Red and green squares are what is punched, or black squares on mylar sheet, etc. Note: red containing rows have no symbols now, while green ones still do, another visual check with repeats this long, it is worth marking up the final template like that encountered on the card or mylar as described in previous posts: a pdf tree_lace for downloading and marking to suit, depending on mylar sheet or punchcard use. Each colored square represents a punched hole of a black cell. The resulting swatch:

the full repeat could be used singly, to create a border, or to become a  part of a much larger one 

the same motif  created in Excelany change to repasted motif affects the whole document in that area, unlike as in creating a new table in numbers as I recently “discovered” (a very convenient difference)
to elongate the design,  so far my solution has been to mark as above, click on third color cells on the left, beginning at the bottom, then using the insert row command. Doing so yields results that can be seen in the partially expanded chart below the remaining process may be carried out, using slightly different tools to achieve the same results.

A bit of seasonal lace mesh_charted_Intwined

a possible hand knit star motif, color coded transfers

flipped for machine knitting

planning the repeat for transfers with LC on left

correction for missing row  required, marked in red

rows to be punched or squares for mylar markings

(motif could be relocated for brick configuration)

2 knit rows follow any with no needle selection by LC

the result

+++

Studio simple lace on Brother electronics

this method works for studio simple lace patterns, wherein a single pass the stitches are both transferred and knit. There has been information published on using Studio punchcards on Brother punchcard machines using the KC to select, followed the LC, each making single passes. My two previous posts on the topic: 2011/05/18/lace-cards-use-on-the-brother-260-bulky/ and  2013/03/17/studio-simple-lace-punchcards-used-on-brother/.
While working out yet another HK to MK lace pattern, I sorted out the following method for using Studio simple lace on the electronic KM. It is a method that does not work on the Brother punchcard to produce the same fabric, however; on punchcard machines, as either carriage is moved to select from the opposite side of the bed, the card will not advance on the first pass, interrupting selection. I tried a swatch and got a very different lace design; depending on the starting pattern the results may be interesting (do not use elongation), but not the ones intended to match any original.

The knitting samples shown below were knit on a Brother 910. On electronic machines, as seen in previous posts on knitting with 2 carriages, the mylar (or otherwise programmed) repeat advances a row with each pass of the carriage, no matter on which side of the bed the pass originates. Dropped stitches are harder to repair in these fabrics than in patterns for multiple transfer lace (there knitting can be unraveled to the start of a sequence where 2 or more knit rows usually occur), so checking transfers, gate pegs, and adjusting stitch size and weights matter even more. There is no need to mirror the image horizontally; draw repeat as is on punchcard onto mylar

start knitting with KC (knit carriage) on left, Lace Carriage (LC) on Right

program pattern double length
on the first row the LC selects, the next row it will transfer; LC always makes 2 passes toward the KC, even if those 2 rows in repeat have no needle selection, and is removed from bed to be returned to the bed on the opposite side after the knit row with KC that follows
KC knits a single row to the opposite side
LC is placed back onto the machine opposite the KC to make 2 passes
KC follows with a single knit row, and the last 2 steps are repeated
3 total carriage passes complete one row of knit
the chart below shows the actions and placement of carriages

this sample was knit beginning with lace carriage on left, as can be seen in marked areas, the alternating repeats have a different quality in the sets of transfers marked red vs green

the “successful” swatch knit beginning with KC on left, LC on right in the method described above

December 7, 2018: an interesting method using 2 lace carriages found on youtube


Large eyelet lace, hand transferred (or not)

This is a lace sample created on a dubied industrial knitting machine

I became curious as to how to duplicate it and decided to use needle selection to help track the transfers rather than counting needles by hand. The repeat is a small one, suitable for both electronics and punchcards. Below is its configuration on my 910, punchcard knitters may want to flip the repeat to match the directions for knitting as written.

the sample’s knit side

its purl side

yarn: 2/8wool

end needle selection (KCII here) must be used any time there are needles out of work in the pattern

transfers are always made toward the carriage

single empty needled are put OOW after transfers across row

pairs of empty needles after they are created are returned to work before the next row of knitting to create side-by-side loops

in  my case, odd rows transfers were —>, even <—

single rows are knit after each set of transfers

1.KCII <—, transfer selected needles <—, move empty needles OOW

2. select row 2 as carriage knits —>, transfer selected needles —>, there will be two empty needles, side by side; bring all needles in work across the row

3. knit <—here there will be 2 loops side by side on adjoining emptied needles; check that no loops have dropped off, rehang and adjust tension if needed; transfer selected needles toward the carriage _ move single now emptied needles OOW

as this row and the next row are knit and transferred, side-by-side loops will become stitches, and another 2-loop set will be created

4. knit —>, transfer selected needles —> onto the adjoining loop, there will be 2 empty needles side by side, bring all/pairs needles in work across the row

repeat steps 3 and 4 for the remainder of the fabric

my previous posts on large eyelet lace were created using the lace carriage
large eyelets, and diagonal large eyelets

a cousin of sorts may be achieved by using the following punchcard lace repeat; the lace carriage selects and transfers for 4 passes, the knit carriage follows with 2 rows of knitting throughout; stitches are transferred, doubled up, and transferred again, so yarn choice, weight, and tension may need a lot of editing.

the resulting fabric

There is an added post on automating such large meshes published in July 2020 

From lace chart to punchcard 6, to electronic

The chart here is simpler than those previously explored, appeared in a Japanese publication, was suggested for use in MK as a hand technique

The lace transfers are in pairs, alternating in direction; this excel chart assigns symbols and colors to them. The repeat is 8 stitches wide, 10 rows tall, which make it suitable for punchcard machines as well as electronic ones

Below is the expanded graph, with alternating transfers for each row, and 2 knit rows completing each sequence. I am now using Studio mylars on the 910, so the additional border markings are to help orient the black squares on the mylar’s markings (6X5 as opposed to Brother’s 5X5). The expanded chart, now 40 rows in height:

On cards, orange and green may be punched as shown. Below is the resulting swatch, knit on 910 with #2 button up (flipped horizontally). 1: dropped stitch joy, which could actually be easily repaired at this point. 2: a partial repeat creating an interesting edge, more successful than the opposite side, a result that bears testing in swatches. 3: bind off around 2 gate pegs for maximum stretch in any blocking.