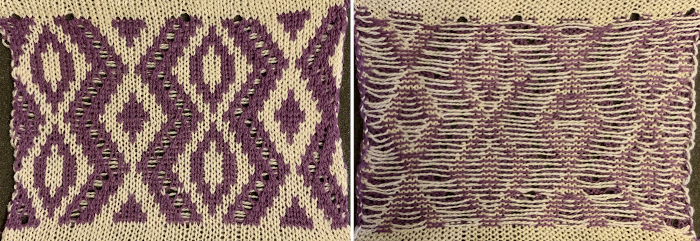
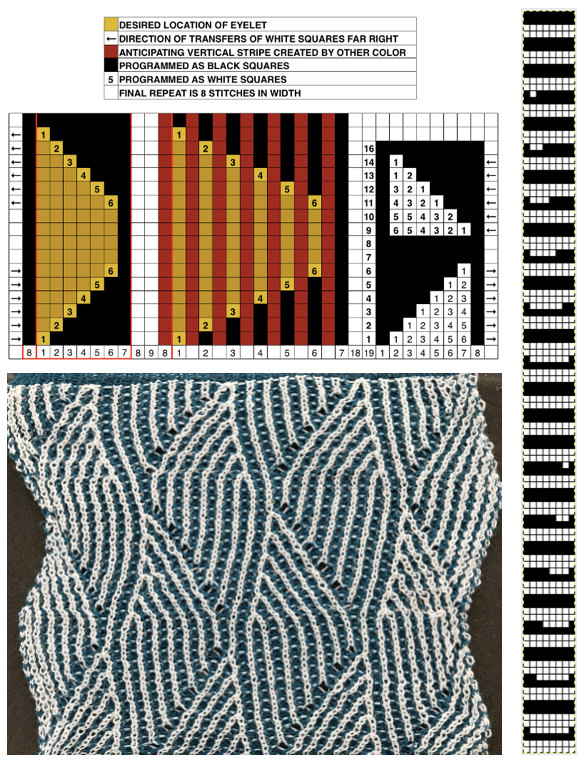
Lots of designs can be developed by shuffling repeat segments to achieve desired textures.
Here, the same number of stitches is hand transferred using multiple prong tools, and selections are aided by electronic or punchcard needle selection with the knit carriage set to knit with no pattern buttons pushed in.
The maximum number of stitches moved is 5.
The post on hand-transferred lace with color striping explores variations with transfers that share the concept.
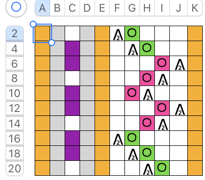
In a spreadsheet, potential results can be visualized, i.e., placement of eyelets once stitches are moved, locations where transferred stitches are placed in each sequence (yellow columns), and easily adding personal notations.
Each of the designs is 24 stitches in width, suitable for punch card models as well. 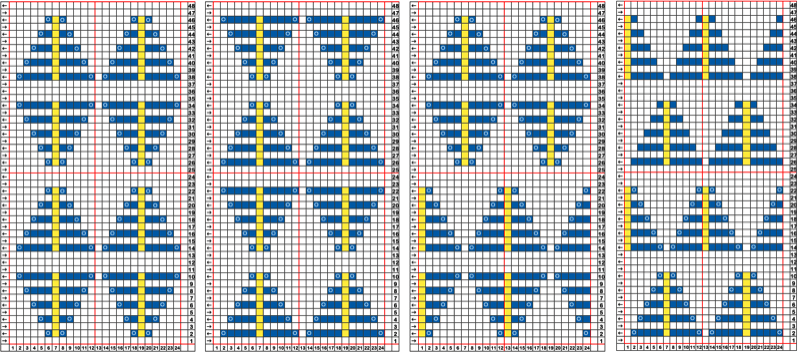 End needle selection is canceled.
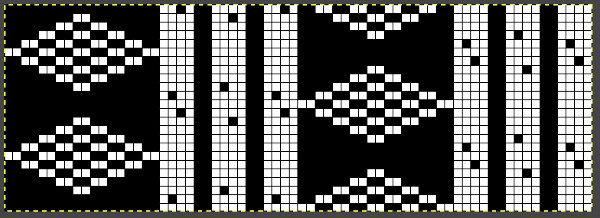
A manipulation beginning with transferring single stitches, followed by inverting the shapes
24X24, 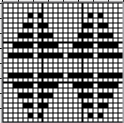
![]()
 and with transferring groups of 5 first, followed by inverting the shapes 24X24.
![]()
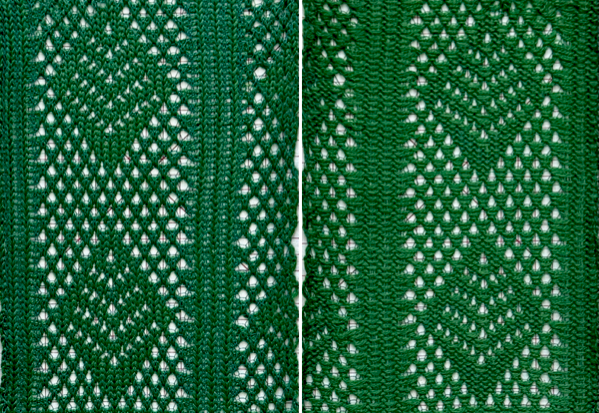
 Results are similar.
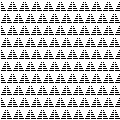
  A brick configuration, 24X48, will form chevron shapes of knit stitches between transfer segments.
![]()
 And finally, a brick alignment, 24X24.
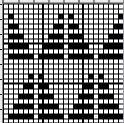
![]()
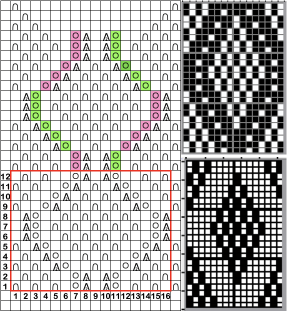
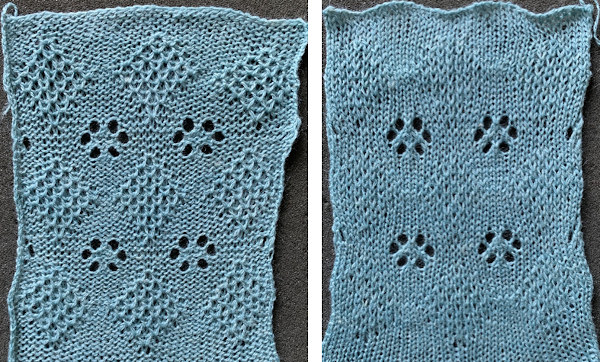
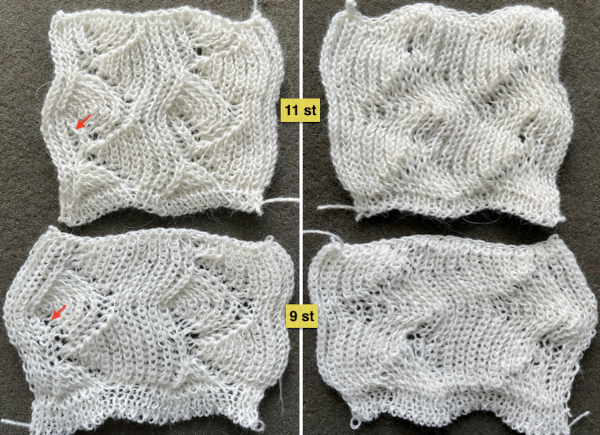
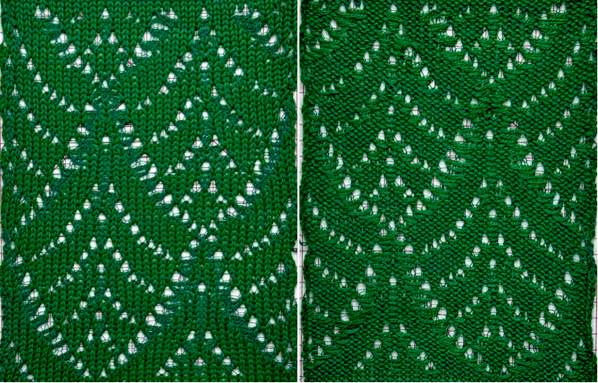
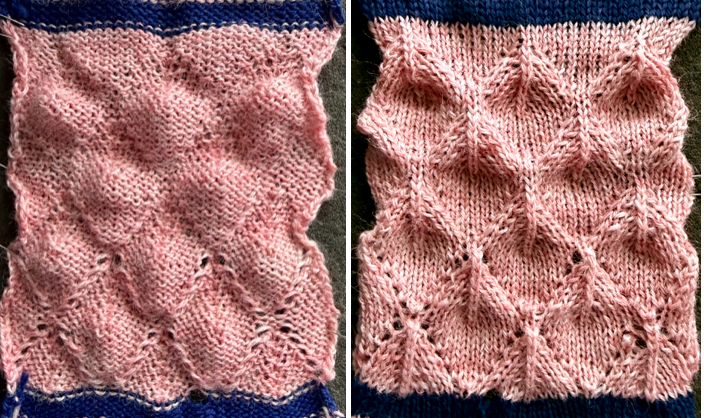 In the bottom of the swatch, the full eyelets are retained, moving toward the top they were reduced in size by picking up from the row below on each side of the transfers.
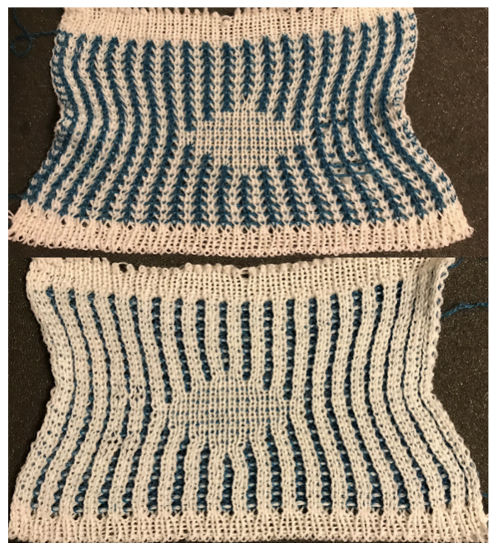
The resulting 3D textures were referred to as dragon scales in previous posts, some with better results than others, at times with the transfers toward the center of the groups made on each side of an undisturbed center stitch as opposed to on it.
This version from Single bed scales made with stitch transfers
![]() was created following the associated chart.
was created following the associated chart.![]() A review that includes single and double bed samples can be found in Revisiting 3D scales and shells, automated and not
A review that includes single and double bed samples can be found in Revisiting 3D scales and shells, automated and not
Category: Lace
Pinterest inspirations vs implementation, tuck and lace combos 2
This post will be a growing companion to Pinterest inspirations vs implementation, tuck and lace combos 1, addressing designing repeats for automation of such designs on electronic machines.
Lace transfers made in the same direction will lead to the knit biasing in that direction.
Reversing the direction of the transfers at intervals will balance some of that bias.
In the post on A return to lace with automated patterning, adding color striping, the LC transfers were charted moving diagonally as well,  achieving this result.
  In this inspiration source, the transfers are made in rectangular blocks.
  Assigning symbols and BW fill to cells in turn,
  expanding the repeat following arrow markings pointing to the LC selections and transfers in the correct directions.
  The single repeat, 20X42.
 ![]()
 In the bottom design rows 1-13, the LC makes 2 passes followed by 2 rows knit, in the top 14-41 rows, 4 LC passes are followed by 2 rows knit.
The test knit on 51 stitches. ![]()
 The side knit borders are 2 and 3 stitches, respectively. Next to the 2-stitch one, the eyelets are slightly compressed, appearing smaller than those next to the 3-stitch border.
There are charts worked out for fully automated tuck and lace combinations using both the LC and the KC to tuck.
Many are published in the Brother punchcard volume #5, but
they are not usable as provided in electronic machines.
The punch card machines repeat selection when the patterning carriage is retrieved for use from the opposite side.
The final charts in the DIY electronic versions will appear quite different, and although they may still be in repeat widths suitable for punch card machines, they are not interchangeable.
Electronic models advance the design for a row with each pass of carriages set for pattern knitting.
An idea using similar, alternating loop and lace diagonal shapes.  In terms of fabric qualities, tuck stitch is short and wide, and lace tends more to long and wide.
Casting on and binding off may need to be adjusted to be looser in final projects.
Jumping right to the use of black and white pixels, following the arrows to track movements of both carriages to achieve the 24X36 final repeat.
Two all-knit rows occur after completing tuck segments, avoiding LC attempts at transfers containing tuck loops far beyond LC tolerance, capable of producing interesting LC carriage jams: 

![]() The swatch was tested on 50 stitches.
The swatch was tested on 50 stitches. ![]() My seemingly endless supply of white yarn has reached its end, hence the color change and restart. As usual, the tuck texture is more evident on the purl side.
My seemingly endless supply of white yarn has reached its end, hence the color change and restart. As usual, the tuck texture is more evident on the purl side.  These were published in a Japanese knitting magazine from the late 80s, with accompanying symbol charts. Counting up from the bottom, it looks as though they were intended for use in Brother models, with row 1 marked 7 rows up on the right of the proposed punch cards.
  Tentative planning in a spreadsheet for each repeat with arrows indicating the respective carriage movements.

 The first preselection row is from left to right, and both begin with tuck patterning.
Testing the first 24X28 design![]() quickly identified a problem area where already formed tuck loops with added yarn from the lace transfers try to meet more tuck loops. Cyan T cells represent tuck loops, the magenta cells the loops formed when emptied needles are brought back into work as the next row is knit.
quickly identified a problem area where already formed tuck loops with added yarn from the lace transfers try to meet more tuck loops. Cyan T cells represent tuck loops, the magenta cells the loops formed when emptied needles are brought back into work as the next row is knit.  1: The first pair of tuck loops is complete,
2: and meet the pair of lace transfers stitches to the left and to the right.
3: When needles emptied by the lace transfers are advanced to knit, the center needle between them is meant to tuck once more, but refused to do so with the next all-knit pass.
Often, the limit for the number of stitches or loops on any one needle to knit off properly on 4.5 mm machines is 4, unless the yarn is thin.  A solution is to add an all-knit row to the design repeat, marked with blue cells.
 ![]() The amended design, drawn in repeat, checking alignments,
The amended design, drawn in repeat, checking alignments,  programmed on 48X28 for test knitting, and mirrored horizontally on the 930
![]() enabled sorting out likely places to watch for any added issues, i.e., location and reasons for any dropped stitches.
enabled sorting out likely places to watch for any added issues, i.e., location and reasons for any dropped stitches.  The second repeat, tested on 48X52, with the pair of added all knit row as above, still posed issues;
 ![]() all-knit rows between the lace transfers must be programmed for execution by the knit carriage traveling from right to left and back to its home on the right.
all-knit rows between the lace transfers must be programmed for execution by the knit carriage traveling from right to left and back to its home on the right.  Programmed 48X52
![]()
 Test knitting required mirroring on the 930
More tuck and Lace combos:
Lace meets tuck on Brother machines
Tuck stitch/ combination fabrics
Large diagonal eyelet lace
Combining tuck stitches with lace 2 (automating them)
Combining tuck stitches with lace 1
Pinterest inspirations vs implementation, tuck and lace combos 1
A companion to this post: Pinterest inspirations vs implementation, tuck and lace combos 2. Both are subject to edits and additions over time.
This has become an interesting rabbit hole for me. I am sharing working notes so far while I explore and document additional textures and combinations that move me forward, making them available to anyone wishing to participate in the journey.
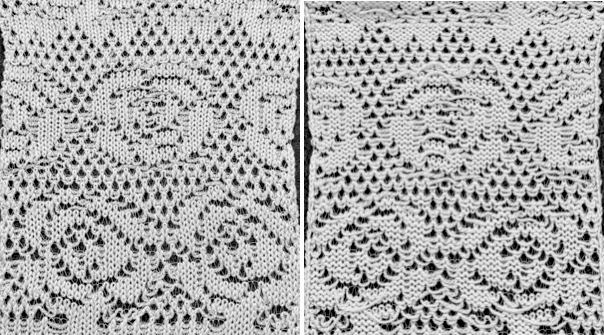
Several images of tuck stitch combined with lace eyelets and diagrams with instructions in a foreign language not clear enough to attempt a translation led to this first exploration of what appeared to be the most complex pattern.
The source image: 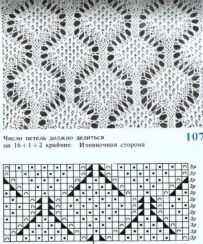 Pubs are not always in agreement as to the significance of specific symbols. In the published chart, the black dots are assumed to indicate stitches in hold or tuck, building up loops on the machine on the associated needles, the black triangles pointing to the left and to the right, the doubled-up stitches after transfers, and the curved shapes, the place where eyelets are formed after needles are emptied.
Many of my lace posts use cyan cells to symbolize transfers to the left, magenta for transfers to the right.
Starting with a symbols chart, in DIY, one may assign symbols that make sense personally. 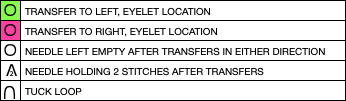
 Conversations with self:
A row of knitting must happen in the location of the emptied needles after each lace transfer.
Each held stitch/ tuck gather in the source image is textured enough to indicate 2 loops represented in tuck stitch by pixel units of 1 in width, 2 in height.
Transfers should occur in the same rows as the first tuck loop formation.
The next carriage pass forms the second tuck loop, with single yarn loops on the needles emptied by the transfers.
Concurrently, the double tuck loops are moved forward on needles to the knitting position, along with preselection for the next first tuck row, and for the next transfers.
Transfers are made after every pair of rows before the next carriage pass, and the process repeats, manipulating needles and their stitches as needed, while also maintaining proper needle selection.
Watch for needles accidentally taken out of work after transfers.
Bring each pair in the transfer groups out to D or E; they need to knit on the next pass.
Getting started: this is a chart that also includes a plan for beginning and ending a program on equal repeat segments, with added cells marked in green.
Charts can contain as much or as little information as to be useful.  The tuck stitches and the transfers in the final draft are both programmed as white pixels, resulting in the corresponding preselected needles remaining in the B position.
 ![]() The swatch was planned with 2 all-knit vertical columns on each side edge.
The swatch was planned with 2 all-knit vertical columns on each side edge.
In many tuck designs, both single and double beds, having a pair to a few stitches on the edges, can provide a serviceable rolled edge that follows the pattern movement.
Since the programmed tuck side edges here are not symmetrical in my test PNG pattern, it was mirrored horizontally using the built-in function in the 930.
Leaving the carriage set to knit for beginning selections helps to identify the anticipated placement of the eyelets.
After the pattern was established, the work on the machine appeared to provide enough clues as to stitch transfer directions to develop a rhythm in making them. 
![]()
 This far “simpler” design was planned from the outset in BW pixels.
 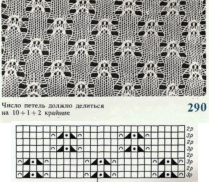 Simplifying the automated repeat, starting in only black and white:
 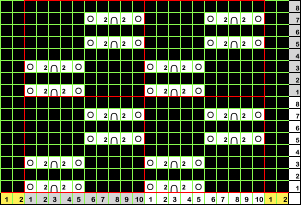 all transfers are made toward the center needle in each of the groups of 5 unselected needles.
The 10X8 repeat, ![]()
 programmed on 40X16 to include knit side edges, mirrored for use on the 930.
 ![]() The emptied needle and the one with the transferred stitch are brought out to E position, making certain the center stitch, the location of the tuck loop, remains in the B position.
The emptied needle and the one with the transferred stitch are brought out to E position, making certain the center stitch, the location of the tuck loop, remains in the B position.
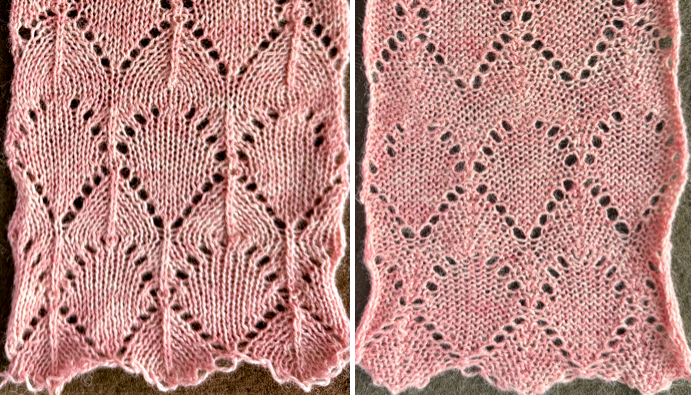
The result is subtle, more evident on the purl side than the knit. The swatch was knit in 2/8 wool, first at tension 7, then at tension 10, an experiment in gauge and texture.
While on one side there is a 2-stitch border, the other has 3, and the eyelets on the 2-stitch side pull in a bit more and appear smaller than those on the opposite side, something to consider in planning finished pieces.  Using the same concept, a yet untested design chart:
 the 10X20 repeat
![]()
 and 37X20 to match the chart
 ![]() Returning to a more complex design using a spreadsheet and a different approach:
Returning to a more complex design using a spreadsheet and a different approach: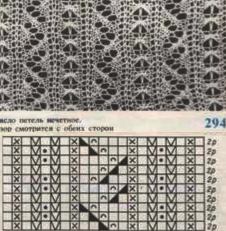 reviewing the guessed symbols in the pub at the top left, with the colored cell significance for this exploration in the center column;
  in the table, 20 rows in height, every other row beginning with 1 at the top was hidden; symbols used previously and colored cells were added, including vertical columns in grey for planned needles out of work to heighten the effect of the tuck stitches.
 and then with rows unhidden, colors were added in the needed locations.
 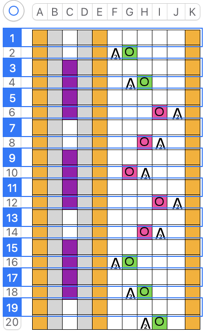 The placement of black and white pixels began to be considered. This 20X20 effort replaces the white pixels in the third column from left with black, the purple with white for tuck stitches. Eyelet locations are marked in black as well. There remain 2 issues. When drawn in repeat in height, there is an error at the center,
 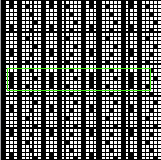 which is eliminated by extending the height to 60 rows and shifting some pixels, now 20X60
![]() tiles without errors.
tiles without errors. 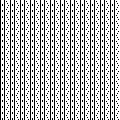 The 20X60 repeat, without all the added black cells, can be printed and coded to suit, with added clues, perhaps even as a guide in an all-hand-manipulated version.
Transfer directions and their respective rows are annotated in this chart.
In the column with cyan and black cells, the cyan indicates tuck loops or needles brought out to hold, and the black indicates the return of those needles to knitting. 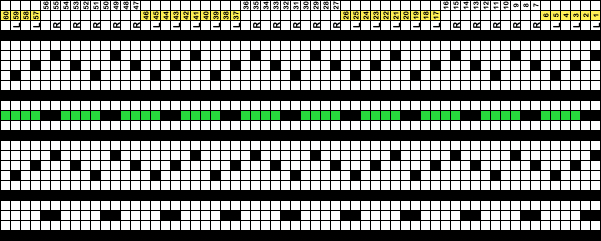 The last consideration is that the columns with lace transfers need to be color inverted, or all those white cells will tuck.
 ![]() Unselected single white cells will then point to transfers, and the ground in their respective columns is black, with all those stitches knitting.
Unselected single white cells will then point to transfers, and the ground in their respective columns is black, with all those stitches knitting.
The swatch was planned for knitting on 50 needles with 2 stitch knit borders added at each side. 
![]() On the machine: ladder locations > NOOW on either side of where tuck loops will form.
On the machine: ladder locations > NOOW on either side of where tuck loops will form. Depending on the location in the repeat, transfers are made to the right or to the left on the center non-selected needle between ladders and areas with expected tuck loops, which are easy to identify as the knitting progresses.
 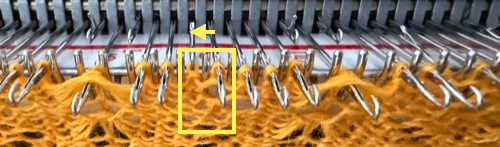 after transfers are made, both needle involved are brought out to E position.

Cable crossings meet eyelets and ladders
More on combining lace patterning with added stitch types looked at lace transfers consistently to the center of groups of 3, with stitches transferred down to the ribber between them, creating vertical columns of knit stitches on a purl ground alternating with lace patterning.
One of the related swatches:  Those who prefer the look, or anyone without a ribber, can use ladders to separate the pattern groups.
The color and fiber content are contributing factors, as always. In addition, with time and wear, stitches aside, the ladders may grow in size, with the space between them becoming diminished. There are always pros and cons to any technique.
This design was tested on 31 stitches and on both a bulky and a standard machine.
Cable crossings that formed eyelets occurred after every 6 rows knit. The repeat was sampled on a multiple of 4-1.
My scrawled needle tapes for both machines to help track transfers.  After the first few repeats, the knit itself becomes a clear visual guide to stitch movements and is easy to execute.
Start with every 4th needle out of work, knit 6 rows.
The center stitch in each group is moved over by 3 positions, and the emptied needle is moved back to the A position to create the new ladder.
Moving the needles out to the E position offers the opportunity to look for proper stitch transfers and any dropped stitches.
 The formerly empty needle, as one moves across the row, is returned to the work position, and new groups of 3 stitches are formed and knit for 6 rows.
At that point, after repeating the actions on each group of 3 stitches, one returns to the same distribution as in the starting position. The design 12 row repeat: circles represent stitch transfer location with the corresponding needles taken out of work, while orange cells point to locations where empty needles are returned to work, becoming the center stitch in each new group of 3.
 The test swatch was knit using a softly spun rayon
 scale compared to its bulky knit companion
 Adding stitch transfers to the ribber along with a change in in the type of stitch crossings, eyelets are formed where empty needles are returned to work.
 The work on the machine on a multiple of 12+2 stitches, with needle tape markings, and needles brought out to D position after crossings:
 Getting more complicated: the move of 2 stitches as one so as to leave empty needles, shares the same concept as in the last swatch, but over a wider space. The setup rows are on every needle, all stitches knit on every row, a border can be added on each side, what appear to be ladders are the result of the yarn getting tugged across needle spaces by cable crossings.
 Stitch and needle arrangements on the machine after the respective completed series of transfer rows.
 Closer looks: the pairs of stitches that will be moved to face the back of the work can be rested on their tool on the adjacent pair of needles, leaving the hands free to manipulate the remaining pairs of stitches.
  The stitch further away from the center group of 8 is moved first, onto the adjacent one,
  then both skip a needle and move one spot over,
  the held pair of stitches moves in turn, to fill the empty pair of needles,
  completing the first set of transfers
 While moving across the row, as long as the needles are in B position, the needles with double stitches and the adjacent empty one may be used as the resting place for the double eye transfer tool while the adjacent pair is manipulated.
The test swatch was knit using a 2/8 wool.
The bottom includes testing tension and simple crossings.
Cables for me are an excellent way to not only test the machine and yarn tolerance, but that of the operator as well.
The back of this knit is textured and stretched taut between metal machine parts, so errors (or discoveries to follow up on, “design features”) are not immediately identifiable without careful checking. 
More to browse
Ladders with lace, (leaf) “making things work” 1
Ladders with lace, (leaf) “making things work” 2
Ladder lace
Ladders and Lace
MK ladders, and a bit of crochet includes a hand crochet edging
More on combining lace patterning with knit weaving
Brother Punch Card Pattern Volume 5 is a great tool for learning about the various technique possibilities on any machine.
The accompanying swatch images are guides to visualizing the results and the relationship between punched holes and stitch structures and textures.
Some designs may be used as published on electronic models, while others need some adjustments.
When 2 carriages are used to select needles from opposite sides, punch card machines do not advance the card with the first pass of the second carriage from the opposite side, repeating the selection in the previous row, while electronic models advance a design row with each carriage pass.
When traveling between machine models and developing DIY variations, test the lace portion of the design first; depending on the machine type or the software used to download to the machine, the PNGs provided may need to be mirrored horizontally. The big clue pointing to mirroring being required in testing is if there are two empty needles side by side after any of the transfers.
Electronic models can do that with the selection of a button. Keep good notes for future reference of the specific patterns.
This series began with a ready-to-knit repeat for the technique.
End needle selection is canceled; the goal is to maintain the weaving pattern along the side edges.
The smallest repeat segment in the card #275 is isolated, in this instance, to 12X28. The image on the far right shows areas where selection rows are repeated with the change of the carriages.
 The chart for the repeat was plotted first in a spreadsheet, 12 columns X 36 rows, with arrows indicating the direction of the carriage moves, and the knit-woven rows were also noted with red cells.
![]() The sample was drawn in repeat X3 to 36X36, and a border column was added to each side, adjusted for an evenly distributed woven floats, used as is on the 930, no mirroring required, 38X36,
The sample was drawn in repeat X3 to 36X36, and a border column was added to each side, adjusted for an evenly distributed woven floats, used as is on the 930, no mirroring required, 38X36, ![]()
 Using a random card design for transfer lace, #623, with the smallest repeat isolated to 8X18,
 8X24
8X24![]() doubled in height, altered to maintain the weaving pattern repeat,
doubled in height, altered to maintain the weaving pattern repeat, 8X48
8X48![]() tiling checked on 96X96
tiling checked on 96X96 knit tested on 33X48,
 ![]() mirrored horizontally on the 930
mirrored horizontally on the 930 Choosing a pattern from a published design for electronic Brother models, repeating the process with #182
 Drawing the initial 13X66 file drawin in repeatX 2 in width revealed areas with double cells in the weaving rows, shown edited on the right
 the new PNG, 26X66, with tested tiling
 ![]()
 knit on 44X66 to accommodate edge transfers and with pixels added to maintain weaving pattern
![]() required mirroring on the 930
required mirroring on the 930
The weaving yarn used is the same space dyed wool worsted, and the lace yarn thickness matches the 2/18 yellow.  A larger motif, still using comparable weight yarns, #161, 24X48.
![]() The process, summarized,
The process, summarized,  the knittable 24X72 BW PNG, and its tiling alignment
![]()

The tested repeat, 50X72,  required mirroring on the 930
A spreadsheet offers easy editing of cell groups and rows. The concept applies to any available and familiar tools that allow for planning the sequences.
The steps in my process using Tables and Mac Numbers in summary:
begin with a published design with 2 knit rows occurring after each series of LC carriage passes, filling the corresponding cells with an easy-to-see color. It is useful to have a symbol or shape to add to any column, indicating Lace Carriage movements.  Selecting either of the 2 yellow rows, expand the chart by consistently choosing either the top or bottom row, adding a row below the top or above the bottom one X2, yielding 4 yellow rows.
The red cells in the column on the right indicate planned knit carriage passes.  Adding BW cells indicates the placement of alternating pairs of weaving patterns.
  When programming repeats for the number of needles used in the piece,
verify that the direction of the transfers works so as not to produce side-by-side empty needles. Some machines and download software require horizontal mirroring of lace patterns; electronic models have buttons that will perform the mirroring without added programming.
Tile the weaving design in height, isolated in this sequence, ![]() and illustrated simply as a BW file, 24X16, with correct tiling in height.
and illustrated simply as a BW file, 24X16, with correct tiling in height.  Check that it is maintained with the full “final” LC, and the weave repeat is doubled in height; look for any same row repetitions. In those instances, adjustments will need to be made in the top half of the design by shifting and redrawing cells.
  Add needles in work on either or both sides if needed to avoid side edge stitch transfers.
For better finishes on side edges, maintain the weaving pattern repeat, filling in cells in the PNG, or pulling needles out by hand if needed.
Returning to my episodic leaf lace obsession, #576.  The 24X56 start
![]()
 Two-stitch side borders were added, marked with magenta cells in the corresponding chart, resulting in a multiple of 24X2=48+4=52 stitch width repeat, no mirroring required on 930
 Sampling was planned using a 2/8 green wool for the lace, which test-knit fairly easily at tension 9.
Then the fun began: the yellow, thicker yarn was a loose, three-stranded variety, and began to separate and skip getting caught. The second shade of green worked fine after a tension adjustment, until I forgot I was weaving, almost transferred a whole EON selection row, got a lovely LC carriage jam, and was not happy at the degree of contrast between the two greens.  Thought I had sailed through this sample, and then, when steaming it, I found the many dropped stitches that had gotten away from me and my eyeballs.
May consider regrouping and a third try, but not today!
Knit-weaving methods and associated swatches
Knit weaving 5: manipulated floats 8/24
Knit weaving 4: combining stitch types 7/24
Knit weaving 3 5/24
Knit weaving 2: swatches, experiments 2/21
Knit weaving 1 2/21
More on combining lace patterning with added stitch types
Far older posts: Combining tuck stitches with lace 1, Combining tuck stitches with lace 2 (automating them), the arrow points to operator error, both from 2015
 Lace meets weaving on Brother Machines 1, 2020
 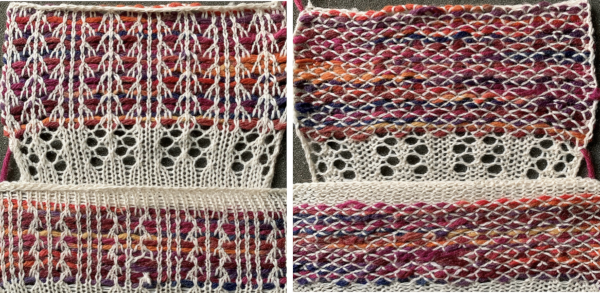 Lace meets weaving on Brother Machines 2, 2020
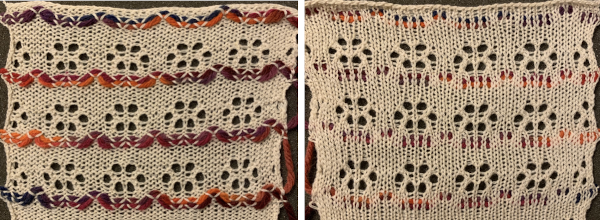 Lace meets FI on Brother machines 2020
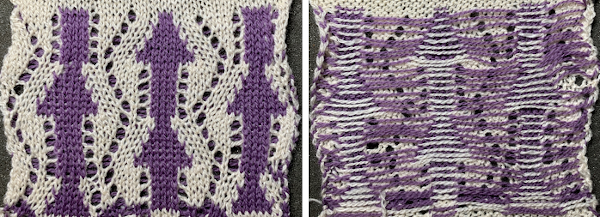
 Lace meets tuck on Brother machines , 2020
Punchcard volumes offer many variations for this technique.
Both the knit and the lace carriages select needles in pattern.
It is necessary to keep in mind when planning to attempt using the published card repeats on electronic models that they advance the design with every carriage pass, while the punch card models repeat the same needle selection when the alternate carriage makes its first pass from the opposite side. To match results, the electronic repeat would need to be edited.
A sample knit on the 930:![]()
 2026
2026
Pinterest inspirations vs implementation, tuck and lace combos 2 Pinterest inspirations vs implementation, tuck and lace combos 1 2025
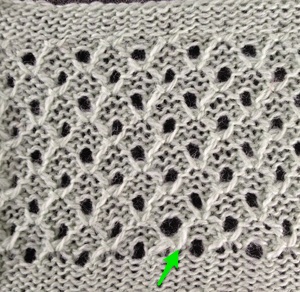
Combining automated tuck patterning with hand transfers to form eyelets in vertical columns on a tuck stitch ground
For working on the single bed, the spreadsheet plan includes markings for transfers, magenta cells to the right, cyan to the left.
The repeat is 16 stitches wide, knit on a multiple of 16 needles +5.
The grey columns represent needles that are emptied and pushed back to the A position; ladders will be formed in those spaces.
The first and last stitches in each group of 5, marked with blue cells, remain undisturbed throughout.
 Though the repeat could be shorter, it was tested in a 40 row height, 16X40
![]() on 56 sts, mirrored horizontally for use on the 930,
on 56 sts, mirrored horizontally for use on the 930, ![]() air knitting the preselection row:
air knitting the preselection row:  as hand transfers are made, emptied needles and the remainder of each group of 5 must be in or returned to the work D, or E position to form eyelets amid kit stitches on the next pass. Watch that empty needles are not accidentally brought back into work.
  Vertical lace columns and rib:
End needle selection is cancelled, as in any case where not every needle is used on the knit bed
The knit carriage may be set to select, but no cam buttons are pushed in, knitting every stitch
Needle preselection guides the transfers, as with tuck lace, proper needles need to be taken out of work, and while hand transfers are being made, watch for needles being accidentally pushed out of work, or out of work needles being accidentally pushed back into work.
A vertical column is added on each side for a knit row, aside eyelets formed by transfers, the full repeat width remains a multiple of 5.  Programmed repeat, 38X12
![]() The swatch needle setup with added needles in work for more knit stitches, first and last needles on the top bed:
The swatch needle setup with added needles in work for more knit stitches, first and last needles on the top bed:  All transfers were made toward the center stitch, beginning consistently with the stitch on the left. The yarn used initially was a 2/20 silk/wool blend, which lost surface texture and flattened permanently with steaming and light pressing.
  The same proved true with a slightly different design using the same needle setup but with transfers on alternating sides.
  Using 100% wool yarn produced designs with a more defined texture. These knits narrow considerably when off the machine, and wool has spring back that may be diminished but not eliminated with blocking.
The programmed repeat used was the same 38X12 as in the first sample in the series.
The needle setup, first and last on the ribber
The repeat for the second test was changed to bring the eyelets a row closer together,
programmed on 38X18![]()

A review of brioche patterning
Nearing the end of another year, reviewing previous drafts, I find myself coming across posts that were never quite completed or published.
This content began to be brought together in 2022.
The term brioche in knitting is used loosely at times in any references to tuck stitches. Designs may be worked in single colors, or with more complicated planning, they may be executed in 2 colors.
Some patterns are fully automated, with the knit carriage set to tuck in both directions, the ribber set to knit in both, others are worked as a tubular tuck, and lastly, some require frequent changes in cam settings in either or both beds.
My explorations for the use of tuck stitch settings in double bed every needle rib fabrics began with attempting to create a solid color shape on a vertically striped ground in Geometric shapes on ribber fabrics with tuck stitches 1.
The arrow marks the spot where both colors used were picked up from the changer. C1 and 2 show indicate cam setting changes used in the last part of the swatch.

 Here, a simple shape was programmed, and varied carriage settings on either or both beds were explored Geometric shapes on ribber fabrics with tuck stitches 2; knitting with 4 carriages.
 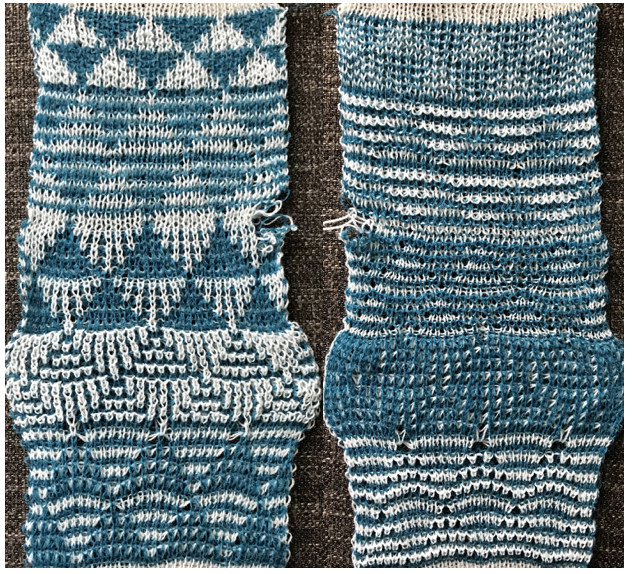 Geometric shapes on ribber fabrics with tuck stitches 3 explores self-drawn repeats in multiple colors.
 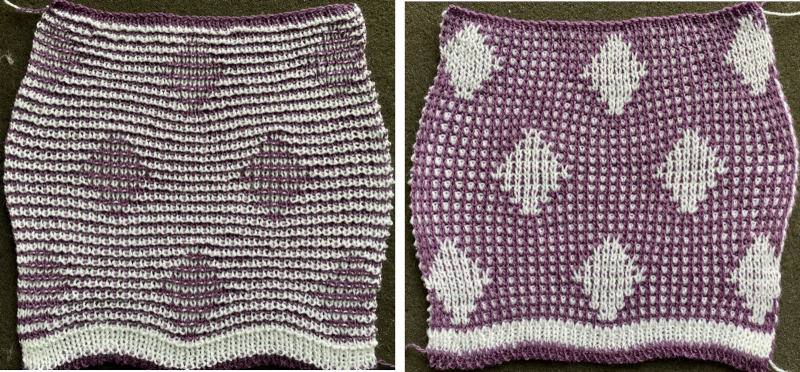 Added samples and files in the subsequent post New double bed swatches based on published sources of inspiration 2

Lace transfers meet fisherman rib in 2 colors on Brother KM 1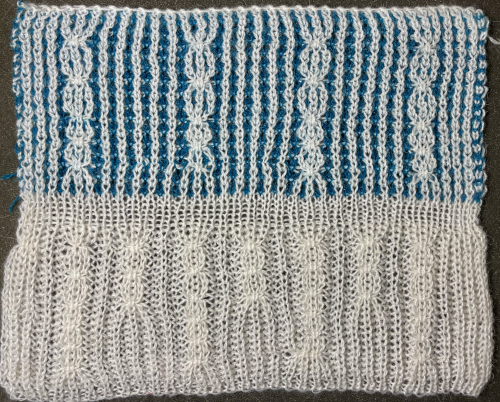 Lace transfers meet fisherman rib, 2 color ribbed brioche on Brother machines 2
 These are advanced, complex fabrics. The repeats for 2 colors can grow exponentially in length.
Returning to designing suitable repeats, beginning in a spreadsheet: grey vertical lines represent stitches on the ribber, which will force apart stitches created on the top bed, creating the more familiar tuck rib surface.
Mac Numbers offers the opportunity to hide both columns and rows. In this instance, with the 10 grey columns hidden, one begins to get the sense of shapes and movements needed on the top bed 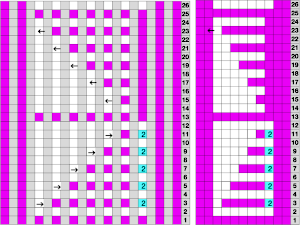 Working toward a repeat for knitting the shapes in a single color, imagining the location of eyelets resulting from stitch transfers,
 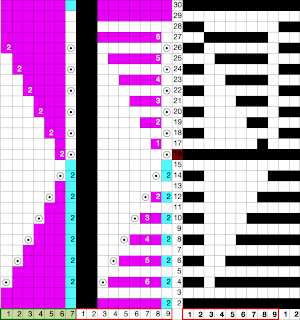 I used two repeats, adjusting the first repeat to vary the resulting shape slightly
 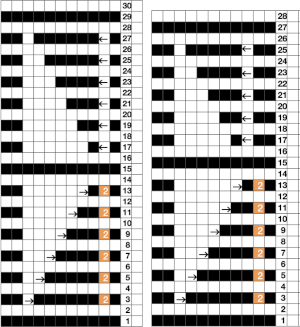 A 11X30 repeat mirrored horizontally for use on my 930, tiled twice horizontally before programming and downloading, used as a 23X30 single motif to obtain a matching border on each side,
 ![]()
 A 9X28 repeat, my second try, programmed as a 20X28 single motif,
 ![]()
 When knitting using only one color, the machine is set with the main bed tucking on every needle in one direction, followed by knitting on every needle as it returns to the starting side, the ribber does the same but in the opposite direction. It is a circular tuck, also referred to as fisherman’s rib.
A slight shift in patterning may change the outline of the desired shape, introducing or removing stray lines or secondary shapes.
The possible cam setting options: 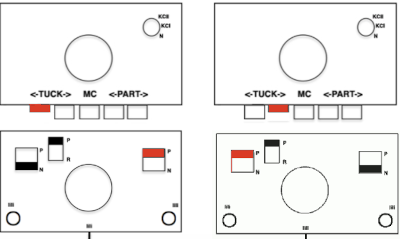
 In two-color brioche combined with hand-transferred stitches, the main bed is set to tuck in both directions, white cells tuck, black cells knit.
Brother machines preselect needles for the next row with each pass of the carriage, so on even-numbered design rows, as the carriage moves to the opposite side, all needles will form tuck loops on the main bed. The next row will be preselected, with some needles now back in B rather than D position.
With an appropriate transfer tool, move the stitches on the non-selected needles to the adjacent selected needle to their right after pushing it back to the B position. After each transfer, push all worked needles and their stitches, as well as the now-empty needle, to the E position.
As the carriage returns to the opposite side, an all-knit row will be completed. Several tension adjustments may be needed to ensure loops do not get hung up on gate pegs as stitches move across the bed, while still being loose enough to knit off properly.
Planning a fully automated design, reducing the ground, and staggering the color of the shapes. In these knits, the colors in the background form clear vertical lines:
24X44
![]() brick repeat 24X88
brick repeat 24X88![]() tiled.
tiled. 
A half-drop tiling error was revealed,  and the file was reduced to 23X44.
 ![]() The half drop repeat 46X44
The half drop repeat 46X44 ![]()
 Using the 24 stitch repeat executable on a punchcard machine as well, planning to knit the test swatch on 72 stitches,
  anticipating what will happen with color of the alternating pairs of rows forming the shapes, noting that the total number of rows is an odd multiple of 4:
 adjusting the repeat to 48X40with the total rows an even multiple of 4,
 ![]() tiling check, 72X80
tiling check, 72X80 the stitches composing the all the shapes will knit in the same color
  The pattern, tested in thin yarns reveals the stitch structure even more. That said, the dark color was 2 thin yarns threaded on the same side of the mast. At one point, one of the 2 began to loop around needles, causing a carriage jam and a bent needle hook, hence the short height of the sample.
  Passap to Brother 6, exploring a possible tuck stitch design
![]()
More shapes on ribber fabrics with tuck patterning, fantasy fair isle 
More designs worked on the double bed using tuck cam settings on either or both beds:
Ribber fabrics with main bed tuck patterning 1/ pick rib
Fisherman and English tuck stitch rib 1_ checks patterns_ Brother, Passap
Knitting with more than 2 carriages
Pintucks 1 vs shadow pleats
Geometric shapes on ribber fabrics with tuck stitches 2; knitting with 4 carriages
Interlock explorations 1
Modifying a sinker plate for use with double bed knits
Knitting with “unusual” fibers/ elastic 2
Ribber fabrics with stitch transfers between beds 2
Ribber fabrics produced with 2 knit carriages selecting needles
Multiple color drop stitch lace using img2track and more
Added play with lace designs 1
This experiment began with this full published punchcard chart, 24X40 cells The related PNG, 24X20,
 ![]() was tested on the 930 electronic machine.
was tested on the 930 electronic machine.
Weight and tension adjustments led to avoiding dropped stitches, familiar to many with experience using the lace carriage (LC) to make the needle selections and transfers.
The side borders can be planned to be vertical columns of knit stitches or with shaping created by the transfers.  Reverse engineering, from punchcard repeat to a hand technique chart begins with color coding the transfers, cyan to the left, magenta to the right.
The punchcard machine automatically reverses programmed motifs, but in charting for hand techniques place the symbols and their direction are as intended with the purl side facing.
This start led to the first draft for use on the bulky.
 Needle beds and tapes may be marked in a variety of ways to help track hand techniques. Custom needle tapes on any model can be printed to scale and inserted under needles for similar guidance.
Claudia Scarpa has published tapes for a large range of needle spacings on her blog. They are numbered and in colors to match factory tapes for both full needle beds.
Mac experiments on printing needle tapes and punchcard templates to scale and other tips shares 4.55mm bed downloadable documents.
Each table cell in my bulky DIY measures 22X26 points in a Mac Numbers, an editable spreadsheet: bulky tape
The related PDF file, needle tapes only bulky , printed to the correct scale using these setting adjustments. The 23-cell table screen grabbed, opened in gimp, cropped to content, 1177X91,
![]() also printed to proper scale and offers the opportunity to fill individual cells or blocks with specific colors using the fuzzy select/ magic wand tool
also printed to proper scale and offers the opportunity to fill individual cells or blocks with specific colors using the fuzzy select/ magic wand tool 
 The 9mm tape is shown in place with markings chosen to match the chart for alternate pairs of rows.
 The result is with knit rows after each series of transfers.
 A side-by-side view/comparison, highlighting differences in the number and size of the eyelets.
  Readjusting the repeat, shown in progress; the rows marked with red cells take into consideration the actions of the automated LC selection.
The transfer in each segment is made first, and then subsequent selections and transfers are made until the final eyelet is formed in the desired place for each of the following segments.
The yellow cells represent blank rows in the cards.
Multiple transfer tools, in this case a 2-prong one, can be used to make the multiple stitch transfers in single moves.
The final repeat is collapsed to place eyelets in the proper location and is reduced to 8 rows in height. The knitting in progress on the bulky machine illustrates transfer rows,
 and shares its appearance with this test on the 930 knit using 3/8 wool
 This 31 stitch swatch was executed first on the bulky km following a chart,
  measures 8.75 inches, 22.25 cm in width at its widest point.
 On the standard machine, a 31 stitch X 15 row PNG program was used to help track transfers.

![]() The chosen yarn was a 2/8 wool,
The chosen yarn was a 2/8 wool,  the swatch measured 4.25 inches at its widest point, as opposed to the bulky, 8.75 inches at same.
Here the swatches are compared side by side. 
Returning to thread lace, adding bulky knit samples
IN PROGRESS
Many knits are named referring to the resulting open spaces with the term lace.
Links to more information on the technique are listed at the end of this post.
Thread lace uses thick and thin yarns for the illusion of eyelets.
Beginning with published designs can provide a springboard for DIY, an opportunity to observe the size of eyelets and lines formed by the respective white cells/unpunched holes in cards, ot the companion black cells/punched holes.
This test is knit using #12 from the Brother punchcard set P.  The thick yarn is a 4/10 wool, the thin a woolly nylon, which, although a good color match, proved to be a poor choice. It has some stretch, and off the machine, the resulting illusion eyelets were far smaller in size than expected. Steaming with light pressing and a mild tug to enlarge them broke the nylon in several places, as well as making the knit surface appear irregular.
 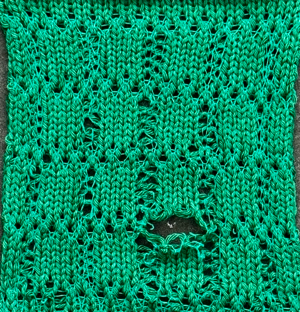 The results improved vastly with a switch to sewing thread as the thin yarn.
  Representational designs can have blurred details from the floats of the thick yarn showing through the thinner yarn stitches. This rose design was used in a garment years ago, and began with this 24X56 file.
![]() Some needle selection was eliminated in the card used in the piece to allow for the transition to a new, smaller design repeat.
Some needle selection was eliminated in the card used in the piece to allow for the transition to a new, smaller design repeat.
The standard KM version was knit using contrasting colors using wool-rayon and sewing thread
 The thicker yarn in this test on the bulky is an unscoured worsted with natural oils, intended for hand-knitting on #7 or 8 needles to produce 5-4.5 sts per inch. It was stiff and hard to knit on the machine, required a loose tension, and the eyelets were quite large. It took aggressive pressing and steaming for the best reading of the design; any final piece would likely grow in length over time. I unraveled the swatch before realizing I had not measured it.
 A slightly different, continuous repeat, 24X60
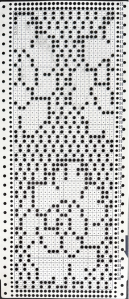
![]() was knit on the standard using wool and a nylon thread,
was knit on the standard using wool and a nylon thread, 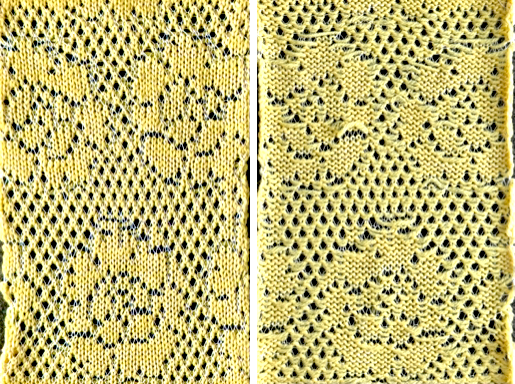 and the bulky, using worsted-weight acrylic and the same nylon thread.
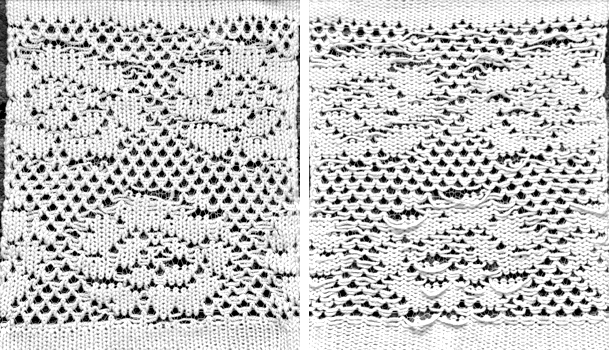 The size of both swatches, knit on the same number of stitches/rows, compared in size.
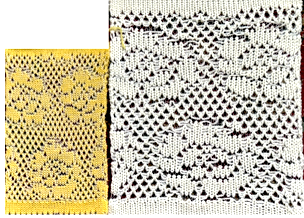 A return to a leaf shapes knit using a 3-strand worsted-weight wool yarn and a 16/2 durene, and the Brother 25p card.
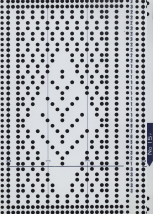
 This was in my stash of self-punched cards; neither side has any marks of any kind.
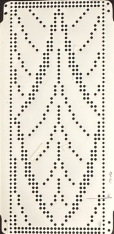
 The 24X54 matching PNG used in other samples,
 ![]() scaled and gridded as a guide for punching
scaled and gridded as a guide for punching 
Thread “Lace”
Revisiting Fair Isle, thread lace, 3D surface potential
Tuck stitch meets thread lace repeats and vice versa
Unconventional uses for punchcards 2: thread lace cards for “filet” mesh
Thread Lace on Brother KM bulky samples
Thread lace and punchcard knit carriage use on Brother 910_1
Thread lace and punchcard knit carriage use on Brother 910_2 ribber
The setting may be used to achieve textured knits and mock cables using elastic ie as seen in:
Knitting with “unusual” fibers/ elastic 1
A tale of lace knit counterpanes
Decades ago, long before English language magazines intended for machine knitters were published, several Japanese language ones were available.
I recall a particular dealer who used to attend seminars and made them available in the associated marketplace, occasionally with free issues for anyone able to execute and knit a “guess how this is made” handout.
Publishers included Nihon Vogue, ZaZa, Studio/Silver Reed, and Brother.
Before electronic machine models became available, pattern repeats were offered for use on punchcard models or simply as hand-knit charts.
This Brother pub introduced counterpane-inspired designs, such as seen in this hand-knit version found online, from an unclear source. 
 The circular lace movement is created by the gathers at the cast-on edge of flat horizontal knit bands.
Partial repeats from the pub, a 16X14 and a 20X16
 both designs may be scaled in size, adjusting width, height, and the number of transfers.
Many previous blog posts here have analyzed how to convert hand-knit patterns for automated lace knitting on Brother machines.
Hand-knit patterns often show transfers on the knit face side, making it necessary to mirror the charts horizontally to match them on the machine, where only the purl side is in view to the knitter.
Punchcard machines mirror punched designs horizontally automatically.
On electronic models such as my 930, downloaded PNGs are automatically mirrored, necessitating one of 2 choices. One is to mirror the PNG before downloading it to the machine, and the other is to use the built-in image reverse button to do so.
Testing a single repeat first helps isolate pattern errors. If 2 needles are selected by the LC side by side, the cause may be that the image needs to be mirrored due to the machine brand/model or the download software being used.
Assigning colors to the left and right LC transfers is useful in expanding hand transfer charts to automated designs.
Cyan cells indicate transfers to the left, magenta ones indicate transfers to the right, in this 14-stitches by 12-rows repeat.
![]() The expanded chart that follows was created using Mac Numbers to develop a repeat for a square pane using four petals.
The expanded chart that follows was created using Mac Numbers to develop a repeat for a square pane using four petals.
A blank column on either side edge will include transferred stitches and will be used to seam the knit.
Yellow/ blank rows do not always reflect knit rows in the chart; in some cases, they include passes needed for the LC to return to its proper location on the left side.
A single design repeat is expanded to 14X44. ![]() Following the built-in machine prompts rather than the row counter, the red cells indicate knit rows after each transfer segment is completed.
Following the built-in machine prompts rather than the row counter, the red cells indicate knit rows after each transfer segment is completed. 

 With pattern mirroring, needles 28L to 29R are in use.
  57X44 matching the chart, used with the 930 #1 reverse key.To reduce the bulk when the band is gathered at the end of the knitting, e-wrap cast-on every other needle, leaving a long tail to be used for gathering the center of the square.
To gather the loops formed by the cast on, the same yarn may be used, or even a thinner, stronger yarn. Testing on a small swatch helps one make the choice.
The technique can happen off the machine, but it is also possible to thread through the loops close to the start of the piece on the machine.
To knit:
E wrap EON, from right to left
hang the cast-on comb,
knit 5 rows, ending with COR,
begin using the lace carriage,
when the piece is completed, bind off around 2 gate pegs for enough stretch, leaving a long enough yarn end to seam the piece together.
The completed band, ready for bind off Steam/press the finished band for the initial blocking, and seam it into a tube.
Gather the loops from the cast-on with the gathering thread around, over the join, up to two times, pull tight, and secure the thread.
Lightly block once more into a square.  To knit a pentagon, a fifth repeat is added,
  mirrored 71X44 PNG, ready for download and knitting on the 930 needles 35L to 36R
![]()
 The design can be expanded to achieve a 24-stitch repeat usable for automated patterning on punchcard model machines.
The chart is scaled up first in size to 24X26 to be followed for a possible hand-transferred lace. A single segment was tested on needles 13L to 12R; transfers proved challenging, with stitches dropping, yarn splitting, and generally resisting group moves. Finally, a 2/20 wool, with one operator error, a missing transfer/ eylet, completed the test.  The 24X26 design,
 now expanded for use with a punch card, 24X184.
 The repeat, rendered in BW.
  The PNG for the 4-petal +1 repeat, mirrored and ready to knit on the 930, 97X184,
  was divided into two tracks by img2track, with the first 50 rows in track 1, the remainder in track 2, changing the machine prompt numbers if relying on those for row numbers rather than the counter.
A 24-stitch portion of the design, avoiding the multiple tracks. ![]() The swatch was knit on needles 48L to 49R, using 2/8 wool commonly used at tension 8, too thick for the LC to transfer without problems.
The swatch was knit on needles 48L to 49R, using 2/8 wool commonly used at tension 8, too thick for the LC to transfer without problems.
I chose to proceed manually with transfers occurring away from the knit carriage, checking that no needles were accidentally pushed back to the A position or that extra stitches were not transferred if wrong needle selection is affected when correcting dropped stitches.
1: the e wrap cast-on on every other needle with the comb in place, leaving a yarn end longer than the width of the needles in work
2: the first pass knits to the opposite side
3: the cast on comb is brought forward
4: the yarn end is threaded through a needle, and gradually stitched over, under the yarn loops moving across the row
5: the completed band, about to be bound off around 2 gate pegs.  After binding off, the piece was removed from the machine and steamed and blocked lightly. After seaming it into a tube, the cast-on edge was then gathered, and a bit more ironing and steaming followed.
  Comparing the size of the two square pieces.
  This is a throwback swatch, knit in a softly spun rayon, which proved to be out of control in terms of forming a hexagonal seamable shape.
Yarn choice and tension contribute to successful sizing or fails.  The quickest version, a 16X22 repeat forming a pentagon, knits with a programmed pattern to guide stitch transfers beginning with a 7-prong tool.
The yarn is 2/8 wool, knit slowly and with more patience.
The chart may be printed and followed as an added guide.
Needles 40L to 41R, 16X22 PNG
![]()
81X22![]() was programmed in addition with the 930 #1 reverse key selected.
was programmed in addition with the 930 #1 reverse key selected.
A nylon cord was carefully threaded through the cast-on loops at the start of knitting.
The intent was to steam/ iron the band lightly as the initial blocking before seaming, the universe intervened, letting me know it is time to replace my iron as part of the piece was immediately scorched and the cording spot melted.  Regrouping, the cast-on loops were visibly clear and easy to gather at the center after seaming using a saved long yarn end from the cast-on row.
  This pentagon, compared in size to the red yarn version
For some 2D doilies, see:
From automated lace edging pattern to doilies and ruffles
Doilies: Lace meets hold and goes round