Ladder lace

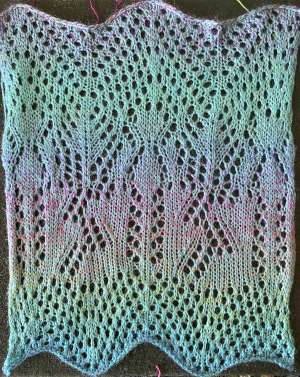
The inspiration: part of a magazine photo  A slightly different approach than in the last post. The tale begins with a hand-knit graph:  expanded to include alternate rows the “graph” paper version   
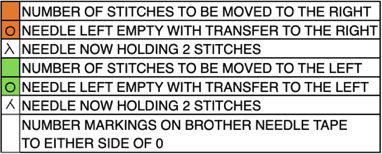
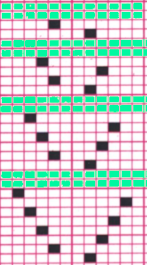
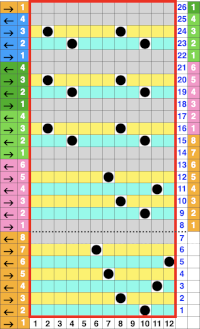
If a punch card is to be used, all colored squares represent punched holes. I used my 910, Studio mylar for my swatch. The mylar repeat and programmed numbers: A png for a single repeat used in the later postThe approach in the execution is a bit different from the previous samples. In this instance, colored squares represent the number of stitches to be moved/the number of prongs on the transfer tool to be used.
The pairs of transfers in the chart are made away from each other, orange to the right, and green to the left.
The transfers produce 2 empty needles side by side, they are left in work, as the next row is knit they will produce loops on each needle.
Side-by-side loops do not make stitches, so subsequent rows will continue the ladder.
It is helpful to use yarn that does not split and get caught in hooks, as that may partially knit on the next pass, creating a knit stitch and disrupting the ladder. Also, rows with loops should be checked to make certain they are in the pairs of needle hooks, not off either or both, before the next row of knitting.
Do not release the loops; when the next set of transfers is reached, treat the loop (where circles occur in the graph) as you would a stitch, moving it over on its own prong.
As with transfer lace, it bears taking the time to knit slowly and prevent errors rather than having to attempt “fixing” errors such as runs due to dropped stitches.
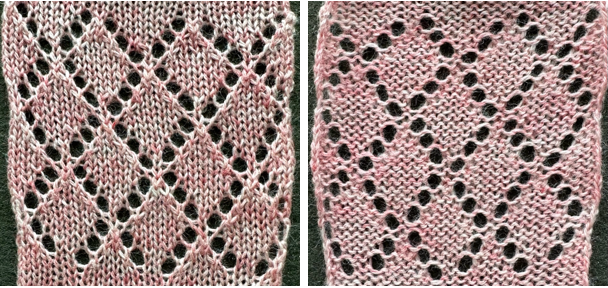
The resulting swatch on the standard KM (2/8 wool)The punchcard:  The related swatch knit on the 260 bulky KM The yarn is an alpaca too thick for the standard.  I liked it at tension 1 for stocking stitch, but I had to increase the tension to  3.. to be able to manage the transfers, especially the ones over by 3 stitches X2.
for a sense of the scale difference between the 2 swatches. The punchcard was made from a roll purchased directly from Hong Kong, advertised specifically for Brother. The roll is continuous, with separations as seen in the image below. Numbering, however, is for Studio KM systems, so adjustments need to be made for using them on Brother KMs (ie. the first selection row will be row 3 as marked in the punchcard used in the swatch above).  2022: Sometimes what works well on a small swatch does not in a larger one, or may simply require a different yarn, more attention, and slower knitting speed. The first trial at other yarn content included a yarn perhaps too thin for the effect (green), and one requiring maximum tension making the transfers with loops difficult. Once the initial transfers are made, this loop formation will appear in locations indicated in the chart. A visual check should be made as to whether there is a loop on each needle. If one is skipped, simply lift the yarn onto the hook of the empty needle. As the fabric progresses, the loops will appear on the top of the shafts of the selected needles and are treated as one would handle stitches in multiple-stitch lace transfers Shown again in the white knit  After the transfers are made A yarn split on the machine may be seen in the center of this image.  
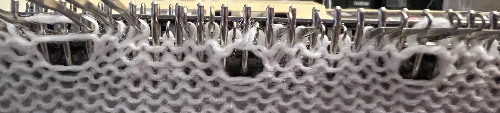
Yarn splits and dropped loops are quite visible in these tests.  A return to a different 2/8 wool brought better results, again, splits can be identified in the fuzzy spots even if the ladders are formed correctly  This last swatch was knit in wool rayon. The problem of splitting was eliminated, while dropped stitches were easier to miss 


Ladders and Lace

The patterning resulting from creating and manipulating ladders with needles out of work can create interesting openwork fabrics. I like to use punchcards or mylars for “automatic” patterning in selecting needles, with carriage set to plain knit,  to help keep track of where to introduce transfers when possible. Microsoft Excel or Mac Numbers remain my favorite “graph papers” for working out repeats at various stages of developing the trial swatches.

A work in progress sketch: 2 side by side repeats, my first “drawing”. Empty circles indicate where I think I want to produce holes, green transfers and orange ones are toward each other, colored squares (orange and green) indicate the number of prongs on the tool used for transfers: orange transfers are made with a single eye tool, green with a triple eye one. Needles in the greyed-out area are left out of work after each transfer to create ladders. Where a lace hole is desired the empty needle is returned to work after its stitch is transferred. The yellow line is the knit of every row’s center stitch of the pattern. The chart does not match the card, which was further edited

the punchcard repeat for the edited final version, including markings showing directions of transfers and ” row 1″

the resulting swatch

I have a brick repeat sorted out, not certain about its end-use

another card, 2 prong tool was used for transfers, arrows on the right indicate the direction of those transfers, and color change indicates its reversal

the resulting fabric: A_ empty needles left in work throughout, B_ as the direction of transfers is reversed, the empty needle on top portion is “filled” in by lifting purl bar from the row below onto its adjacent side, C_ 2 adjacent needles are constantly left empty to create ladders, with one needle brought in to work for every one taken completely out of work as needed. There are more possibilities. When experimenting it is helpful to keep good notes to ensure the ability to reproduce the desired effects.

previous post on leaf-shaped lace


From lace chart to punchcard 5 to electronic

Continuing with the “relatives” of the proposed border chart in the previous post, this gets us even closet to the hand-knit. So, I have a punchcard, a 12 stitch repeat, really want to go 14 wide for the repeat, and now several other issues are encountered. If one thinks about lettering and controlling horizontal direction with a card, one is reminded that the card “knits” the image ie a letter as punched on the purl, back of the fabric, so when the knit side is viewed, letters are mirrored. One solution is to flip the card over horizontally. If when knitting from a hand-knit lace chart the transfers need to be “flipped” to match results, the punchcard does that for you. With the 910 what you see on the mylar is what you get, so if the repeat is drawn for lace as for a punchcard, it will need to be flipped horizontally. Punchcards are sectioned in blocks of 6, mylars in blocks of 5, so if copying a card it may be worth printing it out large scale, and outlining new blocks 5X5 so as to be able to orient lace markings correctly within them.  With electronics one may have built-in functions for mirroring in either direction, I went another route:

This is a section of my mylar with markings for repeats, the blue outline for the 14 st, the red for the 12, suitable for punching on a card.  The first K2Rs reminder may be seen  in the column on the far right, the colored squares and numbers indicate the programmed repeats for each sample

I chose to knit the test swatches using the lace carriage on the right, the knit carriage on the left. First selection row is made with the LC from right to left

the 12 stitch repeat

the wider and longer repeat (with an unintended dropped stitch),  which would create more of a curved edge if used as a border

“putting this one to bed”

Frome lace chart to punchcard 4: a border tale

A forum post inquired on adapting the following border repeat for use on a punchcard Brother KM, using the lace carriage: the repeat is 14 stitches wide as was given below

Because of repeat restriction in punchcard knitting, the best way to match the above chart is through the use of hand techniques. The image below shows needle bed markings (in water-soluble pen) to help in tracking hand transfers; the long line is the location for the center triple stitch after stitch transfers, the dots place the first single transfers made toward the center long line on the KM, away from the single needle space between them

this is the result of the hand transfers; the fuzz on the left is a manufacturer’s yarn knot

a simplified repeat  keeping some of the elements, but missing that center ridge, adjusted to a 12 stitch repeat for use with punchcard; the missing lace hole was an error in punching out the card

the card for it, showing the correction also marked in red

since the intended use is for a border, it is not necessary to punch more than above; the first row for selecting to right with the lace carriage is marked, blue shows location for knitting 2 rows with knit carriage; the sequence is an easy 4 passes with the lace carriage, followed by 2 with the knit carriage

another option’s results, creating the center ridge as in the hand-knit: not identical, but related

the corresponding card: knit 2 rows after every 6 passes with LC, except for the last repeat segment, where LC makes 4 passes prior to continuing with KC and knitting beyond the border

If using cards I would recommend knitting several rows with waste yarn before casting on (as loosely as possible) and continuing in lace. The very bottom will want to curl toward the knit side of the garment, so cast on the edge may require additional treatment to keep it from doing so.

for one more repeat please see next post

From lace chart to punchcard 3: adding stripes

In machine knitting, frequent color changes are more conveniently made with a color changer. On the Brother KM, the latter is placed on the left side of the machine, so the knit carriage will be knitting by default an even number of rows moving from left to right and back to the left. In turn, the lace carriage will need to move from right to left and back. To retain the same pattern, the card may be flipped over and marked accordingly. Here is an image of the card generated in the previous post, flipped vertically. I prefer colored lines to arrows and other markings: the blue line indicates 2 rows of knitting with KC  (a different color could be used to indicate color changes for striping once those are determined), starting row 1 is marked in pencil.

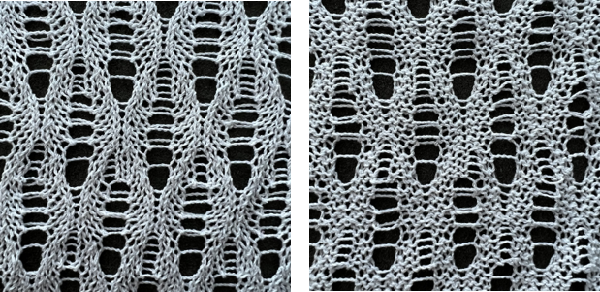
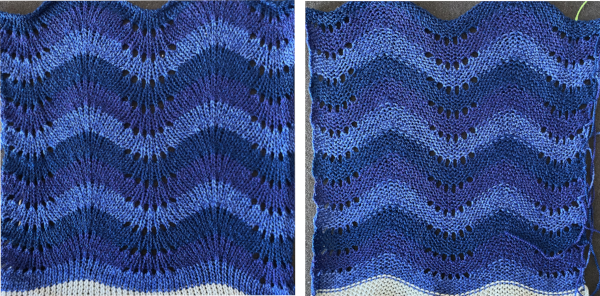
Space-dyed yarns may produce interesting effects, in lace sometimes the pattern is lost, however. In the swatch below I attempted to introduce a random striped sock yarn, thicker than the white previously used. When I loosened the tension for the knit rows, I began to have stitches consistently hung up on gate pegs, adding the second reason to switch my “color 2”. Color changing is every 4 rows, beginning with row 1a larger swatch with tension adjustments and switching the 2nd color to equal weight, “friendlier” yarnThe narrower stripe is spaced 6 rows apart, the wider a full repeat.
Like playing with slip stitch variations, there are many more possibilities that could be tried.
Brother card 426, the bottom half repeats once more. The LC makes 26 passes before any knitting occurs, the number of rows knit may be varied from the usual two rows after each design segment to 4, 6, or more or even different combinations.  
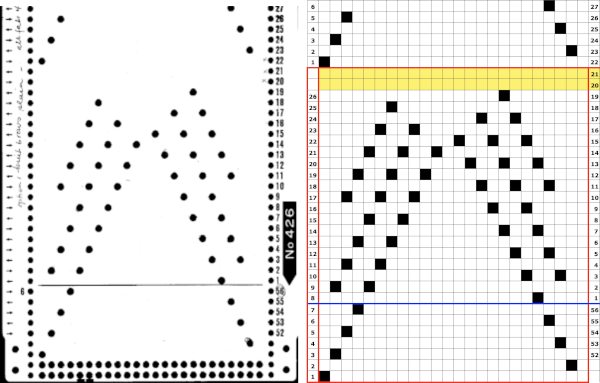
Knitting the pattern using a fuzzy yarn like rayon chenille results in little difference between knit and purl sides while the differences are clear in this wool rayon sample. Using space-dyed yarn may at times result in almost clearly defined stripes, but the effect depends on the number of needles in use and the length each color occupies on the final ball or cone of yarn. In a different experiment, the effects testing different patterns are soft and dithered The yarn was used in a shawl:  Long floats up the side next to the color changer may be wrapped on the end needle periodically and carried up that side to avoid weaving in “all those ends” upon completion of the piece while keeping an eye on whether doing so contributes to the end stitches on both sides resulting in different “lengths” at its edges. Not all lace patterns are equally successful in this technique, and ultimately choices become a matter of personal preference and style. Missoni striped MK laces are a great source of inspiration. For hand knitting, many patterns playing with striping in lace fabrics with both solid and space-dyed yarns may be found at Kieran Foley’s website.

From hand knit lace chart to punchcard 2

Following up on the previous post, from-hand-knit-lace-chart-to-punchcard-1, a 24 stitch chart with marked in symbols for conversion to MK repeat: a 24 stitch chart with marked in symbols 
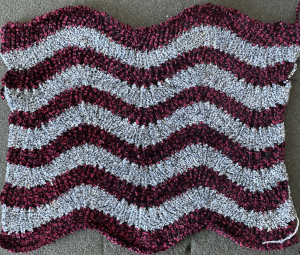
an isolated repeat segment worked out on a striped template after choosing and marking the transfer direction of the eyelets on the original, green for to the left, yellow for to the right,  marking lace transfers rows for a partial card segment,  the numbers on the left reflect LC passes and their direction is marked by arrows, the numbers on the far right reflect those indicated on a factory-issued blank card, being selected seven rows below eye level by the reader.
DIY offers the opportunity for extending designs, here another lace transfer segment is added, a card would repeat the design twice in width, and twice in height, again showing the shift necessary when marking rows for cards,  The full punchcard for the elongated repeat, with a punching error marked by the red spot, also used to indicate the corresponding spot for the transfer error in that needle spot on the corresponding swatch

From hand knit lace chart to punchcard 1

I have posted previously on lace punchcards, their use, and traveling between machine models. There is extensive documentation in manuals and literature on the mechanics of their patterning. This series will attempt to follow my most recent post and to visually address the transitions from a charted repeat to a corresponding punchcard.

The illustrations may apply to machines that use two carriages for lace, Brother/KNitking, and some Toyota. other than simple lace on both Brother and Studio machines by altering the placement of the first selection row on the respective punchcards.

The sole function of the auxiliary lace carriage is to select and transfer stitches. The passes required to execute the transfers for one pattern row are known as a transfer sequence. Since the lace carriage is always set to read the card, every pass needs to be programmed in the card and electronic patterning.

Each time transfers are required it takes two or four passes (more for multiple transfer lace) to preselect the needles, transfer the stitches, and return to the left side.  One pattern row on the chart will need expansion (akin to a color separation) into passes necessary to execute the transfers for each sequence. The lace carriage will always activate the card reader, so every pass must be reflected on the card. This accounts for the familiar arrow markings on the left of factory pre-punched lace cards.  Selection, positioning, and return passes are blank rows on cards, resulting in no needles being selected. No selection rows may serve as a reminder to switch carriages. It is best to begin with simple charts to sort out the process. For punchcard machines, the stitch repeat must be a factor of/divisible evenly into 24. Color-coding eyelets for left and right transfers may help. In multiple transfer lace, two or more adjacent stitches are transferred to the right or to the left, creating an eyelet group. On the knit side the group will lean away from the eyelet. The lace carriage is not capable of multiple transfers at one time, so each stitch in a group will require a separate pass. Within each group, the lace carriage must transfer the stitch farthest away from the eyelets first.

Some simple transfers, graph markings on left, expanded for punching on right

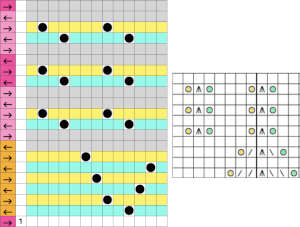
the symbols key for this post a multiple transfer stitch charted for machine knitting location for holes, and directions for lace carriage transfers on the next row the punched card and associated actions going wider, and combining different size motifs the expanded version An alternative way of working: colors are chosen for horizontal lines on which holes for transfers are placed, in the direction indicated by the inspiration chart
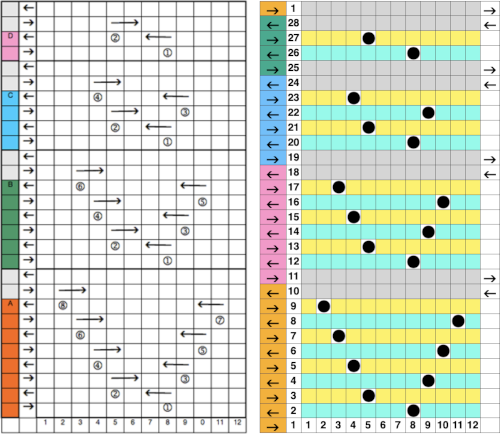
The equivalent mylar repeat

Hand to machine, symbols 5: lace

The beginning of this thread explores how lace may be interpreted from hand knitting patterns and charts, and when hand techniques might be used to make the transfers and create the fabrics on the knitting machine. Going from charts to punchcards will be addressed in later posts.

In hand knitting (unless knitting circular), because the work is turned every row, stocking stitch is formed by knitting one row, purling the next, and repeating the 2. Knit rows are often referred to as “right side” ones, purl as “wrong side” ones. On the machine, stocking stitch is produced as the knit carriage knits every row. In hand knitting, eyelets are created by use of yarn overs (whether single or multiple), and a decrease may in turn be formed ( if the number of total stitches is to remain constant) by knitting multiple stitches together to compensate for the increase created by the yarn over. Often the patterning occurs on knit side rows, the purl side rows are frequently simple purls. Instructions, depending on the author or even the time of publication, may read purl odd rows or even rows depending on how the pattern is begun.

Lace is created on the machine by placing 2 stitches on the same needle to be knit together, leaving the empty needle in the work position. The empty needle is filled with a loop when the knit carriage is passed across the work for the first row, then formed into a complete stitch as the direction of the knitting is reversed. Paired decreases with 2 yarn overs may be created by moving 2 stitches onto a center needle, resulting in the needles on either side being emptied, in turn picking up a loop and forming a stitch with the 2 subsequent rows of knitting with the main carriage.

When selecting hand knitting repeats or charts for working on the machine, it is good to begin with a pattern that has a background of stocking stitch only. It is possible to add ribbed stitches, turn the work over with a garter bar or use a G carriage to add purl stitches on the “right” side in place of the simple knit rows, but that may be considered later and will require marking and punching the cards used in a different manner. Many hand knit lace charts are abbreviated if the whole row is intended to be purled, and those rows may be omitted from the chart. If that is so, then when charting for the machine, the chart will be expanded to twice its length.

There are software programs that will now produce symbol charts for text, and vice versa. To start with it, it may be easier to begin with an existing simple chart to explore the process. As with other fabrics, sorting out the correct repeat remains important.

Hand knitting: a brief list of symbols, and a few of their associated directions on the machine:

O generally represents the eyelet  created by transferring the selected stitch onto the adjacent needle, in hand-knitting, it would be a yarn over and creates an increase

/ represents needle O on left transferred to the right, this needle will now have 2 stitches on it creating in effect a decrease, keeping the number of stitches on the machine constant

\  needle O on right is transferred to the needle on its left, and this needle will now have 2 stitches on it

/\ both needles O at left and right are transferred onto a single needle, which will now hold 3 stitches, again keeping the total number of stitches constant.

In machine knitting, all stitches must be transferred for that row before knitting subsequent rows. Transferring the stitches creates a slant on the knit side. For hand knit patterns that include charts to follow, the knitting key should be checked to the interpretation of the symbols provided.

Working with lace transfers is a bit like working with cables crossed on the knit side in hand knitting.

Symbols will need to be interpreted for the purl side of the fabric (reversed for machine knit). There is a “trick” used for lettering on punchcard machines: if graph paper is used, flip it over a light source, and look at the reverse for punching (or punch the back of the card with text in normal orientation).  This method may make it easier when there are slants to track. If the chart is flipped over, the knit squares become purls facing the knitter, and the purl stitches become knits on the front side.

Mark  Os first for eyelets, count over any in-between stitches, if the slant created is to the right (SSK) in machine knitting this would be a left-leaning stitch on the knit side, so the mark would need to be changed accordingly. Sometimes the direction of the transfers does not need to be changed, but the actual placement for the empty needle may have to be shifted over 1. In summary: charts in hand knitting books will need to be reversed to retain the same look on the knit side for machine knitting. Charts provided for machine knitting already take that into account, are usable as they are for hand transfers, and then the question arises as to how to translate them for use with automatic patterning and the lace carriage.

These graphics represent some of the possible elements and symbols in charts; blue is associated with hand knitting, pink is the same element, for use on the machine. Each is accompanied by a sketch illustrating the appearance of the knit on the knit, face side, and on the purl.

With a little software help: I have been using Intwined for the Mac, which has some issues, the latest being its crashing if there is a library of personal custom-built symbols in the stitch library. For now, I have a clean install, minus my machine knitting symbols. This is a chart for a simple lace pattern created with the program

preferences used

the generated hand “long hand” knitting instructions

the chart saved as jpg and “flipped” for knitting on the machine

if the charts are  MK ready, the transfers are made as you see them, multiple pronged tools speed things up

Studio simple lace punchcards used on Brother

My previous post and a few others addressed some of the issues in knitting lace and the differences between machines. In this instance, I am exploring the use of cards that are designed for transferring and knitting at the same time.
Brother transfer lace is the result of using 2 different carriages.
The studio card used  the resulting fabric

To knit using LC for transfers:
cancel end needle selection on knit carriage underside if possible or push end needles back manually if needed to avoid their corresponding stitches being transferred throughout the piece; set up for knitting the pattern as usual, punchcard row 3 (marked in pencil) becomes row 1 of the design when the above card is used in brother machine; the arrows always indicate the direction the lace carriage will move across the knit to make transfers in the direction of that same arrow
begin pattern knitting with COR, card locked, change knob on KC, needles will be selected  for transfers moving to the left
release punchcard
LCOR moves to left transferring and is released off the machine (same needle selection appears, but those needles are now emptied of yarn)
COL: KC moves left to right, knitting the single row, all needle hooks are full, and new needle selection occurs
LCOL: makes transfers in the direction of the arrow, and is released
These steps are repeated throughout the knit, with the knit carriage knitting and selecting, the lace carriage following its selection to make the required transfers
If there is no pattern needle selection with the KC pass on any row(s), continue to knit until there is needle selection, and begin the process using lace carriage to transfer in the direction of the arrow now in view above the card reader, and once again releasing it after a single pass
A caution: hesitation and reversal in the movement of carriages in Brother machines advance the card in the reader, and result in mistakes in patterning; if errors are to be corrected or such movements need to be made for any reason, it is worth locking the card, checking row numbers, remembering to release the card before continuing, and visually checking pattern after the next knit row.

Another option is hand transfers:
KCOL: lock the card on the appropriate row, row 3 if using a Studio brand one
The KC is set to knit, with no cam buttons pushed in. As a result, there will be needle selection, but no patterning.
KCOL: make the first selection row left to right, release the card, and set it to advance normally, disregarding arrow markings on the card
KCOR: transfer stitches on preselected needles onto adjacent needles to the left, away from the KC, and knit back to the left 
KCOL: transfer preselected stitches to the right and follow with a knit row to the right.
After each selection row hand transfers continue to be made away from the knit carriage, with transfers on odd-numbered design rows toward the left and on even-numbered rows toward the right.
Blank rows on the original design repeat will have no needle selection or hand transfers, the KC continues to advance the card and knit, producing stocking stitch for the necessary number of rows.
Before any knit rows when using tools for hand transfers, check that needles have not been accidentally returned to the A position to avoid ladder formation instead of eyelets or proper patterning.