“Pinning” has become part of my daily routine. This image was pinned by someone else, and brought back memories of my block stitch scarves, along with the temptation for working out a new repeat, similar to that seen on the top of this jacket credited to Forquet.

The term block stitch is one used in published references with instructions for related stitch variations.
Following are some ideas for developing designs for these fabrics, the basic principles work for both punchcards and electronics. Using the motif in a punchcard will make the striping surrounding it fixed, and involves a lot of punching holes. On a mylar or in a download the width of the ground behind the shape can be easily changed, and only the non-selecting, “empty ” squares need to be drawn or entered into a program that is capable of color reverse. One needs to be mindful of the size of the overall repeat when faced with so much “blank space”.
Until one sorts out what happens with the stitches, and where the colors are placed during knitting, it is a good idea to start with a simple shape.
I use Excel as my “graph” paper when I want to easily play with color on a grid. Below is a simple motif as a design start, besides it is an expanded graph leaving every other row blank. Some books suggest erasing horizontal EOR stripes, I prefer the visual cues in the method below. The yellow marks the rows on which the motif will be created.

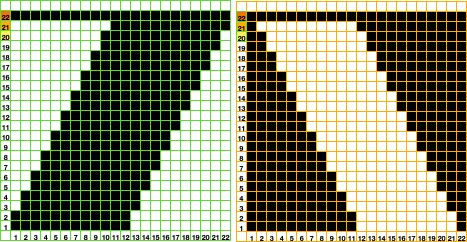
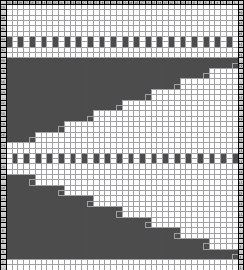
There are a number of ways to go on from this point. Layering the repeat on a colored ground can give a sense of the resulting shape, help plan the type of overall pattern repeat, and ensure that enough rows are allowed to travel to and from the color changer. For sampling I prefer to work on an electronic machine, using the elongation feature and color reverse to minimize drawing in lots of black squares. The grid on the left shows the split motif layered over a striped ground. In the center grid, the motif separation color becomes white/ blank, color one (yellow) is different than on the left simply to allow the white to become more visible.
I use 2 carriages as opposed to the color changer when knitting these fabrics, so the L and R row markings help ensure that indeed there are enough rows in the repeat for both carriages to travel to and from each side, with stripes lining up where required.
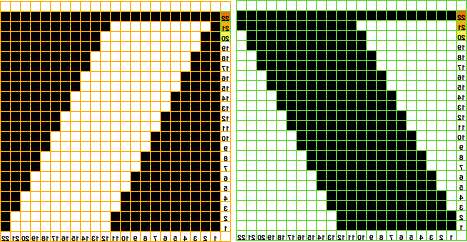
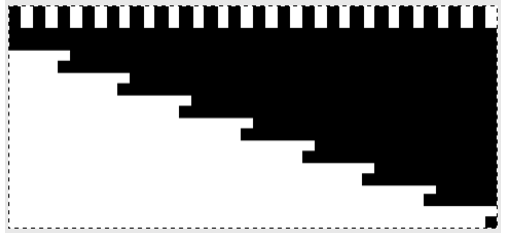
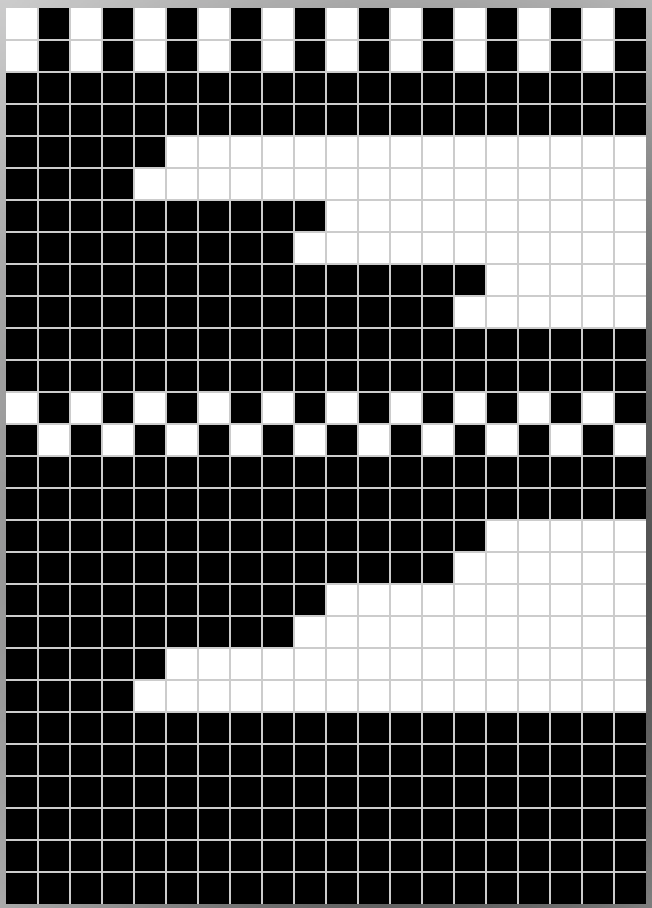
The blank squares represent slipped stitches, and they normally are left blank whether, in a card, mylar, or program, all other colored squares are knit stitches, corresponding to punched holes, and black squares on mylar. On the far right is all that is required to be filled in with a mylar sheet or program capable of lengthening X2 and color reverse. The marks are actually the same as the expanded motif first shown above. For a punchcard, the same motif on the far right could be drawn this way centered, and every other square surrounding the now black lines would need to become a punched hole.

Looking at the graph: color 2 will slip in locations where needles are not selected (white squares). The stitches on non-selected needles get longer in the front of the fabric, the alternate color floats behind them. The next color change will knit the held stitches off, so the motif color in the above design will actually be “green” in the final fabric. Because the colors on either side of the motif are actually knitting every stitch and every row, there will be some distortion in striping around the motif, and potentially even some “bubbling” in those areas
The next choice becomes sorting out how far apart to place motifs from each other, and in what distribution on the resulting fabric. Both are subject to personal preference and taste. Below is only one of many such possible layouts

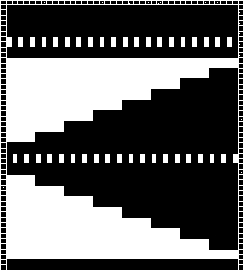
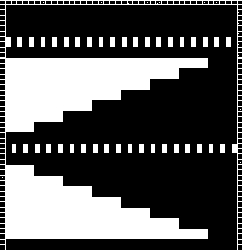
if elongation is not possible or to be avoided, then the option below shows a possible repeat, including a “punchcard” 24-stitch version. Where color reverse is not an option, all but the white squares must be marked/ programmed, and in the case of a punchcard, all but the white squares would need to be punched

It is also possible to offset/ shift the color of motifs themselves so they would alternate colors between the 2 striping colors as well

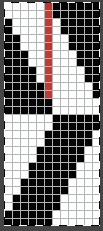
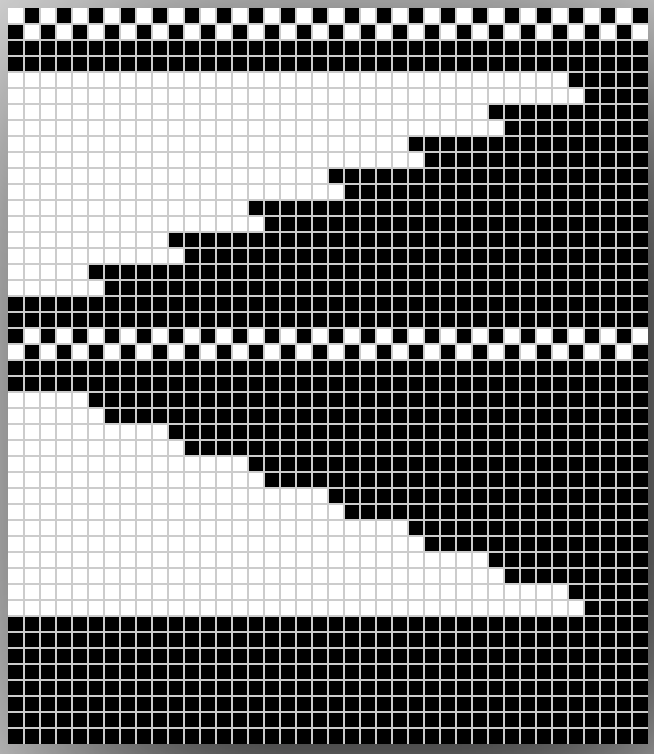
The following chart illustrates the idea: the magenta stripes are not part of the repeat, they are markers to show where the slip stitches for the alternate color need to occur in the repeats

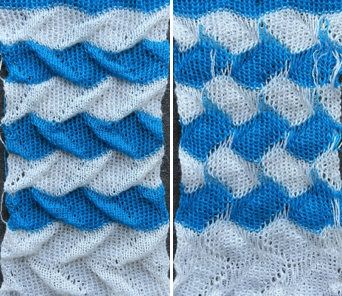
As for the motif that started this thread: below is the test swatch so far, obviously in a different gauge and repeat, but in the same spirit. There is a long float on the back/purl side spanning 8 stitches. If the goal is to produce an unlined item, this could pose a problem in wearing it. Hooking up the floats may be too time-consuming in production, an added stitch in the non-motif color (see marked dots) on either side of the central bar may solve the problem, but alter the design. There are lots more factors to consider and play with in test knitting. The yarn colors in these swatches are chosen for throw-away tests, not for any type of final item.

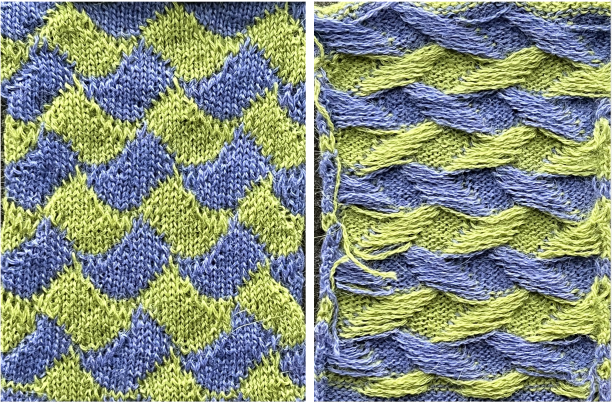
more swatches using both old and new repeats

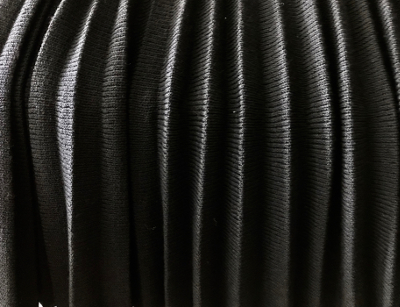
The final, new scarf fabric: knit on Passap, every needle rib, Tencel, and “Nomi Lee”.

The top and bottom edgings are to be worked out; the fabric is soft, drapes well, and has no side curl.


 As each set of repeats for each card is completed the punchcards are exchanged. KC direction is marked on them, with knitting beginning on the opposite side. I found the fabric more manageable when I completed and began each design sequence and color change by beginning and ending with an all-knit row in that color. The bottom of the swatch shows the difference in the side edges if half repeats are not planned for. If this were a production item it would actually be possible to work out the repeat on enough cards so they could be used as a continuous roll rather than having to so frequently reinsert and rejoin them. This sample was knit in Jaggerspun wool, and since wool has memory, the resulting 3D texture remains after steaming, resulting in a noticeable difference from the previously knit acrylic swatches.
 and the knit side


 The execution was in a brick configuration


