My blog is a living document.
At times I return to previously published posts and there have been software updates in the interim, and/or my familiarity with using multiple tools has grown.
I preserve the contents of the original post, they reflect where I began and the evolution of my approach to learning software navigation with specific design goals in mind.
At times some small additions are made to the body of the old post, at others, dated post scrips point to later, perhaps easier or quicker methods to achieve the same goals.
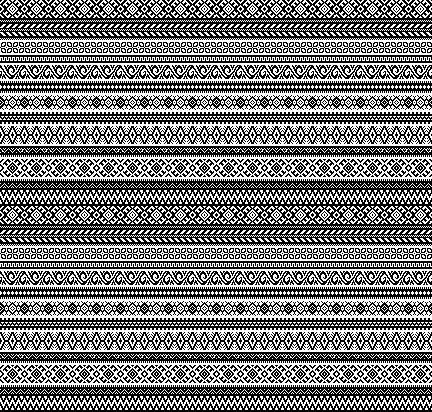
There is a Russian website with a treasure trove of machine knitting patterns, some for 12 stitch models, and extensive collections for 24 stitch models including for fair isle, lace, and single motifs.
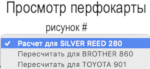
There are pull-down options to show the full repeats charted for Silver Reed (default), Brother, and Toyota brands. The numbering system on the right of the cards will be shifted to the appropriate starting line, but the images themselves do not seem to adjust the placement of the punched holes when that is necessary for correct knitting when switching to other knitting machine brands.
The collections begin with the longest repeats. One such repeat
 I had never had an interest in owning DAK, though never say never, I did purchase the program when my knitting software was switched to a Windows PC. From the promotional material and forums, it would appear their Graphics Studio offers an interesting range of design possibilities in converting such files.
My experiences with the program have been chronicled in related posts.
Those of us who are Mac and Gimp users need not be left out, the conversions are achievable with the investment of a bit of time and patience.
The charts as presented often cannot be successfully converted to the indexed mode and scaled in Gimp to produce readable patterns.
One long solution is to combine the use of a spreadsheet table, in my case created in Mac Numbers, with Gimp design options.
Prior knowledge of the basics of both programs is required.
I assume similar steps could be used with Excel.
A follow-up post on this topic: Numbers and GIMP: online punchcard patterns to electronics 2.
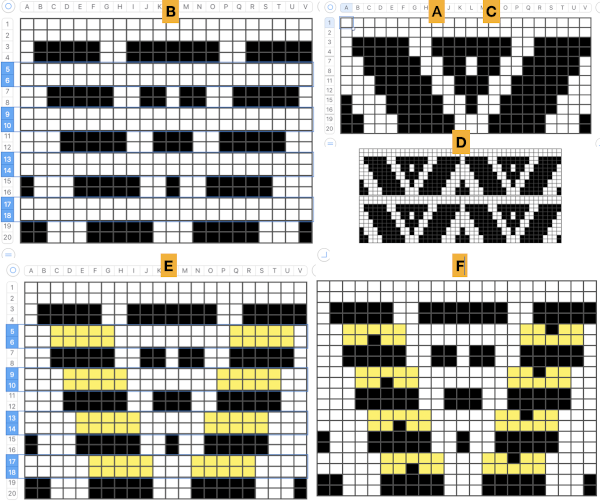
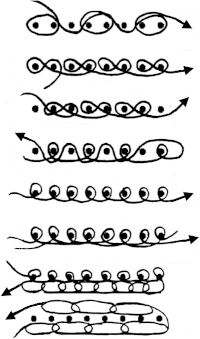
It is easier to test how-tos beginning with a source diagram which has larger, more readable dots representing the punched holes. This was found on Pinterest, dimensions for both stitches and rows are not always provided. 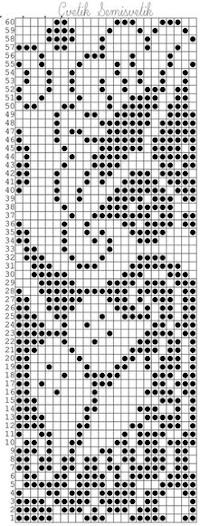 The units in many such illustrations are not square, and the goal is to end up with a PNG where each square unit represents one stitch, one row.
The cell size I prefer in Numbers tables has come to be 20X20 pts.
This particular design is 24 stitches wide, and 60 rows high.
To make it workable in that cell size, the repeat is opened in Gimp, cropped to its margins, scaled to 240 X 600 pixels, and the new image is exported. 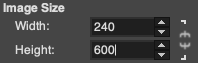 In Numbers, drag and drop the image onto a new sheet if working on a previously created Numbers document. Click on the image, and then on format/ arrange to resize it to the desired proportions,
 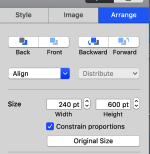 A table is then created, 24 cells wide, 60 high, each measuring 20 pt by 20 pt, with total measurements of 480 by 1200 pts.
 ![]()
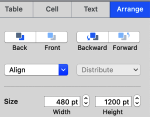 Resize the image if needed to match the table size, in this case, to 480X1200. The size may be adjusted by using the up and down marks to the right of the size option or typing in desired values in each window followed by the return key, with more accurate control than simply dragging on points at the corners of the imported original. Turning off constrain proportions allows for added tweaking of the size if needed.
On the left is the first table image, including extra rows to check for stitch and row numbering, and to its right, is the resized punchcard pattern. 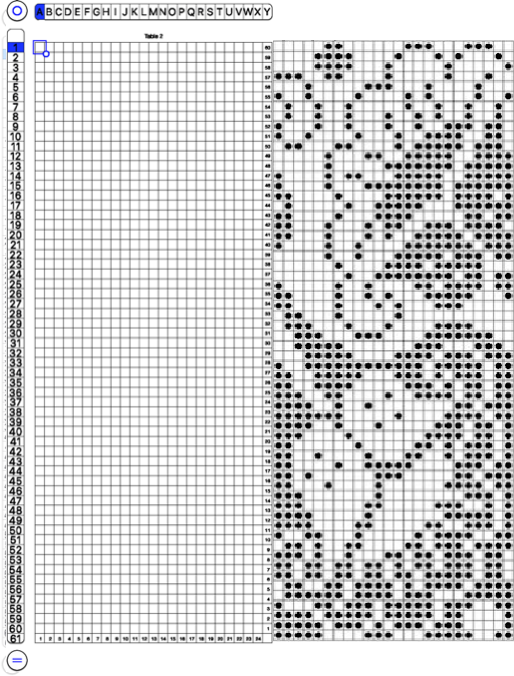 Select the whole table 24 cells by 60, by clicking on the circular symbol at the upper left,
 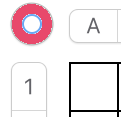 and alter the cell borders to a bright, contrasting color. I chose red, 3-point thickness.
 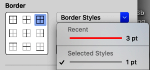 Move the table over the punchcard image or its mirror if needed.
The arrange option may be used to place either in front or back of the other.  Dragging the table using that circle on the upper left corner will place it directly on top of the design.
Select individual cells or cell groups by using the command key and releasing it periodically, to fill the cells with color. 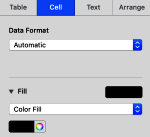 The repeat in progress
 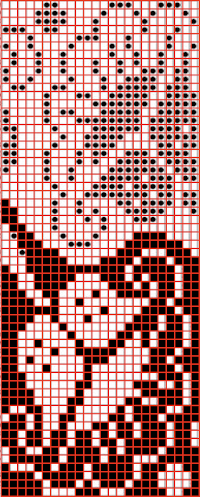 Copy and paste the completed table. Make certain there is a different color cell in any white squares at the far corners of the image, in this case, upper right and upper left (yellow), remove cell borders
 ![]() 1. screengrab a larger area than the repeat
1. screengrab a larger area than the repeat
2. open the screengrabbed image in Gimp
3. choose Image, Crop to Content, to eliminate any extra surrounding cells
4. fill any contrasting color, in this case, those yellow cells, with white
5. choose image/mode/convert to indexed B/W colors
6. proceed to scale the image. In some instances, this needs to happen in 2 steps, the first scaling to make certain both values are divisible by 20, and the second to scale to the desired repeat size of 24X60
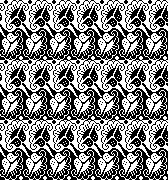
7. before saving the PNG for download, magnify the file to at least 800X, and with the grid in view, perform the first visual check. Then, using filter-map-tile, repeat the design in height and width multiple times to check its horizontal and vertical alignments and to visualize how it might appear in the intended project. 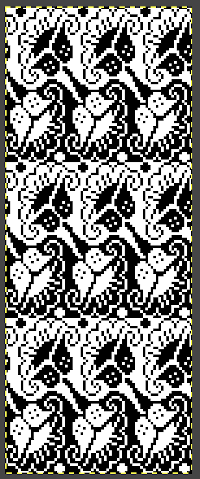
![]() A quicker process using only Gimp version 2.10.34, 2023
A quicker process using only Gimp version 2.10.34, 2023 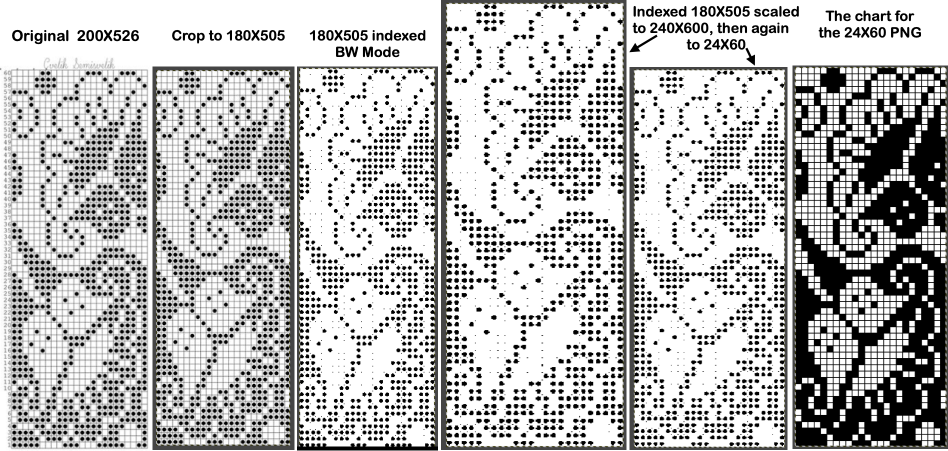
![]()
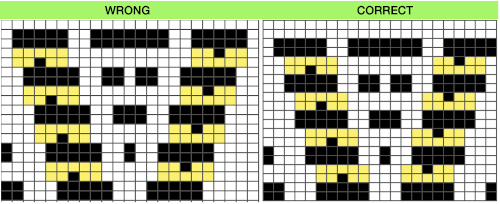
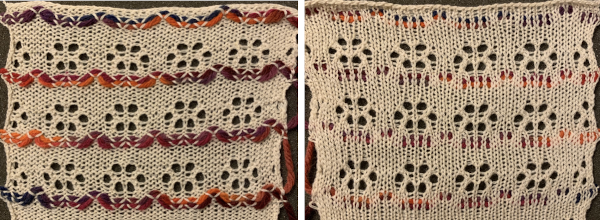
 One needs to have a basic understanding of punchcard illustration markings, and often the repeat required for the use of the design in electronics may only be a very small portion of the total offered in the publication. The extra rows represent perforations that are not part of the design and may be cropped off in Gimp. The image of the repeat on the left began the FB discussion, while the one to its right illustrates the same after making the marks more visible.
 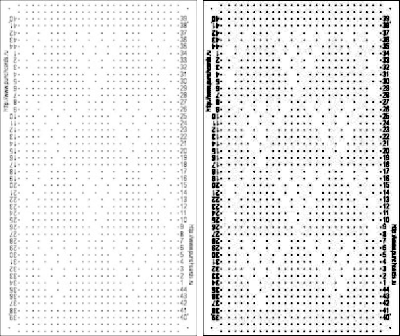 Making the marks more visible is possible by changing number values and by moving the slider immediately below the input levels
 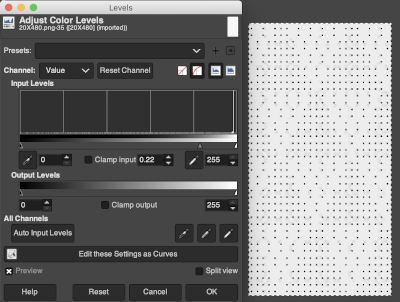 Proceed as for the first image, being mindful of an unnecessary row at the bottom. The saved image can be tweaked in size by turning off Constrain Proportions and adjusting values for width and height for proper placement under the table grid. It soon becomes evident that the card is composed of smaller repeat segments, which can be copied and pasted making for faster filling in the whole punchcard minimum row # requirement.
 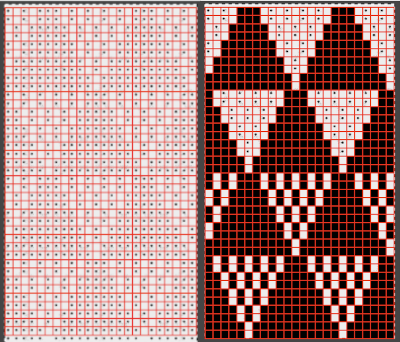 Check the repeat alignment by tiling it.
 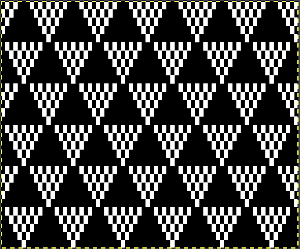 The smallest adjusted electronic repeat, 12X20 pixels.
 ![]() The far longer repeats might best be managed broken up into sections. An easier, quicker solution is presented in later posts.
The far longer repeats might best be managed broken up into sections. An easier, quicker solution is presented in later posts.
This is part of #6717, shown in the process of trimming unwanted info in Gimp and after adjusting color levels to create a sharper image.  The converted, partial punchcard repeat
 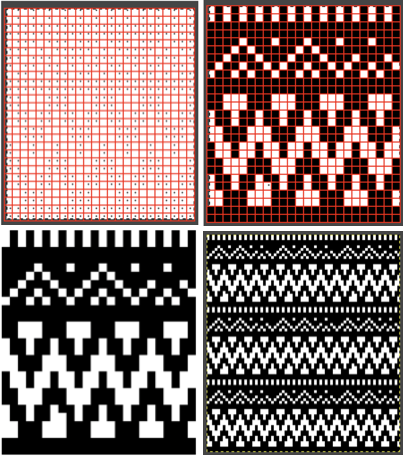 2023: ArahPaint‘s weave from grid tool makes working with the full repeat possible. The final repeat was cropped by 2 rows at the top to 24X206 to avoid a 4-row solid color line produced when the original was tiled vertically.
![]()
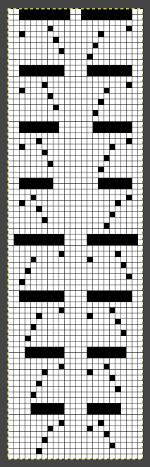
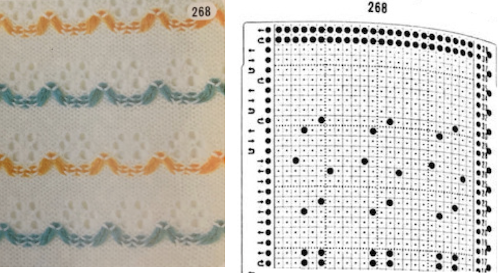
 Returning to the use of Numbers and Gimp: what of the lace punchcard repeats? There seems to be no differentiation between the different types of lace on the Russian website: thread lace, simple lace where stitches are knit and transferred in a single pass (a Silver Reed/Studio special), and lace requiring the use of 2 separate carriages, one to knit, and the other to transfer are all grouped together. In addition, the pull-down menu and changing machine brand selection,
 if used, will change the numbering on the side of the card, but not the design content
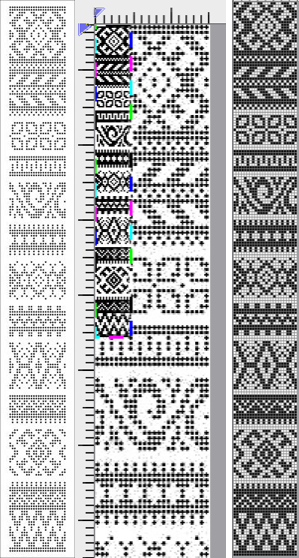
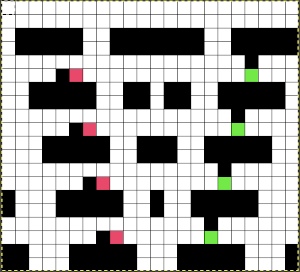
 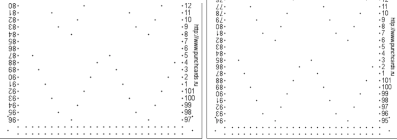 The conversion process intended for the final use on the Brother machine: the image on the far right shows a review of the proper placement of pairs of empty rows between lace segment sequences, highlighted in grey
  In the past I have found lace repeats, in particular, to be particularly cranky when scaled down in Gimp due to the paucity of black cells. After the above steps, I decided to try color invert, resize, and color invert again, which in this instance, produced what appears to be an accurate repeat. Of course, the final png is likely to need mirroring for use in some electronic models
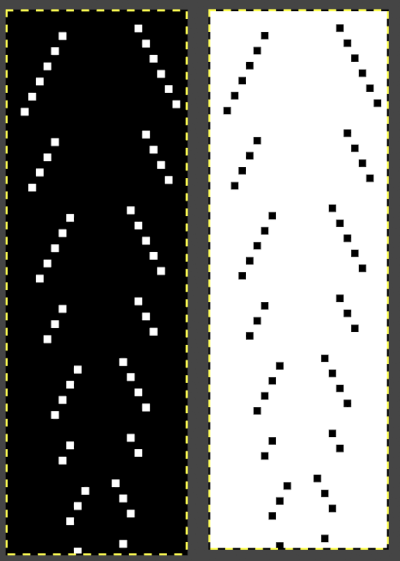
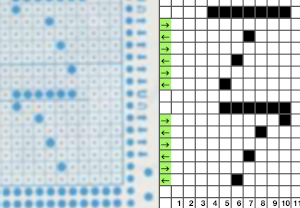
![]() The process did not work for me in using Gimp alone to edit test repeats from the website directly. The white dots, in that case, disappear with scaling to the desired size.
The process did not work for me in using Gimp alone to edit test repeats from the website directly. The white dots, in that case, disappear with scaling to the desired size.
Using resize X 2 with color invert and back with a Stitchworld #150 pattern image got me closer to an editable lace repeat using Gimp alone, worth considering in the future. 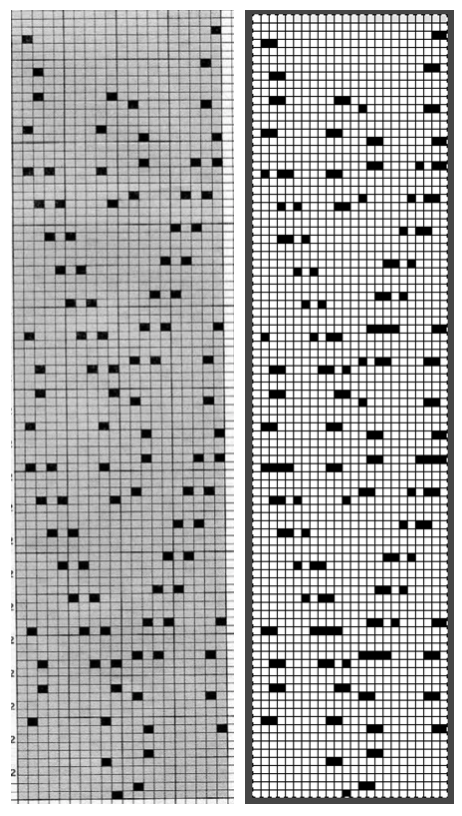 2023: a different approach:
Left: the image from the Stitchworld book measures 26X64 cells
it is slightly tilted, the angle has been rotated for better results, and cropped to the borders of the actual design repeat
Center: the cropped image measures 442X846 pixels, it is scaled with a broken chain link first to a multiple of the original, since the output will be on a square grid, not a rectangular one, in this case, to 260X640.
Use Colors, Threshold, followed by Image, Mode, convert to BW Indexed
Right: Image, scale again with intact chain link to the final 26X64 size, export the PNG 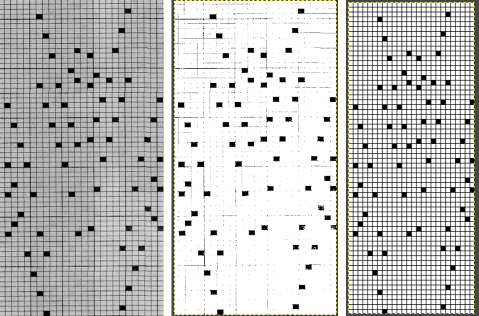
![]() With experience, one learns to trust the process.
With experience, one learns to trust the process.
A proof of concept for the final PNG matching the original is not in any way necessary but is offered here for this particular file or simply for reference.
Work in RGB mode, select and click on the rectangle tool after any steps to make changes to fix the layers.
Select edit, and undo to revert to any previous step(s).
1. open the initial cropped and rotated image, note the pixel proportions
2. in a new work window, open the final PNG, and scale it to the same pixel dimensions as 1
3. select all black pixels, and bucket fill them with red
4. use layer, transparency, white background to alpha, making it transparent
5. copy 4
6. paste 4 on 1, note that pixel placement for the final repeat matches that for the black squares on the original chart

 offers 4 punchcards for use with this technique
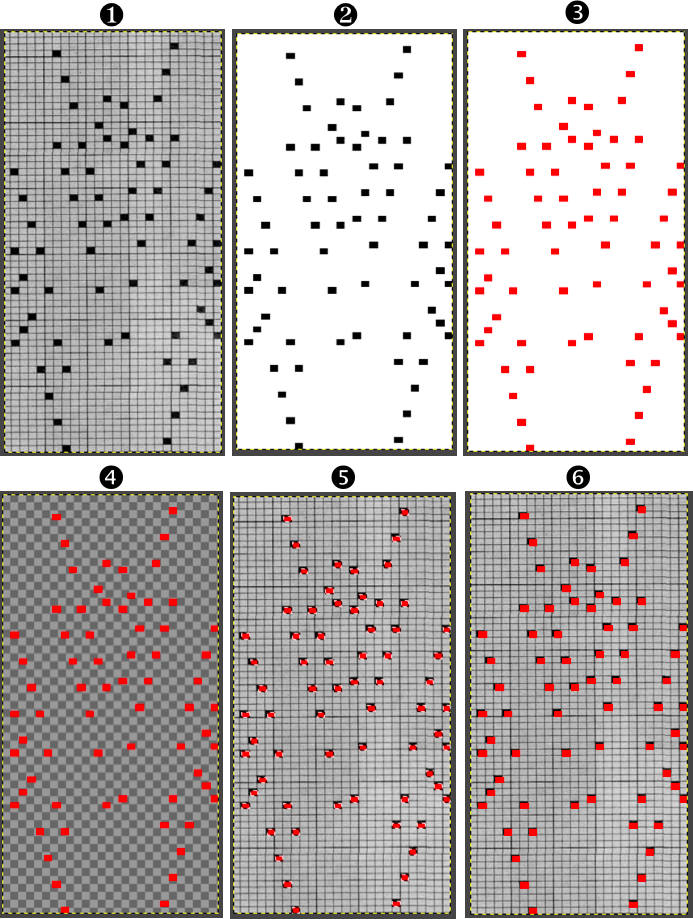
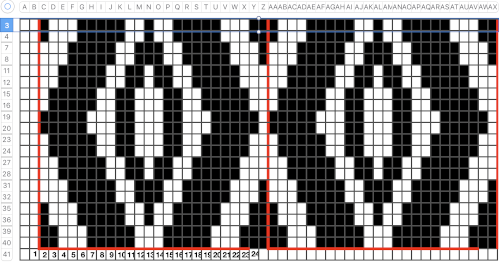
 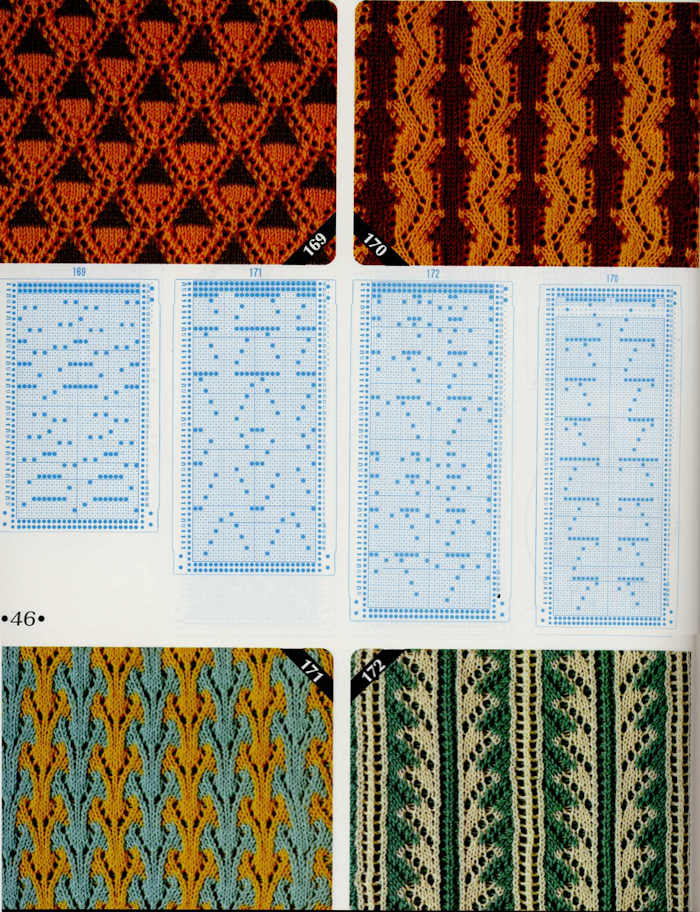 I chose to work with #170. The lace carriage in the Toyota models operates from the right side rather than the left as in Brother. The direction of the arrows marked on the card actually indicates movements for the carriage operating from that side. That fact is taken into consideration planning a possible Brother punchcard repeat. Lace direction arrows are matched based on the punchcard image being mirrored horizontally. The card in its original version is imaged on the left, mirrored on the far right, the proposed Brother punchcard in the center
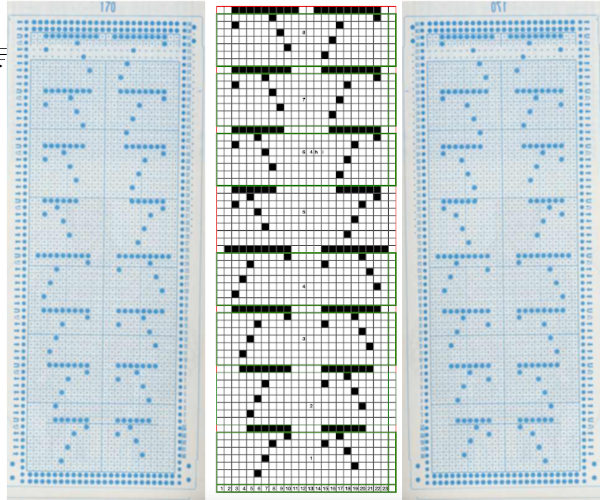
 The proposed Brother punchcard repeat is now expanded for use on the electronic machine, ready for converting to .bmp in Gimp. Numbers in the middle of the chart on the left helped keep track of repeat segments. I also used red dots initially to mark segments as I had completed in the expanded the repeat, then erased them
 I expected something like this
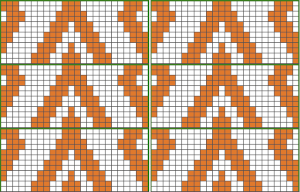
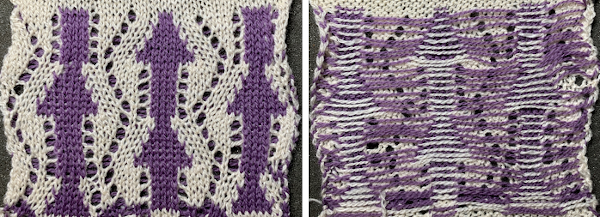
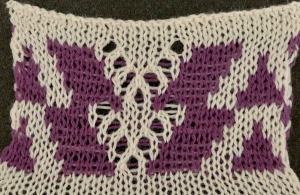
 Regrouping: the easiest place to insert eyelets is in the dominant, background-color
 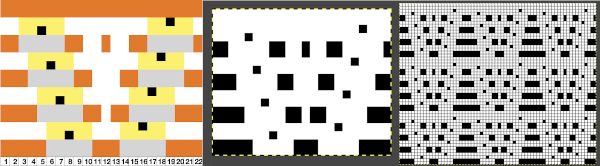 The 930 .png
 Can the exchange of the color positions in the yarn feeder create colored shapes with eyelets on the white ground? not only does it not do so in a way I liked, but my machine was having none of it as well
 It’s good to start with a small repeat.
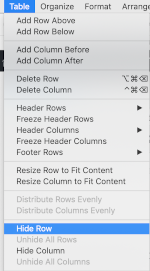
 Taking it to continuous shapes and checking them in repeat: red cells represent transfers to the right, cyan ones the transfers to the left. The empty cells adjoining each of both colors represent the location of the doubled-up stitch after the transfer is made
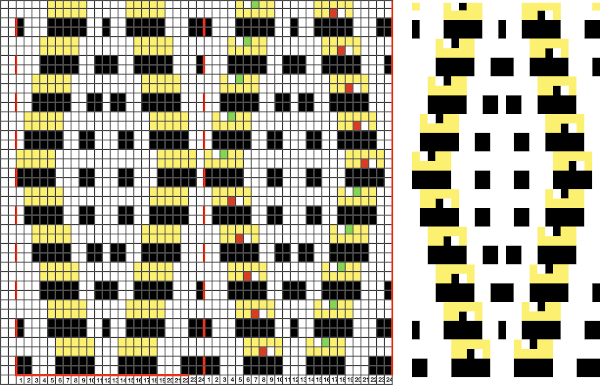
 I like to check tiling for the repats along the whole process
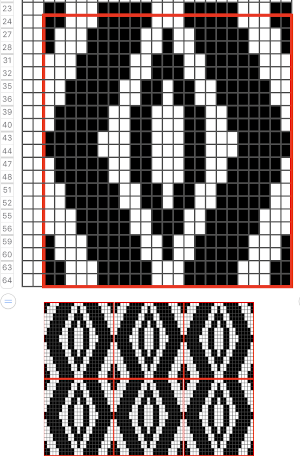 Though the repeat is 24 stitches wide, it is not suitable for use on the punchcard machines in this format, its tiled test
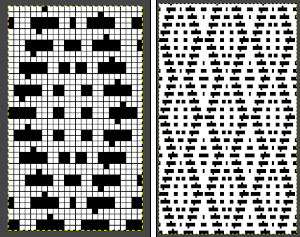
 Adding another contrast color stitch to shapes will make the number of stitches on either side of the eyelets consistent
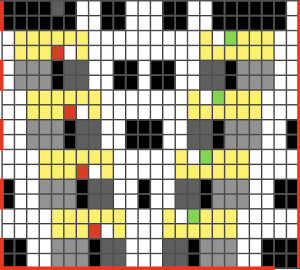
 and with the addition of two blank rows at the top of each segment.
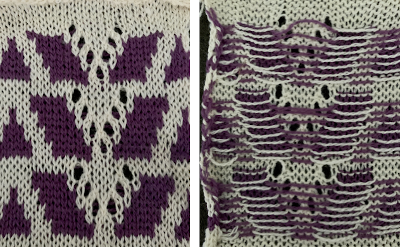 The possibilities are endless, with some patience, they can be manipulated to meet personal preferences and taste.
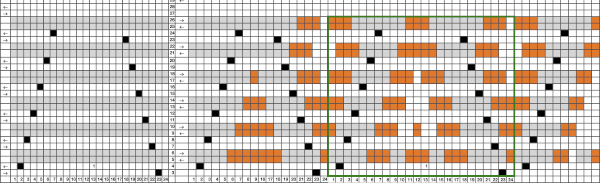
 Working out an electronic repeat: the punchcard repeat is on the bottom, the expanded electronic one on top, yellow cells highlight rows with tuck stitches
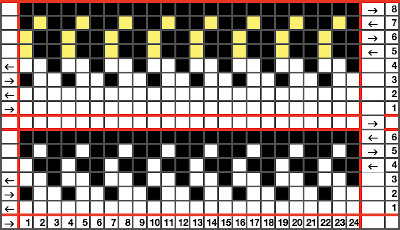
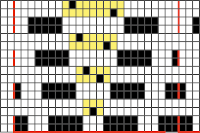
 Returning to Volume 4, here is a combination of lace and tuck repeat that appealed to me. I am repeating a process akin to that used in programming the
 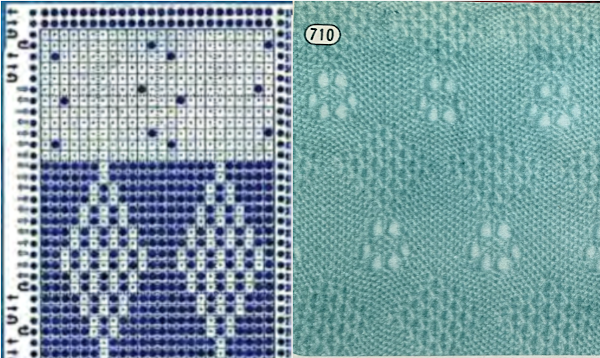 The actions of the 2 carriages on the electronic, the repeat prior to mirroring
 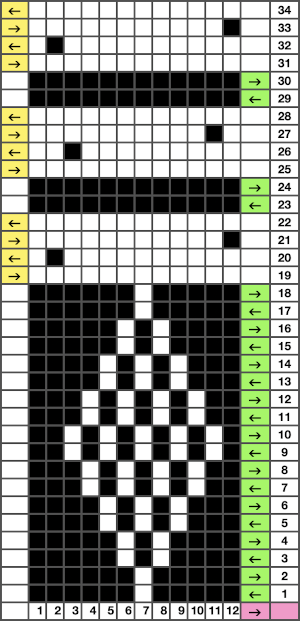 mirrored for use on the 930
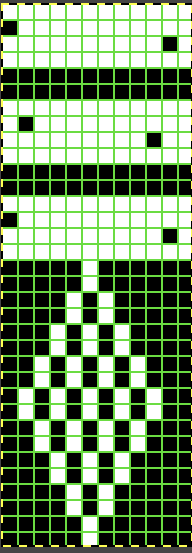
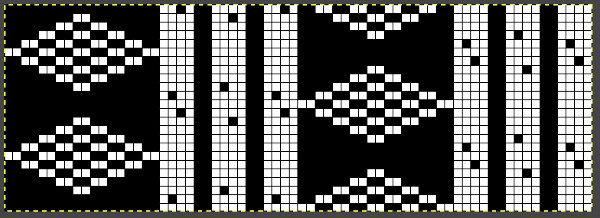
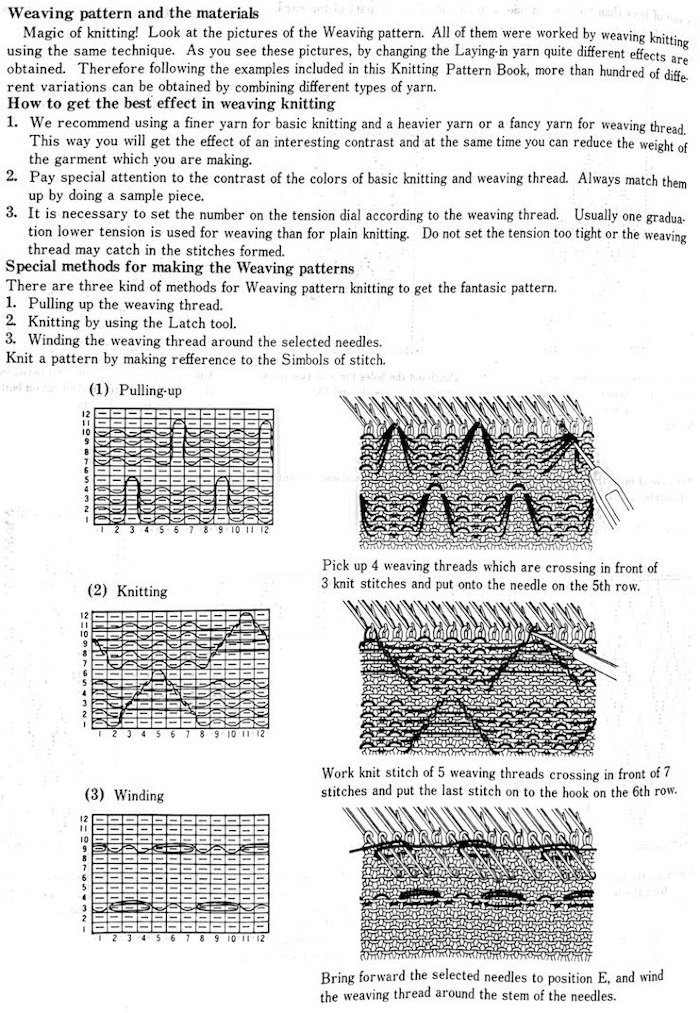
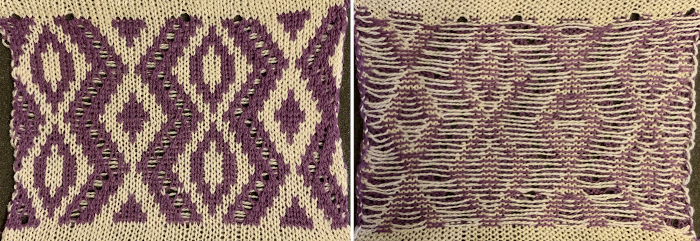
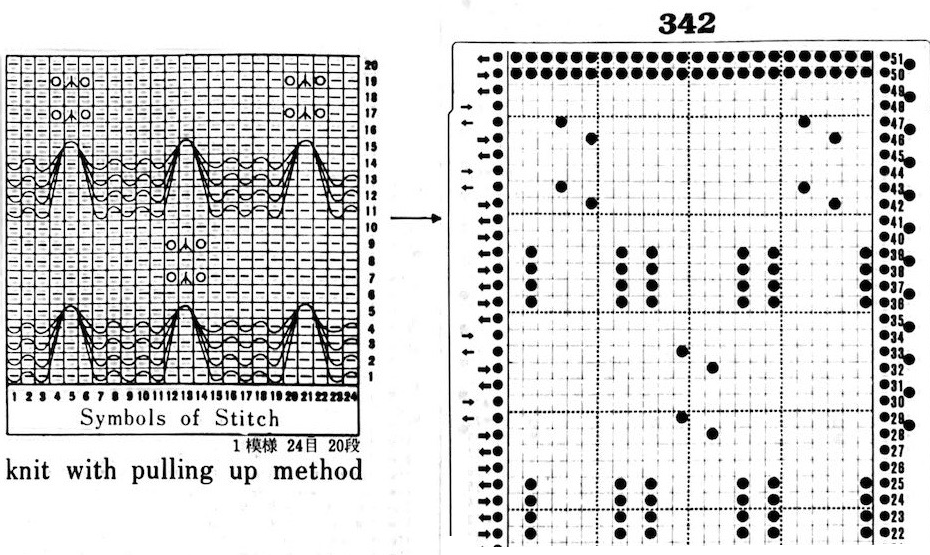
 It has the added data on how each of the fabrics might look visualized in a chart prior to its expansion as a card in full repeat. This is the top half repeat of a card for pull up weaving combined with lace along with the directions for execiting the knit
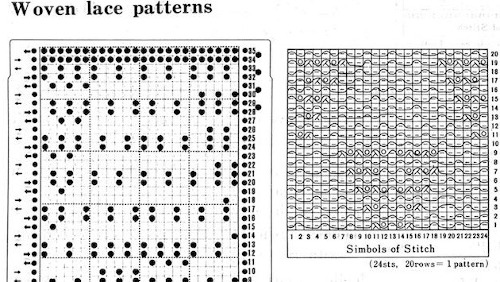

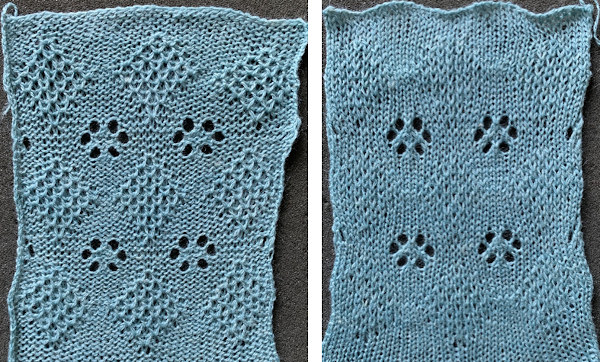
 My experience with trying to knit
 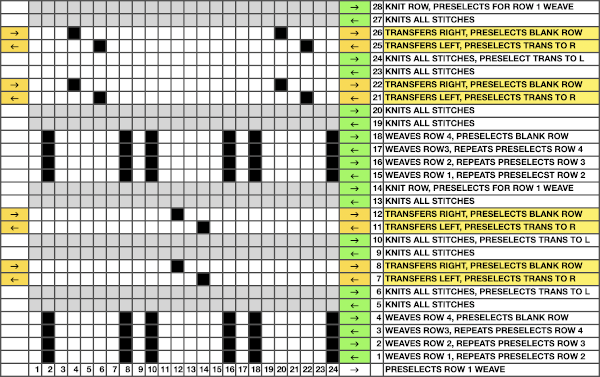 Taking carriages on and off the same side of the machine is nothing I would be inclined to do for any length on any machine. In theory, the identical repeat above could be used on an electronic KM in that way, but I did not get very far with that method before giving up.

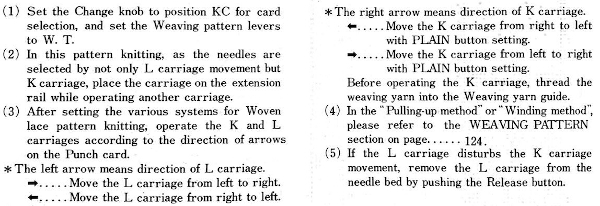
 Volume 4 offers only this advice: “the empty needles are selected at the second lace pattern, but this is not a trouble, and you may pass the L carriage to the side which is indicated on the punchcard”. I take that to mean that after a transfer if the same needle is selected again, don’t be concerned, keep moving the carriage in the direction of the arrows.
 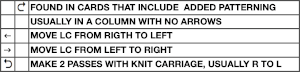 Because the weaving is for only 2 rows, the use of laid in, thicker yarn is well tolerated. The punchcard repeat amended for use on electronic, shown prior to mirroring
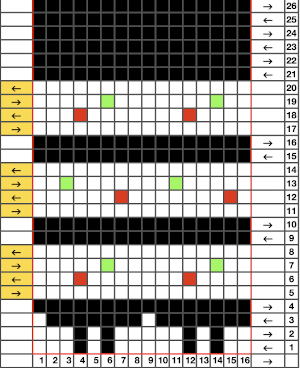

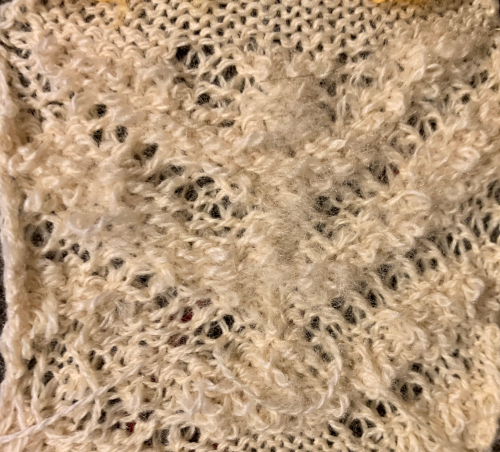
 Alternative settings for one color pile: Tech 256, back lock FX and both arrow keys, pushers one up, one down, front bed to LX, drop stitches every 2 rows.
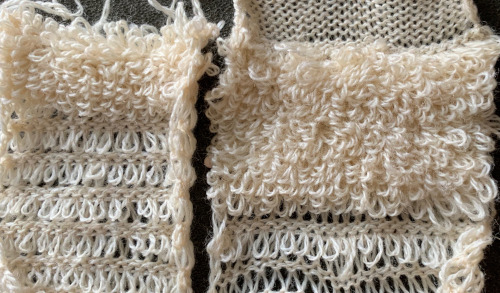
 the loops, formed on every needle on both beds with the move to the left
 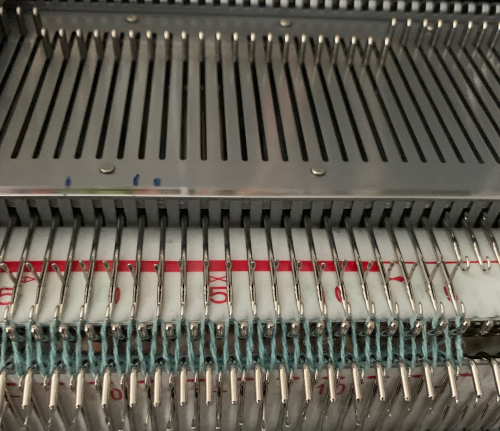 anchored in place on the ribber needles as the only the ribber knits as it returns to the right
 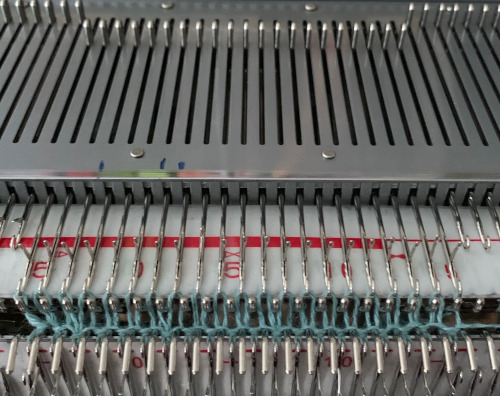 while the carriage is on the right, drop all stitches on the main bed,
 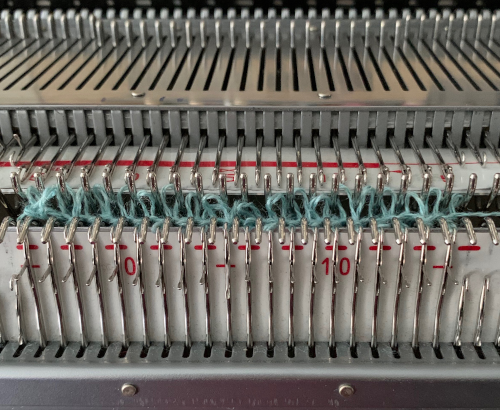 making certain no loops are stuck on gate pegs on the main bed,
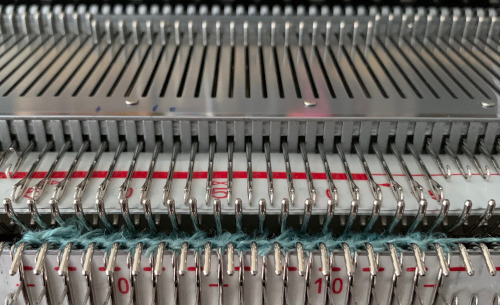
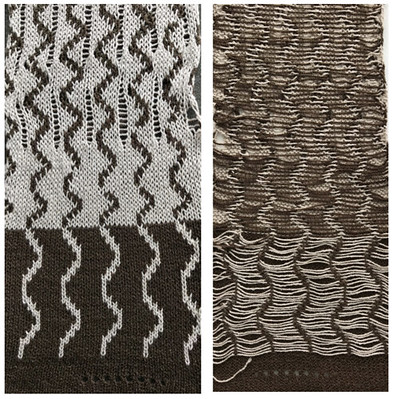
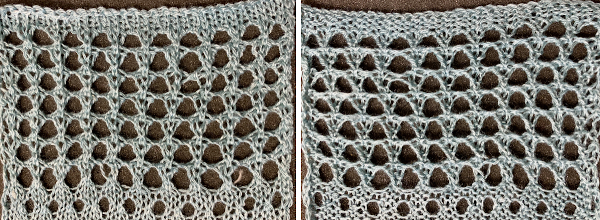
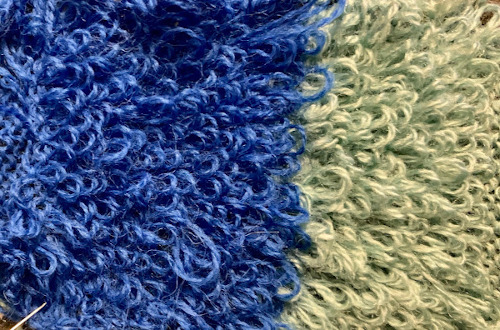 Knitting was smoother with a change in yarn. An extra needle on each side of the knit on the ribber is brought out to hold manually to ensure their stitches knit with every pass of the ribber carriage. I prefer the all-over pile with its loops formed on the top bed. There were nearly no incidences of loops catching on gate pegs on the main bed. One of the drawbacks is that the main bed needles need to be dropped and brought back to the B position manually, bald spots will result where any needles are not returned to the proper work position, so they will not pick up loops.

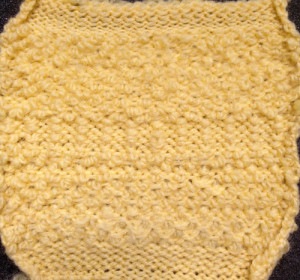
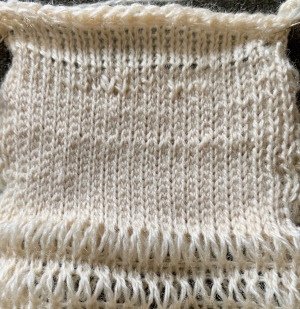
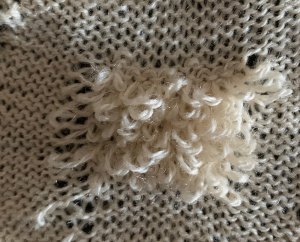 and this is likely my last try at the single pile in a pattern using every other needle tuck on the ribber with the release of stitches every 4 rows. I actually like the elongated stitches in the ground but found the stitches planned for loops simply did not release easily or at all,