Following up on the previous post, from-hand-knit-lace-chart-to-punchcard-1, a 24 stitch chart with marked in symbols for conversion to MK repeat: a 24 stitch chart with marked in symbols  an isolated repeat segment worked out on a striped template after choosing and marking the transfer direction of the eyelets on the original, green for to the left, yellow for to the right,
 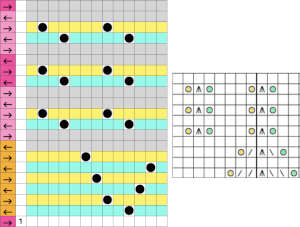 marking lace transfers rows for a partial card segment,
  the numbers on the left reflect LC passes and their direction is marked by arrows, the numbers on the far right reflect those indicated on a factory-issued blank card, being selected seven rows below eye level by the reader.
DIY offers the opportunity for extending designs, here another lace transfer segment is added, a card would repeat the design twice in width, and twice in height, again showing the shift necessary when marking rows for cards, 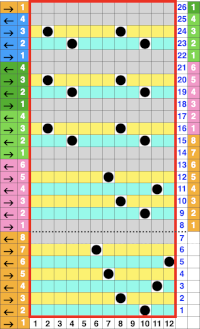 The full punchcard for the elongated repeat, with a punching error marked by the red spot, also used to indicate the corresponding spot for the transfer error in that needle spot on the corresponding swatch

Category: Color Separation for Knits
From hand knit lace chart to punchcard 1
I have posted previously on lace punchcards, their use, and traveling between machine models. There is extensive documentation in manuals and literature on the mechanics of their patterning. This series will attempt to follow my most recent post and to visually address the transitions from a charted repeat to a corresponding punchcard.
The illustrations may apply to machines that use two carriages for lace, Brother/KNitking, and some Toyota. other than simple lace on both Brother and Studio machines by altering the placement of the first selection row on the respective punchcards.
The sole function of the auxiliary lace carriage is to select and transfer stitches. The passes required to execute the transfers for one pattern row are known as a transfer sequence. Since the lace carriage is always set to read the card, every pass needs to be programmed in the card and electronic patterning.
Each time transfers are required it takes two or four passes (more for multiple transfer lace) to preselect the needles, transfer the stitches, and return to the left side. One pattern row on the chart will need expansion (akin to a color separation) into passes necessary to execute the transfers for each sequence. The lace carriage will always activate the card reader, so every pass must be reflected on the card. This accounts for the familiar arrow markings on the left of factory pre-punched lace cards. Selection, positioning, and return passes are blank rows on cards, resulting in no needles being selected. No selection rows may serve as a reminder to switch carriages. It is best to begin with simple charts to sort out the process. For punchcard machines, the stitch repeat must be a factor of/divisible evenly into 24. Color-coding eyelets for left and right transfers may help. In multiple transfer lace, two or more adjacent stitches are transferred to the right or to the left, creating an eyelet group. On the knit side the group will lean away from the eyelet. The lace carriage is not capable of multiple transfers at one time, so each stitch in a group will require a separate pass. Within each group, the lace carriage must transfer the stitch farthest away from the eyelets first.
Some simple transfers, graph markings on left, expanded for punching on right
 the symbols key for this post
  a multiple transfer stitch charted for machine knitting
  location for holes, and directions for lace carriage transfers on the next row
 ![]() the punched card and associated actions
the punched card and associated actions  going wider, and combining different size motifs
  the expanded version
  An alternative way of working: colors are chosen for horizontal lines on which holes for transfers are placed, in the direction indicated by the inspiration chart
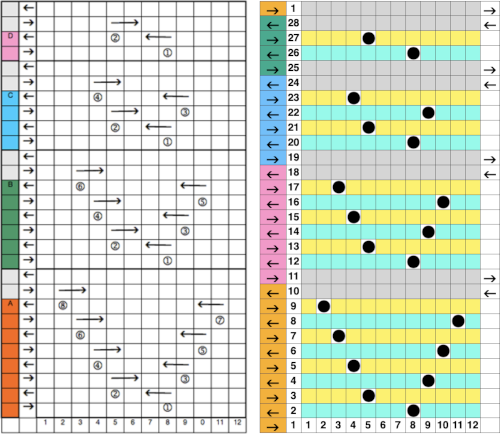 The equivalent mylar repeat
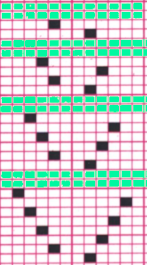
Atkinson dither github (free)
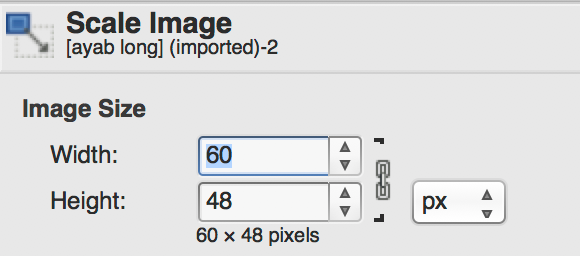
I have linked before (March 14, 2013) to this github as a way to achieve atkinson dithered images for possible use in knitting. I received a post with questions on how to achieve this successfully. I work on a Mac, latest OS. The resulting dithered files were not read when downloaded by any app other than Preview, and resizing within program was poor quality. Here is my work-around: it is always best to resize any of the images to be processed in color or grey scale, before indexing modes or dithering. Once that is achieved, import image into github without changing output size in the program itself, and download. Your own image size will be retained. Now time for another freebie intervention: XnConvert will accept the file, convert it to BMP or other readable formats if preferred, resulting in a knittable image.
the sized image

hyperdithered.png

via github_XnConvert_.bmp
 …
…
Converted images,”representational knitting”
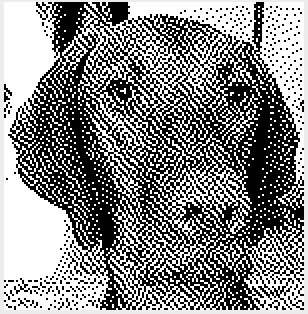
One bit camera “snaps pictures in digital retro style. I began this tale with a partial shot of my face. The app apparently is no longer available via US App Store (11/15/2017)

resized, greyscale, knittable size bmp

The old bag of tricks did not produce an image I was happy with, I finally used Ggraphicconverter Picture_Mode_ Bitmap for my downloadable file

Migrated from Mac to a PC laptop, opened in WinCrea, the image repeat was downloaded to Passap, program tech 179. The bottom of the swatch is knit single bed LX (slip stitch), the top is double bed, back bed set N/N, same tension throughout, the middle stripes are operator error in forgetting to make the lock change to LX on the front bed; the gauge is significantly and obviously different

Moving on to a birds’eye backing, the bottom starts the pattern with dark color, top with light (another operator error and a reminder to keep notes even for what may seem obvious); the black is slightly thinner than blue resulting in a change in gauge once again

The bouncing gauges certainly indicate some of the problems in maintaining aspect ratios in representational knits. The best solution may be to do a large swatch in the planned technique that is at least 100 sts X 100 rs in chosen yarn and then adjusting image aspect ratio before knitting the final piece, which in turn may be better done before conversion to final BMP and require repeating the process from its beginning.
For separations such as technique 179, and those by default in Japanese machines for 2 color DB, images must have an even number of rows in length. My original image crop was 73W by 85L pixels, so I had to shorten it by one row, which was actually achievable within WinCrea. The single bed FI swatch measured 7 inches in width, the double bed ones 12 inches at their widest point.
Last but not least, here is my friend Rocco processed via Hyperdither, Mac to PC, to WinCrea, to Passap and knit 150X150 pixels/ stitches
 May 24, 2019 a greyscale mode scaled image processed in ditherlicious online produced a sharper, far more defined image than my previous effort 142X146 pixels
for more Rocco “portraits” see post
GIMP and dithering color reductions for B/W “portraits”
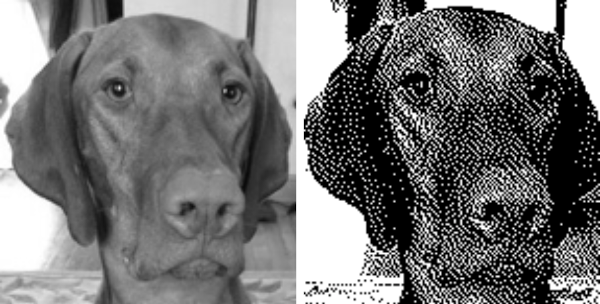
The many faces of Rocco: in my 2013 tests in Gimp, the image is 150 pixels wide by 154 pixels high 
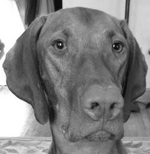 The image is used with the kind permission of Rocco’s owner. I have used this image before, when I posted previously on some ways to reduce colored images to B/W for possible knitting using a Mac computer, please see post on 013/03/14/ color-reduction- conversions-mac-os/. Gimp offers some alternatives to the familiar dithers and is available, free, for both PC and Mac platforms. Tutorial links on Gimp edge detection available online as of May 2019 are listed at bottom of the post.
Image_Mode_Indexed_ one bit black: immediate result, too dark

Threshold adjustments may not be made in indexed images to alter the above image, so it’s back to greyscale. Reductions to greyscale may be achieved through Image_ Mode_ Greyscale or choosing Colors_Desaturate_OK options. Desaturation offers additional choices
Image_Mode_Greyscale Colors_Desaturate_OK
 Rocco desaturated, in “knittable portrait size”
 using edge detection and its algorithms
 Difference of Gaussians


 what happens if in addition color_ invert is used with Roberts
 adjusting B/W with Threshold
 after a bit of “tweaking”
  Image_Mode_Indexed, rendering it “knittable in 2 colors”
  getting silly with filling the ground with pattern behind the floating head
2021: the latest, December 2020 updated version of Gimp for Mac OS
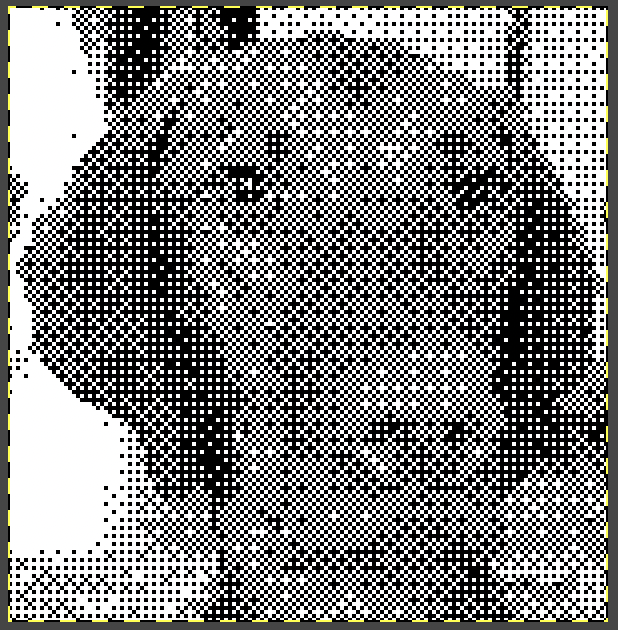
Gimp dithering controls easily accessible with mode changes to indexed 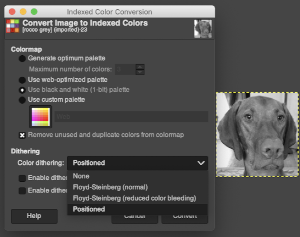 I found I got the best results adjusting the contrast in the original greyscale image prior to changing its mode to indexed and dithering (Floyd_Steinberg, normal)
 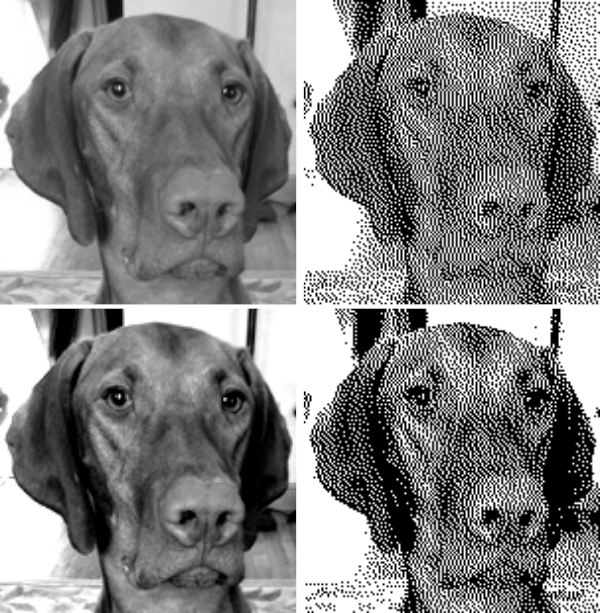 Dithering options in Gimp 2.10 may be found at the bottom of the colors menu
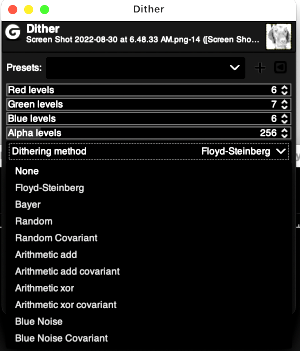 This filter can reduce the number of colors in an image by reducing the levels per channel (colors and alpha). Different dithering methods can be specified to counteract quantization-induced banding.
Presets are common features for many Colors commands.
Red levels, Green levels, Blue levels, and Alpha levels sliders set the number of levels for the respective red, green blue, and alpha channels.
Dithering method: can specify the dithering method to use
None: no dithering will be performed
Floyd Steinberg: the most commonly used method of dithering, and the default for this filter
Bayer: the algorithm is characterized by noticeable cross-hatch patterns in the result
Random, random covariant: use randomization of the pixel values to reduce the number of colors
Arithmetic variants are based on magic numbers and arithmetic
Blue noise variants are sometimes thought to be the least distracting
Random and new seeds are two random dithering methods.
When converting to indexed colors with the image unaltered, and using positioned dithering, the last option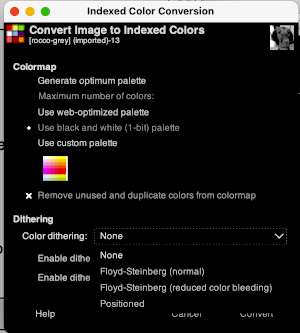
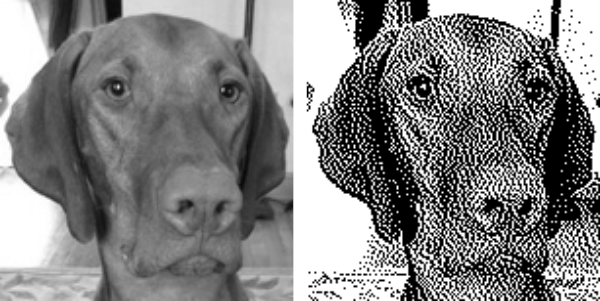
 Hyperdither: options offered
 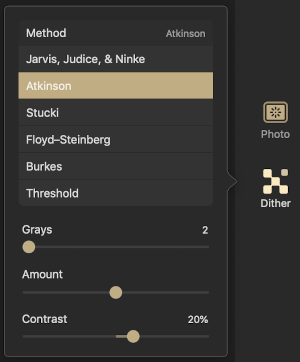 default Jarvis
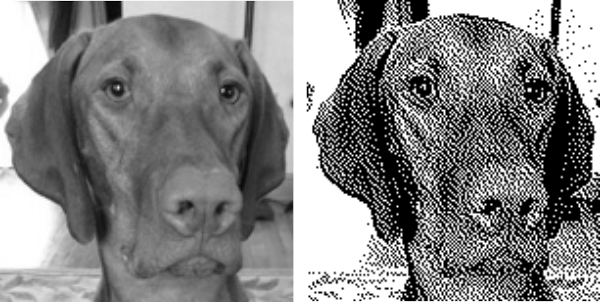
 default Stucki
 online, options https://ditherit.com
 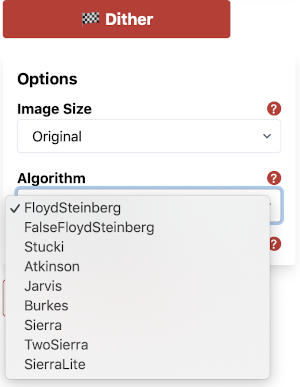 it is possible to choose from multiple palettes
 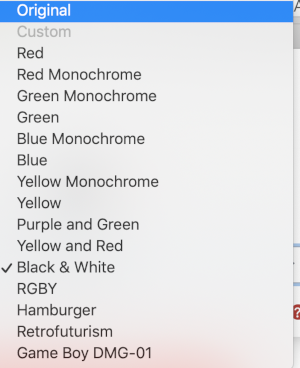 Sierra dither
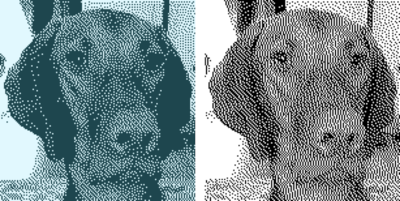
5/4/2019 Other than GIMP: after straightforward load, convert, and save, with no other adjustments, images shown in approximately 150 pixels/sts in width, no significant change results with conversion to color B/W indexed
http://gazs.github.io/canvas-atkinson-dither/
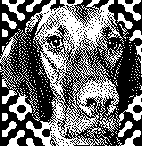
 online, default settings https://29a.ch/2016/08/04/ditherlicious-1-bit-image-dithering
 Check dithered results, downloaded images may be in RGB Mode. Prior to any knitting, they will need to be converted to B/W indexed.
Looking for ways to reduce the noise in dithered images I tried this conversion in XnSketch, using the photocopy effect, beginning with the colored image of Rocco, the results: 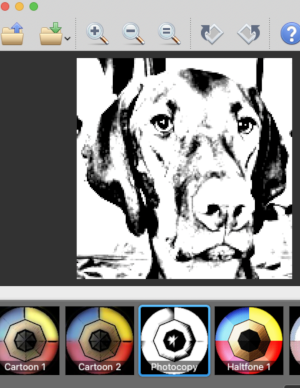 imported the result into Gimp and saved it in indexed 2 color BW and in turn, 3 color indexed mode, no color adjustments, finding the result pleasantly simple
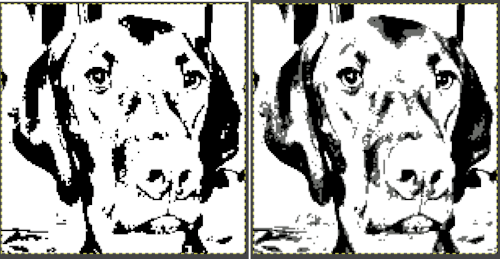
 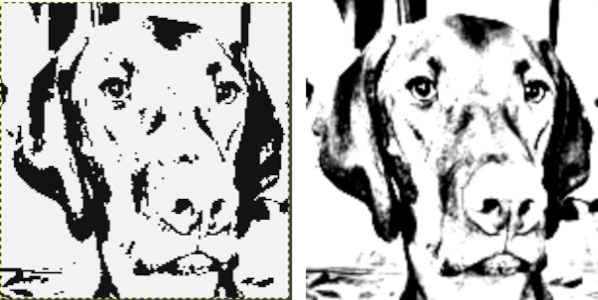 beginning with the greyscale generated image followed by Mode changes in Gimp, indexed 2 color BW, then indexed 3 color, there appear to be very subtle differences with a bit more detail:
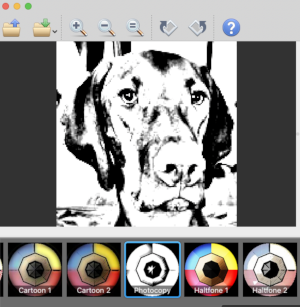
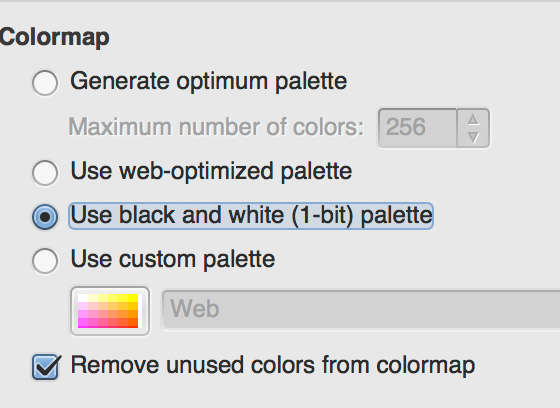
 Another online resource with an extensive array of dithering options https://app.dithermark.com. Here are 2 conversions using the app, the images are 2 color B/W. The presence of a third color is an illusion created by the difference in the distribution of BW color pixels, they loaded fine as viewed for knitting in Ayab, and in img2track, once I remembered to change its setting to 2 color knitting from the last used one at 4 colors
 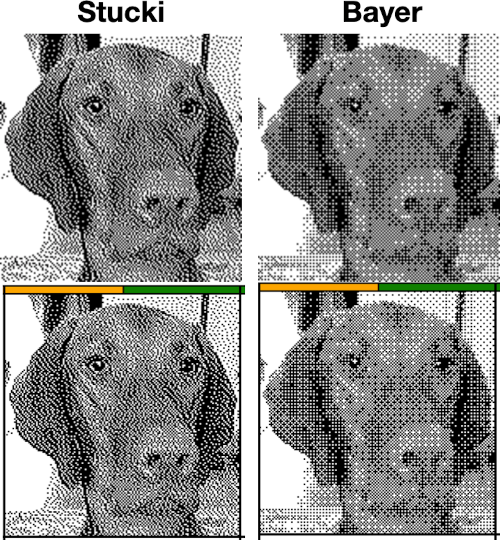 It is possible to reduce images to 4 or 3 colors using the program as well: a slider for color count is used to choose the final number of colors in the reduction. Again, these instances have no added manipulation
 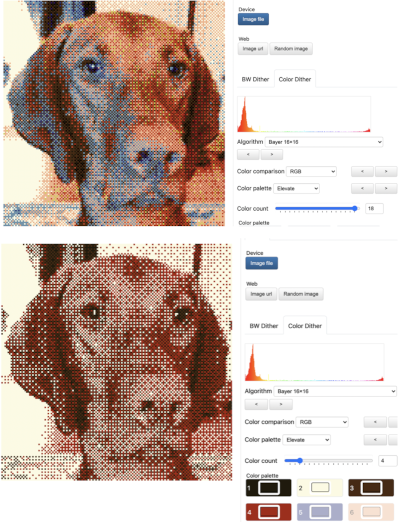 A series of dithers:
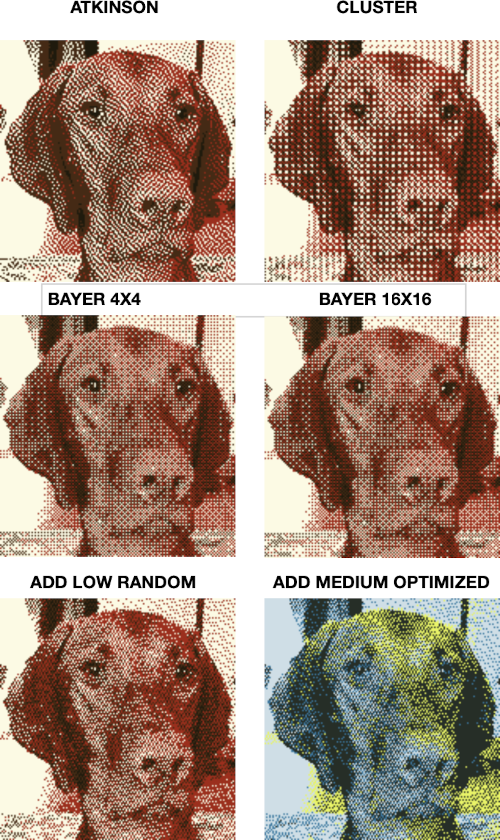 To retain the quality and size of the dithered image, download it, rather than using a screen grab. The software used to separate the chosen dither may alter the result somewhat. I am writing my posts using an iMac M1 with OS 12.0.1. At this point Ayab is not operable, img2track does open images, but in this case, with interesting distortions, and it does not download any files at all.
 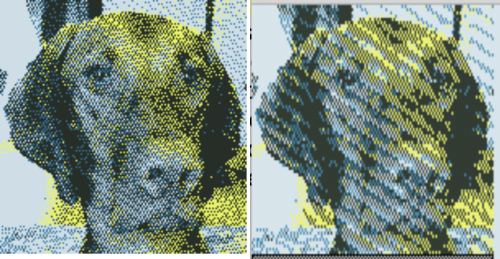 Yet another dithering tool, allows one to draw in dithering mode using a variety of patterns and will dither images. In the latter instance, there is no real opportunity to tweak or alter the result
 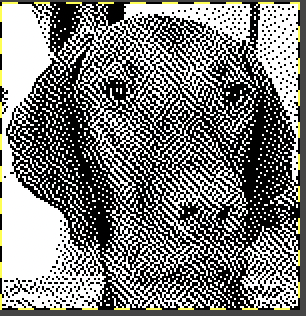 shapes drawn using a few of the large variety of offered patterns:
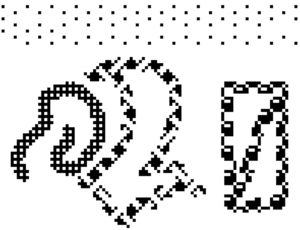
2023 working with pattern fills and removing any background 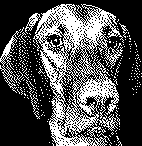
In this instance, a portrait of a dog wearing a sweater image was generated in Midjourney and scaled to 191X195 pixels.
Dithering online apps were used to reduce the colors in instants to 4, 3, and 2.
The greyscale image was also color reduced and dithered in Gimp.
All results were not adjusted further in any way.
Color reductions could be tweaked a bit further prior to actual knitting.
Magnifying the chosen individual result will help visualize the change in resolution quality of the image in the final knit piece. 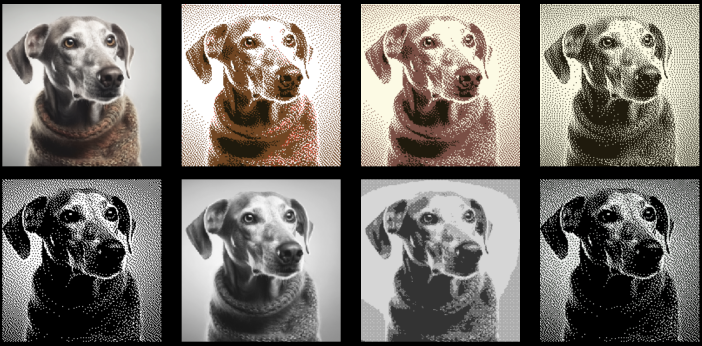
More GIMP charting 3
These are quick notes from some of my continuing experiments, not explicit how-tos or item patterns. Possible lengthening of designs dependent upon knitting technique is not considered; the “charts” were created keeping the aspect ratio of the original motif. The initial images are copyright free.
from scanned B/W source, 200 pixels X 227
 open document
Image_Mode_B&W 1 bit indexed_ Convert
Image Scale 200 wide down to 50

areas were “cleaned up” using single-pixel pencil, when satisfactory capture window with grid enlarged for working graph, or remove the grid, export in format for download

this is a partial repeat of a large black and white .png image

working with a smaller, random selection

Open image
Image_Mode_B&W 1 bit indexed_ Convert
enlarge, show grid, decide on the accuracy of repeat, when OK, graph or export and knit, no clean up required for this one

Filter_Map_Tile_magnifying result will test the accuracy of the repeat

the motif was a random crop, with obvious issues, more work would need to be done with the original image to isolate the proper section for tiling accuracy to occur
a multicolor image 143 pixels X 112

Image_Mode_Indexed _3 color (manual change from 4 to 3)
Image scale to 100 pixels wide
Enlarge for viewing grid and/or cleaning up; result yields 2 repeats that could be used 50 sts wide each, leaves could use a bit more detail
a partial image grab, pre any “corrections”

if color separations are needed for software that can superimpose colors and do the necessary color changer manipulations cues a link on color separations for screen printing provides some ideas. Another method
Tools_Selection Tools_By Color Select
Edit_Copy
Create new document the same dimensions
Edit_Paste
repeat for each color
the results: the flower is actually in the “wrong place” even with what appeared to be the same document settings

easier and “on the spot”:
Tools_Selection Tools_By Color Select
Click on color one (flower)
Edit_Cut
Fuzzy select, click on the screen outside of the image: the result

Re-open original image
Tools_Selection Tools_By Color Select
Click on color two (leaves)
Edit _ Cut
Fuzzy select, click on the screen outside of the image: the result

…
Double jacquard separations 4_ making them “work”
Working back to the repeat from post # 3 on this subject, I returned to the drawing board and edited the separations. Tetris is a tile-matching puzzle video game originally designed and programmed by Alexey Pajitnov in the Soviet Union. The objective of the game is to manipulate tiles, by moving each one sideways and rotating it by 90 degree units, with the aim of creating a horizontal line of ten blocks without gaps. The principle at use for the separated “squares” shapes is to achieve the same result for each of color separation groups (highlighted by dark borders in the charts), by moving them up and down, or changing their positions in the color sequence. The first method (beginning with only one row of ground color) has eluded me in terms of an “error free” result. More than one version consistently in a missing single stitch of color. The latest method shows the problem color “tiles” marked in dark ovals. The column on left is the original separation, A shows the juggled colors, B the pixels, squares, or punched holes for the repeat, and the far column on the right shows markings that may be used to track the color change sequences, which may be transferred to punchcard, mylar, or for any cues in change of sequence your program can provide. The swatch approaches the original intended design far more than any of the previous attempts. It is expected that the background color will be the majority or main color of the design; it gets separated out as first color. By splitting the knitting of most of the needles to the beginning and the end of the sequence (japanese 2 color default) this way, one supposedly eliminates the chance that the needles knitting the second row of each color will knit over, blocking a space yet to be knit in the first row of the design by a color that has not yet been knit. In this small pattern no colors knit more than 3 consecutive stitches at any one time. With some motifs the final alternative is to redesign the motif.

the test swatch (striping was the result of forgetting to set the KM for slip <—>)

Using the alternative method for decreased elongation of motif upon knitting, here are the working charts for beginning with 2 rows of color 1
 the swatch: got it!

my mylar sheet markings

A&B show my marks corresponding to color positions in the color changer, the first 3 repeats on left are the ones used to knit the swatches. Separations are suitable for DBJ, but I chose to knit trials in single bed slip stitch.
…
GIMP software 2
This is the method I used to achieve the “color separations” in the previous post:
File new: create in canvas size for a knit repeat: deleting the default 0 gives a working surface that is 64X40/ OK for small motifs
Change magnification to 1,000, hit return
GIMP Windows_Dockable items_ navigation will provide an easy slider to adjust sizing as needed
View: show grid, snap to grid
RGB mode
Draw test motif repeat, using the one-pixel pencil tool in B to draw, W to erase
The program allows for combining all items in one window, I prefer not to
test motif

Save the file in native format .xcf for backup and future changes
Use color markings to outline repeat

Adjust magnification with navigation slider if needed for easier editing
With crop tool, crop area within colored markings; menu_image_crop to selection

Use filter, map tile to view repeat in multiples- adding a 0 to both x and y pixel number values is an easy way to achieve that. The tiled image is in turn easily gridded if such a graph is required- simply go to view, highlight show grid, grab the resulting image, and save

If the repeat is satisfactory: back to image cropped screen, click within the window, go to file export menu, choose the file format, and save as png, BMP, etc for download, or simply screen grab the image in an easy to see size if punching a card or requiring a single repeat chart. I do not own Dak; GIMP does have a .pat read and save, but I have no way of testing whether files are in any way compatible between the 2 programs.
Most electronics are able to take the motif repeat and separate it automatically for a 2 color DBJ knit. If a separation for 2 colors DBJ is required for use with a punchcard, or for any of the fabrics already discussed one needs to return to the .xcf magnified document.
For the simplest DBJ separation, each row will break down into 2 colors, which in turn need to be knit with 2 passes for each color. This method is the one that is most likely to increase the lengthening of the knit image, but one that “always” works.
To lengthen the repeat X2, cropped repeat area needs to be converted to 2 colors or go to image, mode, click on convert
 Gimp 2.8.22: Image, mode, select Indexed
Open Image Scale window; use image scale tool, clicking once again on selected repeat area GIMP 2.8.22: highlight number you wish to keep constant
To break the aspect ratio and control one of the 2 values, click on the chain like symbol on right, it will appear “broken”
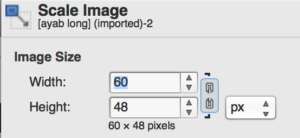 change the second value

Click on scale image. If the intent is to continue editing by using the pencil tool, the image mode needs to be returned to RGB before proceeding with editing.
Adjust numbers to the desired scaling, height doubled for the original repeat would be 18 pixels in length, here is the result

To separate the rows revert to RGB mode, unselect repeat area by clicking outside its parameters.
row 1/color 1 in DBJ needs to knit in the largest number of “squares”, so my color inversion will begin on design row 2, for color 2; because these are individual pixels, numbering is not possible; I use color guides for the row that need to be inverted and repeat outline, and use the navigation bar to enlarge for easy selection individual rows with the crop tool
After selecting the desired row with the rectangle select tool go to colors_invert, seen here for the first row of color 2, repeat for the length of motif. The result is suitable for use with double length KM built-in features and using the color changer. The black squares represent programmed pixels in download, or what is drawn on mylar/ punched in the card. 
If the double length of the separation is required: image _mode _indexed removes red and yellow squares, repeat process described above: select motif, use scale tool over the same area, scale image to 8X36. The caveat here is that one needs to be in the original canvas area: with a beginning canvas that was 64 X40, there is enough room for doubling length once more. Undo scale, use scale tool again, dragging upper and lower corners, keeping an eye on changing numbers in the window for scale tool, type correction to numbers if needed, click on scale, autocrop to selection for export in the desired format or screen grab and print to the desired size
 working with more colors, toward similar goals
adding colors: 3 colors per row motif, drawn in RGB mode

to make it the required triple length

resulting image when scaled to triple pixel height

the still manual color separation: whiting out unwanted colors in each row

double the length again

colored squares represent pixels in download, square in mylar, punched holes in the card
GIMP software 1
GIMP (GNU Image Manipulation Program) is an image retouching and editing program released as free and open-source software. There now is a Mac OS Mountain Lion compatible version. The downloads may be found here, and more links for features, supported file formats, help tutorials. One limitation is that for “color separations” to work by inverting colors one needs to reduce images to 1 bit B/W images, a definite advantage is the speed relative to working in spreadsheet programs. Another drawback is that one is using single-pixel designing, so adding numbers for rows and stitches in a particular format is not possible. My June 10th post on illusion knits illustrated an example in creating repeats for them, here are sample results/charts
quilting double bed (for more on the topic see May 30th post)


MOSAIC PATTERNS

 the accompanying swatch, which shows the difference in width resulting from using tuck setting <—> (top) and slip <—> setting (bottom)
 double jacquard

images of working settings and gimp windows for my separations


…
Illusion /shadow knitting DIY designs_HK
I have played with excel (and Numbers) before to create charts for various fabrics requiring color separations. My latest efforts relating to this knit group have gone in a different direction; I have also attempted to simplify the technique in terms of following the instructions for knitting them. This sample began with the use of Intwined to create the document and graphs. The first chart is set up with alternate row color striping, color 1=dark, color 2 = light. Blank-colored squares are used as knit symbols, and horizontal dash for the symbol for purl stitches. Beginning on light-colored, even-numbered rows, the design is marked in purl stitches.  On odd-numbered rows beginning with row 1, mark all empty squares in the even-numbered light-colored row immediately above it with purl symbols.
  All unmarked stitches throughout the design are knit, whether, on the “wrong/right” sides, all dashes are purled, patterning occurs on the second row of each color. To visualize the full pattern one may use the add row below feature to expand the graph (the chart below is missing the very first row).
  Now add the second row of each color and grounding stripe (s) at bottom of the repeat. Most patterns will start the illusion immediately after casting on with dark color, row 1 above. I was interested in my sample having a border of sorts on its top and bottom.
  The resulting knit swatch
  shadow side
 Intwinded had the capacity for building row by row written instructions for patterns, but there were discrepancies on some rows for these charts, and I opted not to include them.
Note: the program quickly became buggy, unsupported, and unusable on the Mac during the remainder of 2013.
Another program I have just acquired and begun to use is GIMP; it is free, and now also available for use in Mac OS Mountain Lion. Both Gimp and Photoshop make it possible to design using single-pixel pencil and grids to build motifs from scratch as well as gridding of preexisting images. I have a different method for these fabrics using GIMP, which is easier for more complex, overall shapes. The same series of steps may be used for mosaic knitting (the color inversion sequence is different). Below are images generated for a different illusion pattern, I will share my “how-to” for designing the motifs later, referencing mosaics and mazes. To achieve such motifs one is drawing in magnification of multiple hundreds and more, there is no way to number within a one-pixel space, so these charts as generated are lacking numbers for stitches and rows, one drawback. Another is that this color inversion works only in black and white. One advantage: the proper repeat may be cropped and saved with the grid removed in various formats that may be used to import to various machine knitting download programs, and gridded may be used to establish punchcards or mylar repeats. Screengrabs of magnified charts were saved, and are shown below. Black squares represent purl stitches in the second row of each color. The first row of each color is always knit, not represented in these charts
The red squares are guidelines for no color inversion rows, the yellow ones isolate the repeat  the actual repeat
  color inversion begins on row 1 and follows every other row (if numbered these would be odd rows)
  testing the repeat through filter/ map/ tile
  a working chart that can be printed to suit with dark/light row markings and blank squares for tracking knitting rows in the execution of the pattern
  A larger version with stitch and row counts marked. The chart represents half the rows in the actual knit. The cast on row counts as knit row 1, color 1, and following the chart beginning with row 2 knit the black squares and purl the white squares. *Change color, knit one row (odd#), on the next row follow the chart, knitting the black squares and purling the white (even#).** Repeat from * to **.
 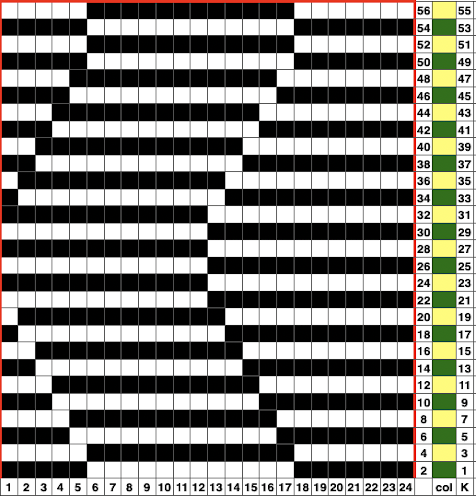 the knit swatch: “shadow side”
  its reverse side
  for online tutorials, patterns, and inspiration see Woolly Thoughts
Feb 18, 2017, I have recently become curious about creating illusions such as these in crochet, am developing ideas, and returned to this chart. The image below is intended to have symbols and notes superimposed on it. It shows the tiling in a different way, so I thought I would add it to this post as well. Repeats are highlighted with darker borders. The repeat on the right needs to be trimmed if the goal is to achieve matching edges. Row counts on the right would differ in knitting, the plan is to execute this pattern in Tunisian crochet, which handles rows in a very different manner than knitting or standard crochet. 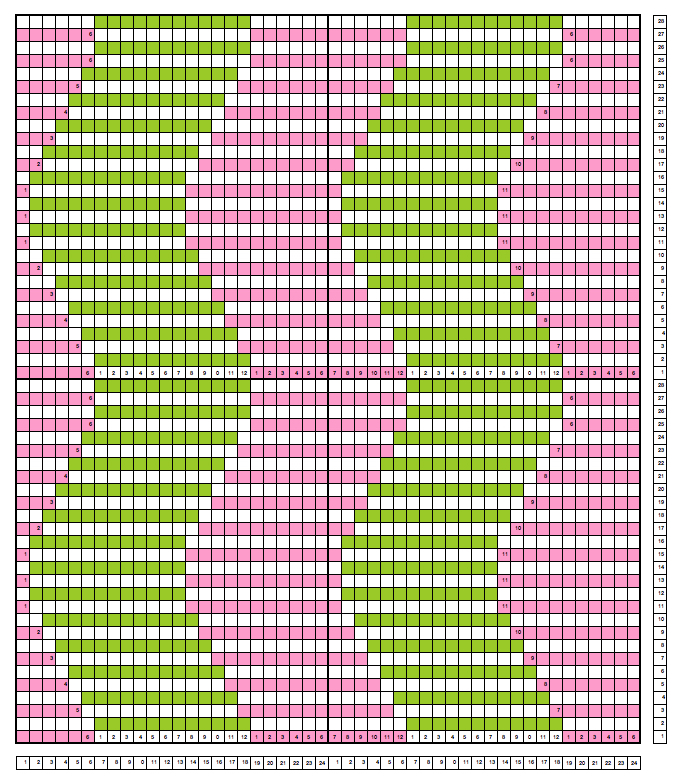 Follow up: 2017/03/06/illusion-DIY-patterns-in-crochet/
2/2019 from the first in a series of posts on geometric shapes on ribber fabrics using tuck settings, a mock variation with the ribber set for knitting in both directions throughout, and the main bed set to tuck in both directions: 
Multiple downloadable pngs for optical illusion designs may be found in the 2023 post on Developing tiled repeats suitable for multiple stitch types, including tuck
2024 the process described in More separations for various knits using Gimp, color to alpha was used on this file, beginning with the 24X28 PNG ![]()
 The initial separated design, also 24X28,
 ![]() tiled X6,
tiled X6,  rendered double length to 24 X56 for knitting with color changes every 2 rows
 ![]() tiled X6
tiled X6  Developing a circular design using the same approach
  a 24X24 repeat
 ![]() color separated 24X24
color separated 24X24 ![]() double height 24X48
double height 24X48 ![]()
 A single row height brick repeat, developed in ArahPaint, also 24X48
 ![]()
 double length, 24X96
 ![]() its half crop companion, 48X24
its half crop companion, 48X24 ![]()
 double height, 48X48
 ![]()