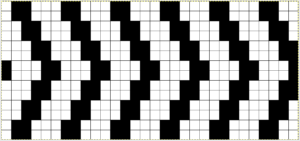
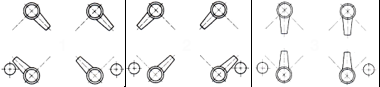
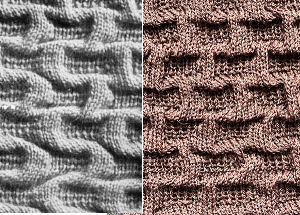
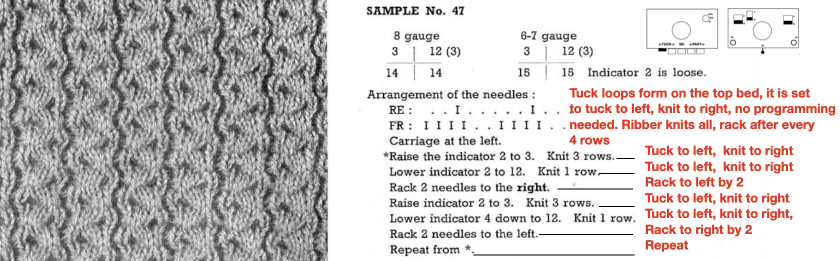
4/23/18: inspiration source is from a Russian pin, bottom left #198
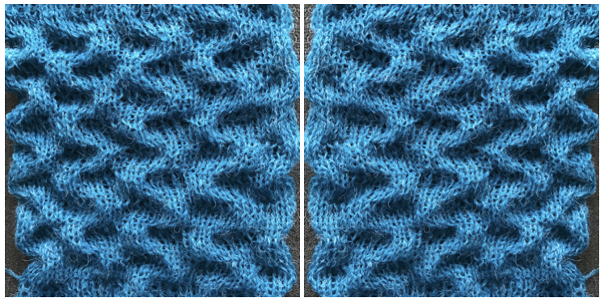
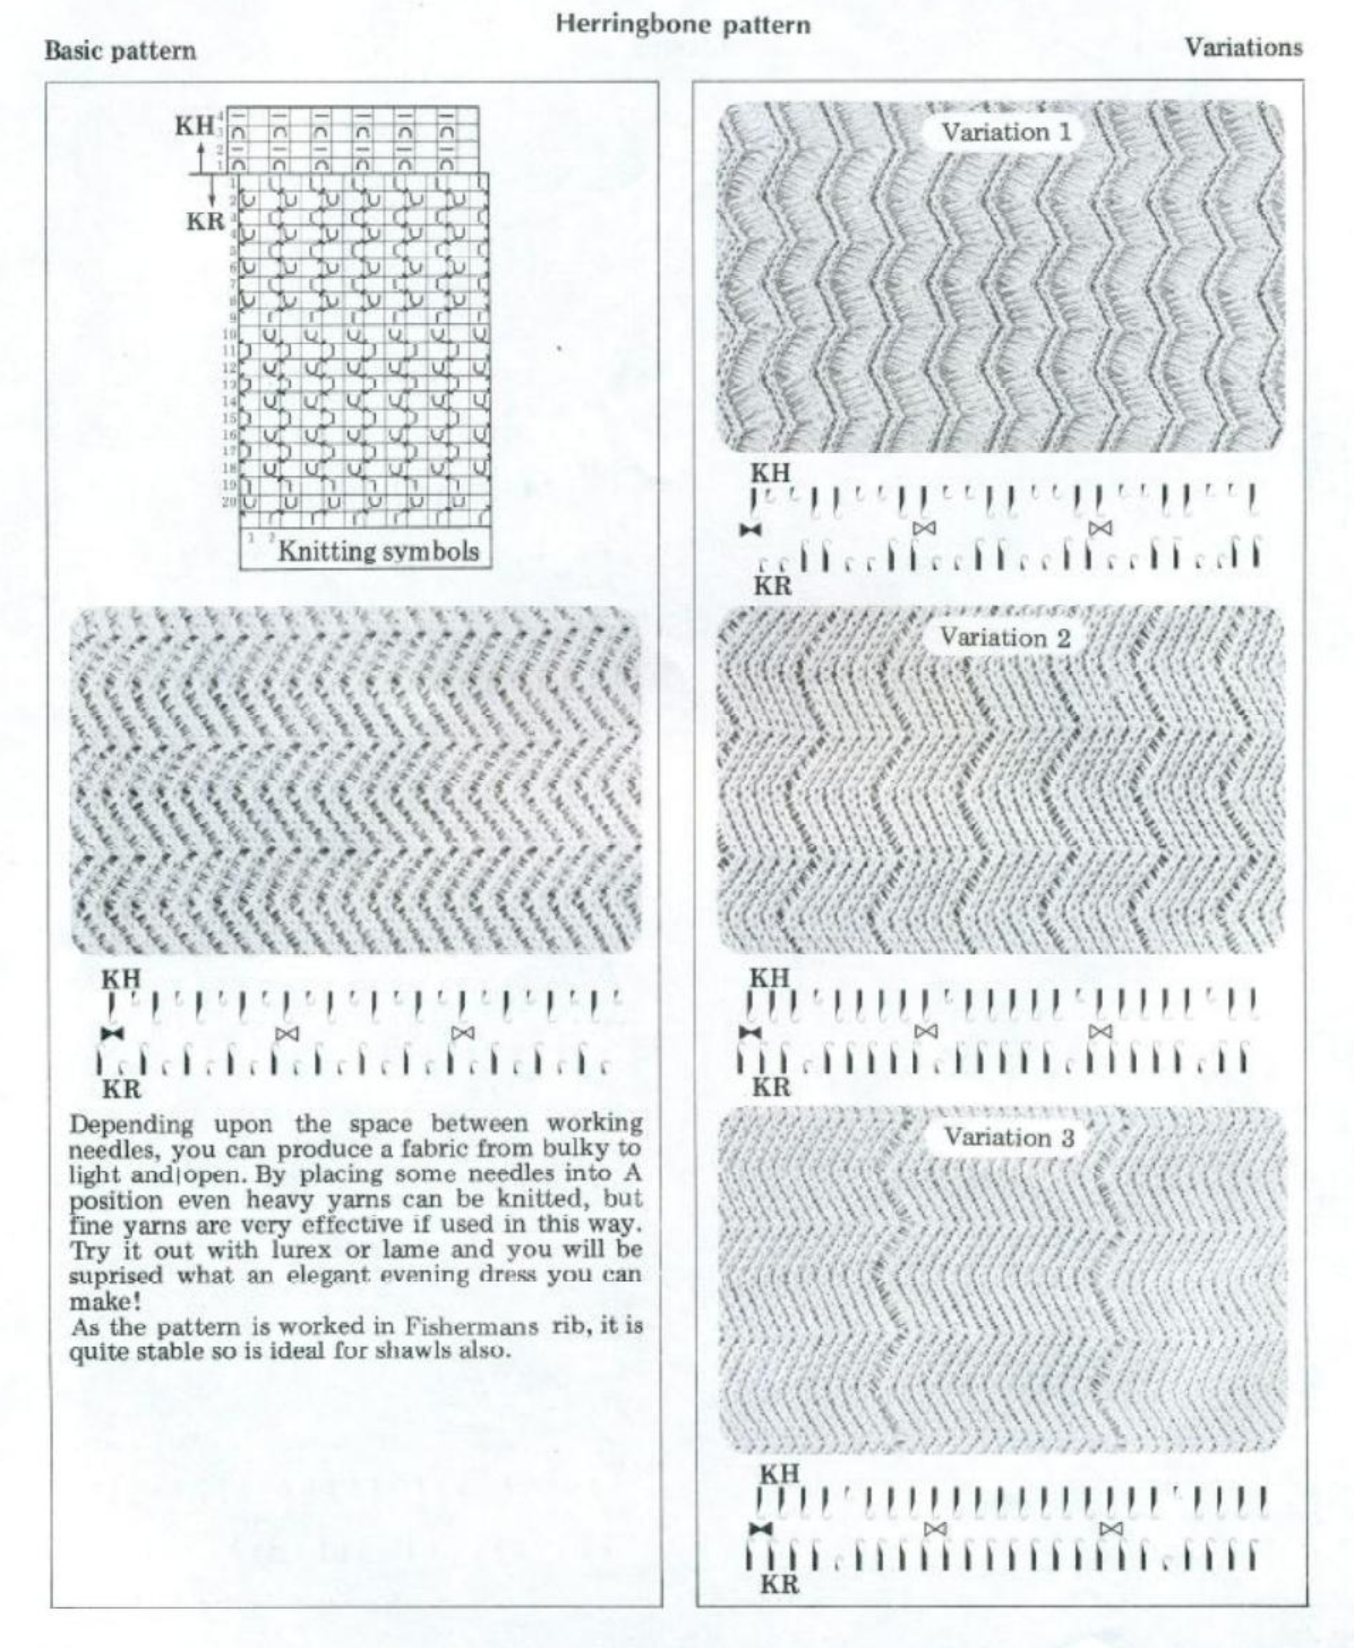
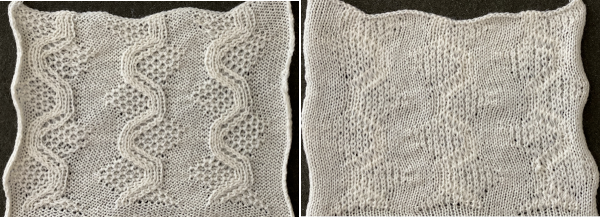
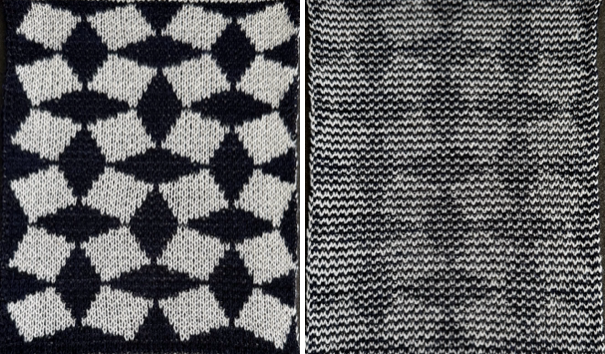
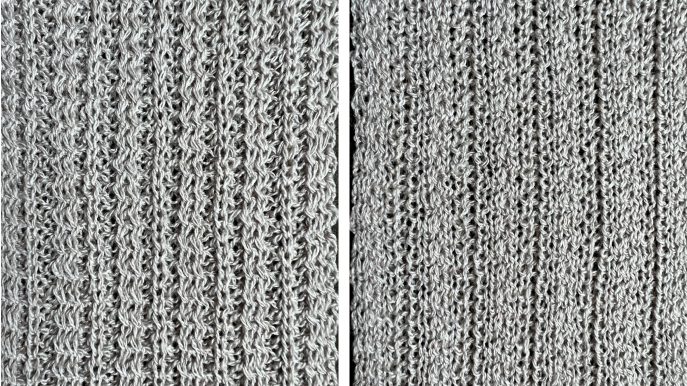
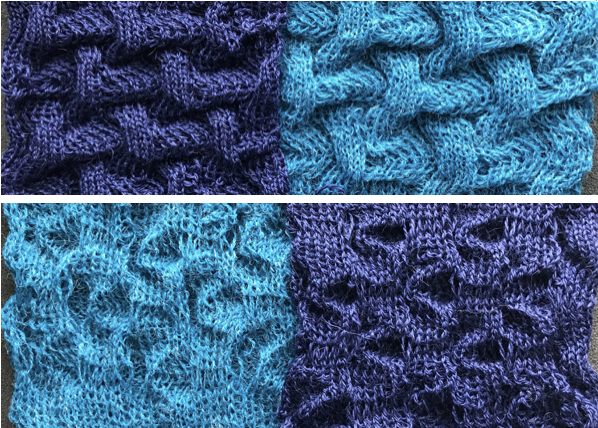
The first swatch, produced with manual selection, and varying the number of rows between racking to establish yarn tolerance
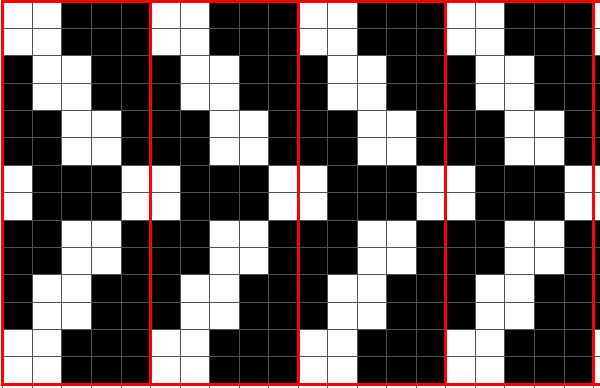
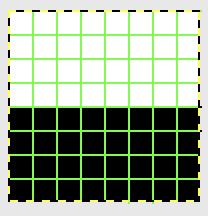
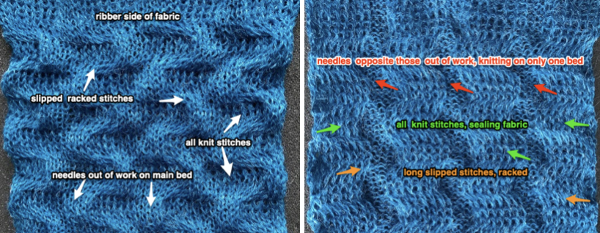
There are single rows of knitting on both beds, so the option of using 2 knit carriages is out of the running. My test swatch had the main bed doing all the knitting, the ribber knitting the joining segments with manual changes in its buttons from slip to knit and back when appropriate. The staring needle arrangement, on “graph paper”, and the subsequent racking positions: the top illustration is for racking position 4, the bottom for racking position 0.
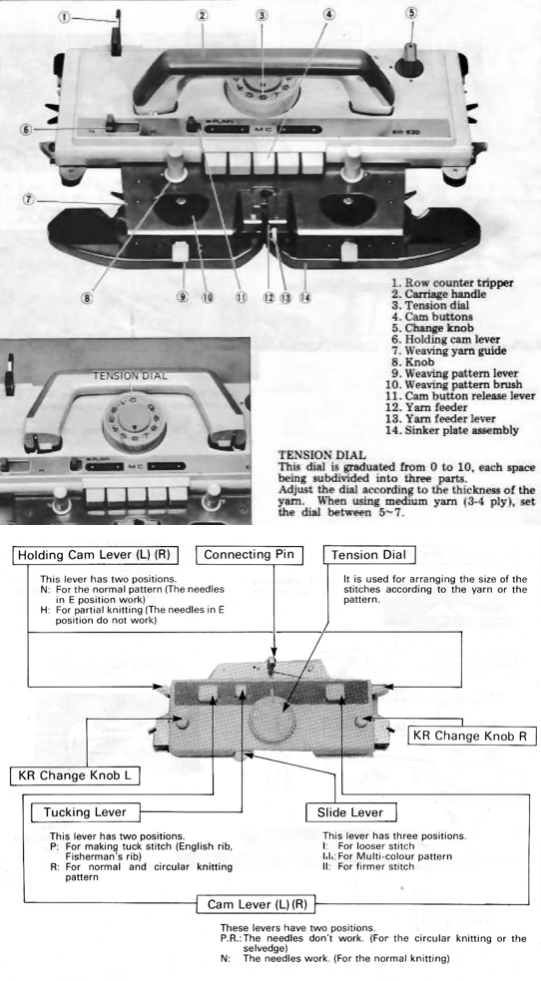
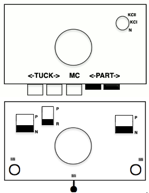
 A tentative plan of attack: the combined knit and ribber carriages are to be used throughout. The main bed KC is set to knit, but the change knob is set to KCII. The blank squares will actually knit thanks to the setting, the selected needles will indicate the direction in which racking is due to take place prior to knitting the next row.
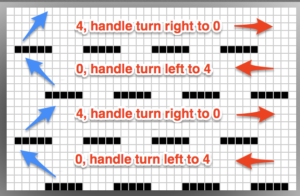
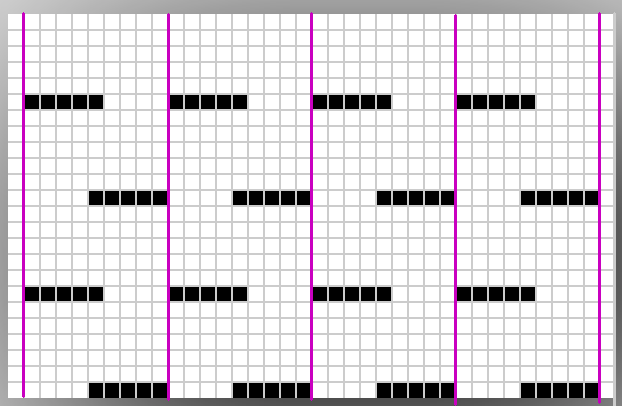
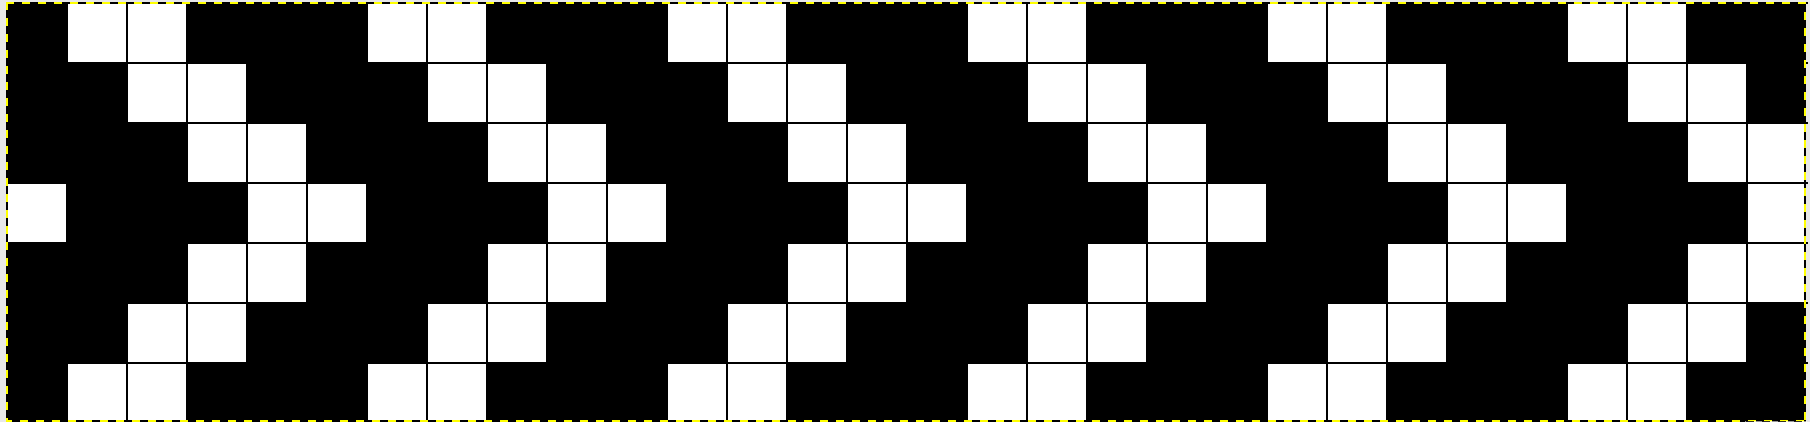
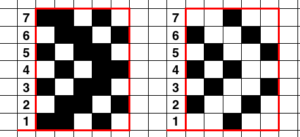
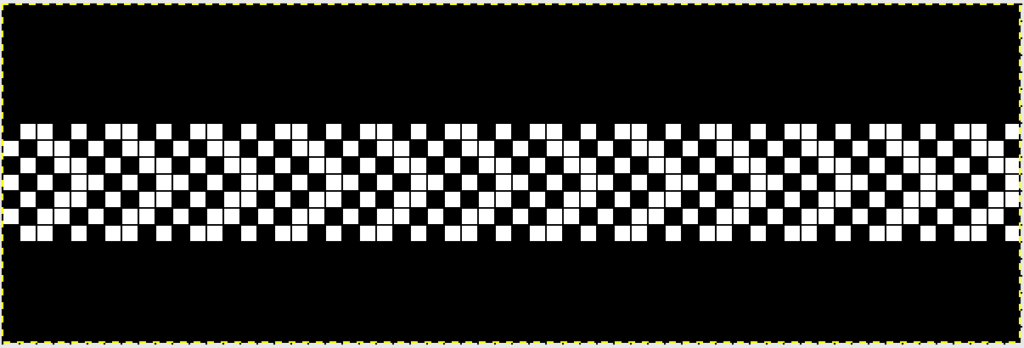
This is the starting ayab repeat, with single repeat segments highlighted (one alone would be adequate for most other electronics). 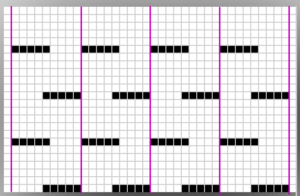
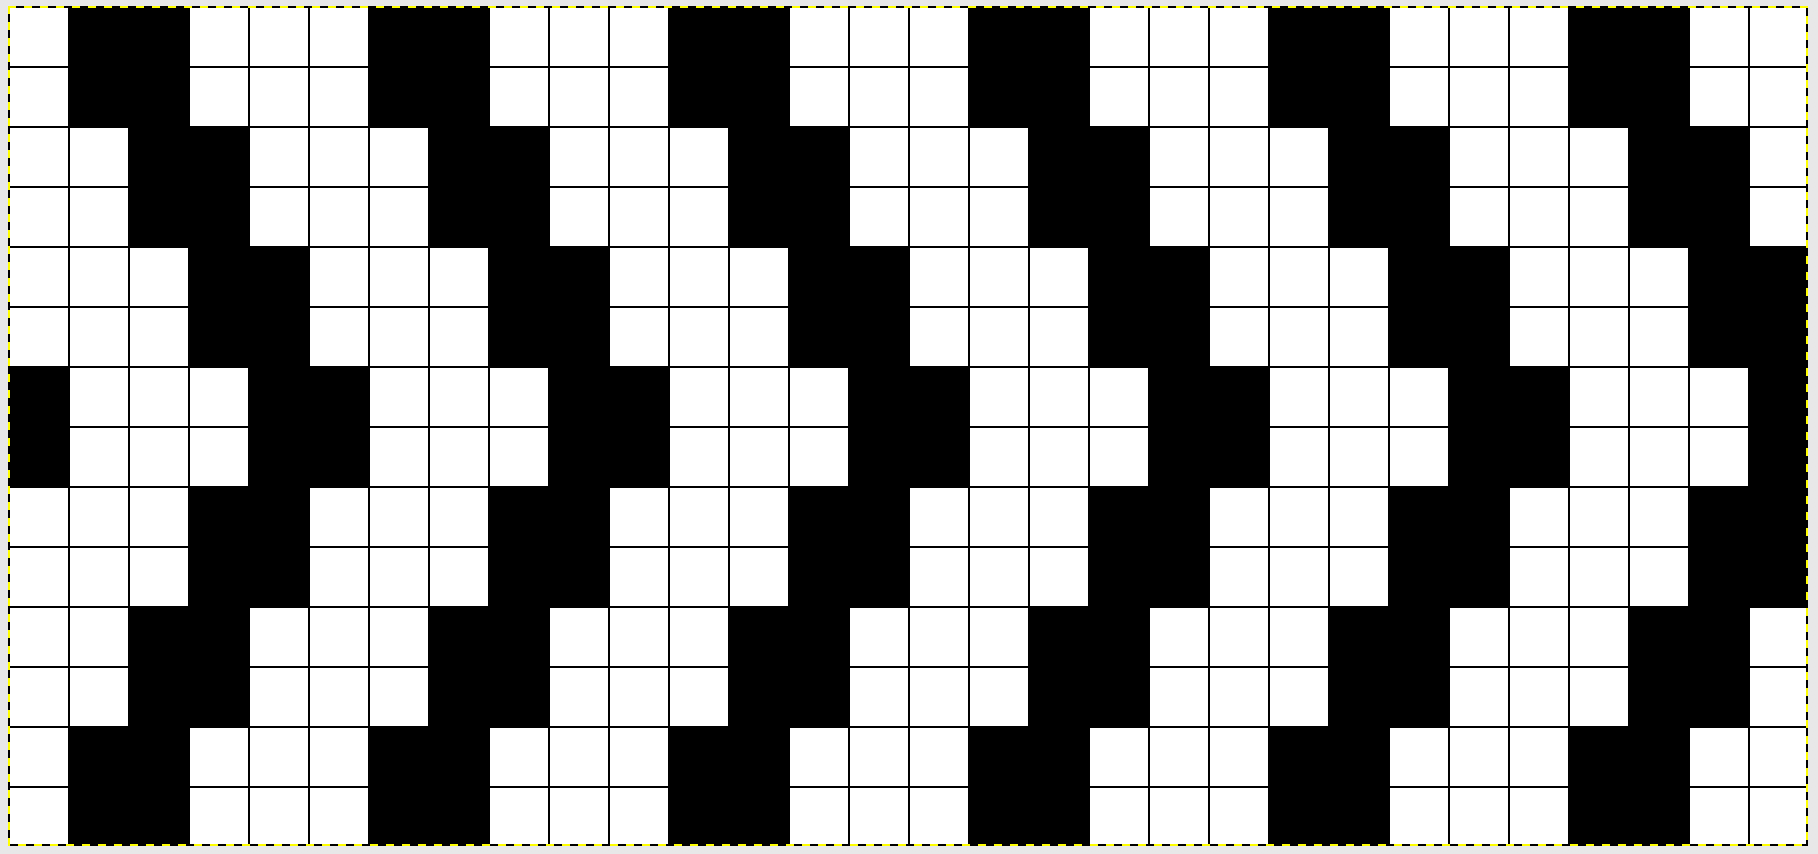
You will be working on the purl side of the knit. In what is an increasingly irksome feature to me, Ayab will automatically mirror horizontally any loaded image, so to get the above, you need to actually be either mirroring the image prior to loading it (my preference), or remember to do so through Ayab’s actions after. Enter this,  the ayab screen shows this
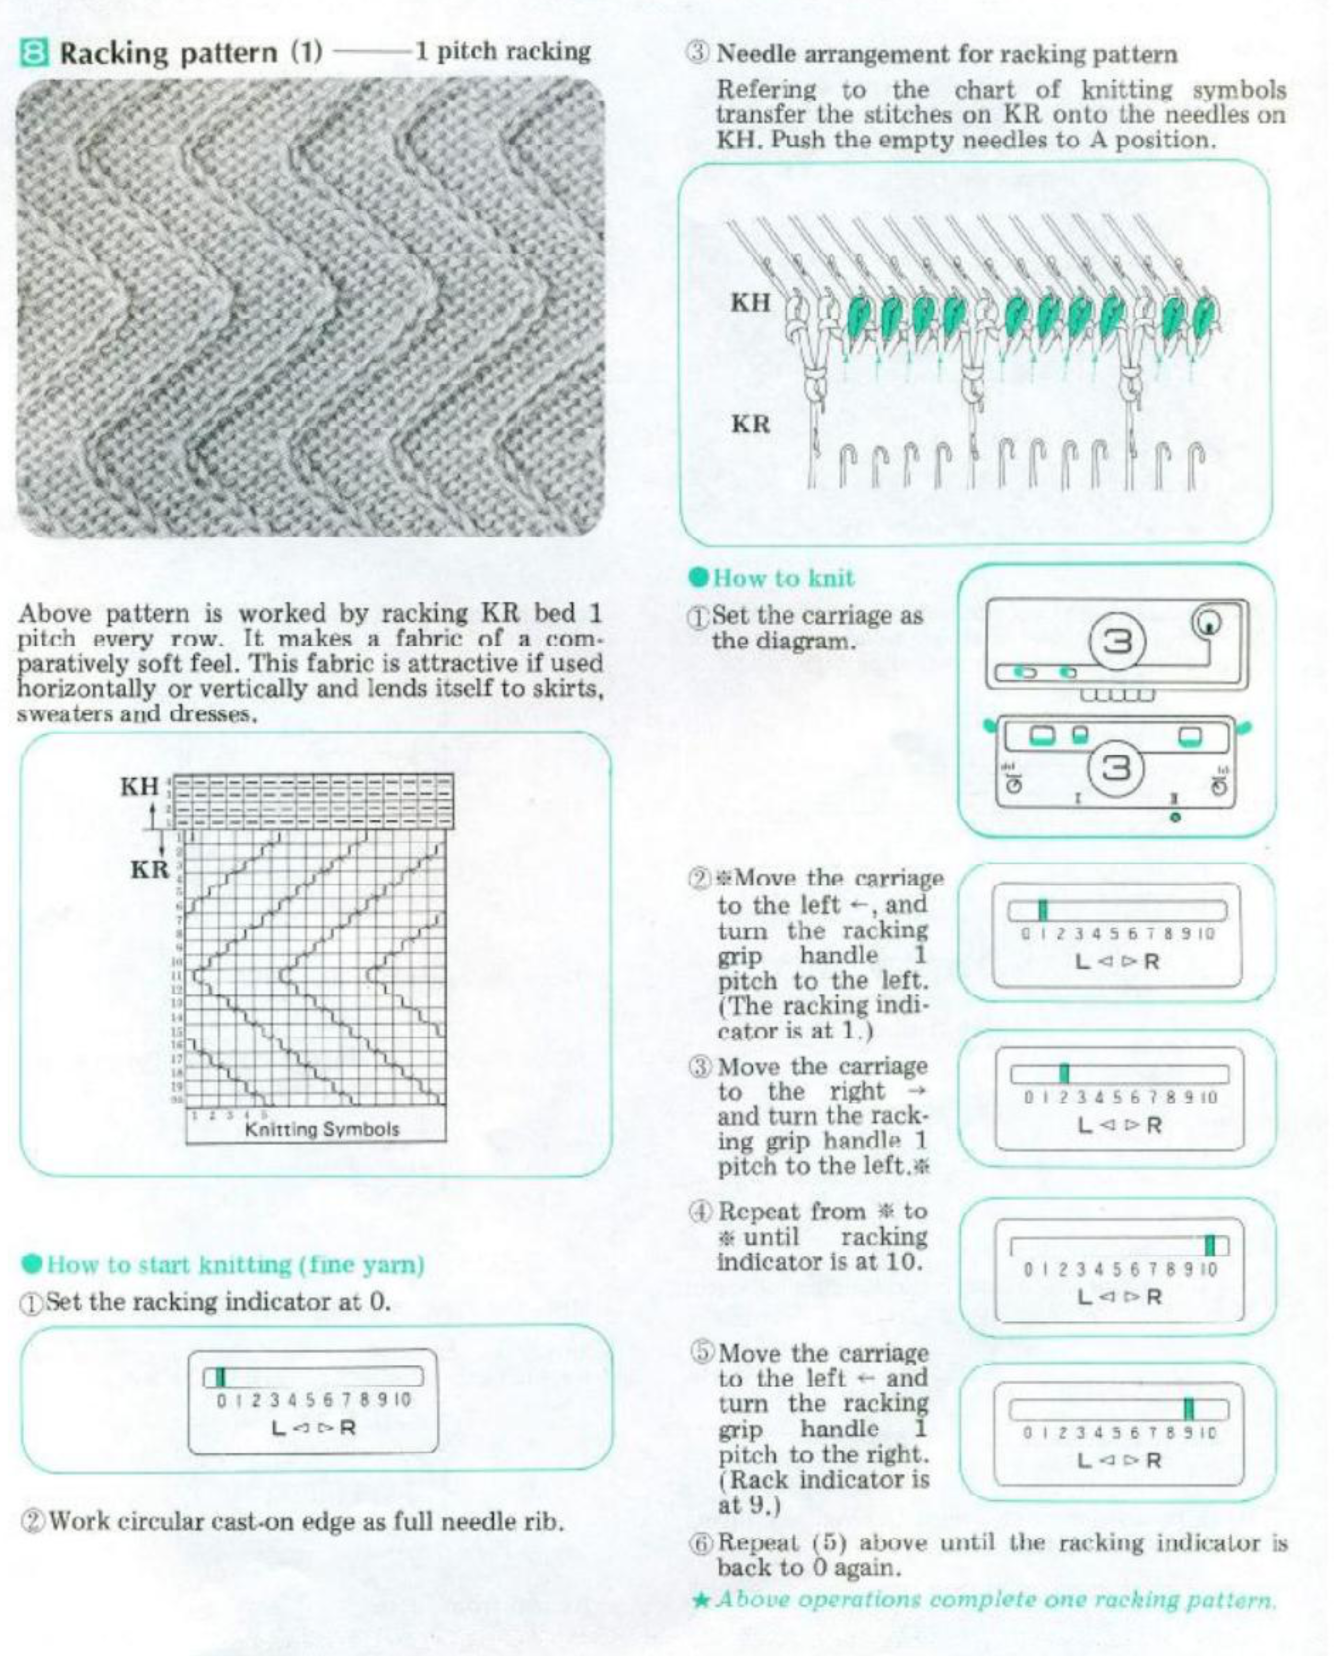
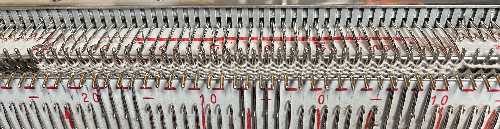
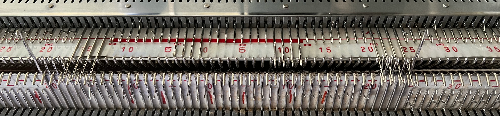
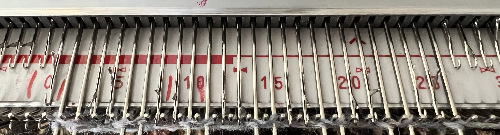
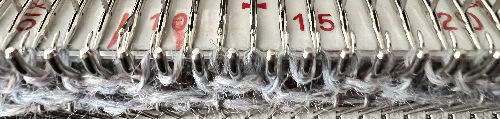
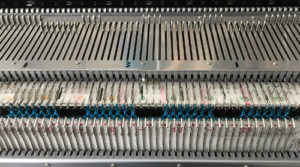
This is what appears on the left side of the Brother ribber. I prefer to rely on other methods to track directions and numbers of positions in racking, but the ribber itself provides some clues. My pitch lever will not move all the way to H, but that is made up for in the ribber adjustments, so it is not a problem. A reminder: turning the racking handle to the left is toward increasing numbers on the indicator, to the right is toward decreasing numbers 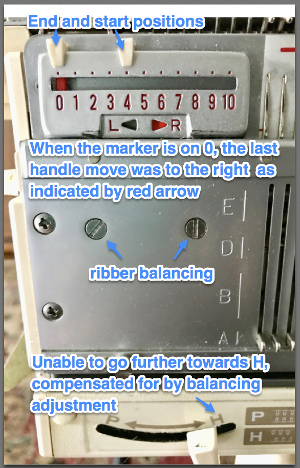 The set up for my swatches, and the first row knit on racking position 0.
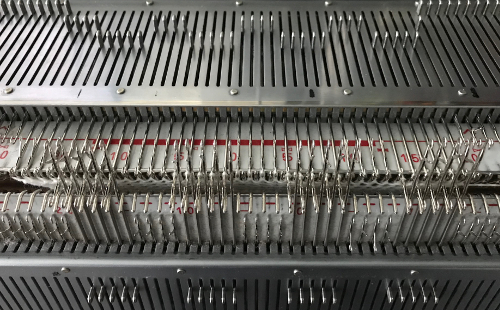
The first preselection row in Ayab knits above needles on both beds. With carriage on the right, set the ribber to slip <– –>, and knit up to the next row where needle pre-selection appears. *Change the ribber button on the side to match the direction in which you will be moving the carriage (left if knitting to left, right if knitting to right) to knit from the slip setting, knit to the opposite side (no more needle selection), change ribber lever back to slip again prior to any more knitting.** Repeat * to **. Position 4:
 I began to run into issues with ribber stitches being too tight, this was knit with a tension adjustment, resulting in a less defined texture
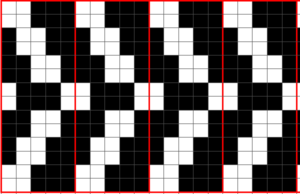
Going a different route: another repeat, with each position, repeated once, repeat is pre mirrored


 a swatch with the racking happening only in the center of needles in work
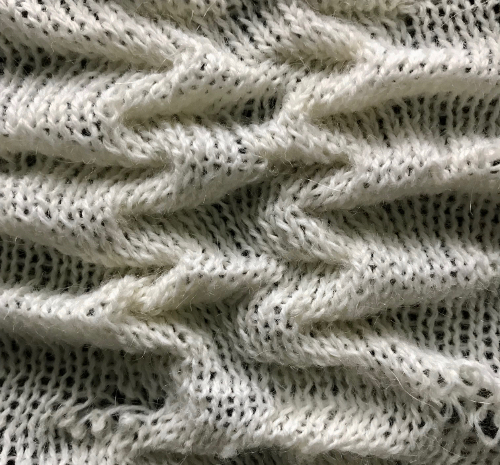
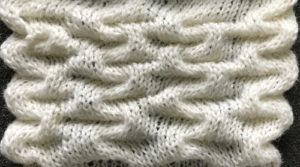
Starting position can be variable. With more stitches cast on, while keeping the same ribber configuration, racking can happen further to the right or to the left. There need to be enough stitches on the main bed so ribber needles do not travel beyond them when racked. The knit bed uses tension close to that used for stocking stitch. The ribber stitch size may need to be adjusted to allow for a wider move toward either side. A looser ribber tension results in a less sculptural surface on the knit side. I have seldom been able to knit more than 6 rows on the main bed with ribber combination stitches on Brother, often maxing out at 4 depending on the yarn. Consistent habits help develop one’s own most meaningful reminders for taking action.
5/12/18 2 more samples. This time racking is done by 3 positions, the ribber setup is with 3 needles out of work, and 5 in work. Set up is with the racking handle on 3, move to and from positions 0 to 3. Knit 4 rows single bed. Rack to the next position. Use ribber set to knit for 2 rows for the sample on left, for a single row for the sample on the right 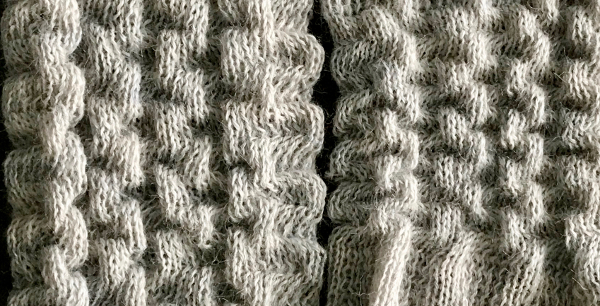
A printable “rib setup” to aid in charting P and H needle configurations, with some space for notes and carriage settings
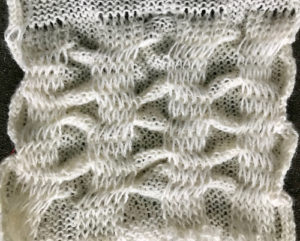
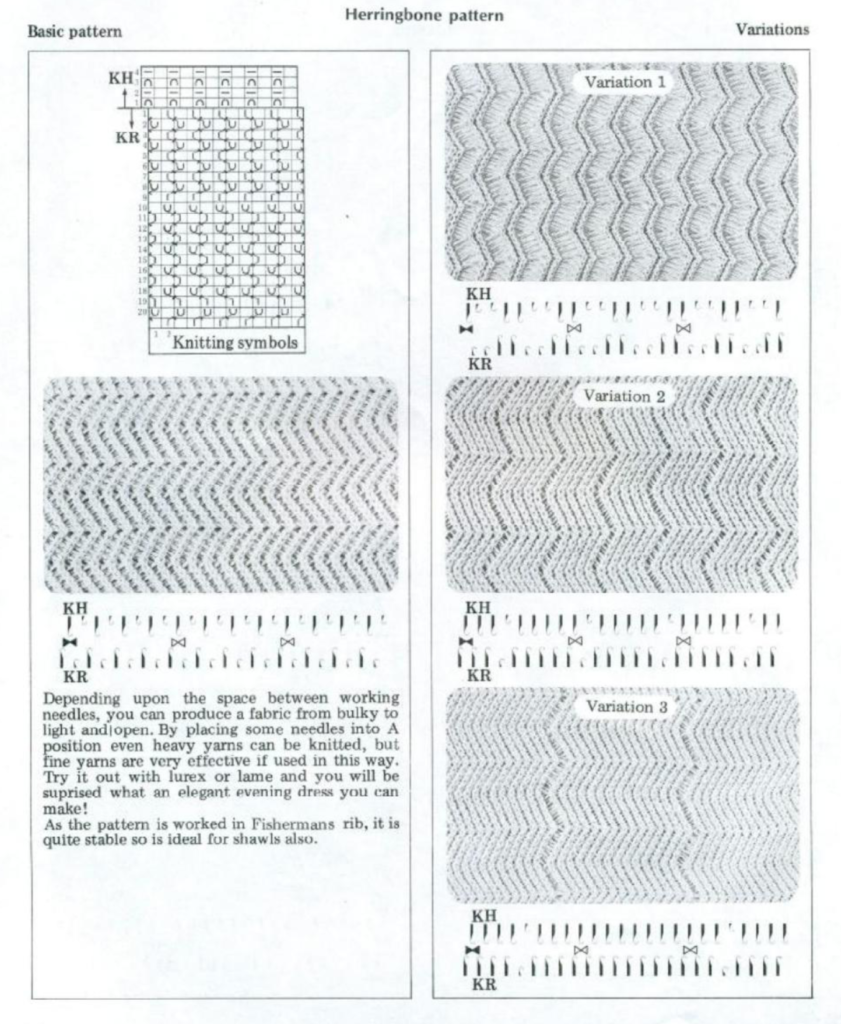
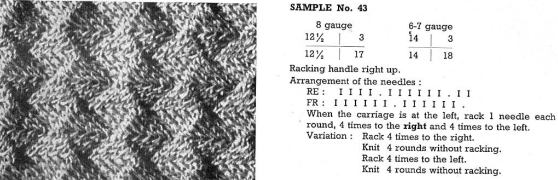
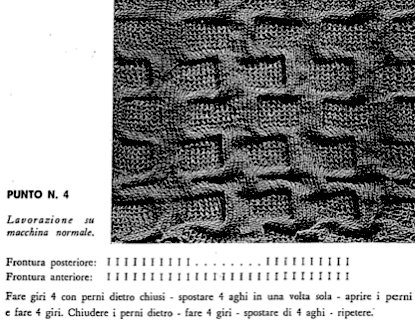
5/8/18 This is from the dubied knitting machine pattern book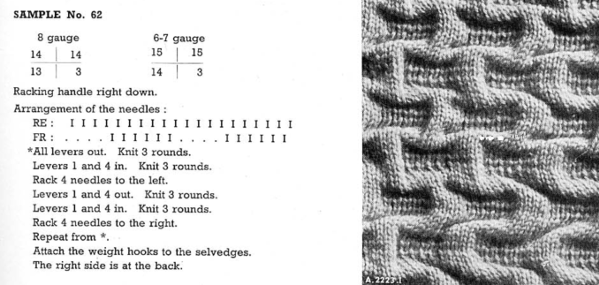
My step-by-step interpretation, which may be worked as a hand technique on any machine
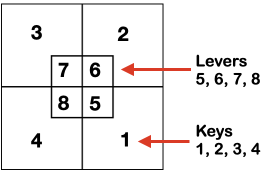
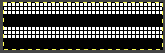
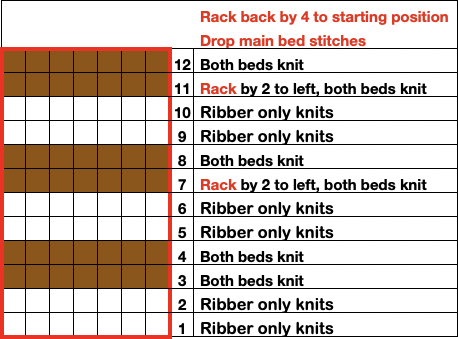
1. racking handle on 0, cast on for every needle rib
2. transfer stitches to the main bed to match the needle arrangement above, and knit 3 rounds
3. set the ribber to slip in both directions, knit 3 rounds
4. rack 4 to the left, set the ribber to knit, knit 3 rounds
5. set the ribber to slip in both directions, knit 3 rounds
6. rack 4 to the right, set the ribber to knit, knit 3 rounds*
repeat steps 3-6
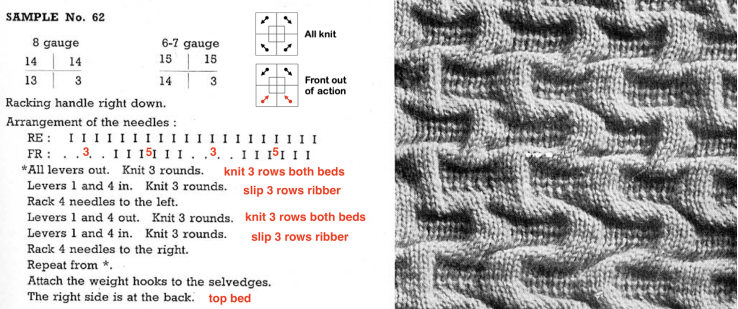
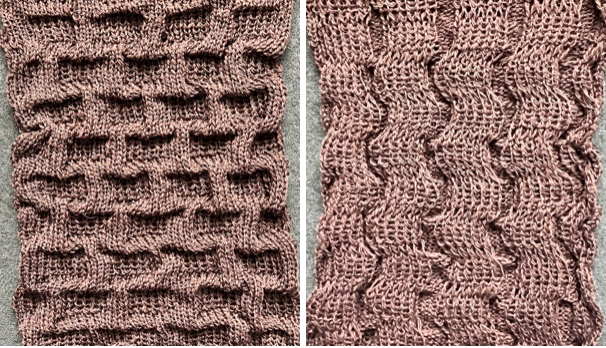
The resulting swatch 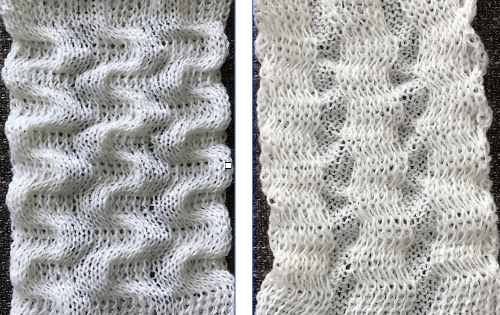 For a different method of knitting this same fabric, please see Combining knit carriage needle selection with racking 2017
The Brother Ribber Techniques book provides guidelines for variations on this stitch type, the following among them. It is available for free download online from various sites and is an excellent resource
These images were shared on Facebook, they are from the Empisal ribber stitch book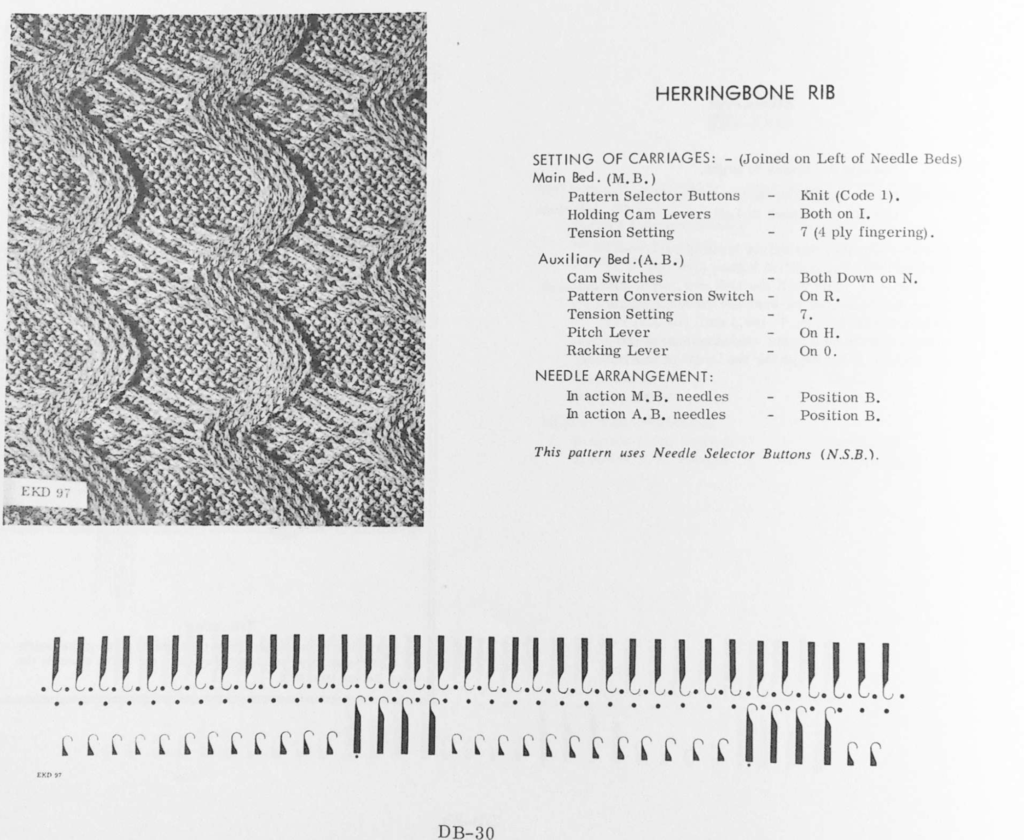
 I have worked with racking in the past but never attempted to have racked shapes interacting with single bed patterning across the width of the piece on the KM. My 910 is presently connected to a Mac via the EMS Ayab kit. Sampling is quick and easy, replacing the mylar. One critical difference is that the repeat used must match the pattern in width numbering the same as the needles in use for the piece, so at least for testing my initial repeats were 30 stitches wide.
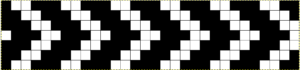
I find trying to chart things out before I actually knit helps me plan and understand what actions I need to take. Mac Numbers is my go-to for charts for the moment. Here a random slip stitch pattern is put on a knit ground that takes into consideration possible racking positions, with the ideal position for reversing the bend at the center of the chevron pattern. With a bit of planning, punchcard markings or even mylar ones may be used to help with tracking racking numbers for accuracy, but that appears lost using Ayab software
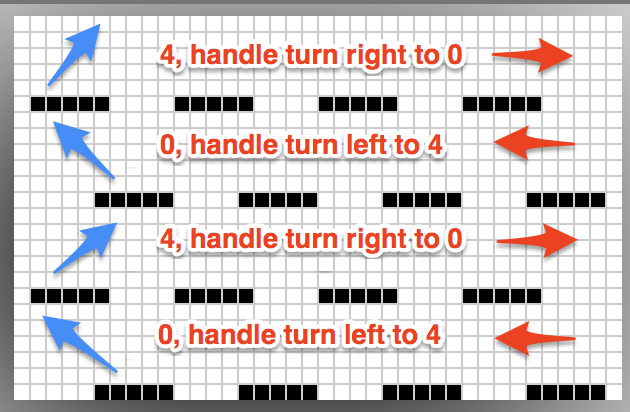
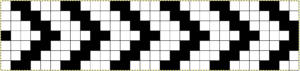
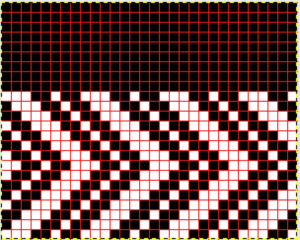
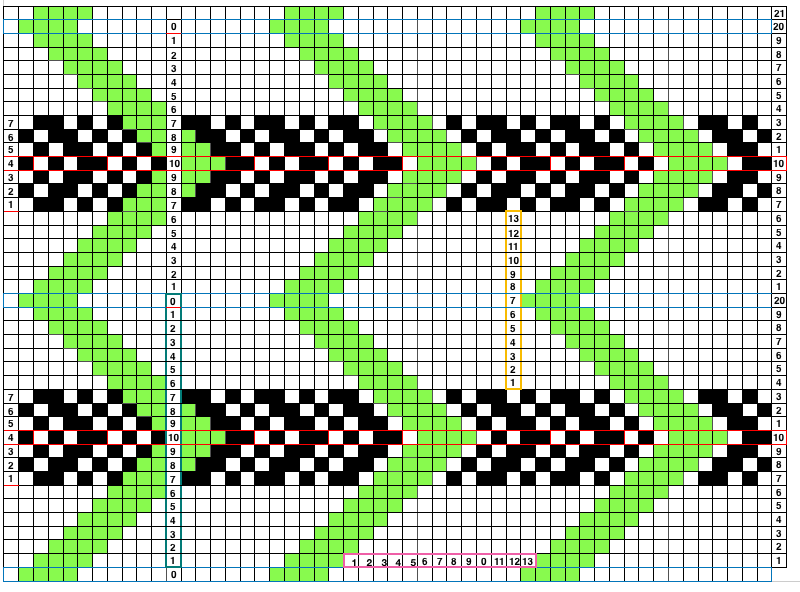 When planning for racking within the width of a piece, the racked columns will extend beyond the vertical edges of the knit. Since this is not about having zigzag edges but keeping the design within the body of the knit, the starting point and spacing for your ribbed stitches matter. Brother racking handle is numbered from 0 to 10. The numbering and direction of movement vary between KM brands. If you begin at 0, you are only allowed to move the ribber to the left, if at 10 the ribber only moves to the right. So that said, the racking sequence in the above illustration should be reversed, traveling from 10 to 0, and back. The green squares represent the direction in which the ribber stitches are moving, and the numbers in the column on the right represent racking handle positions.
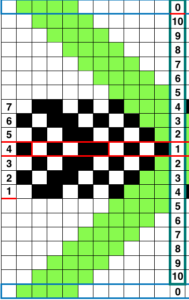
I found this slip stitch repeat produced too little detail in my swatches, but were it reduced for mylar use, it would remain 7 stitches high. It was taken from a punchcard book, so black squares/punched holes represent knit stitches. To match the fabric, in mylar use, the color reverse would do the job. The Ayab kit bypasses both the mylar reader and the programming capacity of the buttons on the left, so double height, double width, color reverse, etc. including the DBJ setting are planned for in the file import into the software. In some instances, Ayab settings (ribber for DBJ, and “circular”) do the work for you. I am using GIMP to create my BMPs. Paintbrush is a free program, still available for Mac, and functional including in High Sierra. It is the program used by some forum members to create their repeats, providing an easy alternative for people who not be used to working with image editing programs.
the slip stitch repeat in its original state: because slipped stitches create their texture on the purl side of the fabric, images do not need to be mirrored for the direction of the texture to be matched using electronic machines
 If the goal is to have the machine take care of keeping track of knit rows for you, without having to make changes in cam buttons, in the mylar a single repeat with blank squares programmed at the top and/or bottom of the repeat could then be knit using color reverse. Here the situation is similar to that of punchcard users who need to punch a hole for every knit stitch but considerably faster. If the original pattern is satisfactory, planning for all knit rows as automatic needle selection can be done by color reversing the pattern in the software and adding all black rows in the image for download.
 some other all-over variations to try, individually, or even sequentially for slip stitch all-over texture
 the first tests, for the various slip stitches, nothing quite “there” yet
 this is getting closer to the goal
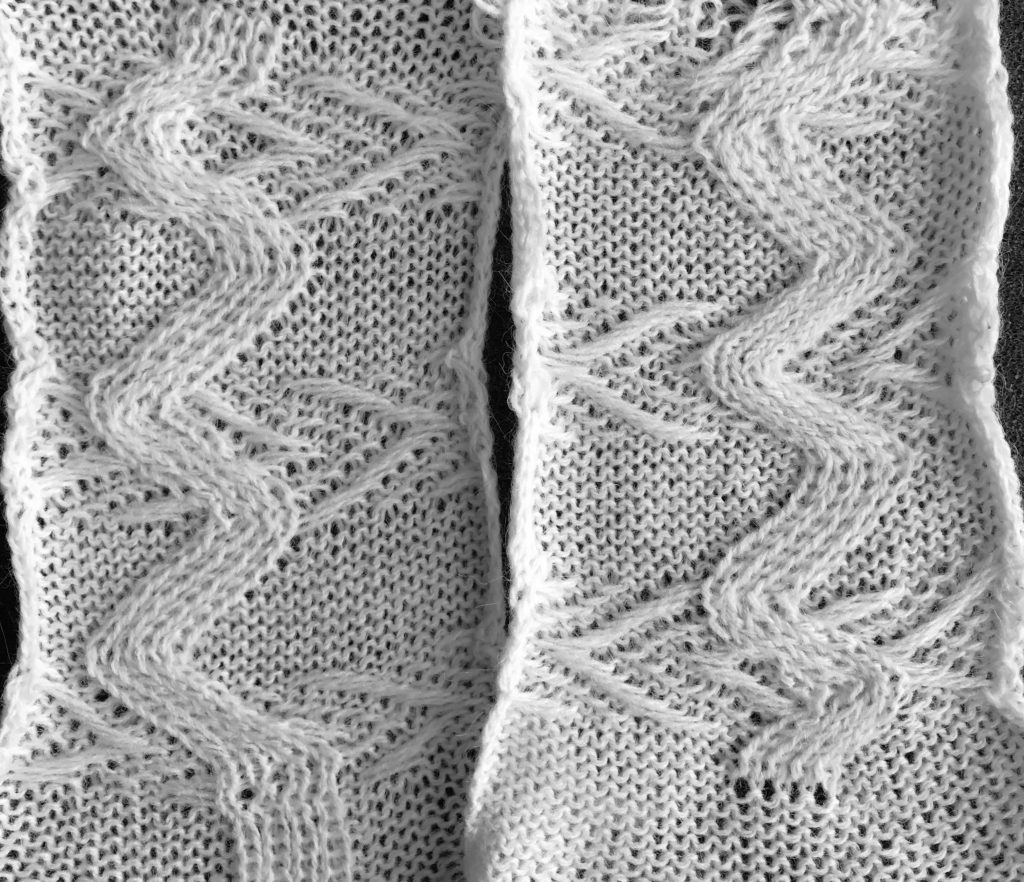
The above working repeat and all above swatches were knit with the first preselection row from right to left, not left to right. For these stitches, the starting side does not make a difference. If the pattern, however, was in blocks that were even-numbered in height (2, 4, 6, 8), and the color changer needs to come into play for striping using it, accommodations need to be made so that preselection for row 1 happens from the right side to the left, toward the changer. The programming needs to be set to begin on the very last row, so the repeat returns to row one for preselection from right to left, and knitting rows 1, 2, etc begin with the KC set to appropriate cam buttons, to and from the left side of the KM.
The racking sequence needs to be adjusted to have the points of the zigzag land in the center of both the slip stitch areas and those in plain knit if that is the goal. I am encountering needle selection issues with my hack, so this fabric is getting put to bed for the moment. In principle, the black squares in the illustration represent knit rows, and their number is easily enough adjusted in height. Punchcard users would need to punch holes for each black square, mylar users can fill in the white squares for a single repeat, add blank rows at the top or bottom, and color reverse when programming. In Ayab software, the repeat has to be drawn for the width of the piece but will repeat “infinitely” in length.
This is a possible punchcard template, with a shorter racking sequence. The Numbered column on left indicates the racking position. Pattern rows are preselected, so racking occurs prior to knitting across each row. I am also in need of purchasing more punchcards or another roll, so there is no test swatch at this moment. The top and bottom rows of punched holes on the colored ground are not part of the repeat, they overlap the first and last 2 rows of design in the punchcard, allowing the pattern to repeat in length. Ascending numbers swing to the left, descending to the right. Rows may be added at the level of #7 (7, 8, 9, 8, 7), so that the center of the swing may then occur on #9 positions in the racking handle, lengthen the card accordingly.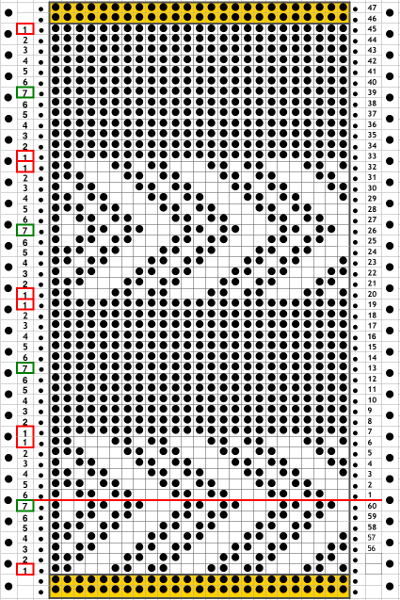 5/14/20
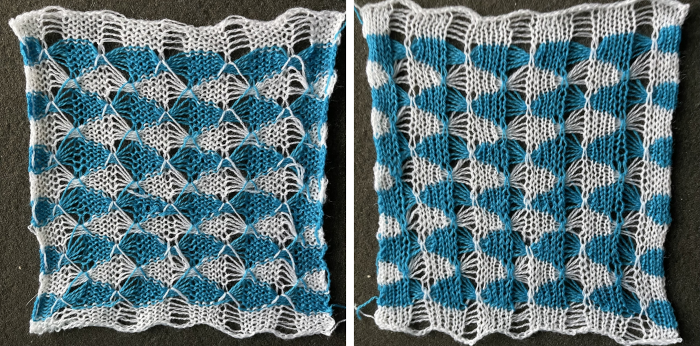
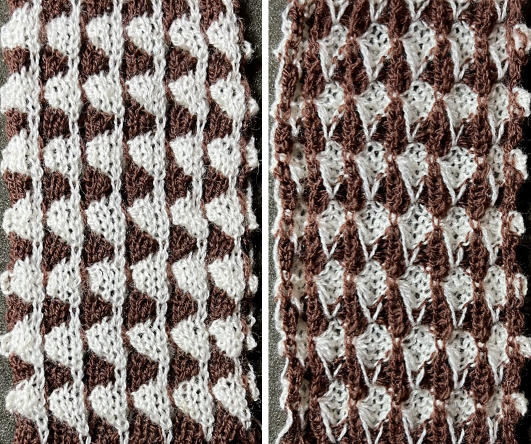
Electronic machine models make experimenting easy and quick. Here an all-over tuck stitch is programmed for the base fabric, and racking variations are considered with the goal to cross the base fabric at various points in the patterned areas, or within the knit space alone. With increasing racking indicator numbers the ribber moves to the right, the shape its stitches create on the main bed moves to the left. With decreased racking indicator numbers the ribber moves to the left, the shape its stitches create on the main bed moves to the right. 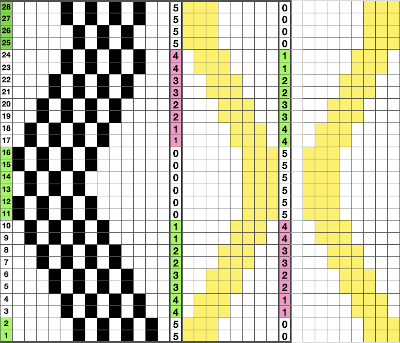
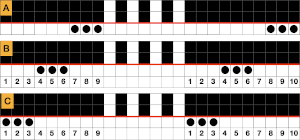
 The repeat required mirroring for use in my electronic 930. Experimenting with racking intersecting tuck stitch on multiple repeat png, stitches were picked up on the ribber aside from the first tuck stitch on the right, A, on the center, B, and on the left, C, of the knit stitch groups.
 The tuck pattern tested, racking placed in the center position
  changing ribber needle positions
 moving toward positioning the racked pattern further into the knit columns.
 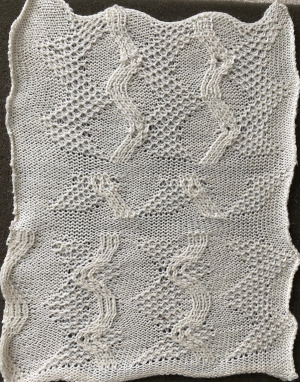 Making the knit columns wider, placing repeats differently.
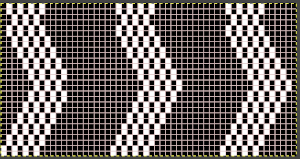
 The intended placement of the racked pattern is shown in yellow.
 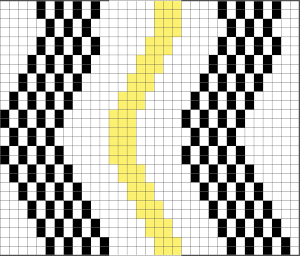 Good notes and documentation of the final needle arrangement will make the technique easily reproducible. The needles involved on the top bed always need to be returned to the patterning position after any shares.
 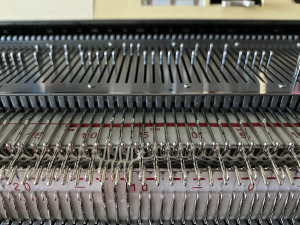 At any point in the knitting, it is easy enough to transfer stitches on the ribber up to the main bed, drop the ribber down, and check on the placement of the racked pattern. If the place is satisfactory, the moved stitches can be returned to the ribber and the work is continued. If not, transferred stitches can be left on the main bed, other stitches can be shared with the ribber and patterning can continue with racking in the new location. One such adjustment is seen toward the bottom of this swatch.
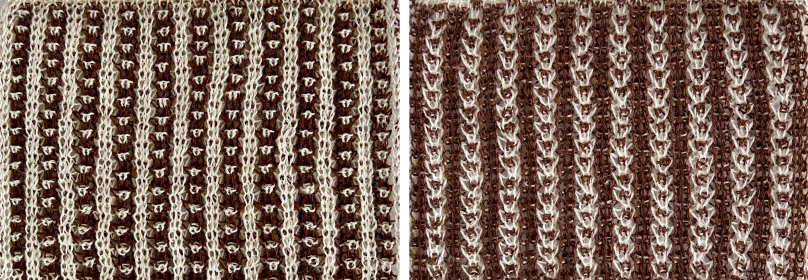
 1: matching needle set up
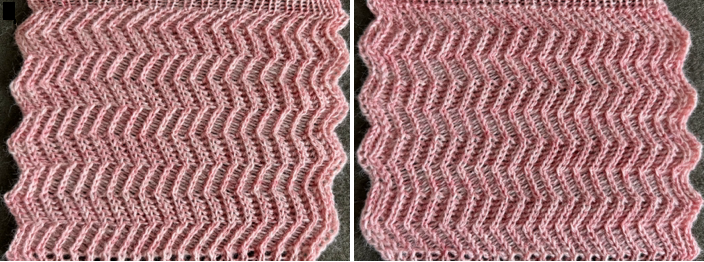
 These images illustrate the differences produced depending on the number of rows knit without racking: four on the left and 2 on the right. The knit is reversible, is lightly pleated, and lies flat.
 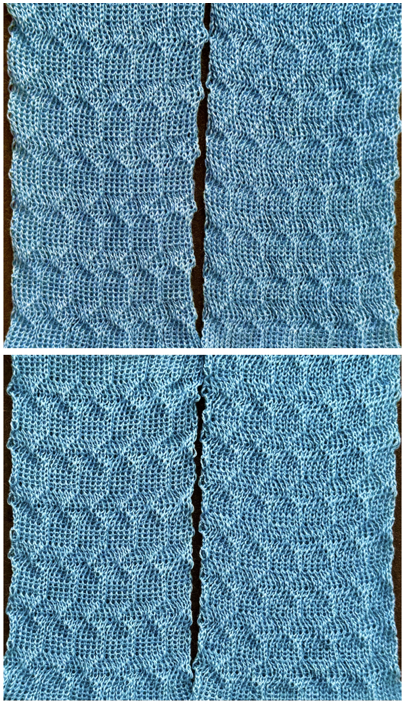 In this swatch, no rows were knit between racking sequences.
 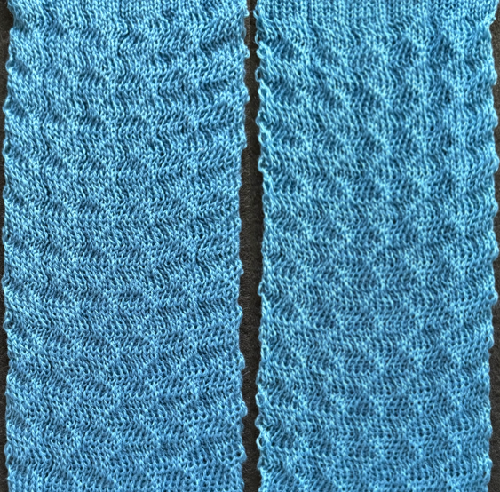 A pattern that requires no cam changes
 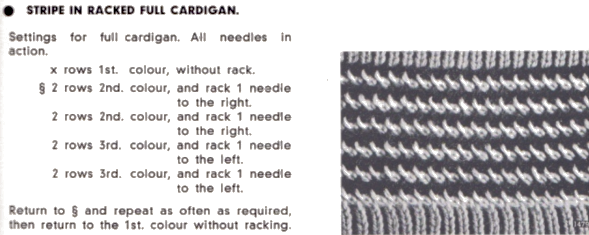 is knit in tubular tuck stitch, using opposite buttons on the knit bed and ribber. The starting size matters in this case to allow for the use of the color changer every 2 rows. Knitting begins on the left, using the settings shown on the left.
 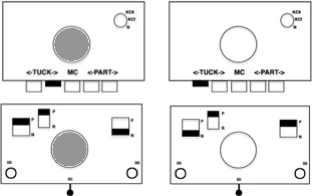 My third color, white, was knit in plain ribbing, would be too narrow if used in a final project, and, if used, should be knit using the same settings as the remainder of the knitting.
 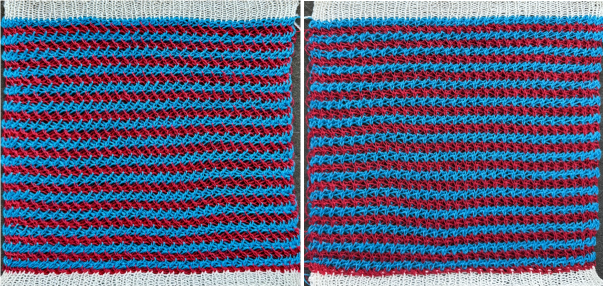 This pattern requires more interpretation, as seen in the blue text notes.
  The knit bed may be programmed, thus automating its functions. The repeat as suitable for punchcard models, 24X36
  the corresponding PNG
 The needle arrangement
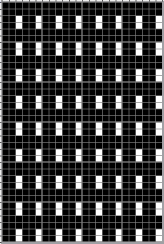
 The knit bed is set to tuck in both directions, all black pixel rows will form knit stitches. When pairs of rows with non-selected needles occur on the top bed, the ribber is set to knit, the tuck lever may be left in the up position.
 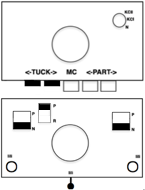 When all needles are selected on the top bed, the ribber is set to tuck
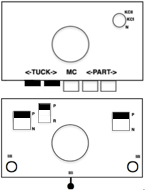
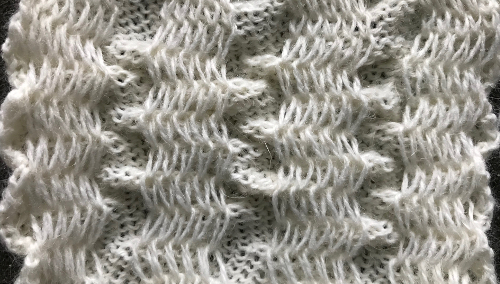
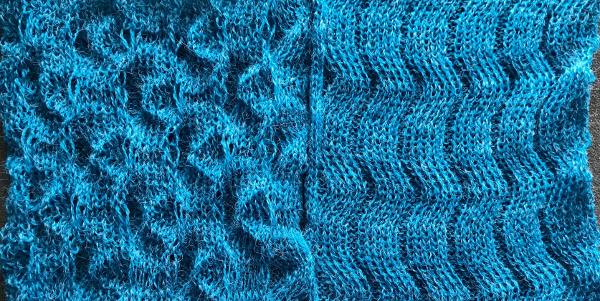
 A closer look at the structure on the knit side
 Slip stitch designs, beginning with “ripple stitch” sample
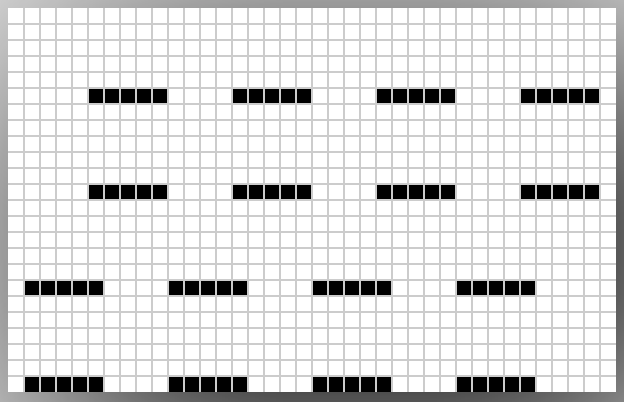
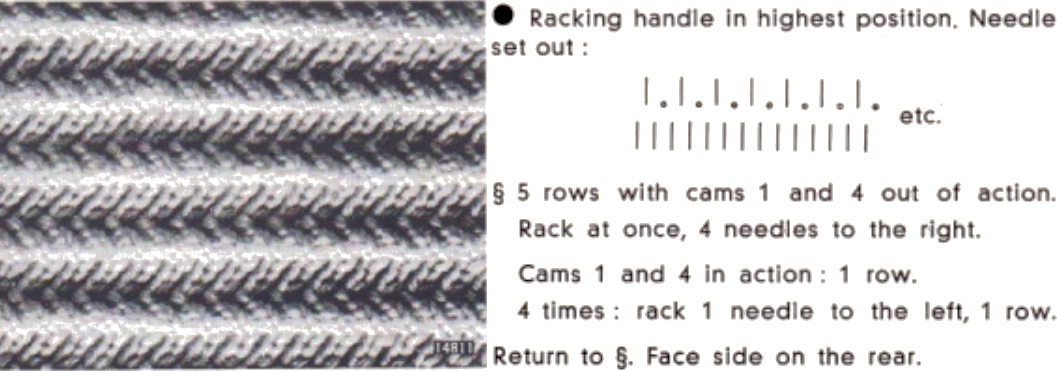 Using a spreadsheet to plan racking sequences and respective row numbers:
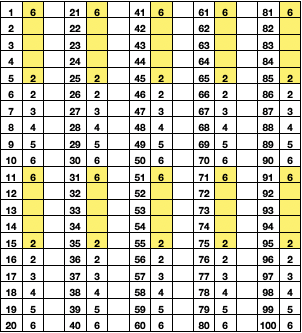 the repeat is 10 rows in height
 for 5 rows, marked with yellow cells
 knit one row
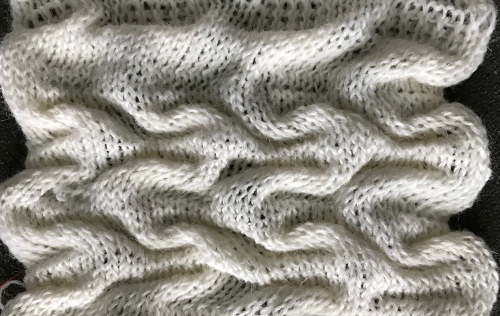
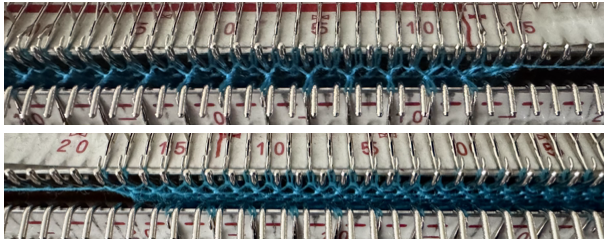 The proof of concept knit in a 2/20 wool
 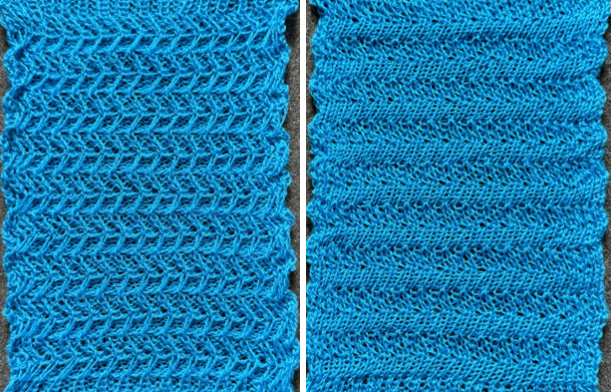 An easy racked pattern in 2 versions and with slightly different needle arrangements began with
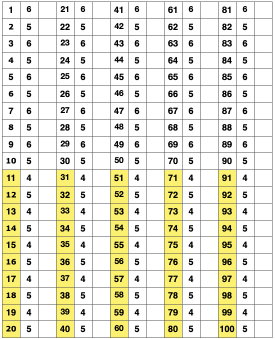 A punchcard machine can be marked with the row # to help track positions.
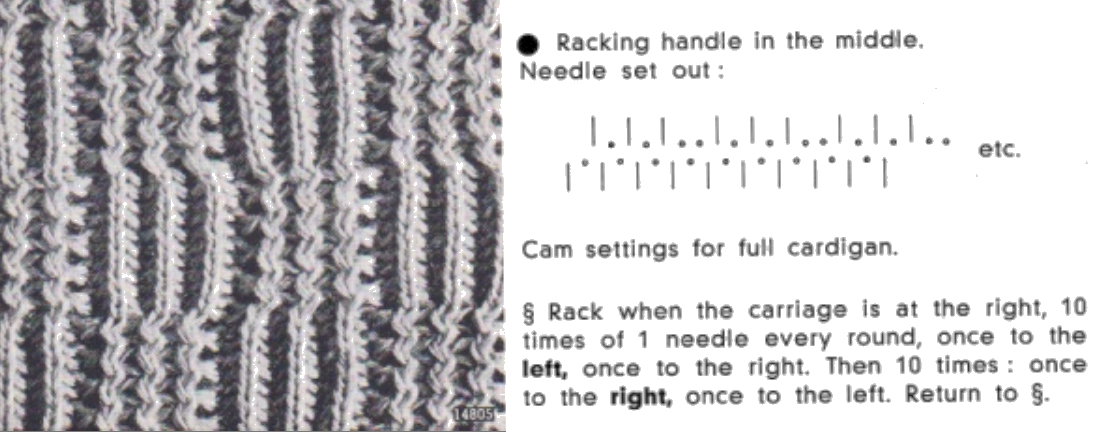 Full cardigan is a tubular tuck, using opposite tuck/knit buttons. As one bed knits every stitch, the opposite bed will form loops on every stitch.
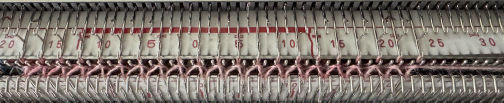
 The second test matched the needle set up in the manual, but was knit in half cardigan, not full, with only the knit carriage set to tuck in one direction
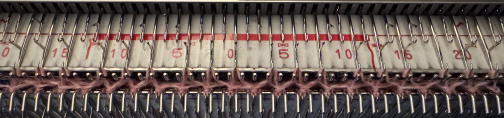
 A version of Brother block racked designs from the Ribber Techniques book uses the top bed to knit every row, with the ribber set to tuck to the right and knit to the left.
 Reversing the racking sequence in direction results in some biasing of the stitches, not as evident in the swatch photo in the manual. That feature can actually be used to produce 3D projections.
 180X174
 a single knit block
 Another striped block variation and the corresponding swatch can be found in the post on Developing tiled repeats suitable for multiple stitch types, including tuck
 with all those dots removed, knit as DBJ


 shown below on the right
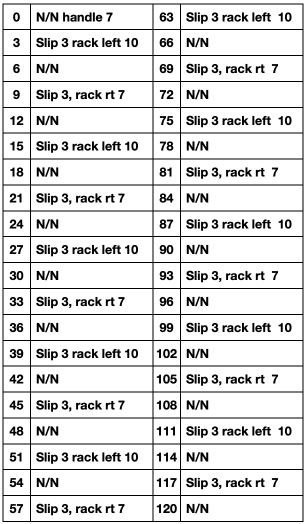
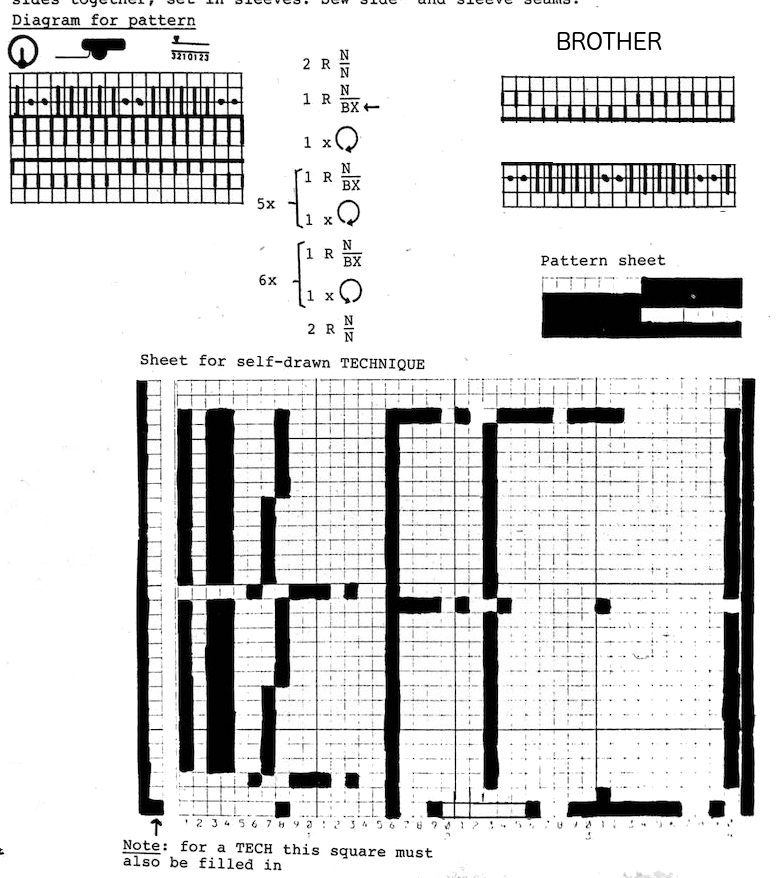 Translating Duo directions to black and white squares in order to develop a repeat for use on Brother: N/N is easy. The Duo is using buttons on the front bed and selection in response to their arrow setting to alter and progress through the pattern. The setup is with 7 needles up, 7 down, creating a 14 stitch repeat. BX on Duo (LX with patterning on front bed E6) is the equivalent of slip setting on Brother. No arrow keys, Passap on N, everything knits. Brother equivalent is a row of black squares (or punched holes if applicable) for each row on the N/N knit setting. BX <– will reverse the needle selection from whatever it was immediately before the previous rows of N/N, and remain there for the full racking sequence. After the first 32-row repeat is completed, at the end of the 12 racked rows, there will then be 4 all knit rows between racking sequences, two knit rows at the top would match 2 rows knit at the start. Once again, the BX<-for one row sets up the alternate blocks of racking. I chose to start my repeat with the 930 with a cast on in racking position 10. The chart shows racking positions on each row, reversing direction after having reached #4. E6 knitters may use the same repeat, matching the Duo racking starting on 3 left to 3 right and back
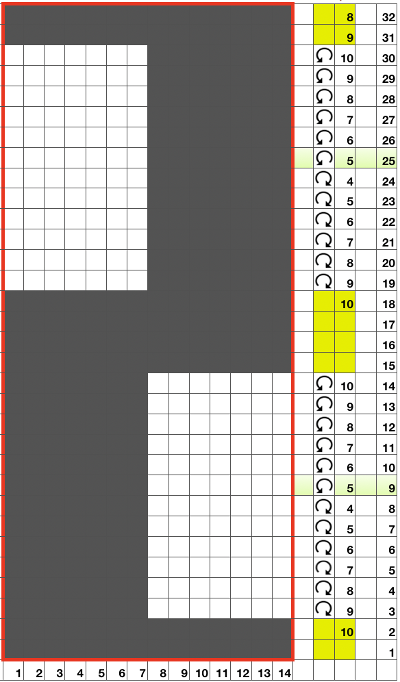 The repeat viewed tiled:
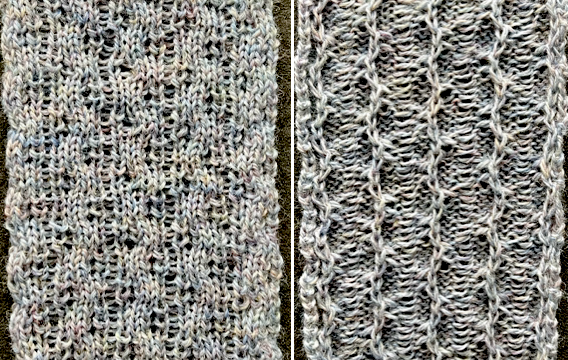
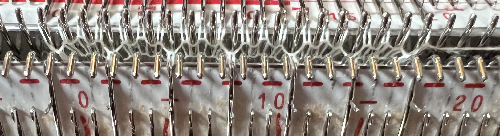
 After swapping out the needle retainer bar, knitting went smoothly. On the right in the photos below, the same racking sequences and needles out of work on the ribber are used, but the knit carriage was not set to slip, so essentially, every stitch on every row on the top bed was being knit. In addition to needle preselection, one should also check the type of stitches actually being formed. One of the disadvantages to knitting ribber fabrics is that several inches may be produced before one can actually evaluate the pattern being knit by peeking between the beds.
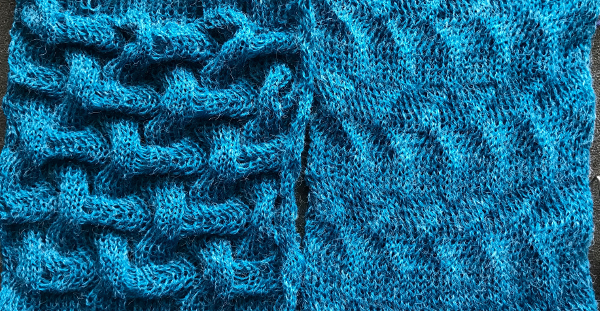
 I will have to revisit a


 All needles used in my swatch, I began the stitch transfers down onto the ribber needles on the far left, continuing across the knit bed.
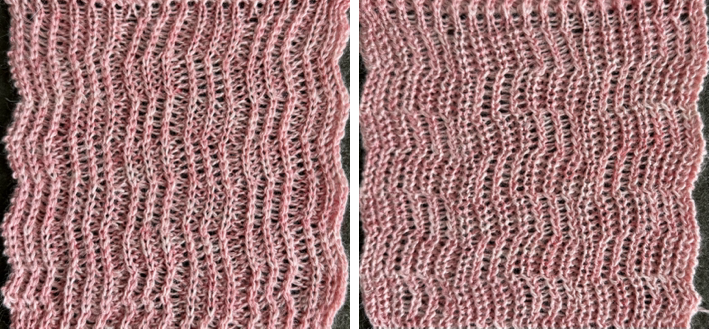
 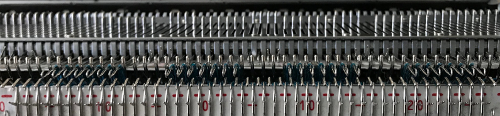 As end stitches knit on the ribber alone, a small edge weight may be required on that side. As stitches on the main bed are not worked in the slip stitch rows, they become elongated. Racking by 4 positions is not possible unless there is enough fabric so as not to pull so much that stitches will not knit off. If the yarn does not have some “give” that can make the changes in position harder, some yarns may break easily. The long stitches:
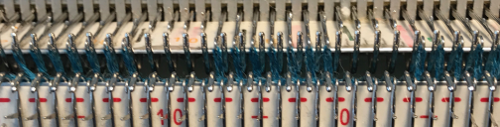

 This is the swatch knit changing ribber settings to and from slip <– –> to N/N on appropriate rows. I found the method above far simpler
  Coincidentally this morning a Duo pattern using a different setup was shown in Ravelry, and I was asked whether producing the same on Brother might have any advantages. The Duo results, shown on a
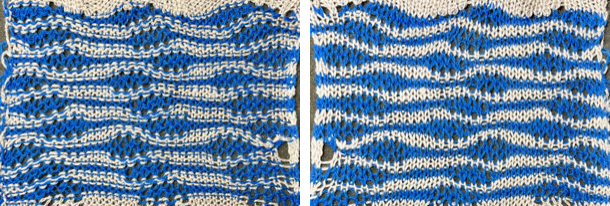
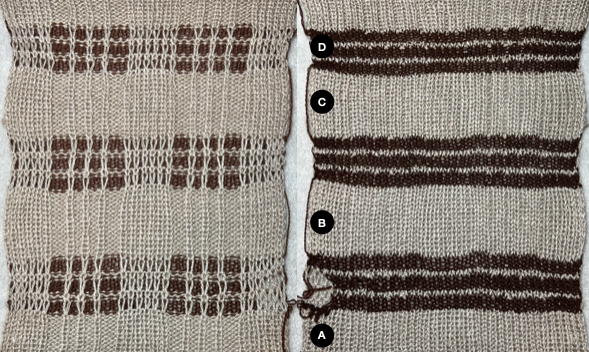
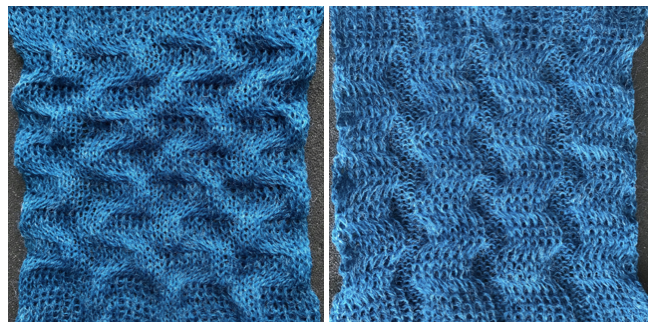
 Racking is from position 10 to 6 and back just as in the previous blue swatch, after the first preselection row at the start of the following repeat sequence. I began the stitch transfers down onto the ribber needles on the far left, continuing across the knit bed. The final look will vary with the choice of yarn and its color. Both swatch sides.
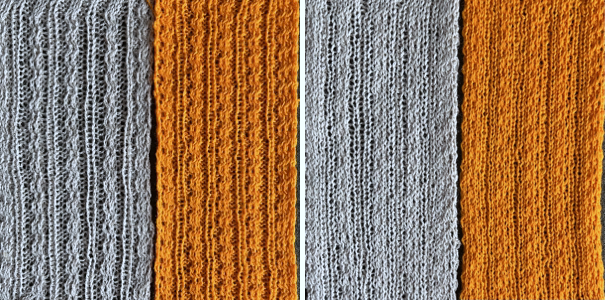
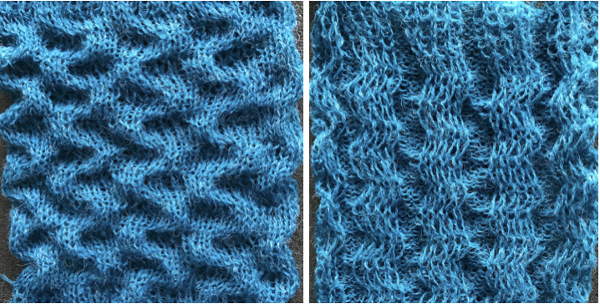 If for some reason horizontal direction matters simply cast on with racking position on 6, and continue to and from there to 10 and back. Below is a horizontal flip of the same swatch image, a way to quickly decide whether doing so might be preferred.