Unconventional uses for punchcards 2: thread lace cards for “filet” mesh


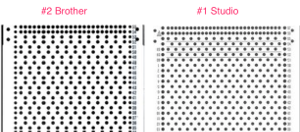
Mock filet crochet machine knit lace has surfaced in a Ravelry blog of late. The sample in question was made by Tanya Cunningham, using a hacked knitting machine and software to download the repeat. Sometimes punchcard machines or early electronic users feel left out of creating particular fabrics. If one can settle for working with simpler and far smaller repeats, however, one can achieve interesting results on that scale.
Several years ago I wrote a series of posts on lace meshes and lace patterns inspired by filet crochet. They are interspersed in the mesh category. There also has been a thread lace Ravelry “thread”, and today’s avoidance of housework led me to think about pre-drawn thread lace patterns to create a filet-like mesh.
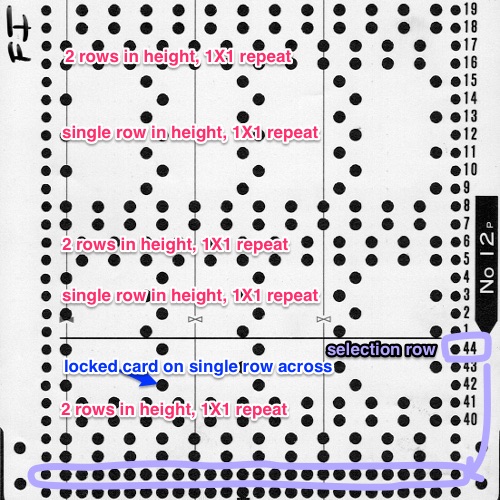
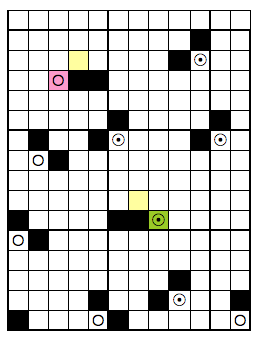
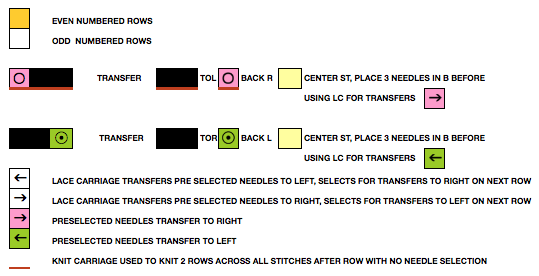
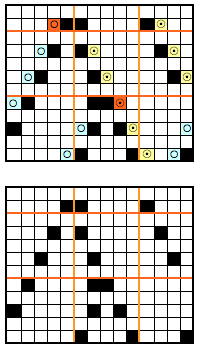
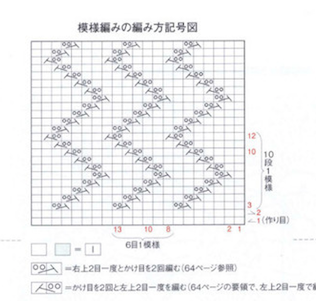
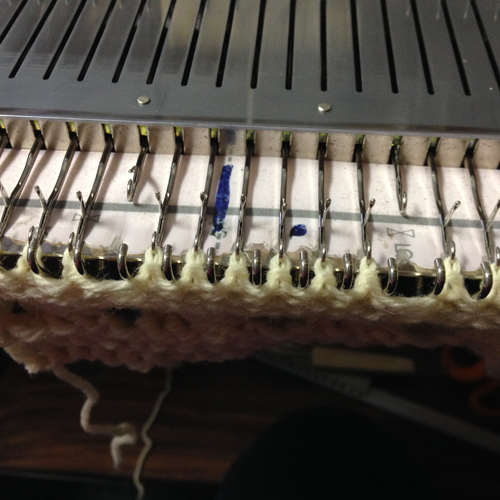
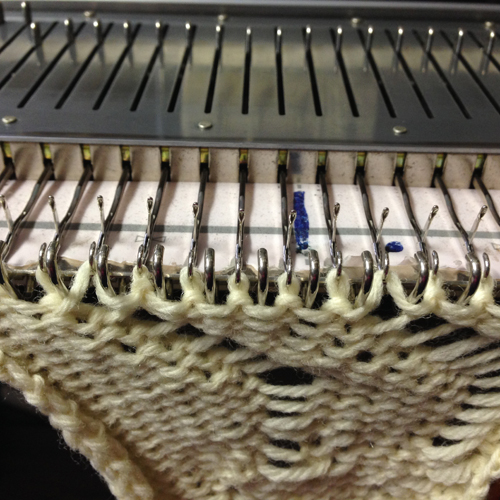
What to look for a first experiment (Brother punchcard machines only): large unpunched areas creating motifs, with no side-by-side punched holes, and no more than 2 consecutive punched rows. Some samples are provided in-stock cards that come with machine purchases. One such 
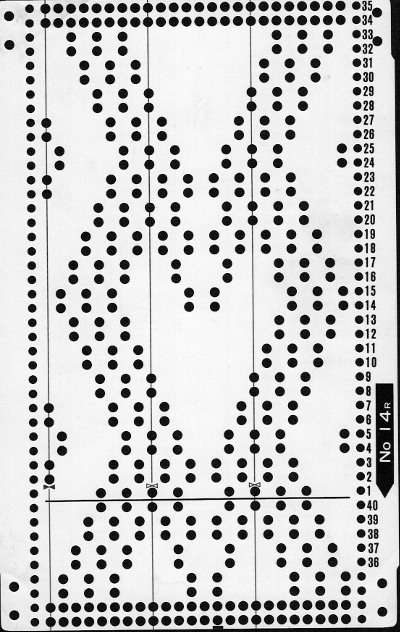
The lace carriage (LC) selects on the first pass, transfers on the second. It advances the card with each pass of the carriage if it is operated consistently from the same side.
If 2 knit carriages (KC) set to select needles for any technique are in use in punchcard machines, as one is put to rest and the other one begins to move from the opposite side, the card does not advance on the first pass, so selection for the previous row is repeated one more time.
If all lace transfers are made in the same direction the resulting fabric will bias. For balanced lace fabrics, the direction of the transfers needs to be reversed, whether in alternating series of rows or with every other set of transfers. In a situation such as this, the LC makes one set of transfers operating from the left, with the next set of transfers operating from the right.
For the correct setup, the first-row selection with the card is made on the row just below the one marked #1 (in this instance that would be row #40), then the card is set to advance as usual.
If the first selection row is made with the card set to below the #1 line, the card needs to be already joined with snaps into a drum or the card reader will be selecting the all-punched row which is normally part of the overlap that sits over the last 2 rows of the pattern repeat.
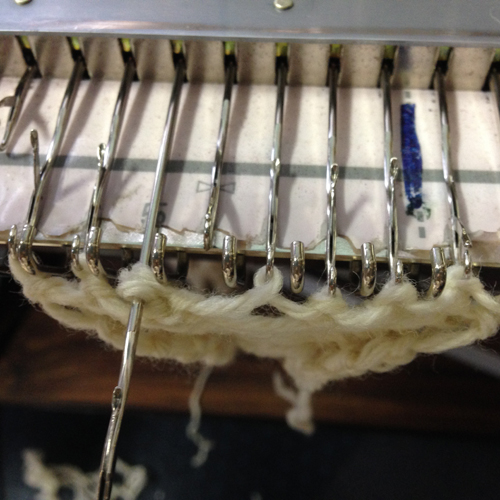
I began with my LC on the left for transfers to the left and alternately placed it on the right after knit row(s) for transfers to the right.
A “simple” lace is produced with only one-row knit between transfers, and a more complex lace if 2 rows are knit between them.
The LC moves left to right and transfers back to left. If the knit carriage is used for one pass only, it stays on left. The LC is now taken off the machine and moved to the right, used for 2 rows, and will be removed from the bed to ready it for its return to the left side.
The KC follows with one pass from left to right.
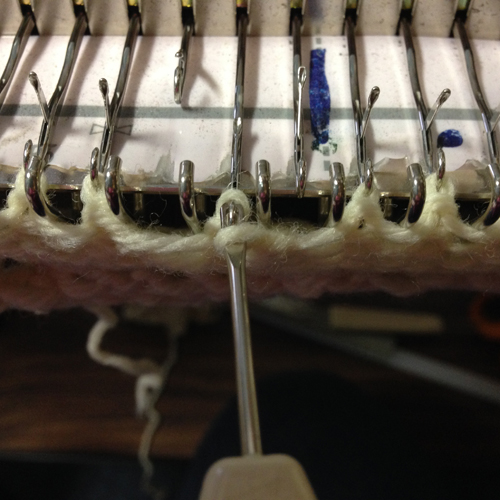
The LC is returned to left and operated for 2 rows, starting the sequence over again. The LC is always moving toward the KC to select, and away from it to transfer.
Brother knitters are used to knitting 2 rows after lace transfers.
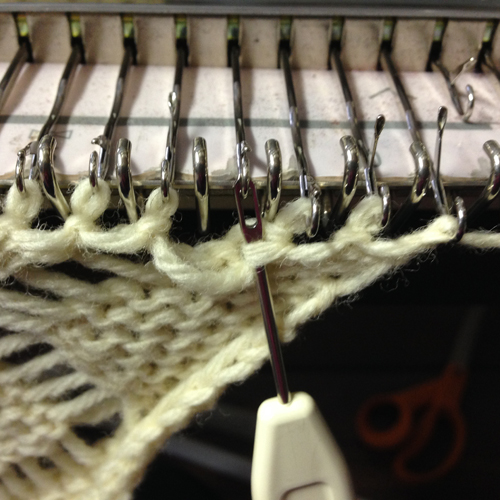
It may be done with this card as well. The problem here is that when knitting for 2 rows, the knit carriage consistently returns to the same side so that when transfers need to be made from its starting side with the LC, the KC needs to come off the machine until after transfers are made.
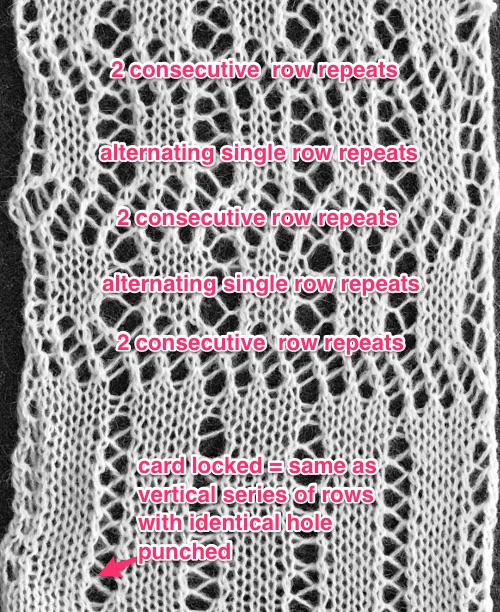
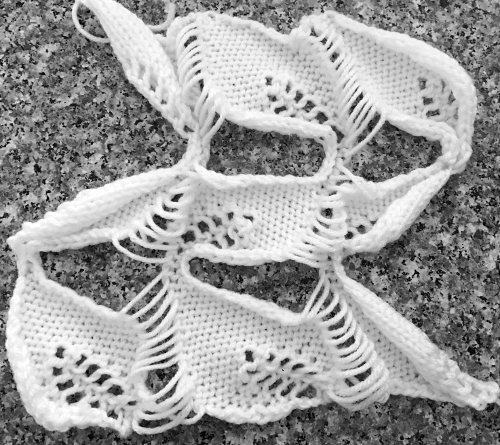
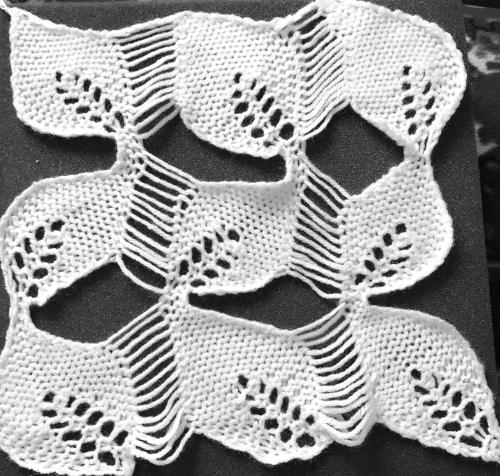
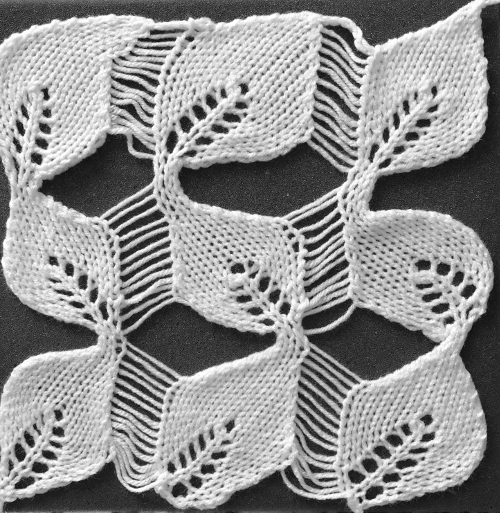
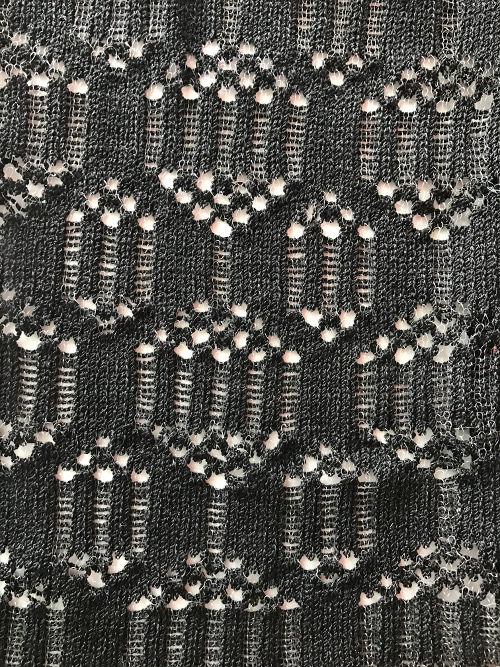
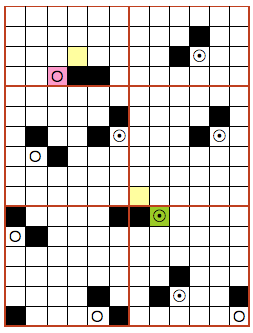
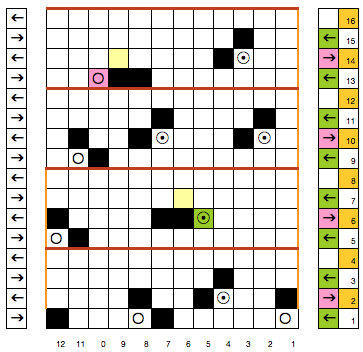
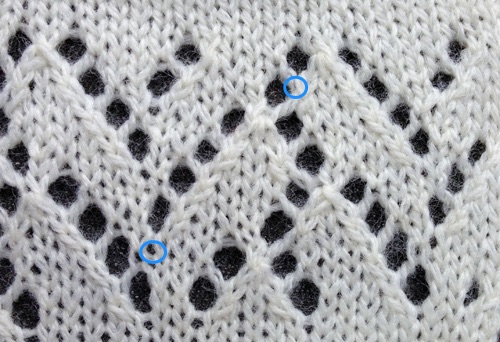
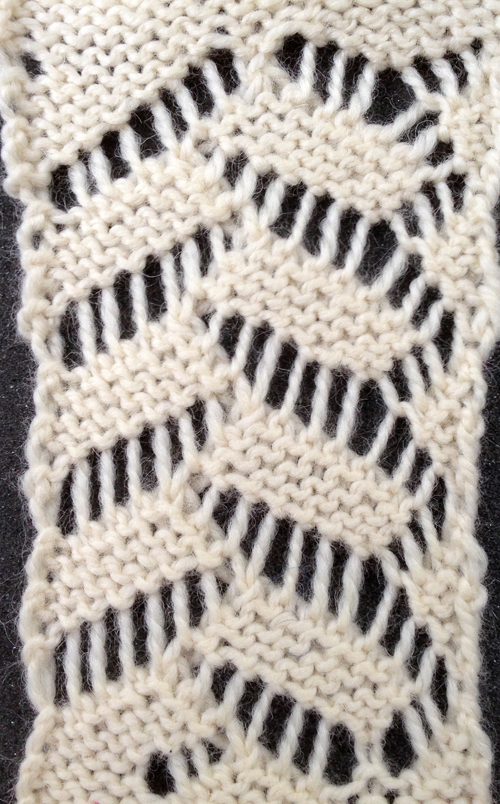
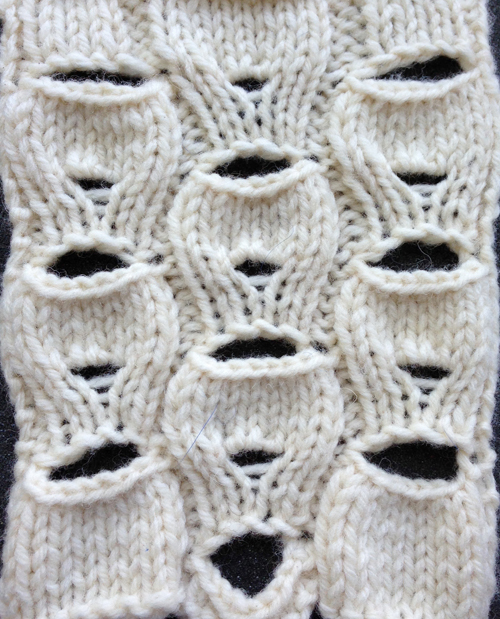
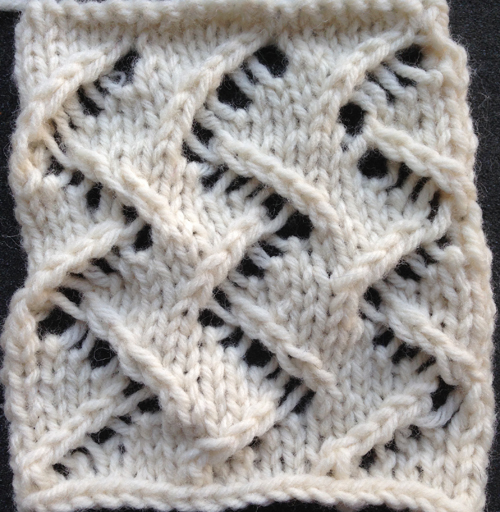
There is a lot more juggling of carriages and keeping track of what needs to be where. The elongation that occurs with 2 rows knit after each set of transfers, and the differences in the appearance of the yarn forming the eyelets (single/magenta arrow vs crossed/glow green arrow strands) for the respective methods are shown below. 
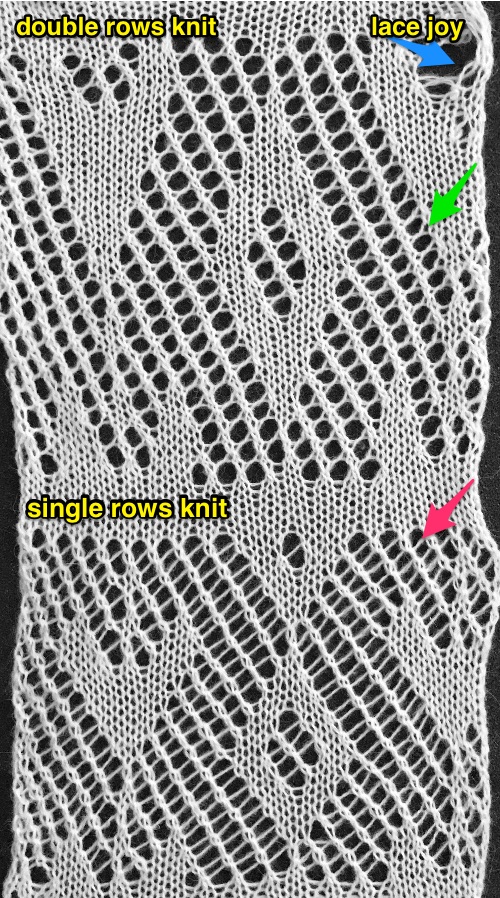
Three more candidates for experimenting with the technique.   
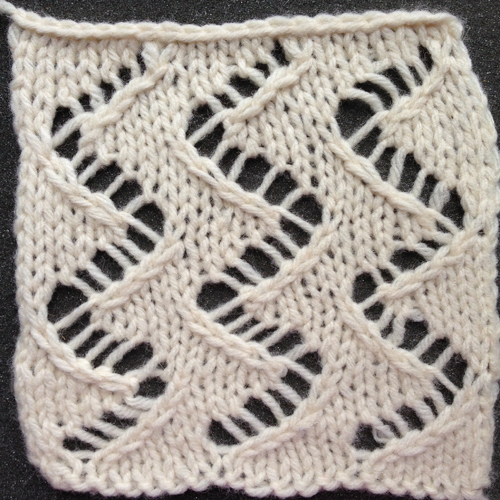
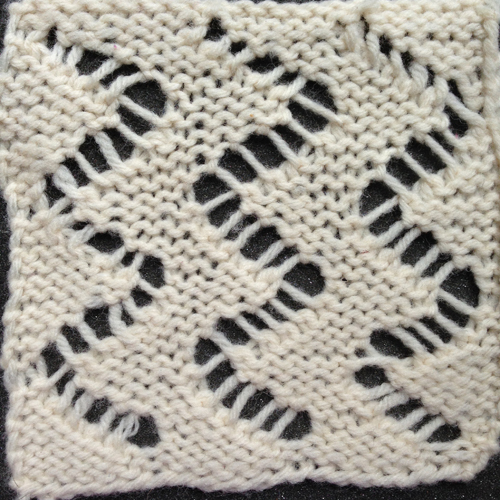
Working the fabric on an electronic, the repeat used: 
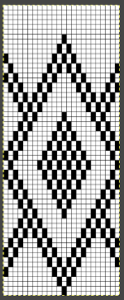
The single knit row between repeats is fairly easy and rhythmic to produce. The first preselection row is made with the lace carriage, beginning on the left, the design is used as given in the punchcard.
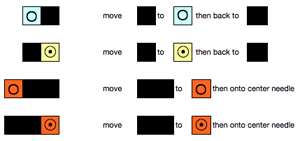
LCOL preselects for transfers to the left as it moves to the right
LCOR transfers preselected needles to the left and preselects the same needles, now empty, a good time to check for any dropped stitches or split yarn. Remove LC from the bed to place it on the right before transfers in the reverse direction
KCOR knit one row to the left, leave it there
LCOR preselects for transfer to the right as it moves to the left, transfers on its return to the right, and preselects the same needles, now empty of any yarn. Again, remove it from the bed in order to place it on the left before transfers in the reverse direction
KCOL knit one row to the right, leave it in that position
LCOL begin the sequence again
preselection with the LC is always toward the knit carriage, and transfers are always away from it 
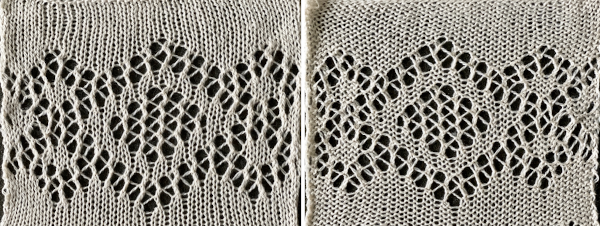
If working the same repeat as transfer lace, the knit carriage moves to and from the right with every 2 rows knit, so in order to make transfers with the LC to the right, the knit carriage needs to be moved off the needle bed for the LC to be able to operate from that side.
The process is a tad fiddly, if the technique is to be used for an all-over design, converting the design to the traditional transfer lace format would be worth the effort. Barring that, some sort of note-taking to serve as a reminder of which side the LC carriage should operate from is also helpful.
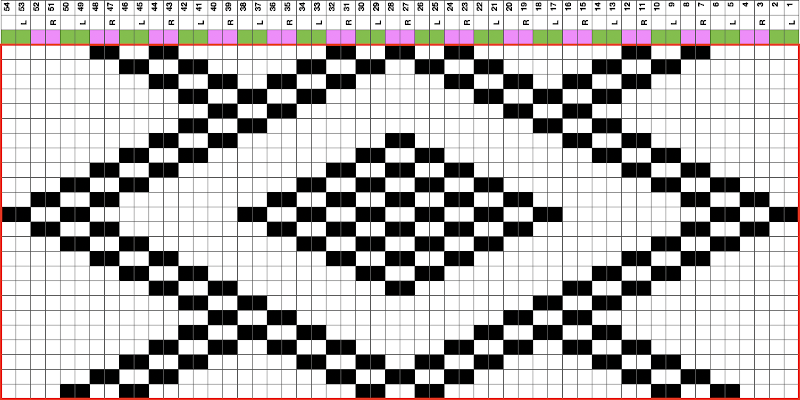
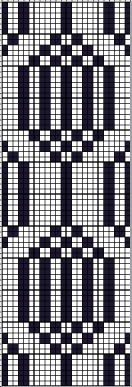
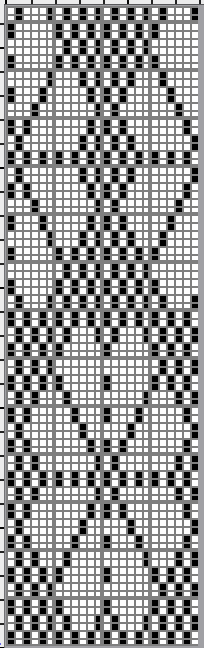
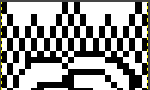
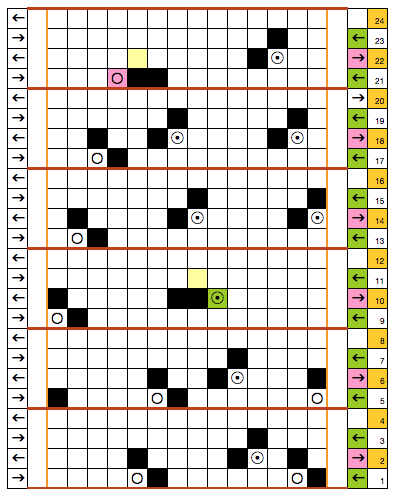
 
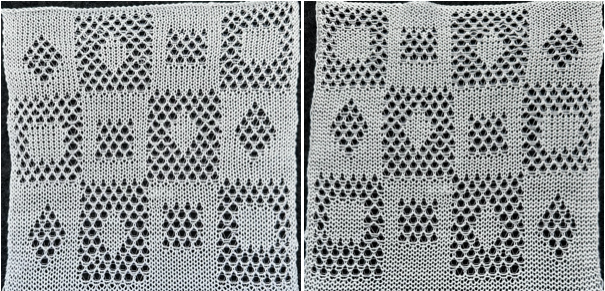
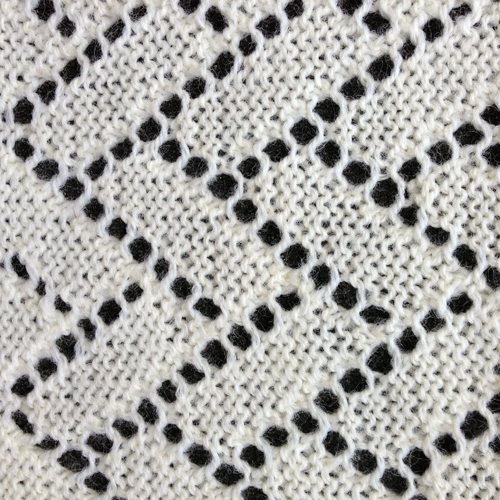
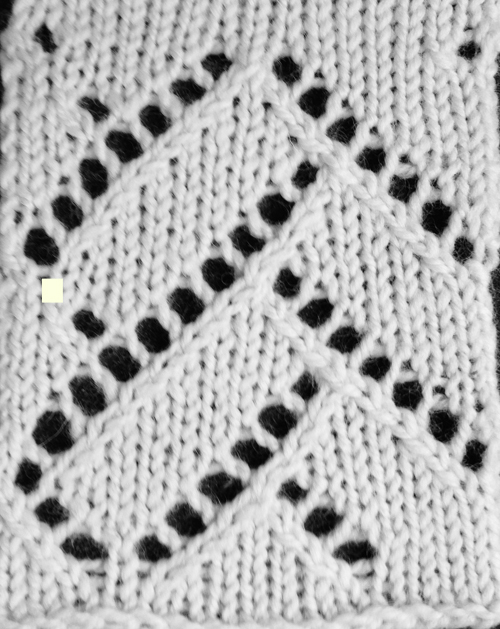
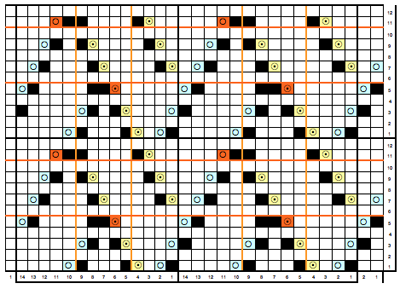
The BMP for the full repeat including blank rows at the top 
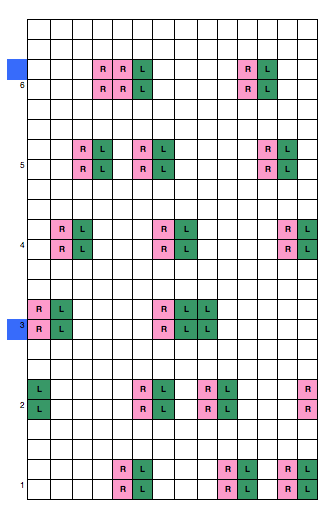
Returning to another Brother punch card, more possibilities in ways to experiment
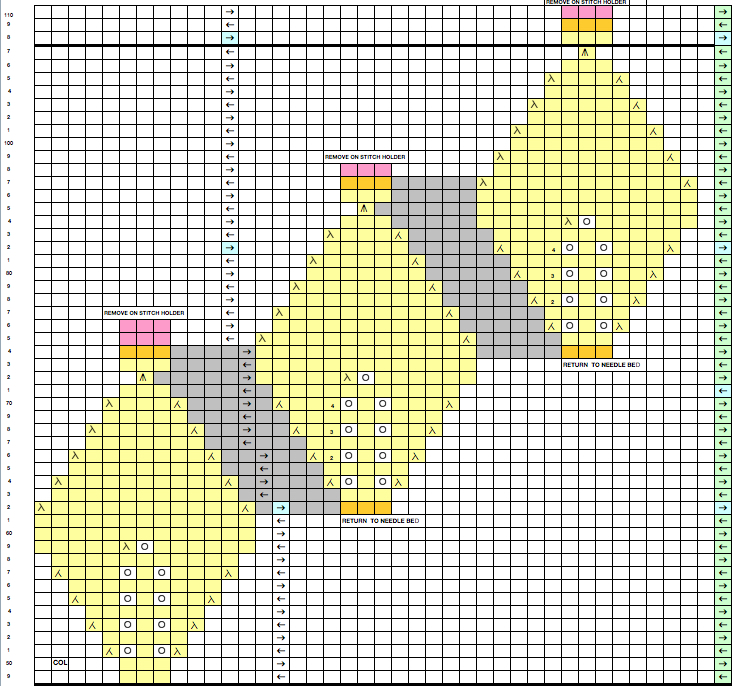
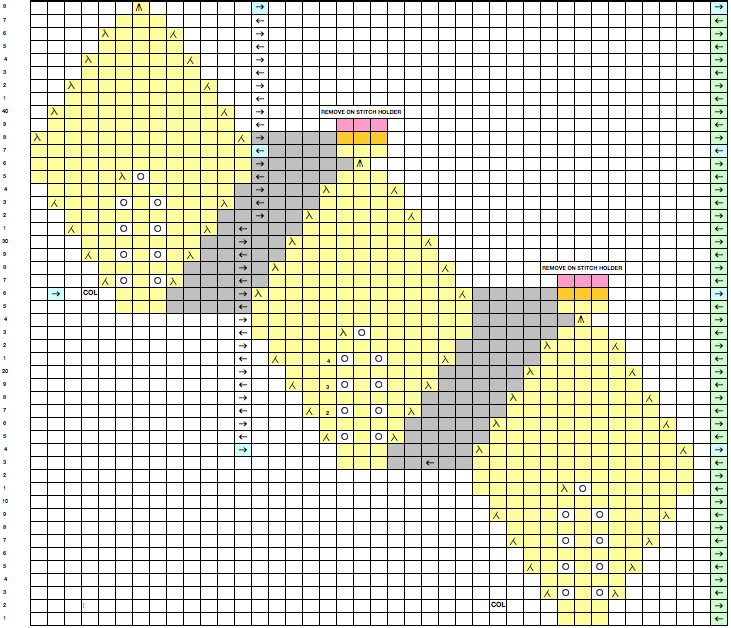
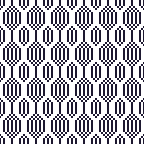
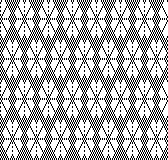
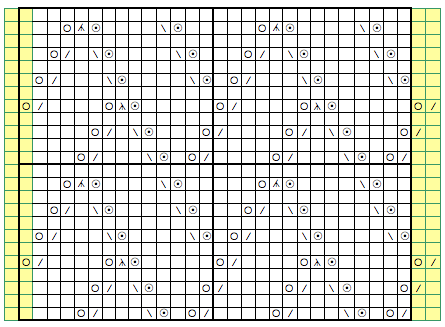
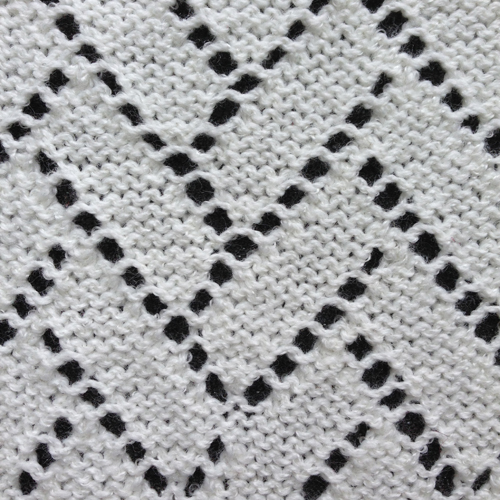
The above shows long vertical lines of transfers are possible in design motifs (punched holes).
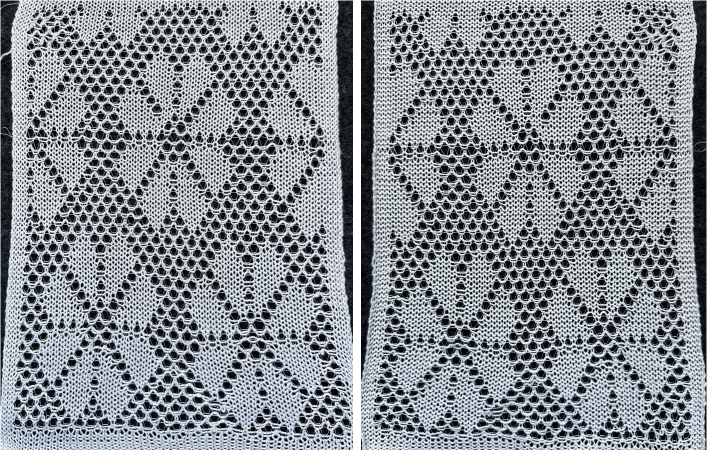
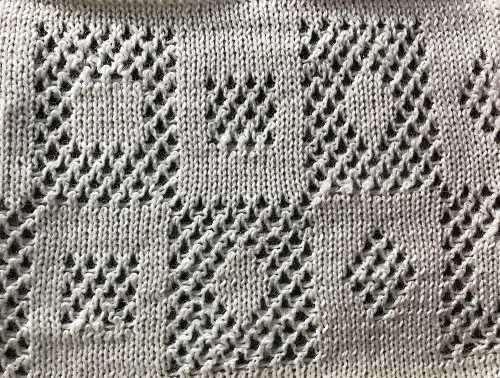
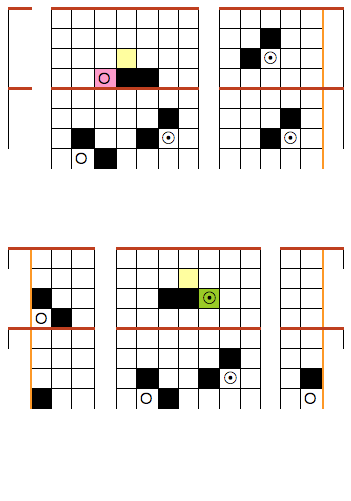
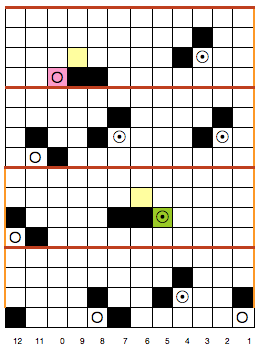
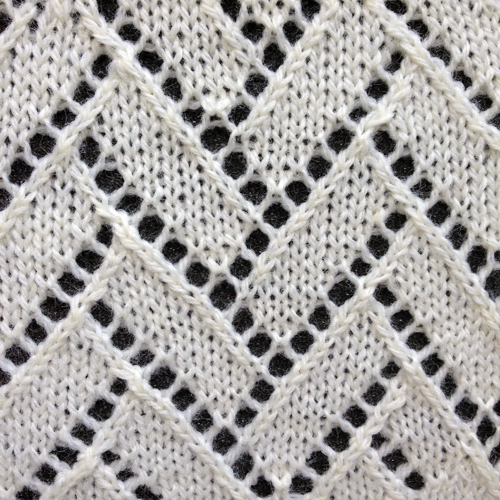
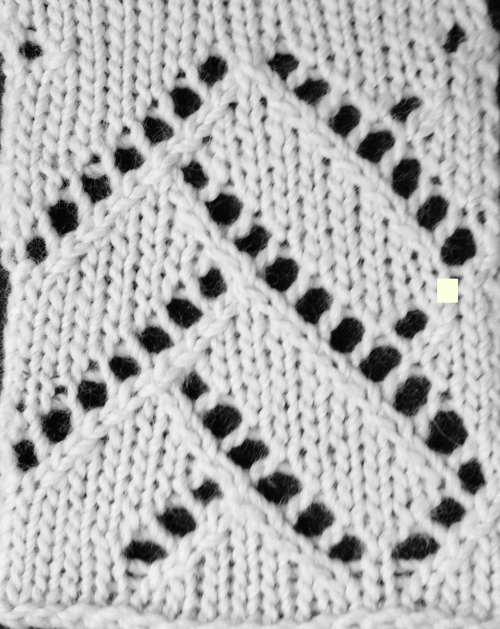
Adding shapes to all over mesh may require some editing along edges where the shapes meet the mesh. Varying size swatches are recommended before committing to any large piece.
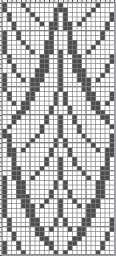
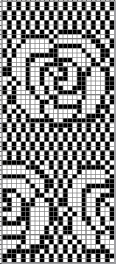
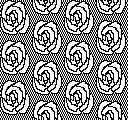
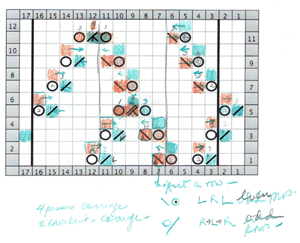
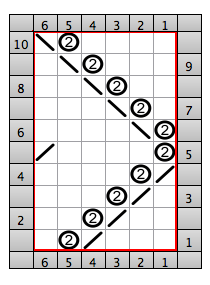
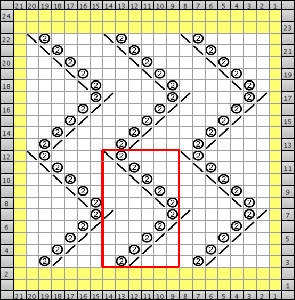
As always punched errors may be taped over. Red squares in the image below reflect holes missing in the card if the goal is to achieve a smoother circular shape.
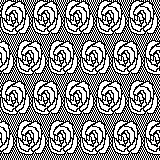
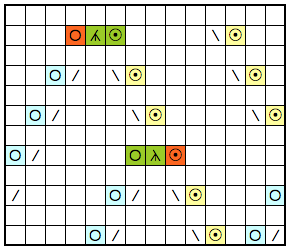
When this technique is used, selection, transfers, and knitting occur in each single, completed row of the design. 
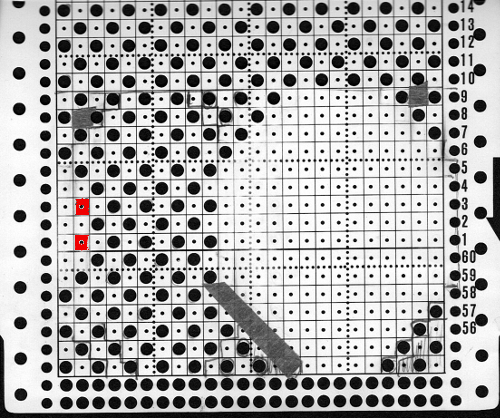
note the differences in circle sides 
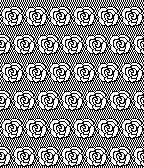
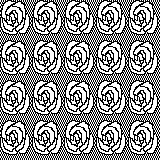
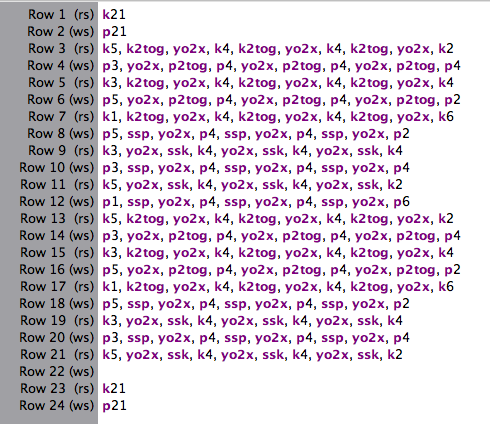
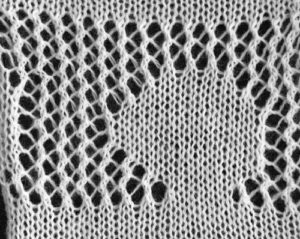
a wider, amended repeat 
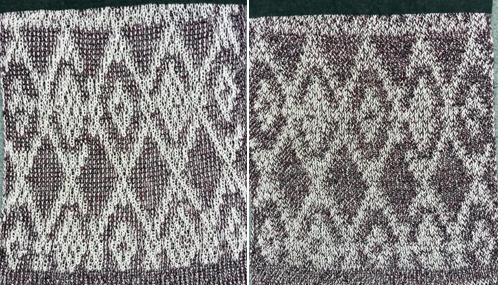
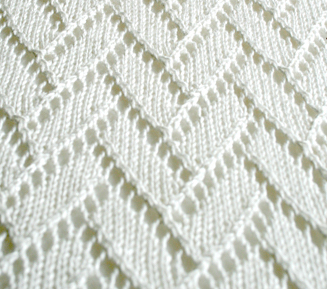
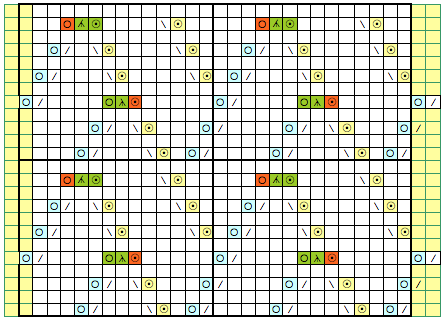
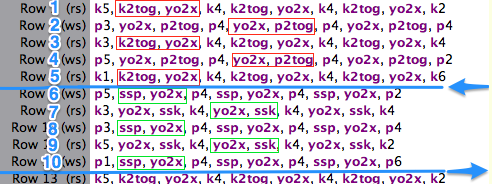
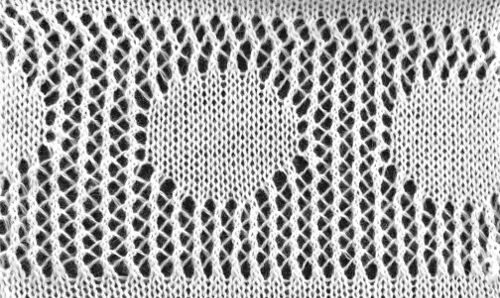
The slight bias zig zag at the top of the swatch results from a missing reverse direction transfer before continuing with plain knitting and binding off. Ultimately whether the final fabric is worth the effort in making it is a personal choice.
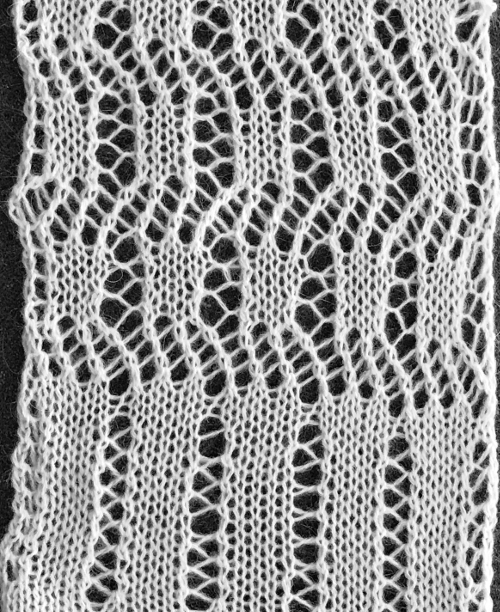
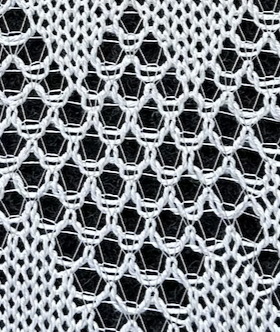
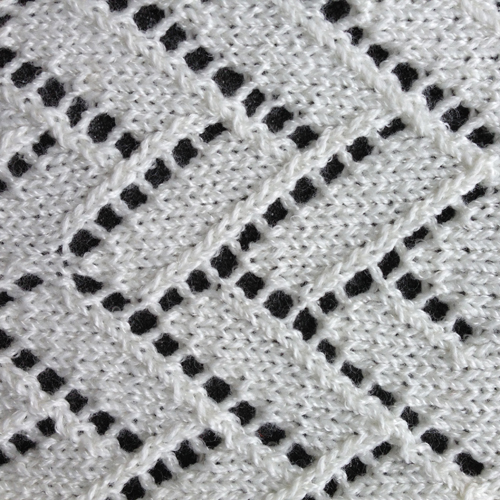
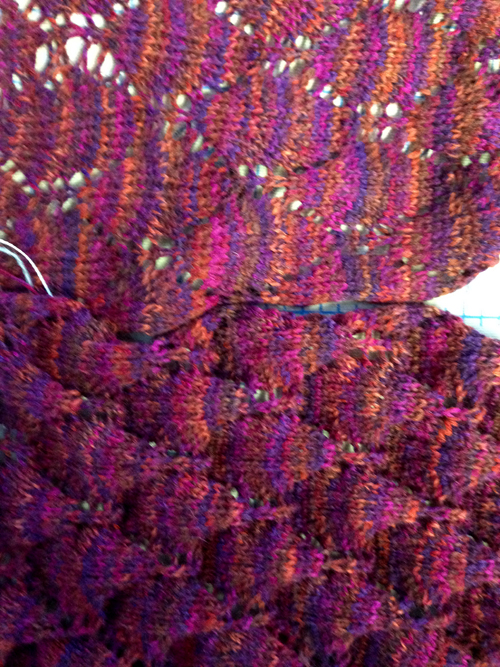
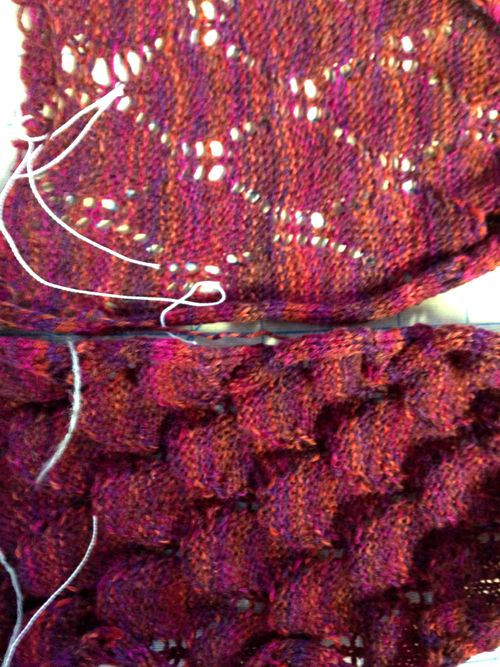
Sometimes small swatches work like a dream, and when large pieces are produced, problems multiply or the result is disappointing.
In the past, I have also tried to use thread lace-inspired patterns for drop stitch lace (ribber fabric), but have found the result far more subtle than expected.
As always yarn and color choice make a significant difference. The yarn used in these samples is a 2/15 wool blend, knit at tension 6.
BTW: Studio pattern books have multiple sections of published 24-stitch thread lace patterns. Not all Brother machines have the capacity for knitting this type of fabric, so not all of their publications include “suitable patterns”. If one understands what punched holes vs unpunched do, some of the Brother weaving and “pick rib” perhaps another post’s topic) can be used as-is or adapted.
punchcard http://machineknittingetc.com/pattern-library-for-punchca…
previous blog notes on thread lace 2016/11/03/thread-lace-on-brother-km/

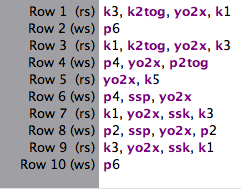
2023 Brother electronic 930, the image is automatically mirrored
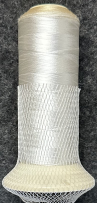
Using StitchWorld #545 Use a yarn that has previously worked well in lace transfer knitting.
On the 930, the Knit Carriage ends On the Left, after casting on. As in any standard transfer lace, it knits stocking stitch rows, does not advance the pattern.
The Lace Carriage begins On the Right, selects needles as it moves to the Left
LCOL the LC transfers to the right, slide it off the machine
KCOL the Knit Carriage makes a pass to the right, knitting a single row, stops and stays there
LCOL returned to the knit bed, the LC preselects as it moves to the right
LCOR transfers as it moves to the left, slide it off the machine
KCOR knits a single row as the carriage returns to the left and stays, knitting a single row
LCOR the LC is returned to the knit bed, preselects moving to the left and the process continues.
At times patterns are best executed with hand transfers as opposed to using the convenience of automating them. In instances such as them, begin the same way, with KCOL
LCOR make a pass toward the knit carriage, transfers stitches manually away from the lace carriage
LCOL make a pass away from the knit carriage, the same needles preselect, they should have no stitches on them now, this is a good time to check all transfers have been made properly and that there are no dropped stitches, slide LC off the machine
KCOL makes a pass to the right, knitting a single row, stops there
LCOL the LC is returned to the knit bed, preselects needles as it moves to the right, hand transfer selected needles away from the LC
LCOR the same needles will be selected on the way back to the left, and are now empty, slide the LC off the needle bed
KCOR  knits a single row as it makes a pass returning the the right, and the process begins again
In both automated and hand technique, the LC always moves toward the KC, transfers are always made away from it.
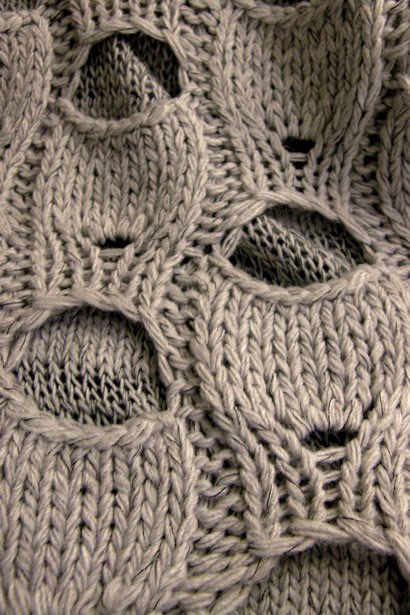
The final mesh is quite different than the standard meshes produced with LC performing all selection and transfers, followed by the KC knitting 2 rows


A new “leaf” lace

I am often surprised when I return to visiting past ideas and discover how long I have actually been blogging.
My temporary obsession with lace leaves began in 2011.
In 2016 Vogue knitting published what appeared to me to be an interesting pattern for a leaf lace variant combining dropped stitches and lace transfers.
Below, I am sharing my WIP swatches and notes.
I am presently working on some production knitwear pieces, and it is unclear when I will return to more samples of this variant.
The “new leaf” requires hand techniques and working with multiple transfer tools.
Dropped stitches in hand knitting can translate to ladders in a machine knit.
My first trial swatch was made on the standard KM.  Casting off and on posed interesting questions. The lines where knit stitches meet ladders, as pointed out in previous posts, can result in the knit stitches aside the ladder growing in size

I do not enjoy time-consuming hand techniques on the machine, so to speed things up I moved on to the bulky. As with any other knitting, the lengthwise sides of the knit are going to want to curl to the purl side. I deliberately worked with acrylic yarn, anticipating that blocking it would be required to attempt to get the results to stay flat. Here is the resulting swatch, as first off the KM

after pressing with steam 

A couple of days later the fabric was still lying flat, so I decided to try to chart it out for slightly different results while planning for a different turning angle and a consistent number of ladders throughout.


I began to use Excel 2008 in 2009, as well as Apple’s Pages and sometimes Numbers over time to produce my charts and illustrations. I keep learning tiny bits as time goes on. Some features may disappear in such programs or become added with upgrades. These are settings I prefer for backgrounds and borders in Excel

format

and for screen grabs or improved visibility, zoom comes in handy 

For links to some online tutorial by other authors https://alessandrina.com/2013/10/29/charting-knits-in-excel/, a search in my own blog will lead you to my own explorations over time. Simple graph paper and color pencils may be used if the software is not available to help work out proper repeats, etc. A single repeat of my leaves so far is shown in 2 segments for increased visibility, successful knitting, probably in another “killable yarn” tbd.

Thread Lace on Brother KM

This post originally did not offer repeats for the design, they are presented here in a 2024 review of content.

Thread lace has also been called punch lace over the years. The “lace holes” are formed by knitting a fine thread with a significantly thicker yarn as the “second color”. When the fine yarn knits (B), a larger stitch in it alone is formed, with the thicker yarn floating behind it. The thicker yarn goes in Brother’s A feeder, the thinner in B.  In FI patterning, the unpunched holes/ blank squares/ no pixels are knit in the yarn in feeder A, and punched holes/ black squares/ pixels are knit in B feeder yarn. In thread lace both yarns knit the unselected needles, corresponding to blanks in the card or blank squares/ unmarked pixels. The tension may need to be adjusted due to this fact.
Test swatches for tolerance to pressing/ steaming to make certain the final garment will bear blocking and cleaning. I had a sweater front finished using an industry “clear” thread, thankfully tried to iron it before finishing starting other pieces, and discovered a lovely melting quality to the clear “thread”. In theory, clear serger thread should be safe to use, there are 2 easily available manufacturers. YLI brand (nylon) is stocked at most chain stores that carry sewing supplies.  One “light / clear” is “whiter” than others; there is a “smoke” version as well, sold on cones. Both produce a bit of a sheen on the surface of the knit fabric. Sulky (polyester) clear is sold on spools and is superior for sewing pieces together, zippers, etc with no “sharp” when the cut ends poking at the skin, but at a different price point and quantity.
This was my garment’s test swatch, the black is a wool rayon yarn.img_3850-1punchcard repeat:the associated 24X72 pngThe fabric is much quicker to produce than traditional transfer lace.
Cards can easily be drawn by filling in solid shapes over a mesh ie the repeat seen in the 1X1 card.
Double length may produce an interesting fabric as well.
End needle selection needs to be canceled. If end needles are selected because of the pattern repeat, push those needles back to the B position manually before knitting the next row. The latter step ensures that both yarns will knit together. On electronic models one can program the number of repeats planned and add blank rows on either side of the repeat prior to downloading for all knit borders on both sides of the piece.
Either side may be used as the “public side”, depending on personal preference. The thread lace option is also available in the 260 bulky machines. Here a very thin acrylic was used as the “thin” at the start of the swatch, monofilament for the remainder (bulky KM)  img_3851punchcard: 24X54 png  A floral repeat card

the 24X80 png The thin rayon is noticed especially over a dark ground in the finished piece, not as much as in this view. The fabric will lie flat when pressed, here it was steamed lightly  A closer look The old sample, knit with monofilament as color 2, the repeat is suitable only for an electronic, even if only half is used  img_3852Uncertain as to the repeat in the present time, here it is reconstructed to a 52X48 png.  A new proof of concept swatch, knit in rayon yarn and a shiny sewing cotton Taking it to a garment (standard KM): color 1 = wool/rayon blend, color 2 = sewing thread. Note the difference in color where there is no needle selection for pattern, and how one color is more prominent on one side than the other. Sometimes the latter may be used to advantage when the goal is a plaited fabric, but no plaiting feeder is available. Simply program in a blank row, and position threads using the thread lace setting to produce the knit.img_3855img_3854The card: the 24X56 png some needle selection was eliminated in the knit piece to allow for a transition to the new, smaller design repeat  The chart for the small repeat used in the upper body A larger, electronic repeat found on an ancient 560 mylar of mine to play with
32X40  32X80
64X40 I knit on a 910 electronic, with no option for such fabrics built into the knit carriage. I was able, however, to modify and use my punchcard carriage with the intent of producing yet another “unconventional”, ribbed fabric. screenshot_23Added tips: the tension dial usually ends to be a bit tighter than stocking stitch. The fabric produced is also thinner and shorter than stocking stitch, as is fair isle.  The finished fabric tends to elongate with rest after blocking.
The setting may be used instead of plating. A plated, solid fabric is produced by non-selected needles. The thread lace thread tends to appear on the knit side, as opposed to the plating yarn, which appears on the purl side. The color mix may appear less even than in traditional plating. Simply lock the card or needle selection on an all “blank” row.
If the “lace” thread is too thick or too contrasting in color, the eyelet pattern may be lost.
Simple geometric shapes are best.
Some knit weaving patterns may also work well.
In terms of altering the repeats using the buttons on the electronic models, double length or sometimes double wide as well as vertical mirroring may produce interesting results.
Sewing or serger threads may serve as the thin yarn and match yarn color well if that is desired. A sort of “sock” may help with more even feeding, the mesh used here was from a florist, netting from supermarket products ie unusual fruit can come in handy as well  On the select/memorize row both yarns are fed into the same feeder (A) as the thick yarn, and the “lace” yarn is then removed and placed in the second feeder (B).
An option for drawing your own patterns: shapes can be superimposed on mesh designs as described in “filet crochet” posts, with no elongation of the motif.
A sample of a floral on a transfer lace mesh, one of my one-off scarves from eons ago Punchcard machine owners may use tape over sections of card number 2, or card 1 which in turn gives the option of testing the design elongation X 2 for both eyelets and motif as well. The tape may be moved to suit, and once the pattern is satisfactory, the final pattern design card may be punched.
Both Brother and Studio offer the cards in their standard  punchcard assortment with the purchase of respective machines. 
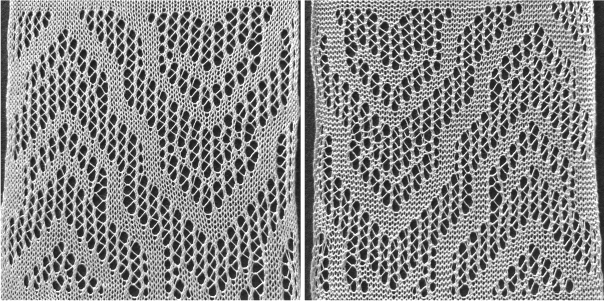
A later blog post on the topic with additional information on yarn placement, settings, and more: 2019/02/25/tuck-stitch-meets-thread-lace-repeats-and-vice-versa/


A block lace pattern on KM 3 (punchcard, LC, HT)

This is the original lace working repeat as seen in previous post. It needs to be reduced in repeat width, with segments then moved to accommodate the required changes in height as well

original repeatgetting things down to 12 sts repeat width, eliminating sts and rows: easy task with software and virtual “graph paper”minus rowsthe segments, collaged together; black squares now to become  punched holesrepeat_cardmarking out borders to suit mylar or brand of blank punchcard makes placing the markings for transfers accurately easier ie.

every 5 squares every5                           every 6 squares                           every6

chart with actions of lace carriage included, the 14 stitch by 24 rows electronic repeat now reduced to a 12 stitch by 16 row repeat; see previous post for symbols keyLCactiona brief test of the resulting fabric: blue circles highlight a couple of the intersecting spots where the punchcard produced lace fabric looks different from the electronic version, because of its shortened and narrowed repeats marked

A block lace pattern on KM 2 (electronic LC, HT)

Sometimes I begin by analyzing the moves on large print paper to get a sense of the direction for the required transfer moves. This pattern is fairly straightforward, single moves to the right or to the left. What makes it different is what I have referred to as the knit side “chain” in the previous post. To achieve this, sets of stitches are transferred, doubled up, and moved back to the original position to create the proper eyelet placement.

Tension may have to be adjusted to accommodate the double travel of stitches. If it is just a tad off and occasional stitches sit on a closed latch, that may not be noticed, and runs in lace are no fun. Edge stitches get fussy as the knitting grows, edge weights moved up at regular intervals can help with that problem. Where 2 stitches need to move to their right or left, I have chosen to do so by hand rather than relying on the lace carriage to move them onto the single needle, and in turn back onto the center one of the group of 3.  My initial notes on paper:PAPER SKETCHAssigning colors for transfer, charting in excel: green to left, pink to right, checking where markings need to be for full KM repeat:FULL REPEAT

Expanding the repeat, adding 2 blank rows between pairs of transfers with the intent to white out square for “wrong” transfer rows places transfers to right on wrong chart rowwrong

all markings, shifted to proper locationfull mylar

symbols used: black squares = mylar markingschart symbols

The lace carriage begins on left as usual, makes 4 passes before each 2 rows knit. The first sequence hand transfer occurs on row 2 of the 4 LC passes. The second sequence hand transfer on row 1 of 4 passes. After the 3 onto one hand transfer, be certain all 3 needles line up in B position before the lace carriage makes its transfers as well.

the resulting fabric’s knit side 500_954

purl side 500_955

A block lace pattern on the KM 1

A friend recently posted a forum query on a published pattern that has led to my exploring another hand to machine knit transfer lace. The “flemish block lace” design from the second treasury of knitting patterns by Barbara Walker, p. 270 seemed to be the lace pattern motif used. Here is a partial detail from the fabric that began the discussion

try to copy

Below is a chart for the Walker repeat produced with Intwined. The repeat is a multiple of 14 + 3 border stitches, the first row is purl, but I could not enter an all purl for row one and not have the remaining symbols altered by the program, which assumes in lace the first row is knitflemish block lacethe program’s generated HK instructions for one repeat plus 3 border stitches screenshot_04In attempting the machine knit version I chose to use the HK chart for my transfers as it stood, the directions of the transfers being mirrored vertically did not matter to me.

This design has “chains” traveling along some of the edges of the diagonal shapes. A lot of moving stitches in groups of 2 or 3 is required to achieve the look. It may be possible to achieve the fabric knitting with the aid of a lace carriage,  but planning the punchcard or electronic repeat and correcting any dropped stitches pose special challenges. My first samples were knit on the bulky KM, working in width of the 17 sts illustrated above.

I began to test transfers by moving stitches every row. Interesting things happen when single rows are knit on the machine as opposed to the traditional 2 in multiple transfer lace, as well as the resulting shape being half the number of rows long. The eyelet yarn lies single, without the twist usually seen, and begins to look more like ladders (see previous posts on zig zag ladder lace).

knit sideIMG_1938purl sideIMG_1939

with 2 knit rows between transfers (the missing eyelet in marked spot is due to operator error) the familiar look of multiple transfer lace appears1940

IMG_1941

below the swatch image is flipped horizontally for a different perspective, approaching the original hand-knit inspiration1940
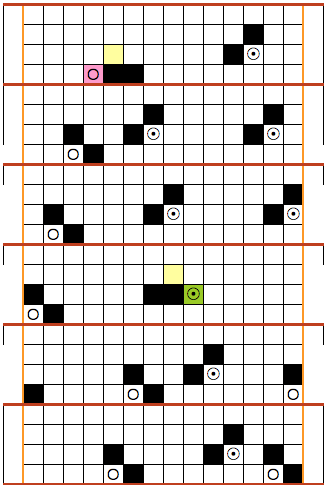
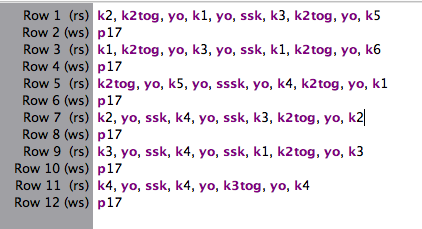
looking at charting differently, back to Excel: single repeat

BW repeat_12

                    checking alignment, adding border stitches4 repeatbw                                                adding colorcolored repeat

moves                    checking alignment, adding border stitches4 repeat color2The next consideration might be how to make executing the pattern easier on a standard machine. Needle pre-selection may be used to guide hand transfers. Working out the electronic repeat, represented by black squares:isolating mylar rep                                         the transfer directions

transfers                        the chart in repeat , including bordersmylarx4_borderThere is no transfer on row 3 of the repeat next to border on the chart left, it is omitted in the bottom of the chart, shown on the top half. End needle selection is canceled throughout. The resulting test swatch, one operator error transfer missing on mid left:

                                                    knit side 500_1945                                                     purl side500_1944One of the issues I encountered during the initial tests was that of occasional needles “sneaking”/ dropping back on the machine, so ladders rather than eyelets were formed. The needle retainer bar is old, and I like to work lace with the ribber off and a tilted main bed, explaining the possible cause.

A lace WIP

A WIP using a punchcard developed in the previous post. I missed a dropped stitch and wound up with a glorious run and giant hole, one of the ultimate joys of lace knitting. I find repairing such is more easily done if the knit is dropped off the machine, pressed lightly, and knitting is unraveled to the point where it can be re-hung on an all knit row. Lace traditionally is shown blocked, perhaps to maximize the eyelet pattern. If “left alone” it can have an interesting 3-dimensional surface. The latter is more likely to be retained if one uses yarn with “memory”, such as wool, and knits the fabric in as low tension as possible.

The images below show my WIP and the difference in the untreated vs. the pressed and steamed portions of the piece. The yarn is a hand/ machine knitting super-wash wool/ polyamide blend. The manufacturer’s suggested machine knitting tension was 7-5, my cowl in progress is knit at 8.2 to make the transfers manageable.

IMG_500_913

IMG_500_914

“Button holes” and “make many – increase” “lace”

An image often found on Pinterest, with its source attributed to a Vero Moda garment and accompanied by a “how-to” request, led me to give “designing” it a shot. Here, I believe, 2 layers of a garment are pictured, resulting in the stocking stitch knit that appears behind the eyelets. augudAnalyzing the fabric: a wide, flat rib is created. The equivalent of “buttonholes” with a fewer cast on than bound off stitches is in use, creating the narrowing effect at the top of each slit, four stitches are “lost”. Making multiple stitches from one (4 in this case) restores the original stitch count and returns width to the fabric. To make 4: Knit 1, purl 1, knit 1, purl 1 into the same stitch, or in this case, the bar between the 2 center stitches. Executing this is not “practical” on the knitting machine. Below is one possible method that could be adapted for groupings with slits of varying sizes.

My chart, showing 4 repeats (black border) and 3 added starting rows. Green numbers on the bottom indicate the repeat’s width (20 stitches), and on the left its height (12 rows). Slits are created every 6th row, with the right side facing. Two more stitches would be added on the far right for each side to match in the finished piece. Side borders and top and bottom bands could be made wider and longer respectively, knit in garter stitch to keep edges flat. repeatX4_31

the symbols used

screenshot_30

my unblocked sample, knit on 32 stitches in worsted weight acrylic, using #8 needles

IMG_1907


Zig Zag ladder lace 2: hand knit

I work primarily on a Mac, Maverick OS. Intwined software has had some issues operating in Mac consistently in the latest OS versions. The chart to text can be a really nice feature. The repeat, drawn here with symbols in the built in stitch library, shows errors in row 2 and 4 of the accompanying text.single repeatmistakes single

On a larger canvas, the original repeat is outlined below in red. Yellow indicates knit border stitches around ladder lace pattern repeats; row 22 is absent from the text that accompanied the larger chart.

full chart

full directionsSkitch is a free program, available for both Mac and Windows, that allows the opportunity for of highlighting or further editing a graphic. Taking the information above, here I added numbers that reflect actual repeat rows, used the arrows as a reminder of change in direction of zig zag, and the red outlines vs green indicate changes in type of knit decrease. It is easy to add as much or as little additional information as one feels helpful. There are controls for line thickness, shadows, etc.

actual repeat

JKnit is another program that may be of interest to anyone who prefers to track their projects, progress, and much more on their iPad or iPhone. The Lite version is free for both devices.

Below is an image of the hand knit swatch, unblocked, which appears three dimensional; transfer  lace has traditionally been blocked to lie flat and maximize eyelets. The fabric may be very interesting without blocking. If a slightly thicker yarn with “memory” is used, the piece may be steamed lightly, and the pattern segments will tend to shift in and out from the flat surface, whether the piece is hand or machine knit.IMG_1901

The yarn used was a “throw away” swatch testing acrylic. A very quick, light press and a bit of steam and here it is in the resulting killed, forever flattened version

IMG_1905  and it reverse side

IMG_1906

Zig Zag ladder lace 1: on knitting machine

My previous posts on combining ladders and lace: 1, 2 . The chart below, found in a random Japanese publication, started the process of my sorting out a possible “how to” on the knitting machine
bulky zig zag lace

In hand knitting, the 2  empty circles generally indicate a double yarn over. On the machine these can be simulated by working with extra empty needles. For swatching, a few rows of stocking stitch will do as a start. In a final fabric, waste yarn may be followed by ravel cord and a crochet cast on. After the crochet cast on, the chain on the needles for the extra “yarn over” location can be dropped, leaving those needles “empty”, and the pattern may begin immediately.

One of the 2 yarn overs will be created by manipulating an empty needle, the other by transferring stitches by hand as one would in lace.

If the empty needle if moved back to A, a ladder is created that is essentially a float in front of the gate pegs up to the next knit stitch. For purposes here, the result did not give me enough yarn to be able to maneuver.

The first step is to decide on the repeat between transfers, and emptying appropriately spaced needles, seen here in A position

IMG_1878

for the longer “float”: before the first row of the pattern, the empty needle is brought out to work, a row is knit, resulting in loops on those needles, that will create extra yarn slack

IMG_1882

the loop is in turn dropped

IMG_1883a tool is inserted through the loopIMG_1893

turned  clockwise for  casting on  in one direction,

IMG_1886

IMG_1895

and turned counter clockwise for casting on in the opposite. Note that in one instance the long leg of the e is in back of the knit on the purl side, in the second in front. This makes a difference on the knit side of the fabric as well.

IMG_1894

to get the look of ssk and ssp as seen in hand knitting (instead of a simple decrease),  depending on the direction you are traveling, the needle 3 stitch is moved to its right or left onto the center one to create the second “yarn over” . Both stitches are then returned  together to the needle 3 position

IMG_1879

and with the transfer and e wrap completed, one is ready for the next row of knitting. Bringing the 3 needles out to hold gives one the opportunity to check all transfers and wraps, makes the next row easier to knit

IMG_1888

the turn of the zig zag: pick up from row below for increase, instead of e wrapping for a neater turn

IMG_1889

my first swatch: 1/ ladder at start of row; 2/ shows chain moving along the knit side, emulating ssk and ssp decreases seen in hand knitting; all my e wraps were made clockwise, 3 shows the long leg of the wrap moving to front of fabric as opposed to the rear as in 5, each giving a different look to ladder’s edge; 4 indicated the pivot point for reversing the direction of the zig zagnumbered_1892below shows the results of alternating the directions of the e wraps in each section: clockwise when moving to left, counter clockwise when moving toward right. The large eyelet at the top illustrates what happens typically when an empty needle is brought back into work at the top of a ladder.

IMG_1890 (1)

Ladders may be created in any desired width. The look of the vertical knit edges becomes a matter of preference. Good note-keeping helps insure consistent results.