Frome lace chart to punchcard 4: a border tale

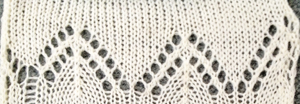
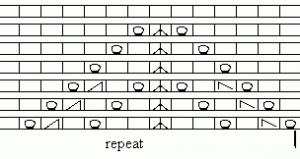
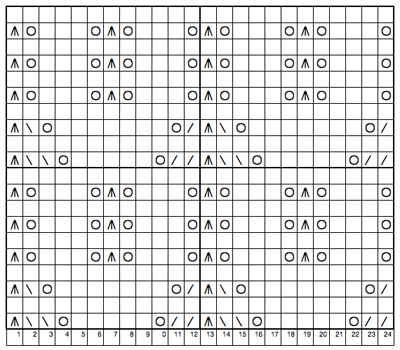
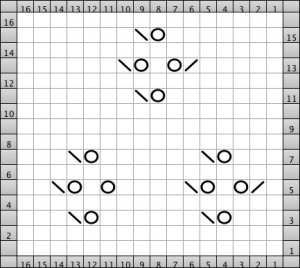
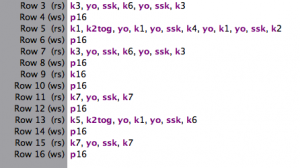
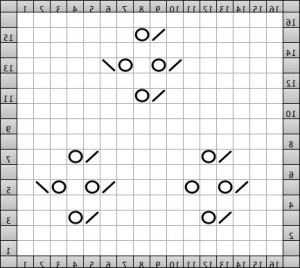
A forum post inquired on adapting the following border repeat for use on a punchcard Brother KM, using the lace carriage: the repeat is 14 stitches wide as was given below

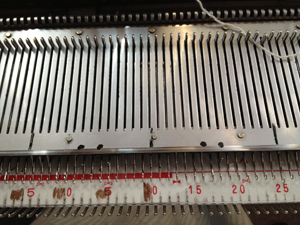
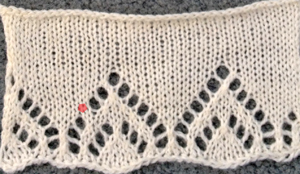
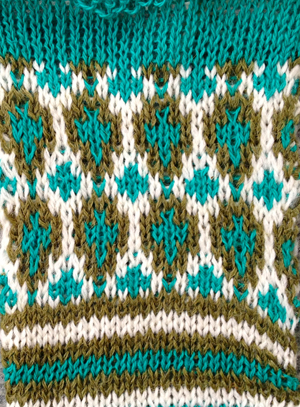
Because of repeat restriction in punchcard knitting, the best way to match the above chart is through the use of hand techniques. The image below shows needle bed markings (in water-soluble pen) to help in tracking hand transfers; the long line is the location for the center triple stitch after stitch transfers, the dots place the first single transfers made toward the center long line on the KM, away from the single needle space between them

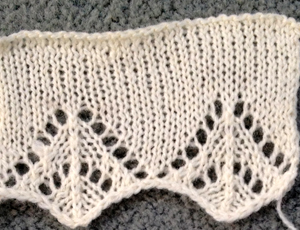
this is the result of the hand transfers; the fuzz on the left is a manufacturer’s yarn knot

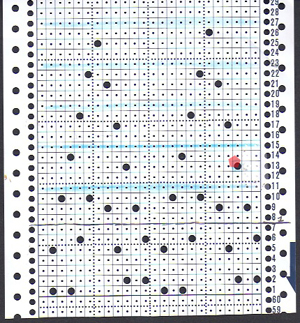
a simplified repeat  keeping some of the elements, but missing that center ridge, adjusted to a 12 stitch repeat for use with punchcard; the missing lace hole was an error in punching out the card

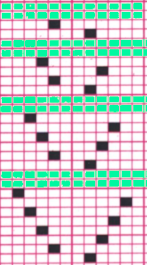
the card for it, showing the correction also marked in red

since the intended use is for a border, it is not necessary to punch more than above; the first row for selecting to right with the lace carriage is marked, blue shows location for knitting 2 rows with knit carriage; the sequence is an easy 4 passes with the lace carriage, followed by 2 with the knit carriage

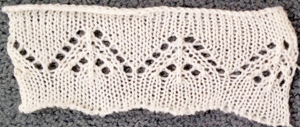
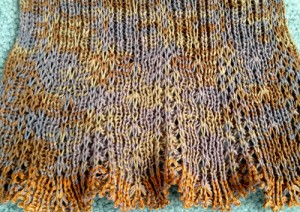
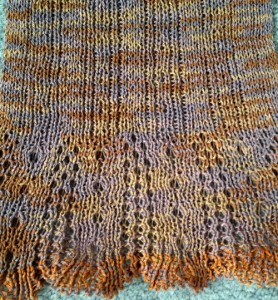
another option’s results, creating the center ridge as in the hand-knit: not identical, but related

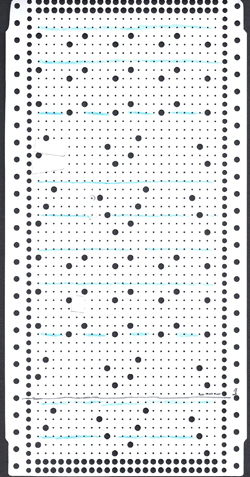
the corresponding card: knit 2 rows after every 6 passes with LC, except for the last repeat segment, where LC makes 4 passes prior to continuing with KC and knitting beyond the border

If using cards I would recommend knitting several rows with waste yarn before casting on (as loosely as possible) and continuing in lace. The very bottom will want to curl toward the knit side of the garment, so cast on the edge may require additional treatment to keep it from doing so.

for one more repeat please see next post

From lace chart to punchcard 3: adding stripes

www.natlsunshine.com cheap cialis In machine knitting, frequent color changes are more conveniently made with a color changer. On the Brother KM, the latter is placed on the left side of the machine, so the knit carriage will be knitting by default an even number of rows moving from left to right and back to the left. In turn, the lace carriage will need to move from right to left and back. To retain the same pattern, the card may be flipped over and marked accordingly. Here is an image of the card generated in the previous post, flipped vertically. I prefer colored lines to arrows and other markings: the blue line indicates 2 rows of knitting with KC  (a different color could be used to indicate color changes for striping once those are determined), starting row 1 is marked in pencil.

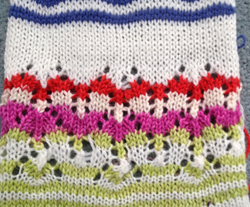
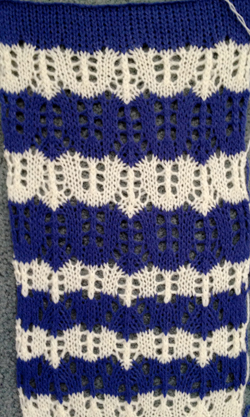
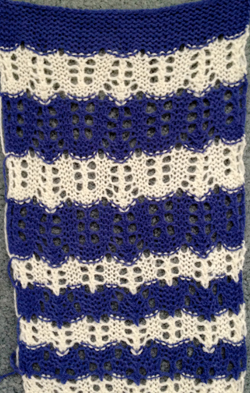
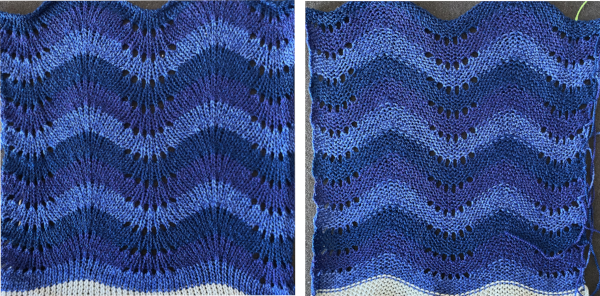
Space-dyed yarns may produce interesting effects, in lace sometimes the pattern is lost, however. In the swatch below I attempted to introduce a random striped sock yarn, thicker than the white previously used. When I loosened the tension for the knit rows, I began to have stitches consistently hung up on gate pegs, adding the second reason to switch my “color 2”. Color changing is every 4 rows, beginning with row 1a larger swatch with tension adjustments and switching the 2nd color to equal weight, “friendlier” yarnThe narrower stripe is spaced 6 rows apart, the wider a full repeat.
Like playing with slip stitch variations, there are many more possibilities that could be tried.
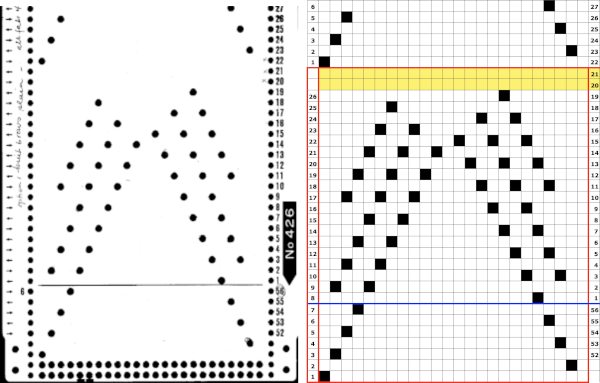
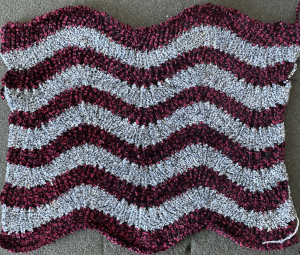
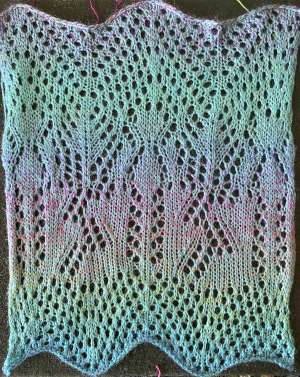
Brother card 426, the bottom half repeats once more. The LC makes 26 passes before any knitting occurs, the number of rows knit may be varied from the usual two rows after each design segment to 4, 6, or more or even different combinations.  Knitting the pattern using a fuzzy yarn like rayon chenille results in little difference between knit and purl sides while the differences are clear in this wool rayon sample. Using space-dyed yarn may at times result in almost clearly defined stripes, but the effect depends on the number of needles in use and the length each color occupies on the final ball or cone of yarn. In a different experiment, the effects testing different patterns are soft and dithered The yarn was used in a shawl:  Long floats up the side next to the color changer may be wrapped on the end needle periodically and carried up that side to avoid weaving in “all those ends” upon completion of the piece while keeping an eye on whether doing so contributes to the end stitches on both sides resulting in different “lengths” at its edges. Not all lace patterns are equally successful in this technique, and ultimately choices become a matter of personal preference and style. Missoni striped MK laces are a great source of inspiration. For hand knitting, many patterns playing with striping in lace fabrics with both solid and space-dyed yarns may be found at Kieran Foley’s website.

From hand knit lace chart to punchcard 2

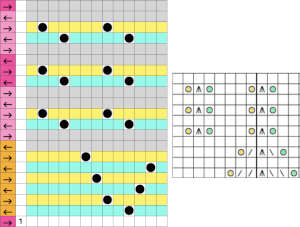
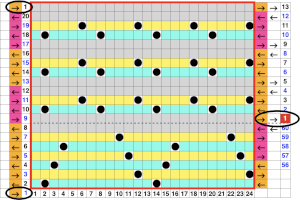
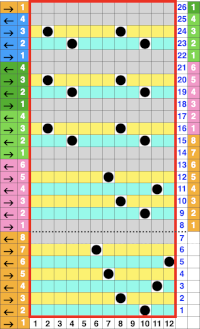
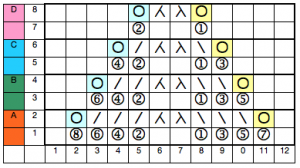
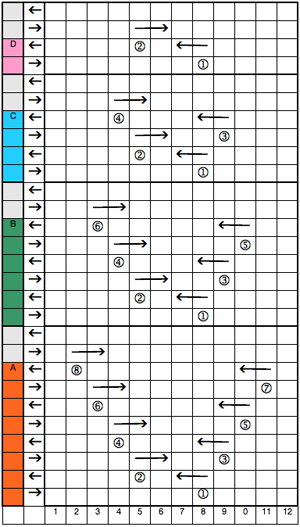
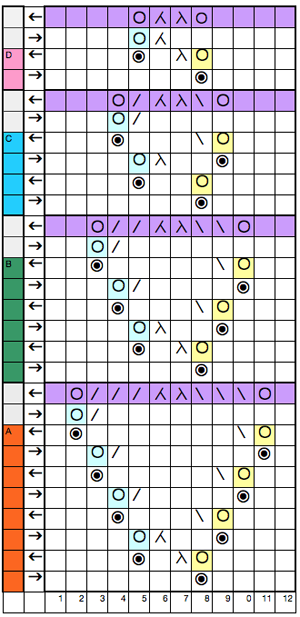
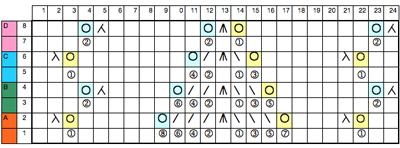
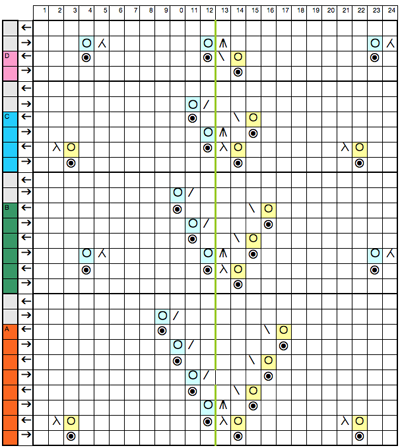
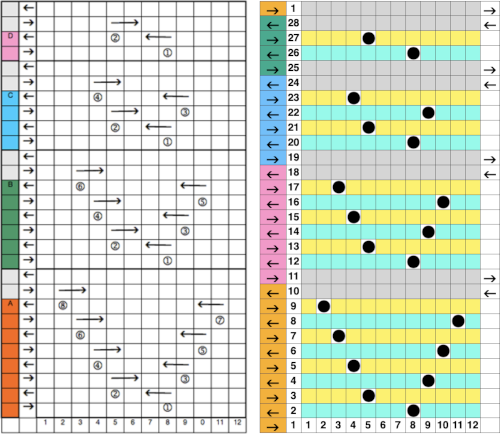
Following up on the previous post, from-hand-knit-lace-chart-to-punchcard-1, a 24 stitch chart with marked in symbols for conversion to MK repeat: a 24 stitch chart with marked in symbols an isolated repeat segment worked out on a striped template after choosing and marking the transfer direction of the eyelets on the original, green for to the left, yellow for to the right,  marking lace transfers rows for a partial card segment,  the numbers on the left reflect LC passes and their direction is marked by arrows, the numbers on the far right reflect those indicated on a factory-issued blank card, being selected seven rows below eye level by the reader.
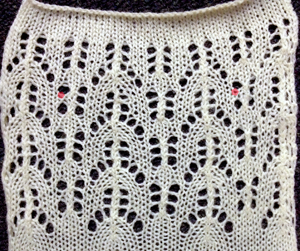
DIY offers the opportunity for extending designs, here another lace transfer segment is added, a card would repeat the design twice in width, and twice in height, again showing the shift necessary when marking rows for cards,  The full punchcard for the elongated repeat, with a punching error marked by the red spot, also used to indicate the corresponding spot for the transfer error in that needle spot on the corresponding swatch

From hand knit lace chart to punchcard 1

I have posted previously on lace punchcards, their use, and traveling between machine models. There is extensive documentation in manuals and literature on the mechanics of their patterning. This series will attempt to follow my most recent post and to visually address the transitions from a charted repeat to a corresponding punchcard.

The illustrations may apply to machines that use two carriages for lace, Brother/KNitking, and some Toyota. other than simple lace on both Brother and Studio machines by altering the placement of the first selection row on the respective punchcards.

The sole function of the auxiliary lace carriage is to select and transfer stitches. The passes required to execute the transfers for one pattern row are known as a transfer sequence. Since the lace carriage is always set to read the card, every pass needs to be programmed in the card and electronic patterning.

Each time transfers are required it takes two or four passes (more for multiple transfer lace) to preselect the needles, transfer the stitches, and return to the left side.  One pattern row on the chart will need expansion (akin to a color separation) into passes necessary to execute the transfers for each sequence. The lace carriage will always activate the card reader, so every pass must be reflected on the card. This accounts for the familiar arrow markings on the left of factory pre-punched lace cards.  Selection, positioning, and return passes are blank rows on cards, resulting in no needles being selected. No selection rows may serve as a reminder to switch carriages. It is best to begin with simple charts to sort out the process. For punchcard machines, the stitch repeat must be a factor of/divisible evenly into 24. Color-coding eyelets for left and right transfers may help. In multiple transfer lace, two or more adjacent stitches are transferred to the right or to the left, creating an eyelet group. On the knit side the group will lean away from the eyelet. The lace carriage is not capable of multiple transfers at one time, so each stitch in a group will require a separate pass. Within each group, the lace carriage must transfer the stitch farthest away from the eyelets first.

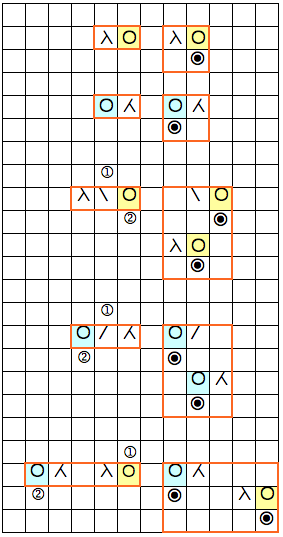
Some simple transfers, graph markings on left, expanded for punching on right

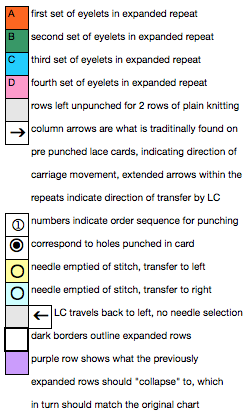
the symbols key for this post a multiple transfer stitch charted for machine knitting location for holes, and directions for lace carriage transfers on the next row the punched card and associated actions going wider, and combining different size motifs the expanded version An alternative way of working: colors are chosen for horizontal lines on which holes for transfers are placed, in the direction indicated by the inspiration chartThe equivalent mylar repeat

Hand to machine, symbols 5: lace

The beginning of this thread explores how lace may be interpreted from hand knitting patterns and charts, and when hand techniques might be used to make the transfers and create the fabrics on the knitting machine. Going from charts to punchcards will be addressed in later posts.

In hand knitting (unless knitting circular), because the work is turned every row, stocking stitch is formed by knitting one row, purling the next, and repeating the 2. Knit rows are often referred to as “right side” ones, purl as “wrong side” ones. On the machine, stocking stitch is produced as the knit carriage knits every row. In hand knitting, eyelets are created by use of yarn overs (whether single or multiple), and a decrease may in turn be formed ( if the number of total stitches is to remain constant) by knitting multiple stitches together to compensate for the increase created by the yarn over. Often the patterning occurs on knit side rows, the purl side rows are frequently simple purls. Instructions, depending on the author or even the time of publication, may read purl odd rows or even rows depending on how the pattern is begun.

Lace is created on the machine by placing 2 stitches on the same needle to be knit together, leaving the empty needle in the work position. The empty needle is filled with a loop when the knit carriage is passed across the work for the first row, then formed into a complete stitch as the direction of the knitting is reversed. Paired decreases with 2 yarn overs may be created by moving 2 stitches onto a center needle, resulting in the needles on either side being emptied, in turn picking up a loop and forming a stitch with the 2 subsequent rows of knitting with the main carriage.

When selecting hand knitting repeats or charts for working on the machine, it is good to begin with a pattern that has a background of stocking stitch only. It is possible to add ribbed stitches, turn the work over with a garter bar or use a G carriage to add purl stitches on the “right” side in place of the simple knit rows, but that may be considered later and will require marking and punching the cards used in a different manner. Many hand knit lace charts are abbreviated if the whole row is intended to be purled, and those rows may be omitted from the chart. If that is so, then when charting for the machine, the chart will be expanded to twice its length.

There are software programs that will now produce symbol charts for text, and vice versa. To start with it, it may be easier to begin with an existing simple chart to explore the process. As with other fabrics, sorting out the correct repeat remains important.

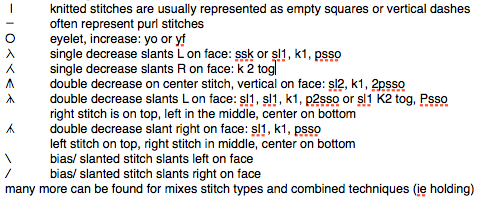
Hand knitting: a brief list of symbols, and a few of their associated directions on the machine:

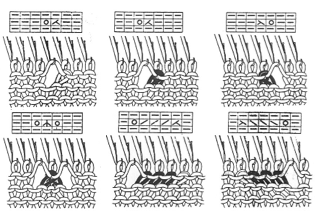
O generally represents the eyelet  created by transferring the selected stitch onto the adjacent needle, in hand-knitting, it would be a yarn over and creates an increase

/ represents needle O on left transferred to the right, this needle will now have 2 stitches on it creating in effect a decrease, keeping the number of stitches on the machine constant

\  needle O on right is transferred to the needle on its left, and this needle will now have 2 stitches on it

/\ both needles O at left and right are transferred onto a single needle, which will now hold 3 stitches, again keeping the total number of stitches constant.

In machine knitting, all stitches must be transferred for that row before knitting subsequent rows. Transferring the stitches creates a slant on the knit side. For hand knit patterns that include charts to follow, the knitting key should be checked to the interpretation of the symbols provided.

Working with lace transfers is a bit like working with cables crossed on the knit side in hand knitting.

Symbols will need to be interpreted for the purl side of the fabric (reversed for machine knit). There is a “trick” used for lettering on punchcard machines: if graph paper is used, flip it over a light source, and look at the reverse for punching (or punch the back of the card with text in normal orientation).  This method may make it easier when there are slants to track. If the chart is flipped over, the knit squares become purls facing the knitter, and the purl stitches become knits on the front side.

Mark  Os first for eyelets, count over any in-between stitches, if the slant created is to the right (SSK) in machine knitting this would be a left-leaning stitch on the knit side, so the mark would need to be changed accordingly. Sometimes the direction of the transfers does not need to be changed, but the actual placement for the empty needle may have to be shifted over 1. In summary: charts in hand knitting books will need to be reversed to retain the same look on the knit side for machine knitting. Charts provided for machine knitting already take that into account, are usable as they are for hand transfers, and then the question arises as to how to translate them for use with automatic patterning and the lace carriage.

These graphics represent some of the possible elements and symbols in charts; blue is associated with hand knitting, pink is the same element, for use on the machine. Each is accompanied by a sketch illustrating the appearance of the knit on the knit, face side, and on the purl.

With a little software help: I have been using Intwined for the Mac, which has some issues, the latest being its crashing if there is a library of personal custom-built symbols in the stitch library. For now, I have a clean install, minus my machine knitting symbols. This is a chart for a simple lace pattern created with the program

preferences used

the generated hand “long hand” knitting instructions

the chart saved as jpg and “flipped” for knitting on the machine

if the charts are  MK ready, the transfers are made as you see them, multiple pronged tools speed things up

Back to circles from squares

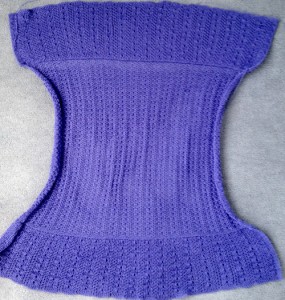
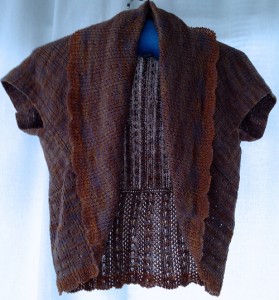
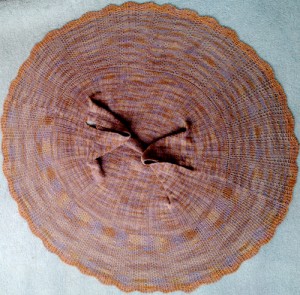
I actually posted on the topic of circular garments in knitting in June-August 2011. Hard to believe 2 years have gone by since I last played with this idea. Here is a version knit on the Passap, using tuck stitches both single and double bed, awaiting seaming and blocking (alpaca/silk)

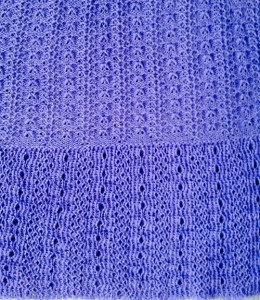
a detail shot

and swatching for a variation on edging  with cotton, using rib tuck and slip throughout

side 1

side 2

viewed on a dress form

the other on a hanger prior to washing and blocking

in process of blocking, 40 inches diameter in this orientation

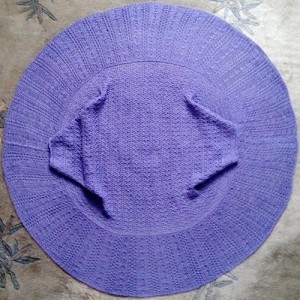
the blue cousin, 38 inches in diameter

>>>

Fair Isle single bed 1: float control

Fair isle is the name given to a pattern knitted with 2 colors in each row.  The motifs are easily identified by looking at the holes in the punchcard, or squares on mylar, pixels in programs. While I will be referring to punch card knitting, the same principles apply. Your knit swatch will look like the card, but the design will be squashed, and these designs are generally knit at least one whole tension number looser than when using the same yarns for stocking stitch.  The length of floats created in knitting these fabrics is sometimes an issue, and following are some of the methods that help with “float control”.

Altering the pattern: random holes may be punched in addition to those in the motif and shorten the very long floats, providing this does not distort the pattern too much. Iris Bishop is a designer with an extensive library of such designs.

Hooking up floats: this method works best when the 2 colors used are similar. If they are strongly contrasting there is a possibility of show through where the float is knitted on the same needle as a contrasting stitch. Use the single transfer tool to hook up the float into a needle hook above while leaving the  needle in the position to which it has been selected. If it is a very long float, it may require “hooking up” several times. Show through can be reduced on machines that preselect the needles, if you can place the float on a needle about to knit in the same color as the float (the needle will be selected to upper working position).
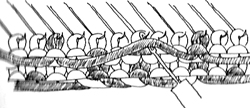
Binding with fine yarn: using a fine yarn, even sewing thread, matching the main color of the design, break off a length for every place that will bind the float down, trying to keep unanchored floats to no more than 5 stitches if possible. Make a slip knot at one end, take it under the first float, and place it onto the needle above, leaving the  needle in the position to which it has been selected . Knit the next row, and lay the fine yarn into the needle hook, fastening down the next float by carrying each length horizontally up your fabric and hooking it over your needles as required. Add more pieces of yarn or change colors as needed.
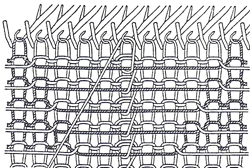
While this method illustrates managing edges of single motif, it also illustrates managing additional threads.

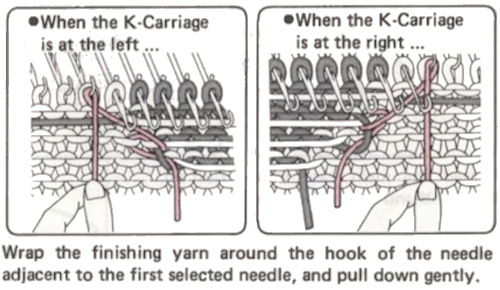
When knitting only a small area in fair isle (single motif), the contrast yarn will pull away from the edge of the patterning. This may result in holes or ladders to either side of the design. The illustration above and the one below from the Brother 940 manual illustrate securing the edges with spare lengths of the main color yarn. The lines of the yarn are in black and pink respectively for the purposes of illustration. Program the machine for single motif, attach each length of spare yarn to a needle adjacent to those pre selected for single motif, in upper working position. Knit one row in pattern to opposite side. Take the extra yarn length between the knitting and the carriage and place it on the adjacent needle in B position (in background color), knit one row to opposite side, repeat wrapping on carriage side throughout the shape.
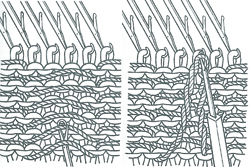
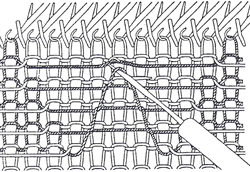
Latching: Using the latch tool, pick up a short float below the first long float. Slip it behind the latch, catch the next long float in the hook, and pull it through the first. Continue in this way, latching up all the long floats, and then place the last float pulled through into the hook of the closest needle above that is knit in the same color latched up. As the next row is knit, the float will be caught. The disadvantage to this method is that the hooked floats will pull across the fabric, making it pucker. This technique may be done off the machine as well, with the last float sewn in by hand.
Sewing: sew floats in by hand after completion of knitting by catch stitching the longer floats in on the reverse of the knit. As an alternative a sewing machine and “stitch in the ditch” with matching thread while placing the knitting on the machine and carefully stitching down the valleys between the rows of stitches at desired vertical spacing.
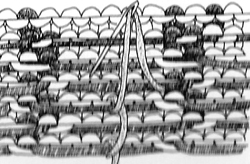
Knit linings: these may be in the form of hems or pieces of knit fabric that you attach as you knit, which could be in finer yarn, large stitches, and not necessarily on every needle. Color matching once again matters.

Bonding with fusibles: suitable for yarns that can take hot, damp ironing. It also stiffens the fabric. Some bonding materials are knit, with stretch in one way and not the other, woven ones have no stretch.

Fringing: long floats may be cut and made into fringes. In this instance, the punchcard may be intentionally masked to cover holes and create intended long floats, which may be later cut. The purl side will now become the “public one”.

Mock weaving: use the reverse side of the fabric for a knit woven effect, one example. The pattern on the knit side may become distorted in a way that could be considered an added design feature.
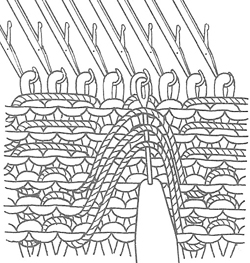
Decorative floats: use the long floats and twist them, or bind, pick up, tuck behind stitches to make decorative fabrics highlighting the purl side.

Ruching in pattern: hooking up stitches as in hems to enclose part or all of the long floats. For this technique, if a lot of ruching is to occur, it may be best to elongate the original pattern to at least X2.

“Stitching in the ditch”: after the piece is finished floats may be anchored by using a straight, medium-sized stitch on the sewing machine. Use thread that matches the main color as much as possible. Place knitting on the machine knit side up. Stitch carefully and slowly in the valleys between rows of knitting in areas with longer spaces between ground and contrast. The same method is sometimes used at standard intervals to secure FI floats when using yarn such as chenille to help avoid “worming” (yarn slipping out in loops) along motif edges as time passes.

Fringing: deliberately planning long floats with the intent of cutting them to create fringed effects. The purl side of the fabric would be used as the “right” side. Specific areas of punchcards could be masked with tape to create wide float areas amid smaller designs, and electronic machine users can control the placement of pixels. Both can vary the designs by exchanging yarn positions in the sinker plate feeder and/or adding additional color striping.

Please note: try any of these techniques on swatches first. There may be changes in the surface of the knit on the knit side such as puckering or bleed through that may require changes. If combining techniques in a garment, each should be tested. If combining FI and “plain knit” one possible solution is to knit the latter in a simple FI pattern using the same color in both feeders, keeping similar texture and weight in both areas. If using several color changes, the card may be marked to help track them.  If self-drawn, repeats lining up in width and height should be knit tested as well.

Combining patterned stripes in stocking stitch: the latter will be single density and different weight than FI. In FI two yarns knit simultaneously, producing a double-thickness fabric. Test on swatches whether doubling the yarn for single color rows works for you. Another option is to knit “plain” bands in a 1X1 fair isle pattern, using the same color yarn in both feeders.
Converted images,”representational knitting”

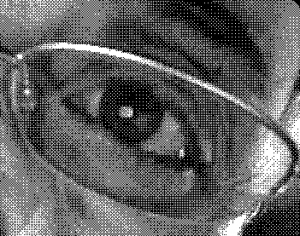
One bit camera “snaps pictures in digital retro style. I began this tale with a partial shot of my face. The app apparently is no longer available via US App Store (11/15/2017)

resized, greyscale, knittable size bmp

The old bag of tricks did not produce an image I was happy with, I finally used Ggraphicconverter Picture_Mode_ Bitmap for my downloadable file

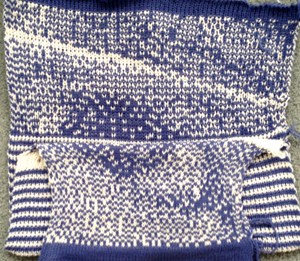
Migrated from Mac to a PC laptop, opened in WinCrea, the image repeat was downloaded to Passap, program tech 179. The bottom  of the swatch is knit single bed LX (slip stitch), the top is double bed, back bed set N/N, same tension throughout, the middle stripes are operator error in forgetting to make the lock change to LX on the front bed; the gauge is significantly and obviously different

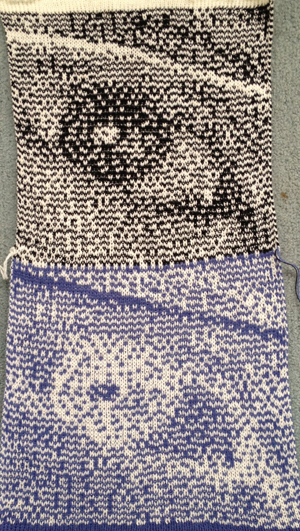
Moving on to a birds’eye backing, the bottom starts the pattern with dark color, top with light (another operator error and a reminder to keep notes even for what may seem obvious); the black is slightly thinner than blue resulting in a change in gauge once again

The bouncing gauges certainly indicate some of the problems in maintaining aspect ratios in representational knits. The best solution may be to do a large swatch in the planned technique that is at least 100 sts X 100 rs in chosen yarn and then adjusting image aspect ratio before knitting the final piece, which in turn may be better done before conversion to final BMP and require repeating the process from its beginning.

For separations such as technique 179, and those by default in Japanese machines for 2 color DB, images must have an even number of rows in length. My original image crop was 73W by 85L pixels, so I had to shorten it by one row, which was actually achievable within WinCrea. The single bed FI swatch measured 7 inches in width, the double bed ones 12 inches at their widest point.

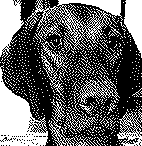
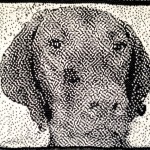
Last but not least, here is my friend Rocco processed via Hyperdither, Mac to PC, to WinCrea, to Passap and knit 150X150 pixels/ stitches

May 24, 2019 a greyscale mode scaled image processed in ditherlicious online produced a sharper, far more defined image than my previous effort 142X146 pixels

for more Rocco “portraits” see post

Double jacquard separations 4_ making them “work”

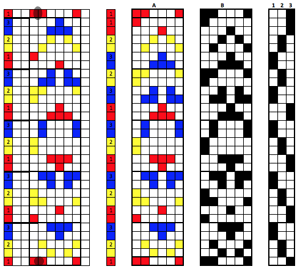
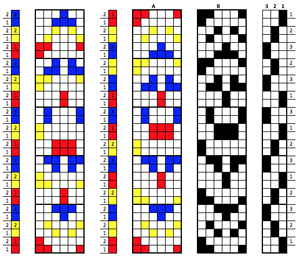
Working back to the repeat from post # 3 on this subject, I returned to the drawing board and edited the separations.  Tetris is a tile-matching puzzle video game originally designed and programmed by Alexey Pajitnov in the Soviet Union. The objective of the game is to manipulate tiles, by moving each one sideways and rotating it by 90 degree units, with the aim of creating a horizontal line of ten blocks without gaps. The principle at use for the separated “squares” shapes is to achieve the same result for each of color separation groups (highlighted by dark borders in the charts), by moving them up and down, or changing their positions in the color sequence. The first method (beginning with only one row of ground color) has eluded me in terms of an “error free” result. More than one version consistently in a missing single stitch of color. The latest method shows the problem color “tiles” marked in dark ovals. The column on left is the original separation, A shows the juggled colors, B the pixels, squares, or punched holes for the repeat, and the far column on the right shows markings that may be used to track the color change sequences, which may be transferred to punchcard, mylar, or for any cues in change of sequence your program can provide. The swatch approaches the original intended design far more than any of the previous attempts. It is expected that the background color will be the majority or main color of the design; it gets separated out as first color. By splitting the knitting of most of the needles to the beginning and the end of the sequence (japanese 2 color default) this way, one supposedly eliminates the chance that the needles knitting the second row of each color will knit over, blocking a space yet to be knit in the first row of the design by a color that has not yet been knit. In this small pattern no colors knit more than 3 consecutive stitches at any one time. With some motifs the final alternative is to redesign the motif.

the test swatch (striping was the result of forgetting to set the KM for slip <—>)

Using the alternative method for decreased elongation of motif upon knitting, here are the working charts for beginning with 2 rows of color 1

the swatch: got it!

my mylar sheet markings

A&B show my marks corresponding to color positions in the color changer, the first 3 repeats on left are the ones used to knit  the swatches. Separations are suitable for DBJ, but I chose to knit trials in single bed slip stitch.

Illusion /shadow knitting DIY designs_HK

I have played with excel (and Numbers) before to create charts for various fabrics requiring color separations. My latest efforts relating to this knit group have gone in a different direction; I have also attempted to simplify the technique in terms of following the instructions for knitting them. This sample began with the use of Intwined to create the document and graphs. The first chart is set up with alternate row color striping, color 1=dark, color 2 = light. Blank-colored squares are used as knit symbols, and horizontal dash for the symbol for purl stitches. Beginning on light-colored, even-numbered rows, the design is marked in purl stitches. On odd-numbered rows beginning with row 1, mark all empty squares in the even-numbered light-colored row immediately above it with purl symbols. All unmarked stitches throughout the design are knit, whether, on the “wrong/right” sides, all dashes are purled, patterning occurs on the second row of each color. To visualize the full pattern one may use the add row below feature to expand the graph (the chart below is missing the very first row). Now add the second row of each color and grounding stripe (s) at bottom of the repeat. Most patterns will start the illusion immediately after casting on with dark color, row 1 above. I was interested in my sample having a border of sorts on its top and bottom. The resulting knit swatch shadow sideIntwinded had the capacity for building row by row written instructions for patterns, but there were discrepancies on some rows for these charts, and I opted not to include them.
Note: the program quickly became buggy, unsupported, and unusable on the Mac during the remainder of 2013.

Another program I have just acquired and begun to use is GIMP; it is free, and now also available for use in Mac OS Mountain Lion. Both Gimp and Photoshop make it possible to design using single-pixel pencil and grids to build motifs from scratch as well as gridding of preexisting images. I have a different method for these fabrics using GIMP, which is easier for more complex, overall shapes. The same series of steps may be used for mosaic knitting (the color inversion sequence is different). Below are images generated for a different illusion pattern, I will share my “how-to” for designing the motifs later, referencing mosaics and mazes. To achieve such motifs one is drawing in magnification of multiple hundreds and more, there is no way to number within a one-pixel space, so these charts as generated are lacking numbers for stitches and rows, one drawback. Another is that this color inversion works only in black and white. One advantage: the proper repeat may be cropped and saved with the grid removed in various formats that may be used to import to various machine knitting download programs, and gridded may be used to establish punchcards or mylar repeats.  Screengrabs of magnified charts were saved, and are shown below. Black squares represent purl stitches in the second row of each color. The first row of each color is always knit, not represented in these charts
The red squares are guidelines for no color inversion rows, the yellow ones isolate the repeat the actual repeat color inversion begins on row 1 and follows every other row (if numbered these would be odd rows)  testing the repeat through filter/ map/ tile a working chart that can be printed to suit with dark/light row markings and blank squares for tracking knitting rows in the execution of the pattern A larger version with stitch and row counts marked. The chart represents half the rows in the actual knit. The cast on row counts as knit row 1, color 1, and following the chart beginning with row 2 knit the black squares and purl the white squares. *Change color, knit one row (odd#), on the next row follow the chart, knitting the black squares and purling the white (even#).** Repeat from * to **. the knit swatch: “shadow side” its reverse side for online tutorials, patterns, and inspiration see Woolly Thoughts

Feb 18, 2017, I have recently become curious about creating illusions such as these in crochet, am developing ideas, and returned to this chart. The image below is intended to have symbols and notes superimposed on it. It shows the tiling in a different way, so I thought I would add it to this post as well. Repeats are highlighted with darker borders. The repeat on the right needs to be trimmed if the goal is to achieve matching edges. Row counts on the right would differ in knitting, the plan is to execute this pattern in Tunisian crochet, which handles rows in a very different manner than knitting or standard crochet. Follow up: 2017/03/06/illusion-DIY-patterns-in-crochet/

2/2019 from the first in a series of posts on geometric shapes on ribber fabrics using tuck settings, a mock variation with the ribber set for knitting in both directions throughout, and the main bed set to tuck in both directions:

Multiple downloadable pngs for optical illusion designs may be found in the 2023 post on Developing tiled repeats suitable for multiple stitch types, including tuck

2024 the process described in More separations for various knits using Gimp, color to alpha was used on this file, beginning with the 24X28 PNG The initial separated design, also 24X28,  tiled X6, rendered double length to 24 X56 for knitting with color changes every 2 rows   tiled X6 Developing a circular design using the same approach a 24X24 repeat color separated 24X24 double height 24X48 A single row height brick repeat, developed in ArahPaint, also 24X48 double length, 24X96   its half crop companion, 48X24 double height, 48X48